How to fold sheets
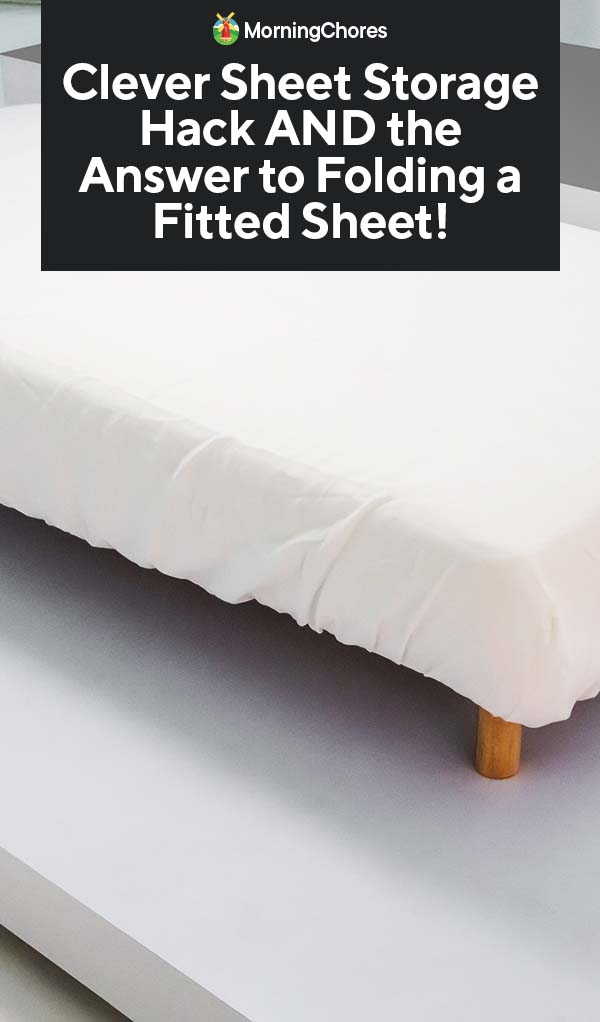
How To Fold A Fitted Sheet
by Amelia Jerden | Updated: August 2, 2022
Folding a fitted sheet is a skill that truly makes you feel like you have your life together. Yes, you could just roughly “fold” your fitted sheet into a jumbled pile, but there’s something truly satisfying about folding it flat. Not to mention, a clean fold will reduce wrinkles in your sheets and make storage simpler.
However, folding a fitted sheet is not an intuitively simple task. That’s why in this article I’ll teach you how to fold a fitted sheet (two ways!) like a pro.
How Do I Fold a Fitted Sheet?Let’s get into the nitty-gritty of fitted sheet-folding. Keep in mind that some materials are easier to fold than others. For example, the sheet I used in Method One is made from slinky viscose — which was more difficult to fold — whereas in Method Two I used a sturdier cotton sheet.
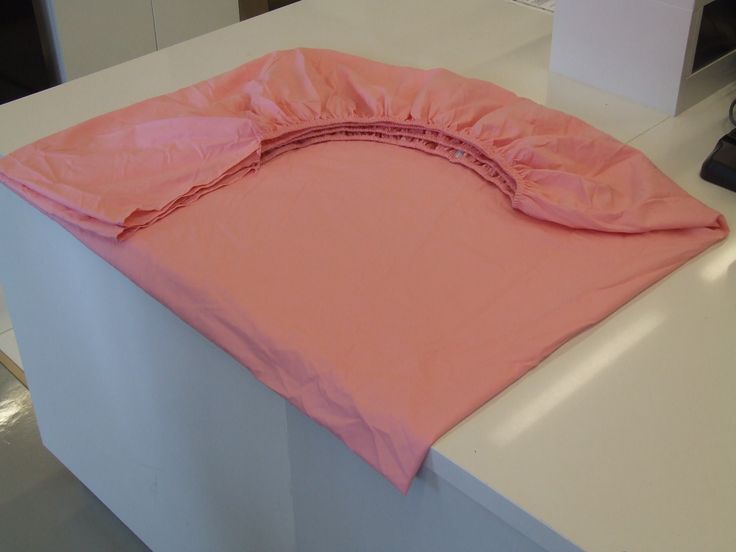
Method One@sleepopolis learn our first method of folding a fitted sheet! did you already know how to do this? 👀 #sleeptok #sleepbetter #howtofoldafittedsheet #fittedsheetfolding ♬ original sound – SleepopolisPut a hand in each corner with the elastic on the sheet facing you.Turn the corners inside out so that you’re holding them externally, with the seams facing out.Turn the sheet around so that the elastic is facing you again as you swap hands to hold opposite corners.The sheet should now be inside out, with the elastic facing you, one hand in each pocket.Then, clap your hands together.Take the right-hand corner and flip it onto your left hand. This will free up your right hand.Place both corners from your left hand onto your right hand so that your left hand can travel down the elastic to the other corners.Now each hand should be in the new corners.Lay the sheet onto your bed and try to find the U shape in the elastic.
 Straight out the U and fold into thirds vertically.Once folded three times, flip it over.Then fold three times horizontally.Smooth out any wrinkles.Be proud of your finished product!
You did it! Congratulations on learning our first method of folding a fitted sheet. Now, let’s move on to Method Two. This method produces a more compact finished product, so it may be of interest to those trying to save space.
Method Two@sleepopolis our second method to fold a fitted sheet! which do you prefer, method one or two? #sleeptok #sleepbetter #howtofoldafittedsheet #fittedsheetfolding ♬ original sound – SleepopolisPlace each hand inside a pocket with the elastic facing you.Turn the pockets inside out so you are holding them externally with the seams facing out.Swap hands to hold opposite corners as you turn the sheet around so that the elastic is facing you again.
 Now the sheet should be inside out, but with the elastic facing you.Clap your hands together.Fold right-hand corner onto your left hand so that your right hand is now free.Place the corners onto your right hand so that your left hand can travel along the elastic to the other corners.Now each hand should be in a corner.Clap your hands together again.Fold the left-hand corner onto your right so that your left hand is now free.Lay the sheet down on your bed and find the J shape in the elastic.Once you’ve found the J shape, fold the sheet three times horizontally.Then fold the sheet two times vertically.Hooray!
You did it! Personally, I prefer Method Two over Method One, but I recommend trying both to see which is easier for you. Plus, once you master one method, the other should come to you easily.
Final ThoughtsIf you’ve made it to the end of this article, hopefully you are feeling like a master of folding a fitted sheet. It’s a great skill that can help you save space, prevent your sheets from wrinkling, and make you feel a little more put together.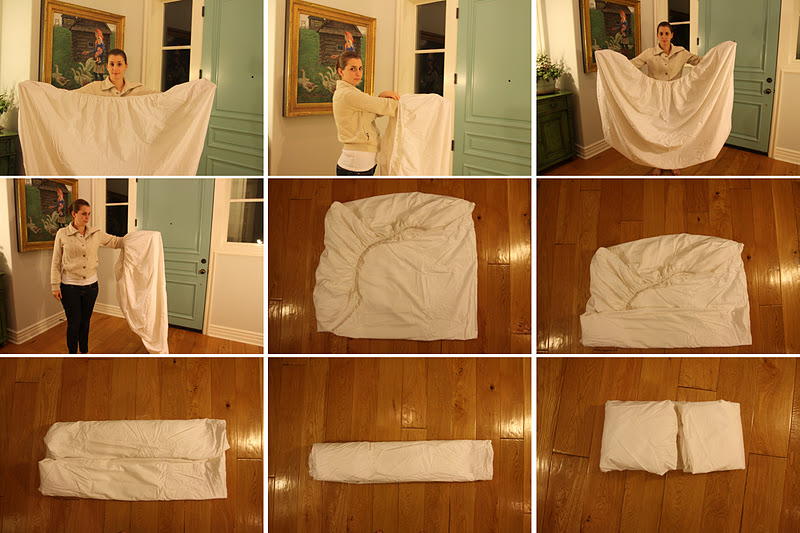
Sheets are an important part of your bedroom setup, so be sure you’ve got the best ones. If you’re looking for a sheet upgrade, check out our best sheets roundup to find a set that will work for you — and now you’ll be able to fold them.
Subscribe Today!
Get the latest deals, discounts, reviews, and giveaways!
Amelia is a Staff Writer for Sleepopolis. She primarily covers bedding and sleep accessory products in reviews, how-to guides, and more. You can also find her over on the Sleepopolis YouTube channel. Amelia is a graduate of the University of North Carolina at Chapel Hill, with double majors in media and journalism and in dramatic art. Outside of work, Amelia can usually be found on a hike, traveling to a new city, or at her local thrift store.
HOW TO FOLD BED SHEETS NEATLY FOR A TIDY LINEN CLOSET
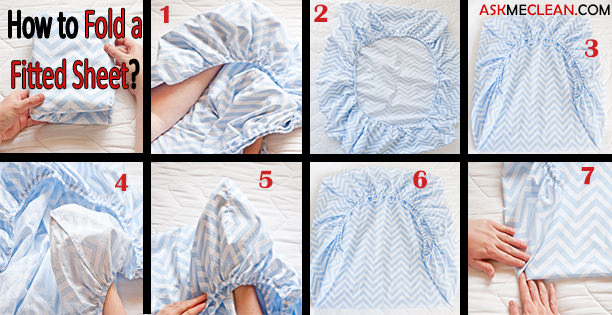
If you know how to fold bed sheets neatly then you have conquered the first step in your quest for a neatly organized linen closet. This step by step tutorial and video will show you the best way to fold a fitted bed sheet and a flat sheet into a bundle to save space and create a lovely linen closet.
For years I folded my sheets separately and stacked them but one day I learned how to fold bed sheets neatly in a bundle and it changed the organization of my linen closet completely.
This post contains affiliate links, meaning I receive a commission if you purchase using the links below at no extra cost to you. All opinions are all my own.
After doing a post on organizing your linen closet I realized it would be most helpful if I shared the easiest way to fold the fitted sheet and how to fold the flat sheet together so when it is time to make your bed all you have to do is grab one set of folded sheets.
You can easily do this with cotton, flannel, or bamboo sheets. We love bamboo sheets at our house. Our favorite bamboo sheets are Cozy Earth. They are breathable, moisture-wicking, durable, and ever so soft. Tap Cozy Earth sheets if you would like more information and use my coupon code for 40% off SUMMERHILL40.
Now, remember this works no matter the size of the sheets. Just this one easy step can make your household chores easier!
How to Fold Bed Sheets Neatly
Here's your complete guide to folding bed sheets neatly.
Let's start by grabbing your flat sheet, fitted sheet, and any pillowcases that match the set. If you have a folding table or your bed, it's helpful, but not necessary. Any flat surface will do.
How to Fold a Fitted Sheet
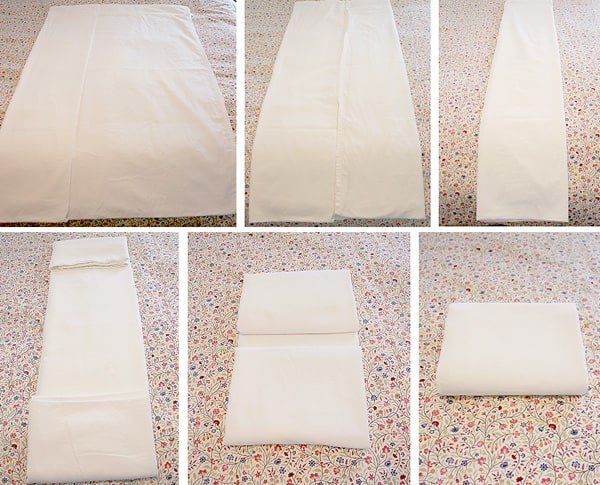
Begin by putting your fingers in the elastic corners on one side of the fitted sheet. In other words, grab one long side of a fitted sheet and place your fingers on the outside corners.
Put your pointer finger in the corners then bring your left hand and right hand together.
Notice how you are seeing the inside or wrong side of the sheet. This is important because when we are finished the fitted sheet will be folded with the outside showing.
Next, pull one corner over the other corner like in the photo.
Now reach over and put your finger in the other corner on the outside and tuck it on the inside of the other corner.
Next find a flat surface and lay the corners down. Then gently pull the sides down and make a square.
Then take the opposite end and fold it over the top of the end with the corners.
The next easy step, fold it over one more time to make a long rectangular shape. The elastic edges will not be showing, only the straight edges of the long rectangle.
And place the fitted sheet off to the side because now we are going to work on the flat sheet.
How to Fold a Flat Sheet
For the next part of the folded sheet bundle is to fold the flat sheet. Some people refer to this as the top sheet. Begin by grabbing the long end and pulling the corners together. Or you could grab one corner from the top of the sheet and one corner from the bottom of the sheet. This can also be done with a duvet cover.
Next, fold it again one more time.
Then fold it from the other end and place it on a bed or table.
Grab the fitted sheet that you have set aside and sit it on the flat sheet.
Now fold the flat sheet over several times to make a square.
Place the folded fitted sheet on the corner with the open edges, not the folded edge.
How to Fold a Pillowcase
Next, let's fold the pillowcases to sit in the sheet bundle.
First, fold the pillowcase in half.
Then fold it again.
Then fold it in thirds.
And place the pillowcase on top of the fitted sheet that is sitting in the corner.
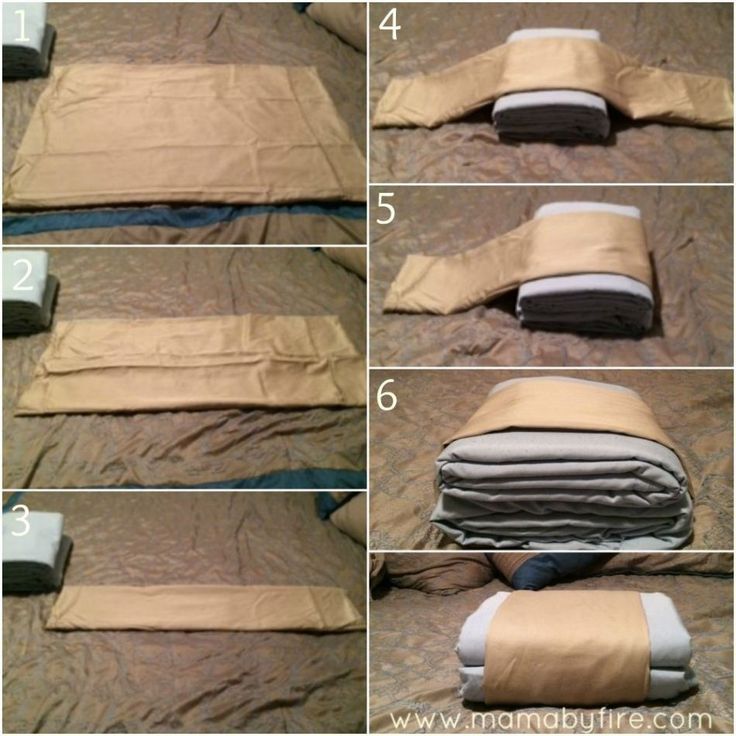
How to Fold a Sheet Set to Save Space
Fold the flat sheet over the fitted sheet and pillowcase.
Place your hand along the edge and fold the fitted and flat sheet and pillowcase over one time.
Fold it one more time.
And you are finished. Good work! Your sheet set is neatly folded into a bundle where you can sit it beautifully in your linen closet.
Conclusion
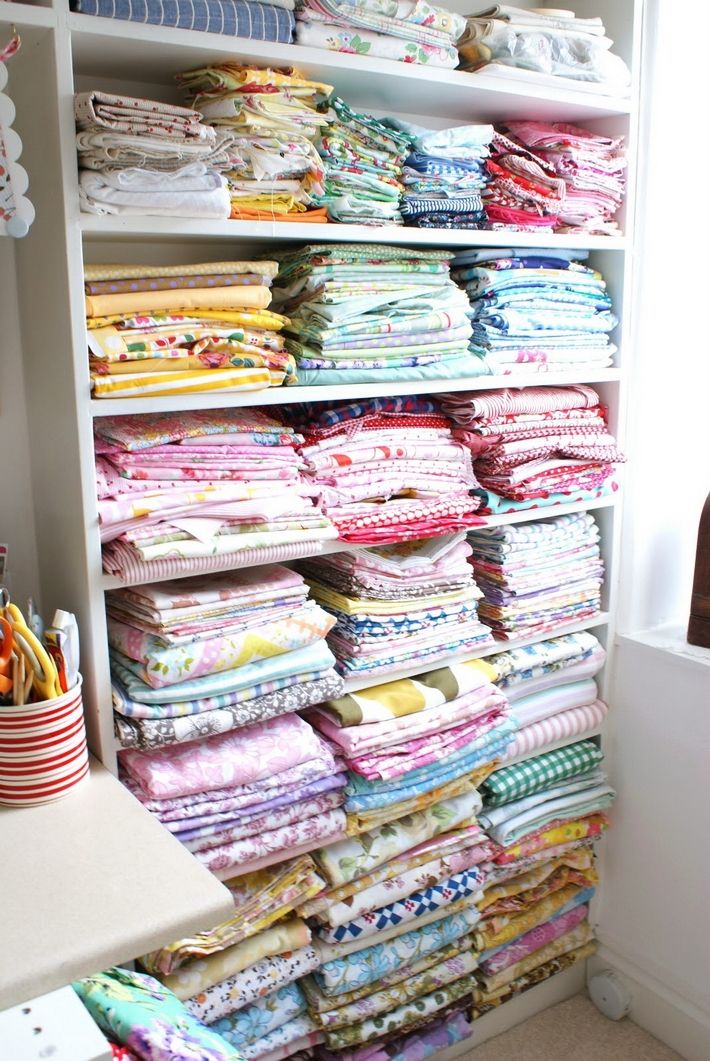
Now that your sheets are nicely folded in a bundle it is time to place them in your linen closet. When you stack your bed linens on the shelves turn them where you see the side like in the picture below. With the open ends in the back and the folded sides facing out, everything will be uniform. This will make the stack in your closet even prettier.
Another tip for keeping your linen closet tidy looking is to purchase some baskets. I have one basket per sheet size.
The first time you use this method may take a little longer, but with a little practice, I know you'll be thrilled with the results. It really makes life easier when sheets are categorized by size. But there are lots of popular methods and lots of different ways to organize your life. This guide of simple steps is definitely a favorite of mine!
If your linen closet is not ready and organized for your sheet set bundle I have an organizing 101 post and I include tips on linen closets. And if you want to create a beautifully decorated linen closet check out my using Pinterest to organize post. It is a fun way to plan your closet and then add your lovely sheet bundle.
Another great resource if you decide on a pretty decorated linen closet is this amazon linen closet shopping guide. There are so many wonderful organizing items you can use to decorate your linen closet that is functional and pretty like baskets.
Good luck and I hope this tutorial on how to fold sheet sets is helpful and encourages you to organize your linen closet if it needs organizing.
Happy Decorating!
If you enjoyed this post, sign up to receive new decor ideas each week. FREE EMAIL SUBSCRIPTION
Active Time 5 minutes
Total Time 5 minutes
Difficulty Easy
Materials
- Sheets
Tools
- No tools needed
Instructions
- Let's start by grabbing your flat sheet, fitted sheet and any pillowcases that match the set. If you have a folding table, it's helpful, but not necessary. Any flat surface will do.
- Begin by putting your fingers in the elastic corners on one side of the fitted sheet. In other words, grab one long side of a fitted sheet and place your fingers on the outside corners.
- Put your pointer finger in the corners then bring your left hand and right hand together.
- Notice how you are seeing the inside or wrong side of the sheet. This is important because when we are finished the fitted sheet will be folded with the outside showing.
- Pull one corner over the other corner.
- Reach over and put your finger in the other corner on the outside and tuck it on the inside of the other corner.
- Find a flat surface and lay the corners down. Then gently pull the sides down and make a square.
- Take the opposite end and fold it over the top of the end with the corners.
- Fold it over one more time to make a long rectangular shape. The elastic edges will not be showing, only the straight edges of the long rectangle.
- Place the fitted sheet off to the side because now we are going to work on the flat sheet.
- The next step is to fold the flat sheet. Some people refer to this as the top sheet. Begin by grabbing the long end and pulling the corners together.
 Or you could grab one corner from the top of the sheet and one corner from the bottom of the sheet. This can also be done with a duvet cover.
 - Fold it again one more time.
- Fold it from the other end and place it on a bed or table.
- Grab the fitted sheet that you have set aside and sit it on the flat sheet.
- Fold the flat sheet over several times to make a square.
- Place the folded fitted sheet on the corner with the open edges, not the folded edge.
- Next, let's fold the pillowcases to sit in the sheet bundle.
- First, fold the pillowcase in half.
- Fold it again.
- Fold it in thirds.
- Place the pillowcase on top of the fitted sheet that is sitting in the corner.
- Fold the flat sheet over the fitted sheet and pillowcase.
- Place your hand along the edge and fold the fitted and flat sheet and pillowcase over one time.
- Fold it one more time.
- And you are finished. Good work! Your sheet set is neatly folded into a bundle where you can sit it beautifully in your linen closet.

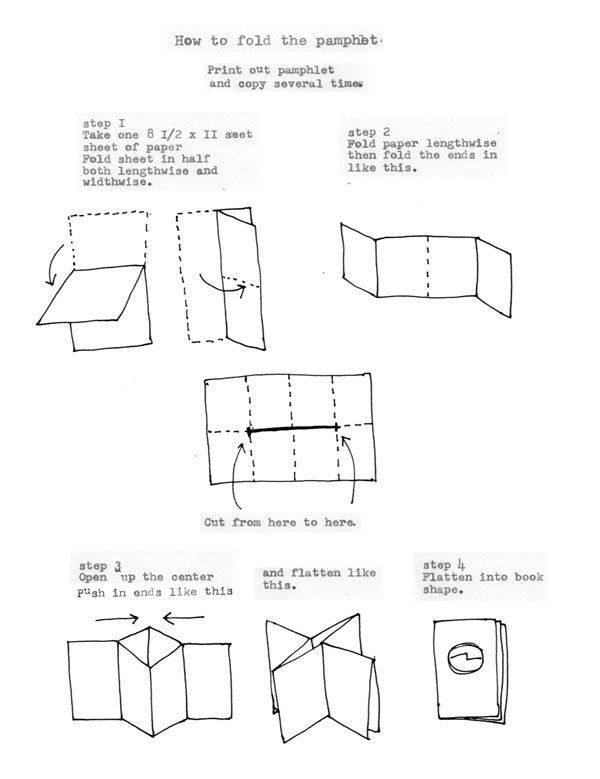
- brochure;
- for folders.
- A0. The right edge below is divided into 4 equal parts (19 cm each). The remaining segment is divided in half. In the upper corner on the left side, mark 10.5 cm and make a bend. Then they fold with an accordion. The main inscriptions should be on the front side. The sequence is clearly shown in the diagram.
- Format A1. On a horizontal line, the right edge below is divided into 2 parts (19 cm each), 21 cm are measured in the left, the segment between them is folded in half.
 In the corner, which is located at the top, you will need to measure 1 segment (29.7 mm). In the left, located below, 10.5 cm are bent. Further folding is done in the same way as for A0.
 - Format A2. 21 cm are marked horizontally, the remainder can be divided equally, 29.7 cm are measured at the top. The upper corner on the left is bent 10.5 cm, then folded sequentially: first longitudinally, then transversely. In a vertical position at the top, it is worth measuring 297, on the left side - 105, on the right - 190 mm. The upper corner on the left is folded and folded according to the scheme.
- A3 format. Here, 29.7 mm are measured horizontally at the top, 10.5 cm on the left, 19 cm on the right. Then they fold in the same way as in the example of any previous format. It is folded identically to the algorithms described above.
- A4. These sheets do not require a separate fold.
- Top 10 best lawn mowers

- How to choose a couch for living room

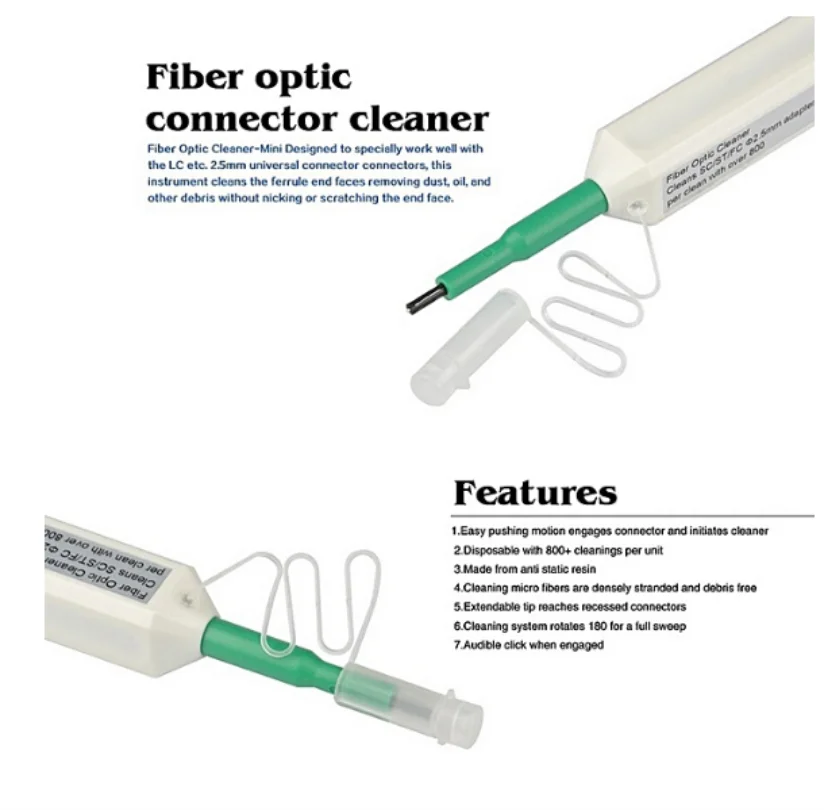
- Cleaner for fiberglass tub
- Beautiful craft room
- Wet room floor plans
- Images of living rooms decorated

- Interior window wall
- How to take border off walls
- Over the sink kitchen lighting ideas
- Neutral kitchen floor tile
- Room saving ideas

Notes
Now that your sheets are nicely folded in a bundle it is time to place them in your linen closet. When you stack your bed linens on the shelves turn them with the open ends in the back and the folded sides facing out. This will make the stack in your closet even prettier.
Another tip for keeping your linen closet tidy looking is to purchase some baskets. I have one basket per sheet size.
How to properly fold an A1 A2 A3 drawing for filing
Categories: Lessons in drawing, engineering graphics and inscription / Articles
| Project type | Number of sheets (drawings) | |
| Format |
How to fold drawings
The process of folding drawings in professional printing is called folding. The word comes from the German falzen - to bend. In a printing house, folding is used for folding notebooks, books, newspapers, drawings and any other printed matter. The purpose of folding printed sheets is to bring them to a single format in order to obtain a finished printed edition. Well, actually the fold line is a fold. The number of folds may vary, depending on the original format and what format you want to end up with. Folding methods differ in the relative position of the folds relative to each other, this is a parallel method, perpendicular and combined. With the parallel version, all the folds are parallel to each other, in the perpendicular version, they are perpendicular, but in the combined method, the previous two are used.
It should be noted that folding can be done both manually and with the help of special devices. Manual folding of drawings is an operation that is entirely performed by a human. At the same time, the process itself takes place in accordance with certain standards, regulated by GOST, but more on that below. An important aspect of manual folding is attentiveness and precision. As for the automatic method, special machines are used for this, the services of which can only be used in printing houses.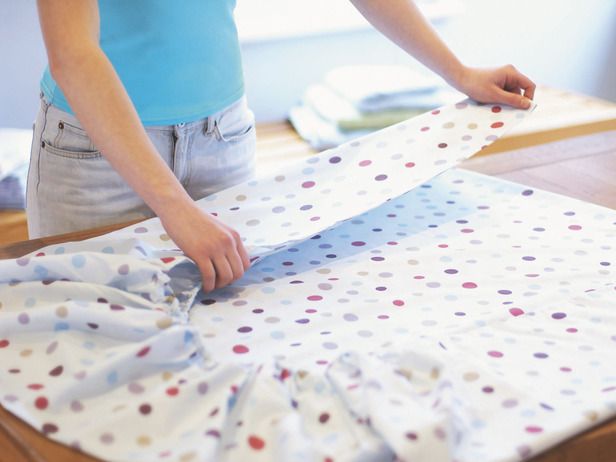 In St. Petersburg, for example, there are such in the Copycenter. The meaning of automated folding is the same - folding a large volume into a small one, only the whole process takes place automatically, but under the supervision of a specialist. Many people think that the manual method is more accurate, as an experienced folder is in complete control of the process, but modern folding machines will outperform any professional due to speed and quality.
Why is it necessary to fold large sheets into small ones? For example, the implementation of course or graduation projects is almost always accompanied by several drawings of A1 or A0 format, and so after the defense of the work, all of them must be folded in a special way. So, any format should be reduced to A4 format, because the drawings are fixed at the end of the folder with the thesis itself. This significantly saves space in the archives, since there is no need to create a separate rack for storing them. Most often, in technical universities, on subjects devoted to drawing, they explain how to fold drawing A1 into A4 according to GOST . If over time there is trouble, which often happens during a session, or the volume of material is very large (let's say 100 pieces) - you can quickly print and fold the required number of drawings in special companies. In St. Petersburg, the addresses where printing and folding are done are on the website.
The actual requirements of the standard allow for folding in two ways: folding into a folder, or folding directly for binding. How to fold a drawing in A1, A2, A3 format? Yes, it's very simple, for this you need to be guided by the dimensions of the A4 format, namely 210 mm by 297 mm. When folding into a folder, any format is simply reduced to the A4 format, but the difference in folding for binding is that the width of the A4 format is neglected, focusing only on the height - 297 mm.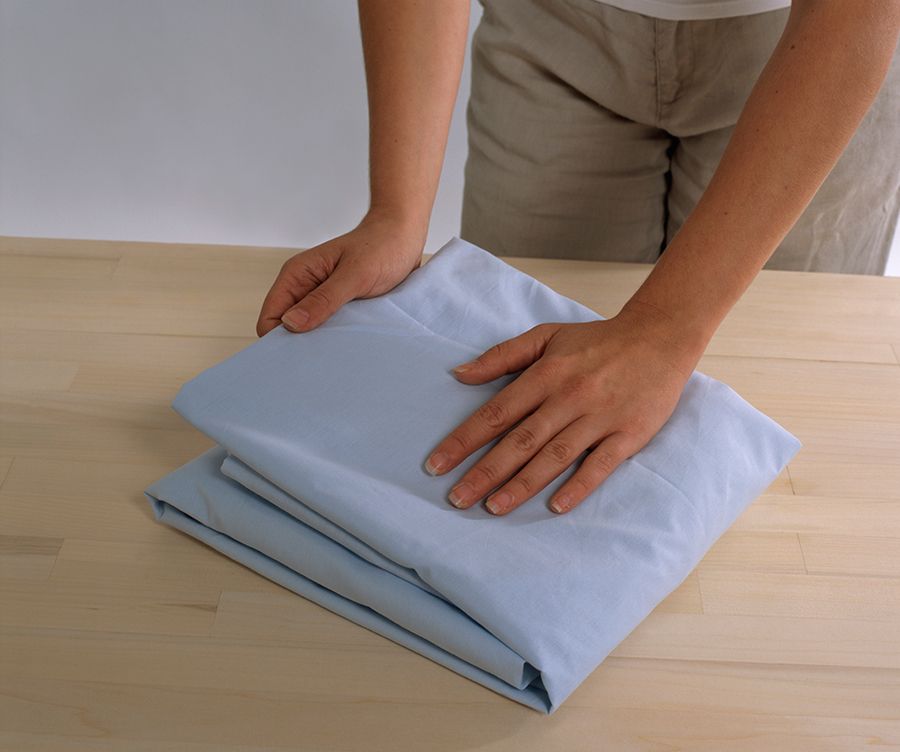 This is done in order to leave a certain distance on the left side for the holes through which the drawings will be stitched.
In order to correctly fold a drawing of any size, you must follow the basic rules. After folding, the sheet itself should look in such a way that the main inscription is located on the front side, which is located in the lower right corner. Folding must be done first along lines perpendicular to the main inscription and only after that along parallel lines. You can also consider these lines as longitudinal and transverse, respectively. If you follow these simple rules, then there will never be a question about how to properly fold drawings A1, A2, A3.
As mentioned above, many recognize that manual folding of blueprints is a simple, albeit rather time-consuming, method. The advantage is that the “stacker” itself controls the entire process. Making manual folding is quite simple if you follow the principles described above, and also look at GOST 2.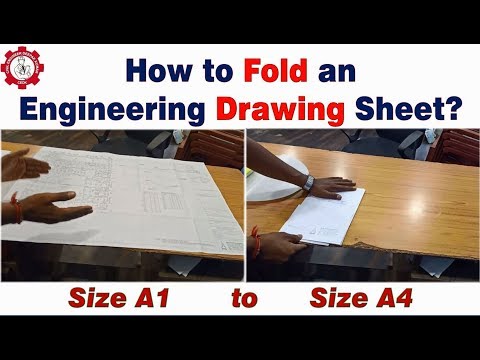 501-88 when folding. There is no description of the process itself, but rather visual diagrams will help in this process. And if you imagine the defense of a graduation project or term paper, then after the speaker’s story (if everything is fine and a retake is not planned), it is necessary to “pack” all the diagrams into a folder with work on the spot, the speaker will have a reason to “show off” additional knowledge about volume how to fold the drawings for manual filing .
Now let's get even closer to the issue of folding, we can say closely, and talk about the folding scheme. Schemes for each of the formats A0, A1, A2 and A3 can also be seen in GOST. But GOST is a small and uncomfortable little book with small handwriting. Therefore, below we will try to “in words” explain the process of manual folding.
A0 fold is the most difficult paper folding process due to its size. There are two folding options, as mentioned above, these are folding into a folder and folding for binding. When folding into a folder (this is an easier method), you need to start on the right side, from the one where the title block of the drawing is located. Do not forget that we bring everything to the A4 format. So on the right side we measure the width of the A4 format - 210 mm. On the A0 format, you will get 5 such segments, the sixth will be shorter than 210 mm. We fold along these longitudinal lines with an “accordion”, but without forgetting that the main inscription should remain on the front side. Next is cross folding. Also, from the lower right corner, we measure up the height of the A4 format - 297 mm. There will be two such segments, and the third will be shorter than 297 mm. Folding is carried out in the same way, with an “accordion”, while a segment that is shorter than 297 mm should eventually end up at the bottom, and the main inscription on the front side. If folding is done for stitching, then the scheme is similar, except for the length of the segments. We also start from the lower right corner and measure 4 segments of 190 mm each, then measure 210 mm from the left end of the sheet. Between the four segments on the right side and one segment on the left, there will be a small segment that must be divided in half. Cross folding is carried out similarly to the “into a folder” method, but at the upper left corner it is necessary to measure 105 mm and make a small bend. Next, we make folding "into an accordion", not forgetting that the main inscription should be on the front side.
A1 fold can be used for horizontal and vertical drawings, folder method and for binding. On the horizontal drawing, a 210 mm segment for longitudinal folding is measured from the right corner, the fourth segment will be shorter. And up from the lower right corner, one segment of 297 mm is measured, the remainder will again be shorter.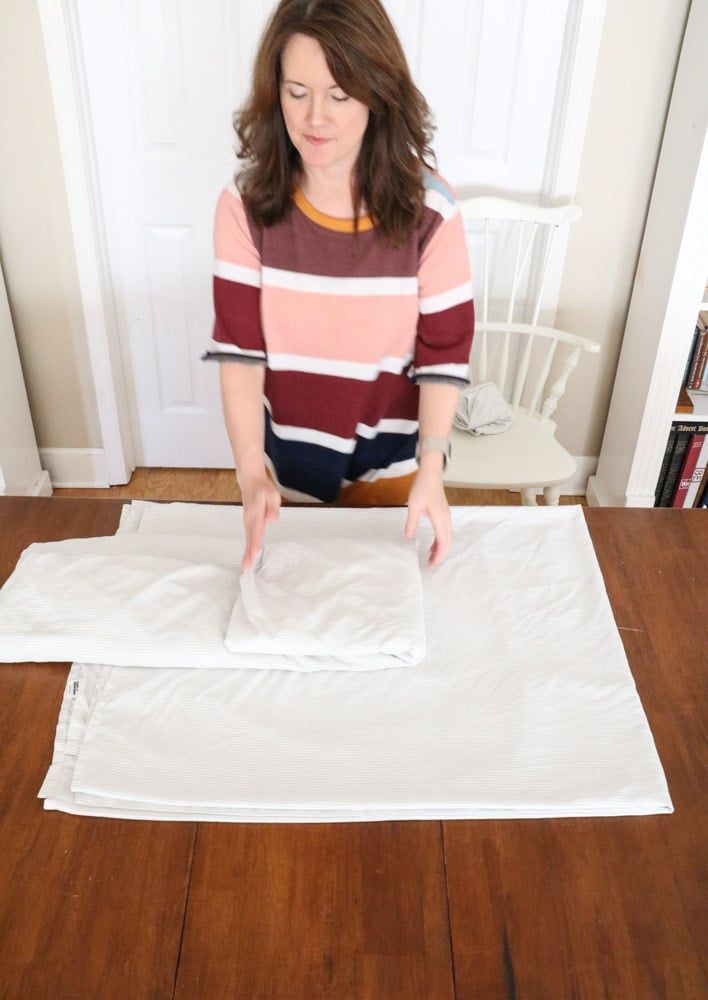 Folding is carried out similarly to folding the A0 format, taking into account the fact that the main inscription should be on the front side. The vertical drawing folds a little differently. From the right corner upwards, two segments of 29 are already measured.7 mm plus the remainder, and two pieces of 210 mm in width. Folding is done with an accordion, so that a segment shorter than 210 mm ends up on the right side. When folding for stitching for a horizontal drawing, we measure two segments of 190 mm from the lower right corner, then 1 segment of 210 mm from the left side, and divide the remaining distance between them in half. Upward, we set aside one segment of 297 mm. And do not forget to make a small bend at the upper left corner, measuring 105 mm. Folding is carried out similarly to the A0 format. When stitching a vertical drawing A1 from the lower right corner upwards, we measure two segments of 297 mm, and from the lower left corner one segment is 210 mm, the remaining distance is divided in half.
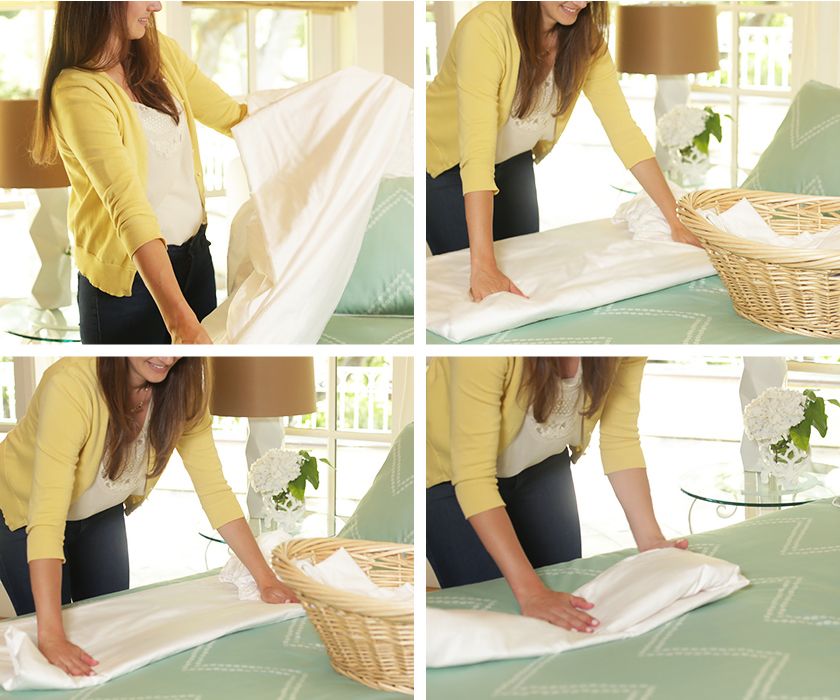 We also make a fold at the upper left corner, at a distance of 105 mm. We make folding, not forgetting about the main inscription on the front side.
A2 fold is even easier, although it is already clear that the smaller the original sheet, the easier it is to fold. The "to folder" method is also possible for horizontal and vertical drawing. With a horizontal arrangement, similarly to the description above, we measure two segments of 210 mm from below, one - 29 upwards7 mm. We fold it with an accordion, but in this case we simply fold the upper residue after longitudinal folding. If the drawing is vertical, then from below we measure one segment of 210 mm, upwards also one segment, but 297 mm. We leave the main inscription on the front side and fold it, first longitudinally, then transversely. When stitching a horizontal drawing on the left side, we measure 210 mm, divide the remaining distance in half, measure 297 mm upwards. At the upper left corner we make a 105 mm bend and fold it, first longitudinally, then transversely.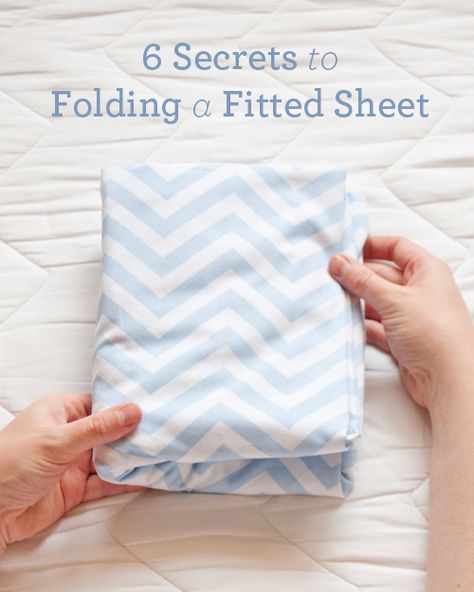 If the image is vertical, then measure up 297 mm, from the left edge 105 mm, and from the right 190 mm plus at the upper left corner we make a fold, we fold.
A3 fold. With the “into folder” method, for both horizontal and vertical completed drawings, measure 210 mm along the bottom edge, and measure 297 mm upwards. Fold lengthwise, then crosswise. If we fold it for stitching, then in both versions of the drawing we measure upwards a segment of 297 mm. For a horizontal drawing on the right, measure 190 mm, left 105 mm, for a vertical drawing also 190 mm on the right, and 43 mm on the left. We add in the same way as described above. And immediately, we note that A4 folding, as an independent format, is not performed, since such a drawing is ideally filed into a folder with a diploma or term paper.
So, we figured out the question of how to fold a drawing of any format using the requirements of GOST. But it is worth noting that you can also resort to automated folding of drawings, which is also performed in accordance with GOST. About how to print a drawing and how to fold a drawing is known to specialists of professional printing houses. For example, you can come to the Copycenter, print and fold on the spot. GOST folding drawings is a fairly common service that is constantly in demand. In this case, special machines are used, programmed for the dimensions that were described above in folding drawings of various formats. In addition, such machines can most often perform creasing, but this is necessary when folding thick grades of paper or cardboard. Before the folding process, creasing is performed - pressing the paper before folding, which greatly simplifies the process. You can download the drawings so that you can then print and fold them here.
And one more important question. If there is no need for folding and further binding of drawings, then you can simply roll it into a tube. A small nuance is, how to fold the drawing A1 , the most important thing is to fold the side with the image inward, so as not to damage it. A tube is more often a plastic tube with a carrying handle that opens on both sides. Inside, of course, it is as smooth as possible, but there is still a chance to scratch the drawing. Therefore, if there is no need for folding and you are interested in the question: how to fold A1 drawings and other formats, then the best solution would be to use a special carrying tube.
In addition to folding sheets, you need to create drawings first, our database of ready-made drawings will help you with this.
How to fold drawings according to GOST for filing
Knowing how to fold a drawing correctly will be needed when working with design documents and other important papers. To describe this procedure, the term "folding" is used. It comes from the German word "falzen", which means the verb "to bend". You can learn how to collapse documentation from the information prescribed in the State Standard. It establishes the rules for combining paper sheets from A0, A1 and A3 formats.
Requirements of the State Standard
Folding is used for the correct folding of drawings in accordance with GOST. This is done so that all paper is the same scale. Due to this method, it is also possible to fold a3 into a4 books, brochures, various printouts, etc. They work with them in several ways: combined, parallel-transverse and perpendicular-longitudinal.
Folding is done by hand or on special equipment. To fold the sheet by hand, you will need accuracy and caution. The mechanical method is used in printing houses where automated equipment is installed. The safety of documents is determined by 2 types of folding:
How to fold the drawings by hand is indicated in the State Standard. This method is more accurate, but the equipment also gives good results.

Distribution in folders
To know how to fold GOST drawings into a standard folder, it is enough to know a couple of simple rules. As a rule, a 21x29.7 cm template is used for this. Therefore, for quick measurements, a sheet not A1 is suitable, but a sheet formatted in A4, and measurements should be taken from it. Its parameters are 21x29.7 cm. This is especially useful if there are many pages.
Binding
How do I fold the drawings for binding? For this, the stitching method is used, which should be considered in more detail using examples:
Large paper is filed if diploma and term papers include schematic drawings, etc. After delivery, they are left in the archive of the premises, designated by a serial number for accounting. To properly fold, you should adhere to standard indicators (A4).
If you follow the rules and follow the diagrams, you can quickly figure out how to fold the Diploma Supplement.
Examples and drawings
A0 is the most difficult to fold due to its large dimensions. In order for everything to work out correctly and the folded sheet to look neat, it is important to adhere to the algorithm shown in the pictures. Start on the right, where the name is located. Here they plan a width of 21 cm. A0 includes 5 full-length segments and one slightly shorter. Each of them will need to be bent to make an "accordion". All actions are shown in the figure.
If everything is folded correctly, the shortest section remains at the bottom, and the signature is on the front side.
A1 according to GOST fold 2 methods, which are indicated schematically.