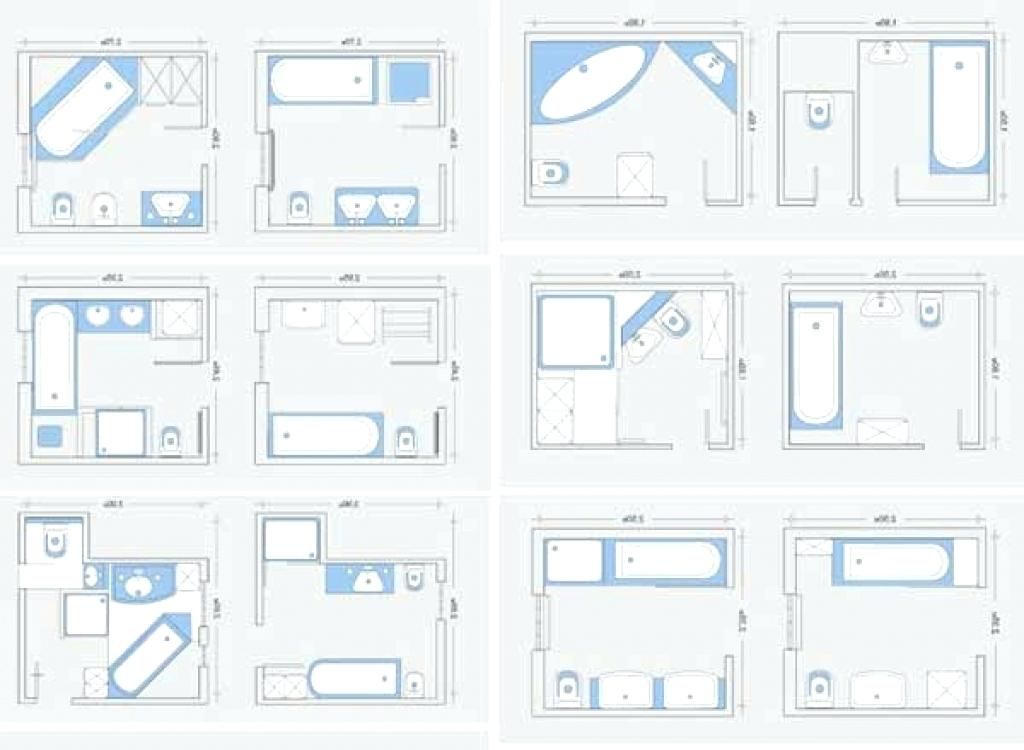
Wet room floor plans
16 stunning wet room bathroom designs |
(Image credit: Richstone Properties / Mandarin Stone / l Drummonds / Darren Chung)
Wet room ideas open up the opportunity for contemporary creative design, without the need to squeeze in a shower enclosure or raised shower tray.
A wet room can be a real luxury at home, even when the space you have to work with is limited. Try thinking along the lines of colorful floor-to-ceiling tiles, built-in seating and sleek, concealed pipework.
A true wet room without any panels provides you with more room to move, and an open-layout is easier to keep clean than a regular shower.
However, wet rooms are a big project to take on when it comes to bathroom ideas. The tanking process to ensure your room is completely watertight can be a significant upheaval, not to mention costly, too.
You may want to weigh this up against the longevity of the space, as a wet room’s seamless design makes it a great option for accessibility and future-proofing your home for years to come.
Wet room ideas
Wet rooms have become an increasingly popular choice for shower-lovers because they are the perfect solution for small bathrooms when you don’t have the space for both a bath tub and a separate shower.
The key difference between a shower and a wet room is the fact that while both may have shower screens, wet rooms are completely open spaces without the stand-in tray you will normally get in a shower. The floor is at one level and water is allowed to flow freely to a drain.
A wet room can provide a spacious showering area and the high-end look of a luxurious spa hotel because the look tends to be very streamlined. Wet rooms are also level entry, so easily accessible to all, not to mention hygienic and easy to clean. Done well, a wet room is incredibly desirable and can boost your home’s value, too.
There are a number of things to consider when planning a wet room or walk-in shower – from suitable flooring to drainage points – so that you can achieve the best results.
1. Ensure the space you intend to use is fully tanked
(Image credit: Sarah Hogan)
It goes without saying that a wet room needs to be waterproof. Luckily builders are a lot savvier about how to achieve fully tanked spaces nowadays and wet room tanking systems and products are readily available.
'In particular, hidden tray systems, which fit under the floor tiles and take care of drainage gradients and watertightness have proved a real game-changer,' says Nicholas Cunild, MD of luxury shower brand Matki . 'Low-level shower trays that fit flush with the tiles are also popular and can help define the shower room in a bigger room. Wet room installation is not for novices, it’s important to find a tanking specialist or builder with verifiable experience.'
2. Consider underfloor heating to keep the space dry
(Image credit: Mandarin Stone)
'It’s important to take extra steps with regards to heat, ventilation and drying than you would in a regular bathroom,' continues Nicholas Cunild. 'You may be lucky enough to live in a hot climate which naturally gives a warmer bathroom. But if you live in a colder climate and you exit a wet room onto carpeted rooms – add kids, dogs and all the rest – it is a recipe for waterlogged, messy floors everywhere.
'A screen will help contain major puddles, but underfloor heating and heated towel rails will also speed up the drying process and help prevent slip hazards. Mechanical ventilation is a must and will help clear steam quickly – look for models with intelligent humidity sensors that automatically boost when required.' You can also pair this with a beautiful, easy-to-wash bathroom rug idea.
3. Consider different surfaces ideas, not just tiles
(Image credit: Base Interior)
Tiling from floor-to-ceiling is practical but can feel cold and uninviting in large volumes. Nicholas points out the importance of exploiting other options.
'We’ve noted a rise in polished plaster – both traditional Tadelakt and more modern Microcement – in wet room designs and the results are stunning,' he says.
Built up in layers, the finish is waterproof and seamless, so there’s no grubby grout to tackle.
4. Pick the right sanitaryware
(Image credit: Future / Mark Bolton )
'If you are embracing the full wet room in a large bathroom look and omitting any sort of enclosure or screen, it is fundamental to think about your choice of sanitaryware, as it is likely that it will get wet from the spray of the shower or the condensation in the room,' advises Rebecca Milnes, designer at CP Hart .
'Opt for ceramics that are flush to the wall and are ideally wall-mounted. A wall-hung toilet is a brilliant choice in a wet room, as there are no areas for water to pool and it makes cleaning easier.'
Though a bathroom that has been tanked doesn’t necessarily need a shower panel, you may want to add one to prevent towels or toilet rolls getting wet. Opt for a fluted or frosted finish to maintain a level of privacy if your wet room forms part of the main bathroom.
'In order to create a true wet room, a watertight environment must be created by tanking both the floor and walls of the room to thoroughly protect it from leaks. First a watertight membrane is laid, then the room will need to be tiled throughout with a gentle gradient in the main a shower area so the water flows away easily into the waste.'
5. Choose the right size sanitaryware to enhance the sense of space
(Image credit: Matki)
It’s important to choose sanitaryware that is slightly smaller than the average in size so that it can make the room look bigger. A wall-hung toilet with a concealed cistern, is not just easier to keep clean, but being able to see the floor gives the illusion of a bigger room. Wall-hung bathroom vanity ideas will also help reduce visual clutter and use the bathroom space more effectively.
6. Play with the illusion of space
(Image credit: Future / Jonathan Gooch)
Using matching tiles or composite panels on both floors and walls is a good idea for wet rooms and small bathrooms as it will accentuate the sense of space.
Create areas of bathroom color, and even patterns using mosaics or tiles in a variety of formats, to give definition to your shower space, or mix shapes, sizes and shades for a unique look.
'Add glossy finishes and sleek chrome fittings and use matching shower tile ideas or composite panels on both floors and walls to accentuate the sense of space. Create areas of color and even patterns using mosaics or tiles in a variety of formats to give definition to your shower space, or mix shapes, sizes and shades for a unique look.'
Make sure the floor tiles you want have an appropriate non-slip bathroom flooring rating for wet areas – look out for raised, textured finishes or anti-slip properties in your search.
'Good-quality porcelain tiles are perfect for use in wet rooms and walk-in showers,' says Jo Oliver, Director at Stone & Ceramic Warehouse . 'Firstly, they are impervious to water, making them an ideal solution for everyday use. They also won’t be damaged by detergents or any of the other chemicals we frequently expose our shower surfaces to. '
'
(Image credit: Max Kim Bee)
While it’s easiest to install a small wet room in a new-build or extension, any bathroom, upstairs or down, can be fully tanked for wet room use.
There are certain situations where a wet room comes into its own. 'Wet rooms are particularly effective in small or awkward scenarios, like rooms with sloped ceilings or strange layouts, as you can maximize the showering area without the restrictions of standard shower tray sizes,' says Nicholas Cunild.
Issues like the direction of floor joists can be problematic but not insurmountable. 'In some cases, you may need to accept a step up into the room, in order to achieve the necessary gradients for efficient water drainage. If it’s done by a good professional, it will be unnoticeable.'
8. Fake a wet room
(Image credit: Future / Darren Chung)
If you are not able to create a true wet room, the latest ultra-low profile shower trays are a clever alternative.
A frameless shower enclosure will give any bathroom a modern, seamless feel and create a contained area for showering without the need for a separate cubicle._10218_/floorplans/summerlin_pinnacle/marlette1_1800.png)
Paired with a low-profile shower tray, these walk-in shower ideas with frameless, clear glass panels help to make even the smallest of spaces feel less claustrophobic and therefore a more calming showering experience.
Don’t forget to allow for adequate drainage at the planning stage. Your shower floor ideas may need to be fitted at a sloped angle away from any doors so water can drain away easily. A sunken shower tray that can be installed flush to the rest of the floor.
9. Bring in pattern to help zone the shower area
(Image credit: Bert & May/ Fired Earth)
Many wet room designs lean towards a minimalist look but it can also be a great opportunity to introduce color and pattern into the space.
Even in an open plan space you can use a showstopping tile on the shower walls and floor to zone the shower area. If you are feeling even braver you can contrast the tiles you use on the floor and walls for even more impact.
10. Find the right tile
(Image credit: Future / Artisan of Devizes)
Bright and colorful wet rooms make for an invigorating shower experience. Ideal if you're not naturally a morning person. Smaller bathroom tile ideas like mosaics are a great choice for wet rooms, as they’re easy to lay in a slope towards the drainage hole.
Alternatively, a mix of metro and patterned tiles create a cool and contemporary appearance.
Maintain a seamless look by incorporating a recessed shelf within the shower – a great shower storage idea to keep essential bottles without encroaching on the rest of the space.
11. Enhance the floor factor
(Image credit: Future / Jonathan Gooch)
Shower floor ideas are one of the most important factors when planning and developing a wet room.
Most bathroom flooring types can accommodate the pipes needed for drainage in a wet room – even concrete. But in some instances, the flooring will need to be taken up before tiling takes place to ensure the drainage pipes can be positioned with the necessary slope for the water to drain away.
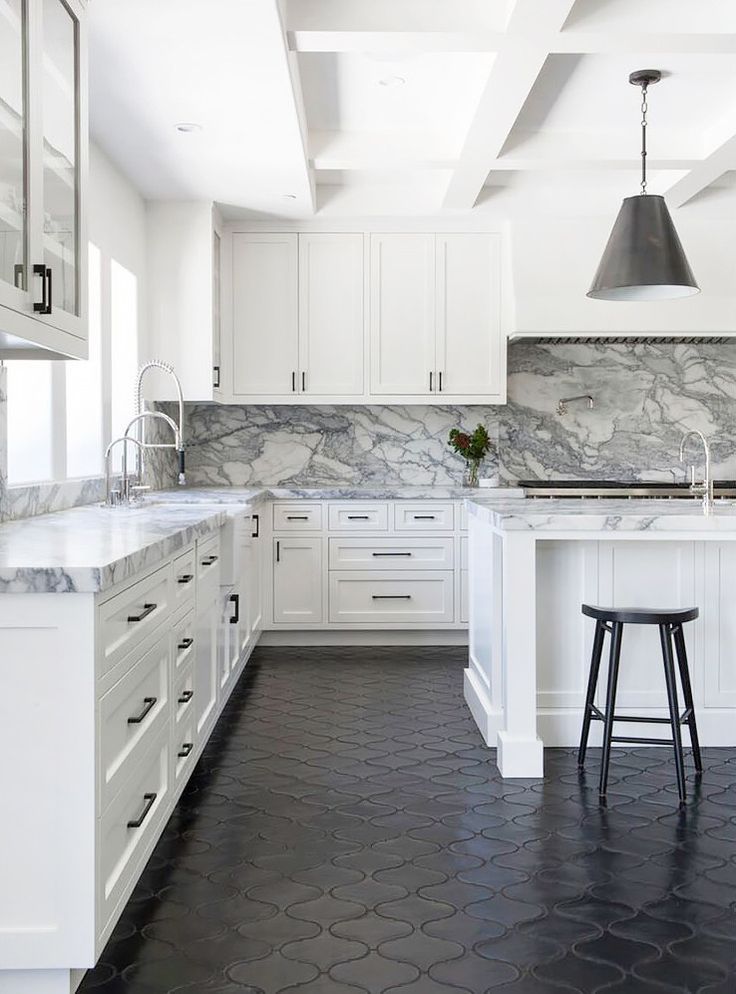
Tiles are the best type of flooring for a wet room. Damla Turgut, founder of Otto Tiles & Design , advises: 'The most suitable types of tiles for a wet room floor are porcelain or natural stone such as marble, terrazzo, encaustic cement or mosaic tiles. Because of their construction and high-shine finish, we would not recommend the use of ceramic tiles on a wet room floor, they are however suitable for wet room walls as are the very on-trend zellige tiles.'
12. Turn a loft space into a wet room
(Image credit: Future / Davide Lovatti)
There are so many advantage to having a wet room.
You can create a more impressive shower room design in an average-sized bathroom simply by removing the bath and freeing up the space needed for a walk-in shower. For instance, if you have a loft space, consider installing a wet room here.
You probably will need a special extractor fan in your wet room. The build-up of moisture and condensation is greater in a wet room than in a traditional bathroom. Fans operated by light switches alone often aren’t effective enough. A good fan needs to be wired into the room (still coming on with the light switch) but with a separate cut-off switch, which is outside the room. Humidity-tracking extractor fans are best for wet rooms as they work continuously and incrementally with automatic extraction for however much steam is in the room.
13. Create a spa-like sanctuary
(Image credit: Future / Mark Luscombe-Whyte)
Real estate agents are quick to point out that a family home without a bath will be less saleable, but there are creative wet room ideas with baths you can explore.
If space allows, the bathroom can be turned into a spa-like sanctuary with a bath, vanity unit and smaller wet room-style cubicle.
'Wet rooms give an added level of luxury, allowing a continuous floor finish making a space feel seamless and bigger,' says Gemma Holsgrove, Associate Director at interior design agency Sims Hilditch . 'With cleverly positioned fittings it can certainly feel well thought through. '
'
A wet room design can also work alongside a bath, as Sally Cutchie of BC Designs explains. 'Choosing to have a wet room can actually be hugely beneficial when wanting a bath to sit in the same space,' she says.
'As a wet room is fully waterproof it doesn’t need a shower enclosure fitting,' she adds. 'This can free up a lot of extra space for the all-important bath.'
If your bathroom is on the small side, then use the same material to clad your whole space. A strong stone, like marble, is a stylish option.
14. Take a seat
(Image credit: Fameed Khalique)
Add built-in seating to your wet room for a sauna-like experience. Complete the look with a large rainfall showerhead, then simply sit back and relax.
A wood look can offer a holistic spa bathroom experience, but you'll need to ensure any timber is treated so that it's suitable for a wet area. Or you can mimic the look with tiles. Just make sure they have a non-slip treatment and are comfortable to sit on.
15. Let the light in
(Image credit: Future / Jonathan Gooch)
If you are creating a new space for your wet room, you will need to think about light sources during planning. A huge skylight like this creates the illusion of showering outdoors. So if you've been inspired by trips to tropical climes such as Bali or Thailand, this could be a practical way to recreate that magic.
The best bathroom lighting ideas feature at least two lighting circuits – one for overhead lighting and another for adjustable mood and task lighting. Where you place these will depend on any natural light sources, too.
16. Install a space to rest and recharge
(Image credit: Future / Mark Bolton)
When considering how to choose a shower for your wet room, Paul Bailey, Senior Category Manager at GROHE , says: 'Features such as steam, sound and chromotherapy through built-in lighting modules are increasing in popularity, due to growing demand for spa and wellness inspired bathroom spaces. '
'
Wet rooms are considered a practical and luxurious addition to a home. However, they can be costly. Nick Cryer of Berkeley Place says: 'Wet room installations are more specialist, more time consuming and more expensive. All the materials and kit is very readily available, however, we recommend only experts are employed to complete the installation.'
Are wet rooms a good idea?
There are lots of benefits to having a wet room – from being able to utilise a small or awkward space where a bath or standard shower enclosure cannot fit, to future-proofing your home.
Estate agents are quick to point out that a family home without a bath will be less saleable. But there are creative options you can explore. For instance, if you have a large master bedroom, consider installing a freestanding, statement tub here for a dash of hotel chic.
'Investing time and money into creating a wet room and properly tanking it can also be incredibly useful when it comes to busy family bath times,' says Paul Bailey, Senior Category Manager at GROHE UK.
The main drawback is the investment and upheaval a wet room project brings, mainly due to the fact that all wet room ideas require proper tanking.
'One other point worth noting is that wet rooms can get quite cold, because there’s no enclosure to keep the steam in,' adds Yousef Mansuri, head of design at C.P. Hart.
How small can a wet room be?
While wet rooms are not limited to incremental sizing, most bathroom designers would recommend that the showering section of a wet room measures a minimum 800 x 800mm.
When planning a shower design for a small bathroom, there are a few aspects which may determine the space required. Will pipework be exposed or concealed? Do you need to install a glass panel to prevent other areas of the room from getting wet?
Don’t forget that adequate ventilation must also be installed in line with building regulations to prevent mould and damp spots.
Get the right layout for a wet room
There's no denying that plumbing can limit the layout of a wet room. Basins, baths and showers only have to take away water but, if placed 12ft from an outside wall, the drainage will have to slope gently downwards for quite a long way, avoiding joists, which may not be running in a helpful direction. The sooner an architect or plumber raises a few floorboards, the sooner you’ll know your options.
'In a wet room, the shower area is flush with the floor level and the drain is fitted into the fully tiled floor. Originally wet rooms were completely open without any glass partition. However, a simple fixed glass panel creating a walk-in shower area is a much more practical choice and has become the most popular trend,' advises Rebecca Milnes, designer at CP Hart .
'Wet room systems are not limited to incremental sizing, like shower trays often are, so they are a great solution for awkward or tight spaces.
'In small rooms it is possible to turn the whole area into a walk-in shower. However, it is best to be mindful of the items in the bathroom that need to be kept dry, such as towels and toilet rolls.
'One of the first things to consider when planning a wet room is where to position the drain. Ideally the drain should be as far away from the bathroom door as possible, to minimise any risk of water escaping the room.
'If you have a wooden sub-floor, the way your joists run is crucial to where your drain can be positioned. You’ll also need to think about which way the gradient fall towards the waste will run, to avoid any tricky wedging effects.'
What's the difference between a wet room and a walk-in shower?
‘A true wet room is a fully waterproofed space without a fixed shower door or tray, and usually has an open tiled shower area,’ explains Nicholas Cunild, managing director of Matki.
A walk-in shower, on the other hand, is an area in a bathroom or shower room with a low-level shower tray and glass surrounds. While completely watertight, you may still wish to include a glass panel in a wet room to contain the water spray.
Is a wet room expensive?
There’s no doubt that a wet room is an investment. The tanking process to ensure the room is completely waterproof can be costly and takes time. All wet room ideas involve tiling the space from floor to ceiling carefully while ensuring proper drainage.
Concealing pipework can also be an investment, though this can often allow recessed shelving and storage to be created as an additional benefit.
You can find out how much it costs to install a wet room in our guide.
What kind of costs are involved in a wet room?
It is never cheap to re-do a bathroom. In a family bathroom with two basins, a WC, a bath and a shower, quality items will easily add up to £5,000.
Installation adds a further £3,000 or so and, with cabinets and storage, good quality mirrors, tiles and lighting, it generally adds up to between £10,000 and £15,000.
(Image credit: Future / Davide Lovatti)
The build-up of moisture and condensation is greater in a wet room than in a traditional bathroom. Fans operated by light switches alone often aren’t effective enough.
A good fan needs to be wired into the room (still coming on with the light switch) but with a separate cut-off switch, which is outside the room. Humidity-tracking extractor fans are best for wet rooms as they work continuously and incrementally, with automatic extraction for how much steam is in the room.
Pick the right wet room flooring
'When deciding which wet room system to go for, think about what your sub-floor is made of. There are systems for both solid and wooden floors. If you have a concrete floor, it can be quite invasive to channel in a waste and create the gradient fall required for drainage,' advises Rebecca Milnes of CP Hart.
'Forgoing a shower tray in favour of a wet room allows the floor tiles to run through to the shower area, which adds visual space to a room. However, not all surfaces are safe to use in a wet room setting and it is crucial to know what the slip rating of the material is. I’d recommend using a material with a structured, textured finish to give extra grip in wet areas. Mosaics are also a great choice for wet areas, as the grout lines between the tiles give appropriate grip.
'In cases where a step-up to the wet area is needed, the step should be at least 10cm high, as anything lower can be easily overlooked by those not familiar with the room and can become a trip hazard. Adding under-plinth lighting can highlight the step and add ambiance to the room.'
Tanking a wet room
'Tanking is essential in a wet room,' says Rebecca Milnes. 'This is a multi-step process which entails several layers of waterproofing to ensure an excellent seal – much like a swimming pool.
'The two main approaches for tanking a wet room are using a self-adhesive bitumen-based waterproof membrane, or applying a paint-on liquid wall membrane. It is always best to speak to your supplier about the best system for your project.'
Jennifer is the Digital Editor at Homes & Gardens. Having worked in the interiors industry for a number of years, spanning many publications, she now hones her digital prowess on the 'best interiors website' in the world. Multi-skilled, Jennifer has worked in PR and marketing, and the occasional dabble in the social media, commercial and e-commerce space. Over the years, she has written about every area of the home, from compiling design houses from some of the best interior designers in the world to sourcing celebrity homes, reviewing appliances and even the odd news story or two.
13 wet room ideas and tricks for a minimalist bathroom |
(Image credit: Darren Chung)
For many years, wet room ideas were a divisive choice for a bathroom renovation. While they were favored for the idea that they could make your space look bigger, and that they work well for small spaces, the major drawback was the idea that when you shower, the whole bathroom gets wet.
Originally, wet rooms were completely open without any glass partition, however, a simple fixed glass panel creating a walk-in shower area is a much more practical choice and the general trend for wet rooms has evolved to include some sort of shower screen.
Now, in terms of modern bathroom ideas, wet rooms are certainly up there with the most popular. While the process of installing a wet room might be more disruptive and expensive than a standard bathroom re-fit, by tanking the envelope of your bathroom, you can streamline your floor tile finishes and create level-access showers which are more practical.
All-in-all, this means a more minimalist, modern bathroom, but the design possibilities don't end there. From types of floor and wall finishes to screens and alternative bathroom layouts, take a look at our gallery of the very best in wet room ideas to inspire your space.
Wet room ideas
Wet rooms are ideal as small bathroom ideas or awkward spaces such as below sloping ceilings or in rooms with height restrictions. They’re a job best left to the professionals to ensure adequate drainage, tanking, and slip resistance. If you love the spacious look of a wet room, creating a wet room-style showering area is much easier thanks to the variety of off-the-shelf low-profile shower trays, recessed storage niches, and frameless glass shower screens and hinged doorways now on offer.
Bespoke trays and screens offer the option of creating a generously sized shower room – perhaps for two – where you can take advantage of the latest shower systems that transform washing into a wellbeing experience, with their wall-mounted body jets and rainfall showerheads incorporating steam, aromatherapy, and chromotherapy features.
(Image credit: Future)
There are some practicalities to consider as part of your wet room design too. One of the first things to consider when planning a wet room is where to position the drain. Ideally, the drain should be as far away from the bathroom door as possible, to minimize any risk of water escaping the room. If you have a wooden sub-floor, the way your joists run is crucial to where your drain can be positioned. A gentle slope or gradient in the main shower area will help ensure that water flows away easily into the waste.
In a wet room, the shower area is flush with the floor level and the drain is fitted into the fully tiled floor.
1. Use tadelakt for an on-trend wet room
(Image credit: Darren Chung)
Tadelakt, a traditional Moroccan polished plaster has become a bathroom trend for wet rooms thanks to its good looks and practical nature. 'Homeowners are creating design-led wet rooms without grout lines that can collect dirt and grime,' explains Ian Kozlowski, founder of Decor Tadelakt , 'but it's also an eco-friendly, unique wall covering, offering minimalist beauty and texture.'
Polished with olive soap for a waterproof finish, tadelakt can be used across all the walls in a wet room for a seamless finish, however, it's not really suitable for flooring, and should be combined with tiles or another bathroom flooring idea.
(Image credit: James Merrell)
When it comes to choosing bathroom tile ideas, mosaic tiles have a lot to offer. They are not only easy to apply, and can be worked well around a shower drain without awkward cuts and fussy detailing, but they can also be used to create bold designs like this two-tone stripe wet room, which runs into the shower area.
Mosaic tiles are also great underfoot, with extra grout lines creating a non-slip surface. However, be wary that all this extra grout isn't always a practical choice when it comes to keeping your wet room clean and looking its best.
3. Or choose large format tiles for a practical wet room
(Image credit: Anna Stathaki)
If you ask Roisin Lafferty, creative director of Kingston Lafferty Design , she'll warn you against using excesses of small tiles in wet rooms. 'I am an absolute lover of detailed and intricate tiling, however not for a wet room – where it’s a case of the less grout the better for longevity and cleanliness,' she says.
'Large-format marble is timeless and very practical, just make sure you have a slip rating if required. Large-format terrazzo or tiles give a similar streamlined effect. And for the highest-end finish, opt for a seamless full-height glass screen with minimal framing or fittings.'
When using large format tiles for a walk-in shower, you need to make sure you specify anti-slip tiles on the floor, especially for shower tile flooring ideas where there's the greatest chance of slipping on wet flooring.
4. Pick a folding shower screen for a small wet room
(Image credit: BC Designs )
Wet rooms have a great advantage in a small bathroom layout in that they don't require bulky shower trays or enclosures, meaning that it's possible to squeeze a shower into a tight corner, often next to a bath.
'When it comes to showers, a separate shower can often be considered a luxury if space is tight. However, there are a couple of clever ways around it including wet rooms and folding shower screens that take up much less room than a typical shower,' says Barrie Cutchie, design director at BC Designs.
In this small bathroom shower idea, a fixed screen would have made access to the shower and the bath difficult and cramped, while the folding shower screen still helps to keep water in one area of the wet room.
(Image credit: Drummonds)
Reeded glass isn't just a huge interior design trend, it's a no-brainer for a beautiful wet room. Not only does the texture of this glass add to a richer scheme, but it can also be used to create pockets of privacy in a wet room, whether it's being used by more than one person at once, or shielding a shower from the view of a window. There are plenty of shower screens on the market featuring reeded glass too, while enclosures using this type of glass are harder to come by.
Reeded glass is also a little more forgiving than standard glass when it comes to watermarks and limescale, making it a practical choice too.
6. Opt for a modern Crittall-style shower screen
(Image credit: Day True)
Just as steel-framed dividers and doors are much-loved elsewhere in our homes, Crittall-style shower screens are a popular choice for bathrooms and wet rooms for a luxe addition to the space.
In this design by Day True , the wet room also positions the shower underneath a large roof light, bathing the space with natural light while retaining its sense of privacy.
7. Or go for a minimalist shower screen
(Image credit: Brian O'Tuama Architects)
While you may be tempted by these feature shower screens, sometimes the best option for a wet room is the simplest. As you have the design possibility to use one tile for flooring throughout a wet room, and with no trays or enclosures to carve up the space, a minimalist shower screen, like this used in this project from Brian O'Tuama Architects , which highlights the seamless nature of the space.
Consider slimline frames and concealed fixings, as seen in this brass and marble bathroom idea, reducing visual noise for a picture-perfect wet room
(Image credit: Mandarin Stone)
The beauty of a wet room is that you don't have to have a screen at all if you don't want to. However, practically when using the space, and for those using it after you, it can help to consider where water will sit in the space. In an ideal world, you'll want water and spray to not reach areas like the basin, where you might want to later stand with dry feet.
'If you are embracing the full wet room look and omitting any sort of enclosure or screen, it is fundamental to think about your choice of sanitaryware, as it is likely that it will get wet from the spray of the shower or the condensation in the room,' says C.P. Hart 's Rebecca Milnes. 'Opt for ceramics that are flush to the wall and are ideally wall-mounted. A wall-hung toilet is a brilliant choice in a wet room, as there are no areas for water to pool and makes cleaning easier. '
'
(Image credit: Darren Chung)
As wet room ideas don't have to have fixed shower enclosure sizes, you can use this as an opportunity to install a double shower set-up. Do you need or will you use two showers in the same space? Only you can answer that, but for a luxury bathroom idea, they can't be beaten.
This bathroom design, which includes a BC Designs bathtub, incorporates a micro cement shower floor running throughout the wet room, adding an industrial contrast to the marble and luxury fittings used.
10. Create an enclosure for a partial wet room
(Image credit: Matthew Williams)
To get the best of both worlds of a wet room, it's possible to divide your bathroom into wet and dry zones. This is usually done by combining the bath and shower into a wet room set-up, separated by an enclosure, but properly tanked in the way a wet room should be.
This leaves your basin and WC out of the wet zone, making it easier to use these spaces after someone has showered without entering into a wet, humid space.
11. Create a broken-plan wet room
(Image credit: McCrum Studio)
This wet room set-up by interior designer Katie McCrum of McCrum Studio is another way you could look to divide up a bathroom for a more contained wet zone. This broken-plan enclosure means that the wall intersecting the bathroom could be used for this clever bathroom mirror idea, freeing up space in the bathroom, while the showers and bath sit beyond in a dedicated wet zone.
(Image credit: Anna Stathaki c/o BC Designs/C.P. Hart)
Wet rooms are well-loved for their walk-in shower designs, but how about a walk-through shower? In a design such as this, from C.P. Hart, a walk-through wet room set-up allows for an unusual freestanding bath idea, laid out with the tub in the center of the room, meaning the shower can be used from either side without disturbing the flow of the room.
While walk-through showers may take up extra space for both an entry and exit to the showering area, they have a luxurious feel about them that makes them well-suited to high-end bathrooms.
13. Try this clever idea to protect wet room windows
(Image credit: West One Bathrooms)
While this wet room from West One Bathrooms might be small, it's perfectly formed. Not only does this Crittall-style shower screen and hexagonal tile create a modern look, but the designers have come up with a clever way to be able to position the shower next to the window, without exposing it to water spray and excess moisture.
A hinged screen over the window not only protects it from the shower, but provides privacy when using the shower without sacrificing natural light. Plus, it can still be opened, like a traditional window treatment to enjoy the view.
What do you need to have a wet room?
To create a wet room, you'll need to create a watertight environment, for example by tanking both the floor and walls of the room to protect it from any leaks. Once a watertight membrane is laid, the room can then be tiled.
When deciding which wet room system to go for, think about what your sub-floor is made of. There are systems for both solid and wooden floors. If you have a concrete floor, it can be quite invasive to channel in a waste and create the gradient fall required for drainage.
Forgoing a shower tray in favor of a wet room allows the floor tiles to run through to the shower area, which adds visual space to a room. However, not all surfaces are safe to use in a wet room setting and it is crucial to know what the slip rating of the material is. C.P Hart's Rebecca Milnes recommends using a material with a structured, textured finish to give extra grip in wet areas.
Tanking is also essential in a wet room. This is a multi-step process that entails several layers of waterproofing to ensure an excellent seal – much like a swimming pool. The two main approaches for tanking a wet room are using a self-adhesive bitumen-based waterproof membrane or applying a paint-on liquid wall membrane. It is always best to speak to your supplier about the best system for your project.
Hugh is the Deputy Editor of Livingetc. com. From working on a number of home, design and property publications and websites, including Grand Designs, ICON and specialist kitchen and bathroom magazines, Hugh has developed a passion for modern architecture, impactful interiors and green homes. Whether moonlighting as an interior decorator for private clients or renovating the Victorian terrace in Essex where he lives (DIYing as much of the work as possible), you’ll find that Hugh has an overarching fondness for luxurious minimalism, abstract shapes and all things beige. He’s just finished a kitchen and garden renovation, and has eyes set on a bathroom makeover for 2022.
Waterproofing floors in bathrooms and sanitary facilities in new construction - Techinformator
The need for waterproofing floors
Floor waterproofing is the protection of ceilings, walls, interior decoration of the lower floors from the flow of water supply systems, sewage systems and simply inaccurate use of water in bathrooms and toilets.
According to clause 7.1 of SP 29.13330.2011 “Floors. Updated version of SNiP 2.03.13-88 " waterproofing against the ingress of sewage and other liquids should be provided only at medium and high intensity impact them on floors.
In the same place, in clause 4.4 , a gradation of the intensity of the impact of liquids on the floor is given.
Low intensity - low impact of liquids on the floor, in which the surface of the floor covering is dry or slightly damp; the floor covering is not impregnated with liquids; cleaning of premises with spilling water is not carried out.
Medium intensity - periodic wetting of the floor, in which the surface of the floor covering is damp or wet; the floor covering is impregnated with liquids; liquids on the floor surface flow periodically.
High intensity - constant or frequently repeated runoff of liquids on the floor surface.
In residential buildings, rooms with medium and high intensity of exposure to liquids on the floor include bathrooms and bathrooms (shower cabins). The floors in them require mandatory waterproofing.
Floor waterproofing with KTtron materials
The technical specialists of the CTtron Plant have developed a technology for the use of CTtron-7, CTtron-10 1K and CTtron-10 2K waterproofing coating materials for waterproofing floors in new construction. The choice of material is carried out depending on the crack resistance of the structure. With high crack resistance, it is possible to use the rigid “armoring” coating waterproofing “KTtron-7”. With the possible appearance of cracks during the operation of the structure (dynamic, seismic loads), elastic coating waterproofing materials should be used. The composition "KTtron-10 1K" covers cracks with an opening of up to 1 mm, and "KTtron-10 2K" up to 2 mm.
According to the proposed technology, waterproofing of bathrooms and bathrooms on concrete is carried out before the screed is installed.
The advantages of this method are:
-
Compliance with the requirements of the joint venture.
-
A significant increase in the quality indicators of waterproofing protection of premises with a potential risk of leakage.
-
The use of coating waterproofing "KTtron" fits into the standard construction technology and does not lead to an increase in the time of work.
-
All layers (concrete, KTtron coating waterproofing, screed) are cement-containing, which ensures a high degree of adhesion between layers and uniformity of the coating.
-
The absence of foreign (roofing material, polyethylene, PVC, etc.) materials with poor adhesion to cement-containing compounds eliminates the formation of voids between the screed and concrete, which enhances waterproofing.
-
Environmental friendliness.
-
Durability.
Application technology of coating compositions "KTtron"
-
The floor must be cleaned of dirt, dust, concrete influx.
 If necessary, repair concreting defects with repair materials "KTtron".
-
The surface must be moistened until completely saturated with moisture, but not wet.
-
The inner corners are filled with a repair compound in the form of a fillet (you can create a fillet shape by leveling the laid mortar with the bottom of the bottle), you must wait for the repair compound to fully rise (see Figure 1).
-
Prepare a coating waterproofing solution, observing the proportions and modes indicated on the bag, in the amount necessary for use within 30 minutes.
-
Cover the floor surface with a layer of coating waterproofing evenly, continuously with a thickness of 1.5 mm. Apply strictly in one direction. The material is applied with a brush with nylon bristles and a pile length of 50-100 mm.
-
If it is necessary to waterproof the wall, for example in the bathroom, raise the coating waterproofing to the ceiling.
 (In the absence of such a need, apply waterproofing to the wall to a height of 150-200 mm from the floor).
 -
To enhance the crack resistance of the coating waterproofing along the wall/floor junction, a fiberglass mesh with a 5x5 mm cell should be sunk into the applied first layer. Cut the fiberglass mesh in advance into strips 20-25 cm wide. (In the joints, lay the mesh with an overlap of 50-100 mm.).
-
After 3-4 hours, apply a second layer perpendicular to the first. The second layer can be applied with a spatula.
-
Work on the installation of a screed on top of the waterproofing coating should be carried out no earlier than 24 hours after laying the second layer. Mechanical damage to the waterproofing coating should be avoided.
1 - "KTtron-7", "KTtron-10 1K" or "KTtron-10 2K"; 2 - fillet with a radius of at least 50 mm
from the repair material "KTtron-3"; 3 - protective screed
Figure 1 - Waterproofing wall/floor junction.
Wall/floor waterproofing with elastic waterproofing tapes
Particular reliability of floor waterproofing will be provided by the use of elastic waterproofing tapes at the wall/floor junction: “KTtron-Hydrolente PWP”; "KTtron-Hydrolenta DSL"; "KTtron-Hydrolenta DSL-PERFOR".
The adhesive composition for "KTtron-Hydrotape" is coating elastic waterproofing mortars "KTtron-7", "KTtron-10 2K", "KTtron-10 1K".
After completion of the surface preparation work, a layer of waterproofing mortar should be applied with a brush or spatula to the adjacent joint surfaces. The application area should be a few centimeters larger than the width of the tape or cuff to be glued (see figure 2).
Before laying the waterproofing tape, external and internal corners, wall and floor cuffs are glued to the surface. The tape is cut to size and laid along the seam (joint, corner) in a freshly applied wet layer of waterproofing mortar. The waterproofing tape is laid in such a way that it completely covers the seam (joint). When laying on a corner, attention should be paid to the same coverage of adjacent surfaces. For the tightest fit to the surface, press the waterproofing tape, corners, cuffs into the applied mortar with a smooth spatula or roller. Complete removal of air bubbles should be achieved.
Joints of tapes, corner elements and cuffs should be laid with an overlap of 50 - 70 mm. The second layer of waterproofing mortar should be applied over the edge of the tape, covering it completely. The previous waterproofing layer must be cured but still damp. If necessary, waterproof the entire structure. Waterproofing solutions "KTtron-7", "KTtron-10 2K", "KTtron-10 1K" are applied to adjacent surfaces according to the instructions for use.
1 - "KTtron-7", "KTtron-10 1K" or "KTtron-10 2K"; 2 - "KTtron-Hydrolenta PWP",
"KTtron-Hydrolente DSL" or "KTtron-Hydrolente DSL-PERFOR"; 3 – fillet with radius
not less than 50 mm from the repair material "KTtron-3"; 4 - protective tie
Figure 2 - Waterproofing the wall/floor junction with waterproofing tapes
Optimization of the technological process in the production of works
Recommendations for decorators.
When entering the apartment, first of all, you should prepare the floors in the bathrooms and bathrooms. Two layers of coating waterproofing "KTtron" should be applied to the prepared floors. At the time when the applied material rises, work can be done in the rooms and the kitchen. 24 hours after applying the second layer, the finished waterproofing coating can be poured with a screed.
Thus, it is possible to achieve the necessary compliance with the technological process without disrupting production plans.
Floor covering for kindergartens. Types and requirements.
In this article we will talk with you about flooring:
-
What are the norms and requirements for floors in kindergarten?
-
What does SanPin say?
-
What flooring is used in kindergartens?
What are the standards and requirements for floors in kindergarten?
The floor covering in the kindergarten must be:
1. Even. And not just even, but perfectly even. To reduce traumatic situations.
2. Safe. The coating should not emit toxic substances and harm the health of children.
3. Flame retardant and moisture resistant.
4. Damage resistant. Children constantly drop something, so the coating must be durable.
5. Easy care. And of course, do not forget that the floor must be constantly washed. from paints, spilled liquids and more.
What does SanPin say?
According to SanPiN 2.4.1.3049-13 "Sanitary and epidemiological requirements for the arrangement, maintenance and organization of the working hours of preschool
educational organizations" (as amended on August 27, 2015):
V. Requirements for interior decoration of preschool educational premises organizations
5.5. Floor materials used can be wet treated with cleaning and disinfecting solutions.
Taking into account the climatic conditions, it is recommended that floors in group rooms located on the ground floor be insulated and (or) heated, with a controlled temperature regime.
i.e. It is necessary that the floors can be washed and wiped from dirt! This is a very important point!
It follows that the coating must be resistant to the use of chemicals (eg during quarantine). And this is chlorine-containing chemistry, etc., which can corrode the floor covering.
Types of floor coverings for kindergartens.
Floor covering can be divided into 2 main types:
1. Removable - a covering that can be replaced/removed. These are various kinds of rugs, paths, budo-mats, etc.
2. Non-removable - linoleum, carpet, budo-mats, flooded floors.
What flooring is used in kindergartens?
Fixed covers: Linoleum
This is an economical and simple solution. Linoleum can last over 10 years with proper care.
Easy to clean and allows you to do several wet cleanings per day.
Pros:
- inexpensively
- easy to care and maintenance
- it serves (with proper care)
- easily washed and lends itself to cleaning
Minuses:
9000 - WIN . If you purchased an inexpensive option, then it can smell a lot, especially in a small room.- not safe for wet cleaning. Water remains on linoleum and dries for a long time, increasing the risk of injury
- when cleaning with active chemicals, it can corrode and lose the pattern.
Look at newly laid linoleum and linoleum after about 3 years of operation:
Tip: If you decide to take linoleum, then it would be more correct to choose more expensive options for linoleum. Environmentally friendly and completely safe. They consist almost entirely of natural substances.
Yes, they require more care and maintenance and are not as durable.
But they do meet the environmental regulations exactly. And they won't fall apart so quickly.
Carpet
Carpet does not belong to natural materials, but modern technologies make it possible to create material that is not hazardous to the health of the child.
Pros:
- there are interactive carpet options that can serve as a play area for kids
- visually looks aesthetically pleasing and pleasant
- makes the floor soft
- inexpensive option
Cons:
- accumulates electricity, as it is made of synthetics;
- a lot of dust collects in carpeting, which is why it is unsafe for children, even if it is made from hypoallergenic materials carpet is also difficult to remove, so this material is very difficult to care for
Tip: If you decide to install carpet, it will need to be cleaned frequently (vacuuming, wet cleaning with a brush).
Cork floors
Pros:
- Eco-friendly. Made only from natural organic raw materials, safe for the human body
- Not allergenic. Cork products do not emit allergens, especially harmful to the health of the child.
- Thermal insulation. Cork is a heat insulator with a low thermal conductivity. The floor made of this material is comfortable for the child's feet, cool in summer and warm in winter.
- Security. Cork floors reduce the load on the spine and joints of children + they do not slip.
Cons:
- The floor can be easily damaged with a sharp object.
- Interlocking cork floor swells with prolonged exposure to moisture.
- Cost. First-class cork flooring is more expensive than carpet and linoleum, laminate and even parquet. The considerable cost of floor installation work will be added to the costs.
Budo mats (soft puzzle mats or soft tiles)  Expensive and high quality material. But he's worth it.
Pros:
- does not shrink
- does not smell
- does not crumble
- does not absorb liquid
- prevents the growth of fungi and bacteria.
Budo mats have a soft elastic surface, which is most suitable for active games in the nursery; ease of installation and ease of repair. If one of the modules is damaged, it will not be difficult to replace it; such a coating does not attract dust, is not afraid of water and temperature changes; ease of care; a huge assortment and the opportunity to create a unique design for a nursery, collecting real pictures from separate puzzles.
Cons:
- the only negative is the higher price...
In addition to the above options, of course, there are others, such as parquet flooring.
But they are rarely used in kindergartens and have low practicality (cork floor, parquet board) or high cost (self-leveling floor).