Planning a basement bathroom
Everything You Need to Know About Installing a Basement Bathroom
Unfinished basement space often goes unused for anything more than storage, and even finished basements often lack a bathroom, forcing guests and household members alike to climb up at least one flight of stairs when they need to use the facilities. Basement bathrooms are a great way to use the entire home efficiently. They appeal to homeowners that plan to continue living in the house and they are also attractive to prospective buyers, typically leading to an increase in the value of the home.
However, the process of installing a basement bathroom consists of several steps that must be handled by a professional in order for the bathroom to pass an inspection and satisfy building permits. The cost of materials and hiring professionals to complete the work often deters homeowners from pursuing this upgrade, but there are many steps that can be completed by an experienced DIYer to help reduce the overall cost. Take a look at this guide to everything you need to know about installing a basement bathroom before deciding whether this upgrade is right for your home.
Pros and Cons of Installing a Basement Bathroom
While installing a basement bathroom is a costly project that isn't DIY-friendly, homeowners will see an increase in the overall value of the home and increase in ROI. Additionally, the convenience of having a nearby bathroom typically outweighs the drawback of the space that the bathroom takes up. Also, a bathroom is one of the necessary additions for any rental space, so this project may be the first step towards being able to monetize your unused basement. Overall, adding a basement bathroom is a great idea for anyone with the time and budget.
Pros
Convenient location
Increase home value
Create rental space
Assess the Costs
One of the major drawbacks to installing a basement bathroom is the costs involved because, depending on whether you are installing a small half-bath or a lavish full-bath, you can expect to pay between $8,000 to $15,000 on average. While you can save about $500 to $1,000 if the home already has a rough-in drain system installed, which is becoming more common in newer homes, there are still significant plumbing, electrical, carpentry, and material costs associated with this project. Consider the following breakdown when deciding on the design for your basement bathroom.
| Labor, Parts, and Permits | Average Cost |
|---|---|
| Rough Plumbing | $1,000 to $10,000 |
| Electrical | $500 to $2,500 |
| Drywall and Framing | $1,000 to $3,000 |
| Tile Floor | $900 to $3,000 |
| Permit | $50 to $2,000 |
| Lighting Fixtures | $150 to $900 |
| Vanity | $500 to $4,000 |
| Faucets | $150 to $350 |
| Toilet | $200 to $600 |
| Towel Rack (Optional) | $20 to $100 |
| Bathtub (Optional) | $1,400 to $7,000 |
| Glass Shower Door (Optional) | $500 to $1,400 |
| Shower/Bath Liner (Optional) | $2,000 to $6,000 |
| Shower (Optional) | $2,000 to $8,500 |
Also, keep in mind that the hourly rates for plumbers, electricians, and carpenters vary depending on the location, experience level of the technician, and licensing level.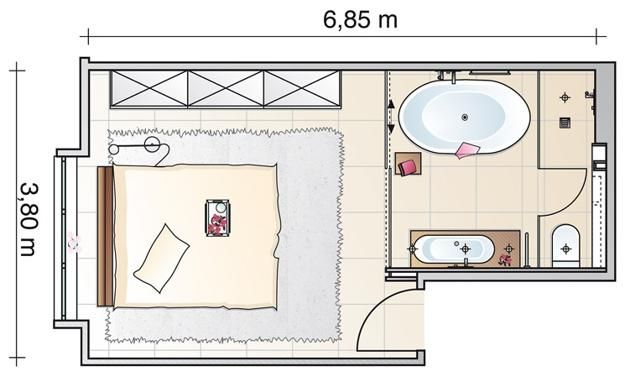 Choose professionals that are capable of meeting your expectations for the project, but that also have a rate that falls within your budget to avoid surprises when the basement bathroom is complete.
Cost to Finish a Basement: DIY vs Professional
Return on Investment
You may already have the budget to dedicate to installing a basement bathroom but are wary about your potential return on investment (ROI). However, this fear is usually unfounded. As long as the bathroom installation is completed according to local building codes with the authorization of a building permit, you can expect a great ROI. This means that when the home sells, you can expect the bathroom to increase the cost of the home by much more than the initial cost of the bathroom installation.
Adding a basement bathroom to a home that currently only has a single bathroom won't just increase the value of the home, but it will also make it much easier to sell the home because most prospective homebuyers are more interested in properties with two or more bathrooms.
Building Permit Requirements
When it comes to adding a basement bathroom, it's likely that you will need to have new water lines, drainage lines, and electrical connections installed. This means that you will need a building permit to ensure that the work is being completed according to code. If you choose to take on this project without obtaining the proper work permits, there is the chance that the local inspectors may stop by with a 'stop-work' order and shut your project down. They may also find it appropriate to fine you and prevent any further work until the appropriate permits are obtained.
To avoid dealing with fines and unnecessary paperwork, make sure to apply for a permit ahead of time so that your bathroom installation is approved. Typically, building permits for most renovation work ranges from about $50 to $2,000, but the cost is worth it to ensure that the work is done up to code.
Project Difficulty
The idea of putting in a bathroom can seem simple enough to an experienced DIYer, but many people overlook the complications of having to dig up the concrete foundation in order to run drainage lines at the appropriate angle for efficient waste disposal and to avoid clogs.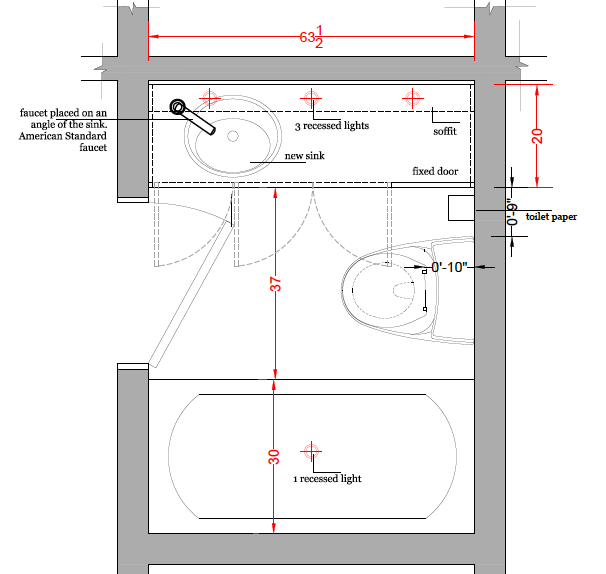 Running new wires to the bathroom may be within your skill set, but it's also necessary to ensure that the new circuits are connected properly to the main electrical panel, which is a task best left to a master electrician.
Overall, installing a basement bathroom is a project that is best handled by one or more licensed professionals. However, experienced DIYers may want to take on parts of the project to help reduce the overall costs. Some steps that are more DIY-friendly include installing the vanity, putting up drywall, installing the faucets, and even tiling the floors. Just make sure that every stage of the installation follows the appropriate building codes in order to avoid potential problems in the future, like a leaking foundation.
Basement Bathroom Installation Process
While many aspects of this job are not suited for DIYers, it's still important to understand each step of the installation process in order to ensure that you are on the same page with your contractors.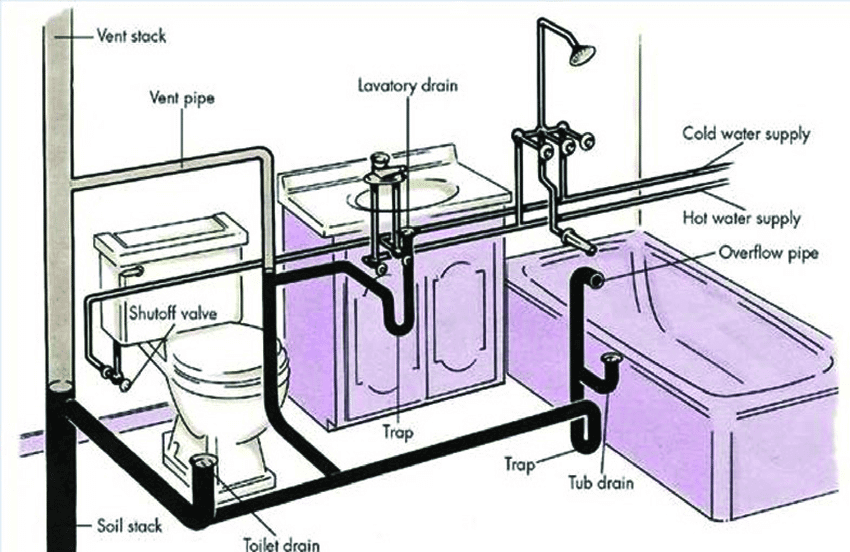 If you are unaware that the concrete floor needs to be broken to run drainage lines, then the sight of a handheld jackhammer might cause surprise and concern. So, instead of trying to navigate through several key design decisions without actually understanding the importance of each choice, take some time to familiarize yourself with this overview of the entire basement bathroom installation process, as well as the tasks that are DIY-friendly.
Design the Bathroom
Before you can start to do anything with your unused basement space, it's important to have a plan in mind for how you want the new basement bathroom to look. This means that you will need to consider whether you are installing a small half-bath with just a toilet and a sink, a three-quarter bath with a toilet, sink, and shower, or a full bath, including a toilet, sink, shower, and bathtub.
Beyond these initial concerns, you will also need to figure out how big you want the bathroom to be and the most appealing layout for the main fixtures in the room. Additionally, you need to decide on the specific faucet, sink, toilet, vanity, shower, bath, and lighting fixtures that you want to be installed. Also, don't forget to choose the tile type, tile color, and paint color to finish off the bathroom.
While not every detail needs to be decided before construction begins, it is important to at least have an idea of what you want, so that you can be sure to keep the design true to your ideal outcome.
Measure and Mark Wall Locations
Installing a basement bathroom begins with figuring out where to run the outer walls of the room. During the planning process, you should have decided on an estimated size or area for the basement bathroom. Use this information to measure and mark the exact locations for the outer walls of the bathroom. Just keep in mind that the concrete floor will still need to be broken up to run drain lines, so the walls will not be installed until after the drainage pipes are in place.
Measuring and marking the walls for the new bathroom is a step that can be handled by an experienced DIYer. However, if you have already hired a professional to complete the carpentry work, then they should measure and mark the wall locations as part of the wall rough-in process.
Position the Drains
With the wall locations clearly defined, you can mark the position of the shower and toilet drains. Typically, this plan is best discussed with the plumber that will be running the drain lines, so that you can come up with the ideal location with minimal drainage difficulties. Use a general measurement of the shower stall or bathtub to determine where the shower drain should be placed.
Position the toilet drain about 1 1/2 feet away from the wall. This should give you enough space for an appropriate fit, but if you are unsure about the layout of the bathroom based only on measurement, consider bringing the actual toilet into the space in order to see exactly how it would fit. This will help you make an informed decision and keep the project moving forward.
Break Up the Concrete
One of the main problems with installing a basement bathroom is that it often requires running long, horizontal drainage pipes that are prone to clogging.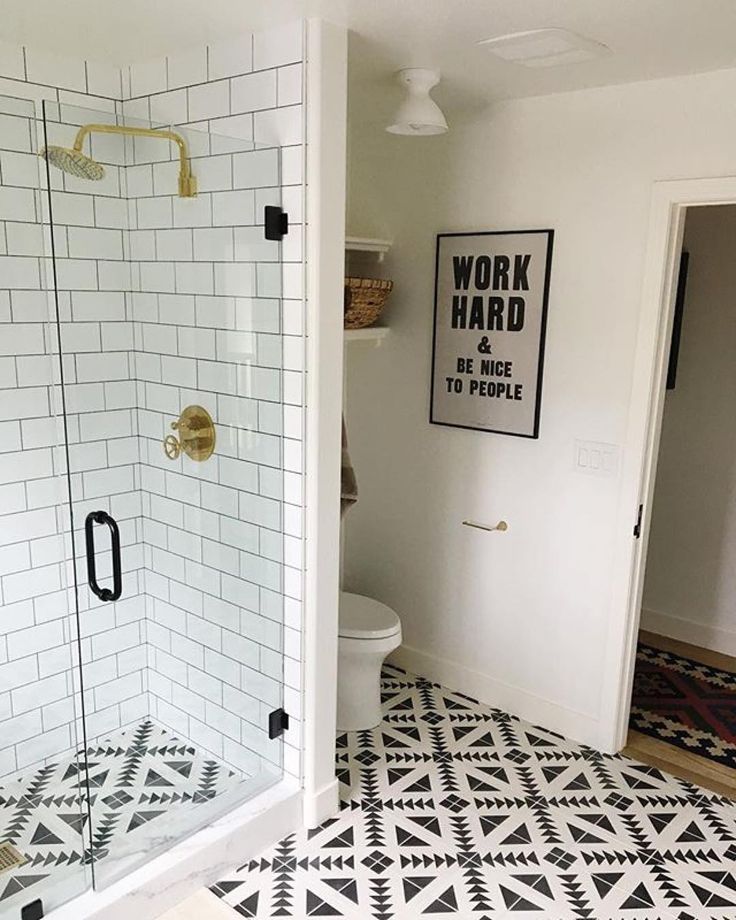 For this reason, it's important to have a professional plumber involved in planning the drain line layout, digging pipe trenches, and installing the drainage pipes.
During this step, the plumber will often use a jackhammer to break up parts of the concrete floor in the bathroom. The purpose is to create trenches where the drain pipes can be installed to connect the toilet and shower to the main drain line.
Install Floor Drain Lines
Once the trenches have been dug, the plumber can begin to install the drainage pipes from the main sewage line to the bathroom. The pipes will need to be measured, cut, and pieced together so that they fit comfortably in the trenches that the plumber has dug in the concrete. This step should always be handled by professionals to ensure that the plumbing is installed to code and will not have issues with drainage or leaks.
Rough-in Walls
The framework for the bathroom can be installed at this point so that it can be used to support the vertical drain pipes, ventilation pipes, and water supply pipes that will need to be run to complete the plumbing.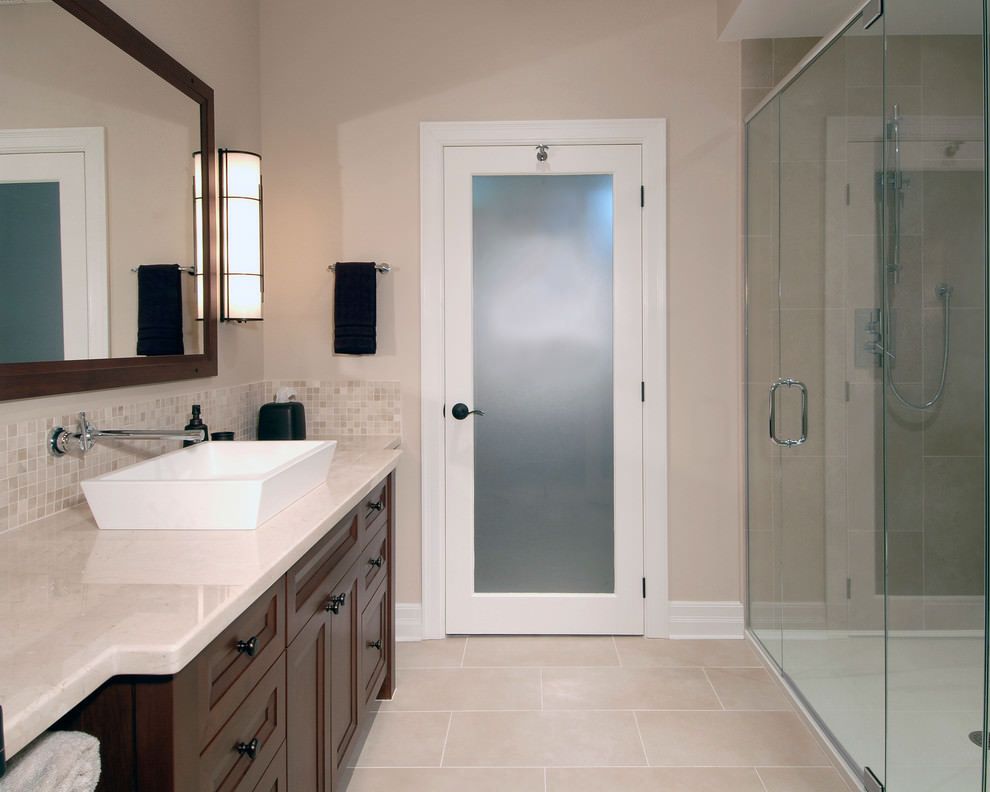 Experienced DIYers can typically handle this part of the project: Just make sure to accurately follow the previously measured and marked wall locations to avoid potential alignment problems during drywall installation.
Install Vertical Drain and Ventilation Pipes
The next step in the process is to have a plumber install the above-floor vent pipes, and branch drains for the sink, as well as connect these lines to the roof vent stack for proper ventilation. The reason these lines are installed after the framework for the room is so that the drain and ventilation pipes can be attached to the wooden studs for support. Without the proper support, too much stress on a single joint can crack the pipe, resulting in terrible odors, leaks, and extensive water damage hidden behind the walls.
Ventilation lines are often overlooked by inexperienced DIYers, but these pipes are necessary to prevent hazardous sewer gas from building up inside the home. Instead, the waste is directed down into the sewer lines via ejector pumps, while the gas is released from a vent on the roof of the home.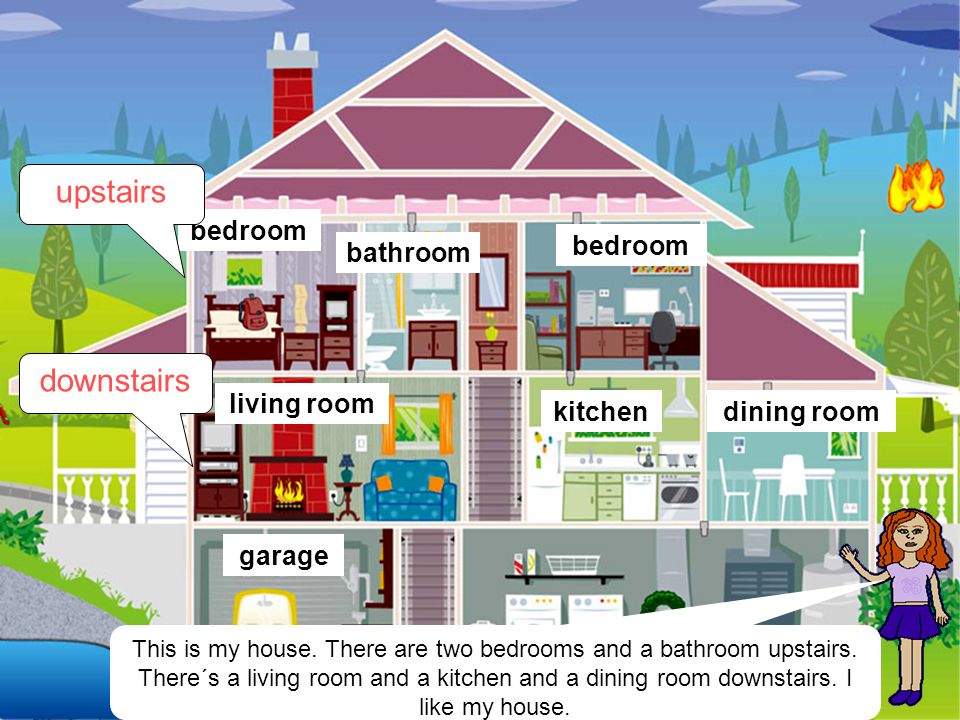
Run Water Supply Lines
Having a reliable professional plumber is necessary for a relatively low-stress basement bathroom installation because there are so many parts of the process that rely on experience, skill, and knowledge that isn't DIY-friendly. Running the hot and cold water lines to the toilet, sink, and shower/bath is another part of this installation that is best tackled by a professional plumber.
They will be able to assess the area and make a plan for efficiently running hot and cold water lines into the bathroom and to the various plumbing fixtures. Typically, the plumber will install copper water lines, though some plumbers will opt for the more affordable PEX pipe. If you have a certain material in mind, make sure you mention it to your plumber.
Install Electrical Wiring
After most of the plumbing work is done, you will want to find a licensed electrician to run new wires from the main electrical box to the bathroom. The purpose of these electrical wires is to provide power to lighting fixtures, power outlets, and baseboard heaters, if necessary.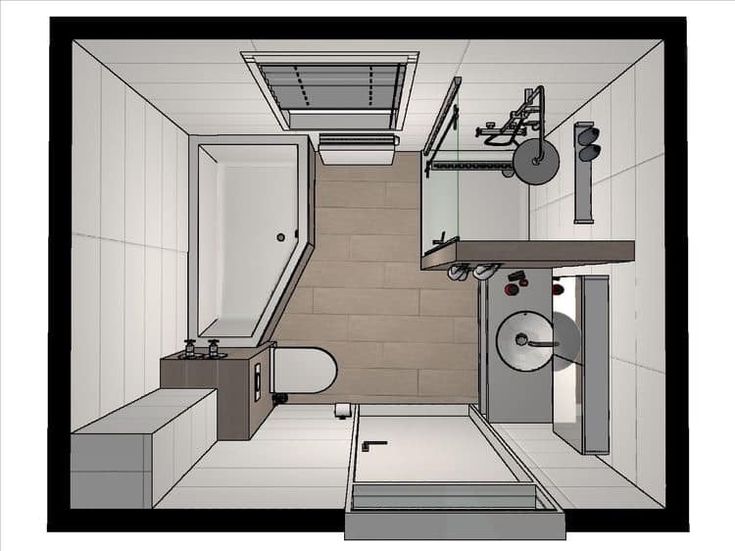 However, the actual fixtures will not be able to be installed until the drywall and ceiling are finished.
Basic wiring may be able to be handled by an experienced DIYer, but it's recommended to leave this part of the job to a licensed professional so that you can be certain that the bathroom will pass an inspection.
Lay Tile Floor and Put Up Drywall
It's a good idea to have an inspector come and take a look at the plumbing, electrical, and framework for the bathroom before covering it up with tiles and drywall. Once it has gotten the OK, you can pour new concrete to fill the trenches, then install the floor. If you aren't familiar with the process of installing a tile floor, then you may want to hire a carpenter to complete the work to get the desired result.
Most DIYers will be able to install a drywall ceiling and walls without too much difficulty. Just make sure to measure and cut holes for any water lines, drain pipes, or electrical fixtures that protrude from the wall.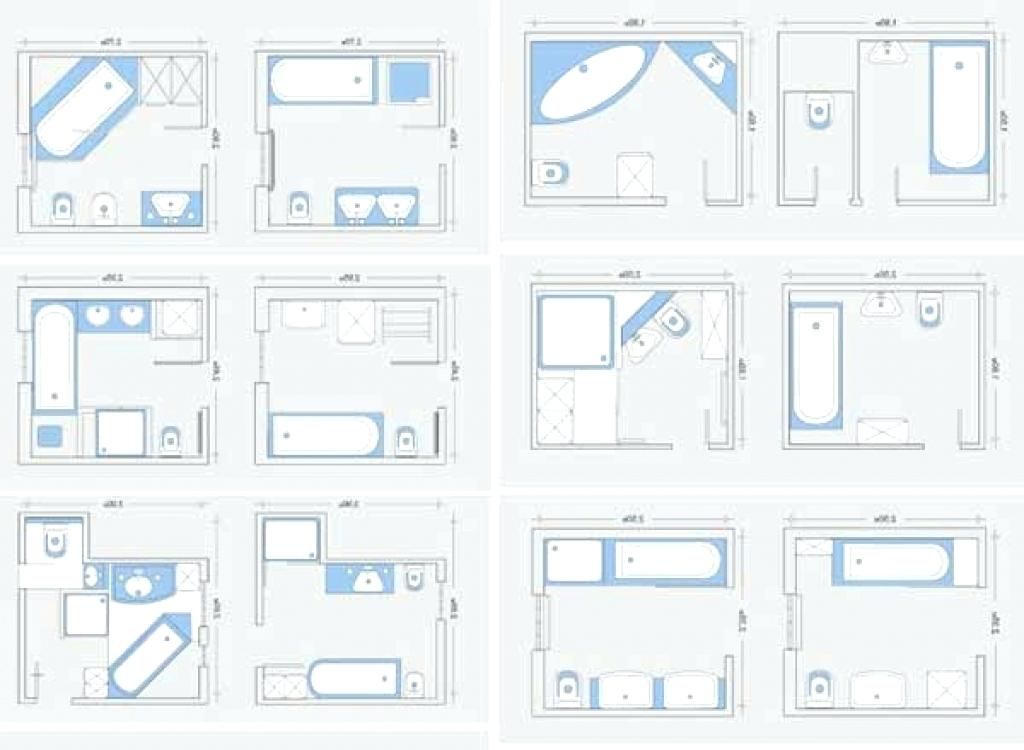 This also includes lighting fixtures that will be mounted on the wall.
Keep in mind that if you are installing a shower or bath, then you will need to install tiling on the walls inside the bath or shower stall to prevent water damage during regular use.
Install a Vanity, Toilet, and Other Fixtures
At this point, the vanity, toilet, and electrical fixtures can be installed. You may also want to install a shower or bathtub, depending on whether the plan is for a half-bath, three-quarter bath, or full bath. While modest finishing work, like putting in the toilet or installing a new faucet, can be handled by the average DIYer, it's recommended to hire a plumber to install a shower or a bathtub. Additionally, the installation of a basic sink and vanity are well within the skills of an experienced DIYer, but this task can also be handled by a hired carpenter if you would prefer to leave it to a professional.
The electrical fixtures should be relatively straightforward to wire and mount if the main wiring has been run correctly, but if you don't have experience working with electrical systems or don't feel comfortable wiring up these fixtures, it's best to have an electrician make the final connections.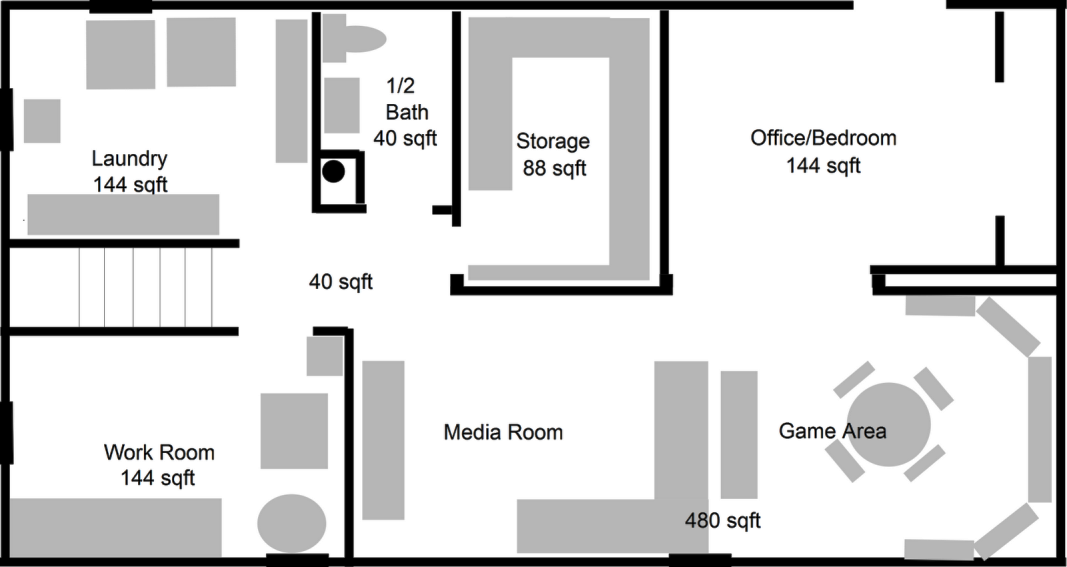
Add Trim and Paint
The last step in completing this basement renovation project is installing the trim and painting the walls. Trim can be tricky for newer DIYers, but experienced individuals will have no problem making angled cuts to slot the pieces of trim in perfectly around the borders of the room. Choose a color of paint that will match or highlight the plumbing and lighting fixtures that you have selected for the bathroom. Make sure that the type of paint is made for use in bathrooms, kitchens, and high-humidity locations to help protect the drywall and prevent water damage.
7 Things to Consider When Planning a Basement Bathroom
Most–if not all–basement remodeling projects include the addition of a bathroom. Even if your remodel plans are only modest, a small bathroom or half bathroom would be welcomed by guests and family members alike.
Finishing a basement requires consideration of many important details, especially when a new bathroom will be part of the added living space.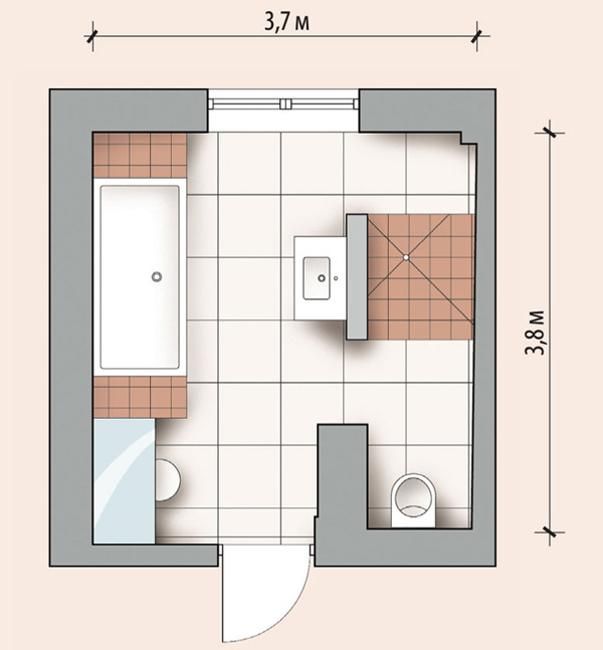
1. Type of Bathroom
A full or three-quarter bathroom should be considered a necessity if you plan to use your basement as a guest room, family bedroom, or living suite. A full-sized installation requires approximately 60 square feet of floor space, while a half-bath or small bathroom will come in at about 30 square feet.
The latter would be ideal if you plan to create basement rec room or entertainment center without sleeping facilities.
2. Plumbing and Electrical
When finishing a basement, efficient use of space proves critical, which implies that the bathroom be located as close to existing plumbing and electrical lines as possible. Directly below an existing upstairs bathroom is ideal, that will keep costs down and make things easier on your contractors.
Ventilation considerations cannot be overlooked, so regardless of where you choose to locate the bathroom it must be close enough to an exterior wall to allow for outdoor venting.
Before embarking upon a basement remodel project, check with local building authorities to find out more about zoning ordinances and deed restrictions.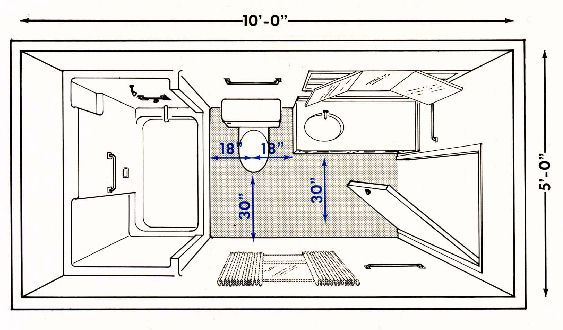 This is especially important if you plan to add a bathroom.
3. Bathroom Design
Do you want:
- A bathtub, shower, neither or both?
- A full-sized shower with tile walls, or a prefabricated shower stall?
- A pedestal sink, or a vanity with sink, countertop, mirror, drawers and cabinets?
- A regular flush toilet, or a specialized toilet to ease concerns about drainage?
- Possibilities here include:
- A pressure-assisted toilet.
- An up-flush toilet.
- A sewage-ejector system.
- A composting toilet.
- Possibilities here include:
Economic considerations, availability of space, and frequency of use will guide choices in these areas.
4. Flooring
Flooring options abound for a finished basement, but there are two types of flooring that should be avoided for use in a bathroom: solid hardwood, and laminate with a fiberboard core. Both are highly vulnerable to warping and buckling in the presence of excessive moisture.
5. Lighting
Recessed ceiling fixtures are ideal for showers, tubs, and directly over toilets. On vanities vertical fixtures mounted on each side of the mirror offer a higher quality of illumination, and track lighting is always a solid choice as well. Brightness of bathroom lighting is an individual choice, and adding a dimmer is always an option if different users have varying preferences.
If you prefer a remodel with style and luxury in mind consider installing a bathroom chandelier, which is both elegant and practical–always a winning combination.
6. Fixtures
Bath fixtures range from sink, toilet, and faucets to tub, shower heads, vanity, towel racks and shelves, depending on the scope of the project. Naturally, you should pay some attention to color and style coordination, and if anyone in the family has mobility issues or other disabilities choose options that are safe and user-friendly.
You may either splurge or choose a spartan approach, depending on your functional and aesthetic requirements. Your contractor and design team may have suggestions, and check out these sources for inspiration right here.
7. Storage Space
A linen closet offers convenient storage of paper products, towels, washcloths, clothes and so on, and could make a sensible addition if the basement bathroom will be used daily (and nightly).
Including a linen closet would make the bathroom project larger. But many people (including you?) prefer to go all out when finishing a basement, to make the final result as attractive and luxurious as possible.
Finished Basements & More is the premier home and basement remodeling company in the Denver metro area and northern Colorado. Together, we can create the finished basement of your dreams. Contact us for advice and to arrange a free estimate today.
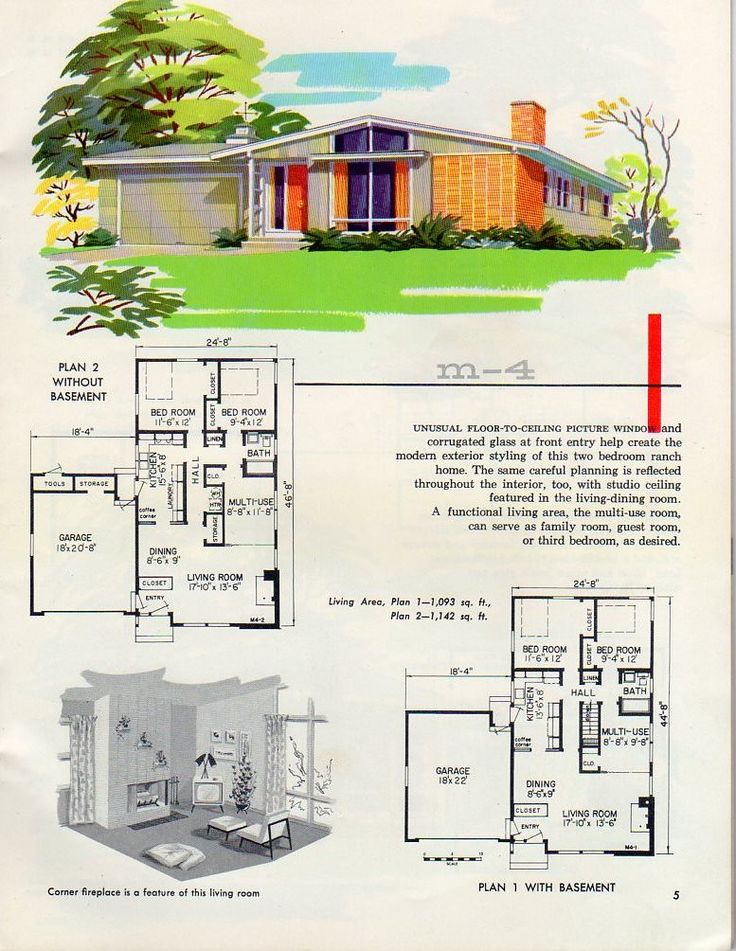
Layout of a house with a basement and a gym
An example of a layout of a house with a gym in the basement. An office and two bedrooms on the second floor.
If you have already purchased or want to purchase a plot of land on which you plan to build a residential building, but have not yet decided which one, then the project and layout of the house with a basement floor can be very useful to you as one of the options for building a future cottage.
Project of a two-story brick house with a basement
Return to the table of contents
Material Content
- 1 Advantages of the basement
- 2 Layout of the house with a basement and a canopy
- 2.1 Planning of the space
- 2.2 Additional information
- 3 project of the house with a garage in the basement
- 3.1 Layout of a high-tech house
- 3.2 Garage in the basement: advantages and disadvantages
- 3.3 General part
- 4.1 Bath complex in the basement
- 4.2 Advantages of such a plan
. Such measures can be successfully applied to place a bath, sauna, bathroom, gym, garage, billiard room, wine cellar, workshop. However, there is also a place for utility rooms, for example, a boiler room, a laundry room, or a pantry. In this regard, your fantasies are absolutely unlimited.
 nine0013
 layout of the basement floor with a gym
However, it is worth knowing about the requirements that apply to the construction of such a floor. These include:
- The presence of a compact pumping station, since the level of water drainage will coincide with the level of the floor in the basement.
- When locating fire-hazardous premises in this place, for example, baths, saunas, a workshop, you will have to deal with equipping the floor with systems that remove smoke and extinguish a fire.
 Be sure to have an emergency exit. nine0013
 - The minimum basement height is 2.1 m.
- Even if you only have technical rooms in this place, it is advisable to place several windows around the perimeter. This is most likely due not to technical requirements, but to psychological ones.
Back to the Table of Contents
Layout of a house with a basement and a shed
So, this plan includes the location of almost all utility-type rooms on the basement. These are a laundry room (14.0 sq. m.), a technical room (5.8 sq. m.), a hall (4.4 sq. m.), and a bathroom (2.5 sq. m.). The boiler room and workshop are a single room, separated by a stone partition almost to the end of the wall. nine0004
The laundry room has special drains. This precaution is very necessary, since high humidity is undesirable in such a place. This can have a detrimental effect on the structure of the entire building, for example, cracks will appear on the walls, finishing material may lag behind the surface, etc.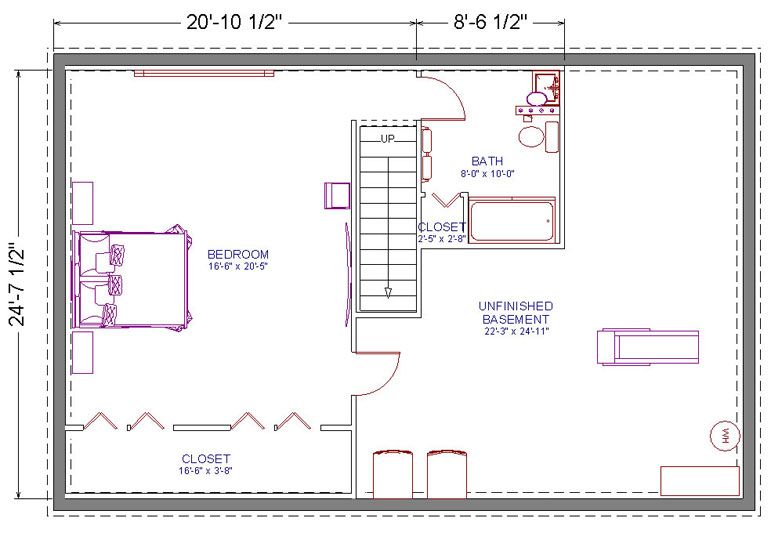 hall,
hall,
And the last room is the gym in the basement. This is the only place that is not economic, but rather entertaining. Under it allotted 16.1 square meters. m. this is quite enough to accommodate several simulators, wall bars and a shower room. The lighting in the gym should be bright so that the eyes do not get tired quickly.
Space planning
As soon as the tenant climbs the stairs, he will enter the hall (7 sq.m.) on the first floor. From it, through an opening in the wall, you can get into the hallway (6.7 sq. M.). From the living room and from the hall you can go to the kitchen, the area of which is 19.6 sq. m. On the ground floor there is also a shared bathroom and a vestibule (2.9 sq. m.). The guest bedroom on the ground floor is 33.6 sq. m., designed for temporary residence of two people.
plan of the 1st floor of the house
The second floor of the house has a standard layout, only from the hall you can get into each of the five rooms.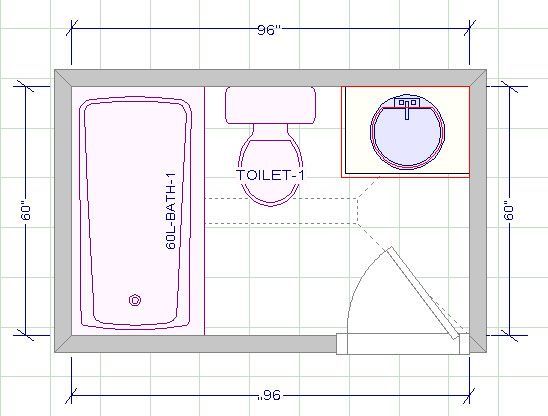 So, the first is an office on the second floor. It is located at some distance from the rest of the rooms so that extraneous sounds and noise are not heard. From the office you can go to a long balcony overlooking the site. nine0004
The two bedrooms on the second floor are 13.9 sq. m. and 14.0 sq. m., these rooms are located nearby. The third room can be arranged as planned by the owners, it is advisable to arrange a nursery or a library there. The size of this room is 15 sq. m., it has a small feature - the bearing wall, which overlooks the backyard, is a huge window. This allows in the daytime not to use any additional artificial light sources at all. nine0004
And the last room is the bathroom (7.8 sqm). This room will be enough to accommodate not only the bath, but also the shower, sink and other plumbing equipment.
layout of the 2nd floor of the house
Additional information
The layout of the house with a basement provides for a family of six people to live all year round.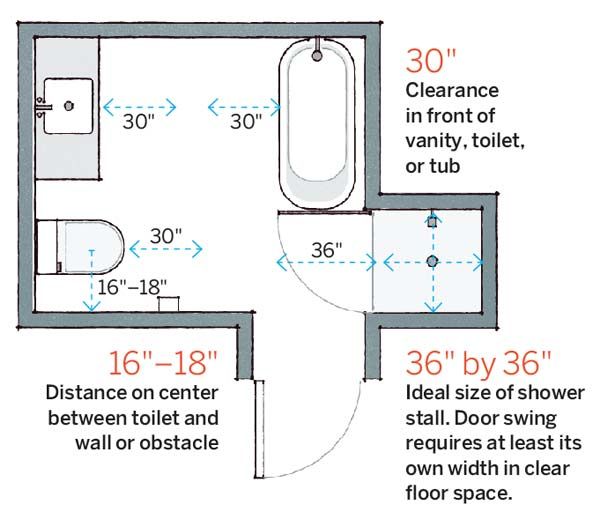 Total area - 251.8 sq. m. Of which the living area is 106.33 sq. m. m.
Characteristics:
- Construction: ceramic. nine0013
- Exterior wall material: hollow brick.
- Floor material: reinforced concrete, monolith.
- Roof construction material: wood, crossbar.
- Stairs: reinforced concrete.
- Foundation: reinforced concrete tape.
- Roof finishing material: ceramic tiles.
- Facade finishing material: thin-layer plaster.
- Basement finishing material: facing brick.
To build such a structure, the plot (at least) must have the following dimensions: 10.2 x 12.3 m.
construction of country houses. A large number of advantages, coupled with the requirements, will ultimately provide a large free space that can be arranged as you wish.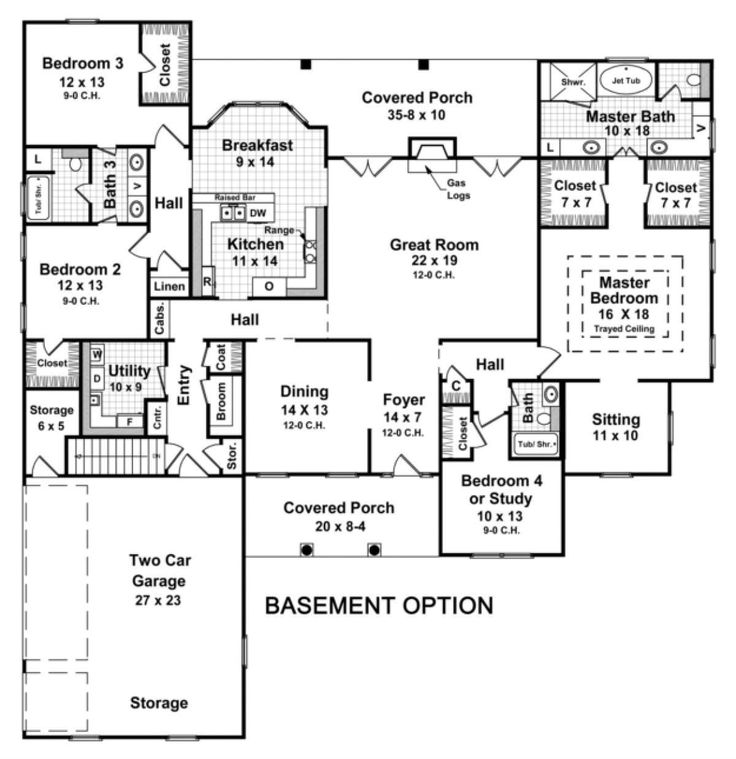 There are enough rooms for technical rooms, and for the implementation of any design idea. nine0004
Back to the top
Project of a house with a garage in the basement
For a modern house, the main thing now is to be compact, but at the same time convenient and comfortable, and, of course, to have some kind of zest. The garage in the basement of the house is just such a feature that can change the perception of the entire building as a whole. Such a building is suitable for a family of no more than 7 people, all year round.
Project of a modern cottage with a garage and a high-tech basement
This layout of the house with a basement and a garage provides for traditional architecture. Spacious and bright rooms will prevail. One of the main advantages will also be a complex consisting of a bathhouse, a sauna and a relaxation room. The owners of the house will be pleased with the presence of a guest room and an office for work.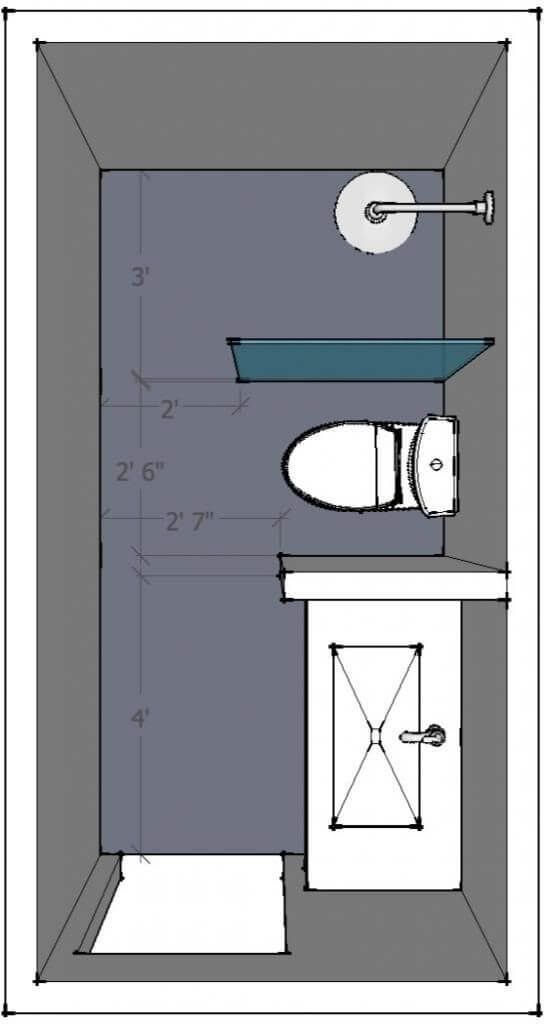
The layout of the house, built in high-tech style
So, as soon as the tenant enters the house, he enters the hall, the size of which is 9.5 square meters. m. The entrance is through double doors, which are equipped with safety chambers. Next comes the living room, its area is 39.5 sq. m., this space can also be used to good use. For example, to embody a design idea or install a sofa for relaxation.
In order to isolate extraneous sounds and noise that can be heard from rooms located nearby, the door and walls are upholstered with insulation. It is able to isolate not only sound, but also heat. It is for this reason that comfort will reign in such a house.
ground floor plan with garage
The kitchen-dining room (12 sqm) is accessed through the hall. It provides for the presence of a zone for eating food, as well as a zone for its preparation. Between themselves, they will be separated by a folding partition in style and design that matches the surrounding interior. The first floor also implies the presence of a shared bathroom, the area of which is 3.5 square meters. m.
modern hi-tech house layout with semi-circular terrace
From the ground floor, stairs lead to the upper or lower floors. The ground floor includes a hall with an area of 4 sq. m. From it you can go to two storage rooms with a size of 12 square meters. m. each, into the boiler room (12 sq. m.). From the hall you can get to the garage (27.0 sq.m.), and from it to another technical room. There is also a bath complex, which is very convenient for small areas where it is almost impossible to place a separate bath. nine0004
plan of the second floor of the house with a large balcony
It is worth noting that before making a decision on the construction of a bath complex, it is necessary to take care of heating. As a rule, a modern boiler room requires a lot of free space. In order for autonomous heating of the house to be really effective, one cannot do without such components as:
- boiler;
- electric pump to draw water from the well;
- expansion tank to never run out of water; nine0013
- boiler, so that the heating system works clearly and smoothly even on solid fuels.
Garage in the basement: advantages and disadvantages
Another feature of the project is that the basement is equipped with an attached garage. Its area is 27.0 sq. m. It will be possible to get into it exclusively from the street, along a ladder specially built for this purpose. Quite often there are similar projects involving the construction of a garage in the basement.
Previously, such an extension was found to be inexpedient, since car smells constantly penetrated into the house, thereby creating a certain discomfort. However, this layout of the house with a basement and a garage in it includes a serious and well-thought-out ventilation system, so absolutely no extraneous “incense” can enter the living quarters. nine0003 Another reason why a garage is often abandoned in such a place is the fact that it is necessary to overcome a large angle of inclination to get into the garage. In summer it is not scary, but in winter it can turn into a big danger.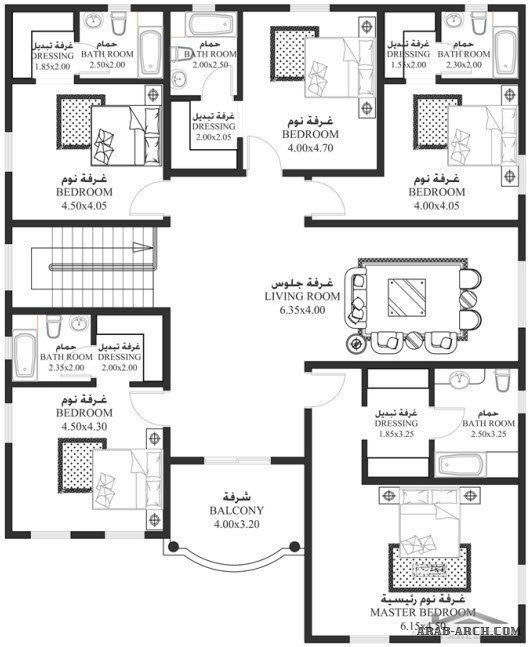 However, this issue was also resolved. To do this, you need to use a special ladder, equipped with small protrusions from the edges.
The machine is thus completely safe from tilting. With the use of a boiler room (for a bath complex), it is possible to provide an inlet line with a heating device. Then, even in the cold season, ice will not form in this place, snow will not accumulate, which means that movement will be safe. nine0004
Garage in the basement
The second floor was built without any special features or "highlights". Everything is as simple and comfortable as possible: two bedrooms with a size of 21 sq. m., 12 sq. m. There is an office (32 sq. m.), as well as a bathroom with an area of 6.1 sq. m. m adjoining one of the bedrooms. From the office and bedroom you can get to the balcony. The entire space of the second floor should be bright and light, as if filled with air.
If the first two floors are intended for active activity, for daytime pastime, then when you go up, you get a feeling of calmness and silence.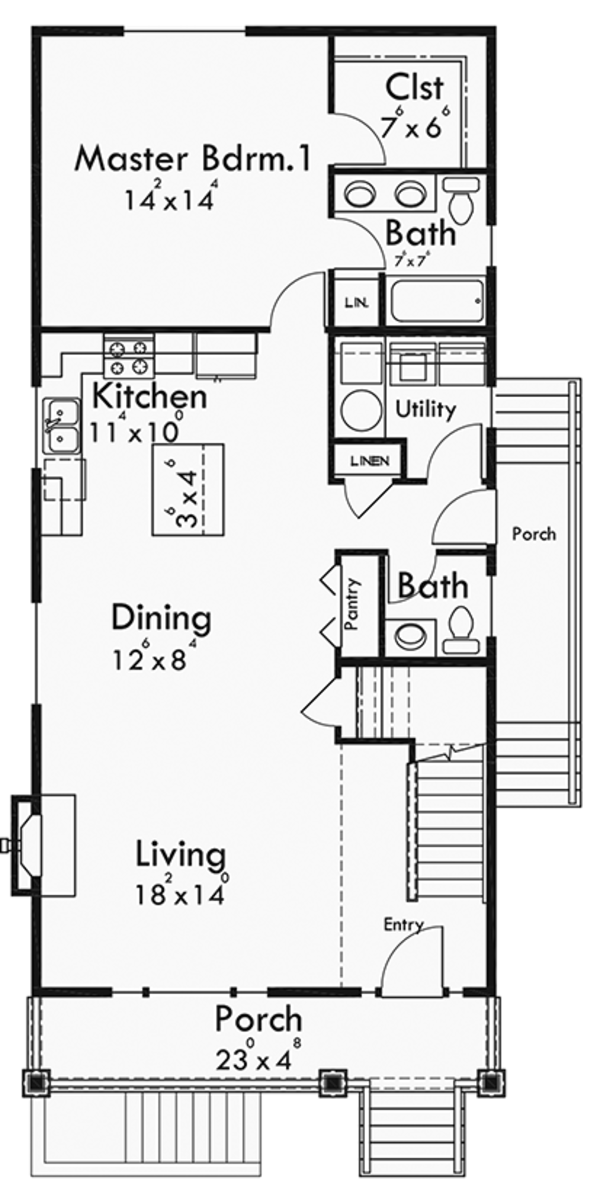 It is this atmosphere that allows each family member to relax and unwind after a busy and hard day at work. nine0004
General part
Construction of the building will be made of insulated bricks. The foundation of the flood type goes along a monolithic slab. Insulated bricks are also used as a material for external walls, and reinforced concrete slabs are used for ceilings. Roof made of wooden rafters. The roof is ventilated, made of tiles. For the facade, plaster based on mineral substances and insulation is used.
This layout of the house is very comfortable and functional. Such a house is suitable for a large number of people and each of them will find a place and something to do. Unusually in the layout, even a clear separation of boundaries. The first floors are working, and the second is exclusively for recreation. The garage in the basement and several bathrooms are all trifles, but it is precisely because of them that the general sociability of the entire structure is formed. nine0004
Back to the top
A house with a basement for a large family
A house that will suit almost every modern person. It consists of two floors, suitable for a family of four all year round.
The entrance to the house begins under a small canopy. This is necessary so that on a hot day you can hide from the scorching rays of the sun. Further stairs and entrance to the house. From the very beginning, the tenant enters the entrance hall, whose area is 2.3 square meters. m. This is enough to accommodate a small closet or just a shoe rack. nine0004
From the entrance hall, a door leads to the hall, which measures 5.8 square meters. m. From it you can get into a small bathroom (3.3 sq. m.), and a shared bathroom (1.5 sq. m.), which is located opposite the bathroom.
layout of the 1st floor of the house
From the hall you can go to the kitchen (12.4 sq.m.) and living room (14 sq.m.). Here is hidden the first feature of the entire internal layout of the house.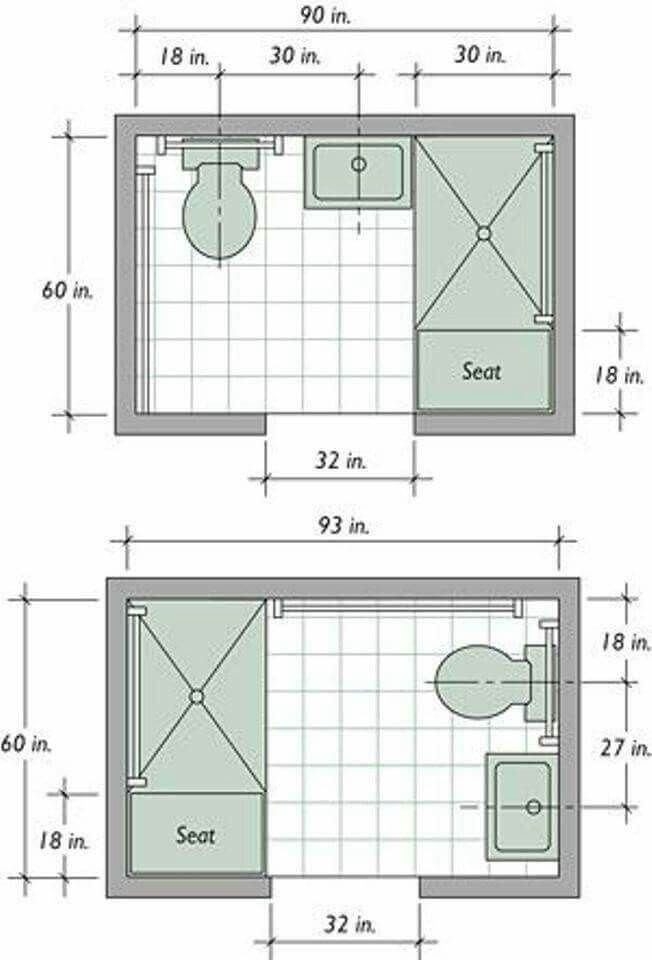 The passage will be in the form of an arch (its appearance can be chosen in accordance with the surrounding interior). nine0004
The second feature is that the living room and kitchen are a single space, which will be divided by a large two-sided wardrobe. The kitchen will have all the necessary elements for cooking, as well as its use. The living room, like any other, has items for an interesting and exciting pastime (set-top boxes, computer, TV). In the living room on one of the main load-bearing walls there is a huge window in the entire height of a person. This will make the lighting in the daytime much better. nine0004
In addition, the first floor includes two bedrooms. They are for the residence of family members, their size, respectively, is 15.6 square meters. m., 16.3 sq. m. A terrace is attached to the house, on which it will be possible to arrange a recreation area, place a deck chair there and put a table. Its size is 1.7 square meters. m., and access to it can be done from the street or from the kitchen.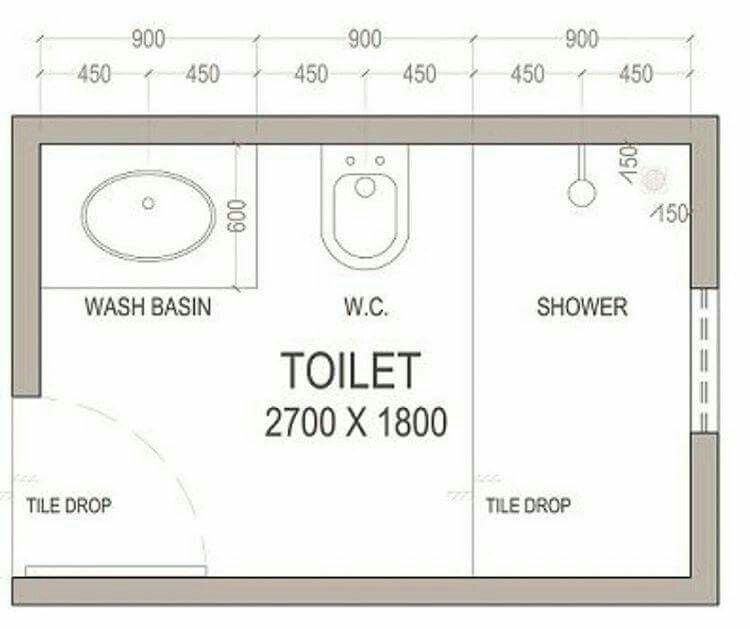
Bath complex in the basement
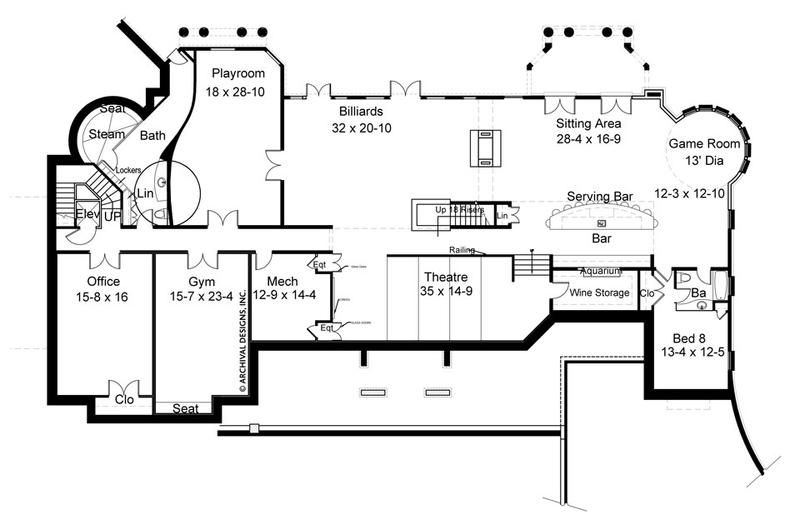
Before going to the basement, you need to pay attention to the stairs to the basement. Unlike standard layouts, it is of a screw type. This is necessary in order to save space and complement the interior of maximalism. This staircase looks beautiful and unusual. After descending along it, the tenant enters the hall (12 sq. m.), from which you can go to the room (14.4 sq. m.), the owners will be able to equip it at will. It is recommended to place a library or workshop in this place. nine0004
Next comes the billiard room (26.8 sqm). This large space is reserved for a small refrigerator, one table and several sofas. In this place and the previous room, it is recommended to create the most favorable lighting. You should not choose white or yellow for this, as the eyes can quickly get tired from multi-colored lighting.
plan of the basement floor of the house with a sauna
From the hall you can go to the dressing room (6.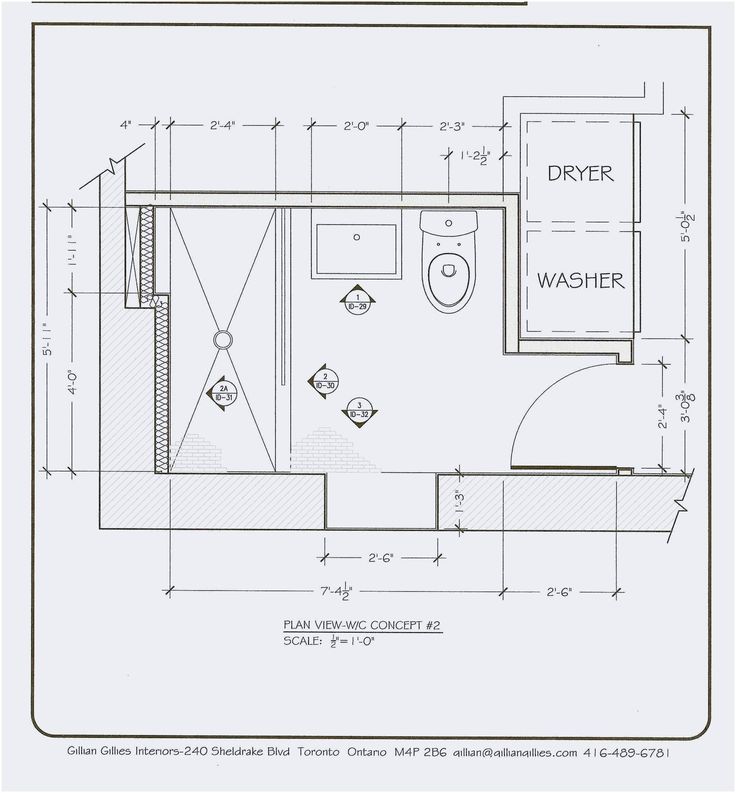 5 sq. m.), from which there is access to a shared bathroom (1.7 sq. m.). Further from the locker room there is a passage to the washing room (4.1 sq. m.), from there to the sauna (4.1 sq. m.). Such a complex will not require bright lighting, most likely, on the contrary, a little dim. For complete comfort, it is necessary to carry out not only work to improve the ventilation system, but also take care of heating, as well as water supply. nine0004
And the last room on this floor is the boiler room (7.9 sq.m.). This space is used to install heating boilers, gas water heaters, etc.
Benefits of this plan
The presence of a sauna in the basement provides certain advantages. One of them is that you do not need to go anywhere, everything is in your own home. Another - next to the sauna, you can place a room in which engineering systems will be located. And the last - you can do the construction of not only a sauna, but also a shower room and a rest room. Be sure to take into account that competent waterproofing must be present.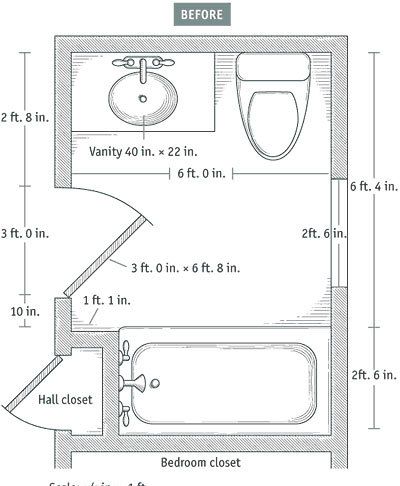 nine0004
House with a basement - convenient and comfortable
Another plus is the presence of a boiler room. It will contain not only boilers, but also engineering systems. In the case of this plan, all space is distributed reasonably and economically. For this reason, it is possible to avoid heating costs, since the heat emitted by pipes and boilers is quite sufficient.
Other pluses depend directly on the presence of a basement floor, and they can be listed by points:
- Saving space. nine0013
- No building load.
- Comfort and convenience.
- The ground floor is the highlight of the building.
- It can be arranged according to one's own desire, regardless of the style of the whole house.
Subsequently, you will not regret that you decided to build a basement, since the area of one floor does not always allow you to place so many rooms that are actually necessary for the normal life of several people, and the construction of the second floor will cost more, than a plinth. nine0004
Planning of bathrooms and toilets
We can congratulate you - you have a reason to be happy! Since you are the owner (in the project) of a cottage, you have the ability and opportunity to create for yourself such a bathroom and a bathroom in which you could be alone with yourself for a long time and think about the eternal. Among other things, residents of private houses are spared from the morning "traffic jams" on the way to the bathroom in order to brush their teeth!
Let's see what needs to be done to create a bathroom that could even be lived in! nine0004
Introduction
To avoid confusion, first let's define terms.
In this article, under the term "bathroom", we will understand the restroom, which has at least a toilet bowl and a washbasin. In some cases, if the area allows, then in addition to the standard set, there is a urinal and a bidet. The bathroom must have at least a bathtub (Jacuzzi) and possibly a shower. We will also talk about combined bathrooms - rooms in which there is plumbing for a bathroom and a bathroom. Combined bathrooms are designed, as a rule, on the one hand, to save space, and on the other hand, for the convenience of residents. nine0004
Modern bathroom
Before you start designing rooms like this, you need to know what dimensions they should have.
Normative dimensions of bathrooms and toilets
Ukrainian building codes (DBN V.2.2-15-2005 "Residential buildings") establish the minimum dimensions of the area of bathrooms. However, it is better to discuss the optimal dimensions for such premises when designing a private house with an architect who, taking into account your priorities, will help you properly manage the area: advise on what you can save on and where you should not do it. nine0004
Minimum dimensions of bathrooms and lavatories according to the standards:
• combined bathroom (equipped with a bathtub, washbasin, toilet bowl, place for a washing machine) - 3.8 m2;
Bathroom plan with minimum dimensions
• bathroom (with bathtub, washbasin, place for washing machine) — 3. 3 m2;
3 m2;
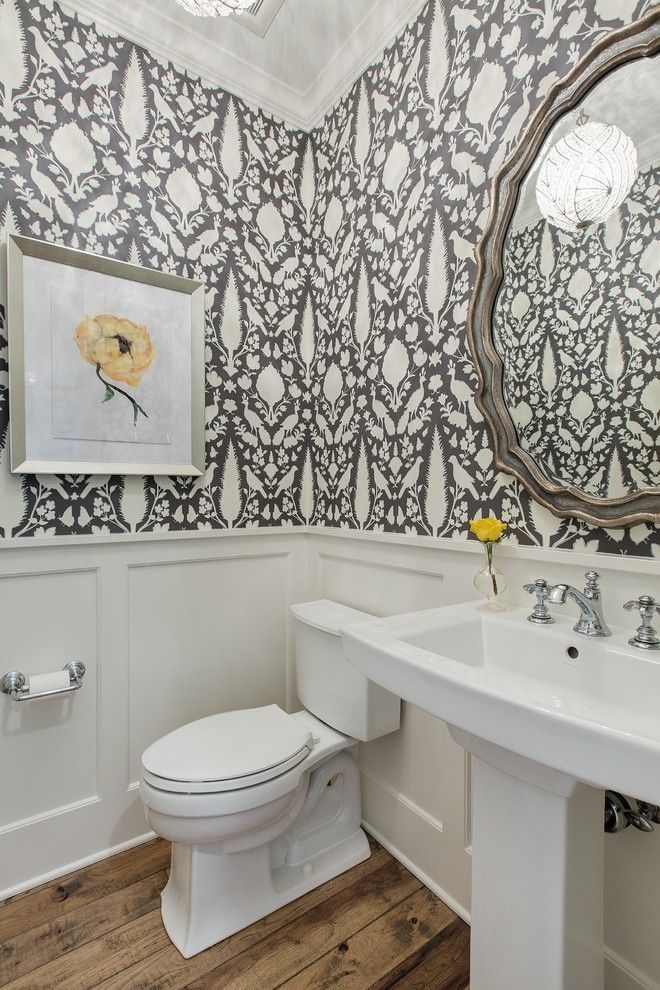
• toilet (latrine equipped with a toilet bowl and washbasin) - 1.5 m2;
WC with toilet and washbasin
• toilet (WC with toilet and without washbasin) - 1.2 m2. nine0004
Recommended dimensions for bathrooms and lavatories
Experts recommend the following dimensions for bathrooms and lavatories
• bathroom and toilet height from floor to ceiling—not less than 2.5 m;
• The height of the corridors adjacent to the bathroom is not less than 2.1 m.
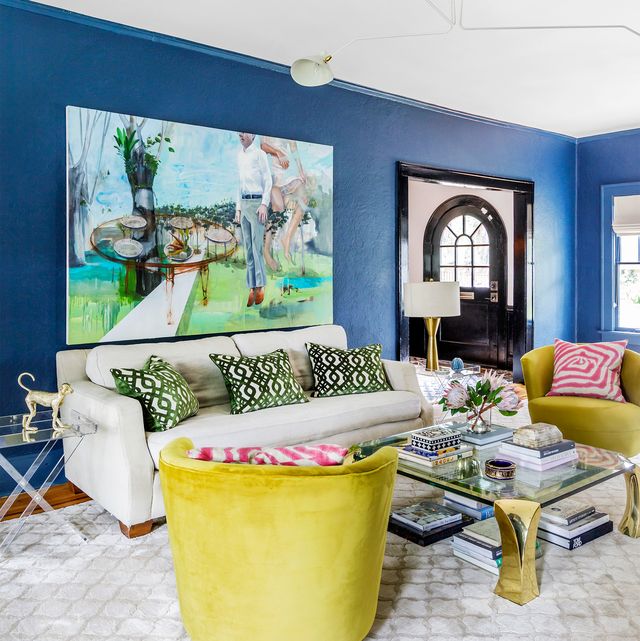
Modern bathroom of comfortable size
The recommended number of bathrooms and bathrooms in a private house
The number of bathrooms and bathrooms is not regulated anywhere. And, by and large, the owners of private cottages can design an unlimited number of them. So what is the optimal number of bathrooms and bathrooms should be in a modern cottage? nine0004
As a rule, the number of necessary bathrooms is planned based on:
• The layout of the whole house;
• Floors;
• Interconnections of premises;
• Number of rooms;
• The number of people living in the house, as well as their lifestyle and preferences.
Usually bathrooms (bathrooms) are located near the bedrooms. Therefore, if the area of \u200b\u200bthe house allows, you can design one bathroom for each bedroom (regardless of whether it is a guest room or a master room). nine0004
To create basic convenience, it is better to design one standard bathroom on each floor, including the basement and basement.
Lavatory room on the 1st floor in a private house ).
Shared bathroom
If one or two people live in the house, one combined bathroom is usually designed, located near the bedroom. When the area of the entrance zone allows, they also have a small bathroom with access to the corridor, hall or hallway.
For a family of three or more, it is better to design one bathroom, located in the sleeping area, and two toilets - guest and master (if the area of \u200b\u200bthe house allows).
If the house has two levels, it is better to plan two bathrooms - for adults and children or other relatives.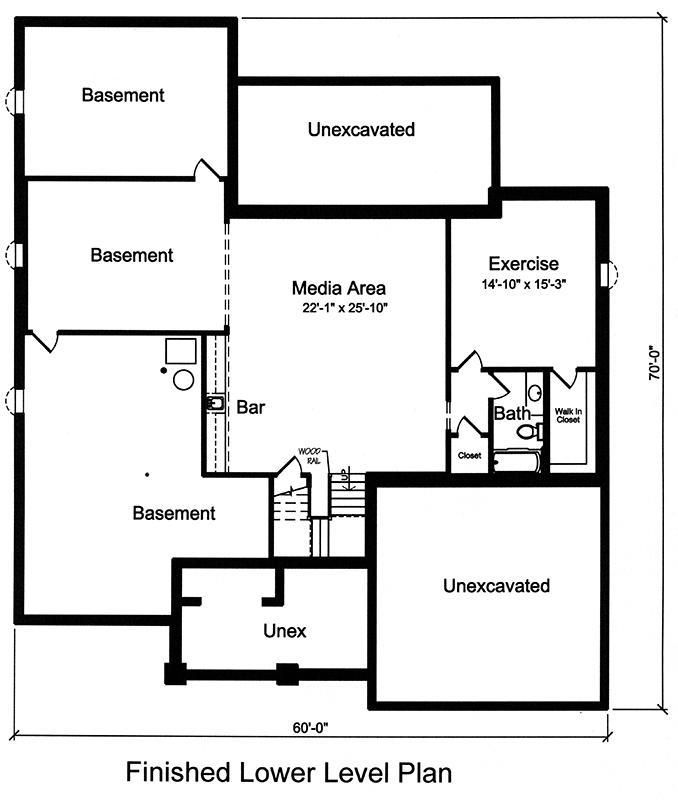 Bathrooms should be located in a private part of the house on the second floor in the sleeping areas (preferably separately for each bedroom). nine0004
Important! If you are a hospitable person and care about the convenience of your guests, then it is necessary to foresee the organization of special guest bathrooms and bathrooms.
For example: if you are designing a three-story cottage (basement, first and second floor), consisting of four rooms plus non-residential premises, for a family of four (father, mother, two children), then bathrooms can be placed as follows:
• Minimum program - one bathroom on each floor plus one shared bathroom in the private master area. nine0004
• Maximum program - one guest bathroom on each floor plus bathrooms for each bedroom plus master bathrooms on each floor plus a master bathroom in various variations (with a jacuzzi, for example).
Bathroom
Location of bathrooms and toilets
Now that you already know how many bathrooms you need, it is important to understand how and where to place them?
We have already said above that, as a rule, bathrooms and bathrooms are located near the bedrooms (in a two-story house, the sleeping area is usually made on the second floor).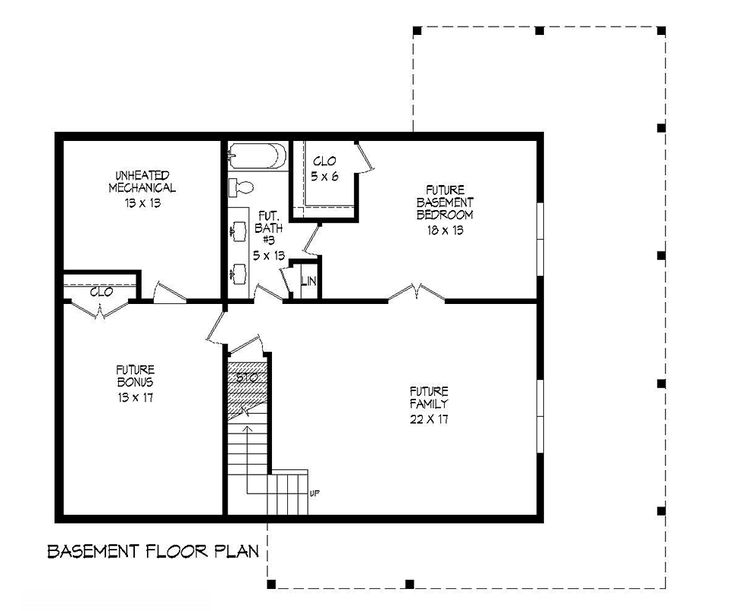 So that from the bedroom there is direct access to the bathroom (without transitions along the corridors). nine0004
If you plan to live with your parents or relatives, it is better to make a separate bathroom for them. In two-story houses, the parents' room is usually located on the ground floor, next to it there is a separate bathroom and wardrobe.
It is very convenient to arrange a bathroom next to the dressing room, which is sometimes located between the bathroom and the bedroom. A good layout option is when you can enter the bathroom from the bedroom, passing through the dressing room.
Note: from an aesthetic point of view, it is possible, but not desirable, to arrange a bathroom next to the kitchen or dining room. It is not allowed to arrange bathrooms and bathrooms above living rooms and kitchens. nine0369
You should also take into account that it is desirable that all bathrooms and bathrooms be placed one under / above the other - for convenience and cheapening of communications (sewage, water supply, ventilation).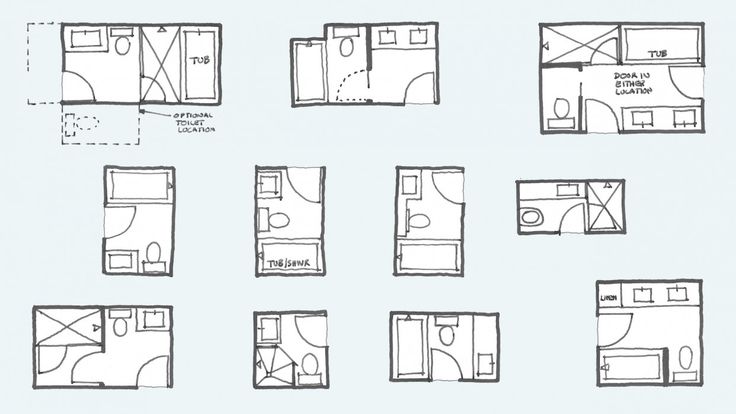
Bathroom with a modern design
Before you start designing bathrooms and bathrooms, you must decide what material the pipes for bathtubs, washbasins and other sanitary ware will be made of, as well as where the valves will be located. It is also necessary to know the location of the ventilation ducts and sewer risers, to which the technical equipment will be connected, and the placement of lighting sources. nine0004
The process of designing bathrooms and latrines in a private home
You must decide on the following questions:
• How many people will use the bathroom or bathroom?
• What would be the layout of this room, given the composition of the family and the layout of the house?
• How many toilets and bathrooms are planned in the house?
• What will be the area of the bathroom and bathroom?
• How much will all this cost you?
When you start planning the placement of the plumbing, remember that the minimum distances between the equipment and the walls of the room must be respected.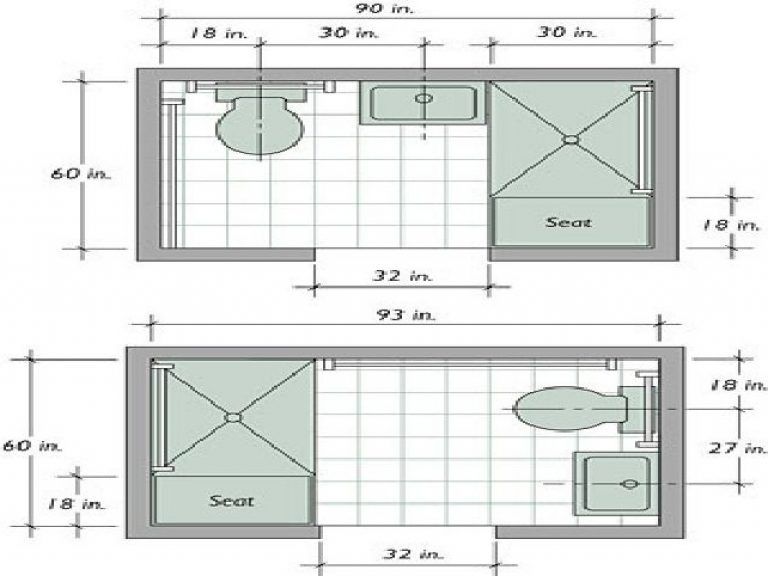 These data should be taken into account when designing and used upwards, but in no case decrease. nine0004
• The free space in front of the bath or shower should be at least 70 cm (so that after bathing it is convenient to get out and use a towel), the optimal distance is 105 cm. cm between the bathtub and other objects in the bathroom
• Towel rails and towel racks are installed at a distance of 50-70 cm from the bath or shower so that they can be easily reached. nine0004
• Free space in front of the toilet and bidet should be at least 60 cm, and on both sides of the longitudinal axis of the toilet - at least 40 cm side of the device).
Optimal dimensions for a toilet in a bathroom
• The flush pipe for flushing the urinal should be directed with holes towards the wall at an angle of 45 degrees downwards.
• It is recommended to place the washbasin at least 80 cm above the finished floor. nine0004
• There must be at least 20 cm between the side wall and the washbasin, and 25 cm from it to the bidet or toilet.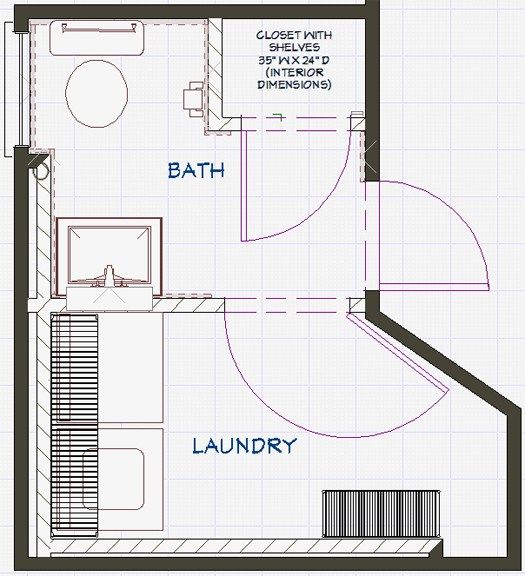 70 cm of free space, and if it is located in a niche - at least 95 cm.
• The distance between two washbasins along the mixer axes must be at least 90 cm (double models with a width of more than 1.2 m are inconvenient when used simultaneously). nine0004
• Leave at least 25 cm between the washbasins themselves (a towel holder can be installed in this gap).
• The distance between the axes of the washbasins is at least 65 cm.
• If your bathroom is located under the roof of the attic, then the distance from the floor to the inclined plane of the attic when installing the toilet must be at least 105 cm.
When planning the placement of plumbing and accessories, you must consider the height of all family members (who will constantly use this room). nine0369
The bath is usually placed on one side against the wall. In large bathrooms, the bathtub can be installed in the center. The piping in this case will be under the floor.
The shower cubicle can be configured in different configurations and be placed near the wall or in the center of the room.