Ideas for repainting kitchen cabinets
29 Painted Kitchen Cabinet Ideas You Can Easily Copy
Devon Grace Interiors
Looking for a quick way to transform your kitchen? Invest in a fresh coat of paint—and remember that your walls aren’t the only thing worth repainting. Since cabinets are the most visible element in any kitchen, they probably deserve a tune-up more than your walls do.
“Nothing is more impactful than a fresh coat of paint,” Mary Maloney, owner and principal designer at Bee's Knees Interior Design, says. “Paint can revive, refresh, and add new life to a tired and dated kitchen.”
When it comes to repainting your kitchen cabinets, there are a few things you’ll want to consider. For starters, what does the rest of your space look like? “Plan and coordinate carefully,” Maloney says. “Think about how the colors will relate to all the other elements and connecting spaces.”
Then, consider other factors—like your home’s architectural style, and how long you plan to live in your home before reselling it. (Spoiler alert: If you plan to sell soon, Maloney recommends keeping your space as classic and versatile as possible.)
Once you’ve narrowed down your selection, you’ll still have plenty of great paint colors to choose from. So to help you pick the perfect shade for your space, we’ve rounded up some strikingly painted kitchen cabinets, and we asked designers to share their go-to kitchen cabinet painting advice.
01 of 29
Becca Interiors
If you're having trouble picking a paint color, use your space as a starting point.
“We love a pop of color, but you really need to map out a game plan that is going to make sense for the long haul,” Maloney says. “What colors will work best with the architecture and style of your home?”
02 of 29
Goldalamode
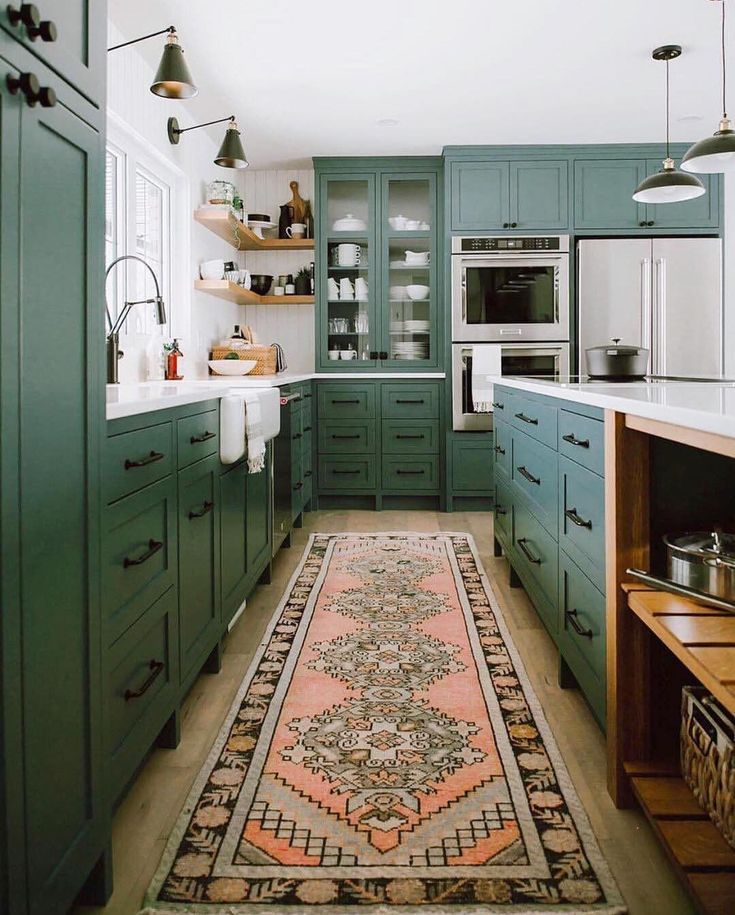
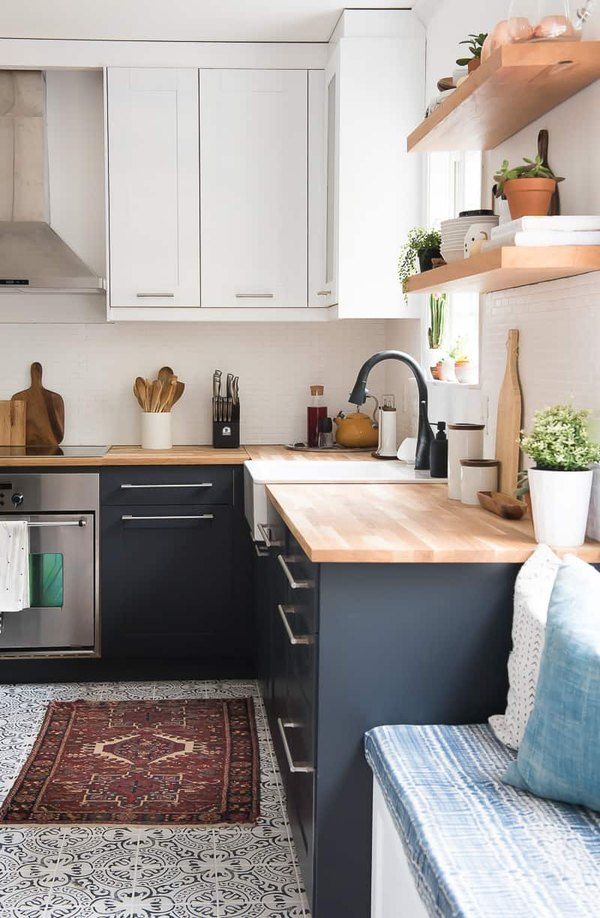
Can't settle on a single cabinet color? Paint your cabinets two different colors. Two-toned cabinets have become a popular pick for kitchens. And while you can choose any two colors you like, you’ll probably want to ground your base cabinets with a dark color and pick a lighter shade for your wall cabinets.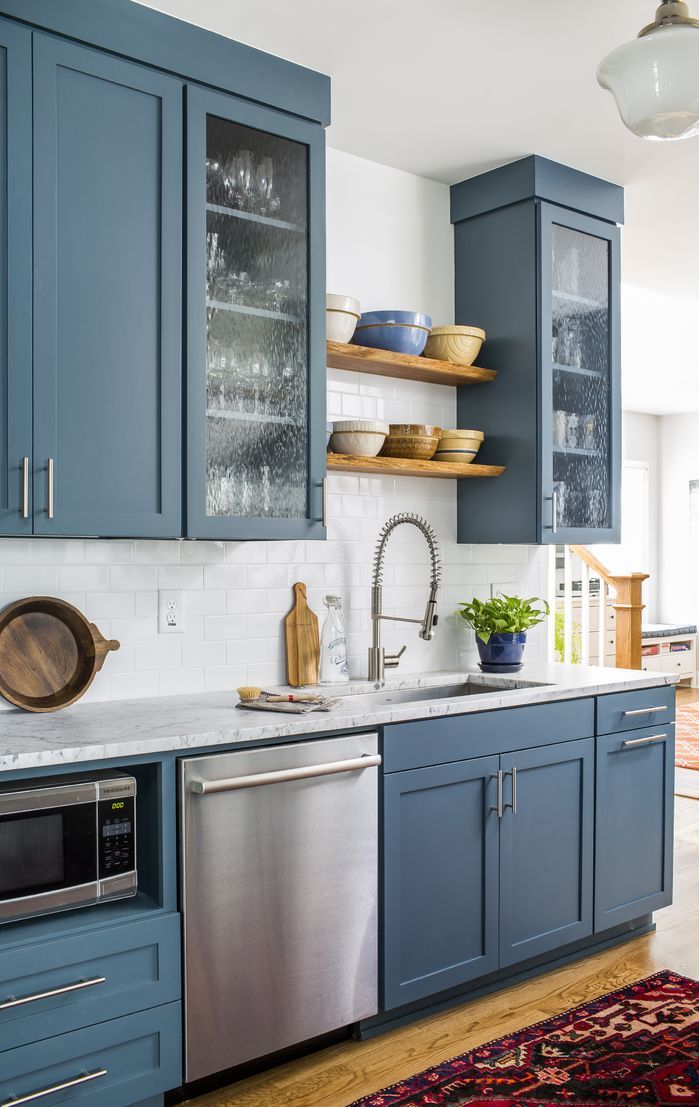
03 of 29
Amy Bartlam
Kitchens are filled with decorative accents. And if harmony is your goal, you probably don’t want all of them to be bold.
“Pick a focal point,” Maloney says. “Who is going to be the star of the show—the colorful cabinets, the exotic marble countertops, the statement backsplash?” Decide whether your cabinets are the statement-maker, and if they're not, keep them subdued.
04 of 29
Bespoke Only
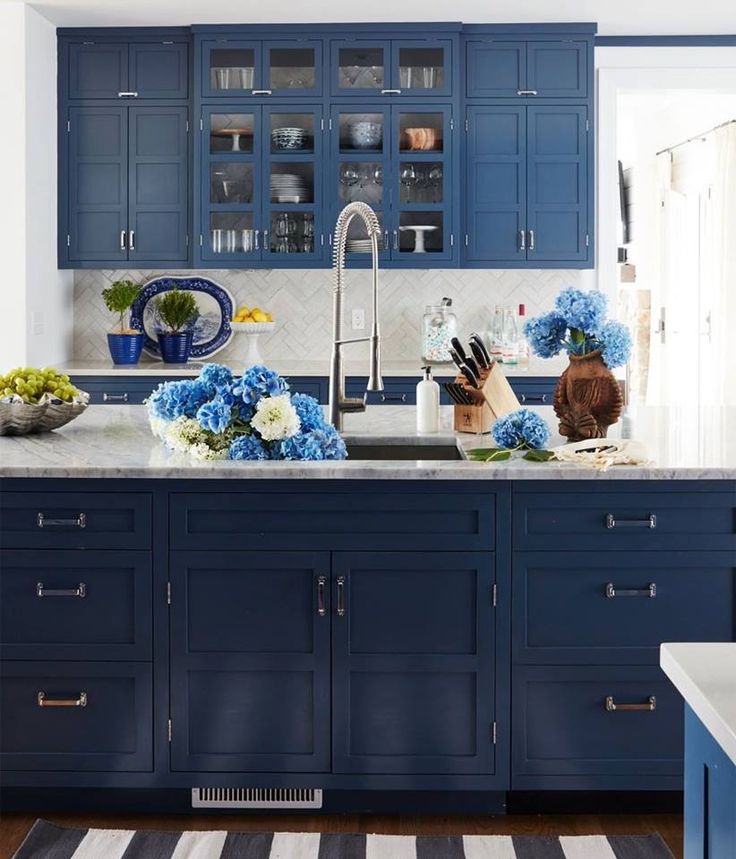
When choosing a paint color, consider how you can add contrast to your space. Olga Hanono, the principal designer at Olga Hanono, says she loves to pair a classic kitchen with a surprisingly bold cabinet color.
“If your kitchen is very traditional, I recommend that you choose a strident color to give it a touch of creativity,” she says.
05 of 29
Julian Porcino
When choosing a paint color, don't just take a shade at face value. Pay attention to the color's undertones and consider how they'll pair with the other undertones in your space.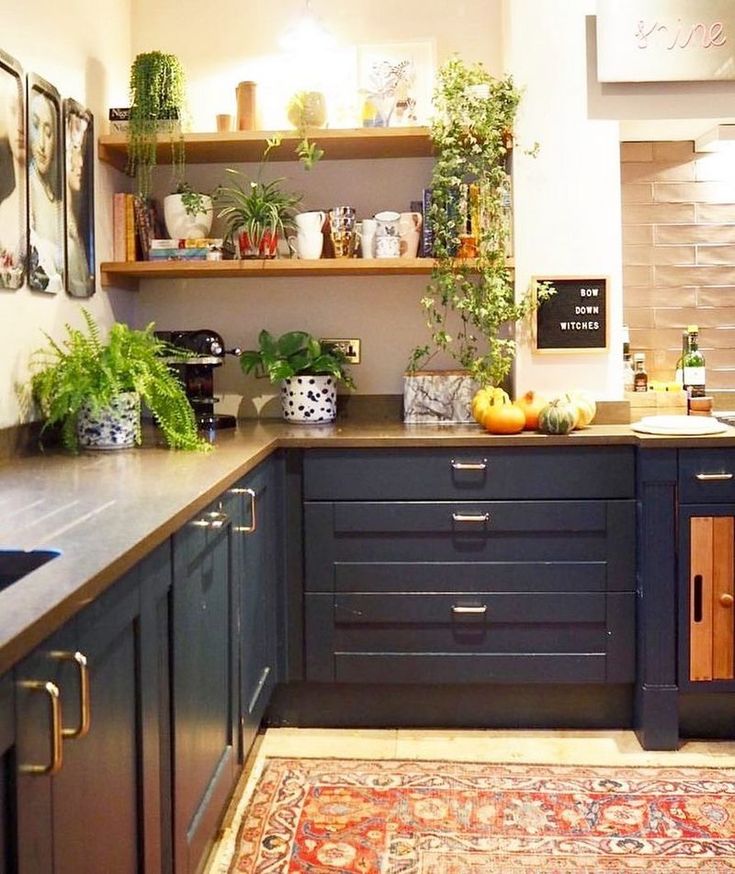
“Mistakes are common, and often occur due to a conflict of undertones,” Maloney says. Undertones are typically either warm (yellow) or cool (blue), and you’ll want to stick to one or the other.
06 of 29
Finding Lovely
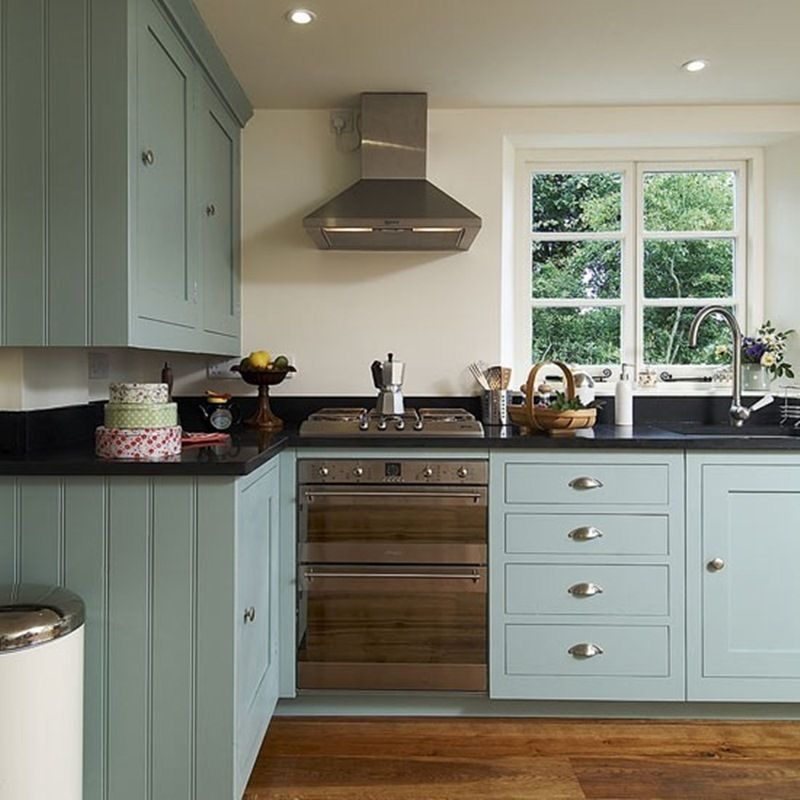
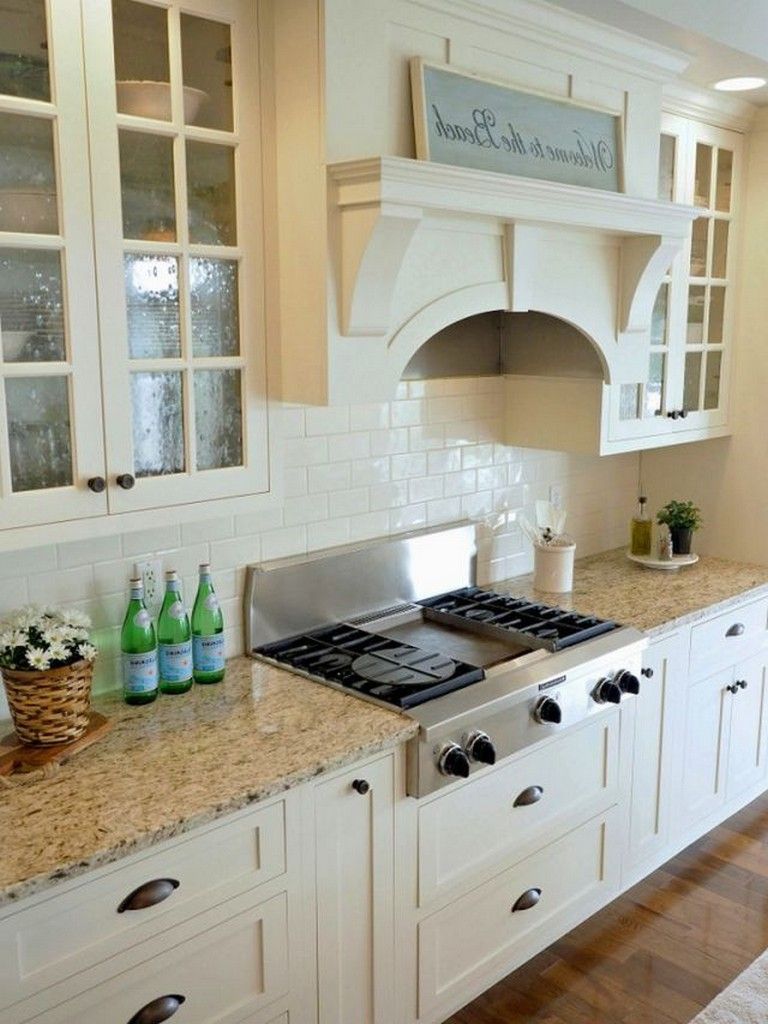
There's nothing wrong with keeping it simple. Warm white cabinets are a favorite for a reason—they reliably look good.
“We love color, and we get excited when a client lets us ‘play’ with color, but you can’t go wrong with a classic white cabinet,” Maloney says. “A warm white is a favorite ‘go-to’ for cabinetry.”
07 of 29
Reena Sotropa
Your cabinets should pair well with the rest of your kitchen, so turn to your backsplash for color inspiration. Match your cabinets directly to your backsplash, or use your cabinets as an opportunity for contrast: If your backsplash is bold, could you mellow out your kitchen with a neutral cabinet color?
08 of 29
Erin Williamson Design
If you're painting your cabinets more than one color, consider divvying up your shades by cabinet style. Paint your base cabinets one color and your wall cabinets another. Or make your floor-to-ceiling cabinets a different color than the other cabinet styles in your space.
09 of 29
Becca Interiors
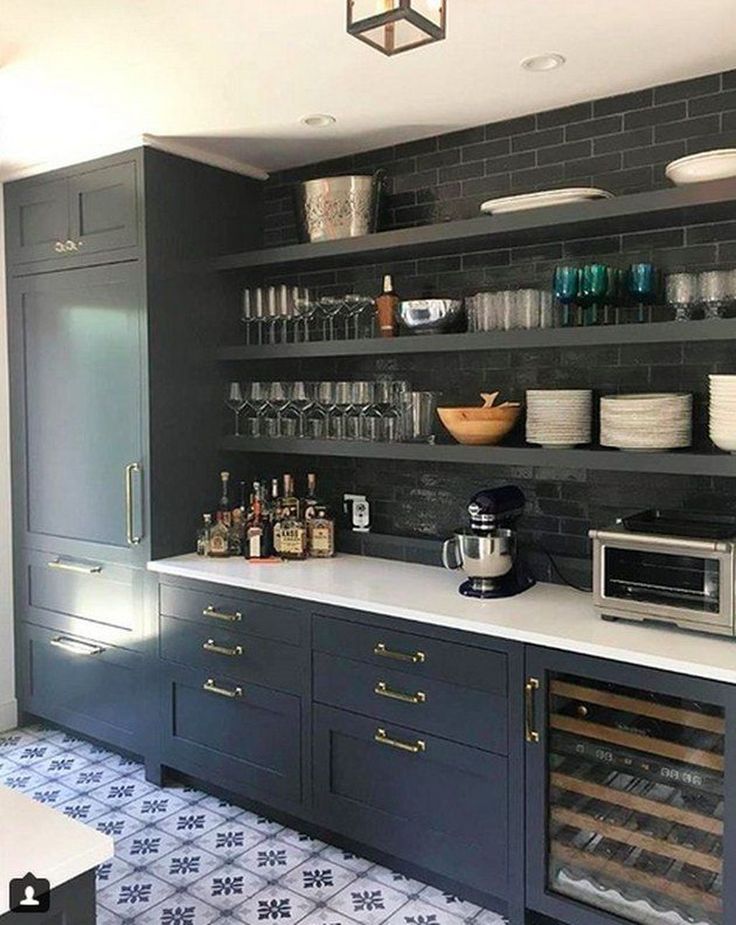
Black may seem like an odd color for kitchen cabinets, but the bold neutral can look great in classic and contemporary kitchens, alike. If you find yourself drawn to a dark color, go for it.
10 of 29
Design: Mindy Gayer Design, Photo: Vanessa Lentine
Keep your kitchen sleek by matching your cabinets to your walls—and matching your walls to your ceiling. This top-to-bottom approach will create one continuous wall of color, which is sure to make a statement, even if the color you choose is white.
11 of 29
Design: Mindy Gayer Design, Photo: Vanessa Lentine
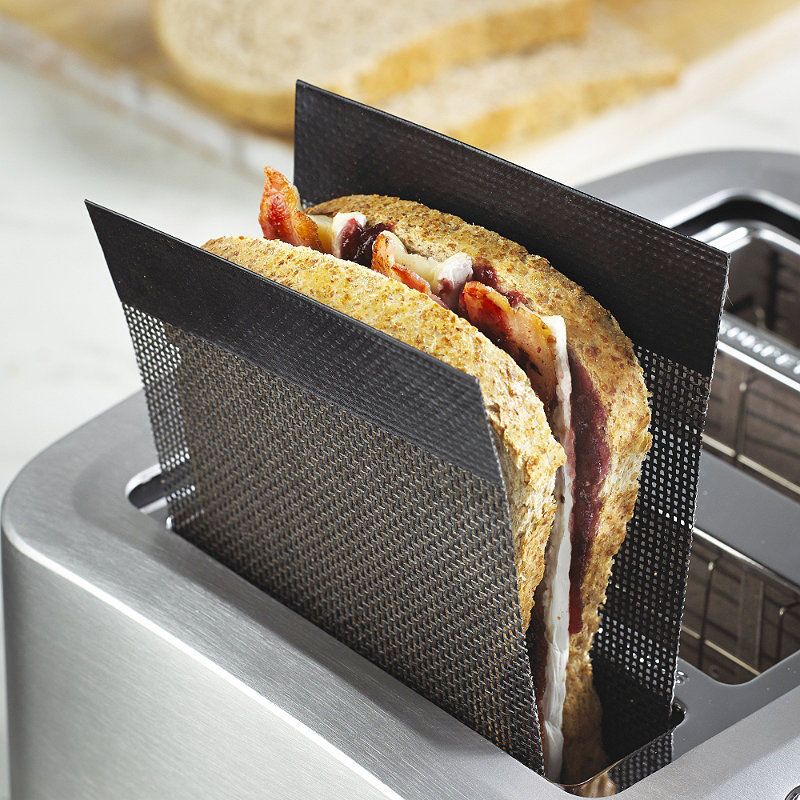
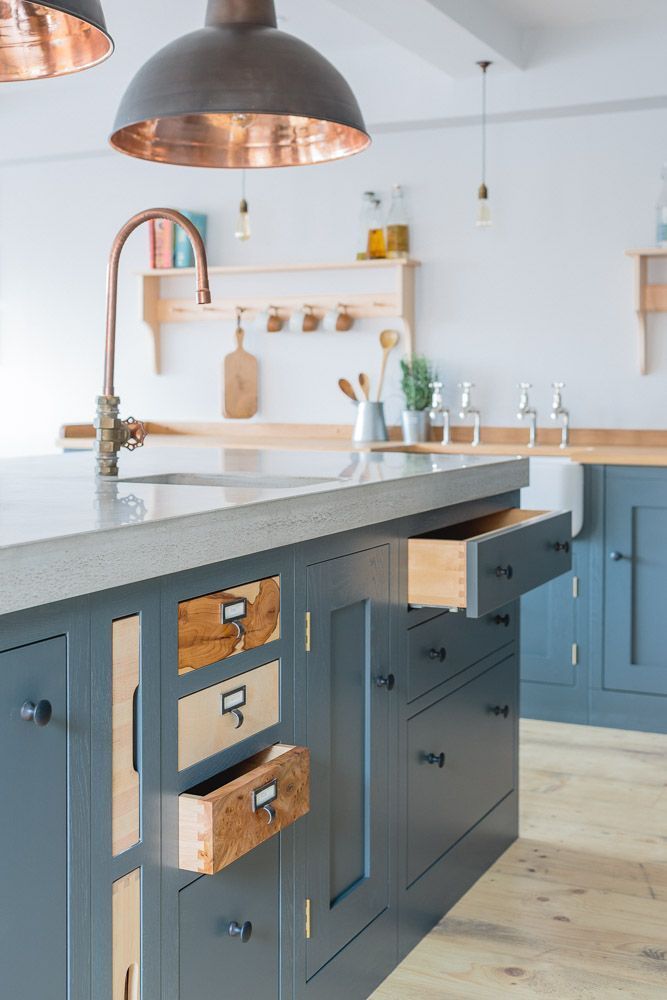
Color isn't the only thing you can play with when it comes to cabinetry. Texture can make your space more dynamic, too. “I like not only using paint for the cabinets,” Hanono says.
She notes that by layering paint over a textured material—like a mesh cabinet door or a deep-grained wood—you can “give a special touch” to your kitchen.
12 of 29
Finding Lovely
If you have any glass door cabinets, consider the items you store inside them. Since glass is transparent, these items will shine through—affecting the way your paint color looks. Treat these items like you’d treat the other accents in your kitchen: Choose a cabinet color capable of complementing them.
13 of 29
Julia Robbs
Since your kitchen counters probably touch your kitchen cabinets, you want the two to pair well. “The cabinet colors you select must play nicely with your solid surfaces,” Maloney says.
Keep your colors complementary, and balance out your space. If your countertops are particularly bold, keep your cabinets subtle—and vice versa.
14 of 29
Finding Lovely
Cabinets come in different styles, and you want to make sure the paint color you choose suits the kind of cabinets you have. If your kitchen is lined with modern slab cabinets, complement them with a contemporary color, or add contrast by pairing versatile shaker cabinets with a surprisingly bold shade.
15 of 29
Jessica Nelson Design
When choosing a paint color, you need to consider every color that's in your kitchen—and every color you can see from your kitchen. (This is particularly important if you have an open floor plan.)
“Are there open site lines visually connecting your kitchen to other living areas?” Maloney says. “If so, you must think about how all the colors relate to each other—do they play nicely together?”
16 of 29
Design: Mindy Gayer Design, Photo: Vanessa Lentine
If you went all out with your kitchen—pairing bold countertops with textured light fixtures and a statement ceiling—your cabinets may be a good place to take a breather. Choose a neutral that will lend your space the cohesion it needs. And if that sounds boring, remember that neutrals abound. (Your options aren't limited to cool white or warm white.)
17 of 29
Ashley Montgomery Design
A range hood is an eye-catching element in any kitchen, so consider painting it the same color as your cabinets. This is an easy way to bring your space together, and it can look particularly statement-making if your range hood is situated between matching cabinets or shelves.
18 of 29
Design: Mindy Gayer Design, Photo: Lane Dittoe
Cabinet exteriors get all the attention. (And rightfully so—they're the first thing someone will see when they step into your kitchen.) But cabinet interiors deserve some love, too. For a striking effect, paint your cabinet interiors the same color as your cabinet exteriors. Then they're sure to look great, whether they're open or shut.
19 of 29
Proem Studio
Your floors may not be the first place you turn for kitchen cabinet inspiration. But since they're a major part of your space, they're worth keeping in mind.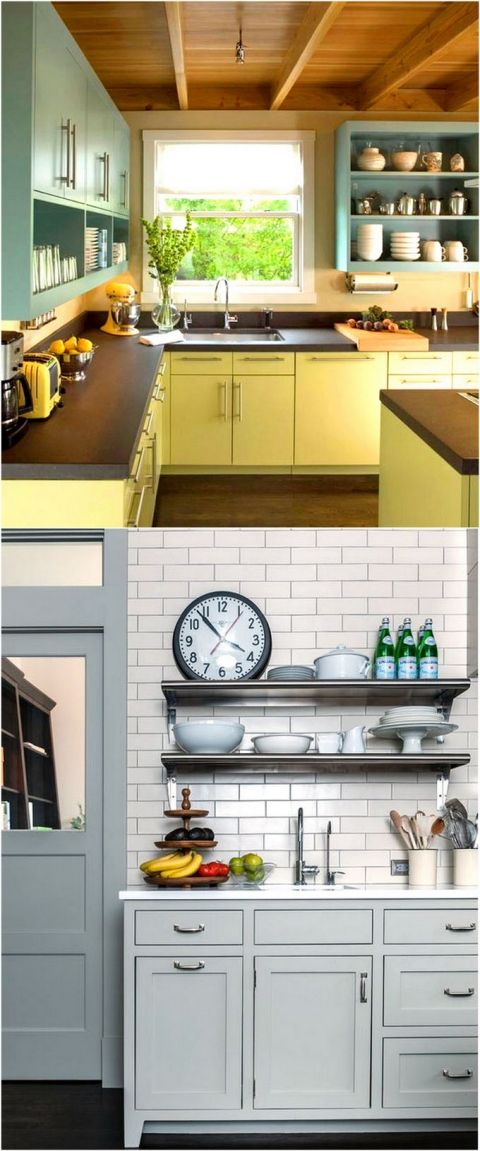
“You need to factor in your flooring, backsplash, and countertop materials,” Maloney says. So keep your undertones consistent. And if your floors are particularly striking, balance them out with subtler cabinets.
20 of 29
Becca Interiors
If you want your cabinets to blend into your space without matching your walls exactly, choose a color that's a shade or two darker than your walls. Since the shade will be in the same color family, it should naturally suit your space—while adding a subtle dose of contrast to your kitchen.
21 of 29
Amy Bartlam
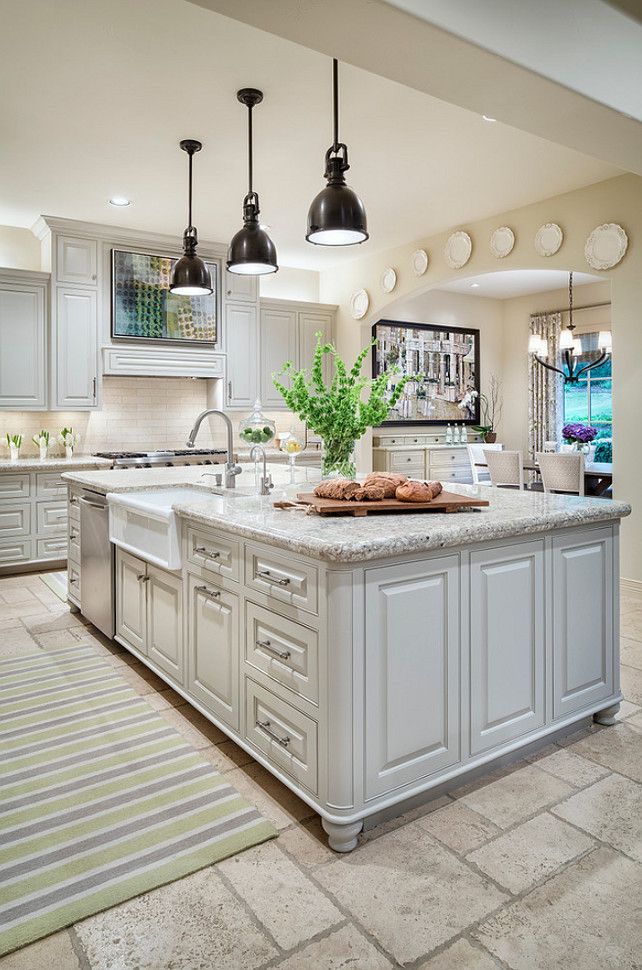
Craving a kitchen that feels classic but not conventional? Paint your cabinets a subtle shade, and save the pop of color for your island. “You can play it safe by introducing a pop of color for the island area,” Maloney says.
22 of 29
Tyler Karu
Remember that you don't have to paint all your cabinets. In fact, by painting most of your cabinets—and leaving some unpainted—you can create a pop of un-color that’s just as bold as a pop of color.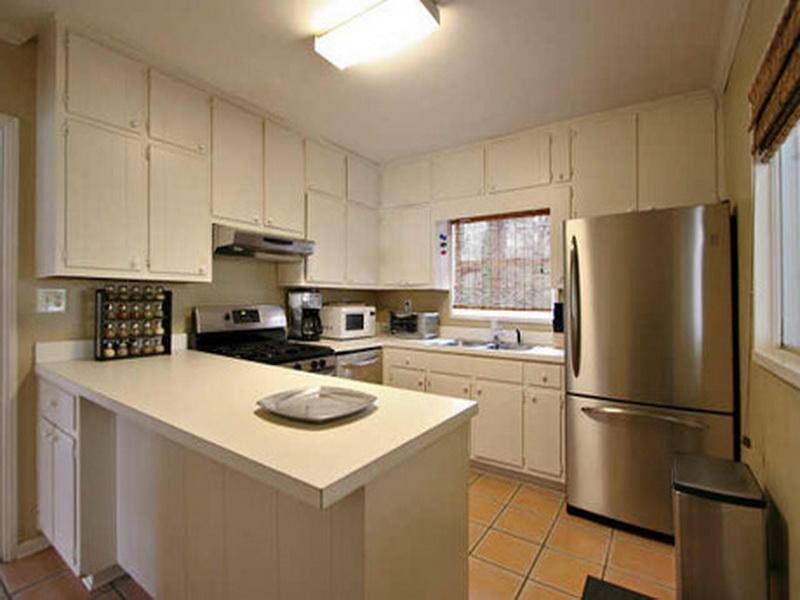
23 of 29
Tyler Karu
On-trend colors can be incredibly tempting, but Maloney cautions against them. “Stay away from anything too trendy, and think about what you are going to love for the long haul,” she says.
24 of 29
Design: Mindy Gayer Design, Photo: Vanessa Lentine
One sneaky place to add an accent color? Your cabinet interiors. If your cabinets are open, this can be a great way to add contrast. And if your cabinets are closed, this detail can serve as a fun finishing touch—one that’s only visible when your cabinet doors are open.
25 of 29
Devon Grace Interiors
Picking three different cabinet colors may seem like overkill. But if all three shades are neutrals, they should play surprisingly well together.
26 of 29
Homemade by Carmona
If you can’t commit to wall-to-wall color, designate a few statement cabinets to paint a vibrant shade. Look around your space for worthy candidates: could the tiny cabinets above your oven become the pop of color you’re looking for?
27 of 29
Devon Grace Interiors
Anxious about adding color to your space? Push yourself to take a risk. “I encourage people to dismiss their fear of colors and experiment,” Hanono says. “You can add a lot of freshness to your kitchen with a bit of color.”
28 of 29
Devon Grace Interiors
No kitchen cabinet is complete without a little hardware. So factor accents—like hinges, doorknobs, and drawer pulls—into your painting plan. “If you wish to update or replace hardware, make that decision before the painting begins,” Maloney says.
After all, your new hardware might affect your cabinet color choice. And if it’s a different size than your old hardware, you might have some holes to fill in before painting.
29 of 29
Calimia Home
Colors can look different at different times of day, so spend time with the colors you’re eyeing before committing to them. “Do color tests,” Hanono says. “Colors don't always match.” And they don’t always look the way you thought they would, either.
12 Ways to Revamp Your Kitchen Cabinets for the Ultimate Makeover
10 Painted Kitchen Cabinet Ideas
By
Lee Wallender
Lee Wallender
Lee has over two decades of hands-on experience remodeling, fixing, and improving homes, and has been providing home improvement advice for over 13 years.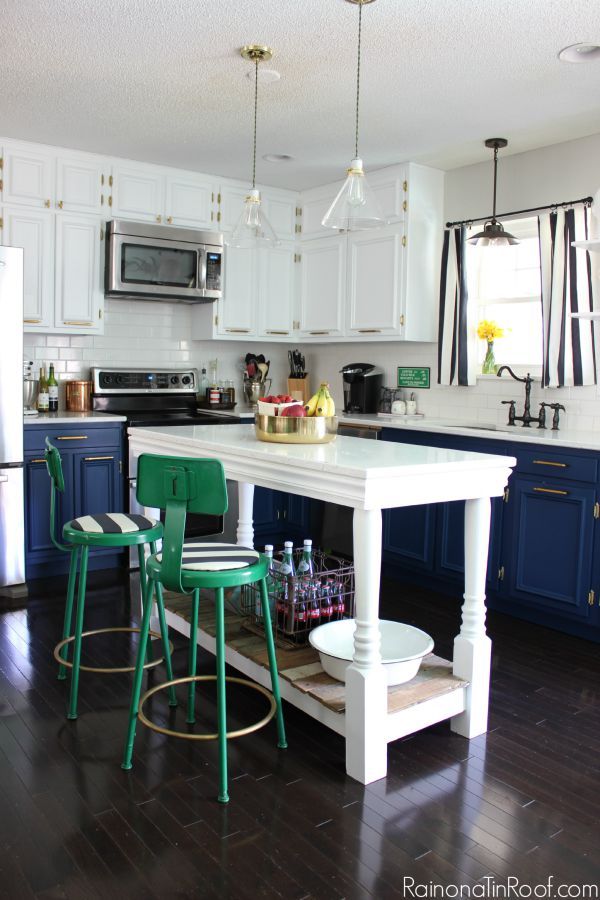
Learn more about The Spruce's Editorial Process
Updated on 06/01/22
The Spruce / Christopher Lee Foto
Pack a punch with freshly painted kitchen cabinets. This time-tested method of giving cabinets a clean look has been advanced with newly developed paints that make your job easier. When you contrast the minimal cost of paint and materials to the incredibly high cost of new kitchen cabinets, painting your cabinets is a clear winner.
Before launching head-first into this project, though, remember that this project is more than a quick, one-day job. Every item in your kitchen cabinets must be removed and safely stored. Doors and drawers need to be removed. Every surface that you intend to paint first requires thorough cleaning. Choose one of two directions when painting kitchen cabinets: using materials assembled individually or working with all-in-one surfacing kits made especially for cabinets.
Painting Cabinets From Scratch
Buying supplies separately for painting cabinets offers the greatest flexibility and range of color choices. Supplies, including primer, paint, and tools, are relatively inexpensive and are easy to obtain. These include:
- 100-percent acrylic or oil-based paints
- TSP (tri-sodium phosphate), a low-cost cleaning solution
- Bucket and clean sponges
- Sandpaper
- Tack cloth
- Primer
- Putty and putty knife
- Roller frame
- Roller covers
- Electric oscillating sander
- High-quality paintbrushes
- High-volume, low-pressure (HVLP) paint sprayer (optional)
Painting Cabinets Using a Kit
Cabinet painting kits include much, but not all, of the materials you need. Cabinet painting kits tend to be expensive, often more costly than the sum of their parts. One prominent brand, Cabinet Transformations from Rustoleum, offers a multi-stage process that lets you paint not only wood cabinets but melamine and laminate cabinets, as well.
Cabinet painting kits help you to revitalize your cabinets through a four-step process:
- Apply a deglosser, then wipe it off with a clean rag.
- Roll or brush on a bond coat, which acts as a type of primer and color base for the subsequent glaze.
- Apply the decorative glaze.
- Apply the protective top coat.
Here are 10 kitchens with exquisitely painted cabinetry to inspire your project.
-
01 of 10
At Home With the Ellingtons
Lush black graces these painted kitchen cabinets. Black cabinets can be chic, modern, sleek, and warm, sometimes all at the same time. Pick your preferred descriptive word and black just might fit the bill. That's because black is stylistically so flexible. But it does have one major downside: All of your cabinet's flaws will be visible.
Lifestyle blogger Tammy Ellington concurs: "It’s so unforgiving.
 It shows every flaw in the wood along with brush strokes and mishaps, but it’s also beautiful when done well." Tammy's secret to pulling off this project successfully is milk paint. It lays down perfectly and shows almost no brush marks. Tammy used General Finishes' Milk Paint in Lamp Black color.
 Black Milk Paint Cabinets from At Home With the Ellingtons
-
02 of 10
Designer Trapped in a Lawyer's BodyIs it possible to paint your kitchen cabinets without the added hassle of prior sanding and priming? For some homeowners, this cumbersome task is the sole obstacle that prevents them from charging ahead with the project at all.
Tasha Agruso of the popular blog Designer Trapped in a Lawyer's Body decided to try painting without sanding and priming. Rather than just brushing on paint and hoping for the best, Tasha entered the project with near-scientific precision, and it worked. After some thought, she concluded that it is possible to paint your cabinets without sanding and priming, but it takes focus and care.
 Tasha reports that the cabinet paint finish is still going strong even years after it was first applied.
 Painted Kitchen Cabinets from Designer Trapped in a Lawyer's Body
-
03 of 10
Dear Lille Studio
A cool, measured balance of classical elegance informs these painted kitchen cabinets. Williamsburg, Virginia-based decorator Jennifer Hudson at the design blog, Dear Lille Studio, inherited these painted kitchen cabinets from the previous owner. Jennifer believes that the color is Benjamin Moore Lampblack. Lampblack was a charcoal-tinged color traditionally found in 18th- and 19th-century wallpapers.
Painted Lampblack Cabinets from Dear Lille Studio
-
04 of 10
Live Love DIYKitchen cabinet on the outside, chalkboard on the inside. This surprising touch is simple to achieve when you buy easy-to-apply chalkboard paint and roll it on the inside of your cabinet doors. Create a grocery shopping list or simply say "I love you" to any family member who happens to be the next person to open the door.
 Chalkboard paint is inexpensive and water-based, so it cleans up well. This kitchen is the creation of home improvement blogger Virginia Plunkett, whose hugely popular tutorial shows how to painlessly paint your cabinets.
 Bright, White Cabinets With Chalkboards from Live Love DIY
What Is Chalk Paint?
-
05 of 10
In My Own StyleGleaming chrome pulls, new subway tile, and a Kohler sink are the finishing touches to Diane Henkler's completely remodeled kitchen. And the centerpiece of that is her do-it-yourself painted kitchen cabinets. One word of advice from Diane: "Spring for high-quality paint." To that end, she chose Valspar Bonding/Sealing Primer followed by paint from the ProClassic brand by Sherwin-Williams. For a high-visibility project like this, it is important to purchase higher-quality products that ensure long-lasting results.
Top Quality Cabinet Paint Project from In My Own Style
-
06 of 10
The Turquoise HomeThe star of this kitchen is not just the gorgeous creamy white color and smooth finish on the cabinets.
 The lack of investment in high priced spraying equipment makes these painted cabinets doubly great. Home design blogger Laura at The Turquoise Home, intent on having a fabulous kitchen without buying what she calls "fancy equipment," invested major labor and a lot of swearing, but says she would do it all again in a heartbeat. Because the choice of paint is important, she picked two winners: Ace Hardware’s Door, Trim and Cabinet Paint, along with Benjamin Moore’s Advance Paint.
 Painted Kitchen Cabinets from The Turquoise Home
-
07 of 10
Aesthetic OutbursttAn upstate New York home built during the 1880s deserves special handling during a remodel. Abbey Hendrickson, at the design blog Aesthetic Outburst, knew that she wanted a classic and sedate mood for her farmhouse kitchen. Simply to rid the existing cabinets of their dark, depressing brown color, Abbey and her husband first sprayed all of them white. Then, they left the upper wall cabinets white but painted the lower base cabinets a rich, moody color accented with Martha Stewart's brand of brass pulls.
Dark Painted Kitchen Cabinets from Aesthetic Outburst
-
08 of 10
Confessions of a Serial DIYerDark kitchen cabinets plague many homeowners. But Christy's cabinets were so dismal that she calls them "dark, dark, and more dark." Exacerbating the problem were the black granite countertops. So, the first order of business was to apply two coats of primer, a necessary step since the cabinets were so dark. Cabinets remained white, while the kitchen island was painted a light-blue shade called Campfire Ash from Behr. Mother-of-pearl tile for the backsplash adds even more shimmer to this space.
Bright, Light Kitchen Cabinets from Confessions of a Serial DIYer
-
09 of 10
The Little DekoningsNot content to live with her oak cabinets and feeling positively "consumed by wood," Kassandra Dekoning took decisive measures and painted over the wood. Her plan of attack involved Zinsser Bulls Eye 123 Water-Based Primer and Benjamin Moore's Advance Paint in Pearl Finish.
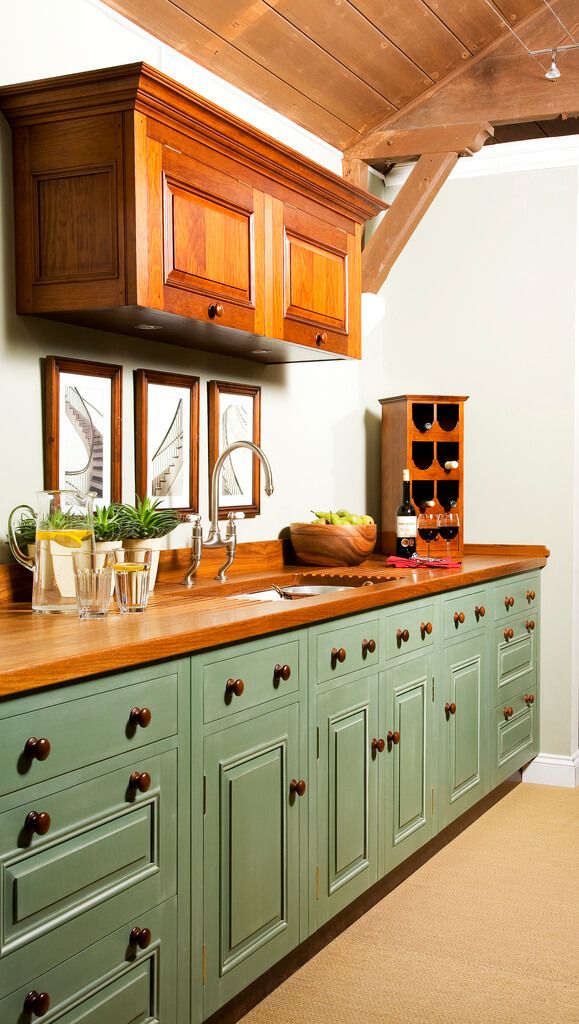 The result is a sleek, sophisticated color scheme that bears no resemblance to the previous country style red oak. Best of all, she spent considerably less on the project than if she had replaced the cabinets altogether.
 Gorgeous Gray Painted Kitchen Cabinets from The Little Dekonings
-
10 of 10
Place of My TasteAniko's kitchen went through a few transformations before arriving at its current gorgeous look. When Aniko first moved in, the kitchen cabinets were builder's grade red oak. After switching to Shaker-style cabinets, she still knew she wanted something different. Time for a two-toned cabinet style, both colors from Home Depot's house brand, Behr. The top cabinets were sprayed in Behr's workhorse color for trim and casing, Ultra Pure White. The base cabinets received Behr Night Club in a satin finish.
Two-Toned Kitchen Cabinets from Place of My Taste
FAQ
-
Painting kitchen cabinets takes around four to five days to do properly.
 The prep takes a while as all items have to be taken out of the cupboards, cabinet drawers, doors, and hardware removed, and all areas to be painted need to be prepped before the painting can even begin.
 -
If the cabinets are damaged in any way, such as chipped, cracked, or warped, painting them will only make these defects stand out more.
-
Yes, paint both the outside and the inside of kitchen cabinet doors. If you don't, every time you open the cabinet door, you will see that the inside is not painted and is the original color. If you're going to all this time and expense of painting the cabinets, it's best to paint both sides of the cabinet doors. You won't regret it.
How to Refinish Your Kitchen Cabinets
in a different color, what paint, step by step instructions, photo
If you want some updates in the interior or fresh notes and bright colors, the easiest way to transform the interior is to paint the surfaces of the facades.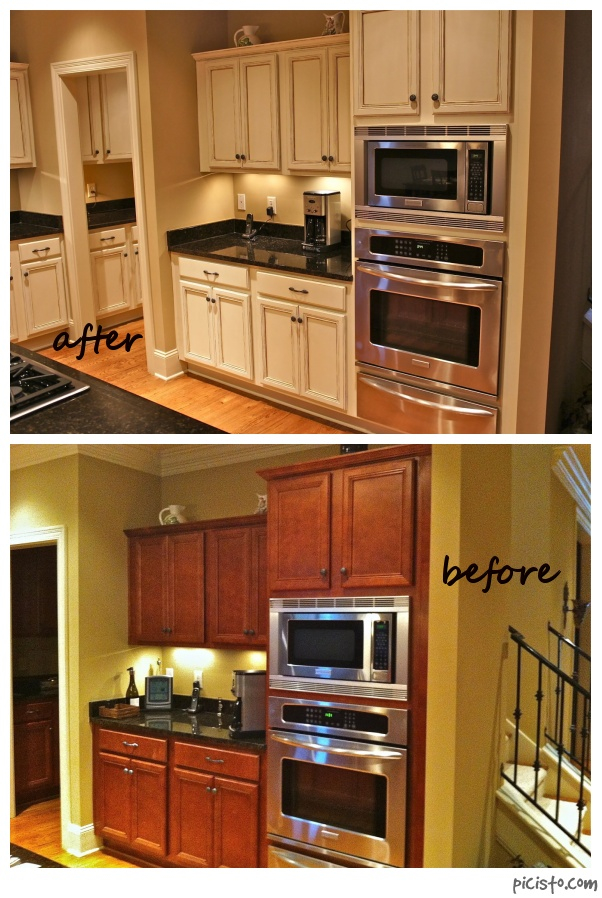 The painting process is quite simple, but still has several features, so this article will focus on how to properly paint old kitchen furniture.
Even the easiest way - painting the kitchen - will significantly change the look. nine0003
The main advantages of painting with your own hands
One of the significant advantages of painting a kitchen set with your own hands is that in order to make changes to the interior of the kitchen, you can not spend a lot of money, but only buy paint. Moreover, the help of specialists will not be required, because even someone who has never done such work before can cope with this task. In general, this is why this update method is the most popular - it is economical, simple and takes a little time. nine0003
You don't need to invest a lot to transform your kitchen furniture, you just need to buy some paint.
How to repaint a kitchen set with your own hands
Many people wonder if it is possible to repaint a kitchen set in some other color? Actually, why not? Of course.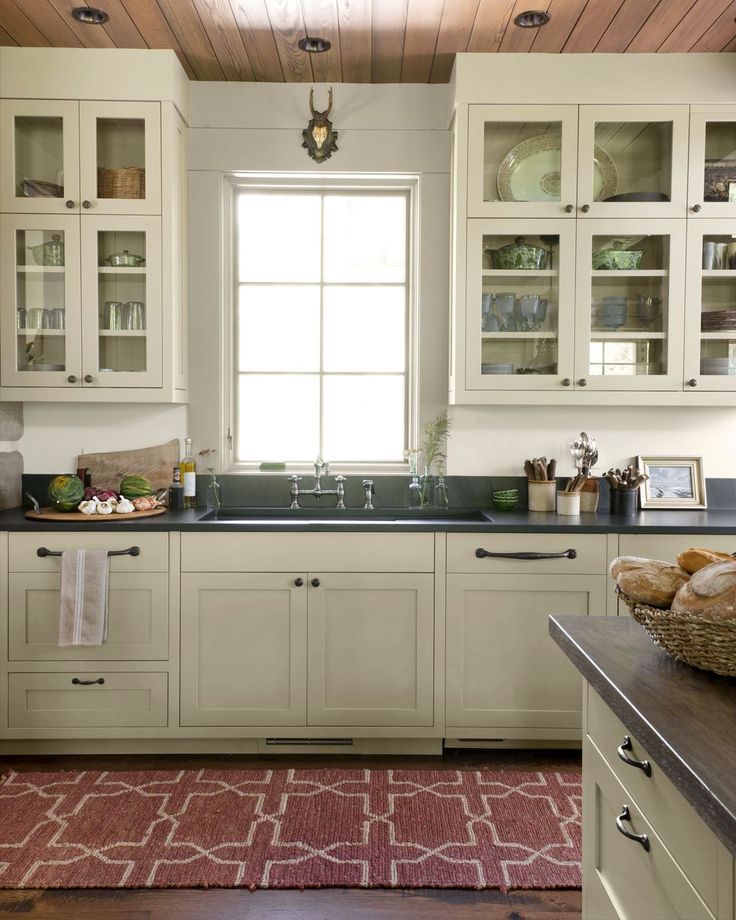 Moreover, everyone can carry out such a procedure. This is a great way if you want to change the interior of your kitchen without spending a lot of money and time. You just need to understand all the details, such as the choice of paint, the correct sanding and priming, precautions, color combinations, and so on. These important nuances will be discussed, because it is better to familiarize yourself with the important points in advance so as not to encounter unexpected surprises during the staining process. nine0003
Painting a set is easy. If you have never done this before, then you can easily cope with this work.
Tools and materials
In order not to be distracted by various details and trifles during the painting process, you need to prepare everything you need in advance. Therefore, further we will talk about what materials and tools will be needed in order to paint the kitchen set with your own hands.
List of materials needed:
- spray paint; nine0026
- sandpaper;
- wood primer;
- solvent;
- gloves;
- putty;
- safety goggles;
- masking tape;
- glisal or varnish;
- new fittings, if you want to transform the facades of the headset;
- oilcloth or newspaper on the floor to avoid splashes on surfaces.

List of required tools:
- brush or roller;
- grinding machine; nine0026
- building hair dryer;
- screwdriver or screwdriver;
- spatula;
- paint tray.
Coloring will take a fairly short time without much diligence.
How to choose the right paint
Modern manufacturers offer a wide variety of different types of paints, but not all of them are suitable for kitchen facade surfaces. Definitely not worth buying water-based or oil paint. These two types are likely to lie unevenly and streaks will form. Also, experts do not recommend using acrylic paint, as it does not tolerate moisture and exposure to cleaning agents. nine0003
The best option is aerosol alkyd paint in cans or car enamel.
The most suitable option is aerosol alkyd paint in cans or car enamel. This type of paint is easy to apply, does not form smudges and is particularly reliable, durable, as well as resistant to moisture and temperature extremes.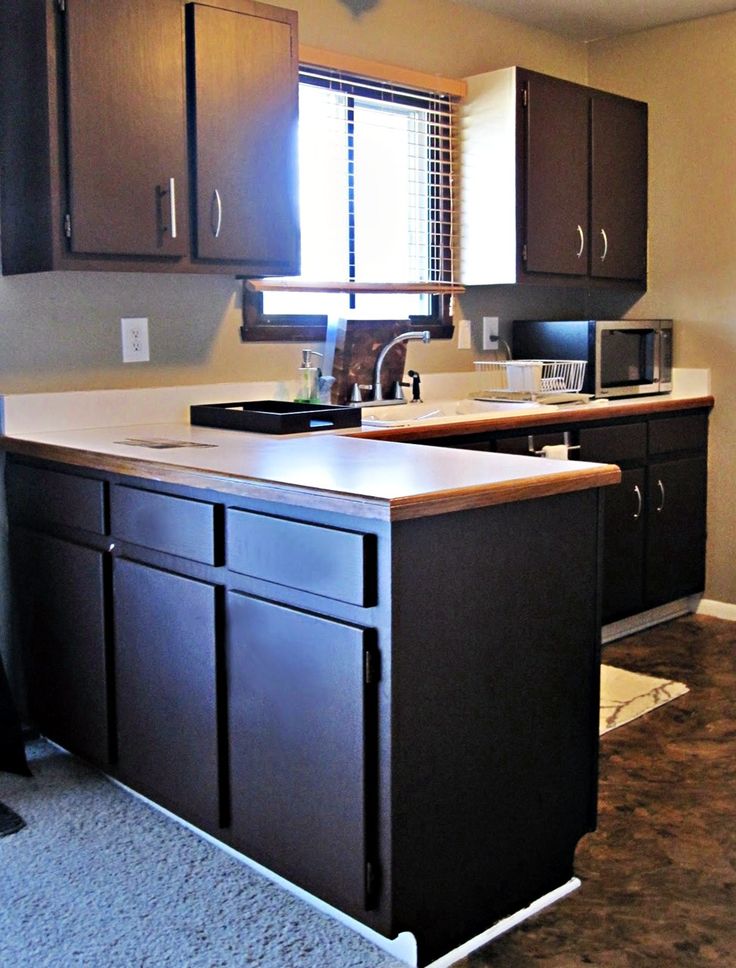
Responsibly, you need to approach the selection of a new color scheme. It is worth preparing for the fact that when changing the color of the facades, you will have to change the textiles in the room. nine0003
It is important to remember that it is better not to combine only dark or only light colors. Don't forget about bright colors.
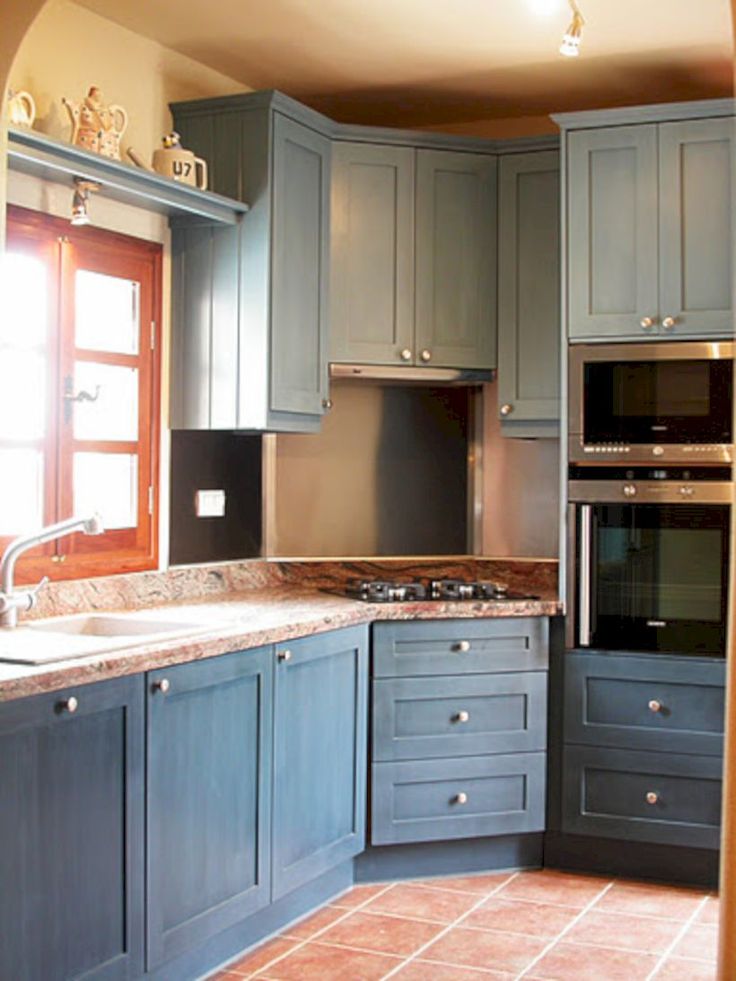
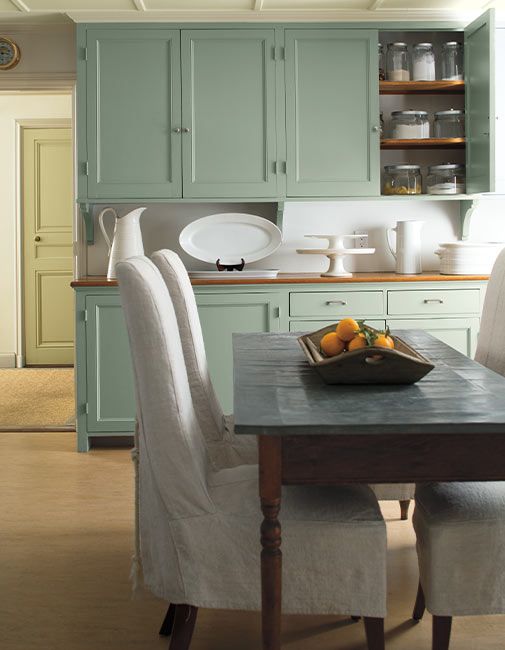
You can choose one color or several matching shades. In order not to miscalculate with the choice of color, you can give preference to a neutral color scheme. As a rule, these are shades of beige, brown, gray and white. It is impossible to make a mistake with such combinations, which means that even a beginner can cope with the task of choosing a palette. You need to be careful only with combinations of dark colors. The most popular and best option is to paint the upper cabinets in light colors, and the lower cabinets in dark ones. This solution is perfect for classic interiors. nine0003
Two bright or two neutral colors is an interesting option, here you should rely on your own taste.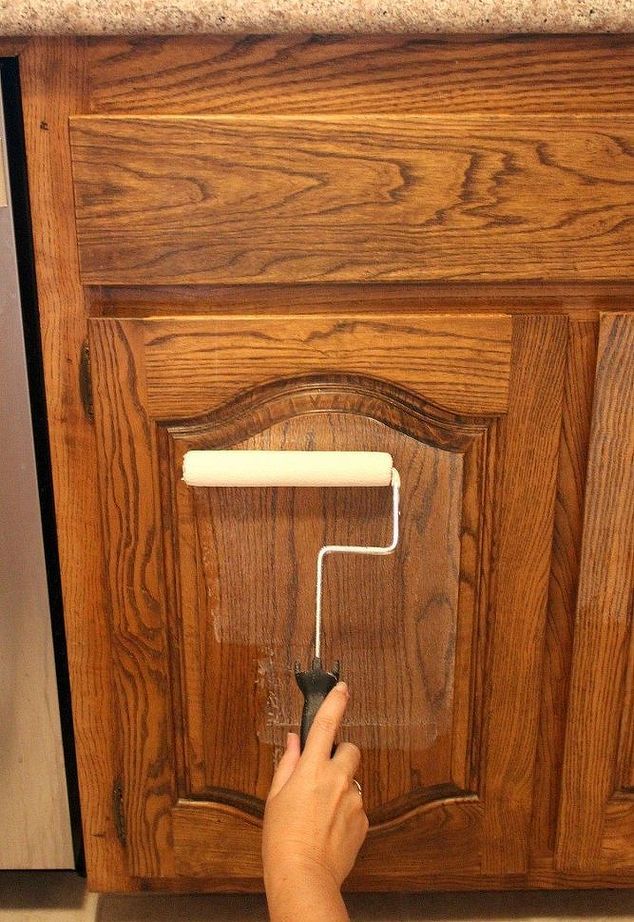
Do not forget about bright colors, they can become an accent of the interior and add mood to the space. Black color can be combined with red, light green, mint, pink, beige, and blue, lilac, blue colors are perfect for combination with white. It is desirable that one color is predominant, and 1-2 suitable shades are added to it.
If you want something very bright, you can combine contrasting colors. For example, the color of lilac and yellow, orange and blue, red or pink with blue - there are a huge number of combinations. nine0003
If you want to have an original interior, combine contrasting colors.
Instructions on how to paint a kitchen set with your own hands
The process of painting kitchen facades is quite simple. So simple that you can complete this task without any experience and any special knowledge on this topic. It is only important to adhere to certain rules and sequence of work. Just for this, a special instruction has been prepared, thanks to which you can, firstly, understand the correct sequence of actions, and secondly, learn many important details of each of the stages.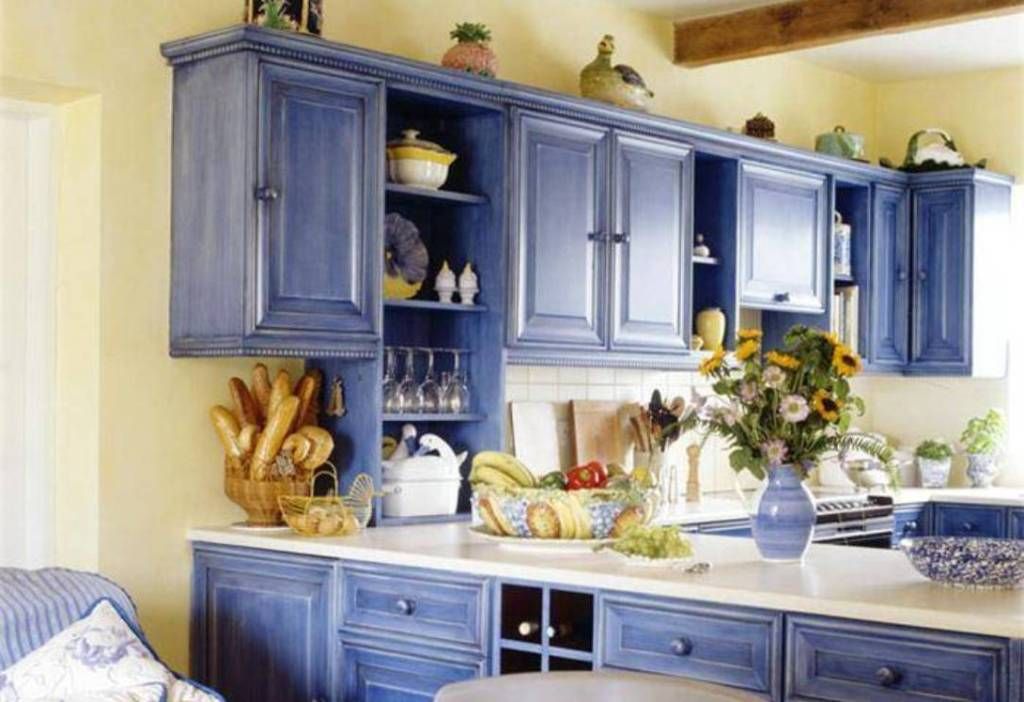 nine0003
The main thing is a competent approach, and simple coloring will give new life to an old headset.
Preparation
There are some preparations that need to be done before the staining process can begin. For example, facades must be removed before painting, as well as handles and all kinds of fittings, if any, must be removed from them. Decorative inserts and hinges must be sealed with masking tape to avoid getting paint on them. The work surface must be protected with a film or newspaper so as not to stain the floor or the working kitchen table. In addition, before proceeding with the staining process, you need to take care of your own safety and prepare protective equipment. Among them:
- gloves;
- points;
- respirator.
Personal protective equipment when working with paints protects a person from the harmful effects of chemicals.
Additional information: A respirator must be used even if the chosen paint is non-toxic, as dust is still unavoidable.

Priming and sanding
Remove the old headset coating first. This can be done by sanding the surface with sandpaper. First you can use sandpaper with a coarse grit, then with a fine one. A grinder or nail polish remover will help simplify the task. You can use a blow dryer to remove the PVC film. The film must be heated with a hair dryer from the front side, and then carefully remove it from the surface. nine0003
If there is a PVC film on the surface, remove it with a building hair dryer.
Important! During the performance of such work, a pungent odor will appear in the space, so it is necessary to carry out the procedure in a non-residential premises, if possible.
After sanding is complete, clean the surface with a damp cloth or sponge to remove dust. Next, you need to degrease the surface with a special solvent.
When choosing a primer, you need to pay attention to the fact that the material for plastic and wood will be different.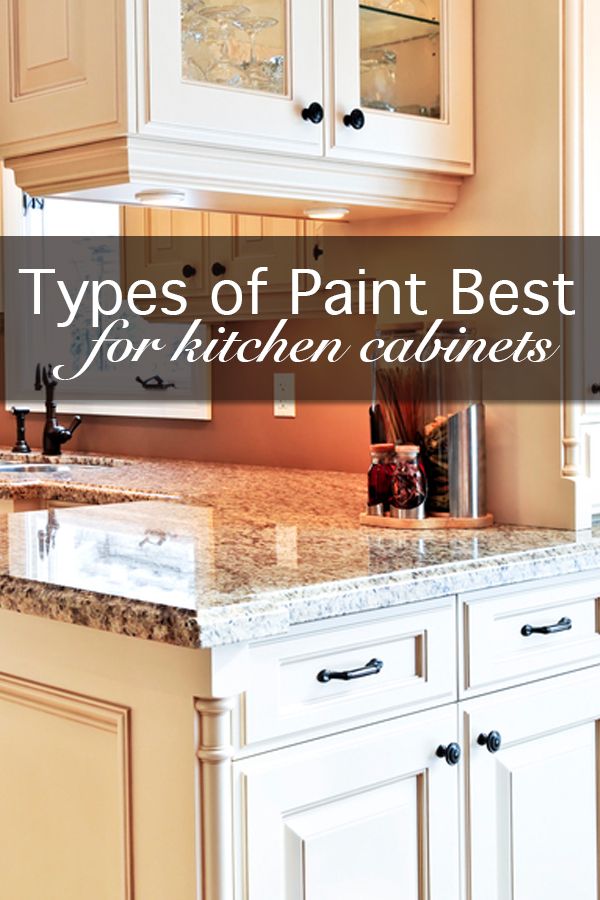 Do not neglect the advice of sales consultants. nine0003
To completely remove all irregularities, we apply putty. After drying, you need to process with sandpaper again.
It is important to choose a quality primer, as its quality depends on the quality of the painting.
The primer is usually applied in two coats. Each layer should dry well, after finishing the primer, you need to leave the product for about a day.
Coloring
Getting to the main part - coloring. In order for do-it-yourself painting to be done correctly, you need to apply 2-3 layers of enamel to the surface. To do this, use a brush with soft bristles or a roller. Tool movements must be in the same direction. An effective and convenient way would be to use a can. It distributes the paint without any effort, and the application is uniform. nine0003
For perfect coloring, apply paint by moving the brush or roller in one direction, no need to rush.
Additional information! If you plan to apply several shades, then the borders can be separated with adhesive tape, thereby protecting them from paint.

After painting is complete, allow the surface to dry completely. Usually, manufacturers write the time required for this on a can of paint or on a spray can.
If you are using a series of tones, cover the borders with masking tape. Of course, spray painting will be more accurate. nine0003
Lacquer finish
Lacquer for kitchen front surfaces, glossy or matt. You can choose the simplest option. A glizal can be a substitute for varnish. This substance is applied after painting, its task is to give a glossy sheen to the painted surface. Glizale needs to be diluted with water. All proportions and more detailed instructions for everything can be found on the packaging of the product.
Lacquering facades and countertops is a simple and fast process. nine0003
The glazing method can also be considered. With it, you can create decorative patterns on the surface. The technique lies in the fact that using polyethylene, a damp sponge and hard-haired brushes, you need to move from one part of the facade to another. Lines and ornaments can be absolutely chaotic. After doing this work, you need to leave the surface for about a week so that it dries.
Paint must be applied in the selected direction in the direction of travel of the tool. nine0003
Important! Lacquer and glisal have a strong pungent odor. It is important that the room is ventilated during work, and you also need to take care of good ventilation after work is completed.
Tips for painting a kitchen set with your own hands
Painting the facades of a kitchen set is a simple process. Every person can feel like a designer and update the interior in his kitchen, even if he has not previously encountered such an occupation and does not have any experience and knowledge in this matter at all. This article described in detail how to repaint a kitchen set with your own hands in order to fix all the most important things in your memory, we will once again list the main nuances and useful recommendations.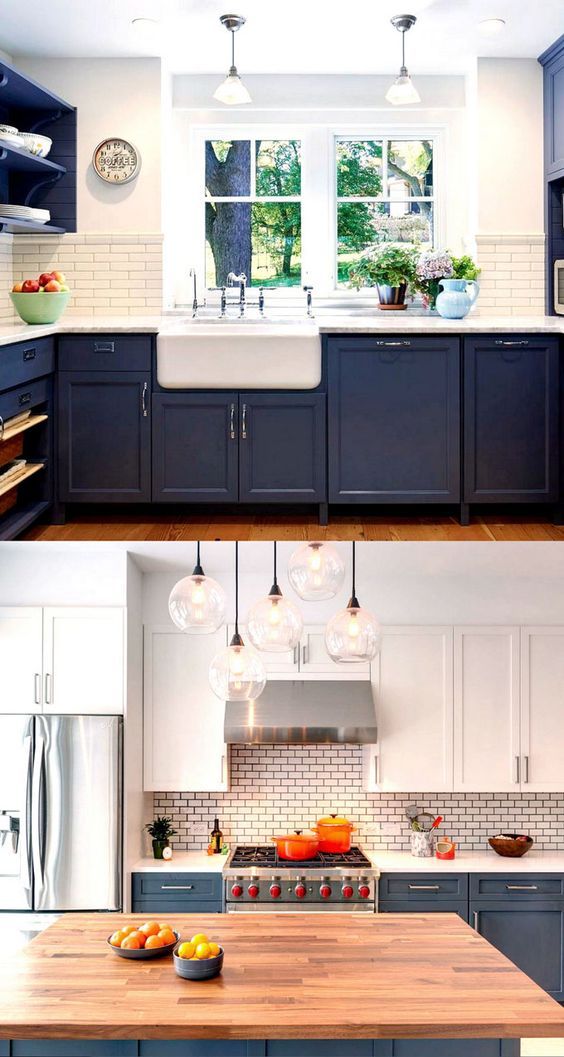 nine0003
- In order for the painting to be successful, it is necessary to choose the right paint and primer material.
- Do not neglect the preparatory work. It is important to protect the floor and work surface of the headset in advance, so that later you do not have to puzzle over how to get rid of paint splashes.
- In order to avoid inconvenience during the staining process and not have to be distracted by anything, you need to prepare all the necessary tools and materials in advance.
- All precautions must be observed and protective equipment (gloves, respirator, etc.) must be used, and the room must be well ventilated. nine0026
By following these simple guidelines, you can make the process of painting surfaces as simple and even enjoyable as possible. After all, it is important, when performing such work on your own, that it is not a torment, but becomes a pleasant pastime. The result will be of the highest quality and will delight the owners of the kitchen and guests of the apartment for many years.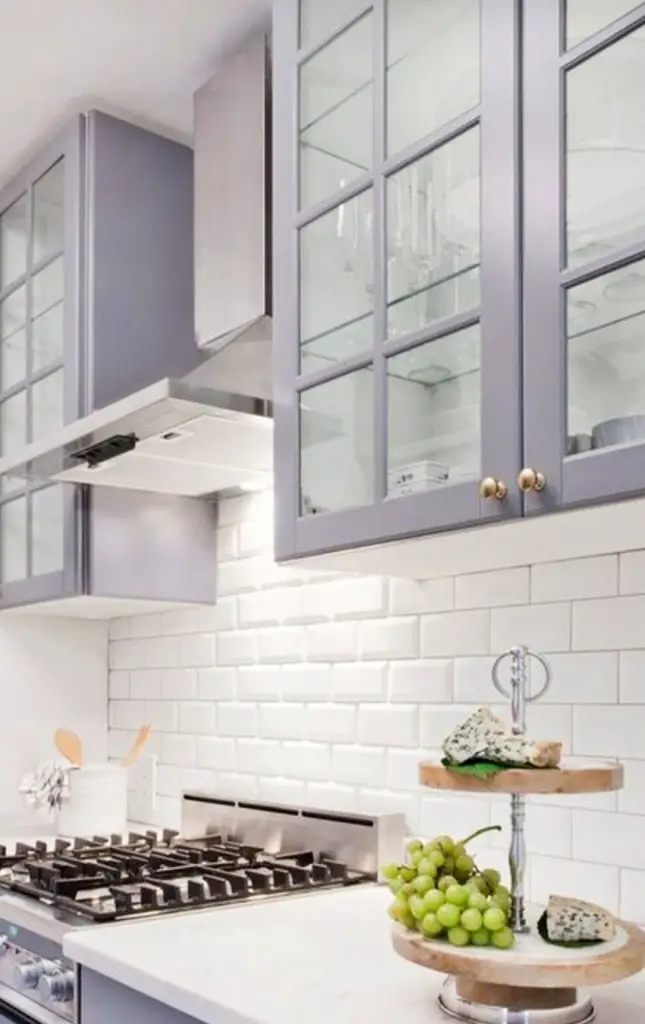
The main thing is a competent approach, and simple coloring will give new life to an old headset.
Video: how to repaint kitchen furniture with your own hands
50 kitchen design options after repainting
We paint the kitchen set with our own hands: a step-by-step algorithm
The kitchen is one of the most significant places in the house. In the evening, coming home from work or school, the whole family sits down at the table, has dinner, over a cup of tea, telling how the day went, what ideas you want to bring to life. That is why the situation in the kitchen affects our emotions, sensations. The mood immediately deteriorates, you don’t even want to enter the room if the furniture doesn’t look right. Therefore, it is necessary to bring the interior items in order. Even the simplest way - painting a kitchen set - will significantly change the look. nine0003
The kitchen is one of the most important places in the house.
Content
- 1 Advantages of painting with your own hands
- 2 Selection of color scheme
- 3 Selection of paint
- 4 necessary materials
- 5 necessary tools
- 6 step -by -step painting algorithm 7 wood
- 9 VIDEO: Kitchen renovation. Part 2.
- 10 50 photo ideas how to paint a kitchen set
Benefits of DIY painting
You don't need to invest a lot to transform kitchen furniture, you just need to buy paint. Painting a headset is a simple matter. If you have never done this before, then you can easily cope with this work.
The situation in the kitchen affects our emotions and feelings.
This type of furniture renovation is the most common option. There is no need to be a specialist and have a long work experience in this field. The method is very economical, but the result will exceed all expectations.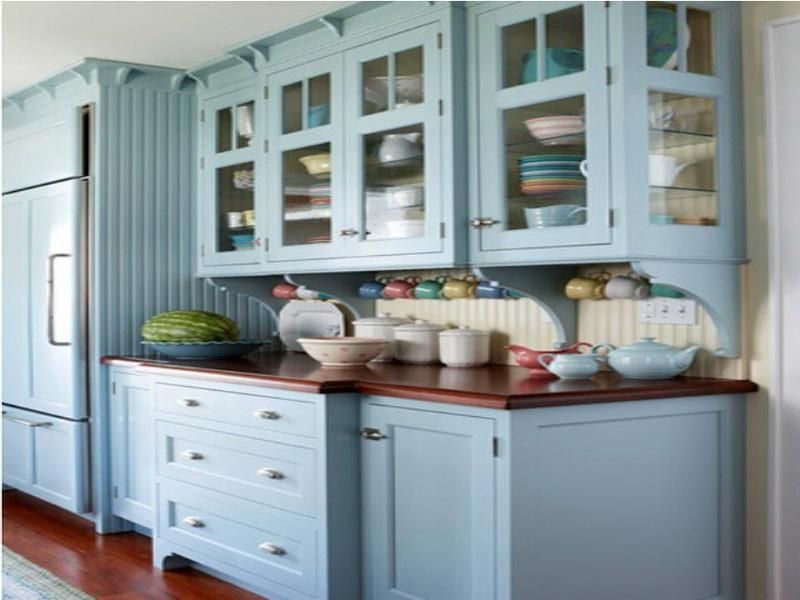 Coloring will take a fairly short time, without much diligence. nine0003
Even the simplest way - painting a kitchen set - will significantly change the look.
Choosing a color scheme
So, if you decide to repaint the kitchen set and decide what color it will be, be prepared for the fact that you will have to change the textiles on the windows and the upholstery of upholstered furniture. You can choose one color or several, which is becoming very popular, it is important that the color scheme is in harmony with the overall interior. It will be easy for those who have taste, but for beginners in this business it will be a little difficult. nine0003
Neutral solution. This includes all varieties of beige, as well as brown, black, gray and white. Combining these colors, it is quite difficult to make a mistake, you just need to carefully combine dark tones. The most common option: the upper cabinets are light in color, the lower cabinets are dark. This combination is more suitable for classic interiors.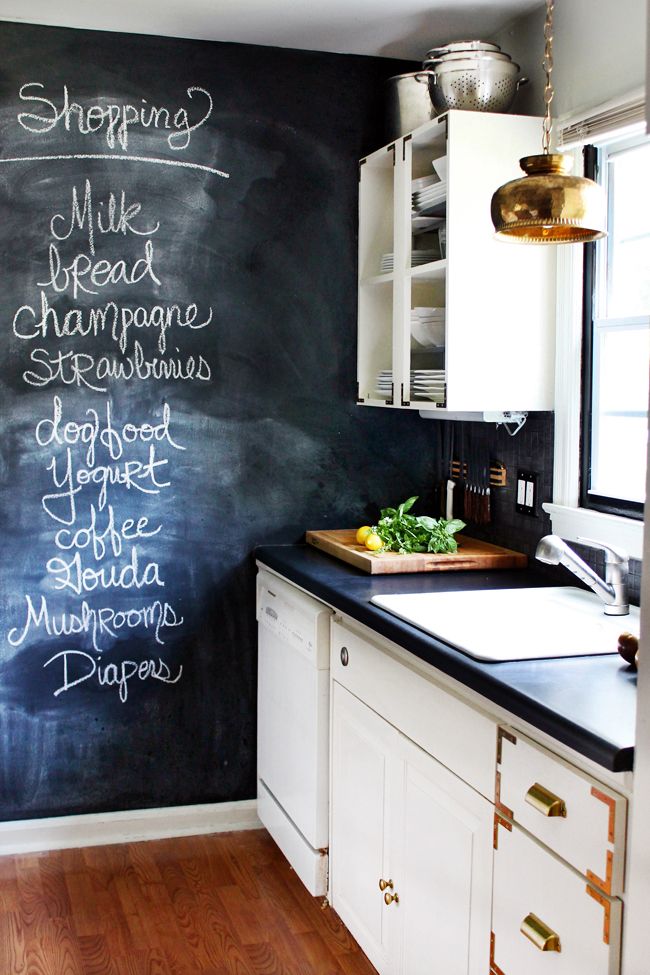
It is important to remember that it is better not to combine only dark or only light colors. Don't forget about bright colors. So, black can be combined with red, light green, mint, pink, beige, white with blue, lilac, blue, beige with red, lilac with cappuccino color, burgundy with cream, white, wood color, etc. Two bright or two neutral colors is an interesting option, here you should rely on your taste. The theme of vegetables and fruits will look no less interesting. nine0003
If you want to have an original interior, combine contrasting colors - yellow with lilac, orange with blue, blue with red or pink. For a more relaxed atmosphere - orange with red or yellow, green with yellow or blue with green.
To date, the use of several colors at the same time has become widespread. For example, a colorful detail can “dilute” two calm shades. You can use a different color for each individual facade - your kitchen will be in retro style. The main thing is a competent approach, and simple coloring will give new life to an old headset.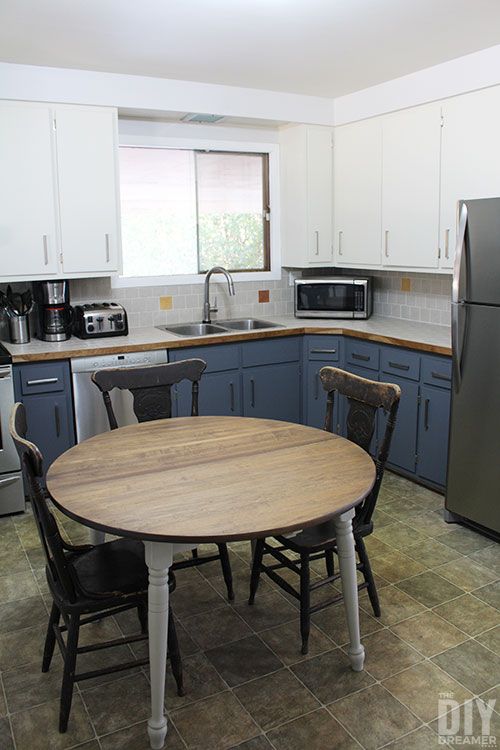 nine0003
You don't need to invest a lot to transform your kitchen furniture, you just need to buy some paint.
Paint selection
Today you can see a huge range of paints in stores. But not everyone is suitable for kitchen facades. Do not use a water-based emulsion and oil paint - they will lie unevenly and leak. Acrylic paint is also not recommended - it will not tolerate moisture and various cleaning agents.
After all the work done, we attach fittings, insert glass, hang cabinets. nine0003
The best option is aerosol alkyd paint in cans or car enamel. This material is applied evenly, without smudges, its properties are reliable, resistant, it easily tolerates humidity and temperature changes, there is a variety of colors.
Required materials
From the materials we need:
- spray paint,
- sandpaper,
- wood primer,
- solvent,
- putty,
- gloves,
- goggles,
- masking tape,
- decoration glisal,
- fittings (if you decide to change the old one),
- oilcloth or film, so as not to drip onto the floor.
Painting a set is easy.
Tools needed
Tools needed:
- roller or brush,
- grinder,
- hair dryer,
- screwdriver or screwdrivers,
- spatula,
- paint tray.
This type of furniture renovation is the most common option.
Step-by-step painting algorithm
How to paint a kitchen set? First you need to remove the doors from the cabinets, all fittings, stained glass or simple, mirrored rates. If there is a PVC film on the surface, remove it with a building hair dryer. We approach this stage of work very carefully so that not the slightest piece remains. Then we clean it from dirt and dust. Now you need to sand the surface using fine sandpaper or a grinder. The plane must be smooth, carefully processed, without minor defects. In the same way, we remove the old paint. In addition, you can use special liquids for removing paint and varnish. We wipe the surface again, remove the dust, it is better to use a brush so that the dust does not clog into the cracks. nine0003
For perfect coloring, apply paint by moving the brush or roller in one direction, no need to rush.
The next step is to treat the surface with a degreaser. We let it dry, prime the plane, applying the mortar on the tree. Leave to dry completely, ideally - for 24 hours. To completely remove all irregularities, we apply putty. After drying, you need to process with sandpaper again. After the surface is completely brought in order, we proceed to painting. nine0003
It is necessary to cover everything around with a film so that the paint does not get in.
For perfect coloring, apply paint by moving the brush or roller in one direction, no need to rush. If you are using a series of tones, seal the borders with masking tape. Of course, spray painting will be more accurate. Here we must remember that during operation, part of the material will be sprayed to the sides. Therefore, it is necessary to cover everything around with a film so that the paint does not get.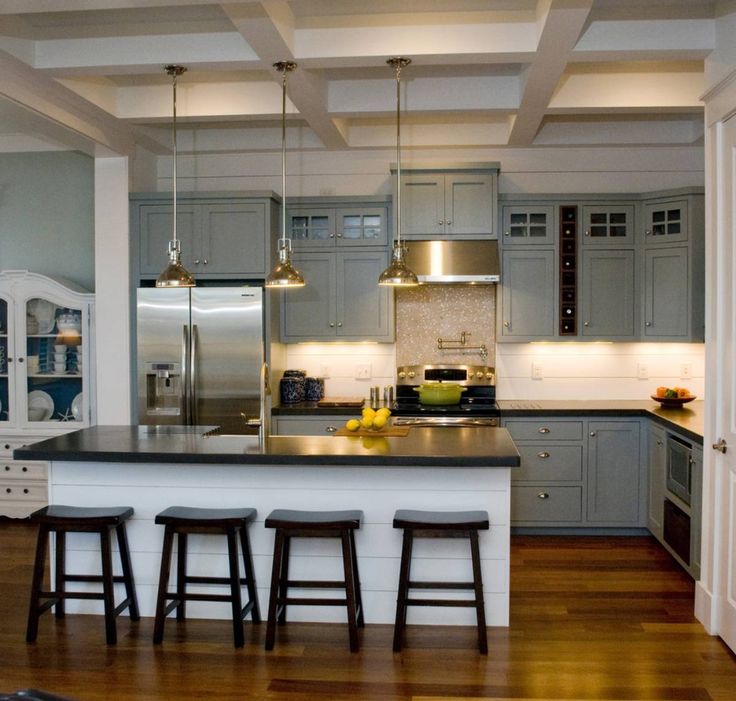 For a more saturated color, you can paint again after the first layer has completely dried. nine0003
For a more intense color, you can paint again after the first layer has completely dried.
After all the work done, we attach fittings, insert glass, hang cabinets. That's how easy and simple it turned out to be the original kitchen set, which we reconstructed on our own.
Coloring will take a fairly short time without much diligence.
The final stage - decorating
Many people want their kitchen to be unique and comfortable. Not everyone has the opportunity to change the headset to a new one. It is best to update the furniture that is unpleasant to the eye with the help of decoration. nine0003
You can choose any method, in addition to restoring the set, you can update the dining area by replacing the upholstery on chairs, stools or by sewing covers on them.
In addition to painting, facades can be tidied up with the help of self-adhesive film, its choice is very rich - a variety of colors, various patterns imitating wood.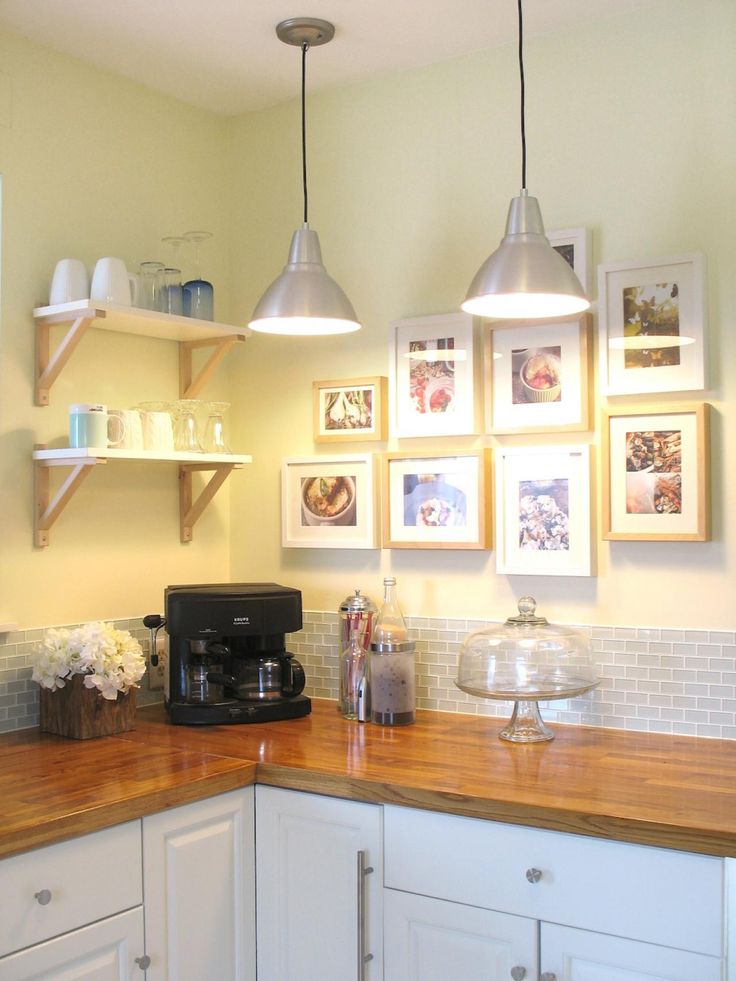 The material is applied to the treated surface and leveled with a special spatula. If bubbles appear during operation, they are pierced and pressed to the plane. If the film is pasted crookedly, with “wrinkles”, remove it and glue another piece. nine0003
To date, the use of several colors at the same time has become widespread.
If you don't want film, use photo wallpaper. The plane is pre-processed - polished, primed. After complete drying, glue the photo wallpaper. Then varnished to protect the surface.
You can use a different color for each individual facade - your kitchen will be in retro style.
If you want an original kitchen set, use decoupage. Here decoupage cards or napkins with a pattern are used, you can take various pictures cut out from magazines, print some pattern on a printer. We place the images on the facades, glue them on PVA, leave them to dry completely. At the end, we cover with a transparent varnish in several layers. nine0003
The main thing is a competent approach, and simple coloring will give new life to an old headset.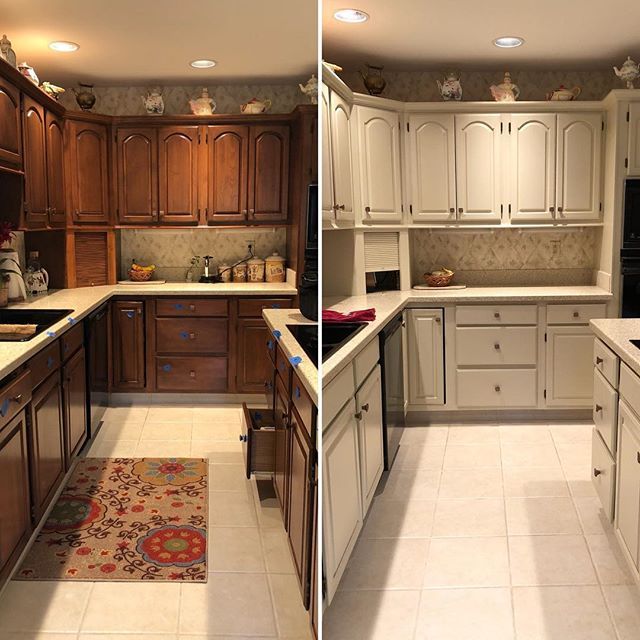
Variety can be added by sticking mosaics, tiles or decorative skirting boards - moldings. Details of the required length are glued to the surface, forming a frame.
The best option is aerosol alkyd paint in cans or car enamel.
You can choose any method, in addition to restoring the set, you can update the dining area by replacing the upholstery on chairs, stools or by sewing covers on them. You can also apply an image to the surface of the table using the decoupage style. nine0003
You can choose one color or several, which is becoming very popular, it is important that the color scheme is in harmony with the overall interior.
How to age a tree
This way of working with wood is very common. Designers use it in the restoration of furniture, in interior planning. You can age a tree on your own, and your unsightly furniture will look completely different, even more advantageous than factory furniture. How to age a tree at home? Here are some methods that are simple, but highly effective. nine0003
Pieces of the required length are glued to the surface to form a frame.
A special way of aging is brushing. Here, with the help of a metal brush, soft fibers are removed from the plane. The brush should move exactly along the line of the fibers. The pressure is applied evenly. Thus, a pattern is obtained, the texture of which can be multiplied by tinting. The next step is to sand the surface. At the end of the work, we remove dust and sawdust. Now we will tint using the Belinka tool of a dark shade. We apply tinting with a brush or roller. After a few minutes, very carefully remove the outer layer of paint with a sponge, thus showing the pattern of the tree. Let it dry completely, apply a clear varnish. nine0003
If you decide to repaint the kitchen and decide what color it will be, be prepared for the fact that you will have to change the textiles on the windows and the upholstery of upholstered furniture.
Large parts of the interior, such as ceiling beams, are decorated with this method of aging and further painting.
1. Multi coat .
Furniture is restored in this way, resulting in a wonderful effect. Before starting work, the tree must be scratched, chipped, indented, worn, even wormholes are applied. This will require certain tools. In order for the result to be obvious, to look authentic, it must be done, but in moderation. Then we take a dark-colored Pinotex tinting agent, apply a layer to the surface. Let dry and polish with sandpaper. nine0003
Variety can be added by sticking mosaics, tiles or decorative moldings.
Apply a second layer of white translucent Belinka, but in such a way that the dark base is visible. We leave to dry, then we take a metal brush and, moving along the fibers, we form a texture pattern. We dilute the white glaze in half with a solvent and apply it again to the surface.
For those who have taste, it will be easy, but for those who are new to this business, it will be a little difficult.
2. Open fire aging.
A gas burner is used here, the wood is treated with fire, the wood becomes saturated in color, then it is passed with sandpaper, developing the pattern. At the end, a protective varnish is applied.
Combining colors, it is quite difficult to make a mistake, you just need to carefully combine dark tones.
3. Using vinegar and steel wool.
This method is based on the chemical reaction of these substances and how the color and surface of the wood subsequently changes. The result is excellent. nine0003
The most common variant: the upper cabinets are light, the lower cabinets are dark.
4. Can use craquelure technique .
This method not only ages painted furniture, but also gives it a cracked look. Of course, these are not all ways to age a tree. In fact, there are more intricate techniques in technique. We have brought the most affordable.