How to make a shower room
Wet Room: How to Build a Wet Room
When it comes to bathroom upgrades, options abound. Now more than ever, it seems people are turning to the sort of renovations that make their shower and bath areas feel as spacious and spa-like as possible. And one increasingly popular option for achieving these spa vibes is by transitioning your traditional bathroom space into a wet room.
This May Also Interest You: What’s a Wet Room?
Read on to learn more about this burgeoning trend and to find out if it might be the right fit for you and your next bathroom renovation.
What Is a Wet Room, Anyway?
A wet room is a completely waterproof bathroom space with no separation between the shower area and the rest of the bathroom. Wet rooms are single level in that there are no steps, trays or raised portions at all. Because they utilize space more effectively, adding a wet room can make your bathroom appear larger. If tranquility and spaciousness are what you’re after, transforming an outdated bathroom into a wet room is the perfect way to maximize your space.
Wet Room Bathrooms: The Benefits
Once you start scrolling through images of wet rooms online, it might start to feel like adding one to your home is more fantasy than reality. After all, their super sleek, elegant appearance looks like something out of your favorite magazine.
But what if adding a wet room wasn’t nearly as difficult as you thought? What if installing a wet room was a smart and sensible upgrade that can be as useful as it is luxurious? The fact is that adding a wet room bathroom to your home offers a number of advantages:
Space Maximization
One of the most enticing reasons to install a wet room is its inherent space efficiency. Because everything in a wet room is waterproof, the need for a shower screen or enclosure becomes obsolete. Without the need for a separate shower area, the entire bathroom becomes an open area that appears larger than it actually is. Do you have a small bathroom with an awkward layout that makes mobility difficult? An open-plan wet room might just be your best bet.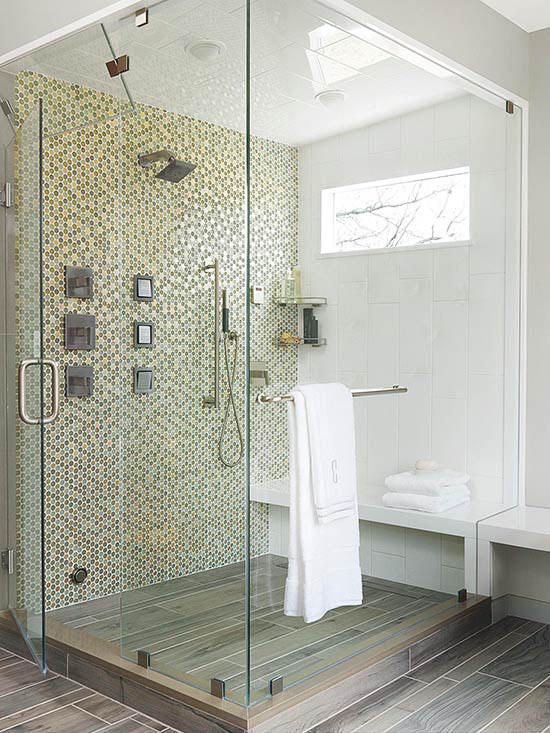
As you lay out your new bathroom, be sure to remember that these rooms are designed in such a way that everything can get wet. So you'll want to be sure to site your toilet and sink in such a way that they don't get sprayed by your shower. If there's not enough room to do so, a simple partition between the shower and toilet/sink space can do the job nicely — and using one made from glass will still keep the open feel of the room.
Easier to Clean
As an added bonus, wet rooms are easier to clean than conventional bathrooms. Think about it: There are no shower trays or screens to contend with and, with fully tiled walls and floors, a wet room cleaning routine is super simple. If you opt to install a wall-mounted toilet or sink to further open your floor space, cleaning gets even easier.
What’s more, when installed properly, your wet room floor will protect your subfloor better than standard bathroom flooring. Because the floor of a wet room is as waterproofed, or “tanked,” as a conventional shower pan, wet room floors prevent water from infiltrating your subfloors and are actually more protected against mold and mildew than a normal bathroom would be.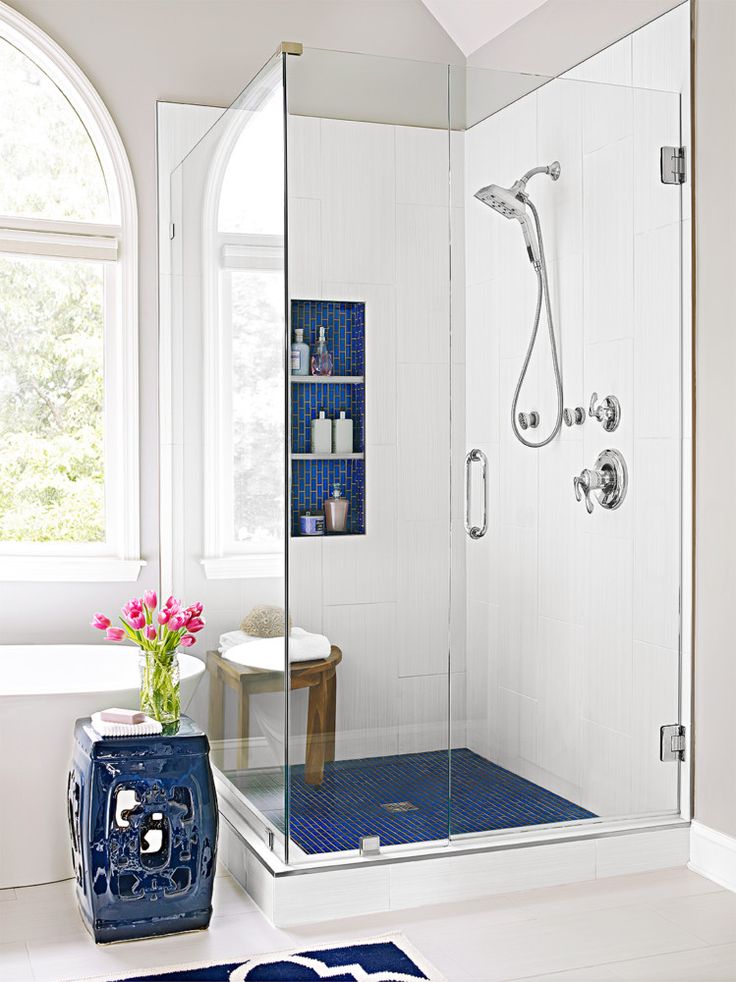
Safer and More Accessible
One of the best reasons for installing a wet room bathroom is its functional, accessible design. Whether or not you have any handicapped or elderly members of your family, a doorless, curbless shower area is just safer in general. If you’re concerned that a fully tiled floor might be a slip hazard, you can easily avoid installing polished tile and opt for a non-slip option like natural stone or porcelain.
Speaking of safety, be sure to plan your drain correctly. A popular option in wet room bathrooms is drains that run from one wall to another and funnel water to a central point. Such a drain system can act as something of a gutter that can ensure that water stays on one side while the other side stays dry.
Adds to the Value of Your Home
Open floor plans are in, and they’re here to stay. Sleek design and open spaces are timeless qualities that are both stylish and functional. Secondly, a bathroom without a shower alcove or a bathroom stall feels and looks larger, so increasing the functional space in a room is always a plus when it comes to adding value to your home.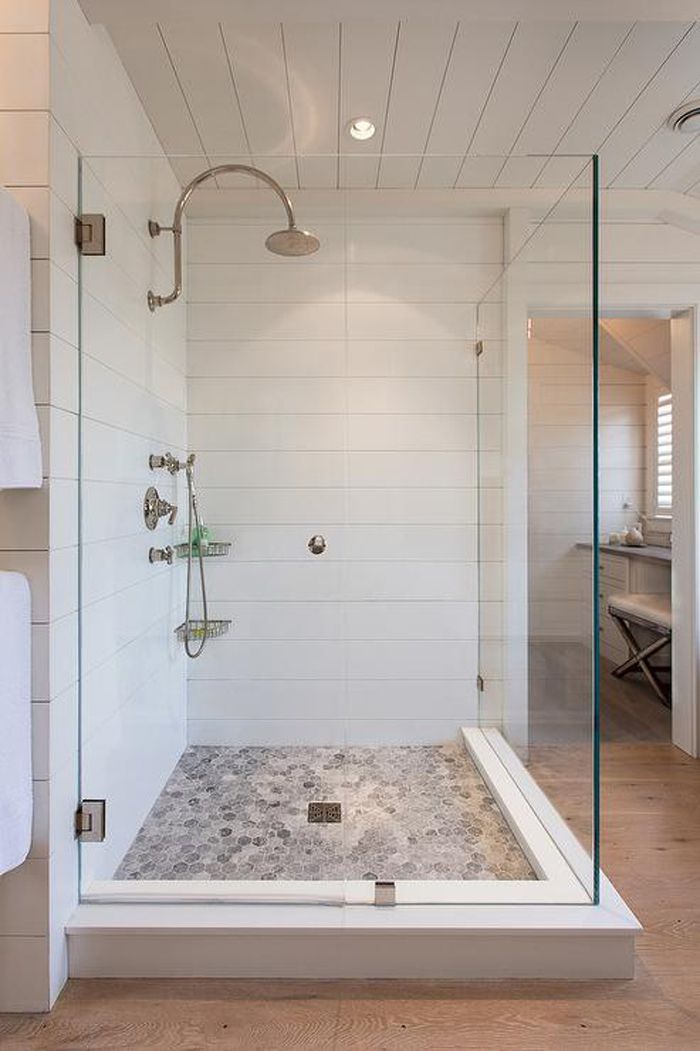
More Related Articles:
- How Much Does a Shower Remodel Cost?
- How to Tile a Shower in 7 Steps
- Making It Rain: How Much Does It Cost to Install a Shower?
- How Do You Install a Shower? Follow This Guide
- How to Remove a Bathtub in 4 Simple Steps
Installing a Wet Room
If you can’t already tell, adding a wet room shower area to your house is a gift that keeps on giving. That said, the idea of ripping apart your bathroom can feel like a pretty daunting and even scary task. And let’s be clear: Unless you’re an advanced DIYer or all-around remodeling expert, installing a wet room is a job that’s best left to the professionals. Ensuring that everything is graded and waterproofed properly is a necessary aspect of a wet room installation, and a pro will be able to make sure there aren’t any water leaks in your new space.
But still, how do you begin designing your new wet room? Whether you’re in the process of a new build or remodeling your existing bathroom, there are crucial aspects to a wet room bathroom design that it pays to stay aware of. Here are some considerations to keep in mind while you’re in the design phase:
1. Examine Your Bathroom Floor
Before you dive into designing a wet room, you first need to examine your bathroom floor to determine how complex the install will be. In fact, it’s generally accepted that the floor type dictates every aspect of the installation process.
Consider the two most popular floor types: timber and concrete. Timber flooring is perhaps the most popular type of flooring and, if you are planning on installing a wet room upstairs, you are most certainly working with timber flooring. In timber floors, joists run parallel to support plywood subflooring. To install a wet room onto a timber floor, you’ll first need to have a floor former installed onto your subfloor. Floor formers have built-in gradients that work to channel water into the drain. On the other hand, if you are installing a wet room onto a concrete subfloor, you’ll need to first install a drain screed to enable the water to channel away from the shower area and safely exit into a wastewater pipe.
2. ‘Tank’ the Wet Room
One of the key benefits of a wet room bathroom is that the entire floor area, as well as the lower section of each wall, is properly waterproofed — “tanked”— to prevent water from damaging the structural elements of your home. The waterproofing process can be time-consuming and can account for a hefty portion of your project’s budget.
To properly waterproof your wet room area, the entire floor section (including the lower section of the walls) will need to be primed and then have a membrane applied that will need to be set or cured. You can choose to use a liquid membrane like Jackoboard Wet Room Waterproofing Tanking Kit that’s painted on with a roller, or a physical membrane such as Impey TileSafe, which is laid onto the floor before tiling.
3. Choose Flooring and Wall Coverings
Once the room has been properly waterproofed, the surface areas are ready to be applied. Tile is by far the most popular choice for surface areas in a wet room, and for good reason. Tile is a sturdy, aesthetically pleasing option that is both easy to maintain and can stand the test of time. However, when choosing tile, it’s important to go for a material that’s not inherently slippery, like ceramic tile. Although they need to be sealed after installation to prevent damage and staining, natural stone tiles are one of the most popular choices for surface areas in a wet room due to their rustic, hard-wearing finish, but also because they’re less slippery than other types of tile.
In addition to tile flooring, vinyl and rubber flooring are other popular choices for a wet room bathroom area. Because of their durability, cost-effectiveness and the wide variety of available patterns, colors and textures, vinyl and rubber flooring remain good waterproof options for your new wet room, particularly if tile is out of your budget.
In terms of wall tile, you can really let creativity be your guide. Keep in mind that porcelain is less porous than ceramic, so it might be a good choice for keeping moisture away from the back of the tiles.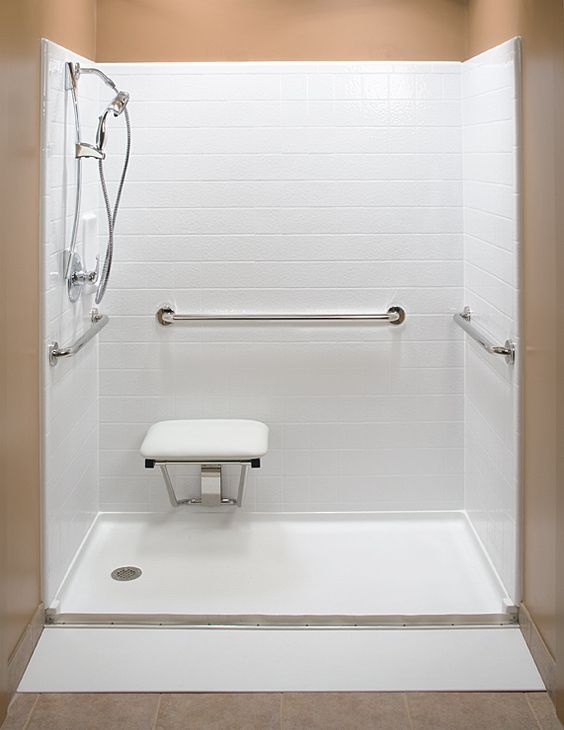 Glass tiles are also a popular and waterproof option.
4. Vent It
One other thing to keep in mind when planning your wet room: Be sure to have good ventilation. This can be as simple as a standard vent fan, but it's critical that you include one in your planning because wet rooms tend to get moisture over a larger surface area. If that moisture doesn't have a place to vent, mold and mildew growth can occur.
Wet Rooms: Worth the Work
Whether you want to add value to your home, increase accessibility or simply update your space, adding a wet room may be the way to go. And doing so might be less complicated than you think.
How to Turn Your Bathroom into a Wet Room
Posted by Catherine Parkinson on Thursday 30th May 2019, updated on Wednesday 1st February 2023
For many people, the idea of a luxurious wet room is a far-off dream, but in reality, the process is not as difficult as you might imagine! The idea of a wet room is simply that instead of having the shower boxed off in one corner, the bath is removed and the entire room becomes one luxuriously sized “shower room”.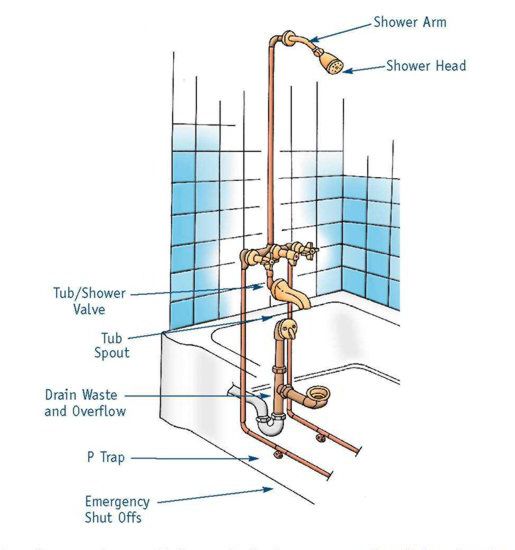 The room is fully drainable and often the basin and the toilet will remain in place so that you can still utilize these necessary details.
Before you start getting to work on your new wet room, take a lot at the many perks and some disadvantages of these luxurious spaces:
Advantages:
Attractive aesthetic
Wet rooms boast opulence and extravagance, making them very attractive spaces. You can enjoy the freedom to design your wet room however you like, whether it’s bright colours or simplicity. Wet rooms also make the perfect environment for growing certain plants such as ferns and this addition can create a magical atmosphere and really make your morning shower into a special experience!
User-friendly
Due to its large, open space, wet rooms offer a practical space that allow disabled users to freely access the shower without an edge or step to manoeuvre over. Wet rooms can also be a great choice for families with children as it is easier for children to manage in a larger space.
Simplistic and easy to clean
These spaces, whether they’re large or smaller, are simple to clean as there are less nooks and crannies to work with! It’s much easier to keep a wet room squeaky clean due to its simplistic layout.
Adds value to your home
Adding a luxurious wet room to your bathroom is also the perfect way to increase the value of your home. Due to the popularity of these opulent rooms, by adding one into your home, you’ll be appealing to a wide range of people and instantly increase the value of your house.
Disadvantages:
The main issue with a wet room is the flooring. The floor must be of a lower level in order for the water to drain off. This can be fixed by adding a “pooling” area around the plughole, so that there is a gradual incline and all water heads in the right direction. Many people who opt for wet rooms also choose to fully tile the room and add integral tiled seating for a really extravagant feeling to the space.
For smaller homes, wet rooms can be problematic owing to the splashing which will inevitably result from showering in the open. Wet rooms can also be chilly so under floor heating is usually recommended. The lack of a bath could put future buyers off as many people want at least one bath in a home.
How to build your wet room
Now you know the perks of a wet room, it’s time to get into the building side! When thinking of building a wet room, the process will inevitably differ depending on your bathroom’s set-up and the type of products you use. However, building a wet room should follow these general steps:
- Remove your bathroom floor to expose the floorboards where the wet room floor boarding will be placed, being aware of any pipes or cables
- Position your waste pipe and drain base for your shower
- Floor panels will be re-laid with a hole cut in for the drain (it is essential this is completely level to allow the new floor gradient to work!)
- The wet room floorboard can be fitted into place (it should fit perfectly with the hole aligned for the drain)
- The rest of the bathroom floor will be laid with waterproof boarding.
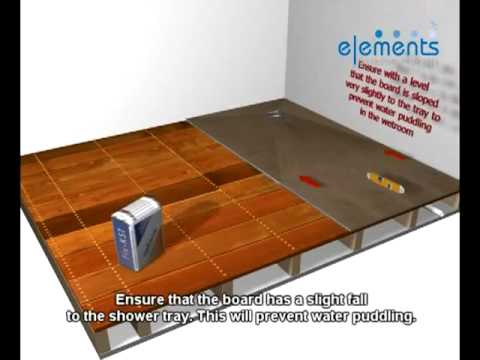
 These boards will have a slight gradient to ensure the water runs towards the drain
 - The floor will then need to be coated in waterproof tape, covering and sealant to ensure all surfaces and gaps are watertight
- It is important that the floor gradient is maintained at all times to ensure the water can drain
- Once all the waterproofing materials have been allowed to set and dry, the floor tiles can be laid
Lastly, here are some top tips and crucial elements we think you’ll need to create the finishing touches to your new wet room:
Waterproofing
One of the key elements of a wet room conversion is to waterproof your room. If you decide to miss this crucial step, you could end up with a wet room that leaks or struggles to manage moisture, and nobody wants that! By waterproofing your new wet room, you reduce the risk of any unwanted water damage.
Flooring
In order to achieve the proper flooring in a wet room, it's a good idea to install a “sub floor” which is basically a second floor which is then covered over with tiles. Other options involve large tray-like surfaces being installed in the room so that the entire surface slopes towards the drain, ensuring that your room is fully dry when not in use. We recommend the AKW Tuff Form Wet Room Former.
Tiling
Tiling is an important stage of creating a new wet room, as it’s necessary to have the room fully tiled from floor to ceiling. While it may seem like this could be a costly exercise, it does afford some wonderful choices in terms of design and colour! We suggest adding tiles such as Starline Bathroom Ceiling Panels or Linda Barker Wall Panels for the perfect, stylish touch.
Shower and shower enclosures
Enhance the luxurious feel of your new wet room with the perfect shower and shower enclosure. Stylish mixer showers are a popular choice when it comes to wet rooms to complete the luxurious feel, but the right shower can be any style you like!
Complete the look with a stylish yet simplistic shower enclosure, designed with function and style in mind.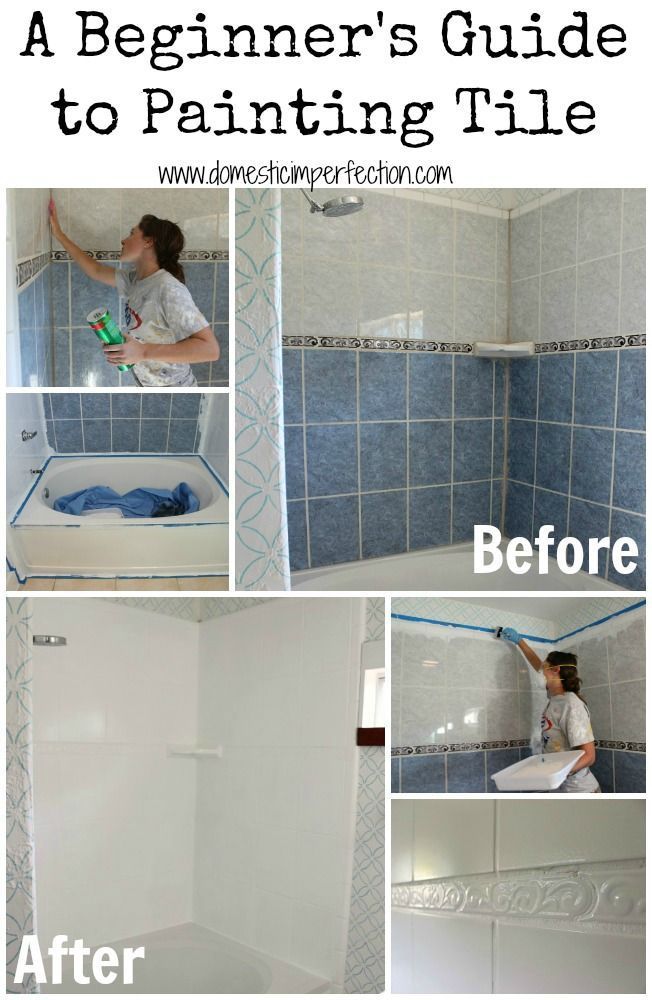 Create your ideal showering space by using a single wet room panel such as the Diamond Wet Room Shower Screen to section off an area of your wet room with ease, or a more extravagant double panel such as the Diamond Wet Room Shower Screens might be more to your liking. Whatever style you choose, these enclosures are sure to bring you a durable wet room solution.
Discover our range of wet room shower enclosures here where you can choose the perfect design for your new wet room.
Wet room kits
Wet room kits offer an easy- to install solution when creating your dream wet room. Our wet room kits allow you to tile your own 10mm porcelain tiles over the top, creating a minimalist, seamless wet room feel in your bathroom! Discover all of our wet room kits here.
We love seeing your bathroom makeovers and sharing them on our Instagram page - if you've had a Plumbworld renovation, tag us in your photos to be featured!
We would love to know, so why not share your favourite designs on social media with us?
Find us at:
Facebook | Twitter | Instagram
| TikTok | Pinterest
Alternatively, sign-up to our newsletter for the latest offers, newest product launches and advice.
Are you planning a new bathroom or kitchen makeover? Shop online with Plumbworld for guaranteed lowest prices and next day delivery.
Don’t forget to check out the rest of our blog for more bathroom and kitchen advice.
Do-it-yourself shower cabin: how to make a cabin yourself But what if the post-quarantine wallet is thin or if a standard cabin does not fit into your bathroom? We tell you how to make a shower cabin with your own hands and what to look for before buying spare parts.
- Buy a ready-made shower enclosure or make your own? Pros and cons
- Types of home -made shower cabins
- How to make a shower with your own hands:
- how to make a sincer cabin without a skill.
 pallet
 - How to make a shower cabin with your own hands from tiles
2. Choosing the material for partitions and doors
3. We select plumbing and accessories
In Russia, the most popular shower cabins are 90 x 90 cm in size, their price starts from 13,000 ₽. In such a cabin you can’t clear up, but you can wash yourself comfortably.
And what about those who live in Khrushchev or a small family (read half of the country)? Shower cabin 90 cm does not fit there. 🙁 It would seem that we take models of 80 or 70 cm, and the trick is in the bag. But it wasn't there.
It is impossible to bend over in a narrow cab. What if the soap falls? And how to rub the heels with a washcloth without clinging to the mixer and the shelf? And in order to lather like a human, you need to turn off the water, otherwise it washes off. Torment, not washing.
Therefore, instead of a prefabricated shower enclosure, many install a prefabricated shower enclosure or build a shower enclosure on their own. But this solution is also not suitable for everyone. We recommend weighing the pros and cons first.
Only a child can wash comfortably in a small cabin
Buy a ready-made shower cabin or make it yourself: pros and cons
There are cases when a home-made shower cabin will not solve the problem, but only bring new ones.
When a DIY shower is not your option:
1. If you are not ready to spend time and effort choosing plumbing.
Factory shower cabin is fully equipped - assembled, connected and you can wash. But to make a shower cabin yourself, you will need to tinker with the selection of suitable spare parts.
2. If you decide to build a shower room in a wooden house.
Wood is a capricious material and does not tolerate high humidity. Therefore, before building a shower cabin with your own hands in a wooden private house or in a country house, you will have to lay waterproofing and carry out good ventilation. This entails additional costs.
If the walls, floor and ceiling are not protected from moisture, then after a month mold will appear on the tree. And then the repair will cost a round sum.
And the finished cabin of the closed model is a sealed box, which means that splashes from such a cabin do not scatter on the walls and floor. Humidity in the bathroom will be less and you will protect the wooden walls.
An example of the design of a shower cabin in a wooden house
3. If your family has a small child and there is no bathroom at home.
The child quickly grows out of the baby bath, and it is too early for him to wash himself. If you have a ready-made cabin with a deep pallet installed, you will not encounter such a problem.
It is convenient to bathe a grown child in a deep shower tray, but it will not work in a shower cabin without a tray or with a low tray.
If you decide to make a shower cabin with your own hands, for reasons of economy, we recommend that you first carefully calculate everything.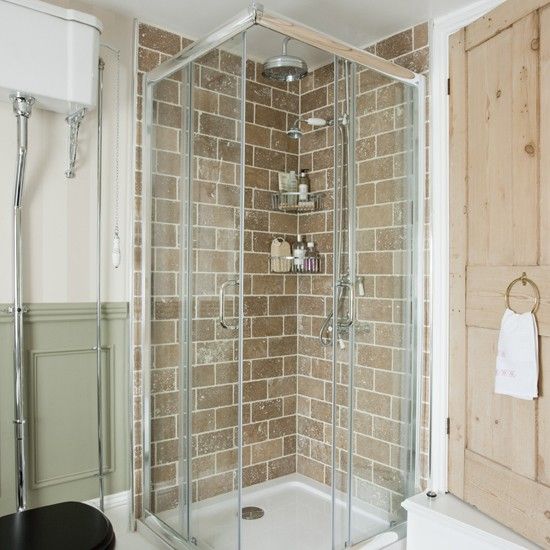 Given the preparatory work, a home-made shower cabin is more expensive than a finished one in the average price range. Only a primitive do-it-yourself shower stall, a shower tray, a shower faucet and a curtain, will come out comparable in cost.
But a huge plus in favor of your own version of the shower is that you can make such a cabin even in a small bathroom and how you want.
Advantages of a self-made shower cabin:
1. Can be made to your size and any design
For people under 2 meters tall or weighing more than 100 kg, standard shower cabins are not suitable. And for your cabin, you can buy a pallet of the right size and install a barrier or curtain at the right height.
At the same time, realize any design: lay out the shower tray with tiles or create a mosaic, put stained glass or with a pattern - whatever you want.
2. More practical.
A modern stationary shower cabin resembles a spaceship: a bunch of lotions, it remains only to understand why they are needed.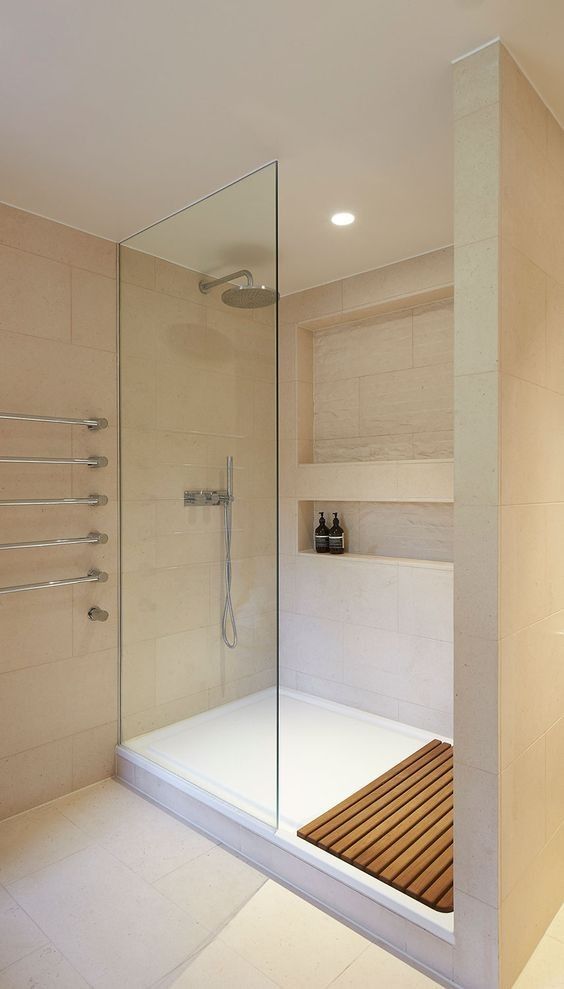 We asked customers how often they use the extra features of the shower enclosure. So 50% use a hand shower and sometimes a tropical one. And the rest of the functions - 3-4 times a month.
In addition, if you have a weak water pressure at home, which is often found in old apartment buildings, the hydromassage jets will flow in a thin stream - there will not be enough pressure. The sad thing is that you bought a cabin with hydromassage and already paid for this feature. 🙁
3. More durable and easier to clean.
If the tiles are of good quality, they will last for decades. In a homemade shower cabin, all parts are in sight, so there are no hard-to-reach places for cleaning. The only thing to consider when planning is protection from flying splashes. Otherwise, after each shower, you are tormented by wiping the water in the bathroom.
Types of self-made shower cabins
A factory-made shower cabin is a closed type cabin (with ceiling and walls). For self-installation, every tenth consumer chooses open-type corner showers.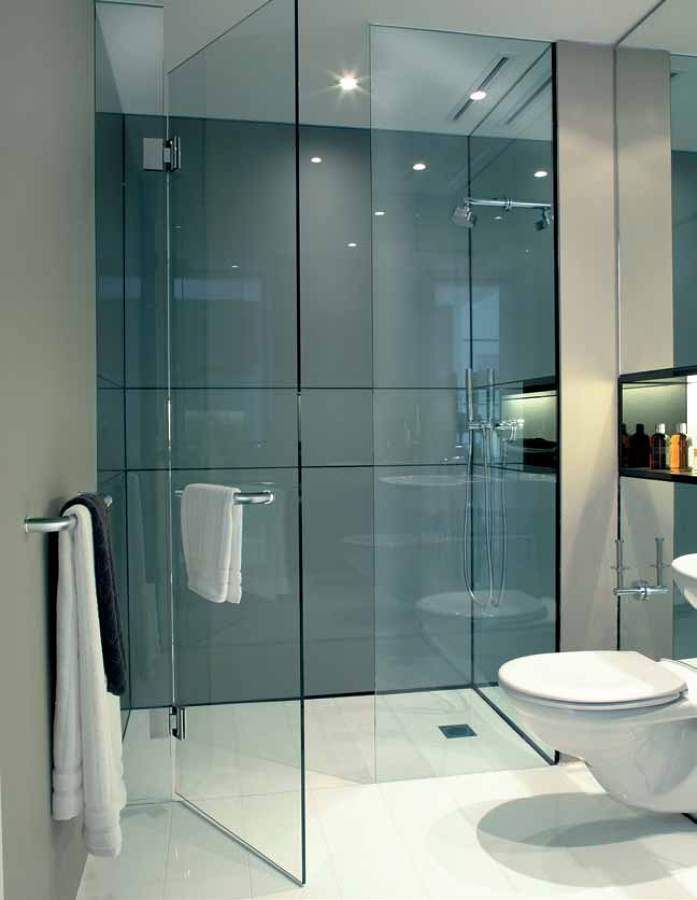 Budget option - open shower with plasterboard wall and curtain . At the same time, remember that you need to perform waterproofing.
Another medium-priced option with a better design is the shower enclosure with glass partition and door . If you want to design a custom shower room, then here you are given complete freedom: install honeycomb glass partitions, lay out a brick or block partition and tile it, or use unusual shapes and colors. And also there are ready-made folding doors for shower enclosures (accordion).
In order to make a shower cabin with their own hands on the street, in the garden or at their summer cottage, zealous owners use polycarbonate, but such a cabin does not look very good.
shower enclosure with folding
glass door
individual design
shower room
summer shower cabin
for summer cottage
Which design to choose: shower cabin with tray or without a tray is a matter of 190 taste14012 without a tray Just be aware that the cab without a pallet requires a slope, so you may need to move the floor. If you still decide to leave the bath, there is a good solution - install a fixed or sliding curtain on the side of the bath .
Bathtub with curtain
How to make a shower cabin with your own hands
Building a shower cabin yourself is much more difficult than assembling a finished one. Therefore, before starting preparatory work, be sure to check the layout, dimensions and make sure that the selected materials are suitable for the room.
1. Choosing a shower tray
At this stage you are faced with a choice:
- Build a shower enclosure without a tray
- Install the finished shower tray
- Lay out the brick and tile tray
How to make a shower enclosure without a tray
A shower enclosure without a tray looks more stylish because the floor in the cabin is flush with the floor in the bathroom. But for such cabins, a special drain is needed - a shower ladder or a shower channel.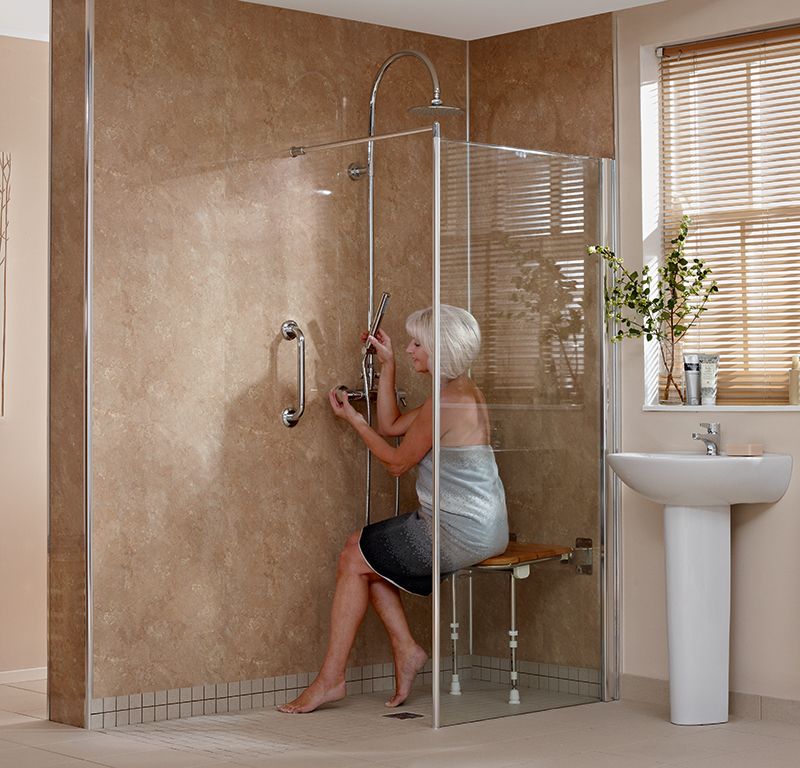 To install it, you need to make a slope of the floor towards the drain hole. Before installation, it will be necessary to carry out waterproofing, make a concrete screed and then lay the tiles, also observing the slope. Otherwise, the water will stagnate.
Fitting a drain and plumbing to a cab without a sump is no easy task. If suddenly the masters screw up at this stage, and problems are discovered only when laying tiles, then you will have to disassemble the floor and correct communications. Therefore, if you are not well versed in plumbing, it is better to hire a specialist for these works. But on the installation of the fence, you can already save money and do everything yourself.
Shower drain
How to install a shower tray
It will be cheaper to use a prefabricated shower tray. On the market there are pallets of different shapes, depths and sizes. As for the material, they often buy 2 types of pallets - acrylic and enameled.
Acrylic pallet is non-slip and lightweight, which means less stress on the floor. And also it warms up faster, which you will definitely appreciate in the off-season, when the heating has not yet been turned on. But if acrylic is not cared for, then over time the surface turns yellow. 🙁
The enamel tray is heavier, but not as picky to clean. At the same time, when wet, the enamel slips, so we recommend putting a silicone or rubber mat in the enameled cabin.
How do you know what size pallet you need? It's simple: stand in a corner and measure the distance from the corner to the end of your outstretched arm. So you determine the size of the cabin on the walls. In a cabin of this size, you will not be cramped.
How to measure the size of a shower tray
But when you figure out the layout of the cabin in height, consider the height of the podium under the tray and the distance between the partitions and the ceiling. When installing a shower enclosure, it is important to leave a margin between the glass and the ceiling so that it is not stuffy in the shower and that steam does not accumulate.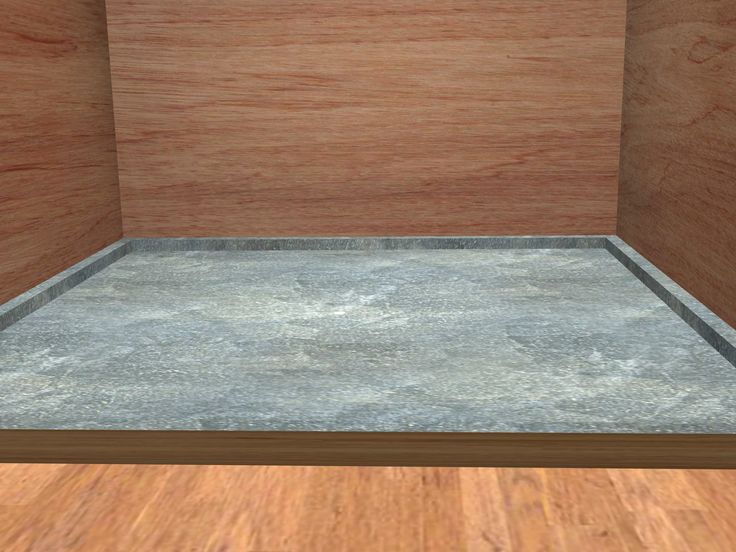
80% of consumers choose radial corner shower trays because they such a cabin takes up less space, and it is easier to fit it into the layout of the bathroom. Such pallets are also called "quarter", because they represent one fourth of the circle.
Shower tray shape
Shower trays also vary in height. Low pallets are convenient for older family members, they do not have to raise their legs high. And in a deep pan you can draw water. Soaking up in it, like in a bath, will not work, but bathing a child or rinsing clothes is completely.
A siphon is installed to drain a shower cabin with a tray. When choosing a siphon, be sure to pay attention to the size of the drain hole, the size of the corrugation and the height of the pallet. High pallets are also equipped with a "drain-overflow" system, which insures that you will flood your neighbors.
-
Add to favorites
-
Add to favorites
-
Add to favorites
0066
If you want to build your own shower tray, it's important to know the details.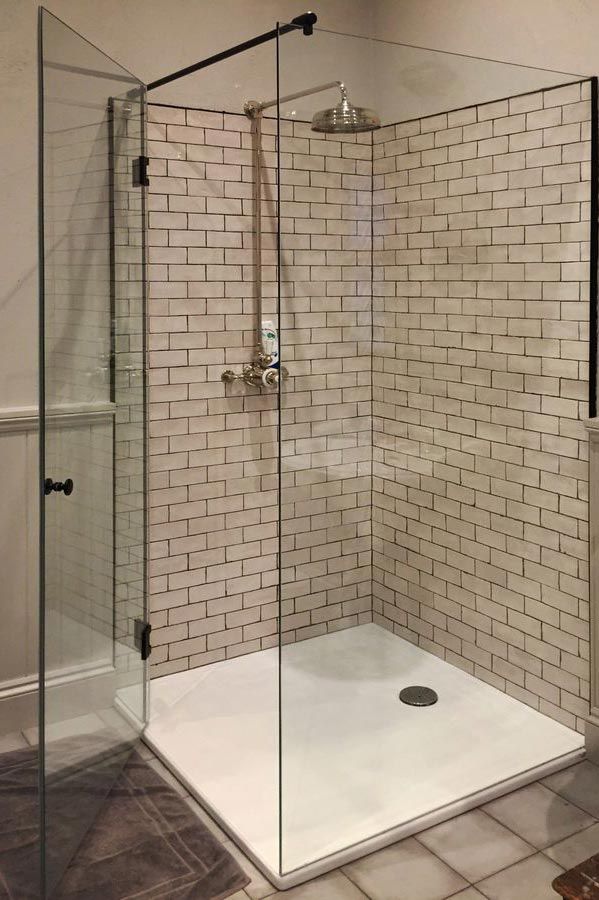 A homemade pallet is made of bricks and lined with ceramic tiles or a mosaic is laid out. Before buying, check if the tile is non-slip. Slipping on a wet shower floor is dangerous.
Before laying bricks and pouring concrete, the site must be cleaned, waterproofed and sealed. A proven option is to use roofing material and bituminous mastic for these works. When pouring concrete, do not forget to make a slope for draining.
Making a pallet out of bricks
A pallet with a mosaic of tiles
2. Choosing a fence and wall cladding
Whichever pallet you install, you will need to protect the walls of the bathroom from moisture. A cheaper option is to put plastic or glass partitions and doors. Tempered glass, of course, will last longer than plastic, but it also costs more.
Choose the door that suits you: swing (single or double), sliding or folding. To put a door or not, decide based on how spacious your bathroom is and whether the door will interfere.
To protect the cabin from leaks, it is necessary to put seals around the perimeter of the partitions on the lower joints and seal the seams between the rear walls and the pallet. If the sealant comes off, water will begin to flow into the cracks, and then you will encounter a terrible smell and mold.
fittings for partition walls and doors
-
Add to favorites
-
Add to favorites
-
Add to favorites
- 007
Spare parts for shower enclosures, Glass seals
Magnetic seal, for glass 4 mm, angle 180°, 2 meters (2 pcs) DC 801
Rating 5.00 of 5
2 reviews magnetic silicone
tapes
- For doors with 180° closing angle
- Suitable for glass thickness 4 mm
- Length - 2 m
SKU: DC 801 4
The back corner of the shower enclosure can also be tiled. Sometimes, in order to save money, they sheathe the back and walls of the bathroom with PVC panels. It's cheap and looks acceptable, but we don't recommend panels. Firstly, the plastic panels are flimsy: it is worth touching a little, and a scratch remains. And secondly, if you decide to hang a seat or a shelf, you will have to install an additional mount, since the panel will not support the weight.
3. We select plumbing and accessories
The faucet is the main element of the shower, let's analyze it in detail. Mixers differ in the type of installation (wall-mounted and built-in) and in the type of connection (universal and with a connecting pipe). More often, built-in universal faucets are installed in home-made shower cabins and corners. This allows you to position the mixer handles at a convenient height and hide communications, but it complicates repairs when the mixer breaks.
If you want to avoid unnecessary problems, we recommend choosing mixers that are resistant to corrosion and water hammer.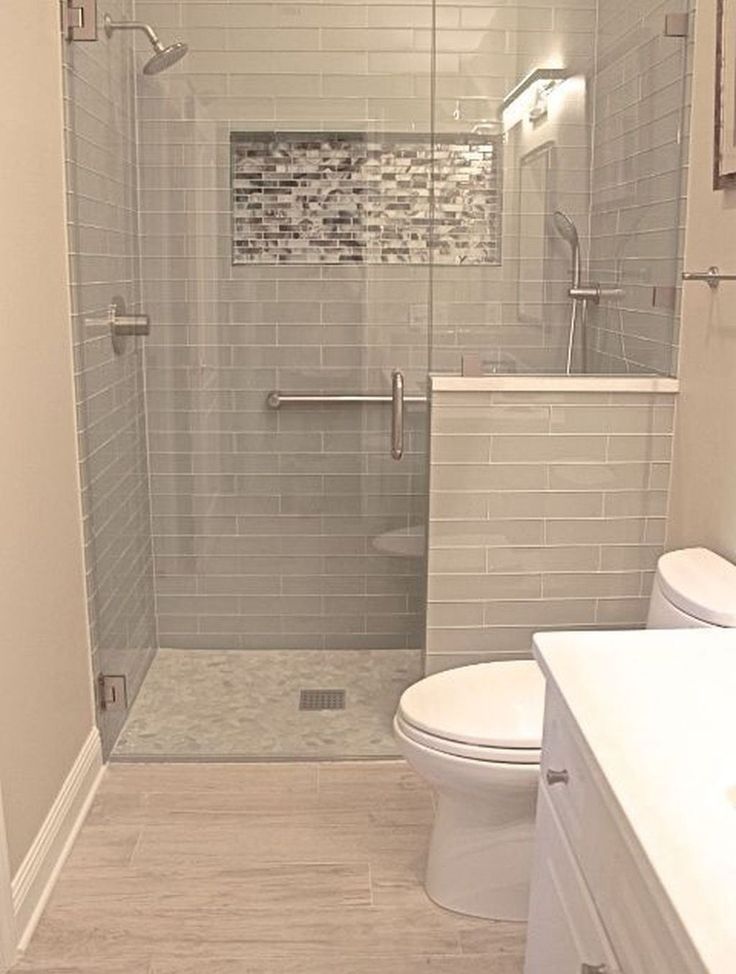 A proven option is brass and metal mixers. Our store offers both simple economical solutions (faucets with switching only to a hand shower), and mixers with up to 5 modes with switching to hydromassage, tropical and hand showers, as well as equipped with a thermostat.
-
To favorites
-
To favorites
-
Add to favorites
As for the rest of the shower enclosure, it all depends on your taste, budget and bathroom layout. Install a large rain shower or a more modest one, whether to bring a hydromassage, put a seat made of natural wood and a simpler plastic one - you can plan all this in a future cabin. Or maybe you want to put speakers to listen to music in good quality, or do you have enough shelves to put your phone there? Choose at your discretion.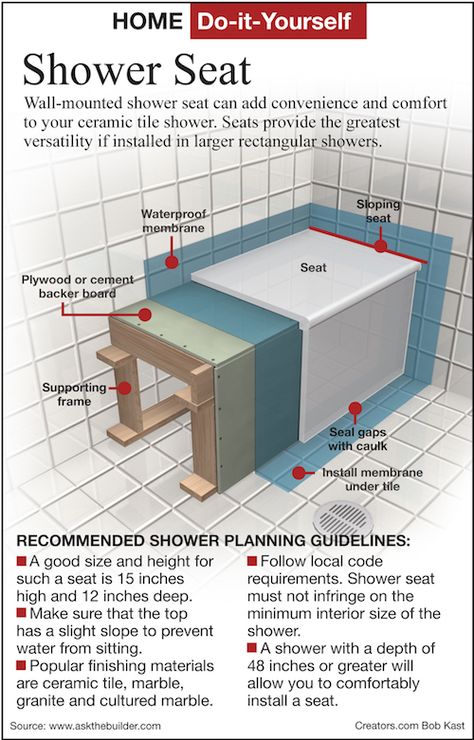
-
in the chosen
-
in the chosen
-
in the chosen
-
in the chosen
We talked about the most important problems that the family is solved, when the Cabinets are built. To make a shower cabin yourself from scratch is only possible for someone who is well versed in plumbing and has at least once done a major overhaul in the apartment. If you do not have such experience, we recommend hiring professional craftsmen, at least to install the pallet and make communications. It is better to do it qualitatively already at the start, when these expenses can still be included in the budget, than later to look for money in the family wallet for rework.
After all, you started all this renovation to create a safe, comfortable and beautiful shower cabin that will be comfortable for you and your family. And our article will help to get around the pitfalls in this matter.
In our shop you can quickly find accessories for your future shower enclosure. Our spare parts are suitable for 86% of cabins and boxes sold in Russia, so they are perfectly combined with other shower equipment.
Warranty for goods - 1 year, before sending, we check the order for defects. We take on the warranty obligations of suppliers, without delay we issue a replacement or refund.
Send me the dimensions of the required plumbing and we will find everything you need in the store.
We select spare parts from the photo in just 1 minute!
Contact us and we will select the components from stock.
How to make a shower cabin from tiles with your own hands
Contents:
- Advantages of a homemade shower cabin from tiles
- Cabin preparation
- How to make a tile shower without a tray
- Shower enclosure with tile tray and rim
- Installation of partitions and doors
Shower enclosures are almost as popular today as traditional bathtubs.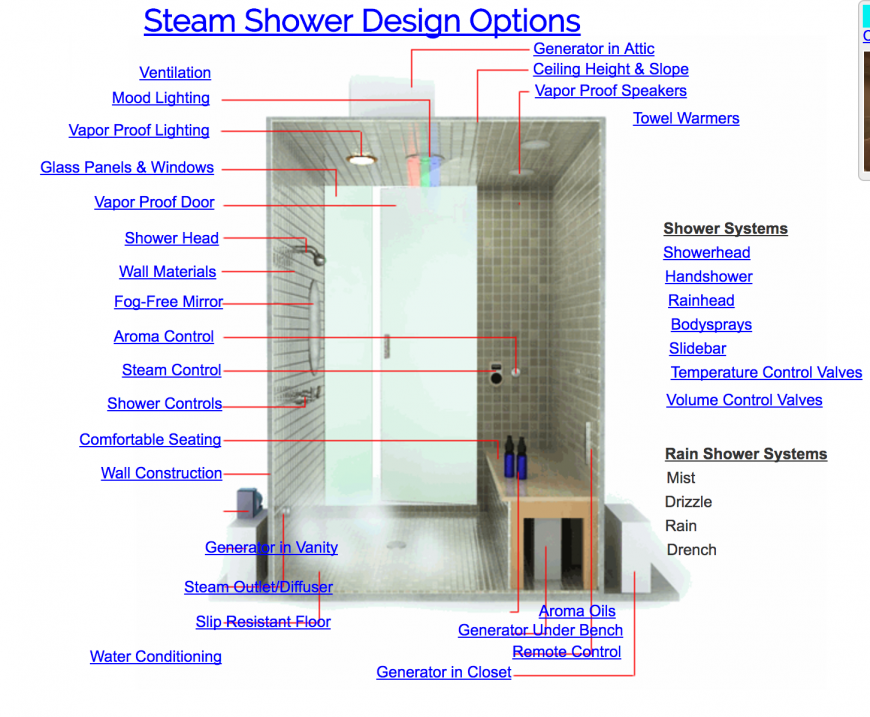 But installing a shower cabin means that you will have to constantly look after it, monitor the operation of all units, and carry out preventive maintenance from time to time. Do not forget that a high-quality cabin is not a cheap pleasure, and the dimensions of most models do not allow them to be installed in small bathrooms and combined bathrooms. What about those who start each morning with an awakening shower and end each evening with a leisurely bath under relaxing jets of water? For such lovers of water procedures, there is a simple and budget solution - shower cabin made of tiles , equipped with your own hands.
Advantages of a homemade tile shower enclosure
This design is simple, but has enough functionality of and provides a complete bath for the owner. Homemade shower cabin:
- is reliable due to the absence of complex technical devices and a minimum of moving parts;
- is convenient due to the openness of all parts and their availability for cleaning;
- is durable as tile cladding is a very durable finish option;
- is aesthetic thanks to the huge assortment of tiles in the store, which allows you to create a decor that is unique and meets the requirements of the owners;
- is practical because it allows you to install additional equipment if necessary.

But you need to keep in mind that the installation of a shower cabin made of tiles involves difficult preparatory work and certain difficulties when connecting it to the sewer. However, with some skills and careful observance of the instructions, these issues are easy to solve. Knowing how to properly prepare the room , carry out waterproofing, lay tiles, you yourself will equip a comfortable cabin in your bathroom as soon as possible.
Cabin preparation
Before you start furnishing your cabin, decide which option will best suit your bathroom. It can be:
- Shower enclosure, in which two walls of the bathroom will serve as shower walls. In the simplest version, a straight or radius rod is fixed on these two walls, on which a shower curtain is hung. You can arrange the rods at an angle so that the wash basin has the shape of a rectangle or square. A slightly more complicated solution is the installation of plastic or glass doors (straight or radial).
 The choice of door design depends on your preferences, but swing doors are considered more reliable and easier to maintain.
 - Three partition walls made of tiled walls. They can also be supplemented with either a curtain or doors.
- One stationary partition - the wall of the bathroom, complemented by plastic or glass partitions and doors or a curtain.
Also, you should immediately decide on the pallet. And here are the solutions:
- shower without tray ;
- cabin with tiled podium;
- wash basin with rim, built of concrete or brick and tiled;
- installation of the finished pallet.
As a rule, by the time the shower cubicle is created in the bathroom, the walls are already finished with tiles or mosaics. It is advisable to determine the location of the shower stall even at the stage of cladding and use an epoxy-based composition for grouting tile joints. Since the walls will be in constant contact with water, cement or concrete grout may crack over time, and epoxy grout does not suffer even from prolonged and regular exposure to moisture.
How to make a shower cabin from tiles without a pallet
Cabins and shower enclosures without a pallet are not exotic. This option is used in fitness centers, public baths, swimming pools. Its main advantage lies in the extreme ease of maintenance of , , and an additional plus is the convenience for the elderly and people with disabilities - it is not difficult to enter such a cabin due to the absence of a threshold. Note that such a solution is more than is beneficial for large bathrooms , it will not look good in a small room.
It is best to think about building a cabin without a pallet during construction, since all communications must be recessed into the floor. The sequence of work in this case is as follows:
- Cleaning the floor from old coatings.
 It is necessary to reach the base of concrete in order to create
During work, try to do everything efficiently and without haste, especially when installing sewerage and installing drain . If you find a malfunction after laying the tile or after a certain period of time after the operation of the cabin, you will have to completely disassemble the coating, in this case it is impossible to repair communications in any other way.
Shower cabin with tile tray and rim
You can also add a rim to a cabin without a tray - in this case you will create a reliable barrier to the spread of water in the bathroom and you will not be threatened by the formation of puddles outside the cabin. But if we are talking about a city apartment, then it will be more convenient to equip a cabin with a side and a tile tray. The fact is that in apartments the thickness of the floor finish is small. If you decide to create a cabin without a pallet, then for laying sewer equipment you will need to fill in a fairly thick layer of screed, and this is not always technically permissible and requires the purchase of an additional amount of material. A pallet raised above the floor level will allow you to easily place sewers in a small area, while the floor in the entire bathroom will remain at the usual level - you need to raise its level only in the place where the shower will be placed.
The height of the pallet itself and the sides depends only on your imagination. But you need to remember that too high a side will be inconvenient for the elderly and children. On the other hand, a high side of sufficient thickness may well replace the seat.
So, first clean the area from the previous finish and get to the concrete. Lay out the side of your design. The easiest way is to use brick or foam concrete blocks for this. Then carefully insulate the surface , laying the roofing material over the walls, and seal all joints with bituminous mastic. Especially carefully process the places where the side fits the walls. To give greater strength to the pallet, place a metal mesh on the surface. Lay sewer pipes, organize a drain. Carefully check the performance of all nodes to avoid their breakdowns. Pour concrete screed to the desired level. It is also worth making a slight slope towards the drain here to avoid stagnant water. Dry the screed and finish the homemade pallet and side with tiles using epoxy-based grout.