Toilet runs after flushing
Why Won’t My Toilet Stop Running?
September 19, 2017 Plumbing
When the toilet is continually running, you are potentially wasting gallons of water and creating a higher water bill. No need to worry, a running toilet is usually a simple fix. The three most common causes are a broken or dirty flapper, too long or too short of a chain between the flush lever and the flapper or a float that is out of position.
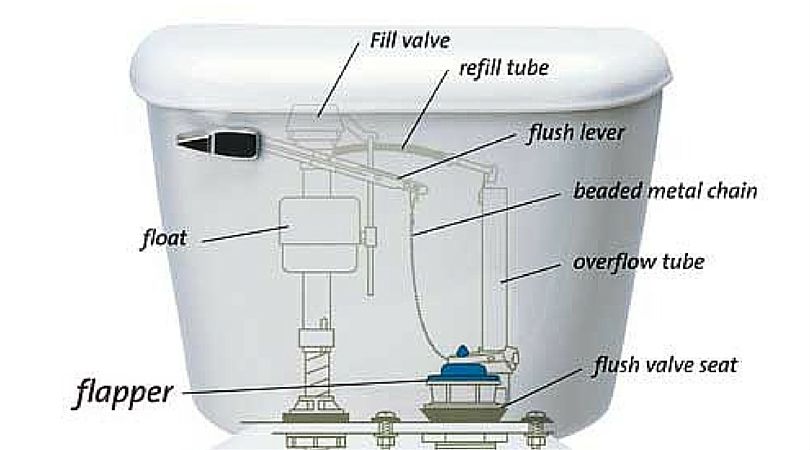
The first thing you will need to do is turn off the water feeding into the toilet. Find the silver knob on the back of the wall behind the toilet and turn it to the right. Second, take off the tank lid and start to identify all the components and how they all work together.
A. The toilet flush lever (on the outside) is connected to the rubber flapper (inside).
B The rubber flapper stops the tank water from going into the bowl.
C. The pump is what refills the tank after a flush.
D. The float raises and lowers with the water level to tell the pump when to stop.
E. The overflow tube sets where the water level should be in the tank.
Cause 1 – Flapper Chain
First, make sure the chain is connecting the flush lever and the rubber flapper correctly. Sometimes the chain will become disconnected. Next, shake the flush lever and see if there is too little or too much slack in the chain. If it’s too short, water will continue to leak into the bowl because the flapper isn’t sealed. If it’s too long, the chain won’t open the flapper when the lever is pushed. If you need to, cut off the excess chain. The chain may also have a float attached to it, adjust the float so that it sits on top the water’s surface.
Cause 2 – Dirty or Broken Flapper
Over time, the flapper may not seal the drain properly because it has become dirty, warped or broken. If you need to clean or replace it, first completely drain the tank and then unhook it from the chain. The store will have a variety of replacement options. If you can, match the brand or find a “universal” label that looks close to what you have.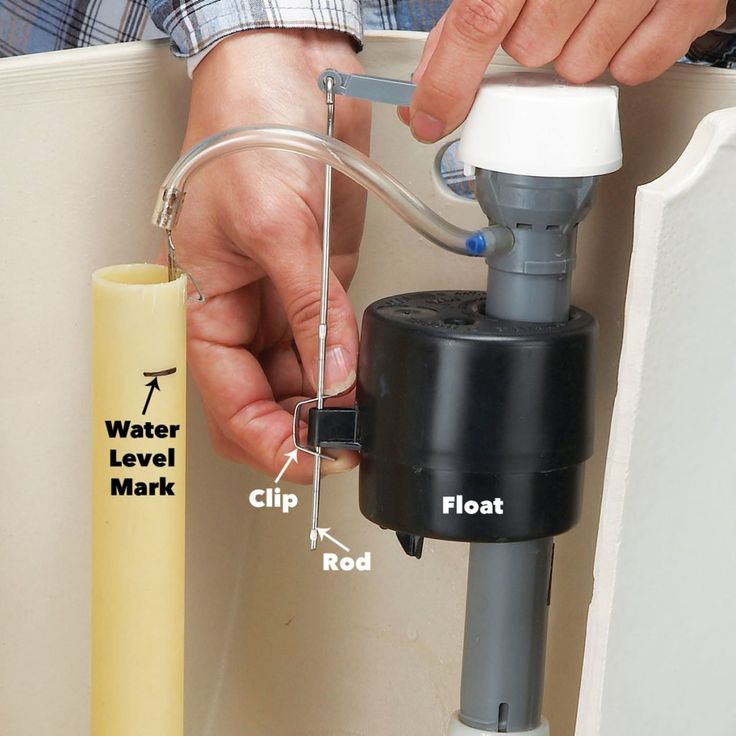 After you have reattached the flapper, test it with water to see if it seals correctly.
If you find that the flush valve (what holds the flapper in place) may be the cause of a water leak and needs replaced, read these step by step instructions.
Cause 3 – Float out of Position
The water level inside the tank is controlled by an adjustable float. If the float is set too low, it creates a weak flush. If it’s set too high, water will spill into the overflow tube and continually run. Look for a fill level mark on the inside back of the tank and mark it on the overflow tube so it’s easily seen. If you don’t see a mark, measure approximately 1 inch down on the overflow tube and make a mark.
Next, turn on the water and flush the toilet to see where the water level stops in comparison to the mark. If the water goes over, then the float for the pump is too high. Adjust the float up or down accordingly. On an older toilet, you may need to bend the brass rod that’s connected to the float.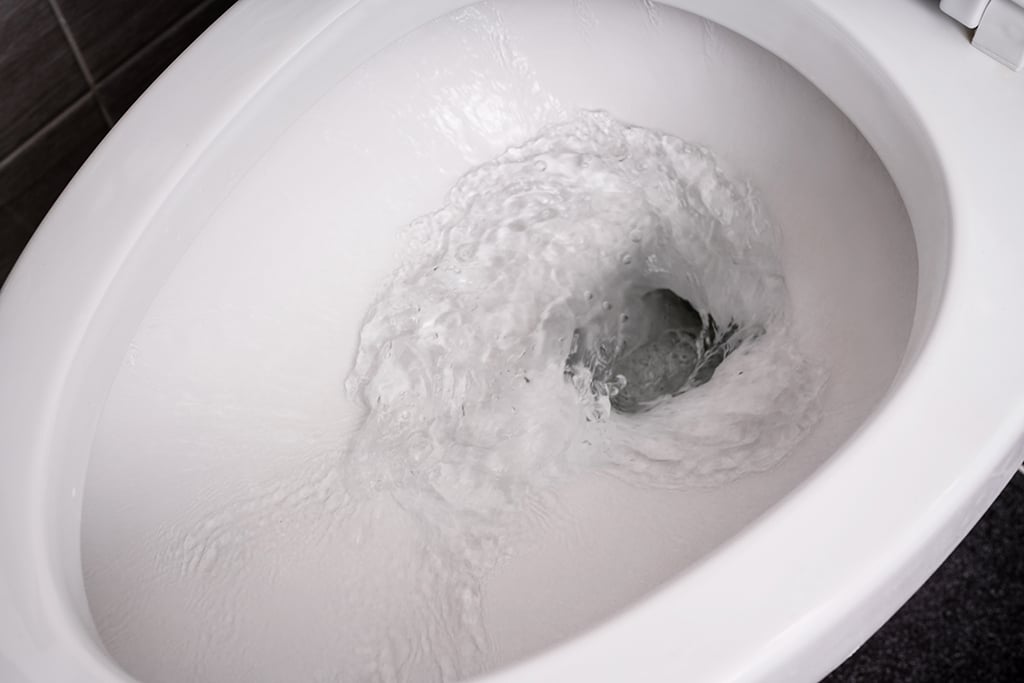 Newer toilets only require you to turn a screw or slide a clip along a rod. Sometimes, the fill valve (what the float connects to) won’t actually shut off and may be defective. In this case, you will need to buy a replacement valve.
If your toilet continues to run and these solutions don’t solve the problem, call the professionals at Bailey Brothers Plumbing at 405-896-9988. Our experts will get your toilet up and running quickly and correctly.
Why Does My Toilet Keep Running After I Flush?
Does it bother you when the toilet won’t stop running after a standard flush? Normally, flushing the toilet should be a short, simple, and straightforward process. However, some toilets tend to drain slowly, taking way longer than expected for the flush cycle to complete. If this problem occurs every time you flush the toilet, it can become a major cause of frustration.
At first, you might stare at the toilet tank with caution, hoping the drainage will magically stop in a few seconds.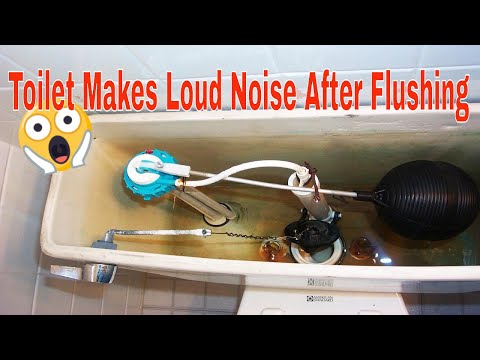 After a while, you may suspect if there’s an underlying reason why the toilet keeps running for so long. Although the problem can sometimes be fixed by adjusting the flush valve, this doesn’t have a guaranteed rate of success. The best course of action is to contact a plumber for professional assistance.
When you encounter a toilet that won’t stop running, the solution starts with identifying the root problem. Here are some possible reasons why your toilet keeps running after a flush:
1. Toilet Flapper ProblemsA toilet flapper is designed to seal water in the tank. When your toilet is flushed, a chain is used to pull up the flapper, which allows water to flow into the bowl. Once enough water has been expelled, the flapper goes back to its original position to re-seal the tank. If the flapper has decayed or cracked slightly, water will keep flowing out of the tank even after the flush cycle is complete.
To check if a faulty flapper has caused the toilet to run intermittently, turn off the water supply and drain the toilet. Next, carefully remove the lid covering your toilet tank and peek inside. Check if the chain’s length is too long or too short, which might explain why the flapper hasn’t returned to its original position. If this is the case, simply adjust the chain to the appropriate length.
In addition, a build-up of dirt around the flapper may contribute to a slow draining toilet. Clean the toilet flapper before putting it back in place. If you discover the flapper is broken or cracked, you will need to have this component replaced.
2. Toilet Float ProblemsA faulty or incorrectly adjusted float negatively affects your toilet’s effectiveness. In some cases, the float may be tangled with the chain, hindering its functionality. If everything is fine in this department, the float itself could be the issue. To confirm this, shake it and listen for water moving inside. If you can hear water sloshing, the float is likely clogged up and needs to be replaced by a residential plumber.
The overflow tube is an open tube that links the toilet bowl and the tank. When the water level in your toilet is too high, the residual water will keep draining into the overflow tube. This causes the toilet to keep running after a flush, potentially instigating water damage in the long run. To correct the water level, you will need to lower the toilet float.
A float ball fill valve can be lowered by adjusting the screw located at the top of the valve. Use a screwdriver to turn the valve partially in a reverse direction. For a float cup fill valve, reduce the float’s height by turning the screw in the same direction. After doing this, flush the toilet and refill the tank to check the water level. The ideal height should be one inch below the top part of the overflow tube.
4. Faulty Fill ValveA faulty fill valve is often the cause of a toilet constantly running. The only solution is to replace it.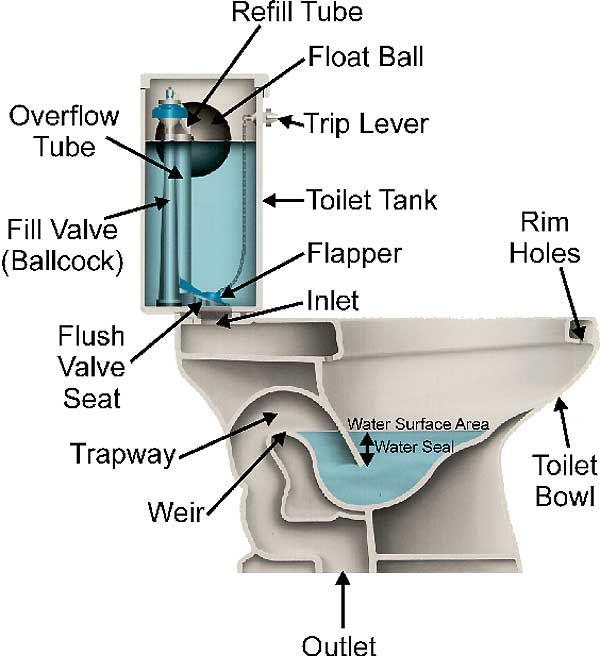 To do so, shut off the water supply and drain your tank fully. You’ll find a lock nut securing the fill valve to the toilet. Using an adjustable wrench, remove the lock nut by turning it anticlockwise. Once this is done, you can now reach the fill valve assembly and pull it out from the tank.
Take the fill valve with you to the local hardware store to find a proper replacement. After installing the new fill valve, make sure you reconnect the water supply line by tightening the nut clockwise to secure it. Finally, test your new fill valve by turning the water supply back on. Let the tank fill with water, observing the water level and adjusting the float height if needed.
5. Faulty Refill TubeSometimes, the reason your toilet keeps running is because the refill tube constantly pumps water into the bowl. This happens due to the refill tube being too long or being wrongly positioned in the overflow tube. To shorten the refill tube, pull it out from the overflow and hold it right above the overflow opening. Trim and secure it to the overflow tube side.
Fixing faulty toilet parts by yourself could be a complex endeavour, especially without prior plumbing knowledge. As there may be other underlying issues with the toilet, it is highly recommended that you contact a professional plumber for assistance.
The toilet bowl is leaking after flushing: what to do, how to fix it
In everyday life, the most used plumbing fixture is the toilet bowl. In the event of a malfunction, they call a plumber or do repairs on their own, saving a certain amount of financial resources. One of the common household plumbing failures, when the toilet is leaking after flushing, makes it impossible to use the appliance optimally, leads to excessive water consumption and therefore needs to be fixed immediately.
In case of leaks in the toilet bowl, for its repair, they eliminate the malfunction of the plumbing fittings inside the tank with their own hands, making the appropriate adjustment or replacement of individual parts. To perform these works, it is necessary to know the principle of operation and design features of the flush system, to have the simplest household tool available.
Contents
- 1 Effects of a leak
- 2 Construction of the cistern
- 3 Why water flows from the tank into the toilet - causes of leakage and remedies
Consequences of a leak
A constant flow of water from the tank into the toilet leads to the following unpleasant consequences:
- Depending on the reasons, water does not completely fill the toilet and in it too little liquid remains for a good flush.
- Leakage leads to excessive water consumption and, accordingly, excessive expenditure of financial resources.
- The toilet bowl is constantly replenished with water, which, together with a babbling stream, creates increased noise in the room, worsening the comfort of living.
- The current water flow leaves traces on the surface of the bowl in the form of lime and oxide rust deposits.
- Continuously flowing cold water lowers the temperature in the room, increases the humidity and promotes the formation of condensation on the surface of the tank and metal products.
Construction of the cistern
To fix the toilet cistern if it is leaking, it is useful to know the principle of its operation, purpose and design of internal fittings.
There are two types of drain tanks according to the water supply points - from the side (old classic models) and the bottom right or left (mostly modern modifications, devices with installation), the type of water supply blocking mechanism often depends on the design. With lateral eyeliner, the float is fixed on a metal pulley or vertical column connected to a shut-off piston. In the design with a lower water supply, a lightweight plastic cup is used that moves along a vertical bar.
The internal components of any toilet bowl according to their functional purpose can be conditionally divided into the following groups:
Automatic filling system
One of the designs is a fitting with a noise-canceling tube at the end, through which water enters the toilet bowl, the inlet of which is blocked by a valve.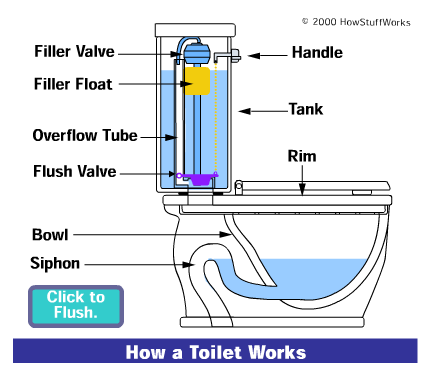 The valve is connected by means of a rod to a plastic float, which, when the tank is filled with water, rises and shifts the piston closing the channel.
In other more modern types of locking mechanisms, when the tank is filled with water, the float, connected by a lever to the locking piston, rises along the rod, thus blocking the inlet channel.
Design of toilet fittings with side and bottom connectionsOverflow protection unit
To protect against overflow with water, any toilet bowl has a funnel built into the body (stop-and-drain column) with an exit to the pouring hole. When water begins to overflow the tank, it flows into the overflow assembly and then drains into the bowl.
Drainage system
Drain assembly includes a button that, when pressed, lifts the sealed shut-off valve in the drain channel and directs the water flow into the bowl. The release valve itself is connected to the button through a system of plastic ties with a lever, that is, when the key is pressed, it rises.
The design of the drain units provides for adjustment of the height of the float - this allows you to set the degree of filling the tank with water. In older side-piped systems, the water level could be adjusted by bending a brass rod to which the float was attached.
In modern models, the pear is shifted along the axis of the rod, or if the holder is made of a composite plastic rod, the latter is folded, fixing the joint with a clamping bolt. In models with a lower eyeliner, the height of the glass is set by fixing it in the desired position on a plastic tie, which has the form of a ribbed strip and is connected to a lever that moves the locking piston.
Also in the drain unit there are similar adjusting plastic strips with ribs that allow you to change the distance of the button relative to the shut-off valve - this is necessary for installing shut-off and drain valves in tanks of different heights. That is, after installing the drain unit, the toilet lid is put in place, and if the button does not reach the upper hole or rests against it, it is rearranged by moving the drain valve along the ribbed guides.
The design of modern shut-off valves for toilet bowls provides for the possibility of draining water in the usual (4 - 6 l) and economical half (2 - 3 l) modes. To do this, a button is installed in two parts with the corresponding symbols.
Units of modern shut-off and drain valvesWhy water flows from the tank into the toilet - causes of leakage and solutions
Solving the problem of what to do if the toilet bowl with a button is flowing, they mainly consider its internal fittings. The causes of tank leakage and methods for their elimination are as follows:
- Loss of elasticity or destruction of the sealing gasket. In the presence of this malfunction, water constantly flows from the drain tank into the toilet bowl, and its filling occurs continuously. For current repairs, remove the cover by unscrewing the cylindrical clamping decorative nut and gain access to the drain assembly.
In modern models, the flush mechanism consists of two parts - the first is attached to the union nut under the bottom of the toilet bowl and is the body for the second assembly, on which the main parts of the piston and the button are located.
To repair the tank, the assembly with a removable mechanism is removed by simply turning around its axis, leaving the fastening tabs from the slots in the stationary part.
After removing the column, the ring sealing rubber on the shut-off piston is changed, having previously purchased the finished product from the distribution network or using spare parts from the repair kit. Upon completion of the replacement of the gasket, the removable assembly is put in place by screwing it into the stationary part.
The initial stages of dismantling the tank- Dirty downcomer. If the toilet cistern passes water into the toilet with little intensity, the cause is contamination of the sealing ring and the flush mechanism with limescale, rusty sediment, which prevents its correct operation.
To repair a cistern, remove its lid and drain fittings, clean it of metal oxides and lime with household chemicals specially designed for this purpose, using an old toothbrush.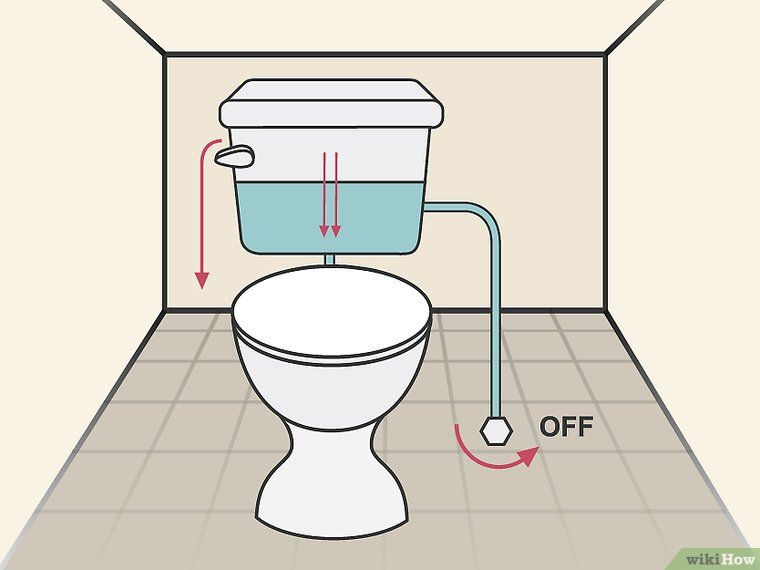 In the absence of preparations, contaminated parts are placed for some time in hot water with the addition of acetic acid. After carrying out the necessary procedures, the cleaned nodes are installed in the tank.
- Sometimes the reason for the incorrect operation of the shut-off and drain column is small defects in the sealing ring or wear of parts, while water flows out in a thin stream - in this case, the defects can be eliminated by a slight reconstruction of the assembly.
Since the sealing plastic piston with a rubber gasket is light and does not always reliably close the drain hole, it can be made heavier by placing a ring of metal - lead, copper thick wire over the cylindrical valve.
Basic operations for cleaning the bleeder- Malfunction of the float mechanism. In older models of toilet bowls, a situation often arose when water got into a plastic pear with an internal hole for fixing a brass rod. It was filled, its weight increased and as a result buoyancy was lost, the consequence of this was the overflow of the tank with water and draining it through the overflow pipe.

To eliminate the malfunction, the polymer float was periodically removed and water was poured out of it, after which the normal operation of the plumbing fixture was restored.
Similar defects, but much less frequently, occur in modern models of toilet bowls when the float breaks and fills it with water.
Typically, a leak associated with a float assembly failure occurs after the valve is installed and is immediately eliminated by properly setting the blower height.
- Mechanical defects. The causes of leakage may be a misalignment of the downcomer, a defective one of the parts of the drain assembly, the ingress of large particles of dirt into the seat of the seal, the fittings may break if not assembled correctly. To eliminate defects, remove the cover, conduct a visual inspection of the locking unit, followed by replacement, repair or cleaning.
If water flows in the toilet bowl after filling the tank, check the operation of its shut-off valves and the float mechanism for controlling the water supply.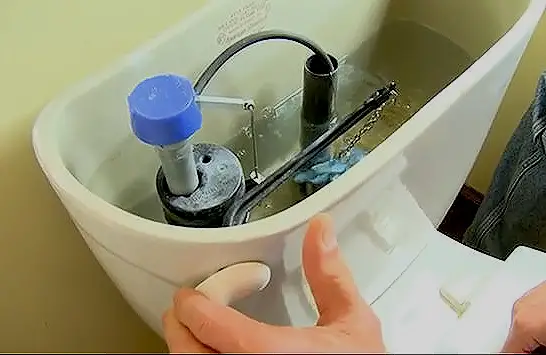 Eliminating these defects is not too difficult for a home master with knowledge of the principle of operation, purpose and typical design of the main plumbing components.
how to fix a leak in the toilet when it is leaking, how to repair it if water is leaking due to a push-button flush, why water is constantly running from the tank in the toilet, why it is leaking, what to do, how to fix it so that water does not flow
Content:
Signs of a Leaking Toilet
Flushing System
Most Common Problems
- Constant flow
- Breakage of the float mechanism
- Damaged seal
- Leaking after flushing
Preventing toilet leaks
Conclusion
Video
Leaking utilities or plumbing within a home is a serious problem that requires immediate attention. A particular case of such a problem is the leakage of the toilet bowl, which can be identified by the murmuring sound from under the lid after flushing. There can be many reasons for this phenomenon, and each of them deserves detailed consideration. How to fix a leak in the toilet, and will be discussed in this article.
Signs of a toilet leak
The process of flushing consists in a long or short-term supply of water into the toilet to remove all waste products from it. The starting point for this process is pressing the tank button or interacting with another control element (lever or handle). The flush ends either after a certain time, provided for by the design of the tank, or after the tank is completely empty.
The control element is connected to a drain valve, which, in turn, is connected to a locking mechanism. The latter, upon completion of the drain, provides cold water access to the tank for subsequent flushing. The system is quite simple, and its meaning boils down to the fact that the entire control of the drain process is carried out by the user himself.
If the toilet is leaking from below when flushing, then this is a clear sign that the entire system needs to be checked for malfunctions.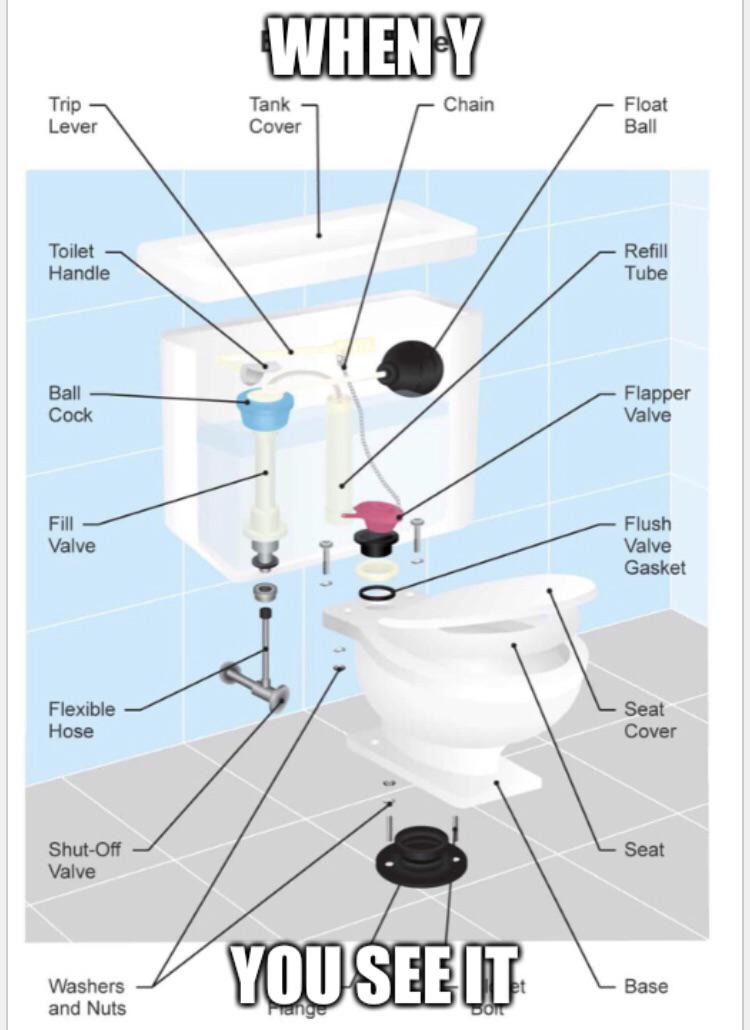 In addition, sometimes the flow of water does not stop at all, and this phenomenon also indicates the presence of problems.
Among the most noticeable signs of incorrect drain operation, the following points should be highlighted:
- The sound of a babbling stream of water that constantly or periodically comes from under the roof of the toilet bowl;
- The presence of characteristic stains in the place where the water leaves the tank;
- Permanent presence of moisture on the wall of the toilet, located under the tank;
- Insufficient or too slow flush;
- The appearance of condensate on the pipeline or tank, which was not there during normal operation of the system.
In trying to understand what to do if water is constantly flowing in the toilet, you must first understand the causes of this phenomenon. For example, the formation of condensate is directly related to the movement of cold water through pipes.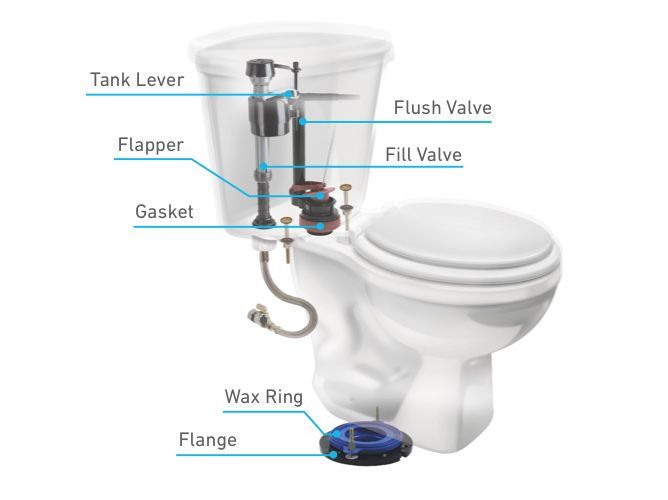 During normal operation of the system, water is regularly used, and before each flush it has time to heat up to a temperature at which condensation is excluded.
If smudges began to appear on the internal surfaces of the toilet bowl, then ordinary dirt that got into the flush tank may be the cause of their appearance. The solution to this problem is to completely clean the tank from any contamination, for which you need to completely remove water from it, remove the fittings and thoroughly clean all surfaces, paying particular attention to the bottom of the tank. However, this does not always help, so you have to figure out what to do if water flows in the toilet, in more detail.
Waste tank device
There are several standard valve configurations. The oldest of them is a drain equipped with a rubber pear. The design of such a tank is extremely simple and can only work with a side supply. However, it is pointless to dwell on this option for a long time - it has long been outdated and is practically not used today.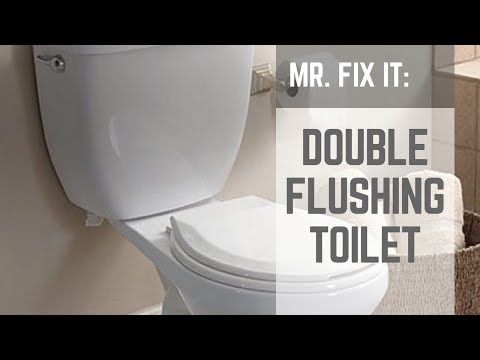
A more relevant scheme is the design, which includes two modules - drain and float. The traditional float, fixed on a thick metal wire, has been brought to a more perfect state. Standard floats block the water from below, and this method is considered more effective. However, side options can also be found, although not so often. In any case, the float system is adjustable, which allows you to independently adjust the volume of water supply.
All structural elements are quite simple and interchangeable, so if you need to work with them, there are no difficulties. If there is a desire, it is quite possible to completely disassemble the mechanism located in the tank. Of course, before this you need to turn off the water and completely empty the tank capacity.
To dismantle the internal elements of the tank, specific tools are not required - most of the work can be done by hand, and the rest is done with the help of keys. Older models of tanks were equipped with a large number of metal parts, but modern products use only plastic, which is more reliable, strong enough and can withstand direct contact with water without any problems.
Parts may vary in size and color, but the principle of their work is always the same. This makes it possible to painlessly replace individual parts when they are worn or damaged. The only thing that will need to be done in this case is to choose the right size for the new part so that it fits. The wrong choice will return to the original task - what to do if the toilet is leaking from below.
Most common problems
Tip: Use our construction calculators online and you will calculate construction materials or structures quickly and accurately.
There can be many reasons and accompanying signs of a tank leak, but they all come down to two main categories:
- The leak is chronic;
- Water leaks only after flushing.

You need to understand the intricacies of each specific situation in more detail in order to understand exactly why the toilet bowl is flowing and find the best solution to the problem.
Constant flow
A small stream of water that constantly flows along the back of the toilet is a clear sign that signals the need for urgent system repair. If the water in the toilet does not flow very intensively, then at first you may not notice it. In this case, you should pay attention to an indirect sign, expressed in the form of a rusty sediment on the toilet. Rust and plaque appear if the water supply is not equipped with filters that purify water from various impurities.
The first step is to understand why water flows in the toilet. Of course, the toilet bowl and the mistakes made during its installation are excluded - in this case, the problems would look completely different. Water can only flow because of a malfunction in the tank, and that's what you need to deal with.
Tank check technology consists of the following steps:
- First you need to remove the tank cover and carefully inspect its working elements - perhaps a “weak” area will be noticed during a visual inspection;
- If the inspection was not enough, then you will have to completely disassemble the tank, and this process begins with blocking the water main;
- Next, you need to unscrew the drain button and remove the reservoir cap;
- After that, you can sequentially remove all internal mechanisms;
- If it is impossible to remove the flushing mechanism, then you will first have to dismantle the tank itself by unscrewing the fixing screws located under the toilet bowl shelf.
This technology is relevant for any models of tanks, so you can always use it for repairs. However, before that, you need to understand exactly why the toilet is leaking.
Float mechanism failure
Malfunctions in the operation of the float can be noticed even visually - just look under the cover. Most often, the problem manifests itself in the fact that the float does not reach its original level, but is always at the same height. The result is the following situation - the float simply does not respond to changes in the volume of water in the tank, which triggers the overflow system, and excess water flows from the tank into the toilet. The root of this malfunction is usually the loss of the tightness of the float.
Another common reason that the toilet is flowing from below is a breakdown in the attachment of the float mechanism. The solution to this problem is to replace the float. To do this, you need to remove the old part, come to her store and choose a model with similar characteristics. Usually, after replacing the float, the flow stops, but it is still worth carefully observing the operation of the system for at least a couple of days. See also: "If the toilet cistern is leaking - causes and remedies for leakage."
Seal damaged
Another reason that water is running in the toilet is a malfunction or wear of the seal. Usually such parts are made of rubber or polymers. These materials wear out the fastest, so this element is considered the least reliable part of the drain mechanism.
The o-ring is usually located right at the point where the water exits. In addition to the direct sealing function, this ring also works as a filter that filters out various impurities contained in the water. Of course, the smallest particles in this case act as an abrasive, gradually wearing out the material of the part. As a result, you have to figure out how to fix a leak in the toilet bowl.
A contaminated part can simply be cleaned using the following algorithm:
- The drain must first be removed;
- Then the cleaning solution is prepared;
- Valve elements are cleaned with a solution;
- Parts are put into place.
If the part was damaged, which was discovered during inspection or during the cleaning process, then it will be easiest to replace it.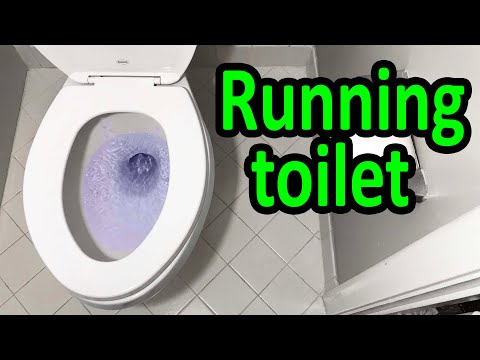 Replacement should be made regardless of the nature of the damage to the seal, whether it be deformation, ruptures or cracks. And, of course, it is impossible to return the damaged part to its place - after that, water flows from the tank into the toilet bowl with the same intensity in the very near future. See also: "What to do if the toilet bowl is leaking - possible causes and solutions."
Leaky after flushing
The second common problem is that water flows from the tank into the toilet only after flushing. Usually the jet flows until the tank is filled with water to the maximum value. Of course, in this case, water losses will not be very large, but, firstly, they increase water consumption (respectively, the cost of funds), and secondly, over time, lead to the appearance of plaque on the back wall of the toilet bowl.
Among the most likely reasons that the toilet is leaking after flushing, it is worth noting the following points:
- Valve components damaged;
- The drain column has shifted relative to the original axis;
- The water drain area is clogged;
- The valve has minor damage to small parts.
In any case, in order to understand how to repair a push-button flush of a leaking toilet, you first need to inspect the structure. If a visual inspection does not give anything, you will have to disassemble the mechanism and look for the cause of the problem manually. See also: "Why water is not drawn into the toilet bowl - possible causes, solutions to the problem."
It is not difficult to notice the skew of the drain mechanism, since it is always indicated by the jamming of the flush button. In some cases, the button may even fall into the container. And the question arises of what to do - the toilet is flowing, although it is impossible to even press the button. To deal with such a problem, you will need to remove the tank cover and understand why the column has moved from its original position. If there is no damage to the parts, then the problem is solved by simply returning the part to its place.
There are other situations - for example, if there are large particles of dirt under the seal that got there from the pipeline. When the volume of water is low, the valve is relaxed, causing water to flow into the toilet. After filling the tank, the pressure increases and the leak stops. And here you need to figure out what to do - the toilet passes water, and a superficial examination did not give a result. The answer is simple - to get rid of such a problem, you will need to clean the entire tank and its working elements very well.
To improve the performance of the drain system and neutralize negative factors, you can use the advice of craftsmen who know exactly how to fix the toilet so that water does not flow. For example, so that the seal always fits snugly against the drain hole, the column axis can be weighted with some kind of load. As a result, the ring will always ensure the tightness of the structure.
Prevention of toilet leaks
In order not to encounter problems during the operation of the toilet, it is worth carrying out a number of preventive measures:
- The most important operation is cleaning the inside of the tank and all its elements.