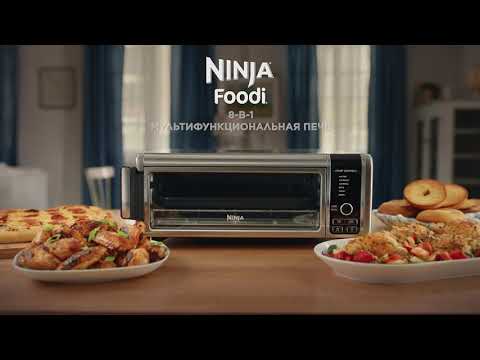
Ninja foodi air fryer oven flip away
The Ninja Foodi Air Fryer Oven review
With continually updated technology and new brands hitting shelves all the time, air fryers continue to be one of the hottest kitchen gadgets on the market. No wonder there’s been a rash of new products that seek to combine air fry technology with the traditional appliances people already have in their kitchens.
The Ninja Foodi Digital Air Fry Oven is one such product. Building off the success of the existing Ninja Foodi, it combines an air fryer and toaster oven into one convenient package. But is it worth the investment? We tested the Ninja Foodi air fry oven to see if it could actually combine two pieces of equipment in one without sacrificing on the performance of either.
How does the Ninja Foodi Digital Air Fry Oven look and feel?
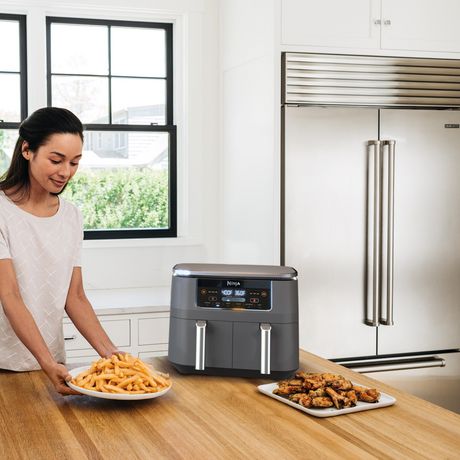
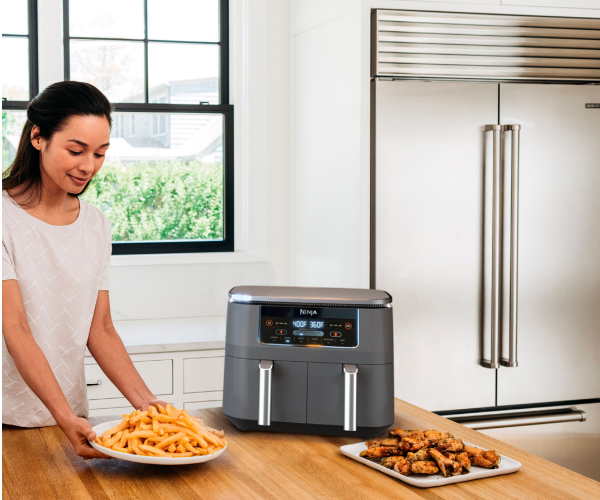
Credit: Reviewed / Jackson Ruckar
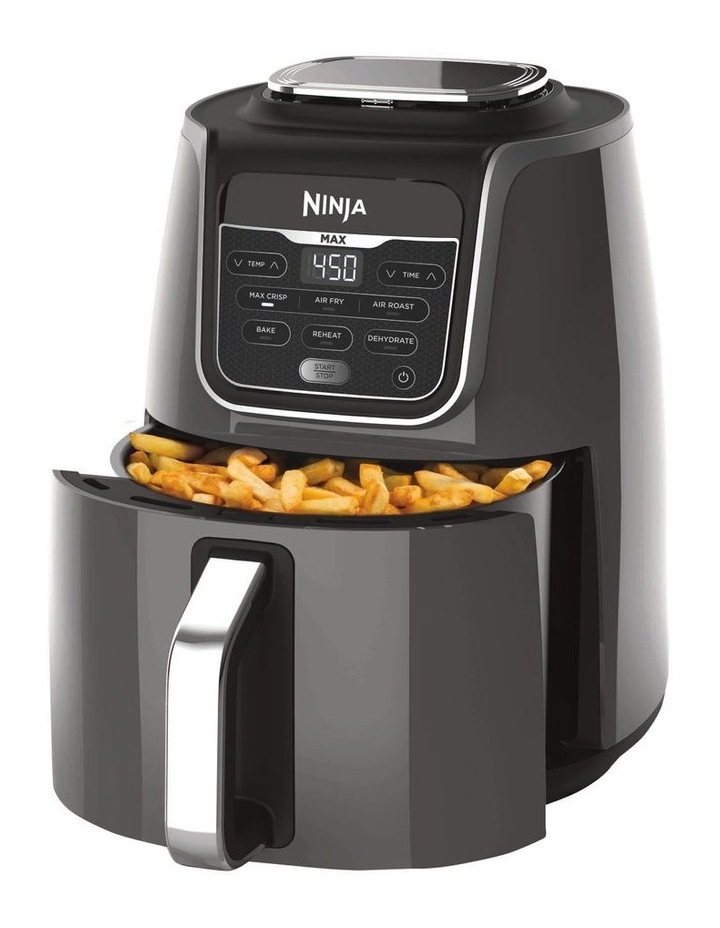
The Ninja Foodi oven is narrow and can be flipped up on its side for storage.
As soon as you take it out of the box, you get a sense that this countertop appliance is a high-quality product. Constructed of brushed stainless steel, it’s beautifully finished with rounded corners and has a digital control pad. It’s also wider and shorter than a typical toaster oven.
When cooled and not in use, the Foodi Air Fry Oven can be flipped up on one side to stand up at the back of the counter, an odd but convenient storage solution. Rather than a towel bar handle in the front, it has a small one off to the side that you use to open the door. While it’s unusual and takes a bit of time to get used to, this handle functions perfectly fine and helps make the oven more space efficient.
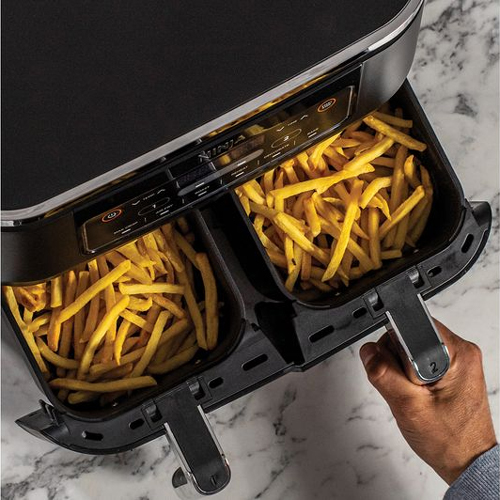
The Foodi Digital Air Fry Oven comes with an air fry basket, a cooking rack, a nonstick sheet pan, and a crumb tray that also seem sturdy and well made. They’re larger than the ones you typically find in a toaster oven, as the oven is so wide.
What can the Ninja Foodi Digital Air Fry Oven do?
Credit: Reviewed / Jackson Ruckar
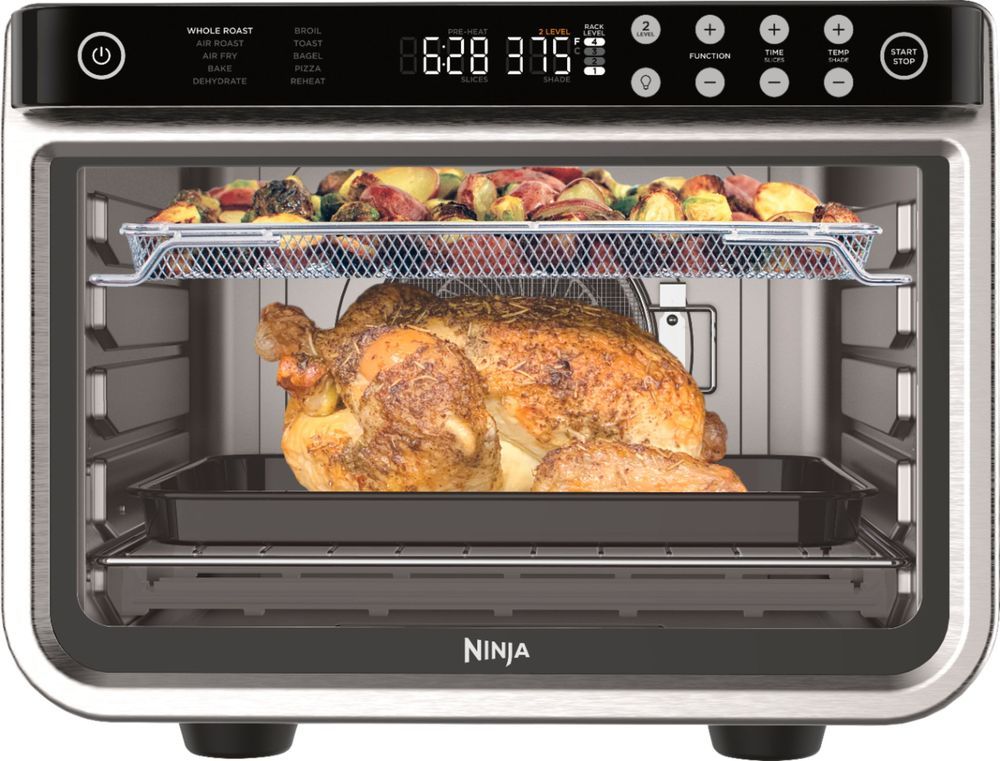
This toaster can air fry, dehydrate, toast, bake, air broil, and keep food warm.
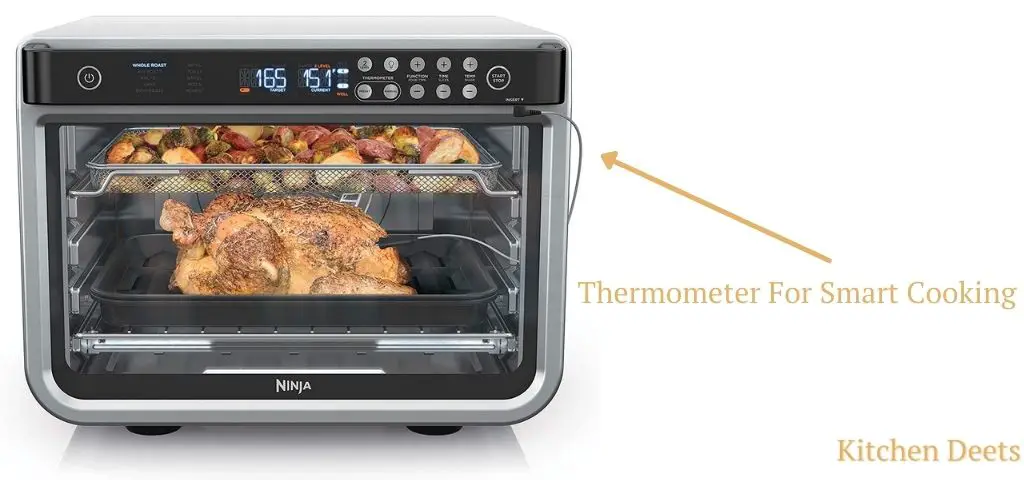
As the name implies, this Ninja countertop oven air fries. And just like a typical toaster oven, it also toasts and bakes. It also air roasts, air broils, dehydrates, and keeps food warm. Because it’s so short, however, it can’t hold a whole chicken like many toaster ovens in its price category.
The manufacturer encourages using the large sheet pan to make sheet pan dinners and includes a formula and some recipes for them.
If you’re looking for other multi-functional appliances that can slow cook, pressure cook, grill, and more, Ninja also offers the classic Ninja Foodi Pressure Cooker and the Ninja Foodi Grill, both of which we've tested.
What we like
- It’s beautifully designed.
- The digital controls are easy to read and intuitive to navigate.
- It’s quiet.
- It’s an excellent toaster, and does a good job of baking a sheet pan dinner.
- To check on food, there’s an oven light.
- For storage, it easily can stand on its side.

- It cooks fast.
What we don’t like
- It’s expensive.
- It can’t roast a whole chicken.
- There could be more cooking guidelines for specific foods in the cookbook.
How does it perform?
Credit: Reviewed / Sharon Franke
The air fry setting left fries unevenly cooked.
Air frying
To be blunt, it’s not the best air fryer on the market, but it’s also far from the worst. The Digital Air Fry Oven air fries unevenly, and food prepared from scratch seemed baked, not fried. On the website the manufacturer claims it can air fry 4 pounds of food at once. While we could pile up that amount of fries in the air fry basket, the loaded basket couldn’t fit in the oven at the rack position recommended for air frying.
Toasting
Credit: Reviewed / Sharon Franke
The Ninja toasts very evenly, but there's no setting that allows for extremely light toast.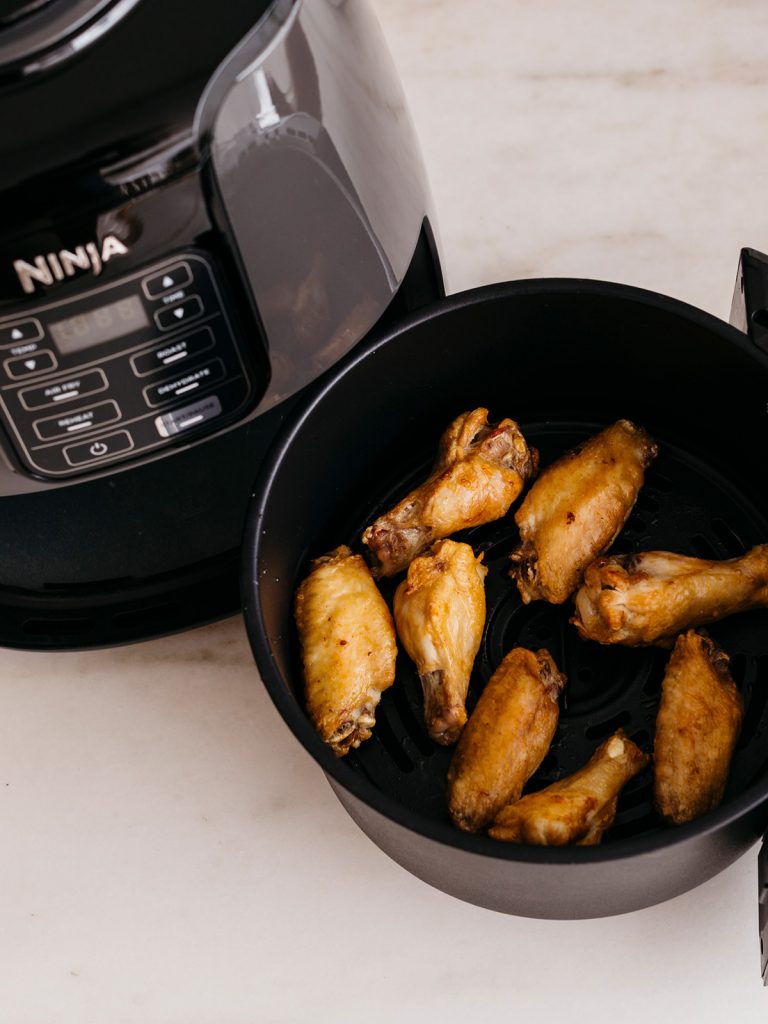
The Foodi Digital Air Fry Oven can accommodate nine slices of packaged bread without squishing them. And it can toast them fairly evenly, too. When used to toast two slices, it gives impressive results, browning exceptionally evenly. It does, however, toast to a golden-brown shade on both the light and medium settings, so it could be a disappointment if you like your toast only lightly browned. It has a special bagel toasting setting and it browns bagel halves very uniformly.
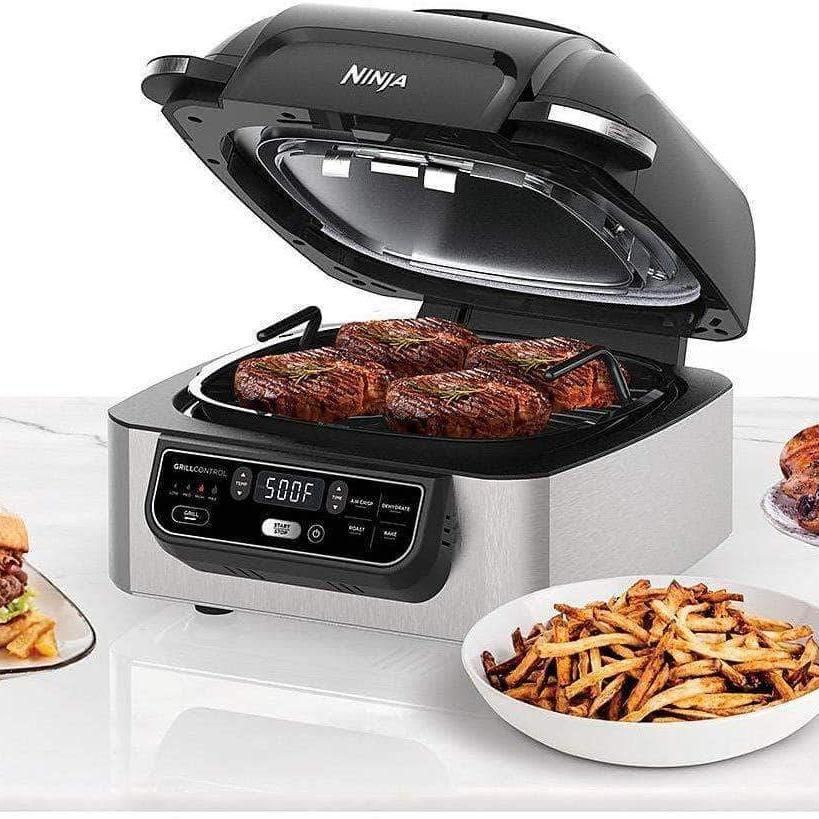
Air roasting
Credit: Reviewed / Sharon Franke
Our sheet pan dinners came out beautifully cooked.
Ninja recommends using their oven to air roast sheet pan dinners with a protein (like steak, chicken, or seafood), vegetables, and spices. After following the oven booklet’s recipe for Spicy Chicken, Sweet Potatoes & Broccoli, I was impressed with the result. All of the ingredients (about 3 pounds in total) came out lightly browned and tender in just 22 minutes and made a tasty sheet pan dinner for four. This technique does seem like a very good use for this appliance.
Baking
Credit: Reviewed / Sharon Franke
Biscuits browned evenly in this toaster.
You’re not going to be able to fit an entire loaf or Bundt pan in this Ninja, but you can use it to bake a cake or muffins in a shallow pan, or small items like cookies right on the sheet pan. Biscuits baked up just as well as from a full-size oven.
Air broiling
Chicken breasts came out juicy and browned on both sides in just 20 minutes. However, even when cooked well-done, steaks looked gray on the outside and in no way resembled broiled or grilled meat. So, while this oven is fast, it can’t consistently deliver the kind of searing you expect from broiling.
Dehydrating
Credit: Reviewed / Sharon Franke
The dehydrate setting works fine, but you can't fit enough to make it worthwhile.
Although its wide air fry basket holds more food than the ones in a typical air fryer (or the racks in a toaster oven), the Ninja is still only able to dry a small amount of food. After running the dehydrator for 10 hours, I was rewarded with a small bowl of banana chips. At least the machine kept quiet as it worked.
Keep Warm
The Ninja kept a small macaroni and cheese casserole at a safe serving temperature for a full two hours. As you would expect, however, the food was dried out by then. If you’re not going to serve food within a half hour or so, you are probably better off just cooling and reheating it.
Is the Ninja Foodi Digital Air Fry Oven easy to use and clean?
Credit: Reviewed / Jackson Ruckar
The Ninja has an easy-to-use digital interface, although it does smudge.
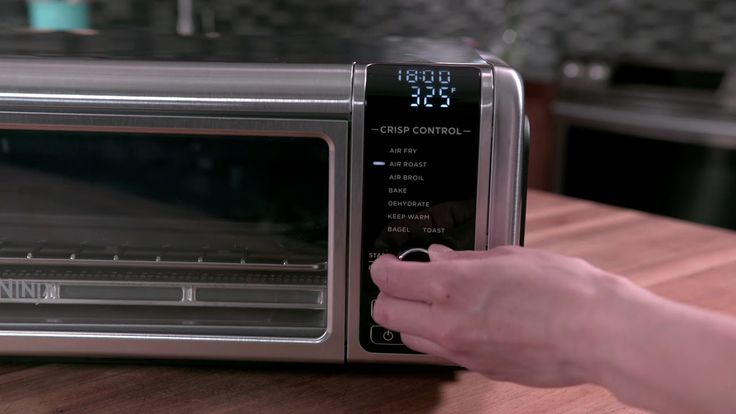
The digital control panel on the Ninja oven is well laid out and easy to read. Its interface centers around a knob that you turn to select the time and temperature (or number of slices and doneness) for each function, and it’s fairly intuitive to program.
We love the fact that the oven preheats automatically and the preheat time is just one minute, so it doesn’t add appreciably to the cooking time.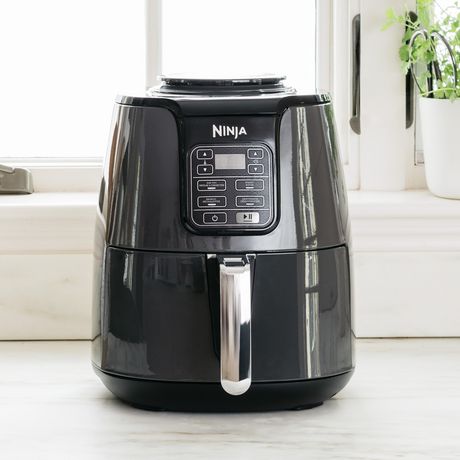 During cooking, the product is quieter than most air fryers, and you can turn on an interior light to check on your food’s progress.
The sheet pan and the air fry basket can be cleaned in the dishwasher. In the standing position, the back opens, giving you access to the inside for cleaning.
The Ninja Foodi Air Fry Oven comes with a very thorough and easy-to-understand owner’s guide, as well as a booklet that contains recipes and cooking charts for air frying and dehydrating and a leaflet with instructions on how to build a sheet pan meal. It would be helpful if there were also charts to use as guidelines for baking, air roasting, and air-broiling.
Warranty
Ninja offers a one-year limited warranty on the Foodi Digital Air Fry Oven and a 60-day money back guarantee.
What owners say
On Amazon, the Ninja Foodi Digital Air Fry Oven has earned itself 4.7 stars from nearly 15,000 customers who praise its convenience, ease of cleaning, and fast cook times.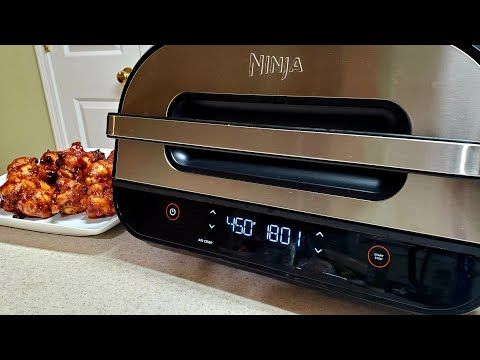 They say it looks great on the counter, and stows pretty efficiently when not in use. Some detractors complain that the interior is not tall enough for their cooking needs.
Is the Ninja Foodi Digital Air Fry Oven worth it?
Credit: Reviewed / Jackson Ruckar
Although it's not an amazing air fryer, this is a great toaster oven.
Yes. If you're looking for an air fryer and a toaster oven, this product is definitely worth your consideration. It’s an excellent toaster and a fair air fryer. The only real drawbacks are that it has a large footprint on your countertop and can’t roast a whole chicken. If you have the counter space and are in the habit of buying rotisserie chickens at the supermarket, we say go for it.
We do recognize that it’s not an inexpensive appliance, but it costs equal to or less than the Breville and Cuisinart ovens that are its main competitors. If you decide to spring for it, definitely try out the sheet pan meals.
Get the Ninja Foodi Digital Air Fry Oven on Amazon for $200
Related content
The product experts at Reviewed have all your shopping needs covered. Follow Reviewed on Facebook, Twitter, Instagram, TikTok, or Flipboard for the latest deals, product reviews, and more.
Prices were accurate at the time this article was published but may change over time.
Ninja Foodi 8-in-1 Flip Mini Oven review: a compact cooker
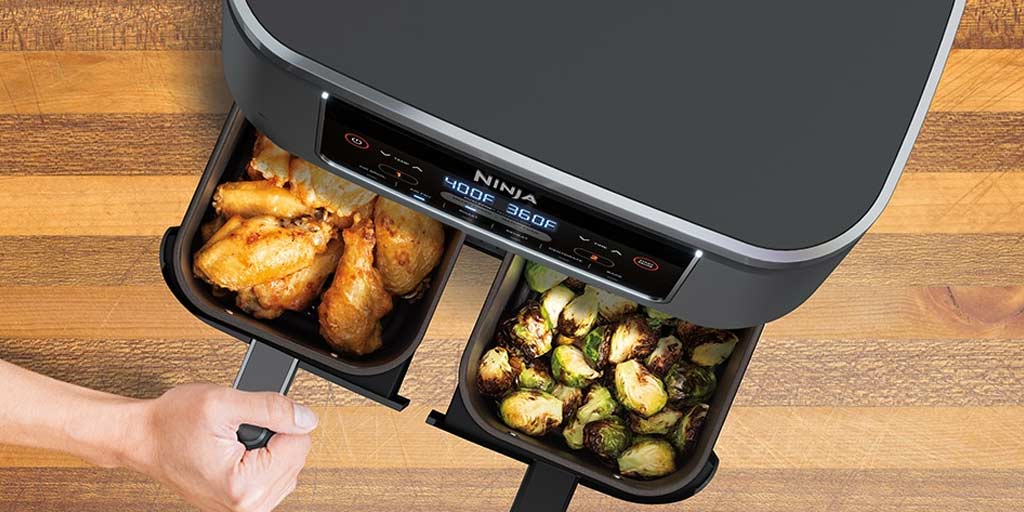
We tried out the Ninja Foodi 8-in-1 Flip Mini Oven to see if it's a good choice for your kitchen. Designed to slot right into smaller kitchens without taking up too much space, this oven has a unique flip feature that allows it to be folded away when not in use, massively reducing its footprint on your kitchen counters. It's a popular choice for those in apartments, or simply those who need more space to cook in their kitchen, but is the Ninja Foodi 8-in-1 Flip Mini Oven any good? We put it to the test, making cauliflower buffalo wings, air frying salmon, and roasting vegetables to see if it's a must-have toaster oven.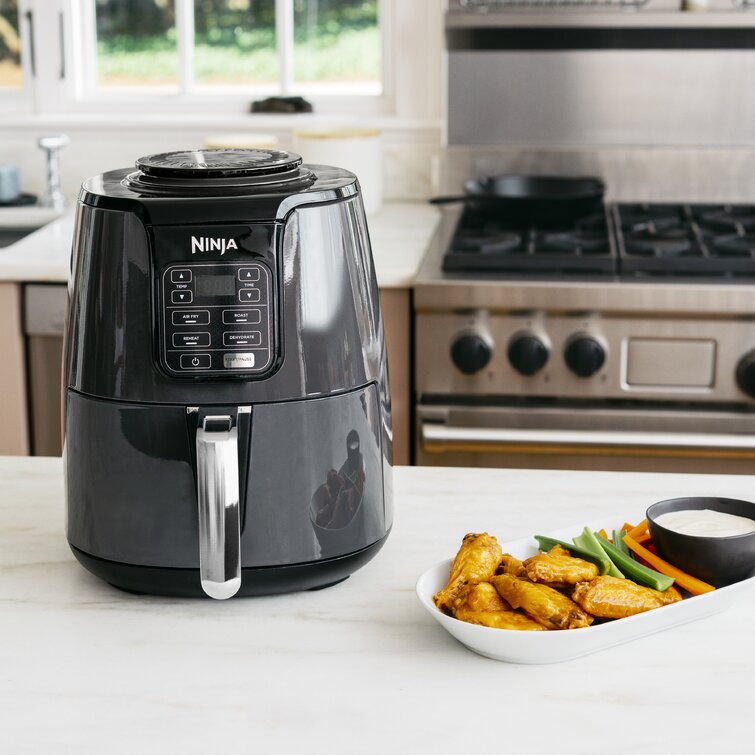
Ninja is known for making some of the best toaster ovens, and given that it also makes great air fryers, it's no surprise that the Ninja Foodi 8-in-1 Flip Mini Oven combines the best of both. It has an air fryer mode, as well as broiling, toasting, and even dehydrating function. The bottom can be opened for easy cleaning, but I found that some areas were tricky to reach when I did try and clean the oven after prolonged use.
If you lack cooking space in your home or you want a compact toaster oven to take some of the pressure away from your regular oven, the Ninja Foodi 8-in-1 Flip Mini Oven is a great choice. I love how easy it is to flip away and press it against the kitchen wall, which will buy you a lot of space on your kitchen counter if you're dealing with a chef's kitchen or a smaller space.
Today's best Ninja Foodi 8-in-1 Digital Air Fry Oven deals
Reduced Price
£199
£179
View
Reduced Price
£199
£179
View
Reduced Price
£199. 99
£179
View
Show More Deals
Ninja Foodi 8-in-1 Flip Mini Oven: Specifications
(Image credit: Ninja)
- Capacity: 13" pizza, 9 slices of toast or 4-lbs in air fry basket
- Cooking programs: 8
- In the box: Cooker unit, crumb tray, air fry basket, sheet pan, wire rack
- Modes: Air fry, air broil, air roast, bake, dehydrate, toast, bagel, keep warm
- Power: 1,800 Watts
- Dimensions: 19.72 x 7.56 x 14.96 inches
Ninja SP101: unboxing
(Image credit: Future)
The Ninja Foodi 8-in-1 Flip Mini Oven comes in a large, hefty box with a range of inserts to easily slot inside the oven. When the oven is not in use, you can turn it back onto a rear flip-away base, and then push it back against your kitchen wall.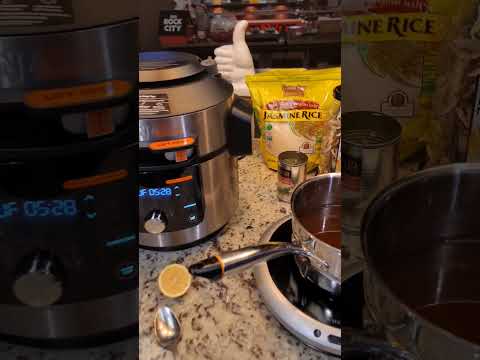 This clears plenty of space in front of the oven, which is great for preparing food before putting it inside the oven to cook.
When flipped up, your oven can open from underneath. This gives easy access to clean the inside of the oven, and when you remove the crumb tray you'll find it easy to remove any splashes or food residue.
(Image credit: Ninja)
The cooking modes in the Ninja Foodi 8-in-1 Flip Mini Oven include air frying, air roasting, air broiling, as well as baking, toasting (as well as a mode for bagels) and even dehydrating.
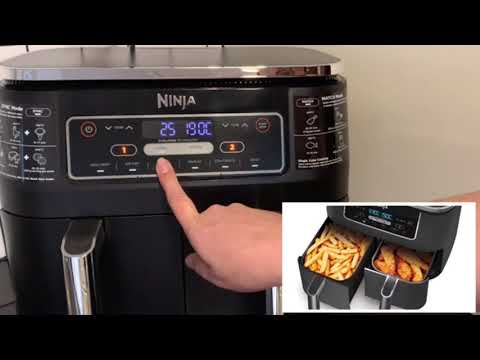
The timer and temperature can be adjusted using the dial, and then it's a case of pressing down on that dial to start or pause your cooking mode.
The control panel on the Ninja Foodi 8-in-1 Flip Mini Oven. I received the UK model, which has the same modes but calls them slightly different names.
(Image credit: Future)
Toasting in the Ninja Foodi 8-in-1 Flip Mini Oven
A toaster oven is designed to replace the best toaster as well as microwaves and air fryers, but if it can't toast, that won't save you on the space a toaster will take up in your kitchen.
The Ninja Foodi 8-in-1 Flip Mini Oven comes with a toast and bagel mode. You can choose the level of browning and the amount of slices inside your oven when cooking on the toasting mode. The bagel mode will heat from only one direction as opposed to above and below, which will leave the edges of the bagel soft and perfect for making a warm sandwich.
(Image credit: Ninja)
I was impressed by both the bagel toasting and the regular toasting in the Ninja Foodi 8-in-1 Flip Mini Oven. Everything came out even, with some slight marks from the wire rack on one side of the toast. I didn't find that the top toasted more than the bottom when using the regular toasting mode, so it's perfect for sandwiches, paninis, and warming pastries.
Cooking fish in the Ninja Foodi 8-in-1 Flip Mini Oven
I've become accustomed to using the best air fryers when cooking fish at home, so I tried the Ninja Foodi 8-in-1 Flip Mini Oven out on the air roast mode when cooking salmon.
Salmon is quite a fatty fish, so I've found that a lot of fat can drip away when cooking it in an air fryer. This happened with the Ninja Foodi 8-in-1 Flip Mini Oven too, and I was concerned that the juices dripping away would cause an issue if they fell directly onto the heating element.
The Ninja Foodi 8-in-1 Flip Mini Oven crumb tray sits underneath the heating elements, but they are guarded by a metal grated cover. You can put a drip tray underneath to prevent the fat from the salmon falling onto the elements.
You can illuminate the inside of the Ninja Foodi 8-in-1 Flip Mini Oven using a button the control panel, which made it easy to monitor it while it was cooking.
My salmon cooked in the same time as an air fryer, about 12 minutes in total, which is a lot less than if I'd cooked it in an oven. The fish was crispy and perfectly cooked, and there was no difference in cooking between the fish that was at the back of the oven, and the one at the front.
Making chicken wings
I used the air fryer tray to make chicken wings with the Ninja Foodi 8-in-1 Flip Mini Oven. After marinating my chicken in buffalo sauce for a few hours, I laid it out in the air fryer tray and put it in the oven. The air fryer tray can only go in the top oven latch, but you can put the wire rack beneath it to cook other elements of a meal simultaneously.
(Image credit: Ninja)
Like salmon, chicken wings are quite fatty, so there was a lot of fat and also buffalo marinade dripping down from the tray insert to the dripping tray. This became baked-on, and a little tricky to clean.
With a pre-heat time of only a minute, the SP101 has the wings cooked in record time. After 15 minutes in the oven they were perfectly cooked and ready to serve. I had to use oven gloves to hold the tray while I put the wings onto a plate, and then left the oven to cool fully before putting it back against my kitchen wall.
(Image credit: Ninja)
Baking in the Ninja Foodi 8-in-1 Flip Mini Oven
Anyone who's read my reviews of the best stand mixers will know that I'm an avid baker, so I was keen to try the Ninja Foodi 8-in-1 Flip Mini Oven out to bake.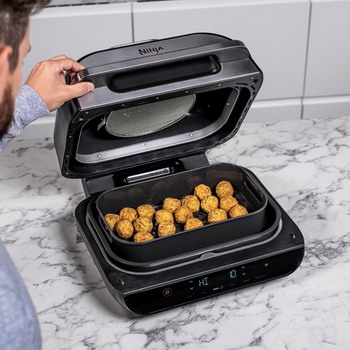
The Ninja Foodi 8-in-1 Flip Mini Oven doesn't come with a muffin tray, but you can buy a 12-cup muffin pan on the Ninja site if you love to cook cupcakes.
I used the baking sheet, which is 13x13 inches, to place my cupcake cases in the oven. I was concerned that they would touch the top of the oven when they rose, but I had no issues. I would definitely refrain from cooking bread or a full-sized cake in the Ninja Foodi 8-in-1 Flip Mini Oven, but that's down to the smaller internal capacity as opposed to any issues in its ability to cook.
Cleaning
(Image credit: Ninja)
The insert trays, including the drip tray, can go in the dishwasher with the Ninja Foodi 8-in-1 Flip Mini Oven. That's great, because a lot of stubborn oil and residue can become baked onto the inside of the air fryer.
When you remove the crumb tray you can pull the base open and clean the inside of the oven. Ninja advises to just use soap and water to do this, but I found that the heating elements became quite dirty and difficult to clean if I didn't clean them after every use. This didn't create any issues in cooking, but it did lose some of the aesthetic value of the oven.
Should you buy the Ninja Foodi 8-in-1 Flip Mini Oven?
(Image credit: Ninja)
If you plan on using this as your primary oven, you may struggle with the shortness of the cooking space. Not all trays slot into every cooking space in the oven, and it is definitely too short to bake bread or cakes. You will also struggle to fit a whole chicken into this oven, so I would suggest opting for a larger toaster oven if you plan on using this as your primary cooking unit. If you have an oven to cook larger items and want a smaller toaster oven to cook side dishes or make speedy midweek meals, the Ninja Foodi 8-in-1 Flip Mini Oven would be great for you.
Another big reason to buy the Ninja Foodi 8-in-1 Flip Mini Oven is the pre-heat, which is so quick that it can save you a lot of time when cooking. The cooking and toasting is even, the quality of the air frying is great, and the controls are very easy to get to grips with.
As I've said, I found cleaning in the Ninja Foodi 8-in-1 Flip Mini Oven quite tricky. The inserts can go in the dishwasher, which is great, but the heating elements themselves are hard to clean because they cannot be removed.
Today's best Ninja Foodi 8-in-1 Digital Air Fry Oven deals
Reduced Price
£199
£179
View
Reduced Price
£199
£179
View
Reduced Price
£199.99
£179
View
Show More Deals
About this review, and the reviewer
Millie Fender is our Editor for all things small appliances at Homes & Gardens.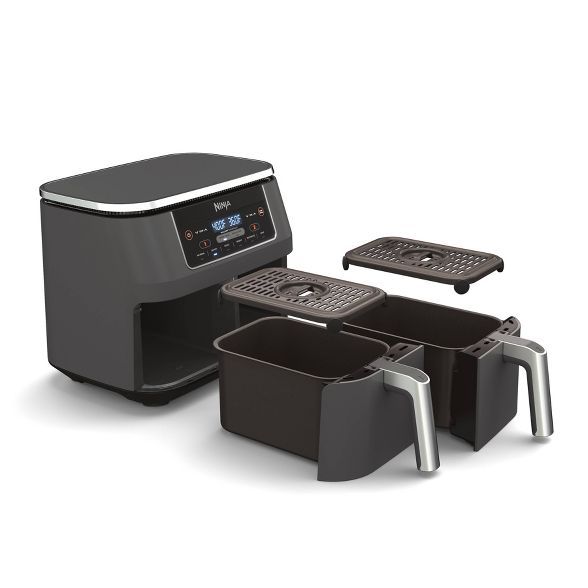 She spends a lot of time testing everything from toasters to air fryers and recommending the very best ones to readers.
All our reviews are tested from home, and the Ninja Foodi 8-in-1 Flip Mini Oven review is no exception. Millie tested it from August to November to fully make the most of all its capabilities before bringing you this review.
Millie Fender is the Small Appliance and Cooking Editor on the Homes and Gardens Ecommerce team. She specializes in cooking appliances and also reviews outdoor grills and pizza ovens. Millie loves to bake, so she will take any excuse to review stand mixers and other baking essentials. All of Millie's reviews are conducted at home, meaning she uses these products in her own kitchen, the way they're designed to be used. Millie is from Bath, England, and she grew up surrounded by classic Georgian architecture and interiors. She dreams of buying her own house and filling it with antiques, but for now, she lives in a sunny London flat with a very busy kitchen.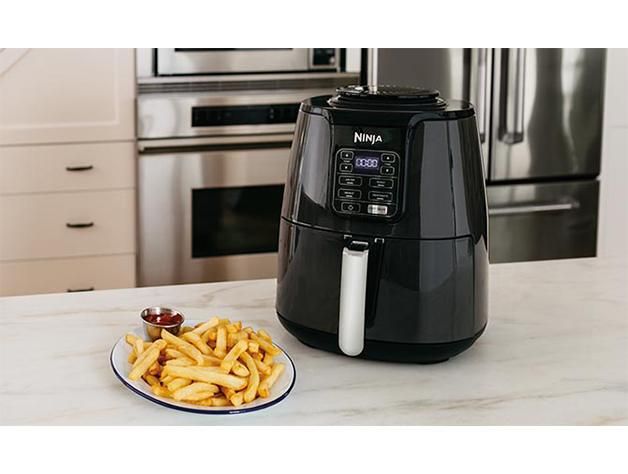
instructions for the Ninja deep -fryer - manuals +
Ninja Fryerica
Important security measures
only for home use
Read all the instructions before using the Ninja® Fricky.
When using an electrical appliance, basic safety precautions should always be observed, including the following:
WARNINGS
- or lack of experience and knowledge if they are supervised or instructed in the safe use of the device and understand the hazards. participates.
- Keep the appliance and power cord out of the reach of children under 8 years of age.
- To avoid a choking hazard to small children, remove and discard the protective cap attached to the power plug of this product.
- Do not allow children to play with the appliance.
- NEVER use the outlet under the meter.
- NEVER connect this device to an external timer or separate remote control system.
- Do not use an extension cord. The short power cord is used to reduce the risk of children under 8 years old getting caught on the cord or becoming entangled, and to reduce the risk of people tripping on the longer cord.
- To protect against electric shock, DO NOT immerse the cord, plugs, or main unit cabinet in water or any other liquid. Cook only in the pan provided or in a container recommended by SharkNinja placed in the pan provided.
- Check the appliance and power cord regularly. DO NOT use the appliance if the power cord or plug is damaged. If the instrument is defective or has been damaged in any way, stop using it immediately and call for assistance.
- ALWAYS check that the instrument is assembled correctly before use.
- DO NOT block the air intake or vent while the unit is in operation. This will prevent even cooking and may damage the appliance or cause it to overheat.
- Before placing a removable pot on the stove base, make sure that the pot and the bottom of the stove are clean and dry by wiping them with a soft cloth.

- This appliance is for domestic use only. DO NOT use this appliance for any purpose other than that intended. DO NOT use in moving vehicles or boats. DO NOT use outdoors. Improper use may result in injury.
- Designed for countertop use only. Make sure the surface is level, clean and dry. DO NOT move the device while it is in use.
- DO NOT place the appliance near the edge of a worktop during operation.
- DO NOT use accessories not recommended or sold by SharkNinja. Do not place accessories in a microwave, toaster, convection or conventional oven, or on a ceramic hob, electric coil, gas hob or outdoor grill. Use of accessories not recommended by SharkNinja may result in fire, electric shock or injury.
- When using this appliance, make sure there is enough space above and on all sides for air to circulate.
- ALWAYS make sure the tray is properly closed before starting work.
- DO NOT use the appliance without a removable dish installed.
- DO NOT use this appliance for deep frying.
- DO NOT place the appliance on hot surfaces, near a gas or electric burner, or in a hot oven.
- Avoid food contact with heating elements. DO NOT overfill when cooking. Overfilling may result in personal injury or property damage or affect the safe use of the appliance.
- Socket voltages may vary, affecting the performance of your product. To prevent possible illness, check with a thermometer that the food is cooked to the recommended temperature.
- If the device emits black smoke, unplug it immediately. Wait until smoking has stopped before removing any kitchen utensils.
- DO NOT touch hot surfaces. The surfaces of the appliance are hot during and after use. To avoid burns or injury, ALWAYS use safety pads or insulated oven mitts and use accessible handles and handles.
- Special care must be taken if the appliance contains hot food. Improper use may result in injury.
- Spilled food can cause severe burns.
 Keep the appliance and cord out of the reach of children. DO NOT let the cord hang over the edges of a table or counter or touch hot surfaces.
 - The frying pan and the crispy plate become very hot during cooking. Avoid physical contact when removing a pan or plate from the appliance. ALWAYS place the pan or plate on a heat-resistant surface after removal. DO NOT touch the utensils during or immediately after cooking.
- Children may only perform cleaning and maintenance under the supervision of adults and children over 8 years of age.
- Unplug it when not in use and before cleaning. Allow to cool before cleaning, disassembling, installing or removing parts, and storing.
- DO NOT clean with abrasive cleaners, steel wool or washcloths.
- Please refer to the "Cleaning and Maintenance" section for regular maintenance of the instrument.
PARTS AND ACCESSORIES
BEFORE FIRST USE
- Remove and discard all packing materials, advertising labels, and tape from the device.
- Remove all accessories from the packaging and read this manual carefully. Pay particular attention to operating instructions, warnings, and important safety precautions to avoid personal injury or property damage.
- Wash the ceramic-coated pan and crisper plate in hot, soapy water, then rinse and dry thoroughly. The pot and plate for vegetables and fruits can also be washed in the dishwasher. NEVER wash the main unit in the dishwasher.
GET TO KNOW YOUR FRYER
FUNCTION BUTTONS
AIR FRY: Use this function to crisp your food with little or no oil.
Roast: Use as an oven for roasting tender meats, casseroles and more.
DEHYDRATE: For a snack, dehydrate meats, fruits, and vegetables.
REHEAT: Gently heat leftover food until crispy.
OPERATION BUTTONS
TEMP arrows : Use the TEMP up and down arrows to adjust the cooking temperature before or during cooking.
TIME hands: Use the TIME up and down arrows to set the cooking time in any function.
START / STOP button : After selecting the time and temperature, start cooking by pressing the START / STOP button. You can stop cooking at any time by pressing this button again.
Power button: The Power button turns off the appliance and stops all cooking modes.
STANDBY MODE After 10 minutes without interaction with the control panel, the device will go into standby mode. The power button will glow dimly.
USING THE FRYER
To turn on the appliance, first plug the power cord into a power outlet. Press the power button.
AIR FRY
- Make sure the crispier plate is in the pan.
- Press the Air Fry button. The default temperature value is displayed. Use the TEMP up and down arrows to set your desired temperature. NOTE: It is recommended to allow the device to warm up for 3 minutes before adding the ingredients.
 When preheating, skip step 4, insert an empty pan and press the START/STOP button to start
 - Press the TIME up and down arrow buttons to set the desired cooking time.
- Place the ingredients on a crisper plate set in the pan. Insert the tray into the unit.
- Press START / STOP to start cooking. NOTE: To stir ingredients during cooking, remove skillet and shake back and forth. Reinsert the pan and cooking will continue.
- When cooking is complete, the appliance will beep and the control panel display will show "END".
- Remove ingredients by tipping them over using oven gloves or tongs/utensils with a silicone tip.
USING THE FRYER - CONTINUOUS
Fried
- If necessary, make sure the plate with the crispier crust is in place. If you're using a casserole dish, you don't need a crisper plate.
- Press the FRY button. The default temperature value is displayed. Use the TEMP up and down arrow buttons to set the desired temperature.
 NOTE: It is recommended to allow the device to warm up for 3 minutes before adding the ingredients. When preheating, skip step 4, insert an empty pan and press the START/STOP button to start
 - Press the TIME up and down arrows to set the desired cooking time.
- Add the ingredients to the pan. Insert the frying pan into the appliance.
- Press START / STOP to start cooking.
- When cooking is complete, the appliance will beep and the control panel display will show END.
- Remove the ingredients by taking them out or using oven gloves or tongs / utensils with silicone tips.
REHEAT
- Make sure the crispier plate is in the pan.
- Press the REHEAT button. The default temperature value is displayed. Use the TEMP up and down arrow buttons to set the desired temperature. NOTE: It is recommended to allow the device to warm up for 3 minutes before adding the ingredients.
 When preheating, skip step 4, insert an empty dish and press the START/STOP button to start.
 - Press the TIME up and down arrows to set the desired cooking time.
- Add the ingredients to the pan. Insert the frying pan into the appliance.
- Press the START/STOP button to start cooking.
- When cooking is complete, the appliance will beep and the control panel display will show END.
- Remove the ingredients by removing them or using oven gloves or silicone-tipped tongs/utensils.
DEHYDRATE
- Put the first layer of ingredients on the bottom of the pan. Then set the crisper plate inside the pan and place the second layer of ingredients on the crisper plate.
- Insert the tray into the machine.
- Press the DRY button. The default temperature will be displayed. Use the TEMP up and down arrow buttons to set the desired temperature.
- Press the TIME up and down arrow buttons to set the desired cooking time.
- Press the START/STOP button to start dehydration.
- When the dehydration is complete, the device will beep and the control panel display will show “END”. NOTE: You can increase the dewatering capacity with a multilayer rack. If the rack is not included with your model, it can be purchased from ninjakitchen.eu
CLEANING AND MAINTENANCE
CLEANING THE AIR FRYER
NOTE: NEVER immerse the main unit in water or any other liquid. NEVER BEEN wash the main unit in the dishwasher.
The device must be thoroughly cleaned after each use.
- Unplug the appliance before cleaning.
- To clean the main unit and control panel, wipe them with a cloth. Do not use a sponge to wash dishes.
- Pot, vegetable and fruit plate and all accessories can be washed in the dishwasher.
- If food remains on a plate or pan, place them in a sink filled with warm soapy water and let them soak in.
- Air dry all parts after use or with a towel.
- If the heating element needs to be cleaned or cleaned, use a non-abrasive cleaner or liquid detergent with a nylon pad or bristles.
HINTS AND TIPS
- For even browning, make sure that the ingredients are placed evenly on the bottom of the pan and do not overlap. If the ingredients overlap, be sure to shake them after the set cooking time has elapsed.
- Cooking time and temperature can be adjusted at any time during cooking. Simply press the TIME or TEMP up and down arrows to adjust the time or temperature.
- To convert recipes from a conventional oven, reduce the temperature of the fryer by 10°C. Check food frequently to prevent overcooking.
- We recommend preheating for 3 minutes. You can use the built in timer to set a 3 minute countdown.
- Fryer fan sometimes blows light food. To make this easier, secure foods (like the top piece of bread on a sandwich) with cocktail sticks.

- The crisper plate lifts the ingredients in the pan so air can circulate under and around them for uniform and crisp results.
- After selecting a cooking function, you can press the START/STOP button to start cooking immediately. The device will work with the default temperature and time.
- For best results, remove food immediately after cooking to prevent overcooking.
- For best results with fresh vegetables and potatoes, use at least 1 tablespoon of oil. Add more oil as desired to achieve desired degree of crispiness.
- For best results, check cooking progress and remove food when desired browning level is reached. We recommend using an instant read thermometer to monitor the internal temperature of foods. Remove food immediately after the cooking time has elapsed to prevent overcooking.
TROUBLESHOOTING GUIDE
• Why doesn't my temperature rise higher?
Maximum temperature 210 °C.
• How long does it take to preheat and how do I know when it's ready?
We recommend preheating for 3 minutes. You can use the built in timer to set a 3 minute countdown.
• Should ingredients be added before or after preheating?
It is recommended to let the device warm up for 3 minutes before adding the ingredients.
• Do frozen foods need to be thawed before air frying?
It depends on the food. Follow the instructions on the package.
• How to pause the countdown?
Press START / STOP.
• Is it safe to place the pot on my worktop?
The pan will heat up during cooking. Handle with care and place only on heat resistant surfaces.
• How do you know when to use the crispier plate?
Use a plate with a crispier crust if you want your food to be crispier. A crisper plate allows food to rise in the pan, allowing air to pass under the plate and get crispy ingredients evenly.
• My food was not cooked.
Make sure the tray is fully inserted during cooking. For even browning, make sure the ingredients are evenly layered on the bottom of the pan and do not overlap. Shake crumbly ingredients until crispy. Cooking time and temperature can be adjusted at any time during cooking. Simply press the TIME or TEMP up and down arrows to adjust the time or temperature.
• My food is overcooked. For best results, check cooking progress and remove food when desired browning level is reached. Remove food immediately after cooking is complete to prevent overcooking.
• Why does my food flutter when I cook it in the air?
Fryer fan occasionally blows light food. To make this easier, secure foods (like the top piece of bread on a sandwich) with cocktail sticks.
• Can I air fry wet ingredients in a batter?
Yes, but use the correct breading technique. It is important to coat foods first with flour, then with egg, and then with breadcrumbs. Be sure to press the breadcrumbs to the food. Since the fryer mechanism has a powerful fan, the breading can sometimes be blown off. Press firmly on the breadcrumbs so that they stick.
• The device beeps.
Your food is ready.
• The screen went dark.
The machine is in standby mode. Press the power button to turn it back on.
• The message "E" appears on the display screen.
The device is not working properly. Please contact customer service at 0800 862 0453.
SPARE PARTS
To order additional parts and accessories visit ninjakitchen.eu
or contact customer service at 0800 862 0453
PRODUCT REGISTRATION
Please visit registrationyourninja.eu or call 0800 862 0453 to register your new Ninja® product within 28 days of purchase. You will be prompted for the store name, date of purchase and model number, as well as your name and address. Registration will allow us to contact you in the unlikely event of a product safety notice. By registering, you acknowledge that you have read and understood the instructions for use and the warnings set out in the accompanying instructions.
report this ad
VISIT US ONLINE At: ninjakitchen.eu
Documents / Resources
Recommendations
- Sale SharkNinja
- NinjaKitchen
- Sale SharkNinja
- Ninjakuhnya
SPECIFICATIONS
Voltage: 220-240V~, 50-60Hz
Watts: 1550W
PLEASE READ CAREFULLY AND SAVE FOR FUTURE.
If you have questions, call Customer Service on 0800 000 9063.
TIP: You can find the model and serial number on the QR code label located on the back of the device near the power cable.
This label indicates that this product must not be disposed of with other household waste throughout the EU. To prevent possible harm to the environment or human health from uncontrolled waste disposal, dispose of responsibly to promote the sustainable reuse of material sources. To return your used device, please use the return and collection systems or contact the retailer where you purchased the product. They can hand over this product for environmentally friendly recycling.
IMPORTANT SAFETY INSTRUCTIONS
FOR HOUSEHOLD USE ONLY
Read all instructions before using your Ninja® fryer.
When using an electrical appliance, basic safety precautions should always be followed, including the following:
WARNINGS
- with a lack of experience and knowledge if they are supervised or instructed in the safe use of the device and understand the hazards. participates.
- Keep the appliance and power cord out of the reach of children under 8 years of age.
- To avoid a choking hazard to small children, remove and discard the protective cap attached to the power plug of this product.
- Do not allow children to play with the appliance.
- NEVER HAPPENED YET use the outlet under the meter.
- NEVER HAPPENED YET connect this device to an external timer or separate remote control system.
- NOT use an extension. The short power cord is used to reduce the risk of children under the age of 8 getting caught on the cord or becoming entangled, and to reduce the risk of tripping over the longer cord.
- To protect against electric shock NOT , immerse the cord, plugs, or main unit housing in water or other liquid. Cook only in the pan provided or in a container recommended by Shark Ninja placed in the pan provided.
- Check the appliance and power cord regularly. NOT use the appliance if the power cord or plug is damaged.
 If the instrument is defective or has been damaged in any way, stop using it immediately and call for assistance.
 - ALWAYS Make sure the instrument is properly assembled before use.
- NOT close the air inlet or vent while the unit is in operation. This will prevent even cooking and may damage the appliance or cause it to overheat.
- Before placing a removable pot on the stove base, make sure that the pot and the bottom of the stove are clean and dry by wiping them with a soft cloth.
- This appliance is for domestic use only. NOT Do not use this appliance for its intended use. NOT use in moving vehicles or boats. NOT for outdoor use. Improper use may result in injury.
- Designed for countertop use only. Make sure the surface is level, clean and dry. NOT move the appliance while it is in use.
- NOT place the appliance near the edge of the worktop during operation.
- NOT Use accessories not recommended or sold by SharkNinja. Do not place accessories in a microwave, toaster, convection or conventional oven, or on a ceramic hob, electric coil, gas stove or outdoor grill. Use of accessories not recommended by SharkNinja may result in fire, electric shock or injury.
- When using this appliance, make sure there is enough space above and on all sides for air to circulate.
- ALWAYS Make sure the drip tray is properly closed before use.
- DO NOT use the appliance without the removable cookware installed.
- NOT use this appliance for deep frying.
- DO NOT place the appliance on hot surfaces, near a gas or electric burner, or in a heated oven.
- Avoid food contact with heating elements. NOT cooking overflow. Overfilling may result in personal injury or property damage or affect the safe use of the appliance.
- Socket voltages may vary, affecting the performance of your product. To prevent possible illness, check with a thermometer that the food is cooked to the recommended temperature.
- If the device emits black smoke, unplug it immediately. Wait until smoking has stopped before removing any kitchen utensils.
- NOT touch hot surfaces. The surfaces of the appliance are hot during and after use. To avoid burns or injury, ALWAYS use protective pads or insulated oven gloves and use accessible handles and handles.
- Take special care if the appliance contains hot food. Improper use may result in injury.
- Spilled food can cause severe burns. Keep the appliance and cord out of the reach of children. NOT let the cord hang over the edges of tables or counters or touch hot surfaces.
Be careful not to touch the hot surface.
SAVE THESE INSTRUCTIONS - The frying pan and the crisp plate become very hot during cooking.
 Avoid physical contact when removing a pan or plate from the appliance. ALWAYS place the pan or plate on a heat-resistant surface after removal. NOT touch utensils during or immediately after cooking.
 - Children should only perform cleaning and maintenance under the supervision of adults and children over 8 years of age.
- Unplug from outlet when not in use and before cleaning. Allow to cool before cleaning, disassembling, installing or removing parts, and storing.
- HE Clean with abrasive cleaners, steel wool or washcloths.
- Please refer to the "Cleaning and Maintenance" section for regular maintenance of the instrument.
PARTS
To order additional parts and accessories, visit ninjakitchen.eu or contact customer service on 0800 000 9063. labels and tape.
GET TO KNOW YOUR FRYER
FUNCTION BUTTONS
AIR FRY: Use this function to crisp your food with little or no oil.
Roast: Use as an oven for roasting tender meats, casseroles and more.
DEHYDRATE: For a snack, dehydrate meats, fruits, and vegetables.
REHEAT: Gently heat leftover food until crispy.
OPERATION BUTTONS
TEMP arrows: Use the up ▲ and down ▼ TEMP arrows to adjust the cooking temperature before or during cooking.
TIME hands: Use the TIME up ▲ and down ▼ arrows to set the cooking time in any function.
START / STOP button: After selecting the time and temperature, start cooking by pressing the START / STOP button. You can stop cooking at any time by pressing this button again.
Button: The Power button turns the appliance off and stops all cooking modes.
STANDBY MODE
After 10 minutes without interaction with the control panel, the device will go into standby mode. The power button will glow dimly.
USING THE FRYER
Using the cooking functions
To turn on the appliance, first plug the power cord into a power outlet. Press the power button.
AIR FRY
- Make sure the crispier plate is in the pan.
- Press the Air Fry button. The default temperature value is displayed. Use the TEMP up and down arrows to set your desired temperature.
NOTE: It is recommended to allow the device to warm up for 3 minutes before adding the ingredients. When preheating, skip step 4, insert an empty dish and press the START/STOP button to start. - Press the TIME up and down arrow buttons to set the desired cooking time.

- Add the ingredients to the pan. Insert the tray into the unit.
- Press START / STOP to start cooking.
NOTE: To stir ingredients while cooking, remove skillet and shake back and forth. Reinsert the pan and cooking will continue. - When cooking is complete, the appliance will beep and the control panel display will show "END".
- Remove ingredients by tipping them over using oven gloves or tongs/utensils with a silicone tip.
Fried
- If necessary, make sure the crisper plate is in place. If you are using a baking dish, this plate is not needed.
- Press the FRY button. The default temperature value is displayed. Use the TEMP up and down arrow buttons to set the desired temperature.
NOTE: It is recommended to allow the device to warm up for 3 minutes before adding the ingredients. When preheating, skip step 4, insert an empty dish and press the START/STOP button to start.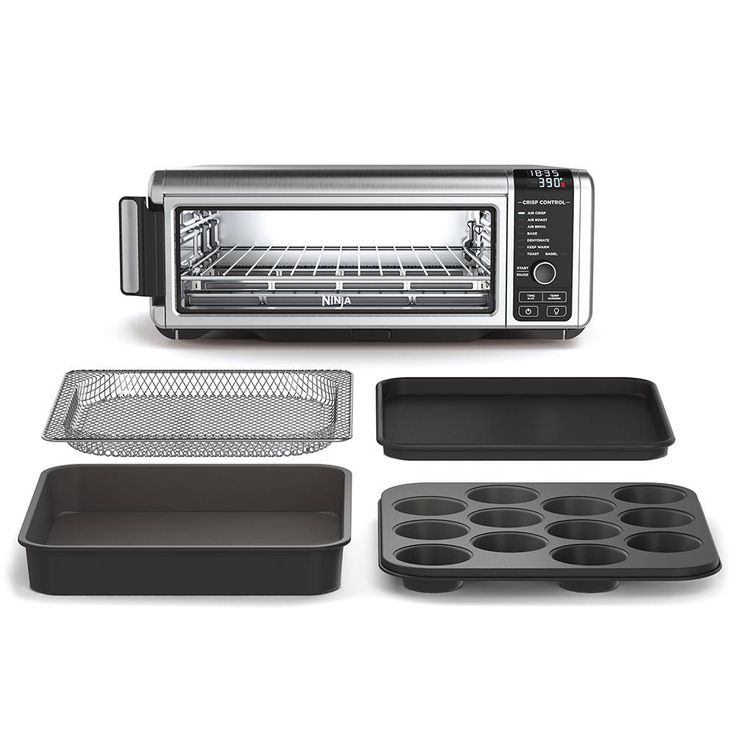
- Press the TIME up and down arrows to set the desired cooking time.
- Add the ingredients to the pan. Insert the tray into the unit.
- Press START / STOP to start cooking.
- When cooking is complete, the appliance will beep and the control panel display will show "END".
- Remove ingredients by tipping them over using oven gloves or tongs/utensils with a silicone tip.
REHEAT
- Make sure the crispier plate is in the pan.
- Press the REHEAT button. The default temperature value is displayed. Use the TEMP up and down arrow buttons to set the desired temperature.
NOTE: It is recommended to allow the device to warm up for 3 minutes before adding the ingredients. When preheating, skip step 4, insert an empty dish and press the START/STOP button to start. - Press the TIME up and down arrows to set the desired cooking time.
- Add the ingredients to the pan. Insert the tray into the unit.
- Press the START/STOP button to start cooking.
- When cooking is complete, the appliance will beep and the control panel display will show "END".
- Remove the ingredients by tipping them over using oven gloves or silicone-tipped tongs/utensils.
DEHYDRATE
- Put the first layer of ingredients on the bottom of the pan. Then set the crisper plate inside the pan and place the second layer of ingredients on the crisper plate.
- Insert the tray into the machine.
- Press the DRY button. The default temperature will be displayed. Use the TEMP up and down arrow buttons to set the desired temperature.
- Press the TIME up and down arrow buttons to set the desired cooking time.
- Press the START/STOP button to start dehydration.
- When the dehydration is complete, the device will beep and the control panel display will show “END”.
NOTE: You can increase the dewatering capacity with a multilayer rack. If the stand is not included with your model, it can be purchased from ninjakitchen.eu.
CLEANING AND MAINTENANCE
CLEANING THE AIR FRYER
NOTE: NEVER immerse the main unit in water or any other liquid. NEVER wash the main unit in the dishwasher.
The device should be thoroughly cleaned after each use.
- Unplug the appliance before cleaning.
- To clean the main unit and control panel, wipe them with a cloth. Do not use a sponge to wash dishes.
- Pot, vegetable and fruit plate and all accessories can be washed in the dishwasher.
- If food remains on a plate or pan, place them in a sink filled with warm soapy water and let them soak in.
- Air dry all parts after use or with a towel.
- If the heating element needs to be cleaned or cleaned, use a non-abrasive cleaner or liquid detergent with a nylon pad or bristles.
HINTS AND TIPS
- For even browning, make sure the ingredients are evenly placed on the bottom of the pan and do not overlap.
 If the ingredients overlap, be sure to shake them after the set cooking time has elapsed.
 - Cooking time and temperature can be adjusted at any time during cooking. Simply press the TIME or TEMP up and down arrows to adjust the time or temperature.
- To convert recipes from a conventional oven, reduce the temperature of the fryer by 10°C. Check food frequently to prevent overcooking.
- We recommend preheating for 3 minutes. You can use the built in timer to set a 3 minute countdown.
- Fryer fan sometimes blows light food. To make this easier, secure foods (like the top piece of bread on a sandwich) with cocktail sticks.
- The crisper plate lifts the ingredients in the pan so air can circulate under and around them for uniform and crisp results.
- After selecting a cooking function, you can press the START/STOP button to start cooking immediately. The device will work with the default temperature and time.
- For best results, remove food immediately after cooking to prevent overcooking.

- For best results with fresh vegetables and potatoes, use at least 1 tablespoon of oil. Add more oil as desired to achieve desired degree of crispiness.
- For best results, check cooking progress and remove food when desired browning level is reached. We recommend using an instant read thermometer to monitor the internal temperature of foods. Remove food immediately after the cooking time has elapsed to prevent overcooking.
TROUBLESHOOTING GUIDE
- Why doesn't my temperature rise higher?
Maximum temperature 210°C. - How long does it take to preheat and how do I know when it's ready?
We recommend preheating for 3 minutes. You can use the built in timer to set a 3 minute countdown. - Should ingredients be added before or after preheating?
It is recommended to let the device warm up for 3 minutes before adding the ingredients. - Do frozen foods need to be thawed before air frying?
It depends on the food. Follow the instructions on the package.
 - How to pause the countdown?
Press START / STOP. - Can the pan be placed on the worktop?
The pan will heat up during cooking. Handle with care and place only on heat resistant surfaces. - How do you know when to use the crunchy plate?
Use a plate with a crispier crust if you want your food to be crispier. A crisper plate allows food to rise in the pan, allowing air to pass under the plate and get crispy ingredients evenly. - My food was not prepared.
Make sure the tray is fully inserted during cooking. For even browning, make sure the ingredients are evenly layered on the bottom of the pan and do not overlap. Shake crumbly ingredients until crispy. Cooking time and temperature can be adjusted at any time during cooking. Simply press the TIME or TEMP up and down arrows to adjust the time or temperature. - My food is overcooked.
For best results, check cooking progress and remove food when desired browning level is reached. Remove food immediately after cooking is complete to prevent overcooking. - Why does my food flutter when I cook it in the air?
Fryer fan occasionally blows light food. To make this easier, secure foods (like the top piece of bread on a sandwich) with cocktail sticks. - Can I air fry wet ingredients in a batter?
Yes, but use the correct breading technique. It is important to coat foods first with flour, then with egg, and then with breadcrumbs. Be sure to press the breadcrumbs to the food. Since the fryer mechanism has a powerful fan, the breading can sometimes be blown off. Press firmly on the breadcrumbs so that they stick. - The device beeps.
Your food is ready. - Screen darkened.
The machine is in standby mode. Press the power button to turn it back on.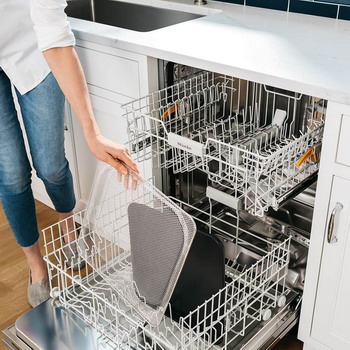
- The message "E" will appear on the display screen.
The device is not working properly.
Please contact customer service on 0800 000 9063.
PRODUCT REGISTRATION
TWO (2) YEAR LIMITED WARRANTY
your "legal rights"). You can exercise these legal rights against your seller. However, at Ninja, we are so confident in the quality of our products (“Products”) that we give you an additional manufacturer’s warranty of up to two years. This warranty applies to the Product only if purchased in new and unused condition. These terms apply to our warranties, only your statutory rights as a buyer are not affected. Please note that the 2-year warranty is available in all EU countries and in the UK if it ceases to be an EU country during the warranty period.
The terms and conditions below describe the preconditions and scope of our warranties issued by SharkNinja Germany GmbH, KurtBlaumPlatz 8, 63450 Hanau (Germany) ("us", "our" or "we").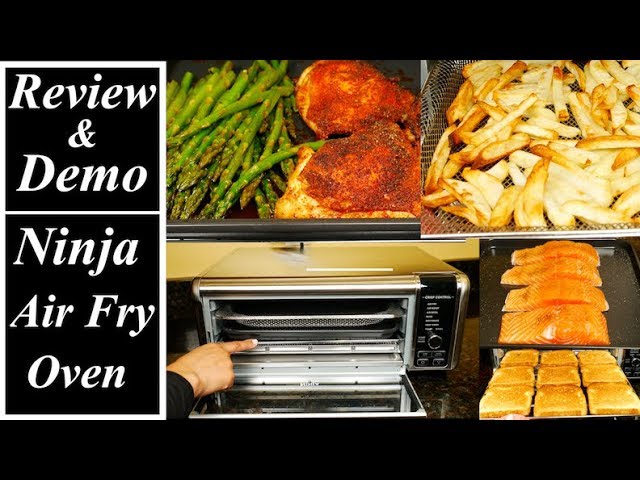 They do not affect your legal rights or obligations of your seller or your contract with him. The same applies if you purchased the product directly from Ninja.
Ninja® Warranty
Kitchen appliances require a significant investment. Your new machine should work properly for as long as possible. The warranty it gives is an important factor reflecting the degree of confidence a manufacturer has in its products and workmanship.
Our customer service (0800 000 9063) is open from 9.00 to 6.00 on Monday, Friday. The call is free and you will be contacted immediately by a Ninja representative. You will also find online support at www.ninjakitchen.eu.
How do I register my warranty?
You can register your warranty online within 28 days of purchase. To save time, you will need the following information about your machine:
- Model no
- Serial number (if available)
- Date of purchase of the Product (receipt or waybill)
To register online, visit www. ninjakitchen.eu
IMPORTANT INFORMATION
- Your Product is warranted for 2 years from the date of purchase.
- Always keep your receipt. If you need to use your warranty, we will require a receipt to verify that the information provided to us is correct. Failure to present a valid receipt will void your warranty.
What are the benefits of registering my warranty?
When you register your warranty, you can receive our newsletter containing tips, tricks and contests. Hear the latest news on new technologies and Ninja releases. If you register your warranty online, you will receive instant confirmation that we have received your details.
For more information about our privacy policy, please visit www.ninjakitchen.eu
How long is our product warranty?
Our confidence in our design and quality control means your Product is warranted for two years.
What is covered by the warranty?
Repair or replace (at Ninja's option) your Product, including all parts and labor, for any defects in design, materials, or workmanship (including shipping and handling charges). Our warranty is in addition to your legal rights as a consumer.
What is not covered by the warranty?
- Normal wear.
- Accidental damage, malfunctions caused by negligent use or care, misuse, neglect, neglect, or handling of kitchen equipment that does not comply with the Ninja® Owner's Manual that came with your machine.
- Use of a kitchen appliance for purposes other than normal domestic use.
- Use of parts not assembled or installed in accordance with the instructions for use.
- Use of non-Ninja® Genuine Parts and Accessories.
- Wrong installation (except when Ninja® is installed).
- Repairs or alterations made by parties other than Ninja or its agents Repairs or alterations made by parties other than Ninja or its agents, unless you can show that the repairs or alterations made by others are not due to a defect, against which you avail the warranty.
What happens when my warranty ends?
Ninja does not develop limited time products.