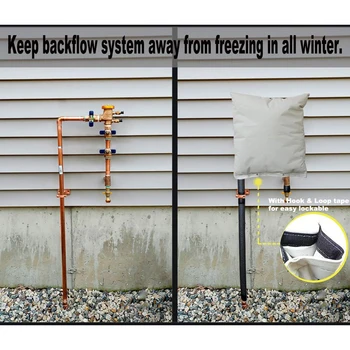
Keep outdoor faucets from freezing
Stop Outdoor Faucets from Freezing First
Return to Expert Tips main page
When chilling temperatures arrive, it’s not a matter of “if” you should pay closer attention to your outdoor faucets, but “when” and “how.” Even if you live in a warmer climate, the occasional cold spell has the power to do incredible damage to your pipes. Neighborly is here to help you stop the faucet freeze before it starts! Use this guide to prevent frozen/burst pipes and the costly damage that follows.
Why Cover Your Faucets?
Your outdoor pipes and faucets are vulnerable to freezing and bursting in the wintertime due to an increase in water pressure. Freezing and bursting often result in expensive water damage and repair costs for your home.
If you live in a warmer climate, you’re not exactly in the clear – in fact, because homes in warmer climates aren’t built for the cold, your pipes are likely not insulated well and are therefore more vulnerable.
Protect Your Pipes
The pipes in your home get to piggyback off the protection and insulation your home provides, but your outdoor pipes aren’t so lucky! That’s why it’s crucial to take care of your outdoor faucets and pipes when the winter months arrive.
- Before covering your outdoor faucets, it’s important to remove and drain the attached hoses. Make sure all the water is out of the hose before wrapping up and storing it for the winter.
- If you live in an extremely cold climate, you may have an internal shutoff valve inside your home. This valve allows you to adequately drain the water from the sillcock. Shut off the internal valve and drain the water from both the drain cap inside and the faucet outside.
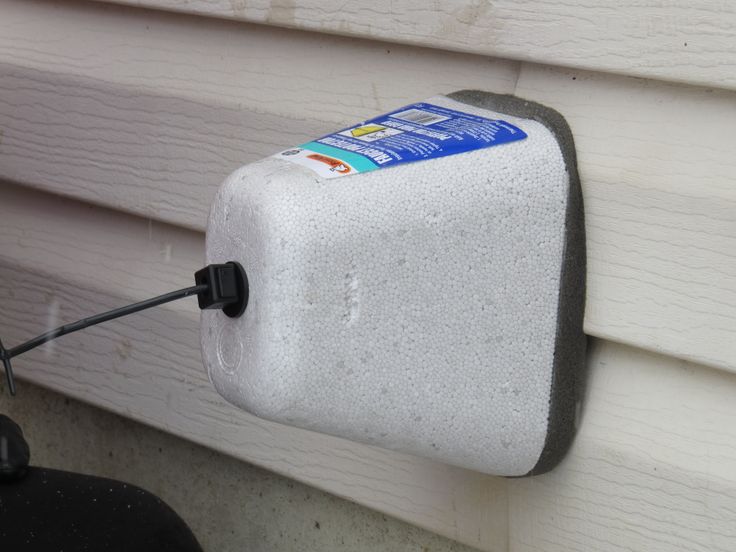
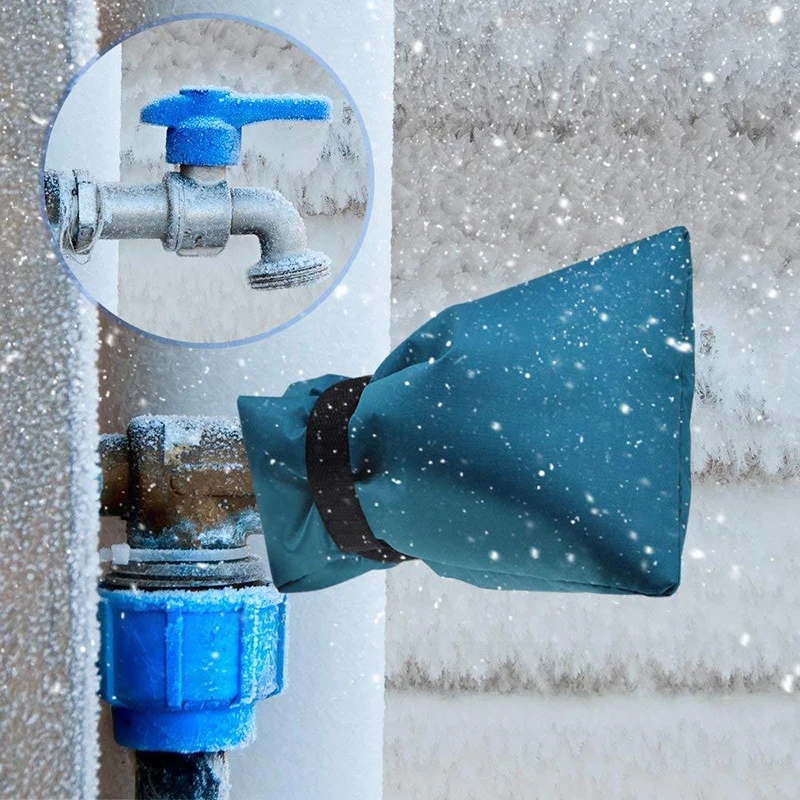
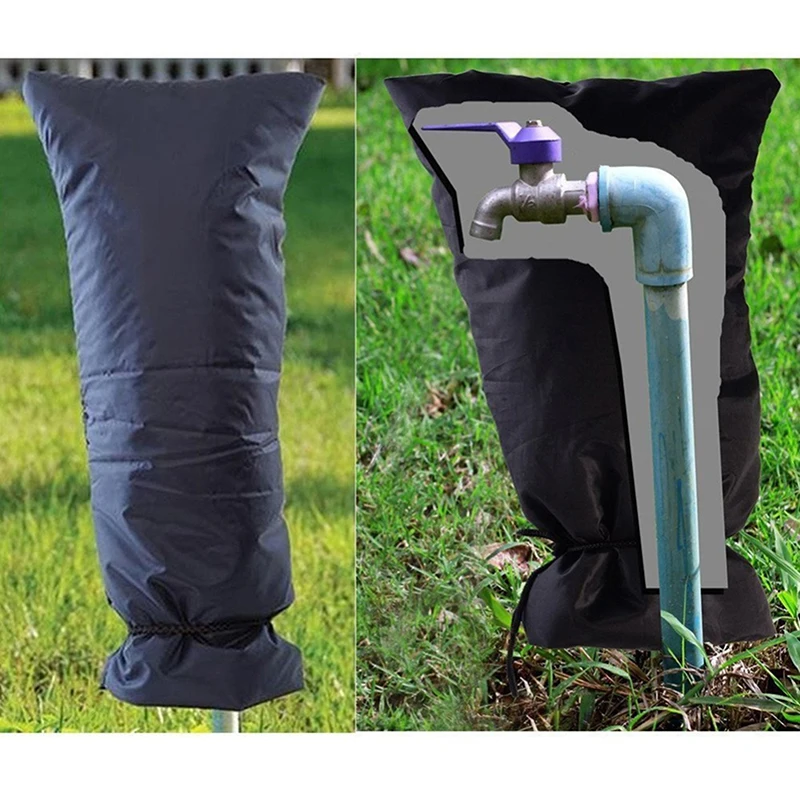
- Cover the exterior faucet with an insulated slip-on cover. This will prevent any remaining water from freezing. Exterior pipes should be wrapped with insulation tubing, which can be found at your local hardware store. Do not wrap your pipes with bath towels or newspaper! These coverings hold moisture like a wet rag and defeat the purpose of covering your pipes in the first place.
Frozen pipes? Don’t panic! Check out these quick ideas and recommendations:
- Take a walk to see which pipes are frozen.
- Give them time to thaw – don’t try to speed up the process.
- Call a plumber (we know some good ones!) to make sure the freeze didn’t cause any leaks.
Don’t wait until a cold front to pay attention to your pipes! Use this guide to protect them before a freeze.
Didn’t get to them fast enough? Mr. Rooter Plumbing, a Neighborly Family brand, is ready to help! Check out more of our service brands at Neighborly.com.
Tags:
- Landscaping and Lawn Care,
- Mr Rooter,
- Plumbing,
- Snow Removal,
- Stop Outdoor Faucets from Freezing
Category:
- Be Ready
Invalid zip code
Some of the Neighborly home service brands mentioned in this post may not be available in your zip code.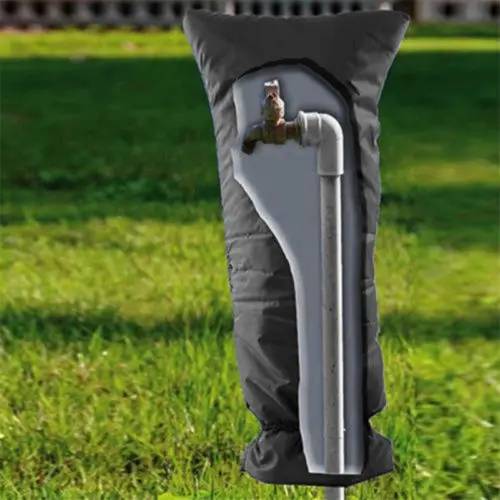 To find out which experts are nearby, search for services in your area.
Depending on current health and safety regulations in your area, some of the services mentioned in this post may not be available. Neighborly service providers will follow the latest health and safety guidelines provided by the local and state governments. Please check with your local Neighborly service provider for details at the time you need service(s).
Use the Neighborly App to get connected to local home service professionals. Download and receive offers only available on the App.
Download It Today
- Previous Article
- Next Article
Back to top
How to Prevent Outdoor Spigots From Freezing
By
Bob Formisano
Bob Formisano
Bob Formisano is a licensed architect and builder with nearly 40 years of experience building new homes and restoring older homes. One of his specialties is repairing old systems dating back to the 1920s, including galvanized water pipes, knob-and-tube wiring, and more. His home repair articles for The Spruce span more than 10 years.
Learn more about The Spruce's Editorial Process
Updated on 08/02/22
Reviewed by
Richard Epstein
Reviewed by Richard Epstein
Richard Epstein is a licensed master plumber with over 40 years experience in residential and commercial plumbing. He specializes in estimating as well as design and engineering for plumbing systems, and he works for one of New York's largest union plumbing construction companies.
Learn more about The Spruce's Review Board
Fact checked by
Jessica Wrubel
Fact checked by Jessica Wrubel
Jessica Wrubel has an accomplished background as a writer and copy editor, working for various publications, newspapers and in public libraries assisting with reference, research and special projects.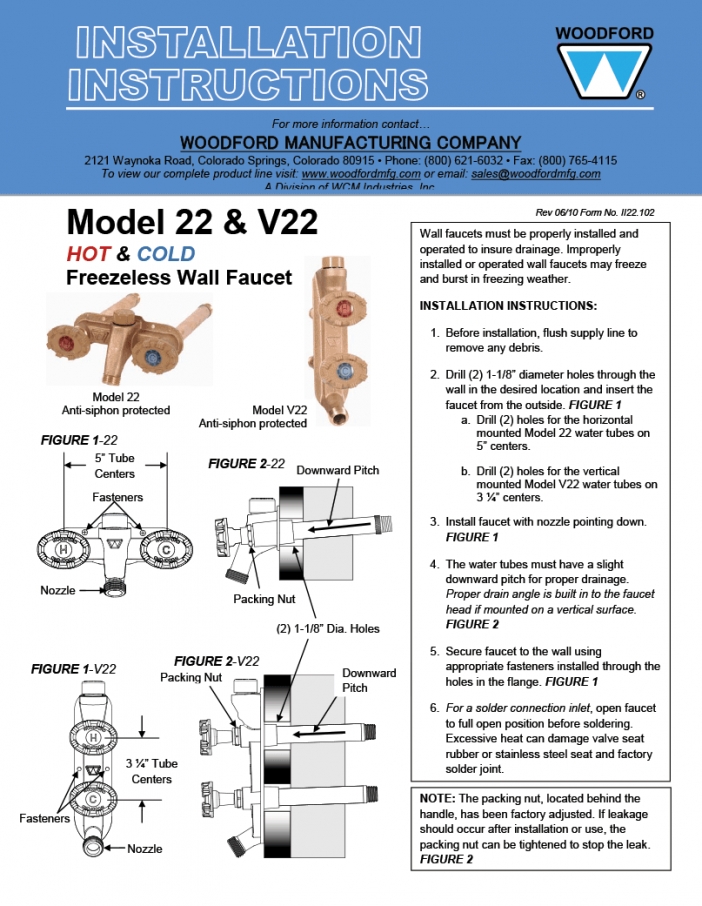 In addition to her journalism experience, she has been educating on health and wellness topics for over 15 years in and outside of the classroom.
Learn more about The Spruce's Editorial Process
The Spruce / Sarah Lee
Project Overview
Worrying about outdoor spigots freezing every winter is something that most homeowners can relate to. But this doesn't have to be such a perennial problem.
If you have a standard spigot, there are simple winterizing steps you can take that make it unlikely you'll have a problem with freezing. You can also go a step further and replace a standard faucet with a frost-proof faucet.
What Is a Frost-Proof Faucet?
A frost-proof (also called "freezeproof" or "frost-free") faucet provides better protection against freezing and eliminates the need to winterize the faucet—other than removing the hose.
Keep reading for two ways to prevent your outdoor spigots from freezing during the wintertime.
Equipment / Tools
Winterizing a Standard Spigot
- Bucket
- Channel-lock pliers (if needed)
Installing a Frost-Proof Faucet
- Screwdriver
- Channel-lock pliers
- Tape measure
- Tubing cutter or hacksaw
- Caulk gun
Materials
Winterizing a Standard Spigot
- Insulated faucet cover
Installing a Frost-Proof Faucet
- Frost-proof faucet with push-fit connector
- Sandpaper or emery cloth
- Corrosion-resistant screws (if needed)
- Exterior caulk
The Spruce / Sarah Lee
How to Winterize a Standard Spigot
-
Remove the Hose
If there is still a garden hose connected to the outdoor faucet, remove it from the spigot, drain any residual water in the hose, coil it up, and store it in a dry location.

The Spruce / Sarah Lee
-
Shut off the Water
Locate the control valve on the water supply pipe leading to the outdoor spigot. If you have metal water pipes, this is usually a brass ball valve located several feet from the outside wall. Turn the handle on the control valve clockwise until it stops. If the valve has a lever-type handle, turn the lever so it is perpendicular to the pipe.
Tip
As you can see, preventing a standard (not frost-proof) spigot from freezing requires a shutoff valve on the supply pipe leading to the faucet. If your spigot does not have this kind of shutoff valve, it's best to install one to simplify annual winterizing tasks.
The Spruce / Sarah Lee
-
Drain the Spigot
Fully open the outdoor spigot and let all residual water drain out of the pipe. If the water trickles and never fully stops, the indoor shutoff valve is faulty and must be replaced. Close the spigot valve.

Hold a bucket under the shutoff valve and remove the bleeder cap on the valve, if it is equipped with one. You may need pliers to loosen the cap. Let all residual water in the line drain into the bucket. Reinstall the bleeder cap, and tighten it snugly.
The Spruce / Sarah Lee
-
Install an Insulated Faucet Cover
Add an insulated faucet sock or faucet cover to the faucet, if desired. Although these covers don't create any heat of their own, they do trap a small amount of heat radiating from the house, and this is usually enough to prevent the faucet from freezing and bursting—especially if you have also followed the recommended steps for draining the pipes.
The Spruce / Sarah Lee
How to Install a Frost-Proof Faucet
The surest way to prevent an outside faucet from freezing is to replace a standard faucet with a frost-proof one known as a sill-cock. These faucets are controlled with a long rod that extends into the home, where a cartridge or compression valve controls the flow of water. Since the valve itself is located within the safe warmth of the home, it is almost impossible for it to freeze.
A frost-proof faucet is a 6- to 20-inch unit with a hose spigot and control handle at one end and a connector on the other end of the tube for attaching to the indoor water pipe. As a further safety measure, these faucets are designed to be self-draining; when you shut off the faucet handle, any residual water in the long stem will drain out of the tube.
These faucets can be attached to the plumbing pipe with a compression, soldered, PEX, or push-fit connection. For most people, it's best to buy a faucet with a push-fit style of connector, such as the SharkBite brand. This will be the easiest install, as it requires no soldering and can be used with any type of water supply pipe.
If you have trouble finding a frost-proof faucet with a push-fit connector, you can use a standard threaded type, and then use a female threaded-to-push-fit transition fitting to join it to the water pipe.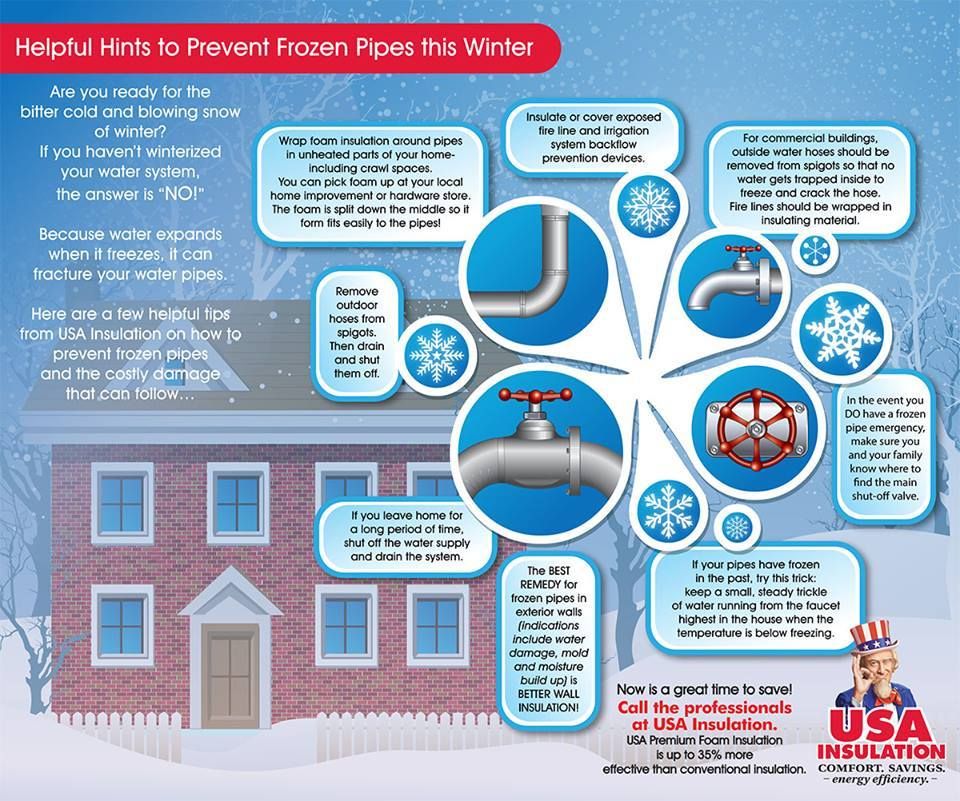 If you have PEX tubing in your home, there are also frost-free faucets that are fitted with PEX-type connectors.
Warning
A project of this scale is best left only to professionals or experienced DIYers: Do not attempt this unless you are confident in your plumbing skills.
-
Shut off and Drain the Water
Turn off the water to the supply pipe leading to the outdoor spigot. If the water pipe does not have its own control valve, you must turn off the water to the entire house, using the home's main shutoff valve.
Open the outdoor spigot and drain the remaining water from the supply pipe.
The Spruce / Sarah Lee
-
Remove the Old Spigot
To remove the outdoor faucet spout, start by removing any mounting screws, then turn the spout counterclockwise to unscrew it from the end of the pipe. You may need to use a pair of channel-lock pliers to twist the faucet spout. Pull the faucet out from the wall on the exterior side.
 Purchase a new frost-free faucet of the same size. It is important that the length and diameter of the pipe match the old faucet.
 The Spruce / Kevin Norris
-
Prepare the Water Supply Pipe
Because of the long valve stem on a frost-proof faucet, it is usually necessary to cut the water supply pipe where the tube of the faucet will connect to it. Use a tubing cutter (for copper pipe), a hacksaw (for galvanized steel or PVC pipe), or a PEX tubing cutter for PEX pipe. Remove and discard the cut-off section of pipe running to the outside of the house.
Debur the inside and outside of the cut end of the water supply pipe with sandpaper or emery cloth. Make sure the outside of the pipe is clean and smooth so it can accept the connection fitting on the new frost-proof faucet.
Mark the end of the pipe at the push-in distance specified by the manufacturer (usually about 1 inch from the cut end of the pipe).
The Spruce / Kevin Norris
-
Attach the Frost-Proof Faucet
Insert the frost-proof faucet through the wall from the outside and position the spout so it is right-side-up.
 Go inside and push the faucet's fitting end straight onto the pipe, pushing as far as the fitting will go. It should reach the push-in mark on the pipe, indicating the pipe is fully inserted into the fitting.
 If you are using a standard threaded-type faucet, screw on the push-fit transition fitting to the faucet's tube first, before attaching it to the water pipe.
From the outside of the house, secure the faucet flange to the wall surface using corrosion-resistant screws, which are usually provided with the faucet.
The Spruce / Kevin Norris
-
Test the Faucet
Open the valve on the faucet, then turn the water back on at the shutoff valve and allow water to run freely out of the faucet spigot. Open and close the faucet spigot several times to confirm that it is working properly and that there is no leaking where the faucet tube connects to the water pipe.
When satisfied that the faucet works correctly, seal the joint between the faucet flange and the house wall with exterior caulk.
The Spruce / Kevin Norris
What to do so that the water in the garden tap does not freeze
To keep the tap water from freezing
Most cottages and private houses have at least one faucet that goes outside, for example, to water the garden or for other household needs. What needs to be done so that the water in the tap does not freeze ?
Garden taps are usually installed close to the house or directly in the ground floor wall, usually several tens of centimeters above the ground. This first solution is less convenient because you have to bend over to put on the end of the hose and unscrew or turn off the water. However, it is easier to drain the water from such a low faucet before the onset of winter and thus protect it from damage. Not all owners do not forget to drain water from pipelines before the onset of frost.
Winter exposure to water
Frozen water (ice) during its expansion forms cracks both on the tap itself and on the supply pipeline. Damaged can be not only a faucet installed in the wall from the side of the garden, but also a faucet in an unheated garage. Theoretically, the temperature inside the garage is always warmer than outside the house, but it can be cold enough that water left in the faucet for the winter freezes and bursts it along with the end of the supply pipe.
If there is a faucet in an unheated garage, it must also be drained before winter.
Paradoxically, always noticeable damage to the faucet is a more favorable situation than when the pipeline itself has a small crack due to the action of water freezing in it. Indeed, when using a tap in the spring, water can penetrate the thickness of the wall of the house for a very long time before a leak is noticed.
Worst of all, when the water passing through the pipeline gets into the structures (floors) of the first floor, in the case when the place of damage is far enough away from the outer walls.
There were cases when the owners of the house noticed in the summer a damp spot on the wall of the living room, very close to the floor. Since the summer was very rainy and the water table in the area had risen significantly, they began to suspect that poor insulation of the foundations was the cause of the moisture. The specialist, having examined the wall and the section of the foundation with waterproofing, ruled out leakage through the foundation.
The reason for this, as it turned out after a long "hydraulic" search, was a crack at the end of the pipeline far behind the garden tap.
We drain the water so that it does not freeze
No one doubts that it is necessary to drain the water from the automatic garden irrigation system for the winter, because otherwise - after the appearance of cracks in many places of the hose hidden deep underground - our lawn can turn into a huge fountain in the spring. However, to keep your faucet from freezing, don't forget to drain your garden faucet, especially if you've made it through the first winter without having finished building your house and nothing bad has happened.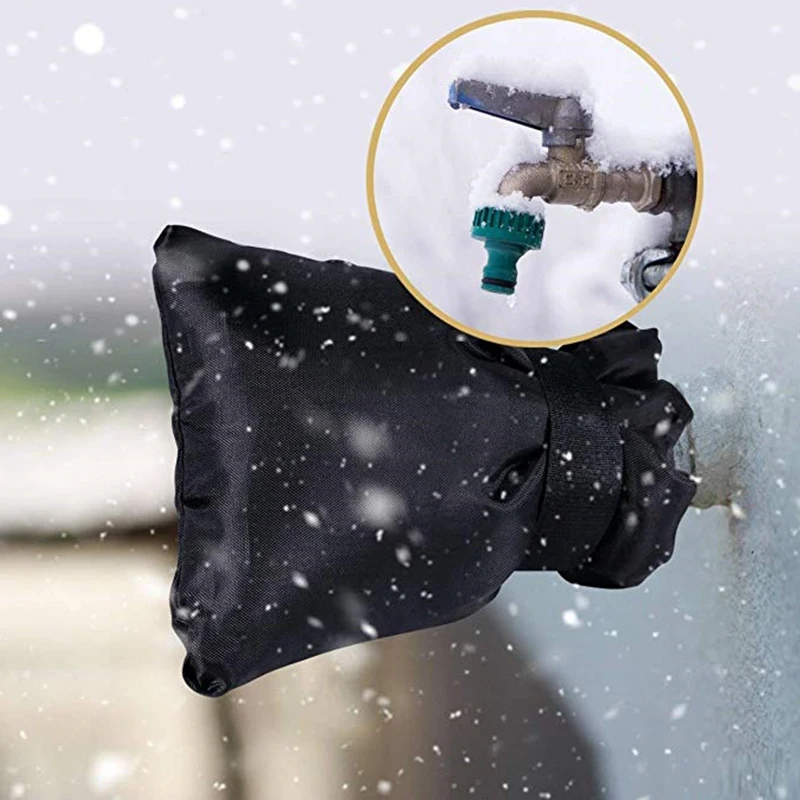
Meanwhile, this action should be considered as one of the mandatory actions that must be performed at the end of autumn, firstly, because, as the experience of many homeowners shows, the elimination of the consequences of such an omission is often not limited to simply replacing the faucet, and secondly , we no longer use water from this tap during the cold season.
Draining the pipe is easiest when the garden faucet is low to the ground. All you need to do is open it, then unscrew the faucet itself, and all the water from this section of the pipe will be drained.
When a watering tap is relatively high, it becomes more difficult to drain water from it, unless a specialist plumber has equipped it with a drain valve at the point where the vertical section of the pipeline becomes horizontal. If the installation does not have such a tap, then the water is drained inside the house, after unscrewing the garden tap and an additional tap located as close to the floor as possible.
Thus, without additional manipulations (for example, purging the pipeline with a compressor), we can remove water from the tap and part of the vertical section of the pipe. However, this is enough to protect the installation from freezing, since the water pipe, which is laid deep in the wall, is in a warmer environment and is protected from freezing by a layer of wall material, mineral wool or polystyrene foam.
If during the construction of the house on the water pipe to the garden there was no additional tap to drain the garden installation, then this can be done using modern technology at any time.
An additional tap may not be needed at all if a backflow prevention valve has been installed after the water meter, which protects the drinking water in the water supply from contamination if, for various reasons, the flow was reversed, that is, from the internal installation to the network. When such a check valve is installed, it is enough to unscrew the drain valve in it to drain the garden water from the pipe.
So, here are the answers to the question of what to do so that the water in the tap does not freeze!
Types of ball valves: features of choice
V. Polyakov, S. Shovkoplyas
The market for water fittings offers a wide selection of ball valves for water supply of various sizes, designs and designs. Their prices can vary greatly. Along with high-quality products, trade can offer lower-quality fittings at almost the same price. What should you pay attention to when choosing ball valves for domestic water supply networks?
Ball valves in domestic water supply networks have now almost completely replaced cork cone valves due to their reliability and durability, which is an order of magnitude higher than that of old designs. The main thing that ensures the reliability of ball valves as shutoff valves compared to valves with a cone plug is that the working medium (water) with solid abrasive particles is passed in the ball valve past the sealing surfaces through the hole in the spherical valve, into the passage, and in the valve with a cone plug -around her.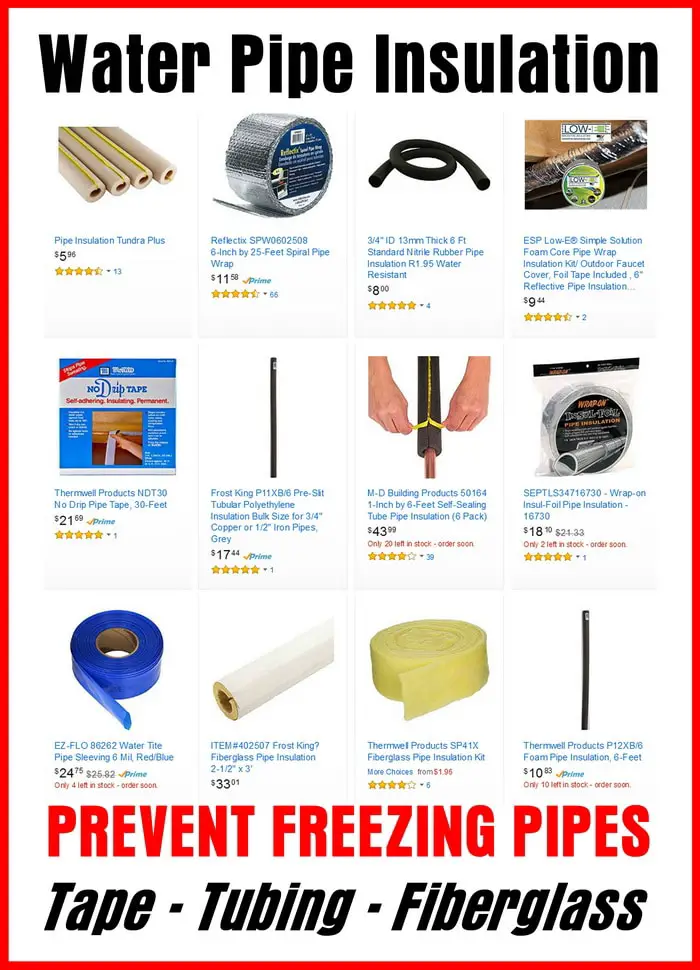
A lapped cone valve plug may lose its tightness after several opening/closing cycles due to the abrasive effect of insoluble mechanical impurities in the working medium washing the sealing surface. In addition, plug valves have significant hydraulic resistance.
Ball valves (with full bore section, which approximately coincides with the conditional diameter of the pipe Du) in the open form practically do not resist the flow. Partial port ball valves are a special solution for applications where flow must be intentionally restricted.
Partial bore ball valves are distinguished by:
- standard bore - a round hole in a spherical valve of such fittings is one standard size less than the inner diameter of the pipeline, the throughput of the ball valve is from 70 to 90% of the flow;
- partial bore - the flow port is much smaller than the inner diameter of the pipe, the flow capacity of such a ball valve is reduced to 40-70%.

Ball valve is designed for full flow shutoff, open/closed and is not designed for flow throttling! Moreover, ball valve manufacturers void their warranty if the defective valve shows signs of having been used to partially shut off flow (as a control valve).
Ball valves have been developed for a long time, but only with the advent of reliable seals have they gained wide popularity and mass demand. Seals used in water ball valves are made of wear-resistant nitrile butadiene synthetic rubber (NBR, usually black) or Teflon (polytetrafluoroethylene, PTFE, usually white or yellowish) with thermal additives and with additives of antifriction agents (for example, graphite or molybdenum disulfide).
Thanks to the improvement of the production technology of spherical valves and modern materials for seals, high reliability was achieved, the forces of turning the valve were reduced, the tightness was increased and the durability of ball water valves was ensured, which led to a massive demand for them and supply from a large number of manufacturers.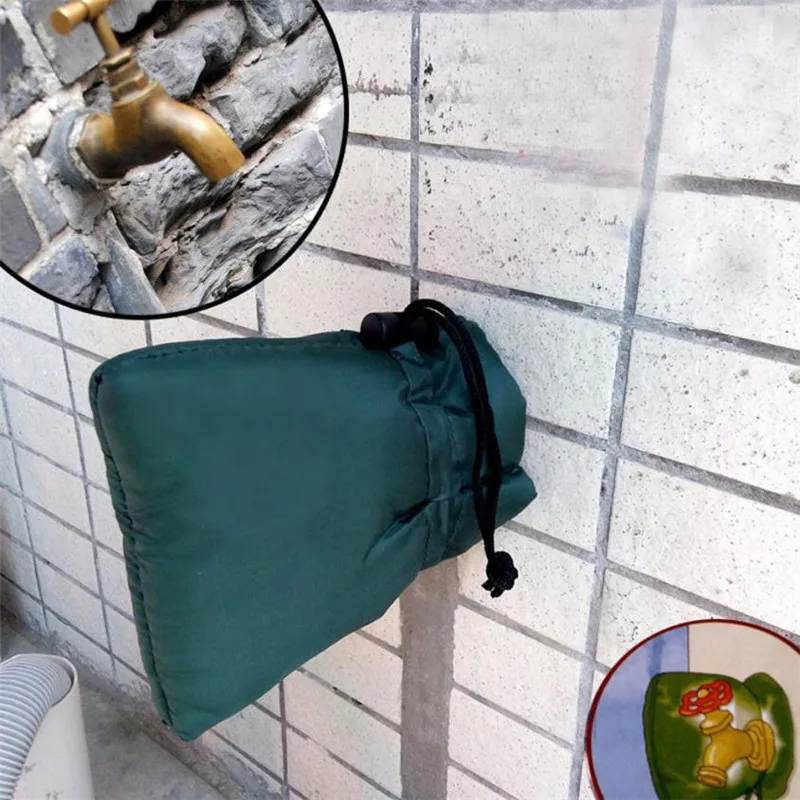
The main element of the ball valve device is a movable and smooth spherical plug with a through round hole that serves to pass the flow of the substance, see fig. 1
Fig. 1. Scheme of the water ball valve
The spherical valve (pos. 2) is located in the central part of the valve body between the seats (pos. 3) - two profiled sealing rings. The shutter, in turn, is fixed on a rotary stem (pos. 5) with a lever handle (pos. 12) or a double-bladed handle (butterfly handle, butterfly handle, pos. 6).
To fully open or close the ball valve, you need to turn the valve with the handle by 9 in a certain direction0° all the way.
In the closed position, the orifice in the ball valve is perpendicular to the axis of the body and pipeline. When the valve is opened, the hole in it occupies a position along the axis of the pipe, creating a free flow through the valve body. The position of the handle immediately allows you to understand whether the valve is closed or open - in the open position, the lever or petals of the butterfly handle are located along the pipe (faucet body) and across - when the flow is blocked.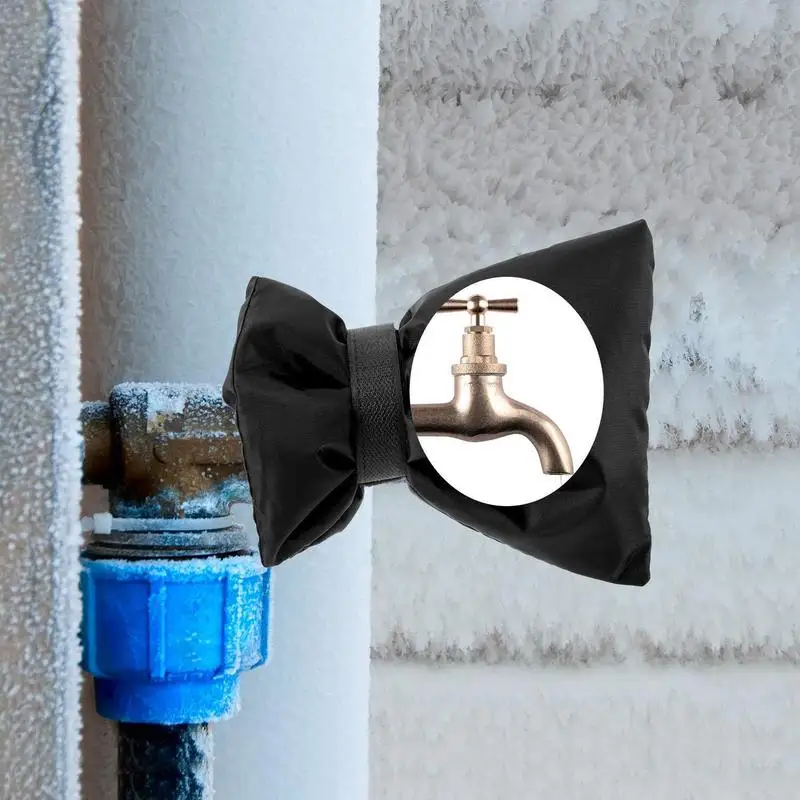
Types of ball valves
In addition to the ratio of the diameter of the orifice in relation to the diameter of the nominal diameter Du of the pipeline, ball valves (conditionally) are divided according to various criteria.
According to the method of attachment to the pipe, ball valves are divided into:
Coupling - are attached to pipes with an internal conical or cylindrical thread. Usually used in intra-apartment and intra-house communications of small diameters (up to 50 mm).
Welded - Attached to pipes by welding. This ensures maximum tightness of the joints and is used in critical and hard-to-reach areas of extended external highways. This type of fittings also includes plastic ball valves, into which pipes made of synthetic material, such as polypropylene, are welded.
Flanged - mounted on pipes with a diameter, as a rule, more than 50 mm using collapsible or non-collapsible flanges. Flange fasteners are used where frequent installation / dismantling of pipeline fittings is possible, as well as in rooms where welding is prohibited.
Combined - to be connected to pipes in different ways. Such products are used in communication systems with different connections - thread / welding, flange / welding, etc., including clamps. According to the material of the body, ball valves are divided into:
Brass - also called metal, they are built into steel and plastic pipelines.
Plastic - built into sanitary plastic pipes.
Silumin - made from a cheaper and lower quality analog of brass - silumin, an alloy of aluminum and silicon. Such products are fragile and require care during installation. Due to their tendency to crack, they are only recommended for use in cold water pipelines.
Powder - made from non-ferrous materials by powder metallurgy - pressure sintering; prone to cracking of the body and the breakdown of threads.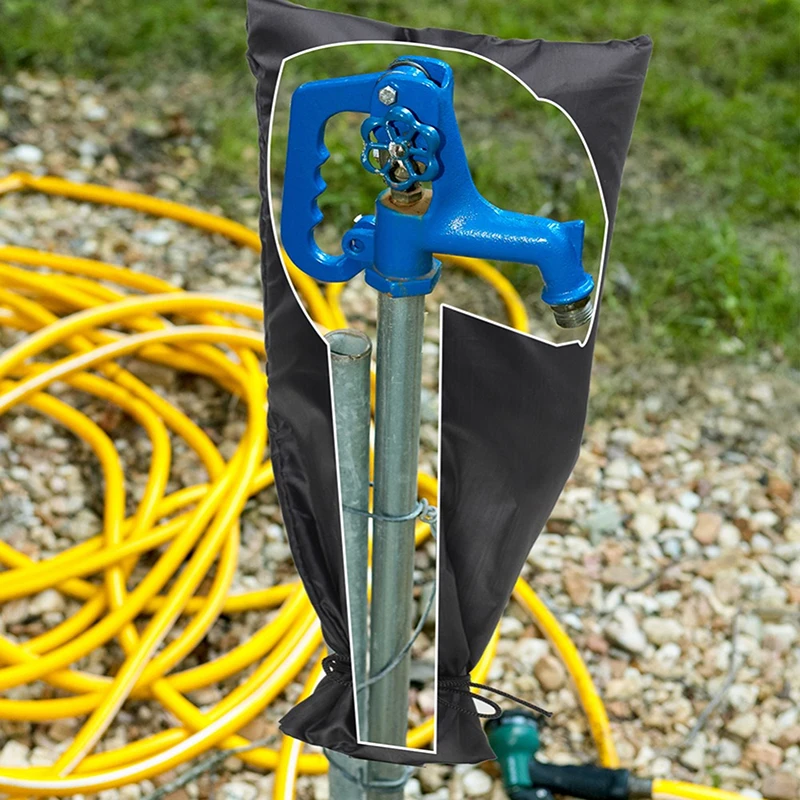
According to the design of the locking element , ball valves are:
With a floating ball - in such products, the spherical plug is not tightly connected to the spindle and can move relative to it. Under the pressure of the inlet flow, the closed valve is pressed against the sealing ring at the outlet, thereby shutting off the valve. Such valves are used in pipelines with a diameter of not more than 200 mm, since on lines with large diameters and pressure, the valve creates too high a load on the seals and the operation of the valve is difficult.
With ball in supports – in such products the spherical plug has special supports. The axial protrusion (trunnion) in the lower part of the ball enters a special recess, and the seats are pressed against the surface of the ball valve under pressure. Thanks to the supports, the forces required to operate the crane are significantly reduced, which allows the use of less powerful drive devices than in the case of floating ball valves. Due to the more complex design, devices of this type are much more expensive than conventional ball valves.
With additional functions - e.g. for air bleed, with drain, with filter, with regulator, etc.
Ball valve body material faucet for water supply - this is the material of the body. For in-house plumbing, brass is recognized as the best material, and not zinc-aluminum alloy (ZAM), offered by some unscrupulous manufacturers. The TsAM alloy contains about 96-98% zinc, 2-3% aluminum and up to 1% copper and much lighter than brass (the specific gravity of CAM is 6.7 g/cm 3 , and for brass 8.4÷8.7 g/cm 3 ). Zinc-aluminum products are widely used in the automotive industry (carburetors, fittings for oil and gas lines), but they cannot be used for water pipes. A TsAM faucet in a house water supply will simply crumble into pieces in a year or two (Fig. 2). The reason for this is quite simple - zinc actually corrodes in water as the very first of the other metals in the product.
 For oil and hydrocarbon liquids, ZAM has sufficient corrosion resistance, but not in water, zinc protects other metals from corrosion by combining with water first.
 Fig. 2. A faucet made of zinc-aluminum alloy (ZAM) after 2 years of operation
You can distinguish whether a faucet is made of brass or ZAM by weight: a faucet made of ZAM is noticeably lighter. But it is necessary to compare structurally similar cranes by weight without handles - unscrupulous manufacturers often “compensate” for the lack of weight by using a more massive lever (handle) made of painted ferrous metal.
Brass has a characteristic yellowness. If you slightly remove the galvanized coating on the faucet body with sandpaper or a file, you can see if it is brass. The color of ZAM is silvery, which does not change during oxidation. It is safest to purchase a faucet that shows the natural color of the brass in some unplated area (fig. 3).
Fig.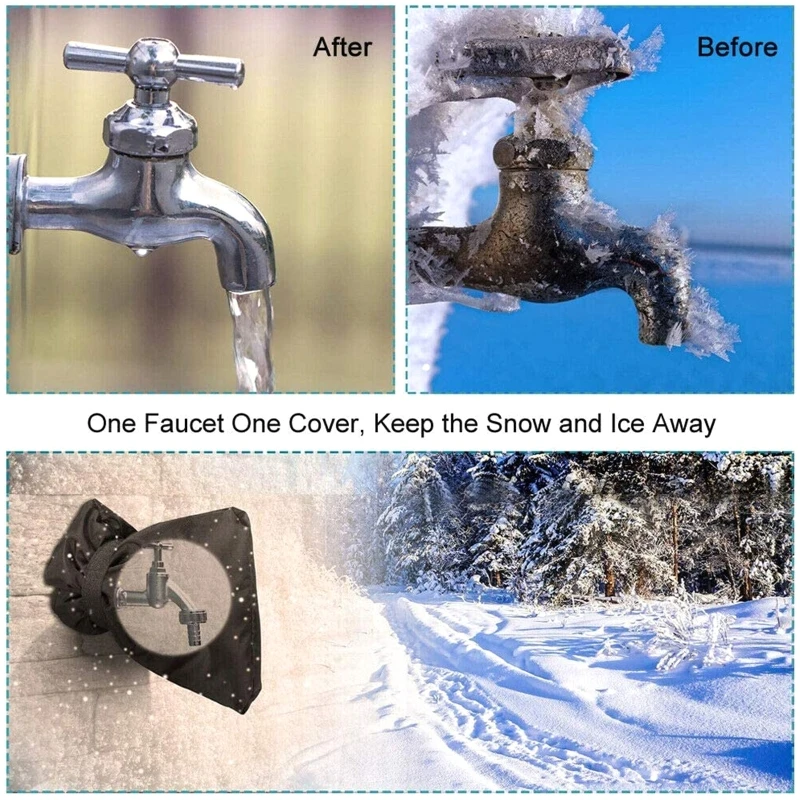 3. The natural color of brass is visible on the threaded pipe of the valve Valtec Base
High-quality brass ball valves are usually made by hot volumetric pressing from lead-containing brass of the CW617N brand according to EN 12165, similar in composition to brass of the LS59-2 brand according to GOST 15527. This is a method preferable to centrifugal injection molding as hot pressed parts are much stronger than cast parts. Brass parts of rod valves (ball valve, stem, gland nut) are usually made of brass grade CW614N (LS 58-3), see table 1. Valves with stainless steel bodies are used in the food industry and are unnecessarily expensive for plumbing fittings.
Table 1. Composition of brass for water ball valves
Stuffing boxes
The stuffing box of the ball valve ensures its tightness in relation to the external environment. The design solutions of these nodes can be different (table 2) and in many respects they determine the operational properties of the crane.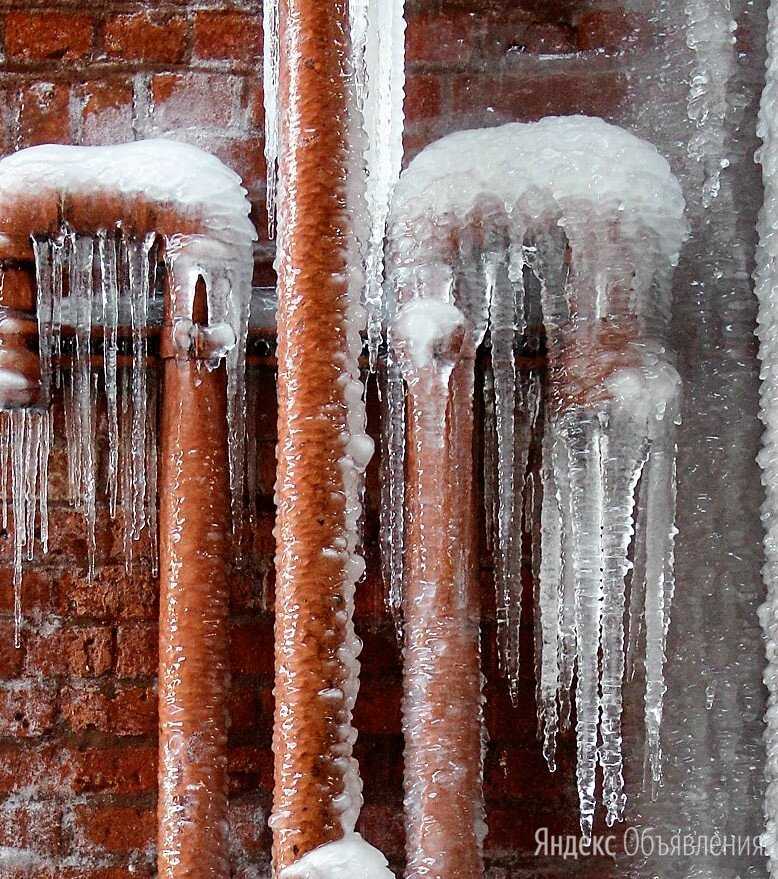
Table 2. Common Stuffing Box Designs for Ball Valves
The most reliable and practical today is the design with a clamping nut with an external thread, see pos. 7, table 2, it is used, in particular, in the Valtec Base crane.
When choosing a valve, it should be taken into account that ball valves with non-repairable stuffing boxes will last until the first stem leakage, after which the entire valve must be replaced.
In a valve where the stem is inserted from the outside instead of from the inside of the body, the pressure can dislodge the stem. On the one hand, this solution makes the valve repairable, but on the other hand, there is a danger of the stem being knocked out by the pressure of the working medium. The stuffing box nut may not keep the stem from being squeezed out - an unlocked threaded connection tends to unwind under the action of a longitudinal force under conditions of alternating loads and vibration, even with a self-braking thread.
When vibrating, the friction force in the thread is significantly weakened, which leads to spontaneous unwinding. The same problem occurs in the union nuts of the compression fittings. That is why they are supposed to be twisted from time to time.
Fluid pressure tends to push the ball valve stem out of the stuffing box. If the stem is inserted from the inside, this buoyant force is taken up by the shoulder of the stem resting on the valve body (Fig. 4; pos. 5, 7 of Table 2).
When the stem is inserted from the outside, the buoyant force is taken up by the threads of the gland nut (fig. 5). Valve vibrations and alternating temperature loads lead to spontaneous unscrewing of the stuffing box nut and the appearance of a leak. In the absence of proper control, the nut may partially disengage from the threaded engagement. In this case, at the slightest pressure surge, the part of the thread remaining in engagement will be crushed and the stem will be knocked out of the valve.
The most unfortunate version of the stuffing box assembly is if the stem shoulder is shifted up and pressed against the stuffing box nut (Fig. 6). In this case, according to the intention of the designers, the stuffing box nut simultaneously performs the function of a rod stroke limiter and a clamping element in the seal.
In addition to the possible knocking out of the stem by pressure, this design adds the danger of a complete jamming of the ball by the stem. This can happen when the packing is pinched by the stuffing box nut.
Ball valve
In most brass ball valves for indoor plumbing, the valve is a ball (Fig. 7 A). Sometimes a circular groove is made from the bottom of the shutter (Fig. 7. B). In this case, a “sump” is formed under the shutter, where sludge will inevitably accumulate. If in a valve with a conventional ball, the distance from the surface of the valve to the body wall is approximately the same everywhere, then in a ball with a groove, a zone of low flow velocities appears, which leads to the deposition of insoluble particles.
Sometimes the ball is turned into a pseudo-cube, turning also its sides (Fig. 7 C). This solution is applicable to valves that are rarely used to open / close the flow, since the edges of the side grooves with frequent rotation of the valve can deform or damage the rings of the seat rings, which will significantly reduce the life of the valve.
To combat the notorious "salmonella" and eliminate the stagnant zone in the lower blind groove, as shown in fig. 7 B, manufacturers have recently begun to produce valves with a through hole in the lower part of the ball valve (Fig. 7 D). However, in this case, the stuffing box assembly with the valve open can be subjected to hydraulic shocks without weakening them.
Fig. 7. Cross-sections of ball valves
Teflon is used for sealing ball valves, it has almost completely replaced other materials. Teflon is a fairly expensive material, so they are trying to save on it. The thickness of the Teflon rings in the valve seats can be so small that when the temperature rises, the Teflon from the ring will turn into a kind of wavy structure that is not able to perform the sealing function.
Cheap grade Teflon seals have grain and roughness that can be seen visually. Such Teflon will not last long, as it can crumble with the edges of the ball valve.
Teflon seat rings are pre-swaged. The working edge of the ring is then deformed, taking on a spherical shape. In this regard, the ball valve must open and close with some effort. If the valve opens completely freely, this indicates either insufficient pre-compression force, or that elastomer “dampers” are installed under the seat rings. Elastomers have lower temperature resistance and durability compared to Teflon, since the elastomer reduces preload over time, its material “relaxes” and subsequently loses its sealing properties.
The ball valve is constantly exposed to the flow of the working medium, which may contain insoluble abrasive particles that "bombard" the surface of the valve. Therefore, it is important that the outer surface of the shutter has a high hardness. The ball valve is especially affected if it is used to regulate the flow and is installed in an intermediate position (Fig. 8).
8).
Fig. 8. Ball valve valve after a year of intensive use
To reduce abrasion, the valve surface is usually polished with a hard chrome plating. Chrome is deposited on a copper or nickel substrate. Its absence dramatically reduces the life of the crane. During galvanization, chromium is deposited in the form of "islands", between which there is a network of microcracks. During operation, these microcracks are filled with corrosion products of the sublayer (copper or nickel) and thus a durable monolithic coating is obtained.
Recently, ball valves with Teflon-coated balls have been introduced. The Teflon coating is intended primarily to reduce friction when turning the bolt. Even a short-term operation of these valves reveals the extremely low resistance of such a coating due to the insufficient hardness of Teflon under the conditions of a working medium flow with mechanical inclusions. Often, not corrosion-resistant brass, but ferrous metal is used for the shutter.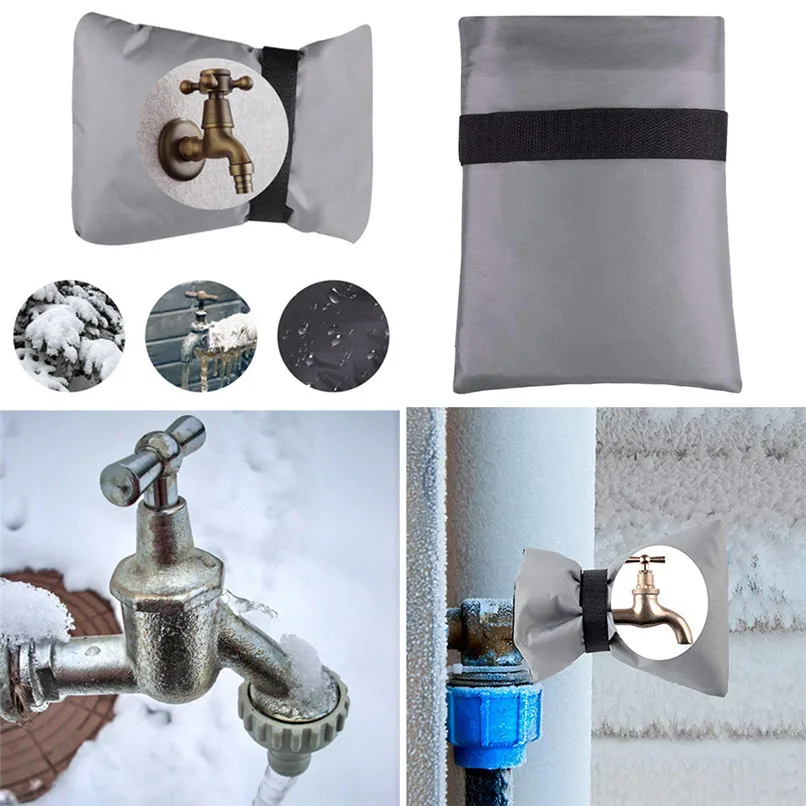 This can be checked with a magnetic tip screwdriver. A quality spherical shutter should be perfectly polished and mirror-shiny, not matte.
Design of the ball valve
Despite its apparent simplicity, the ball valve has a number of design features.
Fig. Fig. 9. Longitudinal cut of the ball valve body
9, the following elements of the body structure are visible:
and - the thread connecting the valve body with the threaded coupling half must have at least three threads. As a rule, this is a metric thread with a pitch of 1.25 mm;
to - the length of the connecting pipe thread for taps made of hot-pressed brass can be reduced by 10%. In particular, for valves with a nominal diameter of 1/2 "dimension "b" must be at least 11 mm;
with - the minimum width of the collar that limits the pipe to be connected in the valve socket when screwing;
d - the minimum wall thickness bodies for the declared nominal pressure (PN) for cast valves "d" should be approximately three times larger in
compared to valves with hot-pressed bodies.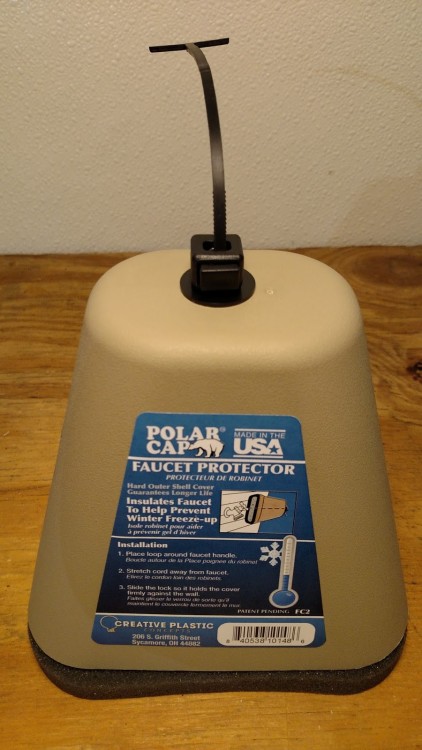
Fig. 10. Flow control with a ball valve
Flow control with a ball valve is not allowed, because in addition to active wear of the sealing surface (see Fig. 8), ball valves have a very thin body wall. It is able to withstand the pressures and temperatures stated in the passport, but when trying to use a ball valve as a regulatory body, the wall is not able to withstand the long-term effects of cavitation of the throttled flow and the destruction of the body walls by abrasive particles (Fig. 10) in the pressure zone.
Handle fixing
Even such a minor feature as the method of attaching the handle of a ball valve can affect its durability and safe operation.
Fig. 11. Mounting points of the ball valve handle
11 shows the most common design solutions for this node. The most reliable fastening is considered to be with a self-locking nut (Fig. 11 B). A polyethylene ring integrated into the nut with an inner diameter smaller than the stem diameter prevents spontaneous loosening of the nut due to variable forces and vibration of the pipeline.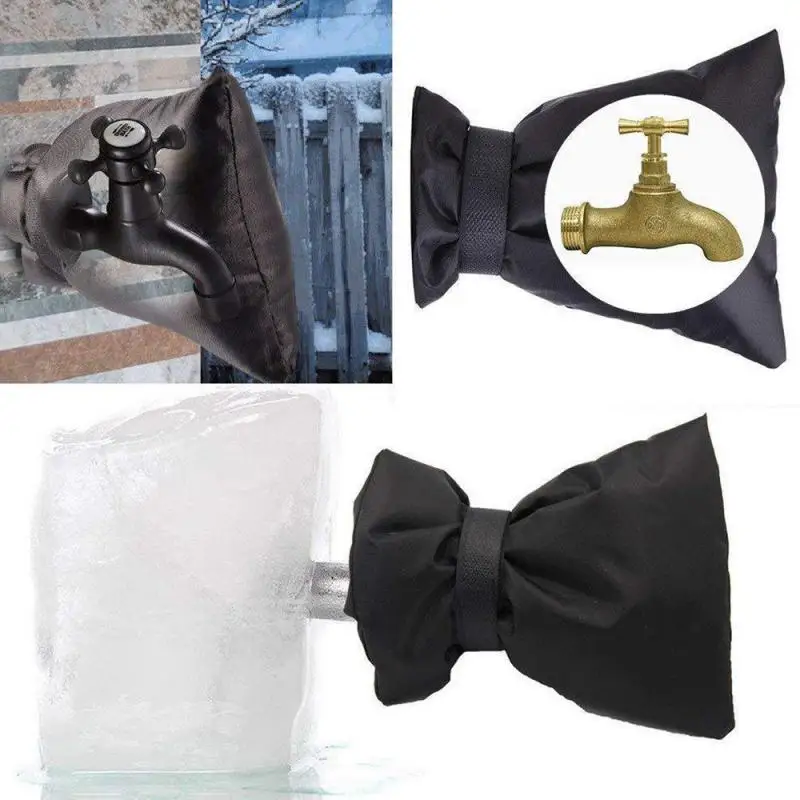 Fastening the handle with a regular nut (Fig. 11 B) requires maintenance: from time to time the nut has to be tightened. Loose tightening of the nut turns the handle into a lever that can break the stem. The least successful is the knot in which the handle is fastened with a screw (Fig. 11 A). The internal longitudinal thread in the stem significantly weakens it, since its free section (along the thread cavities) is extremely small (Fig. 12).
Fig. 12. Stem break on female thread
Types of ball valves
Companies that produce ball valves for domestic plumbing engineering systems usually offer several series of valves of different sizes, each of which is recommended for strictly defined operating conditions. Table 3 lists the types of VALTEC ball valves that have been successfully operated in our country for many years.
Table 3. Series of ball valves produced by VALTEC
Marking on the body of the ball valve
On the outer sides of the body of the ball valve, manufacturers must put a number of symbols (see Fig.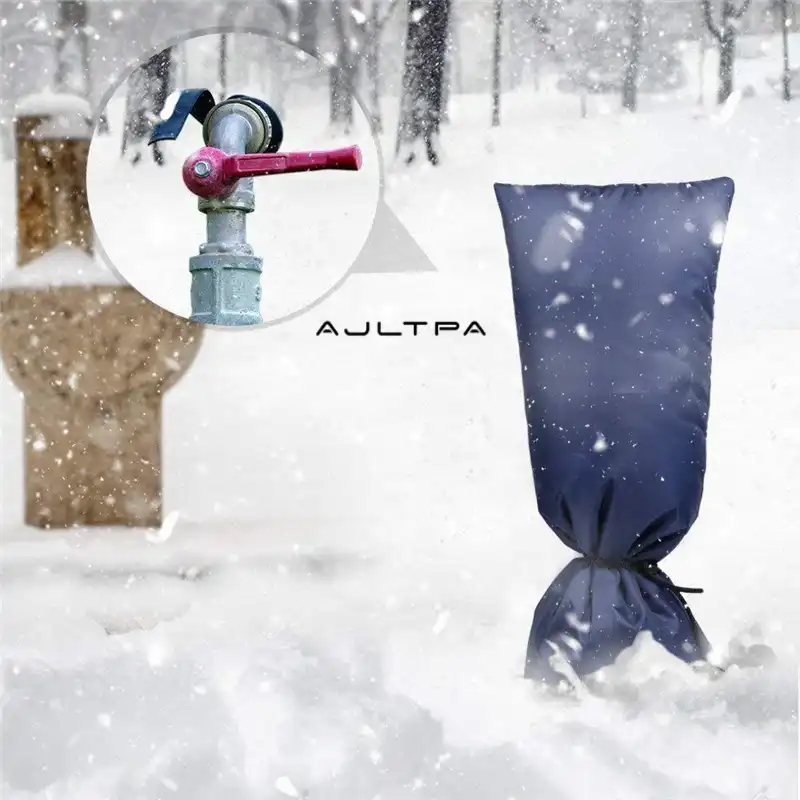 3). All marking symbols should be as clear as possible. The vagueness and fuzziness of the designations may indicate that the forms are worn out or that the buyer is facing a cheap fake.
Fig. 13. Marking on the body of ball valves
The following is usually indicated on a ball valve:
The emblem (trademark, brand) of the manufacturer is a mandatory attribute of a quality product.
DN is the nominal diameter, which can be specified in millimeters (15, 20, 25, 32, 40 and 50 mm) or in inches (e.g. ½, ¾, 1, 1 ¼, 1 ½ and 2”) .
PN - working pressure in bar. Depending on the diameter and design features of a particular product, this value can range from 15 to 40 bar.
Body material - EN grade brass.
Date of manufacture of product is 04/11.
Troubleshooting ball valves
Despite their simple design and long service life, ball valves can fail.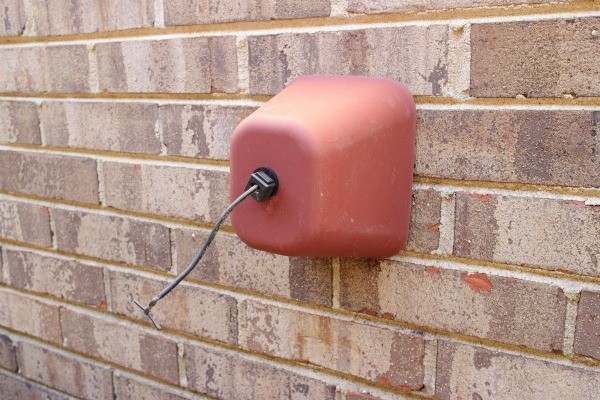 At a certain point, ball valves may stop hermetically shutting off water or turn with great difficulty. These are the first signs of wear of such products, the service life of which is often reduced due to the hardness of the water, which also contains mechanical impurities and abrasive particles.
Video. Troubleshooting a ball valve VALTEC BASE
Over time, salts are deposited on the internal parts of the product, including the shut-off sphere, and when turned, it begins to scratch the sealing rings. Over time, the entire surface of the valve sphere will gradually become coated, contaminants can penetrate into the surface of the seal, which then scratch the spherical surface of the valve. As a result of these two processes, the tightness of the valve may be broken. Why a ball valve is not suitable for flow control and must be operated in a fully open/closed position is described above.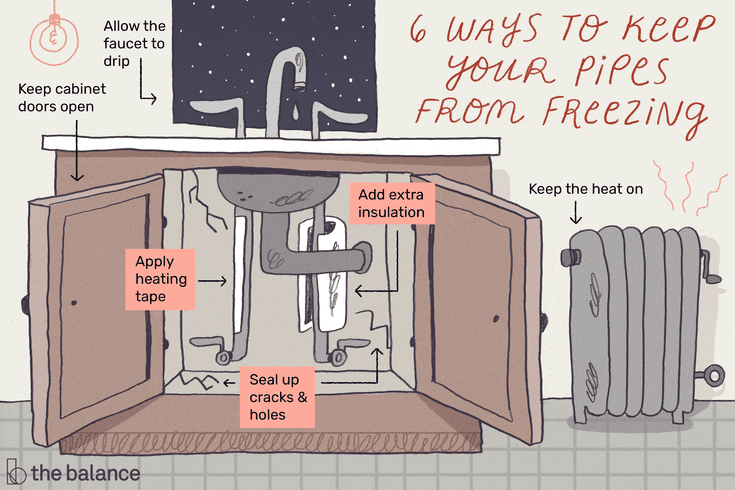
The process of precipitation of hardness salts on the surface of the shutter proceeds faster in pipelines of hot water supply and heating systems. Especially - in centralized urban networks, where the quality of the coolant usually leaves much to be desired. During installation, it is recommended to install a coarse water filter in front of the taps. This will somewhat protect the locking element from wear by small rust particles.
Ball valves can only be protected from plaque by quality water treatment. As a preventive measure, once a quarter, and preferably once a month, the ball valve must be rotated several times from one extreme position to another than to remove deposits.
If the ball valve suddenly stopped working at all, then the matter may not be in internal malfunctions, but in the breakdown of its handle (lever) and the wear of its mounting hole. To make sure that the crane itself is working, you need to unscrew the fixing screw, remove the handle and try to turn the stem of the product with an adjustable wrench or pliers. If the stem is blocked, then the reinforcing element must be replaced.
If, when the handle is turned to the “closed” position, water continues to flow, then most likely salts have adhered to the closure sphere. This faucet needs to be replaced. To restore partial functioning, turn the handle several times to the extreme positions, if necessary - using a tool, being careful not to break the product.
If the ball valve leaks along the stem, then it is necessary to act in this situation depending on the design of the gland assembly (see table 2). Rubber o-rings lose their sealing properties over time, lose their elasticity, as a result of which leakage is possible. This problem can only be corrected on ball valves with a stuffing box nut. To do this, you need to tighten it, after removing the handle of the product. If the valve is not equipped with a stuffing box nut, it will have to be replaced with a new one entirely. In addition, a leak can also occur due to the appearance of a crack in the housing or threaded coupling.