How to make a small christmas tree look bigger
How to make your Christmas tree look taller
Wondering how to make your Christmas tree look taller? Here is a step by step guide and easy hack to do it on a budget!
When I was a kid, my dad and I always got into a fight at the Christmas tree lot.
See, my parents have a 2-story foyer, and I hated how “small” trees looked in it.
I wanted a 10-footer, at least.
My dad wasn’t trying to spend that kind of money on a dead tree. I also doubt he felt like man handling a 10 foot tree by himself.
We always fought about it at the tree lot, but it ended up being OK once we got the “smaller” tree home and set up.
That is because my dad actually used this hack to make their tree look taller.
And even though the room that we now put our tree in is much less grand than my parent’s entryway, Sean and I do this as well!
Click here to see our 2017 Christmas trees!
This is a fantastic holiday money saving hack.
See, you pay for Christmas trees based on height.
This DIY Christmas tree stand will add at least a foot to your tree.
So, you are literally saving money by using this stand and buying a shorter tree!
Here’s how to make a Christmas tree seem taller!
Make sure you know how to fluff your artificial Christmas tree properly!
How to make your Christmas tree look taller
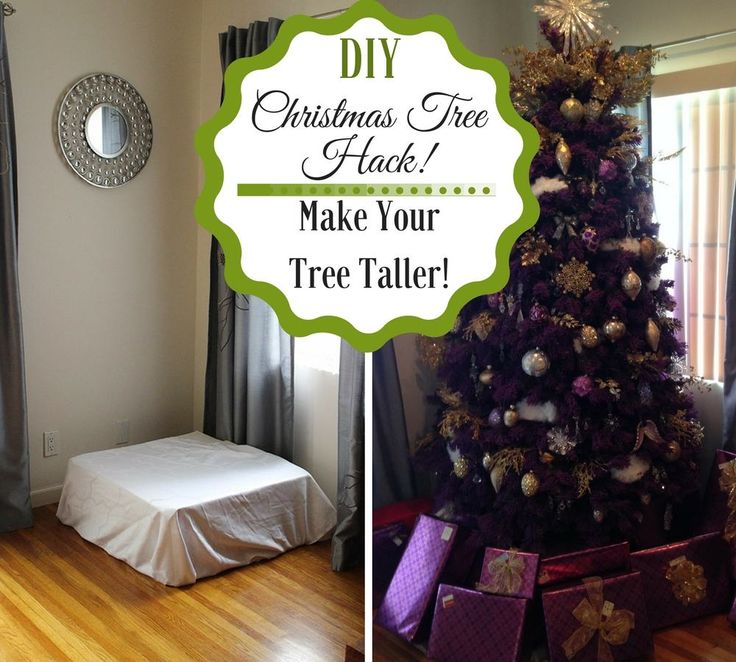
The trick to making your Christmas tree look taller is to build a raised stand. A DIY Christmas tree box stand lifts the tree up an extra foot or more! An elevated tree looks larger than one right on the floor.
This stand isn’t gorgeous, sure. But, it is easy and inexpensive to build from plywood and makes it easy to raise your Christmas tree.
Looking for a prettier stand? Here is our DIY wooden tree stand that also raises your tree! This one doesn’t need a tree skirt over it.
This stand is super easy to build with just a few tools. Attach your plastic stand to it and your tree will be raised!
You could also do this with a fake tree. You will just need to examine the base of that tree and determine how to best attach it to the box.
You do NOT want your tree to fall off this box. It’s stable, but you should attach the stand to the box to be safe.
How to make a Christmas Tree Riser Platform
What you need to build a raised Christmas tree stand:- 1 sheet of 1/2″ or 3/4″ plywood
- Screws
- Plastic Christmas tree holder
JavaScript is currently disabled in this browser. Reactivate it to view this content.
How to build a raised Christmas tree stand:- Start by cutting a square of plywood about six inches wider than your tree holder to serve as the top
- Cut two 12″ wide strips of plywood the full length of two sides of your top
- Cut two more 12″ wide strips of plywood the length of the sides, but subtract twice the thickness of your plywood
- Attach the two longer strips to the top first using screws, then attach the two shorter strips, forming a box
- Use screws to attach the sides to each other for stability
- Use screws to attach your plastic Christmas tree stand to the top
I cover the whole stand with a tree skirt. My favorite hack is to use a beautiful blanket or tablecloth as a cheaper alternative to a real tree skirt.
My favorite hack is to use a beautiful blanket or tablecloth as a cheaper alternative to a real tree skirt.
Be sure to check out 7 DIY Christmas tree collar ideas!
Once it is surrounded by presents, no one even notices that it is on a raised box.
Plus, it makes more room for presents and gifts underneath the tree.
I love this Christmas tree hack and hope that it helps you to save money and have a taller tree this Christmas!
Our DIY box Christmas tree stand (that also raises your tree!)
Click here to see my tutorial for a DIY Christmas tree skirt.
Other ideas to use as a DIY Christmas tree platform:
Use any of these items and cover with fabric, a sheet, a table cloth, etc, then top with a tree skirt!
- Stacked wood boards (very securely stacked)
- Crates upside down
- Wooden pallet, cut in half maybe
Any other Christmas tree hacks?
Active Time: 30 minutes
Total Time: 30 minutes
Difficulty: Medium
Estimated Cost: $10-50
Check out my tutorial for how to make your Christmas tree look taller by building a DIY plywood stand. The stand is fully covered by a tree skirt.
Materials
- 1 sheet of 1/2″ or 3/4″ plywood
- Screws
- Plastic Christmas tree holder
Tools
- Drill
- Circular saw
Instructions
- Cut a square of plywood 6 inches wider than your plastic tree holder.
- Cut 2 12" wide strips of plywood the full length of your square. These will be the sides of your 12" tall box.
- Cut 2 additional 12" wide strips of plywood the length of your square MINUS twice the thickness of your plywood.
- Attach the 2 longer strips to the top using screws.
- Attach the 2 slightly shorter strips to the top and sides using screws to form a box.
- Use screws to attach your plastic Christmas tree stand to the top.
- Add your tree.
- Cover the stand with a skirt - blankets work great.
Facebook | Instagram | Pinterest | Twitter | YouTube
Looking for something?We’ve been doing this since 2012 so we have a LOT of blog posts! Use the search bar below to find what you are looking for!
Search stuff like: Ceiling Projects | DIY Plant Stands | Thrift Flips
SearchCan we send you our newsletter?
Another great way to keep up with out latest projects is by joining our weekly newsletter! Get alerts of our latest projects and special peeks behind the scenes!
Follow along on Instagram
Join our online community where we share real time behind the scenes looks at our DIY projects and peeks inside our home + family!
@CharlestonCrafted
How to Make a Christmas Tree Look Fuller and Taller
I bought a 4-foot Christmas tree and made it look fuller and taller with these tricks!
Welcome to Dagmar’s Home!
Do you want to know how you can make a sad, little 4-foot tree…
…look like this beautiful, 6-foot Christmas tree?
This is the same tree — read on and I’ll show you how I transformed it into a beauty!
As an Amazon Associate I earn from qualifying purchases.
Find ALL of my favorite things in my AMAZON SHOP!
First of all, this Christmas tree almost didn’t happen.
I was determined to get a real Christmas tree this year, after being frugal and using a fake tree for years. This year I wanted a wider tree, and that wonderful pine smell.
The first tree lot I drove to was closed. So was the second one — they only sold to wholesalers.
The third lot was closed as well, and every tree in the fourth lot was six feet tall and way too wide for my little cottage.
I was looking for a smaller tree I could easily carry myself and fit into my car instead of strapping it to the top of the car.
I always try to find a way to be able to do things myself the easiest way, which meant getting a small tree, not a 6-foot tree.
Home Depot to the rescue. I found a $19 tree there that was easy to carry. Finally!
When I saw the extra branches they were cutting off the bottom of the large trees so they could fit into the tree stand, I asked one employee if I could take a few.
They were throwing them out, and they were happy to give me three.
I thought they’d come in handy for extra decor — but then I ended up using them for something else :)
At home, I put together our Christmas tree stand I had bought years ago at a yard sale and put the tree into it.
This is the exact Christmas tree stand. It’s super simple to put together and perfect for small to medium sized trees.
More importantly, this tree stand, compared to others, makes it easy to make the tree look fuller. I’ll show you why in a second.
To be fair, this little tree looked a bit sad once I cut off the netting around it.
I was looking at it. I walked around it…
And then I had an idea: I added an extra branch to the top of the tree with twist ties to create a prettier top.
As an avid recycler, I save bread bag twist ties, and this is the second time they came in handy.
Remember my post about my container garden, where I used them to secure the deer fencing to the posts?
And then I simply shoved the ends of the three branches into the extra space next to the tree stump in the stand.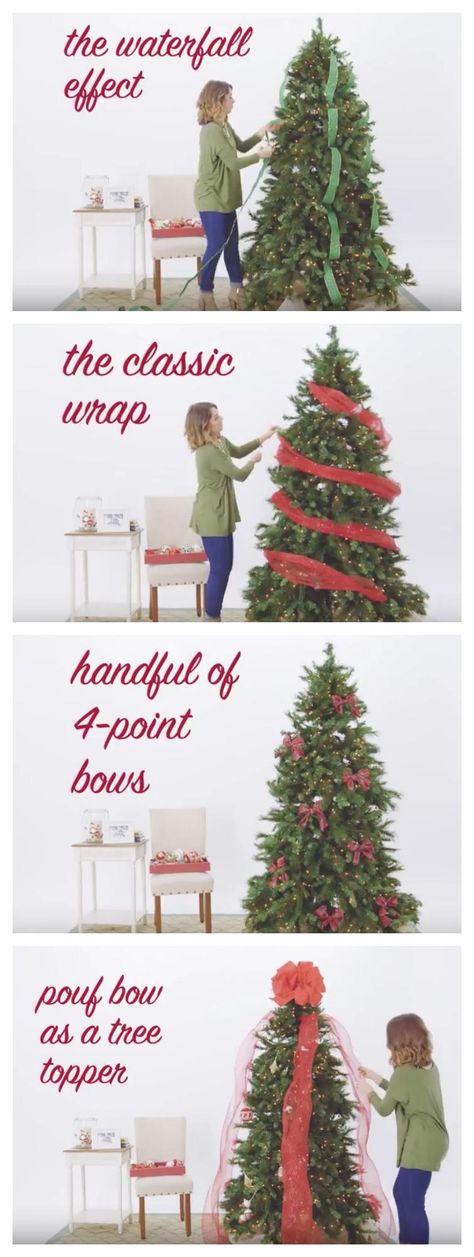
This looked so much better!
Very important: Make sure you water your Christmas tree. Check daily that there is always enough water in your tree stand. And you need to mist the extra branches often to make sure they don’t get too dry so they don’t pose a fire hazard.
Also, protect your floor from water stains and scratches with a small carpet or similar under the tree stand — preferably with something that is also waterproof, or put a large garbage bag under the carpet to avoid water stains.
I like using a plastic shoe tray because the raised edge makes sure extra water can’t run on the floor. These are very affordable.
My son helped me to put warm white Christmas tree lights on the tree, and then I hung these pretty mercury glass ornaments on the tree.
Here are similar ones from Amazon:
I didn’t want to use any of our other ornaments this year to keep the decor really simple and classy.
The only other item I added to the tree was our straw star for the top that we usually use every year.
I added the ornaments in strategic spots to pull down certain branches and fill in holes, and then I trimmed some of the extra branches for a round shape.
For added height, I put the tree on a little table, and wrapped the stand and table with a plaid scarf.
What do you think? Not bad for a $19 tree, right?
The little table wasn’t really big enough to hold the tree stand, so I decided safety is more important than looks and ended up putting the tree back on the floor.
You can obviously put your tree on a side table or crate — just make sure it’s stable and safe.
I’m really happy with my real Christmas tree!
I finished decorating our living room today, and this is what it looks like right now.
Pin this post for later!
Do you have a fake or real Christmas tree this year?
What’s your theme this year for your decorations?
Don’t miss my Christmas Home Tour:
and this post: Amazing She Shed Kits You Can Buy on Amazon
How to Make a Small Christmas Tree Look Fuller and Taller
Great ideas on how to make a Christmas tree with your own hands (25 photos)
A fluffy live Christmas tree looks very beautiful, but it is not always possible to put it at home. We suggest taking a closer look at alternative and no less attractive trees that are easy to do with your own hands.
First of all, you need boundless imagination. And you can make a Christmas tree from almost any improvised means. See for yourself!
1. Christmas tree of cones
This is the most popular and very budget version of the Christmas tree. Glue the cones of coniferous trees to a cylinder made of cardboard. To heighten the effect, you can paint them with paints (for example, silver from a spray can), decorate with colored ribbons and beads.
If long, painstaking work doesn't suit you, simply place the buds in individual pots filled with forest moss.
2. Pasta tree
What could be simpler and more original? Take the pasta shape you like (feathers, shells, wheels look best) and glue it to a cardboard cone. To make the Christmas tree more vivid and believable, spray it with paint or artificial snow from a can.
3. Jute tree
Wind the jute rope around the cone and glue it so that no gaps are visible between the turns. Use satin ribbon roses, beads, lace fabric, etc. as decoration.
4. Newspaper tree
Roll old newspapers and magazines into a tube (preferably in the shape of a cone) and glue to a wooden stick. Make a star out of paper and place it on top of your head. The Christmas tree is ready!
5. Scrap Christmas tree
Cut the waste fabric into small, uniform pieces and pin them to the Styrofoam cone.
Christmas trees made of satin ribbons also look great.
6. Popcorn Christmas Tree
This Christmas decoration will appeal to those with a sweet tooth. Use a glue gun to attach the popcorn to the cone.
Then decorate the Christmas tree with dried orange slices and star anise.
7. Button Christmas tree
Use tailor's pins to attach the buttons to the Styrofoam and place some decoration on the top of the tree.
8. Christmas tree made of cotton pads
If desired, cotton pads can be painted green, but the white Christmas tree looks quite attractive and elegant. Glue the material to the cardboard cone as you like. To make the Christmas tree more magnificent, roll the discs into a tube and place them tightly to each other.
9. Christmas tree made of glass bottles
If you have a solid collection of green glass bottles, don't throw them away, but arrange them in several tiers on round stands of different sizes so that you get a pyramid. Such a Christmas tree can be built in the country.
10. Christmas tree from garden tools
Another option for avid gardeners. Disconnect the old fan rake from the handle, decorate with multi-colored buttons and attach it to the front door.
11. Paper Snowflake Tree
Cut out three snowflakes of different sizes and put them on a wooden stick so that the largest one is at the bottom and the smallest one is at the top. You can use ready-made napkins.
12. Tinsel Christmas tree
Glue green tinsel on a cardboard cone - and an unusual Christmas tree is ready. Attach small balloons or candies in bright wrappers to it.
13. Floral Mesh Christmas Tree
Make a cardboard cone and wrap it in polyethylene. Cut the floral mesh (preferably different shades of green) into small pieces, dip them in turn in PVA glue and stick them on the cone. Make several such layers, and it is better to lay the segments in different directions. Secure with pins if necessary.
When the glue dries, remove the resulting structure from the cone (it should easily separate from the polyethylene), place an electric garland inside it, attach it to the net with a thin wire and decorate the Christmas tree to your liking.
Even unlit, such a Christmas tree will look very impressive.
14. Christmas tree made of wood
The silhouette of a tree can be made from wooden sticks, beams, boards, logs, etc. The main thing is to show imagination and do not forget to decorate such an unusual Christmas tree.
15. Tree of books
Book lovers will love this idea. Take the books off the shelves and arrange them in a pyramid shape. Decorate with a garland and designate the crown with an asterisk or other New Year's figure.
16. Wine cork Christmas tree
Form a Christmas tree from wine bottle corks and glue them together.
17. Christmas tree from a ladder
Ideal for the laziest! Just install a stepladder, fasten garlands, Christmas decorations and tinsel on it.
By following our tips, you can decorate your home with a creative Christmas tree that no one else will have.
How to make a Christmas tree with your own hands: photo
Ideas on how to make a Christmas tree yourself
On the eve of the winter holidays, many people think about how to make a Christmas tree with their own hands. Someone wants to decorate an apartment with an unusual thematic thing, someone wants to present an original gift, and someone needs to help a child make crafts for a kindergarten or school. In order for you to get the most beautiful and unusual Christmas tree, we offer some interesting ideas on how to do it.
Interesting! DIY Christmas balls
The easiest and most affordable option
Even the smallest needlewomen can manage to create their own Christmas tree if they use the ready-made base. We suggest going to the forest or under the nearest live Christmas tree and find a beautiful cone there - this will be our Christmas tree.
Now we fix the cone on the stand, for example, using hot glue, we attach it to thick cardboard or a piece of wood. Then the most interesting - proceed to decorating.
• The simplest option is plasticine. Just stick colored circles on different branches. At the top you can put a snowflake or a star. It will turn out very nice.
•Another affordable way is colored beads. Using hot glue, randomly attach beads to improvised twigs. The color of the decor can be anything - it all depends on your imagination, the desired result and the material that is at hand.
• The cone painted green looks interesting. And to make the winter beauty look like a real one, decorate the ends of the branches with “snow” using white paint or a scattering of sparkles that can be attached to glue or double-sided tape.
If you managed to collect a large number of cones, you can make a larger Christmas tree out of them.
To do this, twist a thick cardboard cone - this will be the basis of our craft. Then, using a glue gun, glue the cone with cones so that the base is not visible. Decorate the finished craft at your discretion with the help of plasticine, beads, sparkles, small Christmas toys, ribbon bows, garlands. Previously, the cones can be painted in green, white or golden. Dream up with your children, and you will definitely get the most stylish and original craft.
From tinsel
Making a Christmas tree from tinsel is also not difficult. Yes, and the time to make such crafts will take a minimum. However, the result will certainly please, and those around you will definitely not disregard your creative impulse.
• We take a cone glued from thick paper or cardboard as a basis.
• Coat the surface of the cone with thick glue or tape it in a spiral with double-sided tape.
• Wrap tinsel around the resulting sticky base.
• It is not necessary to decorate the Christmas tree. If you wish, decorate it with colored fluffy pompoms, small sweets or a garland.
Tinsel can be any color. Christmas trees made of green material look best, as well as two-color tinsel with white edges. Depending on the idea, you can make a Christmas tree of golden, red or any other color.
From sweets
In this case, we will also take a paper cone as a basis. Just glue it not with tinsel, but with sweets. In this case, you can also use double-sided tape or a glue gun. Candy Christmas trees look interesting, complemented by tinsel, ribbons or beads.
From threads
Threads can be found in every home. It is very easy to make an original piece of furniture from them. We offer step-by-step instructions on how to make a Christmas tree at home from threads:
Interesting! DIY gift for mom
•Make a cone out of thick paper or cardboard.
• Take your favorite thread. It is best if it is thick yarn. The color can be anything.
•Coat the cone with thick glue, ordinary PVA will do. Then gently wrap the workpiece with a thread in a circle, tightly laying a turn after a turn.
• Decorate the finished Christmas tree with beads, buttons, paper snowflakes.
Paper
You can also make an attractive DIY Christmas tree out of paper. Moreover, a wide variety of models are obtained from such material.
You can simply cut out two identical Christmas trees and insert them one into the other, having previously made the cuts. How to do this, look at the photo.
Similarly, you can make an openwork Christmas tree. In this case, you will have to spend time cutting. After all, the more small details you cut out on paper, the more tender and attractive your spruce will be. It’s good if you buy a stationery or a special mock-up knife to make an openwork Christmas tree.
Christmas trees made of paper loops, origami, quilling, and corrugated paper look interesting.
And such a stylish paper beauty can be used as a present or a Christmas tree decoration. It is quite easy to make it:
•Cut out a triangle of the desired size from green paper.
• Then fold the workpiece into an accordion shape.
• Take a hole puncher and make a hole in the center of the folded piece.
• Insert a wooden stick in the middle - it can be a skewer or assemble a craft on a ribbon.
Decorate the tree however you like. The original gift is ready.
From ribbons
Satin ribbons are also a great option for decorating a paper cone. In this case, you can show imagination and use several different options.
With eyelets
Herringbones made of satin ribbons arranged in eyelets look interesting. In this case, it is best to use a cardboard cone base, and fasten the ribbons with small tailor's pins.
Kanzashi
If you want a more original Christmas tree, you will have to spend a little more time. In this case, you will have to master the technique of forming petals from a ribbon. Depending on the expected size of the Christmas tree, you will have to make more or less blanks. Then just glue them on the cone base, add beads or sparkles.
Interesting! How to make a three-dimensional snowflake
From cotton pads
You can also make a very delicate and solemn Christmas tree with your own hands from ordinary cotton pads. To make such a beauty, you will need a cone base made of thick paper or cardboard, as well as a large number of cotton pads.
Now there are two main options - to glue the base with discs without folding them, or to make special blanks.
In the first case, starting from the bottom, we attach discs to the cone, trying to make the layers intersect, forming a crown. Next, decorate the Christmas tree with beads and any other decorative elements.
If you want to learn a more interesting option, you will have to work a little. To do this, before pasting the cardboard cone, let's take care of the cotton blanks. Take the disk and fold it in half twice, fix this position with a stapler. Then alternately glue each cone to the base with PVA glue or a glue gun. We position the workpiece so that the corner is pointing down. The result is an attractive Christmas tree. Each petal can be decorated with colored beads or beads.
From feathers
An airy and incredibly attractive Christmas tree made from colored feathers. You can buy such material today in almost any office supply store. Prepare a paper cone, glue and the feathers themselves. Gradually, tier by tier, glue the workpiece. Decorate with small beads on top, do not forget the star.
Pasta
The pasta industry today offers products of various shapes and sizes. Thanks to this, we not only enjoy beautiful dishes at the dinner table, but we can also use pasta to create beautiful objects, such as a Christmas tree.
In this case, we also cannot do without a conical cardboard blank. In this case, we will glue it with pasta. For our work, products of various shapes are suitable, but it is best to take spirals or feathers, you can use pasta in the form of bows as a decoration.
Before you start collecting a Christmas tree from pasta, you can paint them in some color. Pasta of golden, white and green colors looks best.
After the painted pasta has dried up, we start collecting the Christmas tree. We glue each part to the base using a thermal gun.
Don't forget to decorate the top with a star or a bow.
From coffee beans
Do you want an easy and quick way to create a Christmas tree from scrap materials? Then a festive tree made of coffee beans is what you need. Glue the paper cone and simply cover it with beautiful coffee beans. Due to the fact that this material itself looks very interesting and beautiful, it does not need additional coloring or decoration. In addition, such a Christmas tree will smell nice and will be a great present for real coffee lovers.
From the flower net
Take the flower net, preferably green. Cut the material into strips. Then prepare the base. This will again be a thick paper cone. Alternately dip the strips from the mesh into PVA glue and glue the workpiece. The mesh can be tight and not adhere well to the base, so secure it with tailor's pins.
After the glue has dried, remove the mesh tree from the blank.