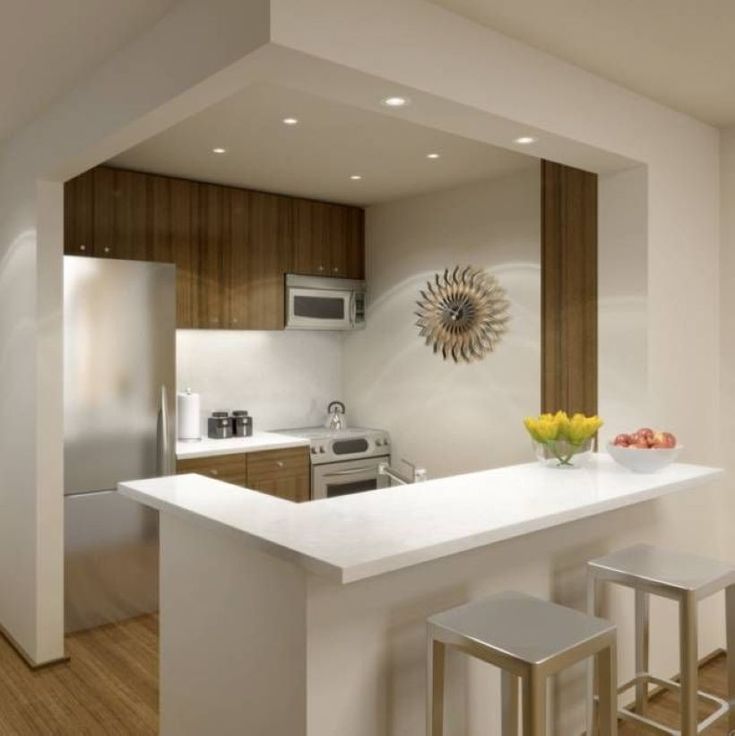
Cheapest kitchen remodels
5 Low-Cost Ideas to Help You Spend Less
The average kitchen remodel costs the same as an Ivy League school. But you don’t have to pay that much.
Image: Clair Carter of Middle of This StreetIf you've got $68,000 lying around, you could buy a luxury SUV. You could pay for one year at Harvard. Or you could remodel your kitchen. Yup. It typically costs that much.
But unlike fancy new cars and Ivy League experiences, you can opt out of the full retail price of a kitchen remodel. Here are five low-cost ideas so you can remodel your kitchen on a budget.
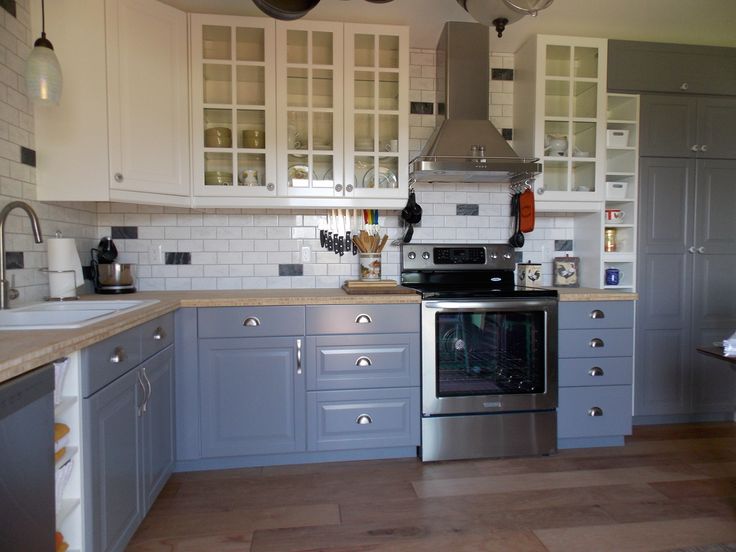
#1 Keep the Cabinets, But Change the Doors
BeforeAfterImage: Refreshliving.net
New cabinets are a big chunk of the average kitchen remodel cost (30%-35%). But most of the time, it's only the fronts that need updating.
A great low-hassle way to save on pricey new cabinets is to buy only the fronts from a manufacturer, like these gorgeous blue ones that were installed on existing cabinets.
Or, if you're into DIY, save even more, possibly spending only a few hundred dollars by:
- Repainting or staining
- Adding new trim or molding
- Removing doors for an open-shelf look
Don't forget new kitchen hardware, a tiny, affordable change — even if you don't change your cabinet fronts.
#2 Stencil Outdated Tile Instead of Replacing It
BeforeAfterImage: Covella Design & Staging
Tearing out old tile and replacing it with new can get expensive. To free up some serious room in your budget, just paint it.
Tile stencils are easy to find online, and it only takes a little prep-work to get your tiles ready. You'll be done in less time than it would take to pry half the old tiles off the wall.
#3 Use DIY Kits to Update the Lighting
Image: Diane Rath of The Rath Project
One of the easiest and most affordable ways to update your kitchen is to use a recessed lighting conversion kit — no electrician required.
The kits only cost $15-$20 each and are a cinch to install, even for DIY newbies. The parts screw right into the recessed light, a brace holds the new light fixture in place, and a decorative cover hides the recessed light.
In about 15 minutes, you've got dramatic new kitchen lighting.
#4 Paint the Floor Instead of Replacing
BeforeAfterImage: Dawson Interiors
If you have an old wood floor or have pulled up your old flooring only to find subflooring (rather than the beautiful hardwoods you were hoping for), try paint.
It might seem a shame to paint wood floors. But professional refinishing can cost as much as $2,000, while painting costs $200 — or less, depending on the size of your floor. That makes it one of the most budget-friendly kitchen updates you can do .
For the most durable results, use polyurethane-based porch and floor enamel.
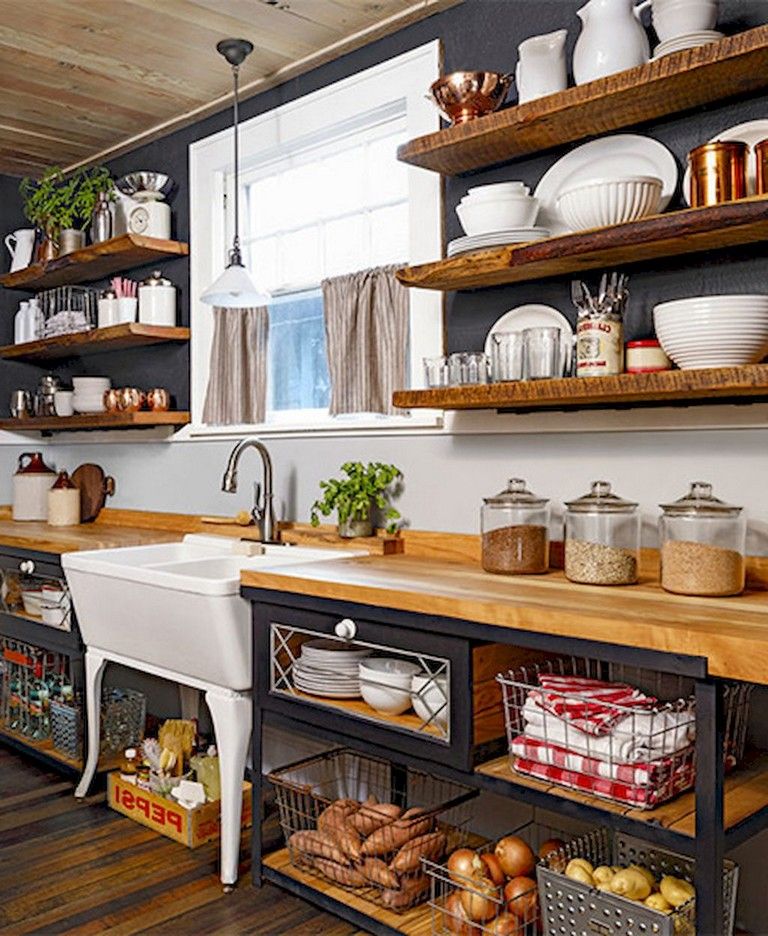
#5 Keep the Footprint, But Change the Look
BeforeAfterImage and Design: Deeply Southern Home
Send a dingy or dated kitchen down the disposal with two updates that make a big impact: a new backsplash and countertop.
Together, they cover an awful lot of surface area, setting the stage for a totally new kitchen look.
A little paint on those cabinets, and it's like a brand new kitchen.
The countertop pictured is quartz, a timeless choice, but if it's not in your budget, there are plenty of DIY countertop options, too.
Related: What To Do About Dinner When Your Kitchen's Being Remodeled
More in By Room
8 Ways We Saved Big on Our Frugal Kitchen Remodel
Planning a budget kitchen remodel? Here are 8 easy ways that we saved big on our own kitchen remodel!
There are affiliate links in this post for your convenience. Please read my full disclosure policy.
I still clearly remember the first time we visited our current house with the realtor for the first time. We were immediately drawn to the beautiful character we saw in it and we loved the layout too.
But when I walked into the kitchen, my heart immediately sank a bit. It was dark and dingy and in desperate need of a good facelift!
I knew that we could easily remodel it, but that wasn’t what caused my heart to sink.
What scared me was the fact that I knew that kitchen remodels typically are pretty expensive and I also knew that our finances were tight enough that it would make things tricky if we ended up trying to do a remodel.
Long story short, my husband and I both loved this place and couldn’t ignore the feeling that it was the perfect house for us.
We ended up putting in an offer in and made sure it was low enough that we still would have some cushion in our budget to do a frugal kitchen remodel and turn it into a spot that I could love.
And as you already know, our offer was accepted and we bought this place and got to work turning it into our home!
We really wanted to create a kitchen that was bright and cheery while also being an efficient workspace…and of course, it all had to be done on a fairly tight budget.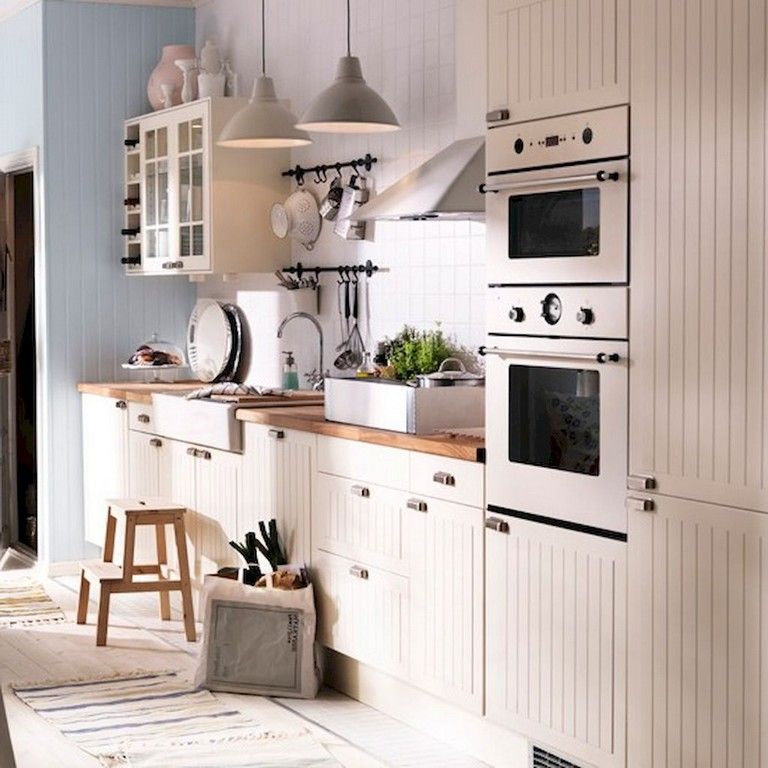
It was a lot of work and I learned so much in the process. But I’m happy to say that our budget kitchen remodel turned out well and we ended up with a kitchen that overall works great for us!
There were some specific things that we did though that saved us significantly and I want to share them with you all to hopefully give you some ideas of ways to save on remodeling a kitchen if you ever have the opportunity!
1. Stuck with Existing Layout (saved approximately $500, very likely more!)There’s no doubt about it, sticking with our kitchen’s original layout saved us a lot of money!
We had toyed with the idea of changing it up a bit, but it would have required possibly moving walls, changing the plumbing, moving doorways and more- all of which would have added considerably to our cost.
And really, in our case, I’m not sure all that work would have gained us much anyway. At least not unless we had upped our budget by 20,000 and totally moved our exterior wall!
2. Went with a Freestanding Stove- Saved around $600
My husband and I both would have loved to have a slide in range just because they provide a much cleaner look. But to save money, we bought our appliances as a package deal during a Black Friday sale.
That, of course, meant we needed to be okay with the style of appliances that were in the package.
3. Bought our Stove Hood from Amazon- Saved at least $150Because of the layout of our kitchen, one of the things that I was really set on having was a wall range stove exhaust hood, not an under-mount style. But it didn’t take me long to discover how pricey they could be!
The stove that was included in our appliance package was this freestanding gas range that has a “back” to it. It doesn’t give the clean look we love, but it is still a nice looking stove and the savings made it worth it!
Thankfully, I discovered this one on Amazon that was just what I was looking for and a good $150 less than anywhere else.
The price tag of custom cabinets was enough to make us quickly decide that ready to assemble cabinets were the way to go!
And even though there are things that would have been super nice about using custom cabinets, going with Ready to Assemble cabinets from TheRTAStore.com ended up working out really well for us.
We’re happy with the look of our white shaker cabinets and are even happier about the money that we saved by going with them.
You can read more about our great experience with designing our kitchen and buying cabinets from The RTAStore.com here. It really made our remodel so much easier!
5. Made Our Own Drawer Dividers- Saved $80 to $100
Instead of buying drawer dividers/organizers through TheRTAStore.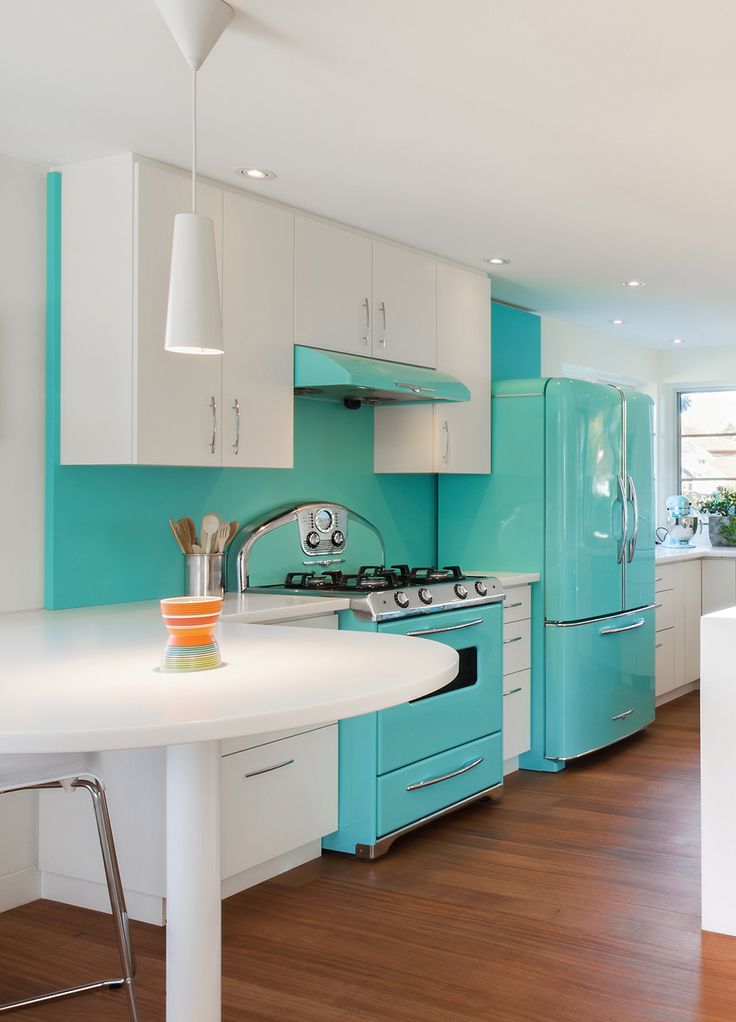 com when we bought our cabinets, my husband just used some scrap wood to make DIY drawer dividers.
I love it because we were able to customize them to make them work for our needs. Plus, the one drawer is really narrow and finding dividers that fit in it would have been super difficult anyway!
6. Used a Self Mounted Microwave- Saved $130The appliance package that I mentioned earlier included an over-the-range microwave. The thing is, we didn’t want an over-the-range microwave for a number of reasons.
For one, I had my heart set on a wall range stove exhaust hood going above the stove. I also find it really annoying to take something that’s piping hot out of the microwave and not be able to just set it down immediately.
And what about those times when we’d accidentally spill something as we were taking it out of the microwave? What if I was cooking something right then on the stove-top? Not something I was excited about! So, we had a dilemma.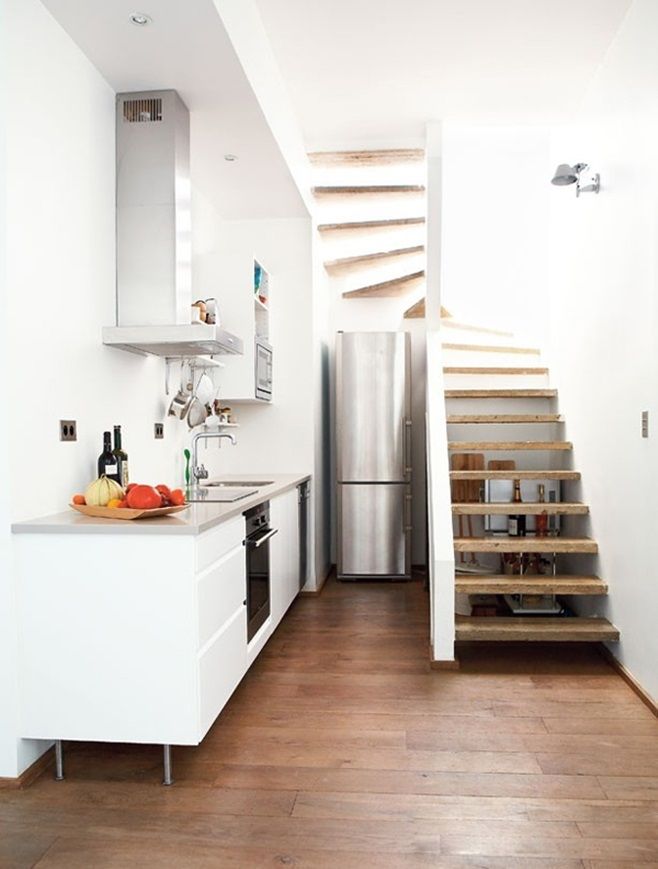
At first, we thought that we’d try to sell the microwave and then use that money to buy another one. But, then we figured out a better solution that worked perfectly!
My husband was able to tweak things a little to attach the over-the-range microwave to the underside of one of our kitchen cabinets instead. We love it and it saved us from needing to buy the microwave cabinet with a shelf that we would have needed had we bought a regular “free-standing” microwave
Plus, I think the “no shelf” look is so much more visually “clean”. And it’s also one less thing to need to keep wiped up too!
7. Used Subway Tile for Backsplash- Saved at least $150
Subway tile is one of the absolute cheapest tiles options available. We chose it not only because it’s inexpensive, but also because we love the clean, classic look that it gives.
We did “splurge” a little though and instead of going with regular subway tile, we went with glass subway tile that we got at Floor and Decor. It added additional interest to our kitchen, while still being inexpensive.
We weren’t originally planning to do this, but one day when my husband was exposing brick walls in other parts of our house, he got the idea to expose brick in our kitchen too.
At first, I wasn’t so sure about it, but I actually really like the character and interest that it adds. And the best part? It was free! 🙂
So, how much did these easy hacks save us on our kitchen remodel?
We saved at least a whopping $3,710! And to be honest, it was likely quite a bit more since I was very conservative in my estimations. I wouldn’t be surprised if it was closer to $5,000.
At any rate, we were quite happy to be able to stay within our low budget and still get a kitchen that we love!
Other Articles that You’ll Enjoy:
- Budget-Friendly Classic White Kitchen Remodel (all the details!)
- 10 Things that Helped Us Pay Off Our $90,000 Mortgage in 5 Years
- 7 Simple Reasons to Declutter and Live with Less
How to make repairs in the kitchen cheap and beautiful? 12 Tips
A beautiful kitchen doesn't have to be expensive. Designers' ideas will help those who are ready for a small redecoration in the kitchen: targeted, sometimes extravagant, solutions for the sake of an obvious wow effect.
► We remind you: to get additional information about each project from this article, to see other angles of shooting the interior or ask the designer a clarifying question - click on the photo you like
Julia Kamanina
1. Combine fronts
Fronts make the main contribution to the price of kitchen furniture. The most budgetary material is chipboard covered with a film. Alas, such doors are doomed to be simple, even and rectangular. But that doesn't mean boring. The film can be of different colors, matte and glossy, kitchen facades can reliably imitate the natural texture of wood.
What to do: Combine several types of finishes within one kitchen set.
Interested in a kitchen renovation?
Let's select a contractor according to your criteria
Entrance Fastighetsmäkleri
Idea with a photo: If the furniture is old, partially updating the facades will help radically look the headset.
Interested in kitchen design?
Let's select a contractor according to your criteria
Ira Nosova
2. Color your furniture
Color is the key to originality. And in this regard, it may be better to choose not the usual orange or green for the kitchen, but, for example, a refreshing blue. Bright monochrome facades "work" as a color dominant, an accent spot in the interior.
Tip: Match the bright kitchen with colorful tiles with an interesting floral or geometric decor - on a backsplash or in the form of a tiled carpet, as in the photo.
Olga Shangina | Photography
In the photo: a solution based on blue; several shades are used - from blue to saturated ultramarine, for example. This design will look especially impressive in the interior of a studio apartment or in kitchens combined with a living room.
CROSBY STUDIO
Rhonda Knoche Design
3. Fittings - an active element of decor
Expressive fittings can become a highlight of the kitchen, especially against the background of simple plain facades. So, long, in the entire width or height of the door, the handles will give rhythm to the interior and emphasize the shape of the furniture. Handles can be different: light and massive, plastic or metal, vintage or modern, made according to the author's sketch.
Judith Mathon / Diagnostic Deco
4. Use the color on the apron
As the photos and pictures of repairs show, usually the maximum that we decide on is to lay out the apron with tiles with a simple decor. It is much cheaper to order and mount an apron made of glass painted in a defiant color, it is easier to care for it. And in terms of strength, heat-resistant glass is in no way inferior to ceramics.
_________________________
RELATED PHOTO…
► Kitchens with red backsplash
► kitchen with blue apron
► Kitchen with apron Metallic Metal
_______________________________
Ekaterina Titenko 9000
on the photo, so that the wall is closed with glass (special the hue did not distort the perception of blue).
Interested in a kitchen renovation?
Let's find an artist according to your criteria
Gleba+Störmer
In the photo: an extravagant transformation was chosen for this Berlin kitchen - both the furniture and the wall were painted the same color.
Tip: Mix and match modules.
Projects of kitchen furniture today can be anything. To make a simple kitchen look original, we advise you to alternate cabinets of different widths: for example, narrower ones with horizontally elongated ones.
Nadja Endler | Photography
4. Add some drama
The accent wall principle works in the kitchen just like it does in any other room. It’s just that a wall with an apron is usually taken as an accent wall. What if the active color is on some other wall?
STUDIO LOUIS
In the photo: the simple form of the sets looks impressive against the background of the deep shade of the walls and ceiling. Such exercises with volume and geometry will give the kitchen a more modern look.
_________________________
photos on the topic ...
0002 Sol Haus Design
5. Don't discount appliqués
An inexpensive way to make an outstanding kitchen is to decorate the facades with self-adhesive foil appliqués. Ready-made options can be found in stores specializing in decoupage products, or ordered in a workshop according to your own sketches.
Lombardini22
In the photo: stickers were used here not only on the kitchen facade, but (take a closer look) on the lowered ceiling above it.
Bjurfors Skåne
6. Buy unusual household appliances
It is not necessary to build everything and everything behind furniture facades. Especially when it comes to the scarlet refrigerator. When there is such a refrigerator in the kitchen, all eyes are only on it - neither the color nor the layout of your headset is striking so much.
Daria Elnikova
The photo shows a tiny five-meter kitchen in a Moscow apartment. The soloist is a scarlet refrigerator, next to it is the simplest kitchen furniture.
7. Dissolve the furniture
The right option is a completely white kitchen, including furniture, walls, ceiling. Against such a background, simple white facades will completely dissolve, and the room will become visually larger and brighter. As a result, you will get a light, airy, non-binding kitchen, the furniture in which tends to fade into the background and not "an eyesore" with its presence. And it will be possible to diversify such an interior with bright accessories. The same technique can be used not only in the kitchen, but also in the design of apartments in general.
Design Studio M I S U R A
8. Bare the top
Ditch the bulky top cabinets. Of course, open shelves will require more thorough cleaning. But in the kitchen-living room they will help get rid of the feeling of "a feast in the kitchen."
atelier daaa
9. Bet on surprise
Who said that the apron should be the entire wall? Sometimes a small but spectacular fragment above the stove is enough: a completely functional solution.
In the photo: the apron was fragmentarily made “under the stone”. It immediately looks more elegant than if the countertop and backsplash were black all over
Logan Killen Interiors
10. Instead of a cupboard - a mirror
Due to lack of space, we traditionally try to fill all the walls of the kitchen with cabinets. And what if you do not hang a bulky cabinet over the sink? If there is not enough space, let there be shelves here. But the best option is a beautiful mirror: it is always nice to see a good person once again.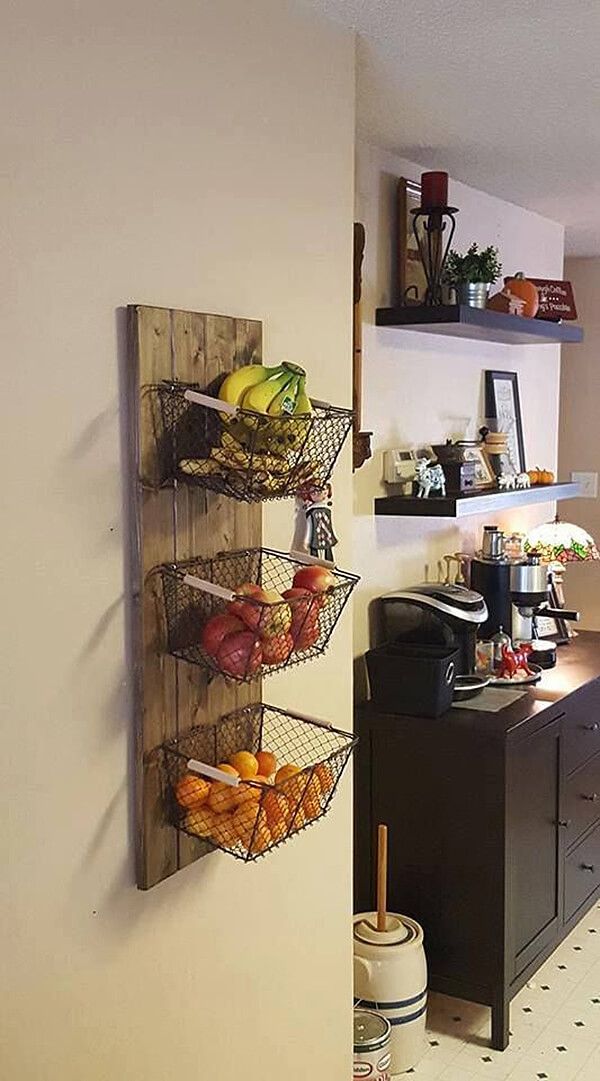
Julie Nabucet Architectures
11. Hang a beautiful designer lamp
Another way to direct guests' eyes (and conversations) in the right direction. Let it be emphatically decorative, nonchalant and playful – after all, for functional lighting, you have LEDs under the upper cabinets and a separate lamp above the work surface.
YOUR TURN…
There are many practicing interior designers among our subscribers and readers. Share your life hacks — how do you manage to achieve a wow effect when designing budget kitchens?
how to make it beautiful and cheap?
Any repair, regardless of whether the object is an apartment or a private house, requires a significant investment of money. The kitchen deserves special attention in residential buildings: it should be beautiful, clean and fresh here, which is why it is so important to make a choice in the direction of practical and good-quality materials. How to organize an inexpensive kitchen renovation so that the quality of the coating does not suffer? In this case, it is important to be smart, making a choice in favor of simplicity, cheapness, safety and functionality.
Contents
- Getting Started
- Making a To Do List
- Smart Renovation Planning
- How to meet the minimum amount?
- Inexpensive materials for decorating kitchen areas
- How to put your own hands and not miscalculate with repairs?
Getting Started
Before renovating, it is important to think about the general concept of the future room. In determining the style of the room, the personal preferences of the residents play the main role, then a list of the main materials and fixtures for installation is thrown. This item allows you to significantly save your own budget. When purchasing cheap materials, it is important to be careful, it is advisable to consult with specialists who will advise on any issue.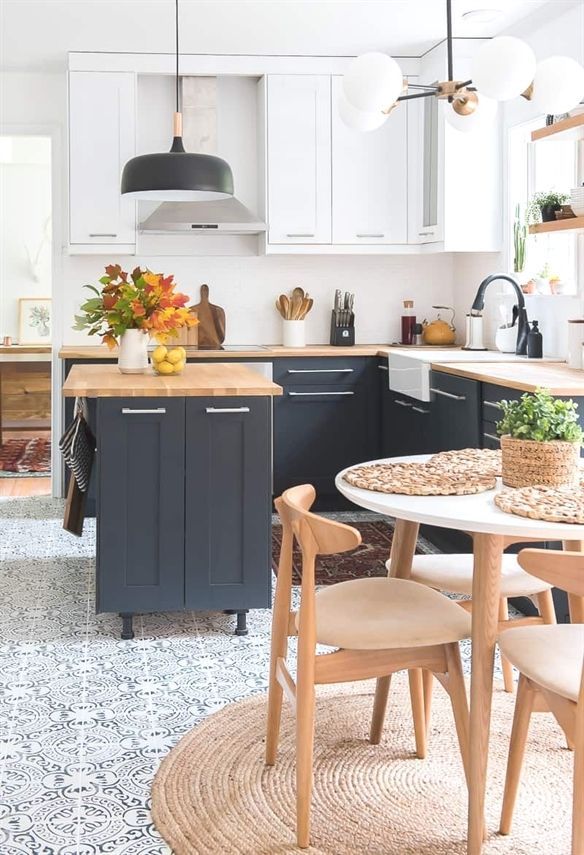
Minimizing costs will allow independent activities during repair work. So, getting rid of the old coating, bringing in or removing material is within the power of each person. Complex types of work that require professionalism are best left to specialists. They will easily carry out repairs to the kitchen inexpensively.
Making a to-do list
Making a to-do list for the restoration work will make things easier.
Highlights to be listed:
- Elementary work such as cleaning the base surface, chasing holes, removing old coatings.
- Measures for leveling the surface, laying electrical wiring, replacing pipes are best left to experienced craftsmen.
- Surface priming, painting is carried out in-house.
- Laying tiles, linoleum is not difficult, so it can be done by anyone.
In the photo you can see the process of self-assembly.
Tip! Analysis of the list of works allows us to conclude that the bulk of the cases can be done without seeking outside help.

Functionality is the main purpose of the kitchen, therefore, taking care of reducing the cost of repairs, it is important not to forget about its main purpose. It is important to remember that excessive simplicity in the future can turn into sheer inconvenience and discomfort. Therefore, an inexpensive kitchen renovation with proper planning will add significance, convenience and originality to the room.
Proper renovation planning
Before you make repairs in the room, it is important to find out what type it will be: current or major. If the first option involves a superficial change in external data, then the second is associated with a complete transformation of the room. In connection with this moment, the future kitchen is being planned:
- Zonal delimitation of the room into a work area and a place for eating.
- Dismantling of old coatings, sinks, windows, doors, communications.
- Designation of points for future installation of household appliances, installation of sockets.
- Determining the placement of kitchen furniture.
- Marking the location of the kitchen backsplash on the wall, tiling the working area.
How to meet the minimum amount?
To organize a budget renovation of the kitchen will help a clear planning of expenses, the acquisition of the most necessary and the perfect match with the overall environment.
How to purchase materials for subsequent repairs?
- be patient and prudent, buying only the things you need;
- purchase building materials in one place in order to exchange goods if necessary;
- small parts, minor trim elements, accessories are purchased last.
Some types of materials show a bright photo. Attributes are selected according to the color scheme of the room. To make repairs available to everyone, you can use simple, inexpensive materials for decoration. So, inexpensive types of linoleum are suitable for decorating the floor. The photo clearly shows examples of such floor coverings. Upon completion of the restoration work, the kitchen is furnished with furniture and household appliances.
Inexpensive materials for decorating kitchen areas
You can upgrade the room with cheap materials that are optimal for the installed part of the room. When finishing the ceiling, it is allowed: drywall, plastic, putty. For the floor coverings in the form of laminate, tiles, linoleum are suitable. It is better to decorate the walls with tiles, treat the remaining surfaces with putty or stick wallpaper. The photo successfully demonstrates the finishing of the kitchen.
Cheap materials have both strengths and weaknesses. To repair the kitchen inexpensively will allow the clear use of plastic elements. This material is quickly assembled, durable and easy to maintain. However, such coatings quickly become unusable when exposed to bulky objects and melt at high temperatures. Examples of such materials are visible in the photo.
Recommendations:
- GKL sheets will ideally level the base, but this material is not entirely practical: the high moisture content in the kitchen will quickly warp the coating.
- Only a person who is well acquainted with all the intricacies of the process can lay out tiles.
- Making repairs with laminate and linoleum is much easier, but it does not exclude any kind of damage during operation.
- Wall renovation can be made cheaper by self-applying putty if the base coat is even and a person who knows the basic nuances of the work.
- When choosing wallpaper, you should choose vinyl sheets: they will simplify the process of gluing, which is especially important for a beginner. The photo shows the lining with this type of material.
How to apply your own hands and not miscalculate with the repair?
Start restoration work from the ceiling. Making repairs cheaper will allow the finishing of this zone without the use of additional structures. The base base is carefully leveled, cleaned, primed, puttied. As the layers dry, the procedure is repeated, after which the ceiling is painted with light paint.