How to grow a flower bed
How to Make a Flower Bed & Prepare Soil
Good soil prep is the key to successful gardening. Learn how to prepare a flower bed for planting.
"Make your bed" is one of those statements that we each must have heard a million times as kids. As gardeners though, this simple phrase has a different meaning. "Make your bed" is all about preparing the soil for planting. Every gardener gets excited by the thought of finally getting their hands in the soil. The joy of finally getting to see the flower garden come together in spring is certainly a rewarding experience. However, the key to success starts before the first plant even sees the garden.
Shop for plants online
The roots of a plant are the foundation on which that plant thrives. Good roots will generally mean that you have a happy, healthy plant that can survive the rigors of spring and summer. A poor root system means your plants cannot grow to their full potential and leaves them vulnerable to damage from insects and disease. The most important factor for good roots is good soil preparation.
If you are a beginning gardener, properly preparing your soil can be daunting. However, there are some easy steps that you can take to get your beds ready to be planted.
There are three basic types of beds you might be preparing (click to jump to that section):
- A brand new bed that has never been planted before.
- An empty bed that has been planted before.
- A planted bed with existing perennials, bulbs, and/or shrubs.
HOW TO START A FLOWER BED
The first step when planning to add a new flower bed or even if you are simply planting a tree or shrub is to check if there are any buried utility lines on your property. Most areas should have a number you can call to check locations for these lines. Check with your local government for the correct number to call. In addition to public utility lines, you will want to make sure you have identified any irrigation lines that might be buried on your property.
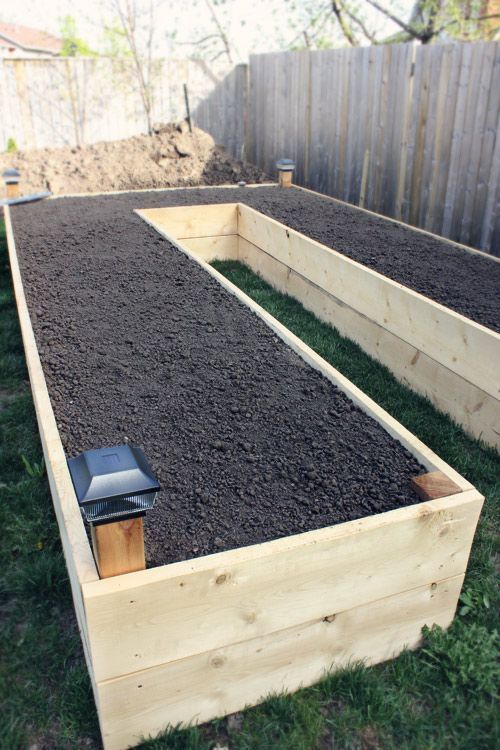
Define the outline of your flower bed
The best way to begin to prep this type of bed is to define the outline of the bed in the fall. It can sometimes be helpful to use a garden hose to determine the outline of the bed. A garden hose can be moved and reshaped until you find exactly the right shape and size for your bed.
Learn more: Flower Bed Design
Remove existing vegetation
When preparing a brand new bed you will need to kill the existing vegetation. If this is woody material, you willneed pruners or perhaps even a saw. If the existing weeds are herbaceous plants, things like grass and chickweed, you will have an easier time.
- Cover the soil and plant material with several layers of newspaper (a good 5 to 6 sheets should be sufficient) and then cover the newspaper with a good thick layer of compost, 2 to 3 inches would be great. Do not use the slick, full color adds. The ink in regular newspaper is not harmful to your soil, but the ink in the full color, slick papered ads can be problematic.
- Leave the bed alone until spring. Over the fall and winter the newspapers will block out all light, which will kill the vegetation. The newspapers will also decompose over several months and come spring you will have a nice layer of compost that you can turn over into the soil. This method is completely organic and will help improve your soil while killing existing vegetation.
- If it is already spring and you want to plant your bed soon, you can use an herbicide to kill the existing vegetation. Be sure to read the label for instructions on how and when to apply the chemical. Some herbicides can remain active in the soil for a period of time after application, be sure to take this into consideration when planning your bed prep. It is also possible to skip killing the foliage and simply move on to the next step, digging.
Turn the soil over
Once the existing vegetation is dead use a tiller, spade/shovel or garden fork to turn the bed over. With a brand new bed it may be difficult to get your tiller to break into the soil so turning the bed over first with a spade or shovel may be best.
When working the soil, you want the soil to be damp, but not wet. If the soil is too wet it will clump when you turn it over. If the soil is too dry it will be very difficult to dig and harmful to the soil. If you turn over a spade full of soil, it should break apart and look moist without sticking to your tools or dripping water.
A tiller will often turn the soil to a depth of 6 to 8 inches. It is good to get down at least 12 inches (the depth of a spade or shovel) when turning over a bed, another point in favor of the shovel. If you are really motivated turning over the soil to a depth of 18 inches is even better, although it is a lot of work. This is often called double digging.
Mix compost into the bed
Once you have turned over the soil, spread a layer of organic matter or compost 2 to 3 inches thick over the bed and then turn the soil over again to mix the compost into the soil. Adding compost will improve the soil by adding nutrition and improving soil structure.
Avoid extremely fine compost or bagged amendments with a sand-like consistency as they tend to break down too quickly. You want something that has both large (1") chunks as well as smaller particles. Use material from your compost pile if you have one, or check with your local garden center. Then rake the surface of the soil to level the soil.
Control weeds
Turning over the soil will expose weed seeds that were previously buried to light, causing germination. You can control the germination of these seeds by applying a thick mulch like pine needles or bark products over the bed or you can treat your bed with a weed-and-feed product to help deter germination. If you do treat with weed and feed, be sure to read the directions and apply correctly. Some weed and feed products can damage roots below the soil if applied incorrectly.
Also, do not directly sow flower or vegetable seeds into the soil when using a weed and feed product as they will not germinate. Weed and feed products kill all germinating seeds, not just the weed seeds. If you use a weed and feed product, you will want to install plants already growing in pots or packs to fill your bed the first spring. By fall the chemicals should have broken down and you will be able to direct seed, if you want.
You can also wait until the weeds come up and simply pull them. This can be more time consuming than chemical applications, but it is organic in addition to being good exercise.
Irrigation, planting and mulch
Before planting, install an automatic irrigation system. Drip tubing is great for flower beds since it delivers water right to the roots of the plants. Plus you won't have to drag a hose around to water by hand. Check out our WaterWise Drip Irrigation system.
After you plant the bed you may still want to add a layer of compost to the top of the soil. A layer of mulch or compost on the top of the soil will help keep weeds from growing, makes for a neater look overall and will also help maintain moisture in the soil.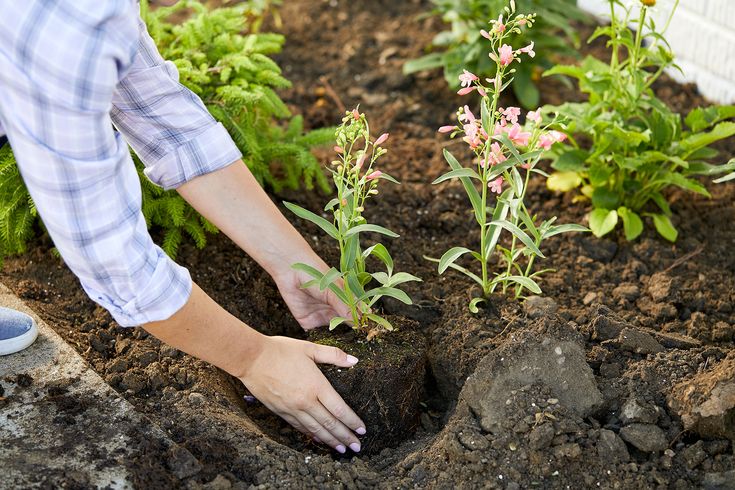
Rules of Thumb for Brand New Beds:
- Work the soil when it is moist, but not wet.
- Turn the soil over to a depth of at least 12 inches.
- Add 2-3 inches of compost and turn it into the bed.
- Either cover the bed with a thick (3-4") layer of mulch or use a weed and feed to help keep weed seeds from germinating.
- Top dress with another layer of compost to keep down weeds and preserve moisture.
PREPARING SOIL IN EXISTING BEDS
The second type of bed is an existing bed that has nothing in it. In other words, you are replanting the same area you used last year. With this type of bed, you can treat it similarly to the brand new bed, but it shouldn't be necessary to layer the newspapers to kill existing vegetation.
Add compost to the bed
In either fall or spring or in both seasons, put a 2 to 3 inch layer of compost on the bed and then turn the compost into the soil. The single best thing you can do for your soil is to consistently add organic material.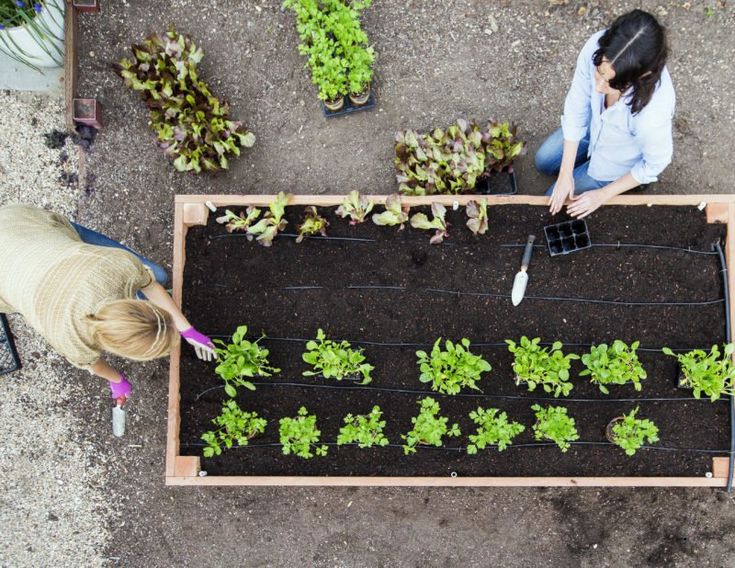 This will enrich the soil and help you grow better plants.
Once again, you only want to work the soil when it is moist, not wet or dry. To check your soil moisture content pick up a handful of soil and squeeze it.
- If you squeeze out water the soil is too wet to work.
- If the soil stays in a ball in your hand and then breaks apart when tapped, it is perfect.
- If the soil is too dry to form a ball, it is too dry to work.
If you work soil when it is too wet, you will cause it to clump and become compacted. If you work soil when it is too dry, you harm the soil structure. Working soil when it is moist will help maintain good air porosity and soil structure.
Double dig to 12 inches
After you add the compost layer, you will want to turn the compost into the soil. As before, you can use a tiller, shovel or garden fork to do this. I prefer to use a shovel so I can get at least 12 inches deep. Double digging will again be optimum, but any incorporation of organic matter will be beneficial.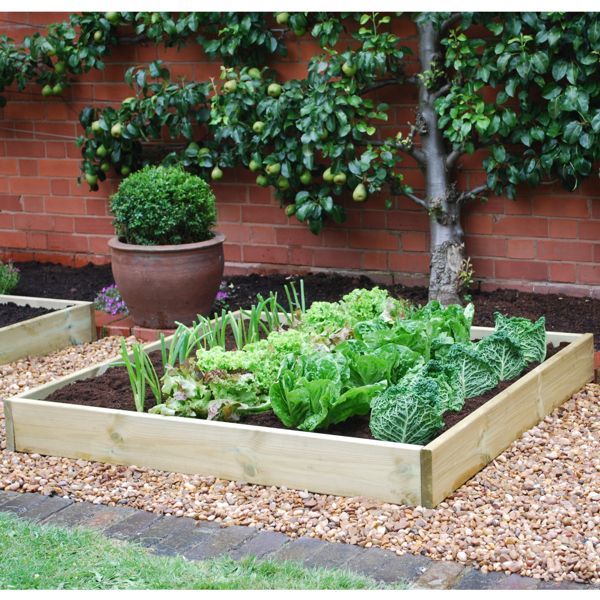
Apply a layer of mulch to the top of the soil
After turning this compost into the soil, you may want to put another layer on top of the soil to act as mulch. If you add organic matter in the fall, it isn't necessary to add more in the spring. However, if you have poor soil adding compost twice a year can help improve the soil much more quickly. Remember that this organic matter gets used up each year and needs to be replenished to keep plants performing their best.
Rules of Thumb for Existing Garden Beds that are Empty:
- Add 2-3 inches of compost and turn it into the bed.
- Work the soil when it is moist, but not wet.
- Turn the soil over to a depth of at least 12 inches.
- Top dress with another layer of compost to keep down weeds and preserve moisture.
EXISTING BEDS WITH PLANTS
The third type of bed is one that already contains some perennials, bulbs and/or shrubs. These beds can be a bit trickier. You can't simply broadcast a thick layer of compost and then turn it under. You will need to be careful when working around the established plants that you don't harm their roots. You do still want to add organic matter. This can be done either in spring or fall, or in both spring and fall.
Incorporate compost around plants
Add a couple inches of compost around existing plants, work this into the top layer of soil a bit, if possible, but do not dig deep enough to harm the roots. Do not allow the compost to come into contact with the stems of the plants as this can promote disease. Even left mostly on top of the soil the compost will break down over time releasing valuable nutrients into the soil while preserving moisture and protecting the surface of the soil.
Established beds will often have open areas where plants have died or where annuals are added each spring. In these areas, go ahead and turn over the soil to incorporate the organic matter and then plant.
Rules of Thumb for Existing Planted Beds:
- Add 2-3 inches of compost and work it into the top layer of soil, if possible
- Work the soil when it is moist, but not wet.

- Do not allow compost to come into contact with plant stems.
- Top dress with another layer of compost to keep down weeds and preserve moisture.
CREATING THE BEST SOIL FOR FLOWER BEDS
Preparing the soil in your beds doesn't have to be difficult, although it is great exercise. Adding organic matter is the one thing that all soils can benefit from whether your soil is sand or clay based. The addition of organic matter is beneficial, even if you are blessed with loam soil. Are there more in-depth steps that can be taken? Sure. However, this is a good place to start. We have additional information on soil testing and amendments in another article.
You may also be asking where you can get compost or organic matter.
- You can make your own
- You can buy it from your local garden center
- Many municipalities have compost for sale or even for free. Check with your local government for programs in your area.
Cow and chicken manure are very high in nitrogen and can burn plants if used in their pure form.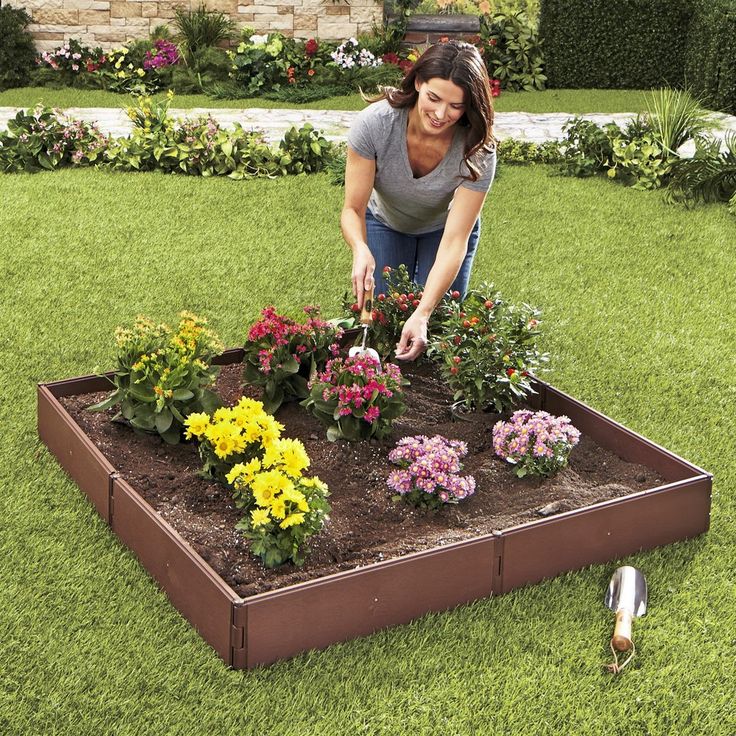 However, they make wonderful additions to the soil if you work them in well. They also act as a natural slow release fertilizer. Most of these manure products are highly composted so look for something organic to add along with them to get the best of both worlds. Peanut hulls, bark mulch (not bark nuggets, unless they are the 1/2" size) or compost from your compost pile are all excellent options.
When I moved to my new house my Dad (he's a farmer) came over and plowed a space for a vegetable garden. My soil is clay, but not really heavy clay. Over two years, I added compost three times and my soil has visibly improved. Now that the vegetable garden is in decent shape, I am concentrating on adding more compost to the flower beds around the porch. The soil there is more clay backfill, generously littered with rocks. I think it will take me longer to improve this soil. I have one thick layer of compost already incorporated and will add another thick layer this spring.
Want to learn more?
- Put Your Beds to Bed!
- 17 Tall Annuals for the Middle of the Border
Ask a Question or Give Feedback about this article.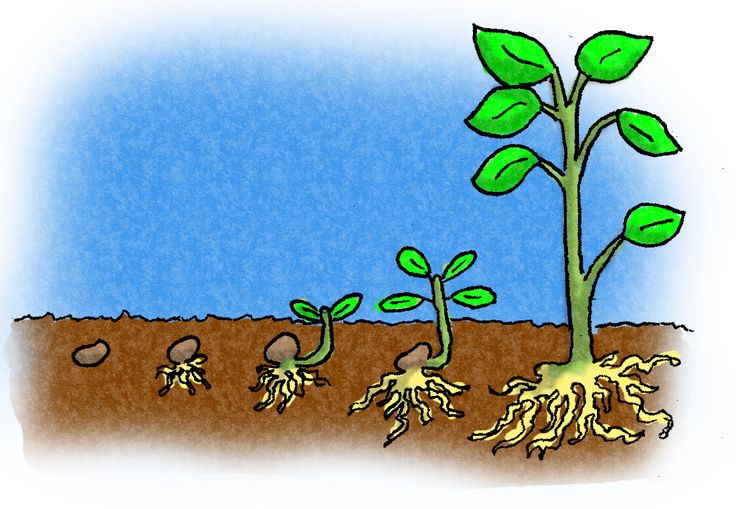
How to plant a flower bed: The essential guide
(Image credit: Future)
If you're wondering how to plant a flower bed and are stuck on how to begin, fret not.
Our essential guide to planting a flower bed for beginners will help you to imagine and create the flower garden of your wildest dreams.
When summer begins and the sun grows stronger, the flower beds in our gardens reach their peak and fill with overflowing color and fragrance.
Successful beds can be established in many different positions in the garden and although a sunny aspect suits the widest range of plants, you can still have a super border in a shady area whose interest is sustained by most roots or protection from full sun.
Beautiful flower bed ideas are (almost) endless, but first comes the actual planning and building. This might seem like a daunting project, but with a little preparation, you'll soon be enjoying a prettier, flower-filled garden in no time.
Before starting a flower bed, you need to plan ahead and be able to visualise the future. We recommend taking a stroll around your backyard (or front yard) and choose a suitable location for your beds.
Unsure where this might be? We have included everything you need to know about preparing a flower bed.
How to plant a flower bed
(Image credit: Future / Polly Eltes)
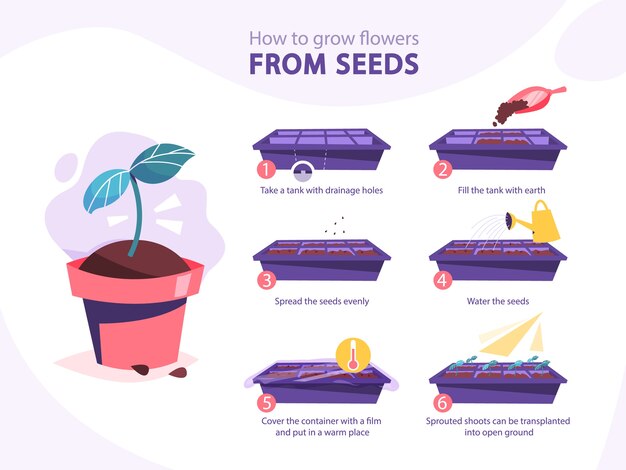
Whether you have a new bed to fill, want to add color to new rock garden ideas, or you want to revamp an existing part of your garden, one of the most rewarding options is to grow flowers from seed.
The advantage of annuals is that they are very fast-growing as they complete their lifecycle in just one year. You can plant seeds now and have colorful flowers by summer. You can also try collecting seeds from your own flowers to increase your stock for free.
And many are so easy to grow that even a complete novice can create a spectacular border on a budget, if you follow a few important rules:
1. Prepare the site
(Image credit: Future)
Choose a sunny spot and dig it over to remove all weeds and their roots. Pull a rake over the surface of the soil until it resembles fine breadcrumbs.
2. Check your soil type
(Image credit: Future)
For gardening success, and to avoid wasting money on plants that won’t thrive, you need to test your soil. This is particularly important if you have recently moved house and are planning lots of additions and changes to your plot.
Always test the soil in different areas of your garden, as pH and nutrient levels may vary in even a relatively small space and have different feeding requirements.
Tests are widely available from garden centres and online retailers, and will tell you which minerals are depleted.
Well-rotted compost and manure help to geed soil, and chicken manure pellets give an excellent all-round organic boost as they are rich in nitrogen, phosphorus and potassium, which aid leafy growth, root growth, flowering and fruiting.
Dig them into your beds and borders every four-six weeks during the growing season and water them in.
Improve hard clay soil
As every good gardener knows, the soil is the key to the success of what grows and what won’t, no matter how hard you try and whatever the size of your plot, so that’s what should be addressed first.
Healthy soil should be brimming with life – think earthworms and creepy crawlies. If your soil is devoid of life, apart from the odd slug with the inevitable eggs, then the important task of bringing this heavy clay soil back to life begins.
Add, in vast quantities, grit and pine bark to improve the clay’s drainage by opening up the air spaces within the structure of the soil, and mushroom compost, to help the health and vitality of the soil.
Once this has been combined with the existing top soil, you can carefully tread down the soil in each bed, Alan Titchmarsh-style, to expel all the air so your beds can be raked and levelled ready for a late spring planting.
3. Choose plants carefully – flower heights are key in beds and borders
(Image credit: Future / Annaick Guitteny)
If you are a novice, then any annuals listed as 'easy to grow' are ideal. Plant taller varieties at the back and shorter ones at the front, and decide whether you want a complementary or contrasting color scheme.
Use tall plants for the back row
Make a bold backdrop with tall, graceful plants. Fast-growing sunflowers can make a colorful screen, or cosmos are an elegant choice, growing up to 120cm tall. If you are planting against a wall or fence you can also grow annual climbers such as sweet peas, morning glories, asarinas or cobea scandens – the Cup and Saucer Vine.
Use medium-height plants for middle row
Plant swathes of color in the middle of the border, aiming to have drifts of flowers in oval and teardrop shapes. Even in the tiniest garden, planting in groups of threes and fives is far more effective than simply dotting single plants around. When growing from seed, thin out the excess plants as they get bigger.
Use low-height plants for front row
Choose creeping and low-growing plants for the front of the border. Look out for options, such as dwarf annual phlox that bloom for months on end. Other great choices include candytuft, which only grows up to 30cm high and also has a heady fragrance. Poached Egg Plant, with its profusion of lemon flowers, is also ideal.
To create a natural effect in your raised garden bed ideas, allow trailing plants to spill over the edges. Cascading lobelias are perfect and may even self-seed so they come back every year. Nasturtiums are another popular choice, but avoid growing them on rich soil, or you'll end up with plenty of leaves at the expense of the blooms.
4. Add a considered color palette
(Image credit: Future / Mark Bolton )
Color is arguably the single most important element when you’re planning new garden edging ideas.
The options are almost limitless when it comes to choosing your color scheme, but opting for a restricted palette, with interwoven swathes of single colors, tends to work much better than having masses of different colors mixed together.
It is important to consider the size of your space when choosing color. If you're wondering how to make a small garden look bigger, it is worth bearing in mind that some colors (such as pale, pastel shades and white) recede and make a space appear larger.
More vibrant shades (orange, reds, yellows and vivid blues, for example) will close it in.
Strident colors can have a big impact when used as accents, but avoid filling the whole border with them or the effect is likely to be overpowering.
5. Water and weed regularly – remove any weeds first
(Image credit: Future / Polly Eltes)
The advantage of planting in rows is that you'll easily be able to tell your seedlings apart from any weeds that pop up.
It should be perfectly feasible to eradicate the grass simply by building the new beds straight over it – but with a few provisos. However, it is worth cutting the grass as short as possible to make the job of eradicating it easier.
Grass will die off quite quickly when light is excluded, as long as it is not weed grass (such as couch), which has underground runners by which it can survive. Ordinary domestic grass will not survive.
The same goes for weeds. Annual weeds will quickly die off it buried, but perennial weeds (such as buttercup) may grow through, to appear in the bed. If the grass contains such weeds, it might be worth spraying it off with herbicide before building raised beds. Though this should be used as a last resort.
The top 5 plants to grow in your flower beds
By now your long-list of suitable plants will have started to be whittled down, and you should be well on the way to a definitive shopping list for an abundant flower bed. But if you’re feeling overwhelmed by the choice, here are some flowers, plants and grasses to consider…
1. Perennials
(Image credit: Future / Val Corbett)
The great thing about perennials is exactly that: they’re perennial. They appear year-after-year to provide your flower beds with rich, beautiful color.
Don’t be tied too rigidly by the old tall-at-the-back-short-at-the-front idea. Clearly it makes sense but short early flowers like hellebores make impressive clumps at the back and like the shade of taller perennials later.
2. Cosmos
(Image credit: Pippa Blenkinsop)
Cosmos is a firm favorite with gardeners. Coming in a wide range of colors, they add instant wow-factor to the border or bed, and if you're looking for patio planting ideas, they pack a punch in a pot, too.
As if their beauty wasn't enough to make you fall in love with these beautiful blooms, their pollen-rich flowers are an excellent choice for wildlife. Bees especially like cosmos making it a great addition to the garden, as it supports this vital pollinator.
3. Ornamental grass
(Image credit: Future / Annaick Guitteny)
The wonderful thing about ornamental grasses is that they demand little yet add excitement to any planting scheme.
They are a fantastic solution to early-fall doldrums: as summer flowers fade, their subtly colored foliage and sprays of tiny flowers will take centre stage.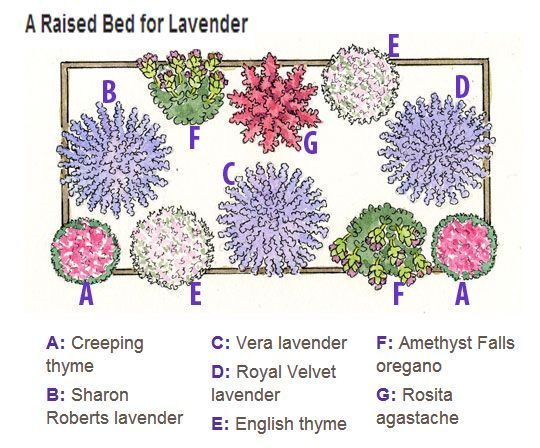 What's more, they are environmentally friendly too.
If you are wondering how to grow ornamental grasses, Anemanthele lessoniana will flourish in dry shade and never needs watering making it a great low-maintenance option, while Calamagrostis will evoke the atmosphere of an abundant cornfield.
4. Herbs
(Image credit: Future / Tim Young)
You don’t need a vast space to create a beautiful herb garden. Herbs grow well in containers, dedicated beds or as an integral part of a herbaceous border planting. The idea is to grow herbs you use and enjoy.
Herbs suit both informal and formal garden ideas. Formal herb gardens are based on patterns and geometric shapes, whereas informal ones are a free-for-all, with species and colors all mixed together.
Despite the spontaneity of informal herb plantings, the best are carefully planned, even if only to ensure that the fully grown height and spread of neighboring plants is compatible.
In a formal scheme, we advise beds of around 4ft (1. 2m) in width, so that the herbs are accessible. Any wider and it’s worth adding stepping stones to improve access.
5. Lavender
(Image credit: Future / James Robinson)
If lavenders were simply obliging evergreens that, come summer, wafted fragrant flower spikes around, they would still earn a place in almost any garden. But, lavenders have it all – color, scent, foliage, form and garden worthiness of the first degree, making them a great option if you're looking for sensory garden ideas.
Lavender is also a good mixer, blending beautifully with annuals and perennials alike. Amongst its many qualities, lavender is drought tolerant, making it ideal for establishing in hot spots, the mainstay of gravel beds or difficult areas that tend to be dry.
Lavender is also invaluable in wildlife-friendly areas, a rich source of nectar to passing insects.
And then there are the practical uses. Having both medicinal properties and culinary uses, lavender sits very comfortably in the herb garden, whilst in the cutting garden, it provides a reliable companion to ethereal summer flowers. Cut and dried, lavender lives on long after the bushes are bare.
Jennifer is the Digital Editor at Homes & Gardens. Having worked in the interiors industry for a number of years, spanning many publications, she now hones her digital prowess on the 'best interiors website' in the world. Multi-skilled, Jennifer has worked in PR and marketing, and the occasional dabble in the social media, commercial and e-commerce space. Over the years, she has written about every area of the home, from compiling design houses from some of the best interior designers in the world to sourcing celebrity homes, reviewing appliances and even the odd news story or two.
Flower bed planting charts for beginners
Creating a beautiful flower bed is a real art, here you need to take into account many things - types of plants, their compatibility, planting features. But an important role in creating a really interesting and luxurious flower bed is played by the scheme according to which flowers are planted.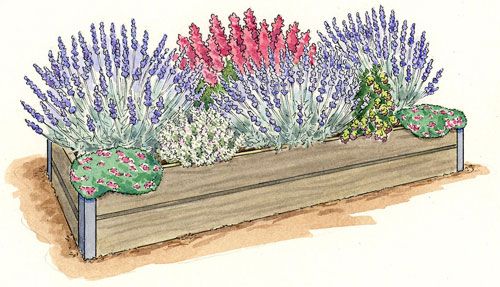 Bright colors of flowers, their height, arrangement in a certain order, form beautiful patterns, making the flower bed a carpet of fresh flowers. Creating a flower bed using a complex scheme and a large number of plants is not easy, but there are flowerbed diagrams for beginners where you can use a few plants and a fairly simple pattern - and the result will surely please you.
The traditional approach to flowerbed design is to plant flowers according to a pattern, but it is not uncommon for plants to be planted randomly in groups. Regardless of which approach you choose, we invite you to familiarize yourself with the basic principles of flower garden design in the following video:
It is not so difficult to create a flower bed on your own - you need to choose a suitable place, pick flowers and decide on a scheme for planting them. If you want to plant plants in such a way that they form a certain pattern, you need to draw a diagram on a piece of paper, and then transfer the markings to the flower bed.
The simplest option is a round flower bed. You can decorate it as follows - plant a group of tall flowers in the center, for example, a delphinium, plant plants of the same species as a frame around the edges - balsam, flax or pansies (for example), and fill the distance between the center and the edge with flowers that bloom all summer, it can be petunia, pelargonium, marigolds, nasturtium, begonia semperflorens.
Drawing will help a lot in creating a flower bed - you will clearly see how best to arrange the flowers, a color scheme will give a visual idea of \u200b\u200bthe appearance of the flower bed
Spectacular flowerbed, created according to a simple scheme. A graceful curl resembles a question mark, but it can also be a circle. Two types of plants in a contrasting color, in the center is a raised flower bed, but it is not necessary to make it, you can leave the center green or plant tall plants in it
When you create a scheme, you need to think about the colors and shades that you want to see in the flower garden. Color combinations in a flower bed can be very diverse.
Monochrome composition
In a small flower bed, flowers of the same shade look very good, you can use one or more types of plants of different heights, placing the high ones in the center and the lower ones closer to the edge.
Such a pretty flower bed can be created using just three plants. 1 - phlox in the background as the highest, 2 - meadow pelargonium, 3 - balsam or pansies
Plant arrangement in contrasting colors
The use of shades that occupy the remote positions of the color spectrum will help create an effective contrasting composition. For example, a combination of blue and orange, yellow and purple, burgundy and green.
Two fairly simple flowerbeds with a clear shape without a border. One looks impressive thanks to the bright flowers of large-flowered begonia, on the other, yellow begonia and a frame of red flowers are contrastingly combined
Composition of flowers of similar shades
A flower bed will look very nice, where the shades of flowers smoothly replace each other. For example, pink, blue and lilac or hot pink, red and burgundy.
Flowerbed with a predominance of burgundy, the distance between the zones is filled with colored gravel, which can also be successfully used in the design of flower beds. It also makes it easier to care for different areas, because. you can walk on gravel without damaging plants
Neutral composition
If you are a fan of bright accents, you can make a discreet, eye-pleasing flower bed in neutral colors - in white and green, green with pink or green with blue. Such a flower bed is visually able to make the space brighter or dilute bright colors where necessary.
Select white or light yellow snapdragons or cornflowers as base colors. In combination with tall smooth molucella, you will get a very interesting low-key flower bed.
We have already considered the simplest scheme for planting flowers in a flower bed. Now let's look at schemes for several more complex flower beds.
Round beds are usually central. If you have a large open area in front of the house, creating a round flower bed on it will allow the area to look smart. Use plants that bloom at the same time, in spring it can be bulbous, then they can be replaced with summer flowers
Pattern "flower" to create an elegant flower bed. Depending on the size, the central part can be occupied by lawn grass, ground cover plants, a layer of gravel or colored decorative sawdust
All schemes have a common point - the middle space is occupied by lawn grass, that is, these are rather large flower beds. If you want to use this pattern to create a small flower bed, the lawn can be replaced with ground cover plants, which are ideal for creating patterns. As plants for such flower beds, flowers that bloom at about the same time are suitable - daisies, zinnias, alpine forget-me-nots, primrose, viola, levkoy.
The “pattern” scheme will allow you to create an original flower bed, a wave pattern can also be an independent flower bed on a lawn or along paths
Oval “royal” flower bed.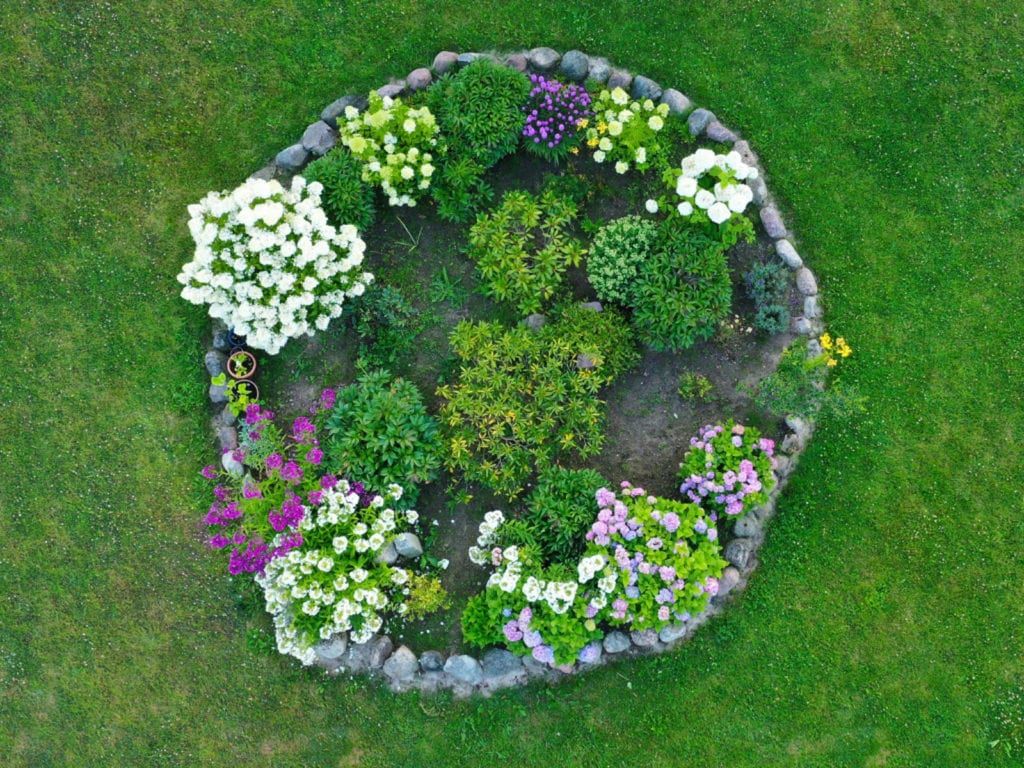 Her scheme is simple, but it will look great as a front flower bed in front of the house or in the center of the garden
When you create a scheme, you need to think about the colors and shades that you want to see in the flower garden. Color combinations in a flower bed can be very diverse. There are no clear recommendations for choosing plants for these flowerbed schemes, you can choose where to plant the flowers you like, how best to combine them with each other.
- Written by sunflower12
Rate this article:
(41 votes, average: 4 out of 5)
Share with friends!
Making flowerbeds and flower beds with your own hands. Perennial flower beds.
Contents
Types of flower beds and flower beds
Flower beds and perennials
What else to plant?
When you have your own large garden plot, you willy-nilly there is a desire to plant it with flowers, shrubs and other plants.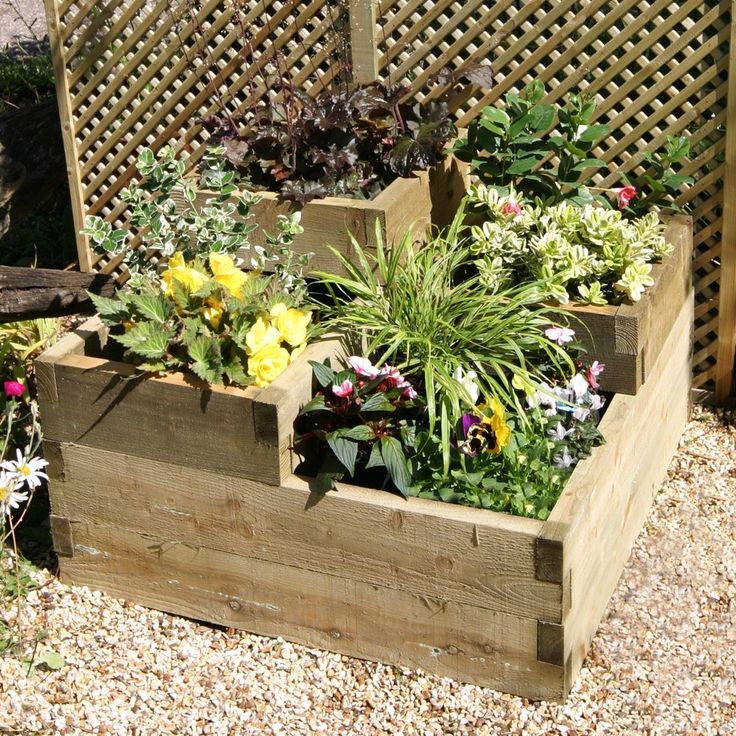 In spring and autumn, when new plants are actively planted, bushes are divided and bulbs are being worked on, it is worth thinking about how your flower beds and flower beds will look.
Types of beds and flower beds
Before we start choosing flowers, let's define what types of beds exist today. Curiously, many of them have names!
Flower bed
What is a flower bed? This is a whole composition of various colors with clear contours. Just it is the main place for the life of flowers and shrubs. When creating it, it is very important to take into account the height of plants, their colors, flowering time, types and many other features.
If you intend to plant perennials in the flower bed, then do not do it in the first year. Surely you have repeatedly had to deal with this situation: you bought beautiful perennial plants, say, blue daisies, and they turned out to be white. An even sadder situation happens with roses, clematis, phlox, etc. Tea, blue, black and two-tone roses, as one, turn out to be red.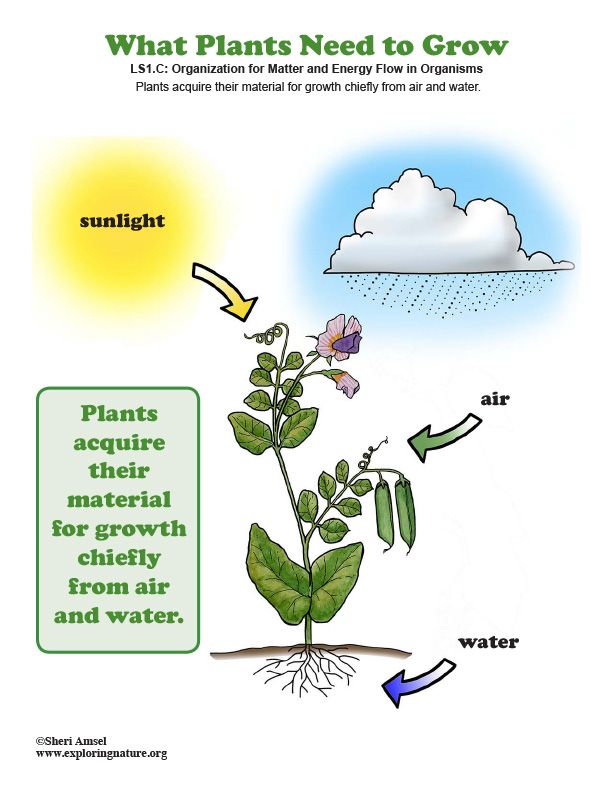 As the housewives themselves joke, the roses “blush” with shame that they turned out to be not what the sellers gave them out for.
Even worse and more offensive is the case with tulips. You create an intricate composition, take into account the colors, and even create a drawing on a flower bed, but in fact you get an indistinct flower cacophony. Alas, the sellers - they are! Therefore, a flower bed should be created only from those flowers with the characteristics of which you are familiar with. As a rule, already in the second year after planting for the first time you will know what color each flower is and what shades it has.
Do you want beautiful flower beds? Then don't plant everything you just bought in them! Most likely, the composition will not work!
Soliter
Landscape designers have long identified a new type of flower garden - a solitaire. In an even grassy carpet, a small recess of any shape is made, into which single plants of the same color are then planted. Roses, hydrangeas, daylilies, tulips, etc. are suitable for this. But there is one "but"! The best tapeworms come from long flowering perennials. Such a bright spot looks amazing on the site.
Border
Another rather successful variant of the floral design of the site is the creation of a border. This is a long narrow flower bed, which is planted with undersized plants. It is this design that can often be seen on city streets. But even here seeds bought on the market can play a cruel joke with you. The best solution for decorating borders would be to buy ready-made (preferably flowering) seedlings in specialized stores. In the fall, you can collect yourself, and next year create your own border from your plants. Borders look best as a contrasting frame for flower beds, although they look good separately from them. Violets, crocuses, lobelias, alisum and many other plants are suitable for the border, the height of which does not exceed 25 centimeters.
If your border will be a separate element on the site, then be puzzled by buying seedlings that will bloom for a long time.
Rabatka
Rabatka and curbs have a lot in common. Both are long and narrow beds, but the beds are longer. They are framed by paths near the house, fences, houses. In this case, the color of the plants does not matter much. They can alternate, replace each other along the entire length, and can be planted in slender long rows in height. You can choose any flowers for them, but do not forget about their compatibility.
Mixborder
So-called mixborders have become very popular today. Flower beds of this type are very colorful, bright and harmonious. Of course, provided that you choose all the flowers for them wisely. That is, their flowers should bloom simultaneously, and not gradually, forming a bright cascade of colors. Tulips of different varieties look great in mixborders in combination, for example, with hyacinths.
Rosary
Needless to say - everything is clear! Only roses grow in rose gardens and not always of the same variety. Classic, climbing, park, standard . .. There are many of them. You can choose different varieties and just plant in a certain order. Use different ideas. In the center of the composition of the rose garden, you can plant a standard rose. It will grow on a thin stalk and bloom in a large lush ball. Climbing roses on a metal frame look good in the center.
The rosary always looks very impressive. Roses begin to bloom in June and delight with their beauty until autumn, until frost begins.
Flower beds of perennials
In order for a flower garden to be beautiful and long-lasting, it is very important to achieve a competent combination of perennials, annuals and tuberous plants in it. With a little experience and knowledge behind you, you can make beautiful flower beds in the country with your own hands. What you need for this: a standard garden tool, a dose of inspiration and the desire to turn your backyard into a small flower paradise.
But the most important "tenant" of any flower bed is a perennial. As we said a little earlier, perennial flower beds should not be planted in place in the first year if you are not sure about the color and other characteristics of the plant.
Perennial flowers for the flower bed - a guarantee of long flowering and bright colors from early spring to late autumn. That is why their choice should be given maximum attention. You will have many design ideas!
Astrantia is one of those perennials that you should definitely pay attention to. Plants are unpretentious, but do not like the lack of moisture. Willingly coexist with stones and live on clay soils.
Remont carnation has become very popular. Of course, she is a very capricious lady, and the soil will have to be picked up and fed, but the plant will certainly thank you for your attention and care with lush flowering.
Phloxes are the favorites of many gardeners. It is enough to plant in a row of several varieties, and your site will almost always look festive. Phlox, by the way, are completely different.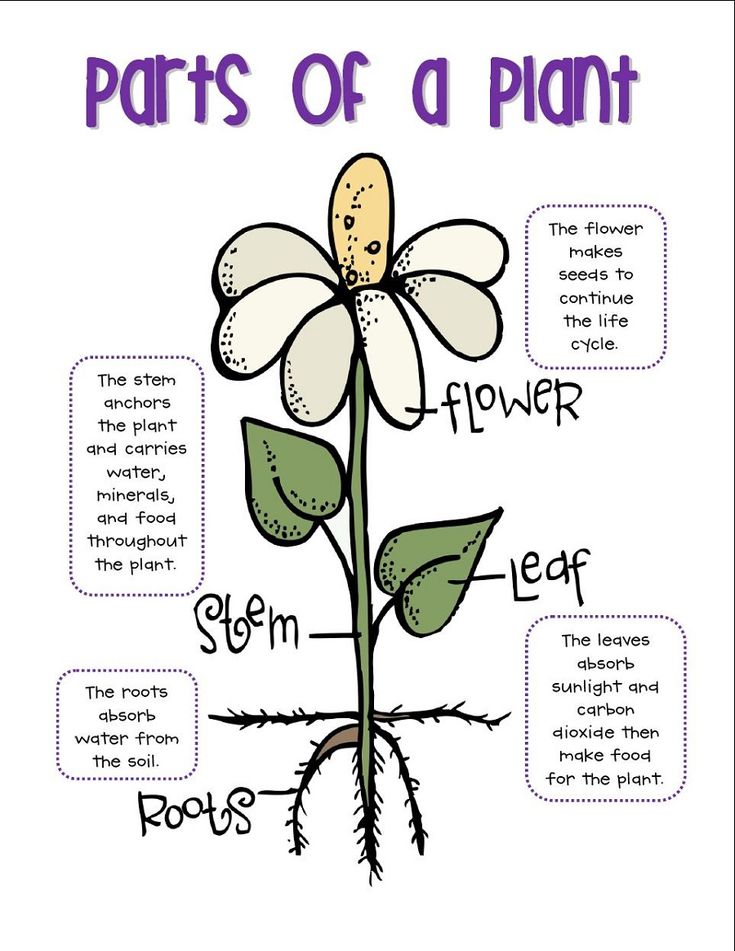 Most of us are used to seeing a purple hat on a long peduncle on a plot. But phloxes are both dwarf and multicolor. You just need to aim and look. By the way, few people know that phloxes are drought-resistant plants. And if you can’t water the flower bed constantly and it doesn’t rain, you don’t have to worry about these plants - they will continue to bloom, while many others will wither!
Chrysanthemums should also be classified as country favorites. Very unpretentious, easy to care for, they effectively and for a long time delight the eye with their flowering. Often they are planted in cemeteries: a simpler and more beautiful flower cannot be found. Chrysanthemums are planted at almost any time of the year. The snow has come down, and the plants can already be sent to the ground - they are also not afraid of the cold.
It is very important to plant drought-resistant plants in the flower bed. And it doesn’t matter if the flowerbed is located next to your house or in the country, where you cannot go all the time. Remember that the composition should include both tall and short plants. Among perennials, it is worth highlighting euphorbia, stonecrop, sage, sapling, eryngium, gaillardia, lavender, mallow.
What else to plant?
Flower beds would be incomplete without annuals. Here the choice can be unlimited, but if you intend to create a bright flower arrangement, then remember the poor quality of the seeds offered in our markets. To cheat summer residents is the task of many sellers. And then look for the fistula of a seller who, under the guise of an exquisite petunia, sold the seeds of a field grass or weed. But this is more of a rarity than a rule. Annual plants should be planted in the center of the flower bed, while perennials go to their place of permanent residence for several years, so it is better to plant them near the wall.
It is very important to learn the names of colors! Very often one plant has several names. Let's say you ask the seller for buttercup roots, and they tell you that they don't have it, although there is a bag of ranunculus on the counter, which is essentially the same thing. For example, snapdragons are also called antirium, and convovulus - bindweed, amaranth - amaranth, etc.
The design of a flower bed largely depends on the type of plants, so try to correctly combine them in the flower bed. A low-growing purslane can be framed with a stone border, and other plants can be planted deeper into the flower bed. By the way, just stones can make excellent solutions for your site.
The design of the flower bed is also inspired by the scheme of planting flowers. Before you make a flower garden and arrange it with plants, it will not be superfluous to draw the location of the plants on paper and carefully consider where the perennials will be planted, where undersized flowers will find their place, how to arrange borders and borders. Think how beautiful it can turn out if everything is done right! To avoid mistakes, it is not superfluous to study photos on the Internet. There you will surely find hundreds of ideas on how to decorate a flower bed, how to make it original and what plants to use when decorating.