How deep do you plant sweet potato slips
How To Grow Sweet Potato Slips
Growing your own delicious crop of sweet potatoes is easy, fun and inexpensive – especially when you can start your own plants from homemade sweet potato slips!
Sweet potatoes have certainly grown more popular then ever. Not only are they an incredible source of vitamins and essential fiber, they also have a lower sugar index than traditional white potatoes, making them quite the healthy choice.
And as their popularity has grown, so has interest in growing them right at home in the backyard garden.
And why not! Beyond their nutritional value, sweet potatoes are easy to plant, grow and harvest. Even better, as a root crop, they can be stored and kept to use deep into the winter months.
Sweet potatoes perform well using all kinds of growing methods. They grow will in traditional gardens, raised beds, and even straw bales and containers.Here is a look at how to grow your own sweet potatoes, including how to create your own “seed” by making sweet potato slips. Be sure as well to check out this week’s new podcast on Making Great Compost at the end of the article
The planting process for sweet potatoes differs from that of traditional potatoes. Traditional potatoes grow from “seed” cut from an existing potato.
The seeds of regular potatoes are actually a portion of the tuber that contains at least one “eye” or bud. And when planted in the soil, the eye then sprouts stems and leaves.
But sweet potatoes are not grown from planting an eye or bud. Instead of using a portion of the potato, you use the roots that sprout from a sweet potato.
These roots are known as slips, and are quite easy to grow from an existing sweet potato. In fact, it’s so easy, it can all be done right on your kitchen or dining room windowsill.
How To Grow Your Own Slips
There are several proven methods of growing slips from an existing sweet potato. But for us, nothing beats the ease of the ol’ toothpick, water and mason jar trick.
First, start with a good, healthy organic sweet potato. Why organic? Because non-organic sweet potatoes are often treated with chemicals that will prevent sprouting.
Using an organic sweet potato, you can grow countless slips that can then be planted to grow sweet potatoes. The sweet potato will continue to produce additional slips from the same eye if left in the water.You can leave the sweet potato whole, but we use larger sweet potatoes and cut them in half to make two separate slip growing jars. We have used both methods, but always feel the cut ends help speed up the top sprouting process.
Next, stick in a few toothpicks just below the half way point near the bottom of the sweet potato. Place the toothpicks in a line around the circumference of the potato.
Finish by filling a mason jar with tap water (non-treated water) and rest the sweet potato down into the jar on the toothpicks. For best results, make sure that a bit more than 1/2 of the potato is out of the water.
Now it’s time to put your jar into a sunny warm window and let the magic happen!
Developing Your Potato Slips
The sweet potato will develop a few stringy roots below the water first. Then in a few weeks, it will begin to sprout stems and foliage from the top.
Allow the slips to reach around 4″ in length before removing to root in water. They need to develop a good set of leaves to help the re-root when removed from the sweet potato.Allow the stems to grow until they reach about 4″ in length. Then carefully remove the stems from the base of the sweet potato with a slight twist. Be gentle, but don’t worry if it breaks off a bit in the process.
Next, place the end of the stems down into another jar filled with water. The stems will float a bit, and that is fine. Just be sure the slips are not completely under water.
In a few days, the ends will begin to form roots, and your slips will begin to grow up! Allow them to continue growing and fill out right up until planting day.
The best part of all is that your original sweet potato will continue to develop new slips in the same location as your old slips develop. Using this method, you can create several rounds of slips before it’s time to plant.
Planting Sweet Potato Slips
Sweet potatoes are vulnerable to frost and cool weather. For this reason, it is best to plant them once the soil warms in late spring, and all threat of frost has passed.
You can plant sweet potatoes in a variety of methods. We actually grow our sweet potatoes in crates and love the ease of the method. But they can also be planted in a traditional garden or raised beds with success as well. See: How To Grow Sweet Potatoes In Crates
Within a few weeks, the slips that were removed from the sweet potato will begin to develop roots under the water. They will continue to grow and develop in the water until it is time for planting.No matter where you plant, good soil is a must! Sweet potatoes thrive on loose, compost-filled soil with plenty of nutrients.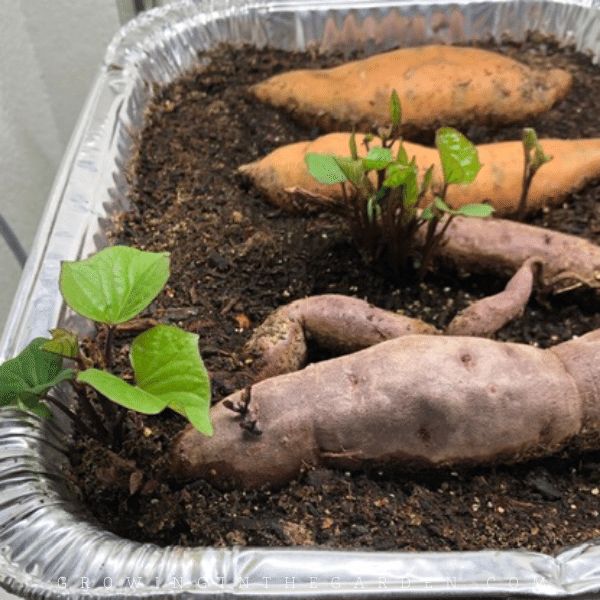
Space the slips when planting 8 to 10″ apart. Always plant your slips at the top of a slight mound of soil. This will keep them from sitting in water and prevent them from rotting off from too much moisture.
Bury at least half of the slip to allow for plenty of rooting. If planting in raised beds or a traditional garden, make sure the soil below is loose and fertile. Amending with compost is always a good idea to promote good root growth.
Within a few weeks, the foliage should begin to grow wild, and your sweet potato crop will be off and running!
Fertilizing and Water
Water the slips well until they become established in the soil. Check daily the first few days for signs of the slip drying out and water if necessary.
Water is important, but be careful not to over-water. If plants begin to yellow, it is usually a sign of over-watering.
Once established in a few weeks, sweet potatoes can benefit greatly from a few applications of liquid fertilizer.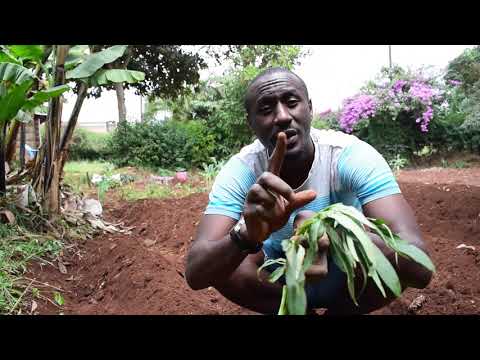 Compost tea, worm casting tea, or a high-quality liquid organic fertilizer will do the trick. See: 5 Great Organic Fertilizers To Power Your Crops
Apply after two to three weeks in soil, and once again a few weeks after that for best results. Once the plants have taken off, back off on fertilizing as it can lead to extensive foliage production up top, but less potato production under the soil.
By mid-fall, plants will usually start to yellow at the ends of the vines. This is a sign that they are ready for harvest. Dig up slowly from the edges to avoid damaging the tubers
Here is to growing your own sweet potatoes from slips this year! Happy Gardening – Jim and Mary
As always, feel free to email us at [email protected] with comments, questions, or to simply say hello! You can sign up for our free email list in the subscribe now box in the middle of this article. Follow us on Facebook here : OWG Facebook. This article may contain affiliate links.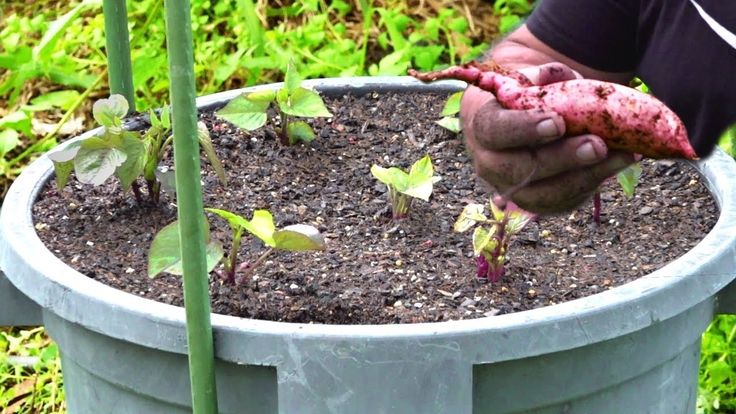
How To Start Sweet Potatoes From Slips
Starting your own sweet potatoes from slips is not only easy to do, it also happens to be one of the best ways to grow healthy, strong and productive plants. Even better, it can help save on your plant budget too!
Sweet potatoes have become so much more than just a Thanksgiving day side dish staple. As an excellent source of Vitamin A & C and with loads of potassium, fiber and manganese – the humble sweet potato is at the top of the list when it comes to selecting healthy vegetables to grow in your garden.
Along with their long list of nutritional benefits, sweet potatoes can also deliver some amazing flavors to a wide range of dishes. Because of that, they have been finding their way into more backyard gardens with each passing year.
Growing your own delicious harvest of sweet potatoes is easy. And when you grow all of your own slips (transplants), it can also be extremely cost effective too!Growing sweet potatoes is a bit different than growing regular potatoes.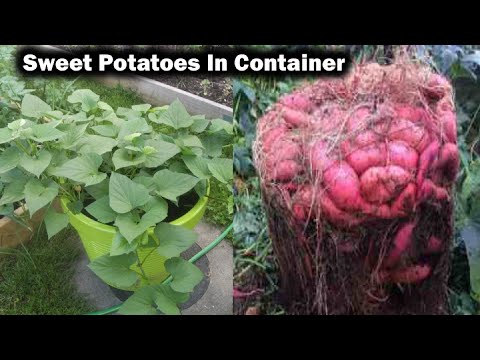 Traditional potatoes are sold and planted as “seed” potatoes. To plant a potato, you can simply cut “seed” from a portion of a potato that contains a sprout or two (known as eyes), and then place in the ground.
A traditional potato will then grow stems and leaves from the eyes. As a result, a new potato plant emerges above ground. Underground, new potatoes then form off the roots.
However, with sweet potatoes, the process for creating and planting seed is a bit different. Instead of growing from portions of a potato planted in the ground, sweet potatoes grow from slips.
Starting Sweet Potato Slips
So what are sweet potato slips? Slips are are miniature sweet potato plants that grow from the roots of an existing sweet potato.
Slips will usually be four to six inches long with a few sets of leaves up top. They are then planted much like any other vegetable transplant would be into the garden, and new sweet potatoes form from the roots below.
A sweet potato slip is a mini sweet potato plant created from the roots of an existing sweet potato. They can be grown in water or soil before planting.
Slips can be purchased as a bare root transplant, or in a traditional soil cell for planting. That is, if you can find them. Unfortunately, sweet potato slips can often be hard to source locally in stores. But luckily, growing your own is not only easy, but fun to do as well!
Sweet potato slips can be started from an existing sweet potato using soil or water as the growing medium. You will want to start your slips about 6 weeks ahead of time to give them plenty of time to grow before planting outside.
No matter which method you use for starting (water or soil), always use an organic, untreated sweet potato. Many times, stores will treat non-organic sweet potatoes with a root prevention substance for longer storage. Unfortunately, that treatment will keep your sweet potato from growing slips.
Starting Sweet Potato Slips In Soil
If starting in soil, fill your container about half full of soil. Place an unblemished whole sweet potato half way into the soil.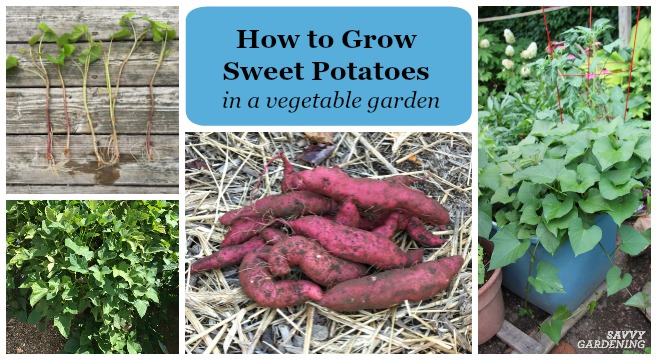 Lay the sweet potato on its side. The soil should be damp, but not saturated.
Leave in the warmest room possible as the warmer the soil, the quicker the sweet potato will produce slip sprouts. Placing the container on a heating mat will speed the process up even more. Place in a sunny location where the potato can receive light at least six hours a day.
Usually within two weeks, you will begin to see new slips forming and shooting up. Continue to keep the soil moist.
Once your slips get to around four to six inches, break off the slip at the base of the potato and place into water (distilled or tap) to root. Continue to keep the slips in sunlight or artificial light each day.
Once roots form, you can plant into soil to create soil transplants, or leave in the water to create bare root transplants. Your original sweet potato will continue to grow new slips that you can continue to break off and start more slips as needed.
Starting Sweet Potato Slips In Water
You can also create your slips entirely in water if you wish. For this process, you can submerge a sweet potato in a jar of distilled or tap water.
Place a couple of toothpicks into the potato, and allow them to rest on the side of the jar. Insert the toothpicks so that about 1/2 of the sweet potato is under water. Place in the warmest room of your house to speed germination. Place the jar in a location that receives at least 6 hours of light each day.
Just as with the soil planted slips, you will usually see slips develop at the top of the sweet potato within 2 weeks. Again, allow them to grow to around 4 to 6 inches before snapping off at the base and placing into water to root.
Some gardeners will cut the sweet potato in half if it is too big, we prefer to leave ours whole when submerging into the water.Once roots form, you can plant back into soil, or leave in the water for bare root transplants. Both soil and bare root work well when transplanting into the garden, it really comes down to a matter of personal preference.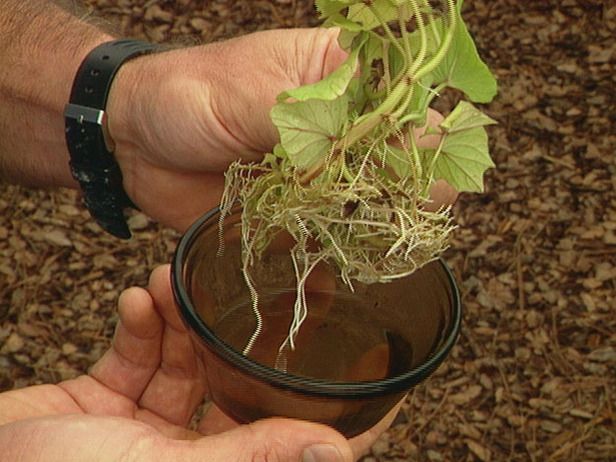
How To Plant And Grow Sweet Potatoes
The best time to plant sweet potatoes is in late spring to early summer. Although you can plant traditional potatoes in early spring, sweet potatoes need a bit warmer soil.
Plan your slip growing to coincide with planting day, allowing anywhere from 6 to 8 total weeks of growing time before you want to plant. One thing is for sure, they are highly frost sensitive, so let the weather warm first!
Sweet potatoes grow best in loose fertile soil. Adding a bit of compost to each planting hole goes a long way towards success. To plant, place slips 6 inches deep in the soil. Space each slip about 12 inches apart to allow the roots and tubers room to expand and grow.
It is best to mound the soil a bit before planting. Create a small mound at each hole about 3 to 4 inches in height at the middle. Bury each slip in the soil all the way to the top set of leaves. Once planted, tamp the soil down around the top of each plant.
You can also plant sweet potatoes in containers or crates with success.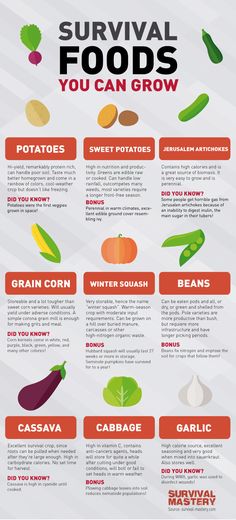 This can allow for easy growing with little need for weeding or extra maintenance. See : How To Grow Sweet Potatoes In Crates With Ease
Maintaining Plants In The Summer – How To Start & Grow Sweet Potatoes From Slips
Sweet potatoes need water to grow to proper size. With that in mind, water plants at least twice a week if there is little rain, especially the first few weeks after planting.
It is a good idea to mulch plants as soon as you plant. Place a three to four inch layer of straw, grass clippings, or shredded leaves around each plant helps to conserve water and keep weeds at bay. Once the plants begin to grow, their massive leaf structure will suppress the majority of weeds.
Harvest Time – How To Start & Grow Sweet Potatoes From Slips
You can start to harvest sweet potatoes as soon as the plants begin to yellow. However, the longer they stay in the ground, the more they will continue to develop additional flavor.
You can partially harvest well up until the threat of frost.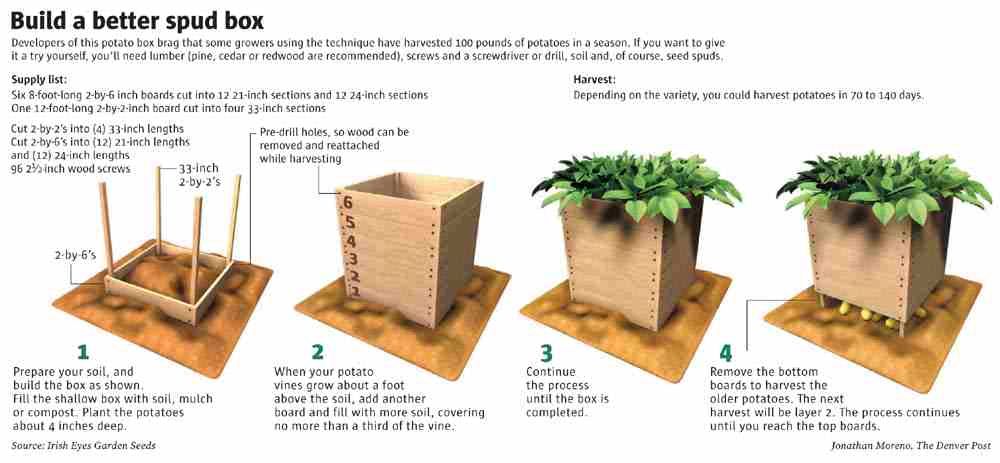 This is a great method to take only what you will be using until you are ready for a full harvest.
Another great benefit to growing sweet potatoes is that they can store for a long time if kept in a cool, dark place. But before storing, they will have to go through a curing process first. Curing is a simple process of letting sweet potatoes dry out completely before moving to long-term storage.
In addition to preparing them for long-term storage, curing also aids in sweetening the potatoes up. To cure, begin by gently brushing all of the soil off of the skins. Do this without water as they will store much better by not allowing them to become wet.
Long Term Storage
Once brushed off, place in a well-ventilated but warm spot for 10 to 15 days. A back porch, barn or garage are all great places to cure. After the curing period, the sweet potatoes are then ready to find a cool, dark spot for long-term storage.
Here is to starting your own sweet potato slips from seed this year, and to growing an incredible crop!
This Is My Garden is a garden website created by gardeners, for gardeners. We publish two articles every week, 52 weeks a year. Sign up today to follow via email, or follow along on Facebook here : This Is My Garden. This article may contain affiliate links.
Results of growing sweet potatoes in 2013 • Diary of a gardener
April 26, 2013. 11 varieties of sweet potato planted for germination.
Sweet potato ...
This year we have grown 11 varieties of this wonderful vegetable:
1. Georgia Jet
2. Tainung 65
3. Purple
4. Pobeda-100
5. Beauregard 90 6. 9000 improved Manchurian unknown
8. Garnet
9. Red ginseng
10. Orange unknown
11. and new for us - the White Unknown variety, which came to us from Khakassia.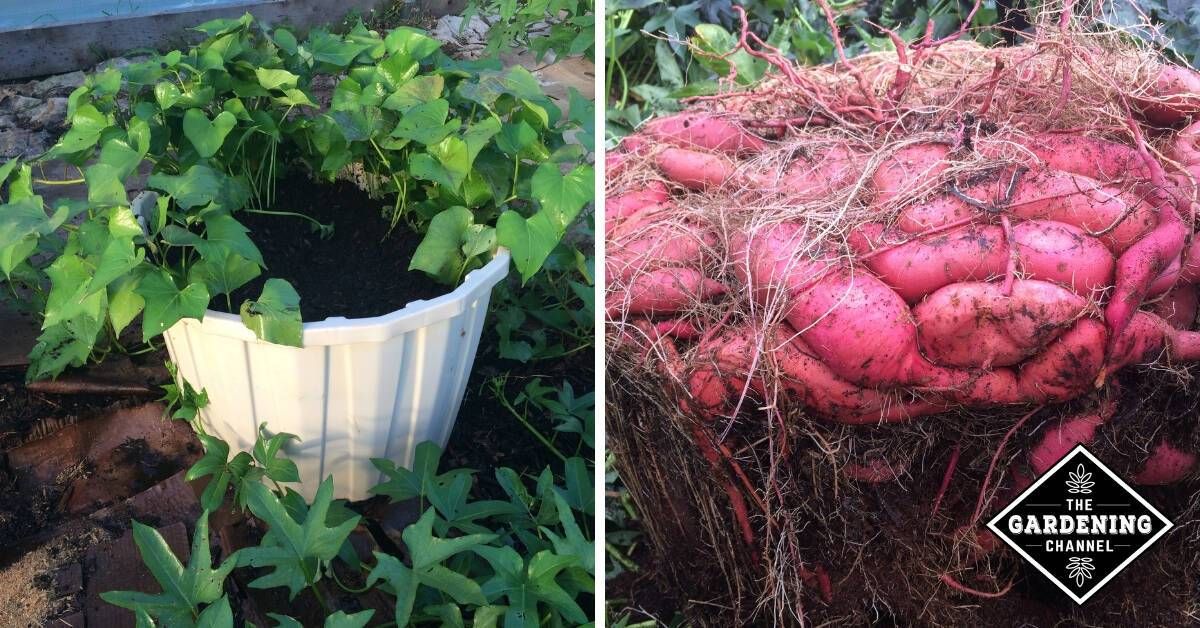
An overview of 2012 varieties can be found here.
Well, now, finally, let's start from the beginning and in order: sweet potato 2013 ...
Growing features and errors
This time we were late with the germination of tubers.
We "remembered" them only after April 20, which led to a delay in the landing. Georgia Jet (our favorite) and Beauregard improved were especially unlucky. The tubers of these varieties did not release a single sprout during the winter, which is great for storage, but absolutely inconvenient for growing seedlings - it took time for the tubers to "wake up".
In general, by the beginning of May, most of the sprouts were not ready for planting, so sweet potatoes were planted gradually from 14 to 25 May . This is a huge and stupid mistake made this year. And if it were the only one...
We also did not take care of warming up the soil before planting and installing temporary film shelters after (for the time of establishment and the beginning of growth).
It turned out to be a kind of experiment. We thought, what if we bother with shelters in May in vain? Sweet potatoes do not die on the cold nights of May, so maybe all sorts of warming up and shelters are all a waste of time and effort?
The result of this experiment was: growth retardation and deep tubers. Alas. Sweet potato loves warmth, especially at the initial stage of growth. Therefore, if it is important to get the maximum yield, convenient for digging, in our climate you can’t do without shelters in May.
Growing errors include planting next to tall and branchy crops. Without foreseeing the impact of abundant watering on soybeans, we planted sweet potatoes in the beds adjacent to it. “The sweet potato will be fine, because the soybeans won’t take up much space, the aisles are at the disposal of the sweet potato!” we thought.
It turned out that soybean is able to completely drown out the sweet potato, aggressively branching into the passages ...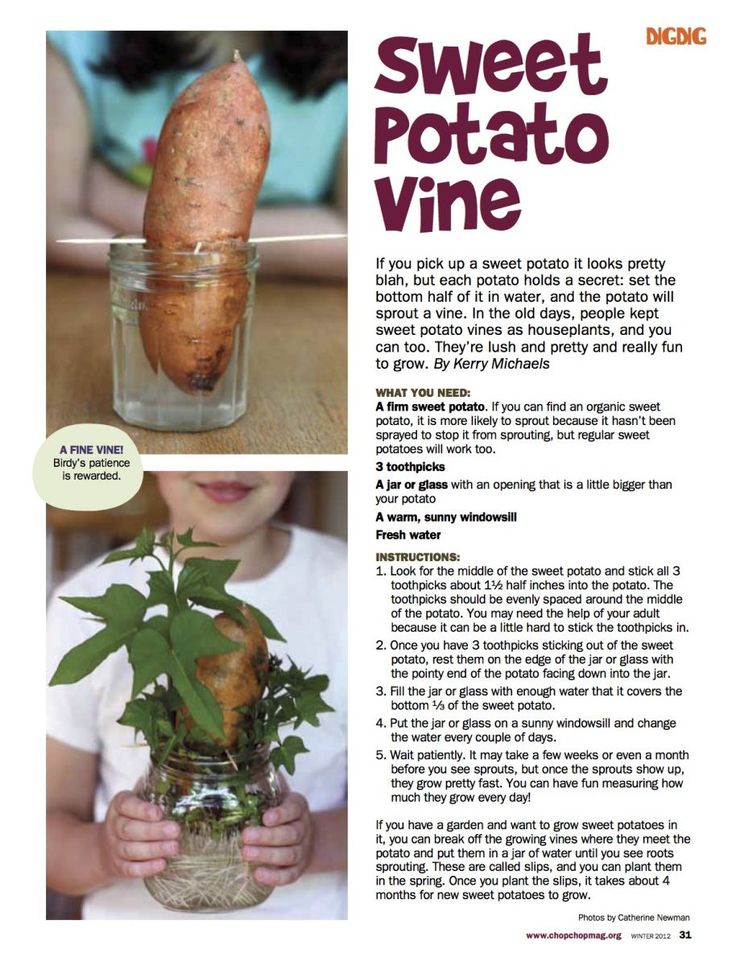 Well, tall corn and cowpea on supports added "joy", completely obscuring the low sweet potato from the east and west. How he managed to receive light is not clear. If there is no light, there will be no harvest.
July 22, 2013. Potato ridges mixed with cowpea, cabbage, soybeans and corn.
August 20, 2013 (1 month later). Solid thickets ...
There is one more mistake that I want to highlight in bold and frame with exclamation marks ...
Vole ! More precisely, the lack of measures to combat it. Last year it multiplied beautifully in our garden. And if it exists, it is necessary to fight it, not help it. Extensive, dense thickets make for a beautiful natural landscape for hiding, and the bonus of sweet, edible roots makes our "yam" garden a paradise for voles. Indeed, in 2012, we planted practically nothing except sweet potato ...
As a result, this year she dug up the entire B-plot (last year it was completely occupied by sweet potato), and began to devour the crop.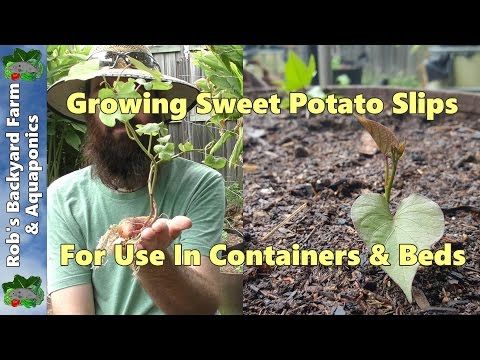 She gnawed through the drip tape in several places, making moves right along the ridges ... and almost ate all of our sweet potatoes. She also ate purple potatoes, ate some soybeans, and even nibbled on some tomatoes.
We will take action. :-[
As for this year's sweet potato yield... We don't know. They didn’t weigh it, because it’s not informative. Sometimes you dig up a bush, and you see only gnawed roots.
Therefore, hereinafter only visual impressions, by variety.
Tainung 65
April 19, 2013. Overwintered Tainung 65 (Tainung 65) sweet potato tubers are ready for germination.
September 6, 2013. Harvest of a couple of Tainung sweet potato bushes 65.
One of our best varieties both in terms of taste and yield! Despite the cold summer, visually gave large tubers, though elongated and deeply located ("thanks" to the lack of shelters in May).
Tainung is a beast! It grows by leaps and bounds, capturing the territory around it up to 4 meters.
Georgia Jet
19 April. Georgia Jet tubers are ready for sprouting.
20 August. Sweet Georgia Jet is sandwiched between ridges of tall soybeans.
September 4, 2013. A crop of several bushes of Georgia Jet yam is mercilessly devoured by a vole.
The Georgia Jet lay beautifully through the winter without a sprout. But it took a very long time and hard to grow. Therefore, our favorite of all varieties turned out to be “offended”, and planted with the very last, small cuttings.
Moreover, the ridge was squeezed on both sides by soybeans... The sweet potato did not get a place under the sun.
It's a shame that we still haven't learned about the maximum possibilities of this variety.
Purple
April 19, 2013. Overwintered sweet potato tubers of the Purple variety.
6 September. Everything that the vole left us (from 4.5 meters of a narrow ridge).
And again the vole. This is probably the most favorite variety of these rodents. A tunnel stretched along the ridge, and we don’t even know how many (and at what stage) the tubers were gobbled up: extensive voids-cavities were observed under the bushes.
But even if we ignore the vole, it is clear that this variety did not have enough heat for growth: the tubers are again thin, brittle. Perhaps if we had used shelters in May and given him an extra two weeks of growth, the result would have been different. But alas ... Purple is still at the bottom of the yield rating.
Victory 100
Planting material of sweet potato variety Pobeda 100.
4 September. Harvest from 12 sweet potato bushes variety Pobeda 100…
An old proven variety. Gave tubers of acceptable size, but did not reach the yield of 2012 ...
White unknown
April 19, 2013. Planting material of sweet potato variety "White Unknown".
July 15, 2013. The shape of the leaves of the sweet potato "White Unknown".
September 6, 2013.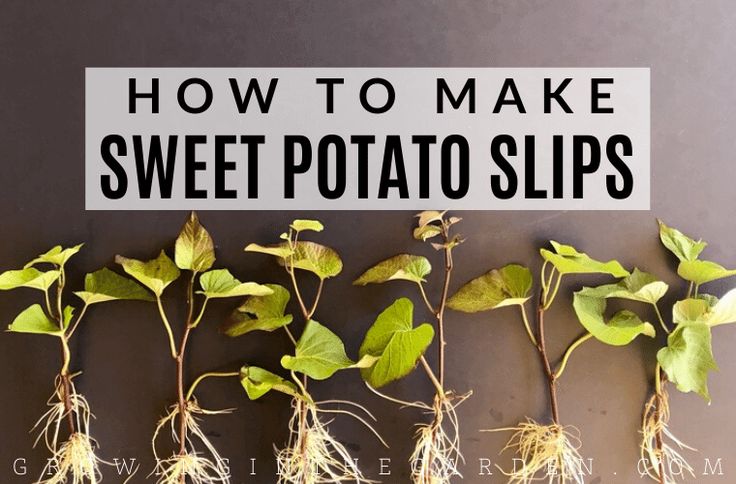 Harvest of several bushes of White Unknown sweet potato.
New variety. (Thank you, Olga!)
He attracted us with his maximum tastelessness (as far as it is possible for a sweet potato). :)
Has white, dry flesh. It proved to be excellent in soups, as it is practically indistinguishable from potatoes both in texture and taste. It is very interesting how the taste will change by spring.
Productivity is comparable to Pobeda-100. Most likely, you can achieve better results in a warmer summer, by early planting in early May under temporary shelters.
Beauregard Improved
April 19, 2013. Overwintered tubers of Beauregard Improved sweet potato
September 6, 2013. Harvest of 7 bushes of Beauregard improved sweet potato.
Just two words: I didn't have time. "Beauregard Improved" simply did not have time to build up mass. Gave a lot of long medium tubers.
Garnet
April 19, 2013. Planting material - sweet potato tubers of the Garnet variety.
September 4, 2013. Harvest from 8 sweet potato bushes Garnet.
Showed itself better than in the June planting last year. The shape of the tubers is similar to Beauregard. Perhaps you need to try to compete for next year's yield.
Bushbok
April 19, 2013. Planting material - sweet potato tubers of the Bushbok variety.
September 6, 2013. All that was left of 6 Bushbuck sweet potato bushes…
There were only three bushes of this variety. No yield. Apparently, the variety is still more suitable for a warmer climate. The variety is under the question of further reproduction.
Manchurian unknown
April 19, 2013. Planting material - sweet potato tubers of the Manchurian Unknown variety.
September 6, 2013. Harvest of 3 bushes of sweet potato variety "Manchurian unknown".
This bush variety was again strangled by Tainung 65. They planted only to update the planting material. Candidate for removal from the list of varieties due to taste (the most "liquid" sweet potato).
Red ginseng
April 19, 2013. Planting material - sweet potato tubers of the "Red Ginseng" variety.
September 4, 2013. "Harvest" of 3 bushes of sweet potato "Red Ginseng".
Oh. I don't even want to comment. The variety is clearly not for our climate. Here, either you need to plant in soil covered with a film, or not plant at all ...
Orange unknown (Unkor, Unknown Orange)
April 19, 2013. Planting stock of sweet potato of an unknown variety with orange pulp (Unknown Orange)
Almost a copy of "Beauregard improved" in terms of tubers, it differs only in green mass and taste (more "watery").
Yield cannot be determined - devoured by vole.
To summarize
This year can be considered not very successful for sweet potato.
Even if we ignore our mistakes, in general, the summer of 2013 was not very warm, the autumn rainy coolness began already in the second half of July. The sweet potato did not manage to gain enough mass, including the green one (blooming varieties did not really bloom). Well, the vole added "fun".
In general, next year we plan to start fighting the vole, namely:
- we will minimize the planting of root crops
- We will protect the sweet potato ridge from the penetration of voles (for example, we will lay a metal mesh underground along the perimeter of the ridge)
- set sticky traps near their holes (exits)
- dig the entire area in the spring and mark the ridges again, leaving more space in the passages
We really hope that all these measures will reduce the number of rodents and will finally make it possible to realistically assess the yield potential of new varieties.
See you soon!
15 recipes with sweet potatoes from Yulia Vysotskaya. Cooking articles and life hacks
“The sweet potato, or, as it is also called, the sweet potato, is a wonderful thing. If you like mashed soups, be sure to try making sweet potato soup, it is sometimes even tastier than pumpkin mashed soup. The difference is that sweet potatoes are really sweet, but you can miss pumpkin, you never know what kind it is and whether it will be so sugary. If you don’t like soups, make a thick sweet potato puree, this is a very good substitute for ordinary potatoes, it turns out a wonderful side dish for chicken or meat cutlets, ”Julia Vysotskaya shares her advice.
If you haven't tried sweet potatoes yet, be sure to cook something from our selection. Let's discover new flavors together!
Winter tart
You can use any vegetables for the filling. Yulia Vysotskaya chose sweet potato, zucchini, sweet pepper and eggplant. Also, the dish is well complemented by pumpkin or celery root. And if you have a fresh bay leaf, then the tart will turn out even more fragrant!
Detailed recipe.
Rice with sweet potato, cranberry and pomegranate
Sweet potato cooks twice as fast as potatoes. Slices need 15-20 minutes in the oven to brown and become soft. Ordinary tubers would have to bake for at least 30 minutes. To make the sweet potato even more interesting in the dish, you can pour it with balsamic vinegar or liquid honey.
Detailed recipe.
Fish casserole
Catfish, cod, walleye pollock or sea bass can be used as a base. The fish must be divided into large pieces. A sauce based on butter, flour, vegetable broth, milk and lemon juice is a good addition to small shrimps. For a vegetable pillow, you can use not only sweet potato, zucchini and potatoes, but also cauliflower, pumpkin or carrots.
Detailed recipe.
Sweet potato soup
First, the onion and garlic are fried in a mixture of olive oil and butter. Then sweet potato is introduced into the pan, everything is poured with broth and boiled for 15 minutes. It remains to add curry, half a can of beans and turn the mixture into a smooth puree. The remaining beans will dilute the silky texture of the dish a little. To serve, the soup is garnished with yogurt and cilantro.
Detailed recipe.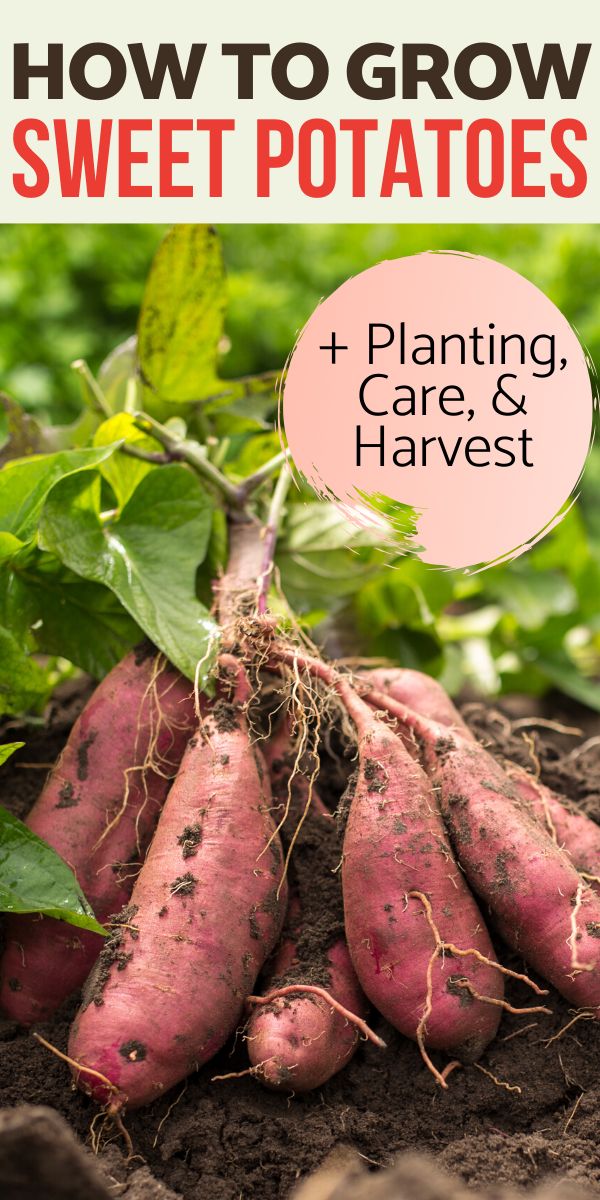
Sweet potato and quinoa meatballs
It is important here to take equal portions of sweet potato and quinoa. The cereal can be slightly calcined before cooking, then the product will acquire subtle nutty notes in taste. Instead of thyme, a mixture of Provence herbs is suitable. These meatballs go well with sour cream.
Detailed recipe.
Baked vegetables with walnut pesto
Pesto is a sauce with many faces. Based on the basic recipe, you can come up with your own unique variations. For example, Julia Vysotskaya recommends replacing pine nuts with walnuts, and adding parsley to basil. Any other hard cheese will work in place of Parmesan.
Detailed recipe.
Caramelized Sweet Potato
If sweet potato is cut into strips, covered with cold water, and after 5 minutes fried in a wok in vegetable oil, you will get an original snack. It remains only to pour the slices with honey glaze and sprinkle with sesame seeds. In the same way, you can cook pumpkin and carrots.
Detailed recipe.
Parmesan, Sweet Potato, and Red Onion Frittata
Caramelized onions, boiled sweet potatoes, feta, herbs, and Parmesan egg dip make this hearty treat perfect for a hearty breakfast or protein dinner. Don't be afraid to experiment! Replace feta with brynza or white cheese, add some bacon or hunting sausages, and, of course, try different vegetable combinations.
Detailed recipe.
Sea bass with fennel and baked sweet potatoes
Agree, the garnish is as important as the main product. Batat is perfect here too. He will delicately complement the fish, but will not distract from the main character. For a more intense flavor, you can add orange or lemon zest to the herbs. If you don't have fresh thyme on hand, use dried thyme.
Detailed recipe.
Two types of potato gratin
And this dish will turn out tasty and effective. The main thing is to follow the sequence so as not to break the "zebra" of slices of different colors. Bake the gratin for 30-35 minutes under foil. Then the leaf is removed and the treat is simmered for another 10 minutes until a golden crust forms.
Detailed recipe.
Chicken wings baked in a spicy sweet potato sauce
Sweet potatoes go well with poultry. Especially if you first fry the chicken, then add vegetables and seasonings, lightly stew and bake with pieces of sweet potato. Remember, the finer the ginger is chopped, the brighter it will feel. Nam Pla sauce can be substituted with extra soy sauce.
Detailed recipe.
Carrot and sweet potato pancakes with feta
Spinach can be added to the mixture for a more interesting texture. The flour will also slightly compact the mass. If you like a treat with a crispy crust, then instead of a whole egg, it is better to take one protein. While the potato pancakes are cooling, you can prepare a sauce based on sour cream, mint, maple syrup and lemon juice.
Detailed recipe.
Fried eggs with sausage, sweet potato and hot peppers
Fans of original dishes will appreciate this fried egg.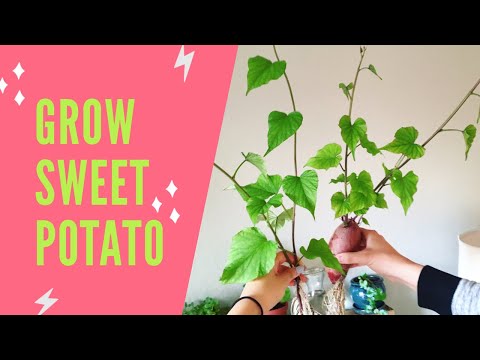 Any pepper will do: hot will add piquancy, sweet will emphasize the vegetable component. The choice of sausage is also unlimited: smoked sausage will add “smoke”, boiled sausage will add the usual meaty notes. After 5 minutes of baking in the oven, it remains to decorate the scrambled eggs with herbs and serve.
Detailed recipe.
Sweet potato baked in foil
Many have enjoyed stuffed potatoes more than once. Julia Vysotskaya offers to repeat the famous treat, but in a more unusual format. Instead of potatoes, you will need sweet potatoes. The tubers are baked at 190°C for 30–40 minutes. The TV presenter adds butter to the pulp and serves, but you can come up with your own original filling.
Detailed recipe.
Sweet Potato Chips
When it comes to pampering yourself with snacks, we advise you to choose homemade treats. For example, these sweet potato chips. Sweet potatoes are cut into large cubes, then the pieces will acquire a crispy crust, but retain a soft core.