Grow sweet potatoes from slips
How To Make Sweet Potato Slips – Producing A Slip From A Sweet Potato
Home › Edible Gardens › Vegetables › Sweet Potatoes
Sweet Potatoes
By: Amy Grant
Image by natalie_board
Unlike potatoes (which are tubers), sweet potatoes are roots and, as such, are propagated via a slip. What is a sweet potato slip? A slip from a sweet potato is simply a sweet potato sprout. Sounds simple enough, but how do you get sweet potato slips? If you’re interested in sweet potato slip growing read on to learn more.
What is a Sweet Potato Slip?
Sweet potatoes are members of the morning glory or Convolvulaceae family. They are grown not only for their edible, nutrient-rich roots but for their trailing vines and colorful blooms. Given that sweet potatoes are from a different family than regular spuds, it’s no wonder that propagation is different.
Regular potatoes are grown from ‘seed’ potatoes, but sweet potatoes (Ipomoea batatas) are grown from sweet potato sprouts or slips. Sweet potato slip growing is really just coaxing a rooted sprout from a mature sweet potato. Slips can be purchased, or you can learn how to get sweet potato slips to grow yourself.
How to Make Sweet Potato Slips
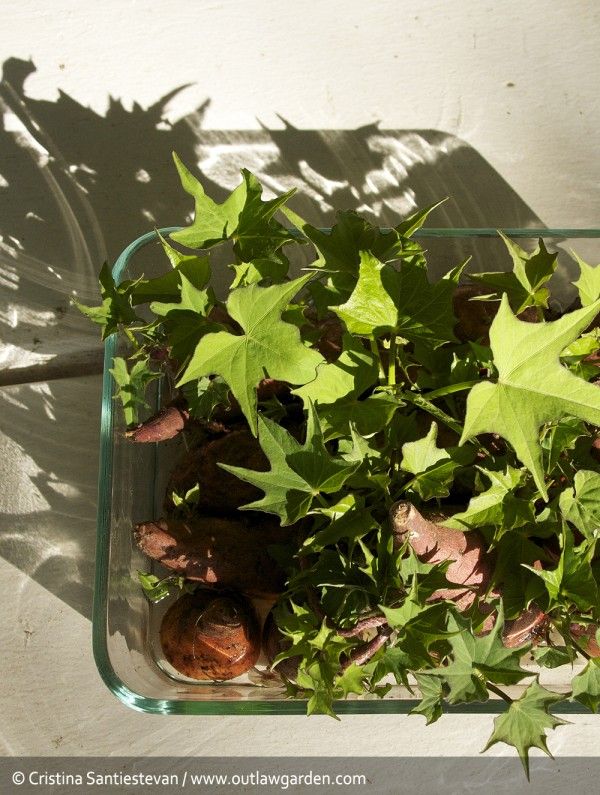
Sweet potato slips can be started in two ways, in water or in the dirt. Of course, both propagation methods work, but starting a slip from a sweet potato in dirt is the more rapid method. If using a sweet potato from the store, buy an organic one that is less likely to have been treated.
A single sweet potato can grow around 15 slips or more which, in turn, equals 15 plants that will produce about 60 sweet potatoes.
The first method of starting in water is a bit reminiscent of starting an avocado from a pit. Submerge half a sweet potato in water, root end in the water. Use toothpicks to keep the entire potato from becoming submerged.
Not sure which end is the root end? The rooting end will taper and have small roots and the other end of the potato will be larger with more ends. Roots will form in the submerged rooting end and sprouts will appear in the top end.
Place the sweet potato in water on a germination mat or atop the refrigerator. Keep an eye on the water and replenish it as needed. In a few weeks or so you should see the beginnings of roots. A week or so from then, sprouts should begin to form.
The other method of starting slips is to lay a sweet potato lengthwise on a bed of seedless soil mix or potting soil and bury half the sweet potato in the medium. Keep the soil moist and in a warm place or atop a germination mat.
Sweet Potato Slip Growing
In either case, once sprouts are 5 to 6 inches long (13-15 cm.), it is time to move on to the next step. Gently remove the sprouts from the sweet potato by twisting or cutting them off. Remove the lower leaves from the sprout and place the partially denuded sprout in water in a warm area with plenty of sunlight or with a grow light. Keep the water replenished as needed.
Once the roots are 4 inches (10 cm.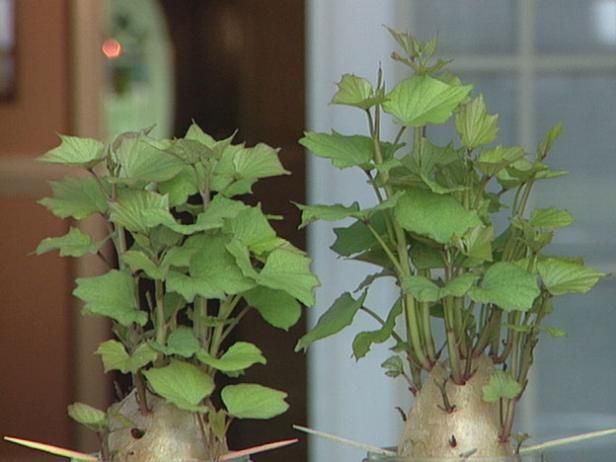 ) long, it is time to plant them. Plant your slips 12 to 18 inches (31-46 cm.) apart and 4 inches (10 cm.) deep. Water the plants in well and feed them with a fertilizer that is rich in phosphorous.
Once you harvest your sweet potatoes, remember to save a couple to start slips for the next season’s crop.
This article was last updated on
Read more about Sweet Potatoes
Did you find this helpful? Share it with your friends!
You might also like…
How To Grow Sweet Potato Slips
Growing your own delicious crop of sweet potatoes is easy, fun and inexpensive – especially when you can start your own plants from homemade sweet potato slips!
Sweet potatoes have certainly grown more popular then ever. Not only are they an incredible source of vitamins and essential fiber, they also have a lower sugar index than traditional white potatoes, making them quite the healthy choice.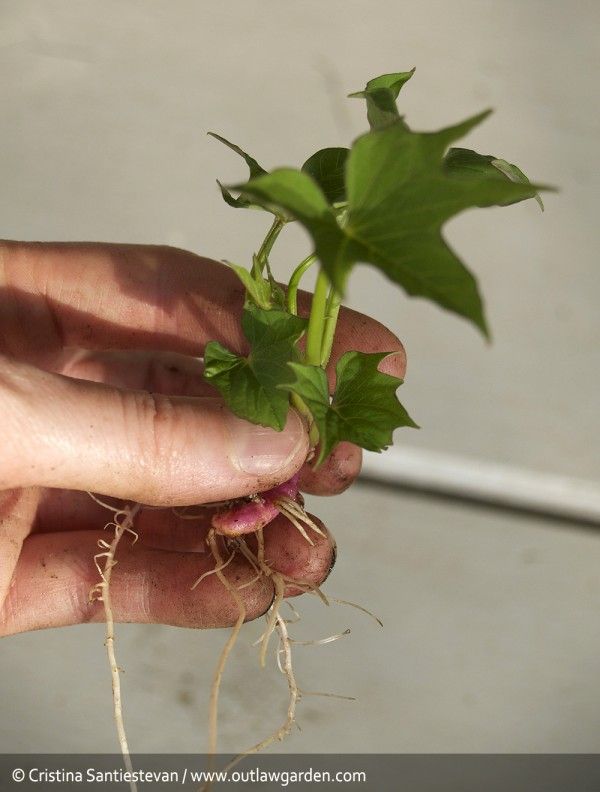
And as their popularity has grown, so has interest in growing them right at home in the backyard garden.
And why not! Beyond their nutritional value, sweet potatoes are easy to plant, grow and harvest. Even better, as a root crop, they can be stored and kept to use deep into the winter months.
Sweet potatoes perform well using all kinds of growing methods. They grow will in traditional gardens, raised beds, and even straw bales and containers.Here is a look at how to grow your own sweet potatoes, including how to create your own “seed” by making sweet potato slips. Be sure as well to check out this week’s new podcast on Making Great Compost at the end of the article
The planting process for sweet potatoes differs from that of traditional potatoes. Traditional potatoes grow from “seed” cut from an existing potato.
The seeds of regular potatoes are actually a portion of the tuber that contains at least one “eye” or bud. And when planted in the soil, the eye then sprouts stems and leaves.
But sweet potatoes are not grown from planting an eye or bud. Instead of using a portion of the potato, you use the roots that sprout from a sweet potato.
These roots are known as slips, and are quite easy to grow from an existing sweet potato. In fact, it’s so easy, it can all be done right on your kitchen or dining room windowsill.
How To Grow Your Own Slips
There are several proven methods of growing slips from an existing sweet potato. But for us, nothing beats the ease of the ol’ toothpick, water and mason jar trick.
First, start with a good, healthy organic sweet potato. Why organic? Because non-organic sweet potatoes are often treated with chemicals that will prevent sprouting.
Using an organic sweet potato, you can grow countless slips that can then be planted to grow sweet potatoes. The sweet potato will continue to produce additional slips from the same eye if left in the water.You can leave the sweet potato whole, but we use larger sweet potatoes and cut them in half to make two separate slip growing jars.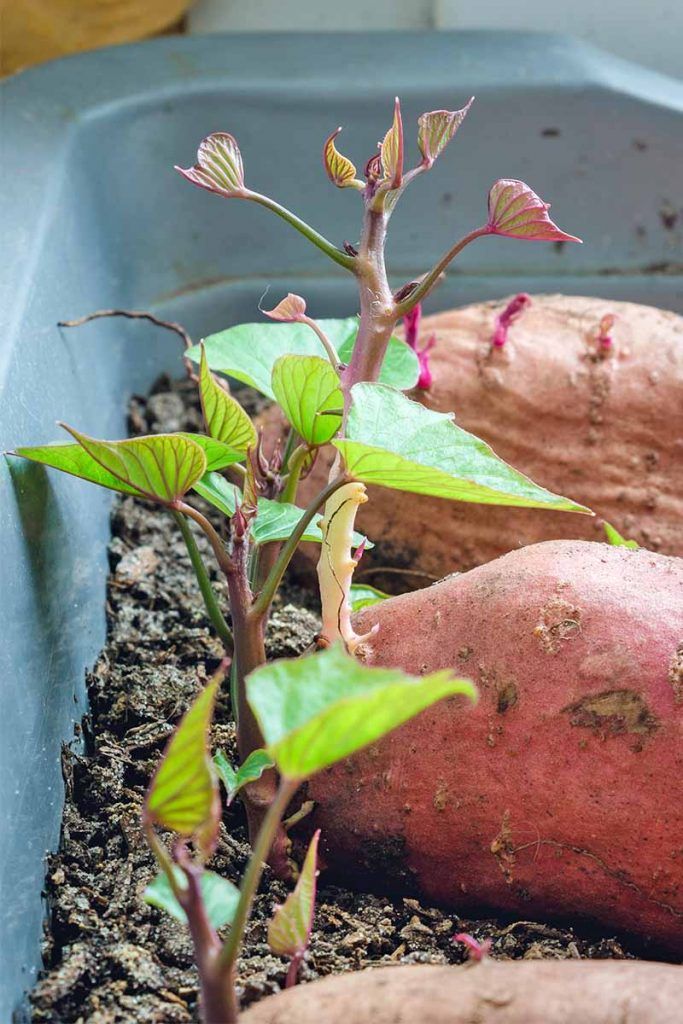 We have used both methods, but always feel the cut ends help speed up the top sprouting process.
Next, stick in a few toothpicks just below the half way point near the bottom of the sweet potato. Place the toothpicks in a line around the circumference of the potato.
Finish by filling a mason jar with tap water (non-treated water) and rest the sweet potato down into the jar on the toothpicks. For best results, make sure that a bit more than 1/2 of the potato is out of the water.
Now it’s time to put your jar into a sunny warm window and let the magic happen!
Developing Your Potato Slips
The sweet potato will develop a few stringy roots below the water first. Then in a few weeks, it will begin to sprout stems and foliage from the top.
Allow the slips to reach around 4″ in length before removing to root in water. They need to develop a good set of leaves to help the re-root when removed from the sweet potato.Allow the stems to grow until they reach about 4″ in length. Then carefully remove the stems from the base of the sweet potato with a slight twist. Be gentle, but don’t worry if it breaks off a bit in the process.
Next, place the end of the stems down into another jar filled with water. The stems will float a bit, and that is fine. Just be sure the slips are not completely under water.
In a few days, the ends will begin to form roots, and your slips will begin to grow up! Allow them to continue growing and fill out right up until planting day.
The best part of all is that your original sweet potato will continue to develop new slips in the same location as your old slips develop. Using this method, you can create several rounds of slips before it’s time to plant.
Planting Sweet Potato Slips
Sweet potatoes are vulnerable to frost and cool weather. For this reason, it is best to plant them once the soil warms in late spring, and all threat of frost has passed.
You can plant sweet potatoes in a variety of methods.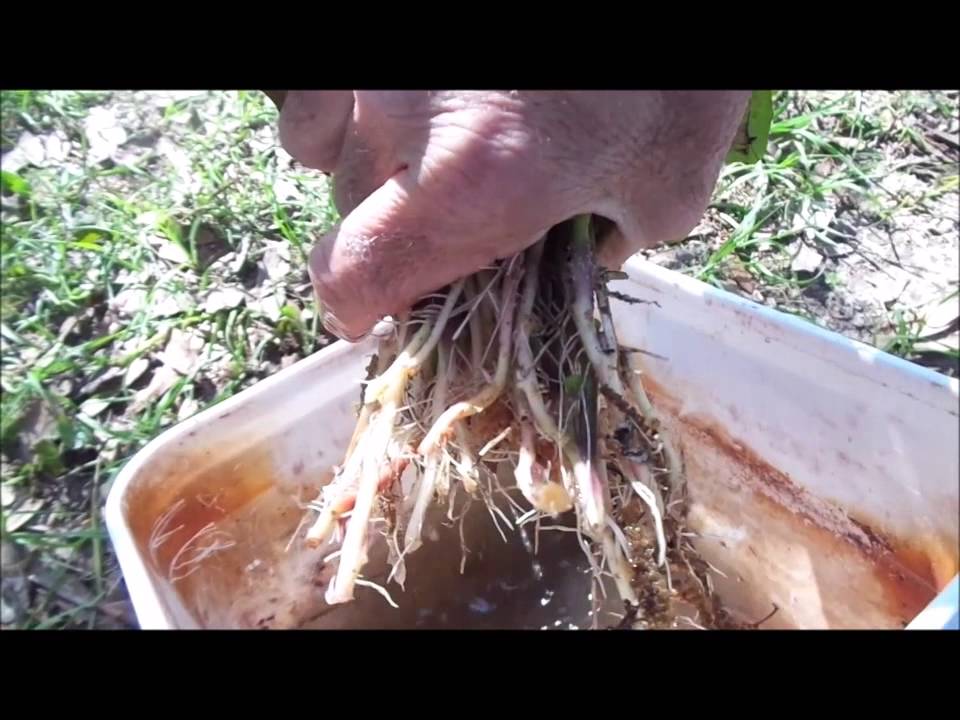 We actually grow our sweet potatoes in crates and love the ease of the method. But they can also be planted in a traditional garden or raised beds with success as well. See: How To Grow Sweet Potatoes In Crates
No matter where you plant, good soil is a must! Sweet potatoes thrive on loose, compost-filled soil with plenty of nutrients.
Space the slips when planting 8 to 10″ apart. Always plant your slips at the top of a slight mound of soil. This will keep them from sitting in water and prevent them from rotting off from too much moisture.
Bury at least half of the slip to allow for plenty of rooting. If planting in raised beds or a traditional garden, make sure the soil below is loose and fertile. Amending with compost is always a good idea to promote good root growth.
Within a few weeks, the foliage should begin to grow wild, and your sweet potato crop will be off and running!
Fertilizing and Water
Water the slips well until they become established in the soil. Check daily the first few days for signs of the slip drying out and water if necessary.
Water is important, but be careful not to over-water. If plants begin to yellow, it is usually a sign of over-watering.
Once established in a few weeks, sweet potatoes can benefit greatly from a few applications of liquid fertilizer. Compost tea, worm casting tea, or a high-quality liquid organic fertilizer will do the trick. See: 5 Great Organic Fertilizers To Power Your Crops
Apply after two to three weeks in soil, and once again a few weeks after that for best results. Once the plants have taken off, back off on fertilizing as it can lead to extensive foliage production up top, but less potato production under the soil.
THE NEW SEASON IS HERE!By mid-fall, plants will usually start to yellow at the ends of the vines.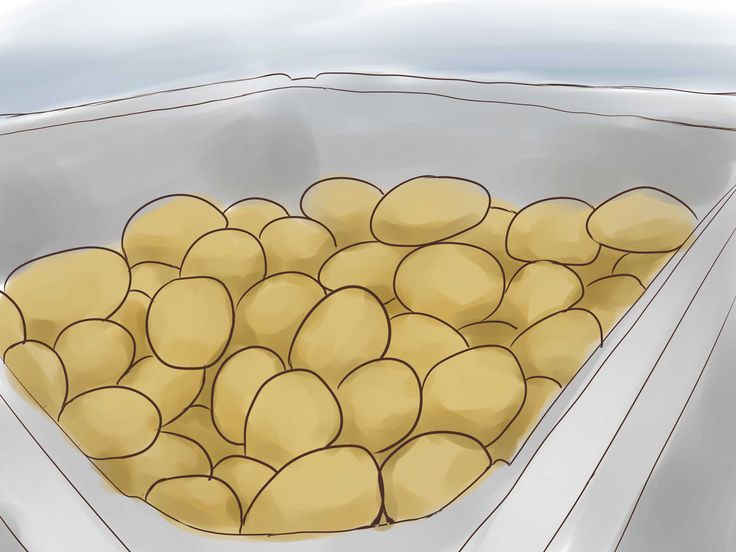 This is a sign that they are ready for harvest. Dig up slowly from the edges to avoid damaging the tubers
Here is to growing your own sweet potatoes from slips this year! Happy Gardening – Jim and Mary
As always, feel free to email us at [email protected] with comments, questions, or to simply say hello! You can sign up for our free email list in the subscribe now box in the middle of this article. Follow us on Facebook here : OWG Facebook. This article may contain affiliate links.
Sprouting sweet potato tubers and obtaining cuttings.
Sweet potato is propagated by cuttings. The sprouts that form on the tuber are the cuttings used for planting. To get cuttings, you need to germinate the tuber yourself. Another way to get cuttings is to order them in the spring from amateurs or grow a sweet potato bush from a cutting planted in the autumn on the window. Before planting in the ground, the stems of such a bush are cut into segments 15-20 cm long (this is also called a cutting) and each cutting forms a full-fledged plant already in the ground.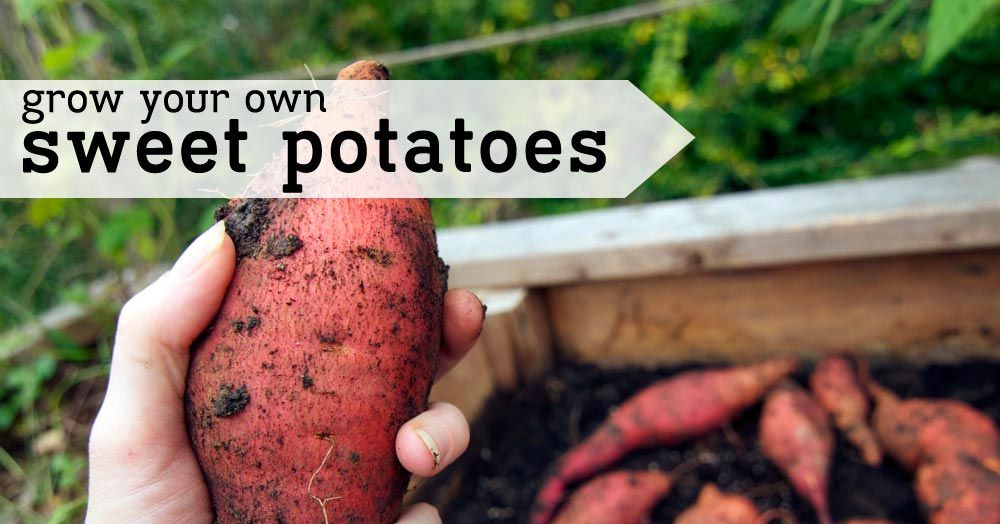 Each of these methods has its own subtleties, pros and cons.
In industrial farms, in order to get cuttings in the spring, sweet potato tubers are tightly laid on the beds (such farms exist in the southern regions, they can afford it), sprinkled with earth, watered and covered with a black film with holes for ventilation. After 3-4 weeks, the film is removed and the sprouts are allowed to grow, and after another week or two, many cuttings are cut, which are used for planting on ridges to obtain a crop. The cuttings will grow back, and after a while, you can re-cut the cuttings.
Sweet potato, unlike potatoes, is propagated by cuttings. The right side of the sweet potato in the photo (tuber) is usually not used for planting. Only what is on the left (cuttings) is planted in the ground. Thus, from each germinated sweet potato tuber, you can get 10-20 (and for some varieties, 50-60 or more!) Cuttings for planting. For comparison, even if you cut a tuber of an ordinary potato of the same size into pieces when planting, you can get only 2-3 bushes.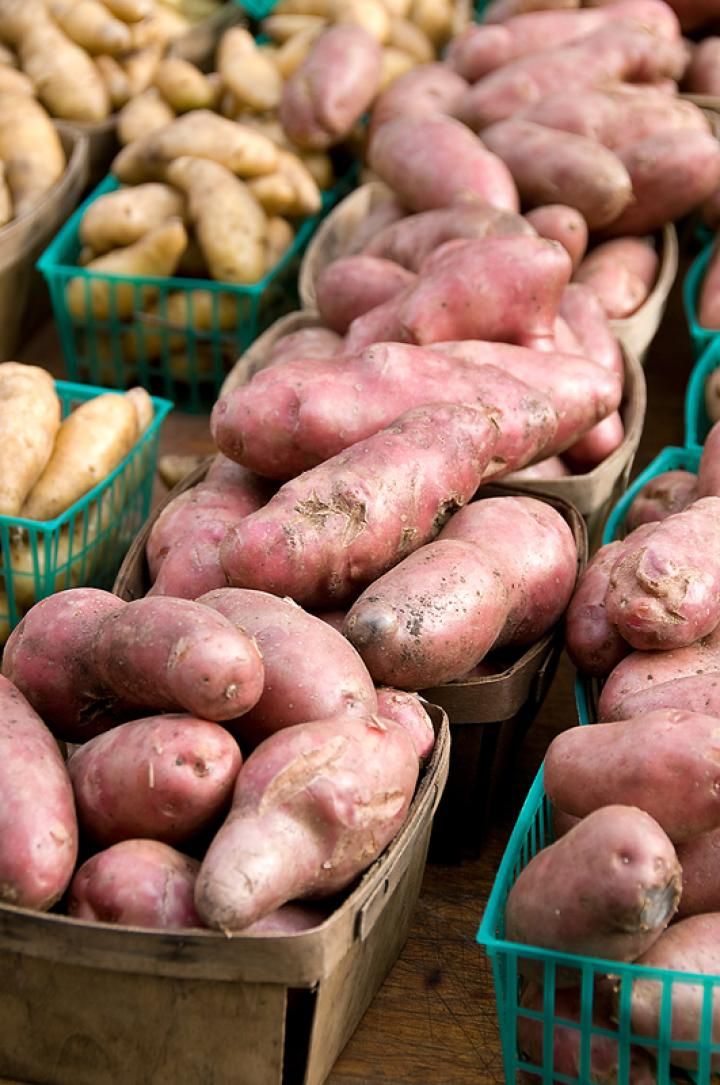
At home, the tubers are germinated in the room, starting the process in March (or earlier for store-bought tubers). In order to start growing, the tuber needs moisture and warmth. The sprouts that appear on the tuber also require light. Therefore, if there is not enough space on the illuminated windowsill, but you want to grow more cuttings, it is better to supplement solar lighting with artificial lighting - for example, fluorescent lamps. Untreated with growth inhibiting chemicals, the sweet potato tuber germinates very easily. There are many methods to germinate a tuber.
The most common germination method is to simply place the tuber on an earthen substrate, about half deep, and moisten regularly. If the earth is kept moist at room temperature, then pretty soon buds will form on the tuber, from which sprouts will begin to grow.
Tuber pre-germination can be carried out not directly in the ground, but on any moist substrate, for example, on wet wipes or even just with regular spraying with water.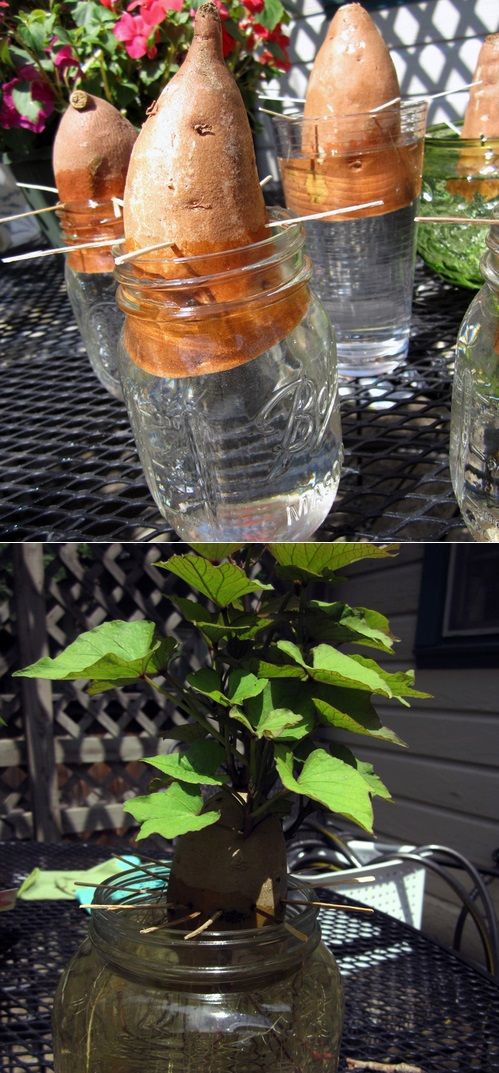 When emerging buds become apparent or a little later, when sprouts already appear, the tubers will still need to be transferred to the ground so that they do not rot prematurely.
Another equally common method is to germinate the tuber in a glass of water. To do this, the tuber must be undamaged, without soft spots, otherwise it can easily deteriorate with constant contact with water. With this method of germination of tubers, the lower part of the tuber, immersed 1-2 cm in water (which must be changed from time to time), forms a root washcloth, and sprouts form on the upper part. This method is good for pre-germination, but it is not recommended to keep the tuber in water for more than a month - there is a high possibility that it will begin to deteriorate. After some time, such a germinated tuber is transferred to the ground, where it continues to grow and give new shoots.
The sweet potato tuber naturally has polarity - one end is "upper" and sprouts form from it, the other end is "lower" and roots grow from it.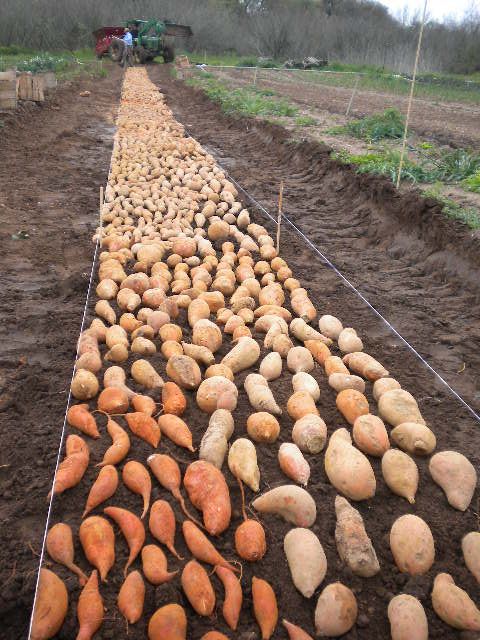 Often, if there are no buds and signs of germination on the tuber, then it is not possible to distinguish the upper end from the lower one. A tuber planted upside down in a cup will also begin to germinate and form buds and roots, but with a delay.
There is, however, a way to overcome the natural polarity of the tuber and obtain cuttings from both sides. To do this, the tuber is cut in half and both parts are germinated separately. This method maximizes the number of sprouts produced, but the sprouts themselves can be somewhat smaller. It should be borne in mind that with this method of germination, there is a higher risk of tuber rot, because the incision is a large wound surface. On the other hand, the cut surface in contact with the moist substrate stimulates the formation of roots, which help nourish the emerging shoots. You can start sprouting halved tubers on any moist substrate, but then the tubers must be transferred to the ground. The germination experience obtained in Batatovy Kushchi shows that with this method of germination of tubers (cut into pieces), cuttings begin to form much earlier and their number sharply exceeds the number of cuttings from uncut tubers.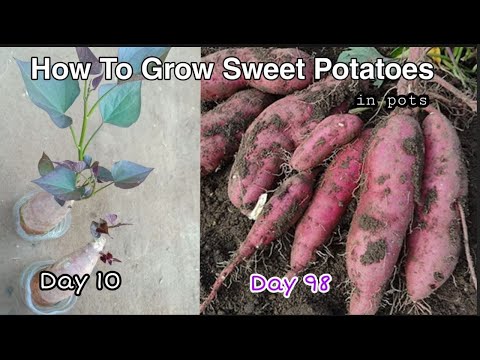 Therefore, we recommend it to all sweet potato growers who have both a small amount of initial material (tubers) for propagation, and a limited amount of space for sprouting tubers in the spring.
Sprouts can form anywhere on the tuber and do not require "eyes" like potatoes. The emerging buds are dark purple in color, they gradually increase in size and begin to release leaves. Starting from the third or fourth leaf, the leaf acquires a characteristic shape for the variety - heart-shaped or split.
Seedlings that have reached a size of 10-15-20 cm are ready for planting in open ground. If the time has not yet come for planting, they can be allowed to grow further.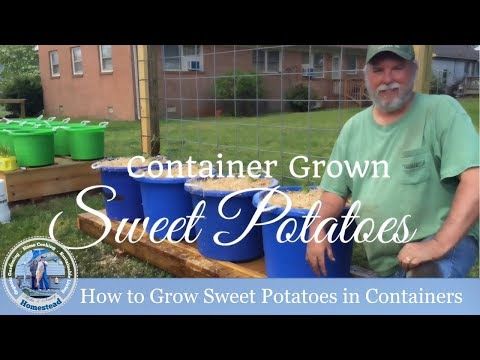 Before planting, the shoots are cut into pieces 15-20 cm long and immersed in the lower part for several days in water. During this time, they form the beginnings of roots, and in this state they can be planted in the ground. With this method of planting, when the roots are already formed in a permanent place, the tubers will be more even. It is not recommended to keep the cuttings in water - a large number of roots are formed, which are damaged when transplanted into the ground and therefore inhibit growth. Cuttings can also be planted in cups with soil and allowed to grow to plant indoors. This agricultural technique promotes early root formation, but the tubers formed in autumn by such plants will be more curved.
If you bought sweet potato tubers in the store, be prepared for the fact that they are treated with inhibitors - substances that prevent the germination of tubers. The logic of sweet potato sellers is understandable, they want the tuber not to use the stored energy for the growth of cuttings, preserving both nutrients and presentation. Naturally, this logic does not take into account the interests of sweet potato growers who want to grow sweet potatoes on their own plot. (And also, often, the interests of buyers who do not want to purchase a chemically poisoned product - but this is a topic for a separate discussion). What does this mean for the sweet potato grower, and what do we recommend doing in this case, when you come across inhibited tubers and you still want to germinate them - read in our article “Sprout Inhibitors of Sweet Potato”.
Growing sweet potatoes from "A" to "Z". All secrets.
In this article I will tell you in detail about how to grow sweet potatoes with your own hands and, after reading it to the end, you can easily do it yourself!
First of all, what is sweet potato? This is a plant of the bindweed family, a herbaceous liana with stems-whips up to 5 meters long. Sweet potato is grown for its tubers, somewhat similar to potato tubers, but much sweeter in taste and healthier in many other ways.
Sweet potatoes come in a wide variety of sizes and shapes, from the smallest to over 30 centimeters in length. The largest tuber that we managed to grow on our site was about 30 cm long and weighing more than 1 kilogram! This is not a bad result for the first cultivation - believe me!
Record-breaking tuber that we have grown!Friends, I will talk about how to grow a good sweet potato crop from my own experience, so all the tips will be tested in practice.
We had sweet potato tubers for planting quite by accident - they were sent to me by my subscribers from the city of Dnipro, before that we were not familiar with sweet potato, but, as it turned out, it is not at all difficult to grow it, if you follow some nuances when growing.
With varieties, I think, each of you will be able to decide on your own, and with time and experience you will understand which of them are suitable for you, because, as they say, there are no comrades for taste and color! The only thing I can say on this issue is that basically all varieties of sweet potato have a sweetish taste, but some of them are sweeter, and some are less.
Sweet potato does not belong to the nightshade family, like potatoes and, accordingly, is not damaged by diseases and pests that prevent us from growing potatoes - on sweet potato you will not meet the Colorado potato beetle and late blight and, accordingly, during its cultivation you will not have to treat plants pesticides!
How to germinate sweet potato?
Obtaining planting material for planting sweet potatoes is fundamentally different from dealing with potato tubers. The main difference is that sweet potatoes do not have eyes, like potatoes, and sprouts develop from hidden buds. From one tuber you can get 25 or more pieces of finished seedlings - not bad at all!
In order to get sprouts suitable for planting, do the following:
the case if waterlogging is allowed during irrigation) in order to avoid spilling the soil and fill it with soil, loose in composition - in our case, we used self-prepared soil from the components of river sand, cow humus, peat and chernozem - all this was mixed in equal amounts and obtained a light, moisture- and air-permeable, fertile soil with an average acidity of about 5. 5-6.5, suitable for growing most plants. How to prepare suitable soil for growing sweet potatoes, you can read here.
The soil layer in the box, sufficient for good germination of tubers, should be about 8 centimeters. Then we lay the sweet potato horizontally on the surface of the soil, deepening them by no more than half.
Spread the sweet potato horizontally on the surface of the soil, deepening the tubers halfway into the soil.We leave the distance between the tubers 1-2-3 cm and carry out thorough watering so that the lower part of the tubers in the soil is well moistened. But you should not water to such an extent that puddles appear in the box - waterlogging can lead to rotting of the tubers.
Thoroughly water the tubers for good germination. It is desirable to add some kind of root formation stimulator to irrigation water, we added a very effective and inexpensive stimulant that helps accelerate root development - succinic acid at the rate of 2 grams per 5 liters of water.
On average, the entire process of sweet potato germination and the appearance of shoots suitable for planting in the ground takes from two to four weeks - a lot depends on the temperature regime, it is best to maintain a temperature of at least 20 degrees during this period.
Some gardeners use sweet potato tubers bought in the vegetable section of the supermarket as seed material - these tubers can also be used, but you need to be prepared for the fact that the germination process of such tubers may be a little more extended in time due to the fact that they treated with a special solution that delays their premature germination.
Yam. How to grow seedlings.
After 2-4 weeks, subject to the temperature and humidity conditions, sprouts should appear on the tubers - at least 20-25 pieces on each, and in some cases their number reaches 50 pieces!
Shoots that have reached a length of 15-20 can already be separated from the tuber, i.e. - break out with a root, which was formed at the bottom of the shoot. At the same time, there is no need to remove the tuber from the soil - everything can be done perfectly on the spot. Is it possible to start separating the shoots from the tuber earlier, when they have not yet reached the specified length? Can! But, if there is little planting material, and a large area needs to be planted, then it is better to separate the cuttings from the tuber longer, which can then be divided into several parts and rooted in a glass of water, thereby increasing the amount of planting material several times.
It is very easy to divide and root the cuttings:
Separate shoots at least 20 cm long from the tuber and cut them into cuttings 5-7 cm long, leaving two leaves on top of them. The lower part of the cuttings prepared in this way is placed in a glass of water, the depth of immersion of the lower part of the cutting in water is 1-2 cm. Sweet potato takes root very easily, so after 5-7 days you can see the roots that have appeared on the cuttings.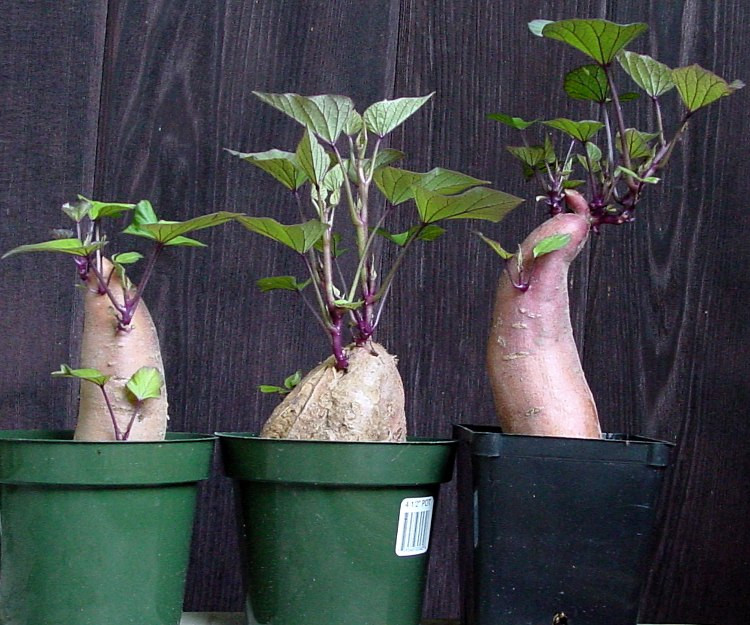
When the cuttings are rooted, they can be planted immediately into the ground - if the weather conditions allow, but remember that sweet potato does not withstand the effects of negative temperatures, in other words, it dies when it freezes.
Therefore, if there is a threat of frost, it is best to first pick the rooted cuttings of sweet potato into cups with a volume of 180-250 ml filled with fertile soil. In these cups, at a temperature of 18-20 degrees, sweet potato can develop until it becomes possible to plant it in open ground. During this time, the above-ground and root parts of the plants will develop enough to quickly "start" after landing on the garden.
Planting sweet potatoes in the ground. Plant care after planting.
As mentioned above, sweet potato seedlings can be planted in open ground immediately after separation from the tuber, but I think (and practice confirms this) that it is still better to transplant it first into cups and hold it in a suitable room for a while - this will allow us to achieve powerful development of the root system and, after planting "in the field", the plants will not receive strong post-transplant stress, but will immediately begin to develop normally.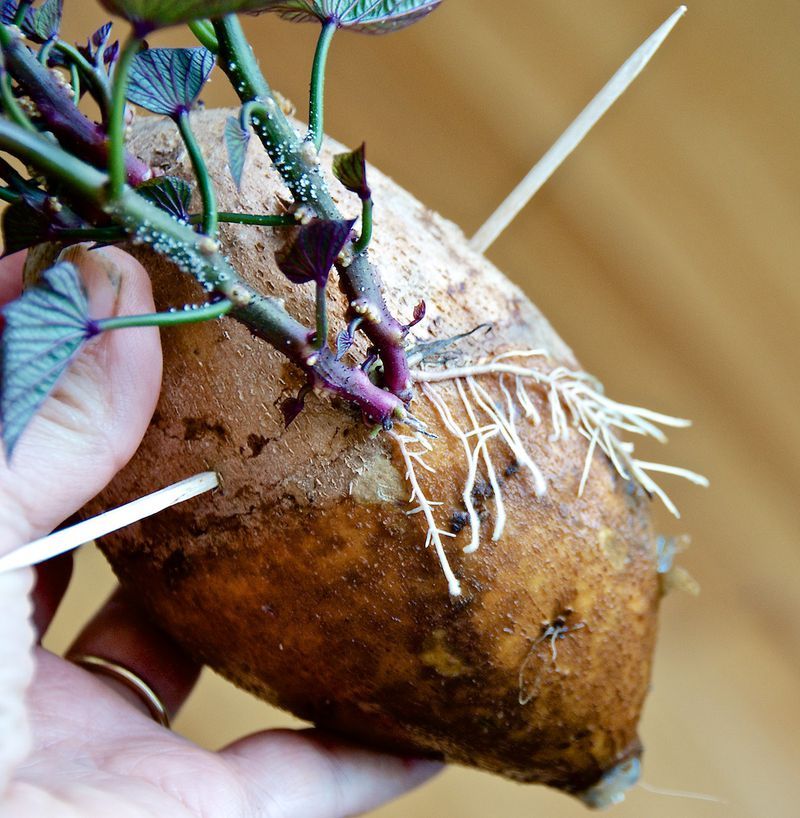
We plant the grown seedlings in the garden when the threat of return frosts is over, because, as mentioned above, sweet potato dies under the influence of frost.
The soil must be prepared in advance - it must be light, loose - this will contribute to the good development of the tubers and they will not be crooked and crooked. In dense soil, it is more difficult for tubers to develop, pushing the soil apart, so they are curved and have an unsightly appearance.
To make the soil less dense, you need to add 10 kg to it every year. humus per 1 square meter. When introducing humus into the soil for digging, it is also desirable to add up to 70 grams of double superphosphate per 1 sq. meter - this will help provide plants with phosphorus during the period of active development of the root system and, accordingly, increase the yield.
We plant sweet potatoes in a belt way, i.e. in rows, the distance between holes in a row should be about 40 centimeters, the distance between rows should be up to 1 meter, because sweet potato vines grow strongly. In addition, tubers underground are also not located in one place, like potato tubers, but tend to “spread” at some distance from the hole, which makes it difficult to dig them out of the soil.
It is best to plant sweet potato seedlings on ridges 25-30 cm high and up to 40 cm wide.
Seedlings by the time of planting should be well developed and have 5-7 leaves in the aerial part, and the root system should almost completely fill the volume of the seedling cup.
When planting sweet potato seedlings in the ground, it is allowed to deepen it by 3-5 cm. so that the roots on the vines do not have the opportunity to grow into the ground. If it is not possible to carry out such mulching, then it is very desirable to pull the vines several times a season so that additional roots do not develop - such actions on our part will allow us to increase the yield.
After planting, we carry out abundant watering of each hole and, in the future, it is very undesirable to allow the growing sweet potato to dry out, as this will negatively affect the yield.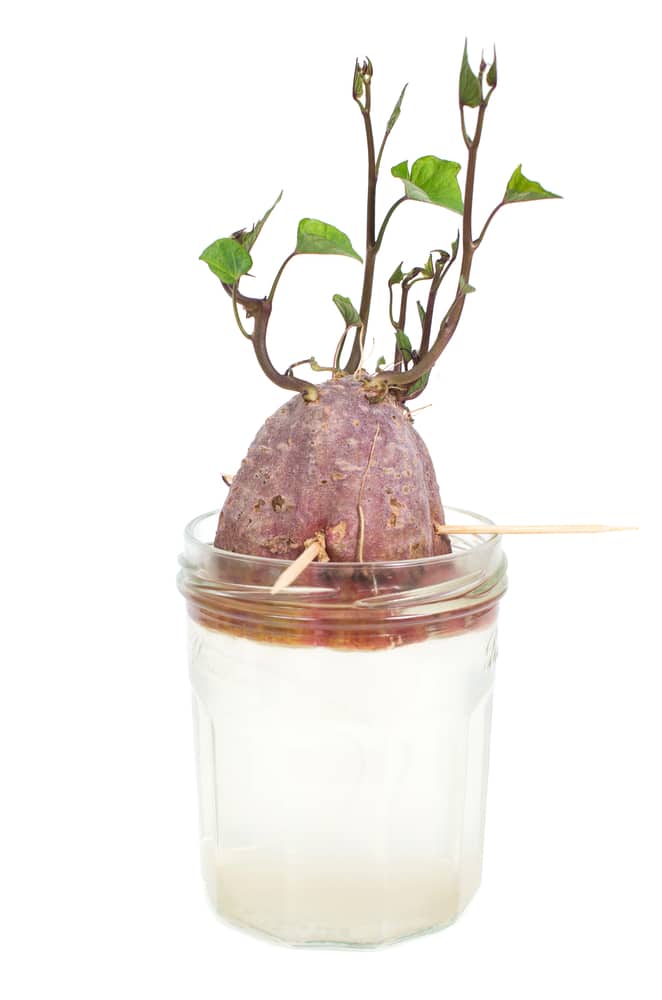 If the soil is properly prepared (humus and superphosphate are added), then additional top dressing under the root during the cultivation of sweet potato can not be carried out - the harvest will be quite good without them, but two foliar top dressing with microelements such as Brexil Combi or Biomaster Humat + 9 microelements can be carried out .
Harvesting and storage of sweet potato.
We figured out how to grow sweet potato with our own hands, now let's talk about its cleaning and storage.
Sweet potato crop is ready for harvest in anticipation of the first autumn frosts, or immediately after them. By this time, the tubers should already be fully formed and there is no point in keeping them further in the soil.
Before harvesting, we cut off the vines from the garden and put them on the compost, leaving small stumps from the cut stems in the holes in order to navigate when digging where the center of the hole is located.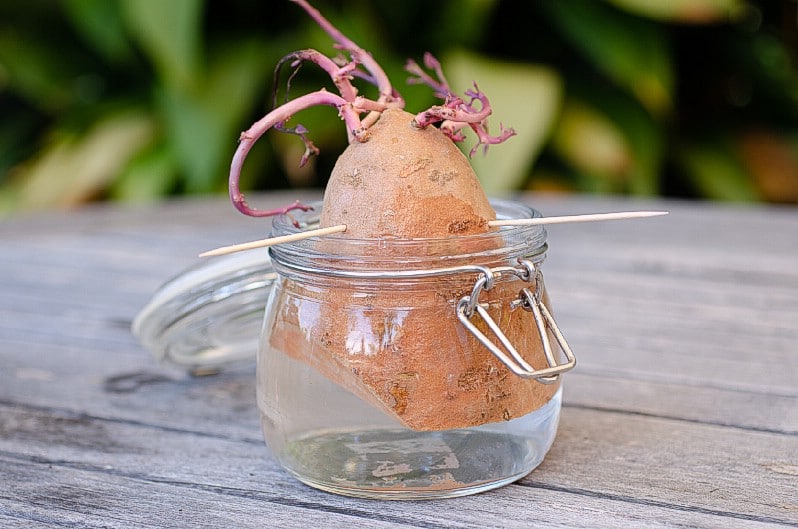 If this is not done and the vines are not removed, then the harvesting process will be very difficult and take a lot of time and effort.
The best way to dig up sweet potatoes is with garden pitchforks, as a large number of tubers can be cut with a shovel because you can't guess where they are located. In general, in my opinion, sweet potato harvesting is how interesting and exciting it is - digging each hole is a pleasant excitement and expectation, especially when you dig up a record-breaking tuber, it is so time-consuming - the tubers can be located anywhere, therefore, in order not to miss anything, you have to literally "shovel" a large amount of soil!
Harvesting is always fun!But once again, it's interesting to harvest sweet potatoes! Especially if the harvest is good.
After digging, the tubers must be dried by spreading them in a dry place in a small layer, it is not advisable to expose them to direct sunlight during drying. It is necessary to handle the tubers carefully after harvesting, since the skin on them is very delicate and easily damaged, and, as you know, pathogens of various diseases can easily penetrate into the wounds.
After drying, store the harvested crop. Unlike potatoes, whose tubers need to be stored in the basement at low temperatures of 3-5 degrees, sweet potato tubers are perfectly stored for a long time at a temperature of 15 to 18 degrees - this is the usual pantry temperature in a house or apartment, so storing sweet potatoes does not create any problems!
Friends, this is, in fact, the whole process, which describes the main steps for growing sweet potato, I also advise you to watch these videos from my YouTube channel “Garden, vegetable garden, with your own hands!”, In which I showed clearly, on my example how to grow sweet potatoes:
Planting tubers for germination (part 1):
Cherging and propagation of the resulting shoots (part 2):
9000 9000 9017 9000 9000: 9000: 9000: 9000: 9000: 9000: 9000: 9000: 9000: Friends, if this article was useful to you, feel free to share it on social networks with your friends, leave a comment and rate it.