Decorating a bathroom cheap
30 Bathroom Decorating Ideas on a Budget
MYLENE FERNANDES
1 of 30
Incorporate Brass Accents
Brass features add “a hint of luxury and a nod to older styles,” designer Shari Francis says of this bathroom she gave a cosmetic upgrade. Any easy yet cheap way to do that? Incorporate brass accessories. If not with a faucet or mirror, use a brass soap dispenser, tissue box, toothbrush holder, or even a set of hardware for hanging towels and robes.
BUY NOW Brass Bathroom Hardware Set, $57
Emily Minton Redfield
2 of 30
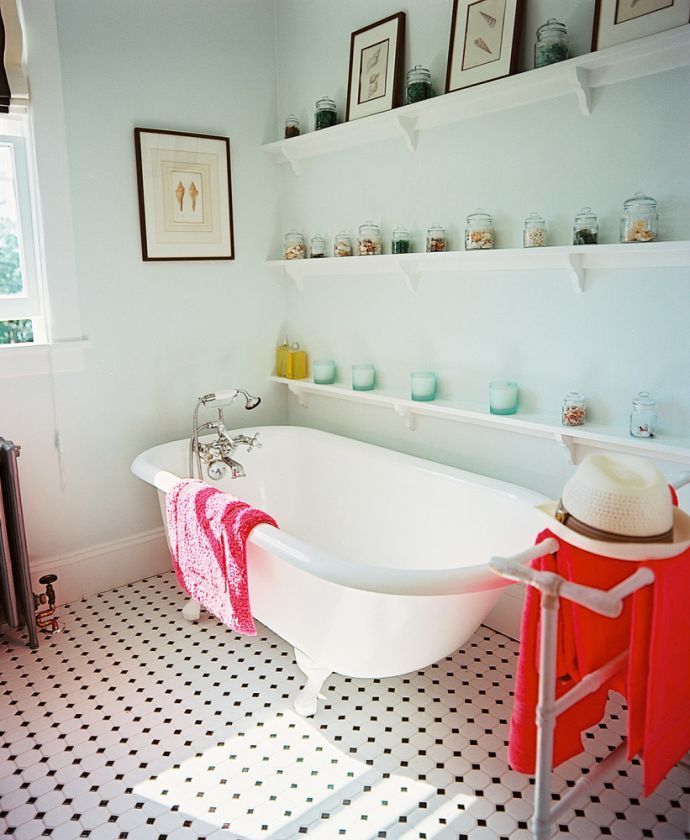
Add a Small Table
Enjoy a regular bubble bath? Put a small table next to your tub, as designer Elizabeth Georgantas did here. A wood stool or small slim side table will not only make your space look more luxurious, but it's perfect for hosting your glass of wine, book, speaker, or candles.
BUY NOW Teak Stool, $78
2LG Studio
3 of 30
Get an Indoor Tree
Add a tree in the corner for a low-lift update that has a ton of transformative power. As seen in this bathroom designed by 2LG Studio, the palm leaf tree truly brings it to life.
BUY NOW Costa Farms Majesty Palm Grower Pot, $33
Leanne Ford Interiors
4 of 30
Paint Everything One Color
Picking one color and sticking to it will make things a lot a easier, and this tonal look is both on-trend and visually interesting (even—no, especially—if you go for something as simple as white). In this bathroom designed by Leanne Ford Interiors, even the faucet is painted white.
BUY NOWRust-Oleum Ultra Matte White Paint, $18
Regan Baker Design
5 of 30
Choose a Colorful Rug
One of the only ways to bring warmth into a bathroom with affordable decor is an area rug. It's also a fun way to add color, print, and texture. The fringe and pops of neon featured in this mostly-marble bathroom by Regan Baker Design is the perfect case study. A bath mat will do, too.
BUY NOWWest Elm Half Moons Bath Mat, $40
Hecker Guthrie
6 of 30
Swap In Eye-Catching Hardware
Always remember that extra storage is your friend in a bathroom, where you'll want to tuck away unsightly essentials. Eye-catching hardware, like the rose gold handle pulls in this space by Hecker Guthrie, make the cabinets look like a lot more expensive. And instead of installing custom marble countertops, you can just shop for an affordable marble tray to stack your items on.
BUY NOW Pink Marble Tray, $17
PHOTO: Tom Ferguson; DESIGN: Arent & Pyke
7 of 30
Splurge on Soap
When you can't afford to renovate the bathroom, focus on minor additions that can make it feel a touch more elevated. Spending thousands on installing a new marble sink for example, may be out of the question, but a fancy soap for guests can do more good than you'd think, and it's a fraction of the cost. Aesop is always a good call, as seen in this bathroom designed by Arent & Pyke.
BUY NOWAesop Aromatique Hand Soap, $39
Hecker Guthrie
8 of 30
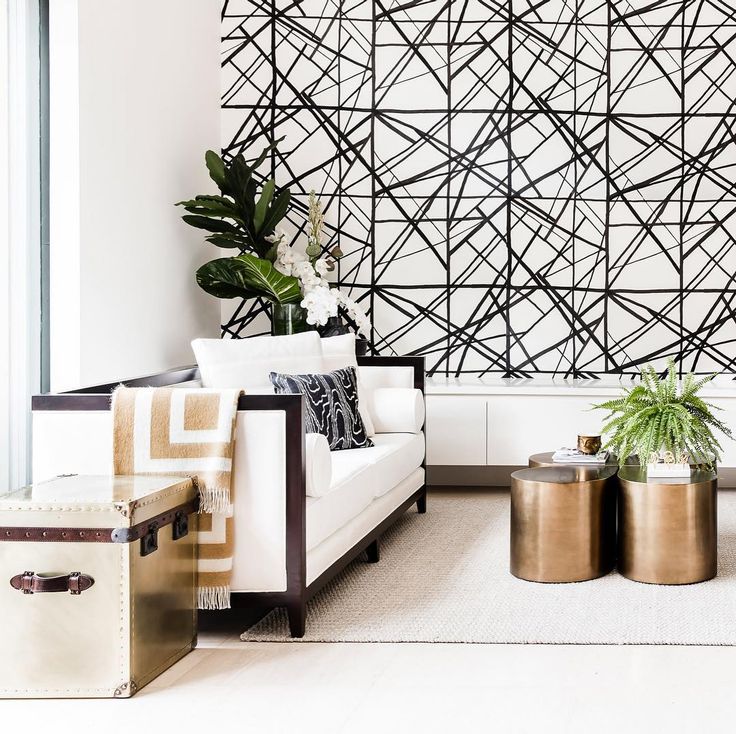
Use Fake Plants
This bathroom designed by Hecker Guthrie proves that you don't need a huge space to make an impact, especially when plants are involved. Love plants but can't keep them alive or don't think the ones that eventually die are worth the money? There are actually some pretty great artificial plants and leaves that don't look totally fake, whether you display them together in a vase or bolster a bouquet of flowers with them.
BUY NOWIKEA Smycka Artificial Leaf, $5
Leanne Ford Interiors
9 of 30
Add Something Metallic
Adding a dash of metal can make the bathroom feel a little fancier and more polished. Even something as nondescript as a catch-all or soap dish will do the trick, but we're partial that round stool in Leanne Ford's bathroom.
BUY NOWAnthropologie Bridgette Toilet Paper Holder, $38
Arent & Pyke
10 of 30
Display a Robe
Even something as simple as hanging a robe can make all the difference. As seen in this Arent & Pyke designed bathroom, it makes the space feel spa-like. The small Art Deco area rug also plays up the blue tones throughout while introducing pattern and a pop of coral.
BUY NOW Parachute Classic Bathrobe, $99
PHOTO: Alexandra Ribar; DESIGN: Leanne Ford Interiors
11 of 30
Hang a Pendant Light
Leanne Ford is the master of reclaiming old items and making them feel brand new again, like the shelf, mirror, antique knick knacks in this bathroom. The schoolhouse-style sink fits in with the retro look while the fresh white paint and oversized dome pendant polish things off.
BUY NOWVintage Thwaites & Reed London Clock, $10
Arent & Pyke
12 of 30
Wallpaper Half the Wall
Not only is it a good idea to keep wallpaper out of splashing range, but it can also cut your cost in half if you only buy enough for half the square footage. The white tiles in this bathroom designed by Arent & Pyke keep things feeling fresh while the wallpaper adds a little more personality.
BUY NOWWild Grass Removable Wallpaper, $40
Alexander DB
13 of 30
Warm Things Up
Design firm Alexander DB softens up the large factory-style windows and gritty concrete floors in this industrial space with a plush area rug and striped hand towels. Though they're decidedly more bohemian, they fit in with the modern black tub and warehouse vibes because they stay within that monochrome palette.
BUY NOWCost Plus Black Villa Stripe Kitchen Towel, $2
PHOTO: Reid Rolls; DESIGN: Leanne Ford Interiors
14 of 30
DIY Wallpaper
Give your walls some oomph and treat it like a canvas for your a collage project. Think vintage ads and magazine articles and a few records for some contrast. In this bathroom designed by Leanne Ford, the vintage magazine scraps play up the retro feel of the tiles.
BUY NOWVintage Life Magazine, $10
Regan Baker Design
15 of 30
Lean a Ladder
Introduce extra storage space for your towels in style by leaning a wooden ladder against the wall. It brings in more dimension than a traditional wall shelf and looks more unique.
BUY NOWLazy Susan Whitewash Wood Ladder, $60
PHOTO: Nicole Franzen; DESIGN: Leanne Ford Interiors
16 of 30
Craft a Narrative
The beauty of this bathroom sink area is that everything looks like it has a history, even the soap dish. While the oval hanging mirror and sink feel grounded and rustic, the sconces and gold faucet introduce a nice formal flair. You'd never guess these old fixtures came from the house of an old friend of the designer, Leanne Ford. "It's a perfect example of how things can look so different depending on where they live," she says.
BUY NOWLucy Michel Whatever Bowl, $50
PHOTO: Dustin Askland; DESIGN: Elizabeth Roberts
17 of 30
Camouflage Toilet Paper
In this bathroom designed by Elizabeth Roberts, our eye is immediately drawn to the pretty linen towels, marble hooks, hexagonal floor tiles, and whimsical floral wallpaper as opposed to the toilet paper. For a similar effect, make your toilet paper blend in or look cooler than it is with a wall-mounted holder.
BUY NOW Ferm Living Black Toilet Paper Holder, $35
PHOTO: Dustin Askland; DESIGN: Arent & Pyke
18 of 30
Opt for an Etagere
Another great way to introduce a ton of storage without having to drill into your walls for custom cabinetry and shelving is by sliding in a etagere, as done in this bathroom designed by Elizabeth Roberts.
BUY NOWBamboo Ladder, $89
Regan Baker Design
19 of 30
Be Bold
You don't need a giant space to design a bathroom that stands out. Take notes from this one by Regan Baker Design. An accent wall with a classic toile pattern, a timeless mirror about a small sink, an artful hand towel, and a geometric light make this powder room feel complete.
BUY NOW Project 62 Round Mirror, $60
PHOTO: Max Kim Bee; DESIGN: Leanne Ford Interiors
20 of 30
Install a Shelf
If your bathroom is tiny, clear clutter and add more surface space by installing a shelf above the toilet or right under the mirror and above the sink, as done in this space designed by Leanne Ford.
BUY NOW Anthropologie Wood Shelf, $48
Studio DB
21 of 30
Add a Fun Shower Curtain
A fun shower curtain with geometric shapes will spruce up a bathroom or play up existing tiles, as seen in this space designed by Studio DB.
BUY NOW CB2 Triangle Shower Curtain, $50
Hecker Guthrie
22 of 30
Pay Attention to Details
Don't overlook the details, like a a toothbrush holder, soap dispenser, and other catch-alls for thing like Q-tips, cotton pads, and more. Transferring those drugstore items from their original packaging makes the whole room look so much more put-together and beautiful, as Hecker Guthrie proves with these minimal containers. Even a toilet brush can be pretty!
BUY NOW CB2 Nexus Toilet Brush, $30
PHOTO: Dustin Askland; DESIGN: Arent & Pyke
23 of 30
Add a Wall Sconce
The turquoise tiles in this small bathroom designed by Elizabeth Roberts are balanced by a more natural rattan-framed mirror, while modern scones bring the look into the 21st century. See how the color makes those other items pop even more?
BUY NOW West Elm Metal Sconce, $79
Hecker Guthrie
24 of 30
Swap a Mirror for Wall Art
It's all in the details—by giving accents an offbeat twist, you'll make a big impact. For example, instead of hanging a mirror above the sink, consider displaying artwork instead (Pro tip: shopping for your artwork on eBay and Etsy or scouring flea markets is a lot more affordable). Then put your hand soap and lotion on a small elevated shelf above the sink and hang a single slim pendant light like Hecker Guthrie did here.
BUY NOW Abstract Faces Art Print, $21
Studio DB
25 of 30
Splurge on Towels
Hanging a few fancy and colorful hand towels can brighten things up immensely and also elevate a space that feels rundown or outdated. These butterfly-print Missoni hand towels in a little girl's bathroom designed by Studio DB are the perfect example.
BUY NOW Missoni Josephine Hand Towel, $30
DESIGN: Leanne Ford Interiors
26 of 30
Add a Magazine Holder
A magazine rack and custom linen curtains are both beautiful finishing touches. And the contrast between the hyper realist, gritty photograph against the classic black and white striped wallpaper and glitzy chandelier create a nice juxtaposition in this Leanne Ford-designed space.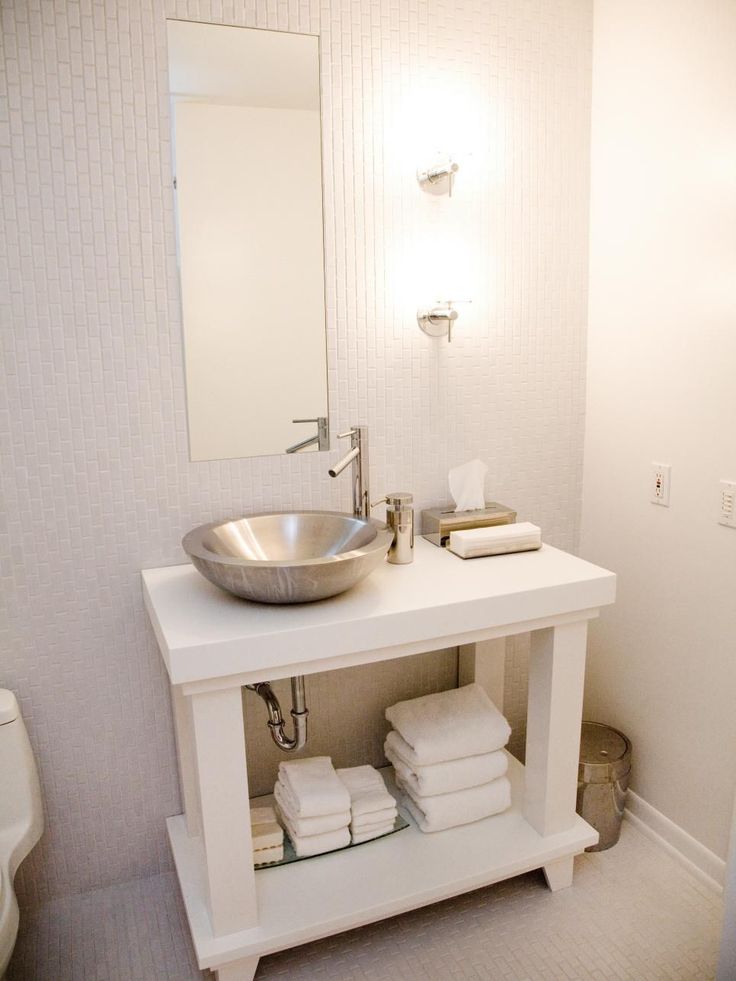
BUY NOW EQ3 Perch Magazine Rack, $60
2LG Studio
27 of 30
Repaint Old Furniture
Want a pop of a color in the bathroom? Transform a flea market find or dated family heirloom by sanding it and then repainting it a fun color. Bonus points if it's a dresser, armoire, or something else that provides extra storage. We love the chalky look of this painted armoire in the 2LG-designed bathroom.
BUY NOW Rust-Oleum Chalked Blue Matte Spray Paint, $42
Regan Baker Design
28 of 30
Upgrade Your Waste Basket
A tasteful wastebasket and matching tissue box cover will tighten up your bathroom nicely. We also love the removable wallpaper from Chasing Paper in this bathroom by Regan Baker Design. It's temporary, affordable, and delightfully whimsical.
BUY NOW Crate & Barrel Sedona Waste Basket, $25
Catherine Kwong Design
29 of 30
Put Out a Luxury Room Fragrance
A high-end room fragrance will instantly elevate the overall feel of a powder room.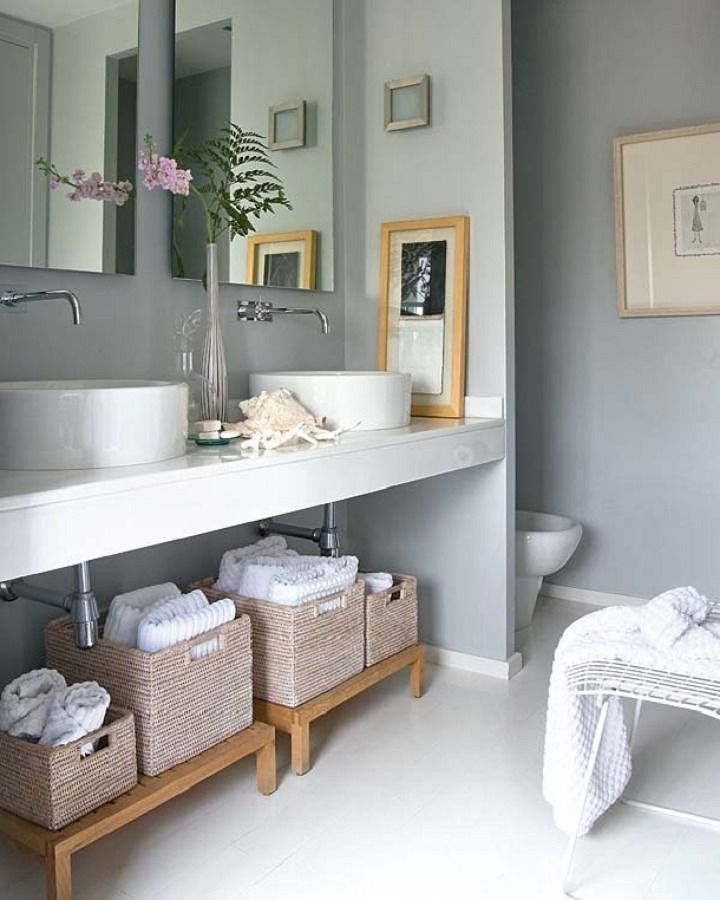 In this bathroom designed by Catherine Kwong, she chose Byredo's classic yet intriguing scent, Gypsy Water. If you don't want to splurge on one of their home fragrances, opt for a candle instead—they're a little easier on the wallet.
BUY NOW Byredo Cotton Poplin Candle, $85
PHOTO: Alexandra Ribar; DESIGN: Leanne Ford Interiors
30 of 30
Paint the Floors
Instead of laying new tiles—which can be super expensive and time-consuming—consider using paint instead. Hand-painted details add a personal touch you can't get in many other ways. Get inspired by this graphic painted floor situation by Leanne Ford if you're not sure where to begin.
BUY NOW Glidden Black Interior Paint + Primer, $25
Bathrooms on a budget – 33 chic yet cheap bathroom ideas
Real Homes is supported by its audience. When you purchase through links on our site, we may earn an affiliate commission. Here’s why you can trust us.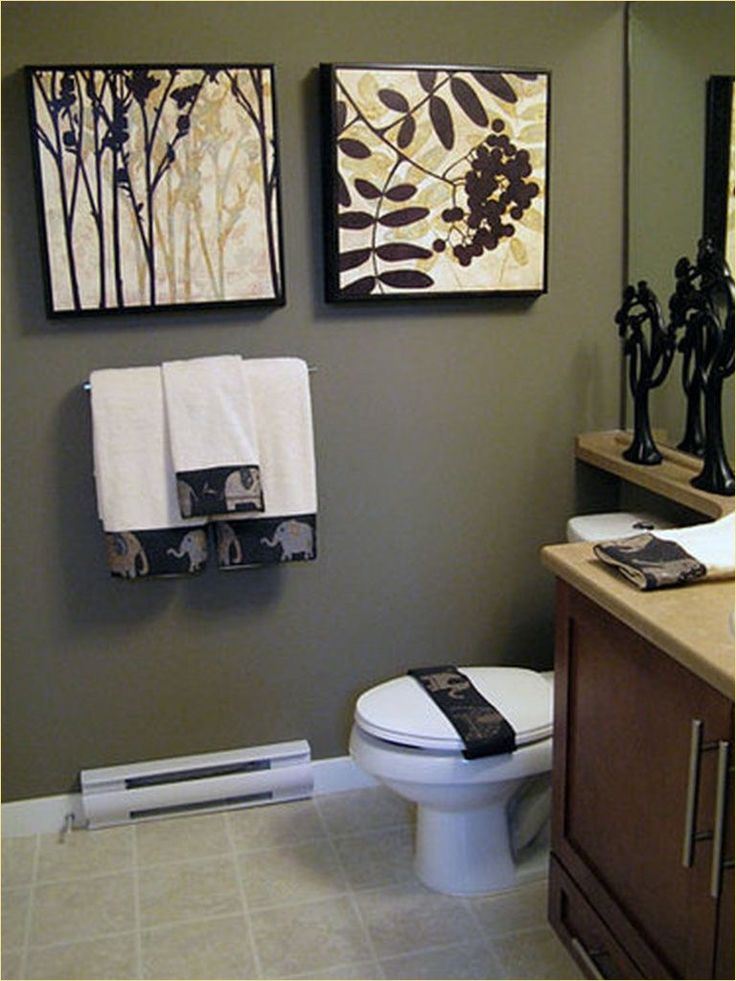
(Image credit: Leader floors)
Join our newsletter
Get the best home decor ideas, DIY advice and project inspiration straight to your inbox!
Thank you for signing up to Realhomes. You will receive a verification email shortly.
There was a problem. Please refresh the page and try again.
By submitting your information you agree to the Terms & Conditions and Privacy Policy and are aged 16 or over.Bathrooms on a budget needn't be any less incredible than pricier options – from interior design shows to celeb-inspired bathroom remodels seen on Instagram, the media is awash with inspirational and affordable spa-like spaces.
Because the good news is that, no matter what you have to spend, most bathroom ideas are still achievable. Thanks to lookalike surfaces, and clever DIY hacks, you can still pay homage to the hottest interior design trends without needing to hire in a contractor.
We have pulled together a list of budget bathroom know-how, some ideas we have cost under $50/£50, some under $100/£100 and some under $500/£500.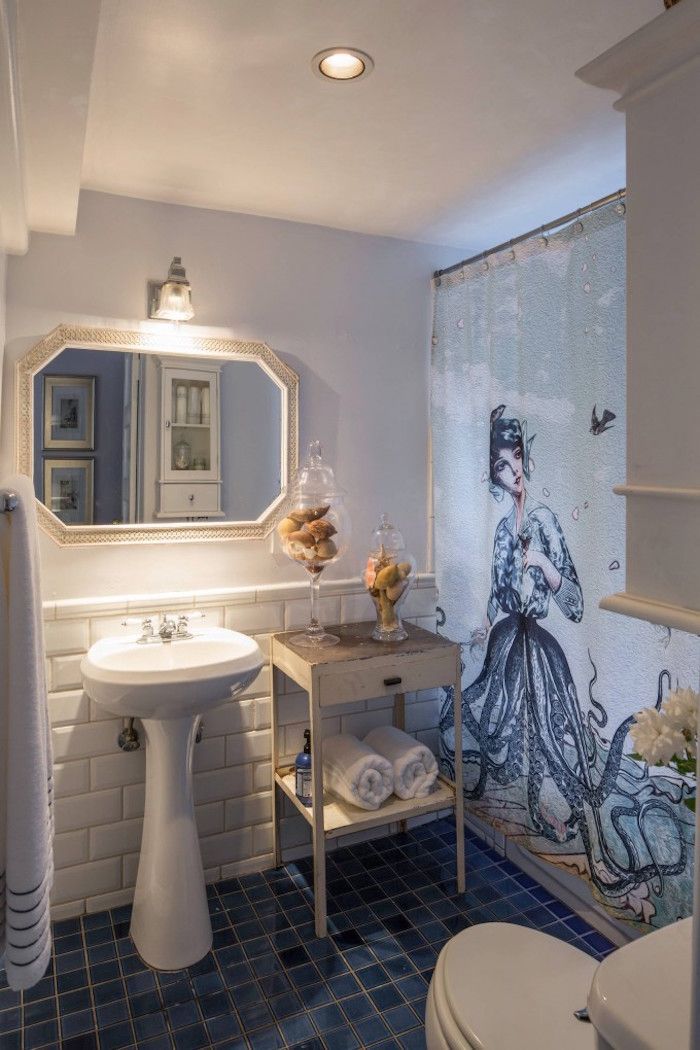 You will then find some more practical advice if you are designing a bathroom from scratch and looking for budget-friendly tips.
Bathrooms on a budget: under $50/£50
Yep, we said budget and we mean it. All the ideas in this section are incredibly affordable and most of them are super quick updates (sometimes it's as simple as adding one of the best home fragrances) or little DIY jobs to anyone could do. That makes them fast as well as cheap – we approve.
1. Use online marketplaces for materials and go DIY
(Image credit: @Homewithhelenandco)
There's nothing like the satisfaction of undertaking a little bit of DIY. Yes, it can be messy and take longer than if you got the professionals in, but there's a lot to be said about a person who can apply themselves to an interior challenge.
Plus, there's also the obvious benefit of cost-saving on labor, and a few smug brownie points to be had when guests compliment your bathroom too.
This yellow bathroom idea by home renovator @homewithhelenandco uses daffodils to give a bit of springtime style to her bath and shower.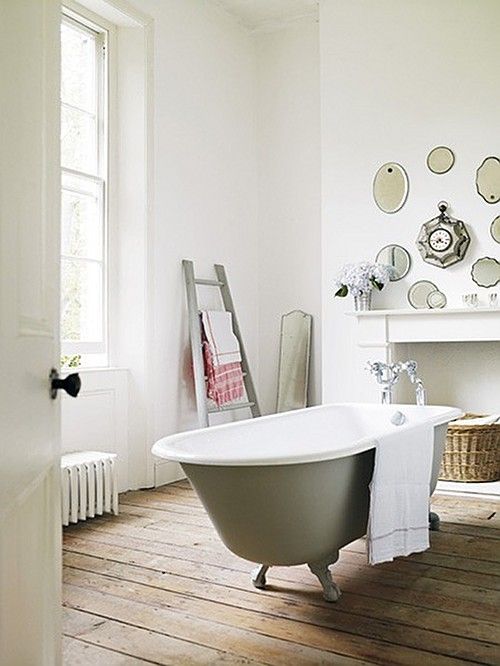
She says: 'I’ve mentioned before that I tiled the bathroom myself. My most asked question is where the tiles are from. I just searched for orange subway tiles on Ebay (yep, they’re orange, not yellow) watched a couple of videos and went for it.'
'If you’re thinking of wallpapering or tiling for the first time, YouTube is invaluable and just take your time. This took me weeks to finish.'
While your own labor is free and the cost of watching online videos is included in your internet package, auction-based e-commerce sites can be a minefield if you don't know what you're doing.
The cost of metro tiles will ultimately depend on how they're sold (per piece or by the box), but we've seen boxes go for as little as $23/£17 per square meter.
Be sure to haggle where you can, know your spending limits and even try searching using misspelled words. Bidding using an uneven amount can make all the difference too.
2. Start with a pot of paint
(Image credit: Annie Sloan)
From beautiful neutral beige, to dark and daring black and navy hues, painting your walls is top of our list when it comes to updating your bathrooms on a budget. And there are many budget bathroom ideas that make the execution both easy and stylish.
Don't just think about painting your walls one single shade. Instead, explore different bathroom paint ideas that experiment with placement, paint types, textures and techniques. For example, whilst chalk paint can add a rustic look your bathroom, a floral stencil can add pretty country details to your bathroom decor.
To keep this budget bathroom decor low-cost and minimal on maintenance, the best paint for bathrooms should be moisture and steam resistant, washable and a formulation that protects the emulsion from mold - something we commonly see in damp areas like the bathroom. Some time-saving variants will be quick-drying and require no undercoat, too.
Lastly, opt for a low odor paint where possible, and keep the room ventilated, to avoid the room smelling too much like paint for days to come.
3. Swap expensive flooring for affordable alternatives
(Image credit: Carpetright)
If you're a fan of tiling, but don't have the DIY expertise or can't foot the financial bill, then luxury vinyl tiling (or LVT) is one of the best water-resistant budget bathroom ideas to consider.
A long shot away from its formerly fashionable, but now outdated lino cousin, this modern bathroom idea imitates more high-end flooring options, and is an accessible choice for homeowners and renters alike. Prices start from a very purse-friendly $2.72/£1.95 per square foot.
What's more, cleaning vinyl flooring is low maintenance too. Using one cupboard staple, you can get this flooring solution gleaming in no time!
4. Upcycle old bathroom furniture
(Image credit: Annie Sloan)
If you have tired, lackluster units that are in need of a bit of TLC - don't throw them away. Across social media sites like Pinterest and Instagram, upcycling old furniture is one of the top trending budget bathroom ideas.
If you have any old units lying around, why not try painting or sanding them to breathe new life into them for your bathroom?
Plus, if you haven't got vanity units that need revamping, Facebook Marketplace, Ebay and Gumtree are great go-tos for where to find secondhand furniture.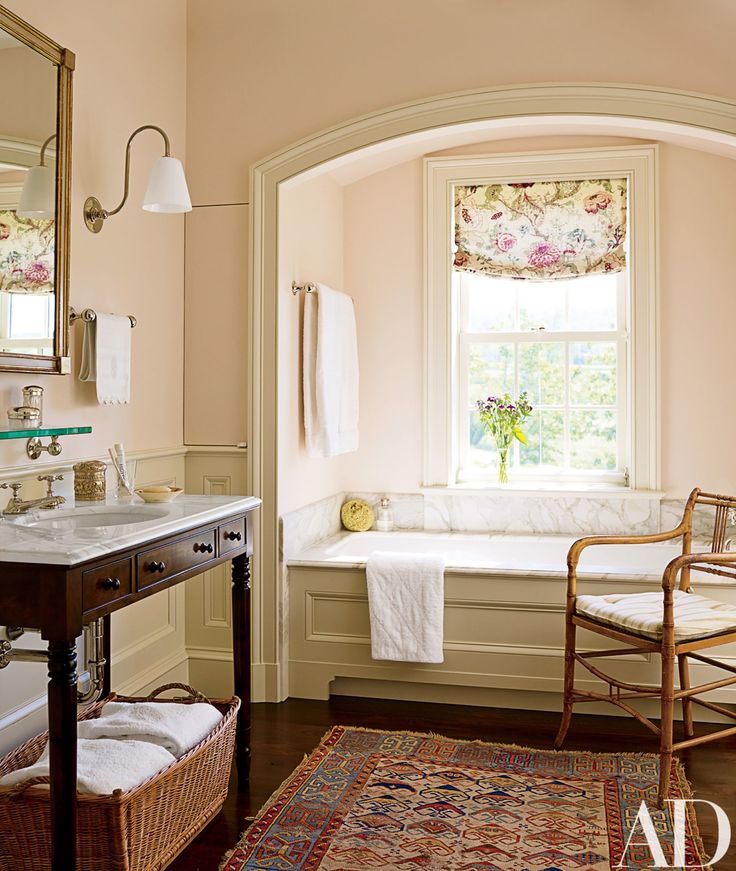
5. Fake tiling with adhesive wall and floor solutions
(Image credit: Brewster Home Fashions)
As the saying goes, time is money, so who wants to spend countless hours doing DIY during their free time? (Unless you enjoy it of course!)
Instead of spending precious time mixing gloopy wallpaper paste, cutting tile after tile and cleaning tile dust off your surfaces – wing it with peel and stick wallpaper and adhesive wall and floor tile solutions.
These sticky solutions aren't tricky! In fact, they are one of many simple bathroom ideas that mimic premium bathroom wallpaper ideas.
So get peeling and sticking for as little as $1.44/£1 per square foot.
6. De-clutter your space like an interiors expert
(Image credit: Christy England)
One of our most cost-effective ideas for doing your bathrooms on a budget, this trendy tip requires no special equipment or designated spend. Simply tidy your bathroom by either stowing away lesser used products or by binning cosmetics, lotions, gels and ointments that are past their expiry date.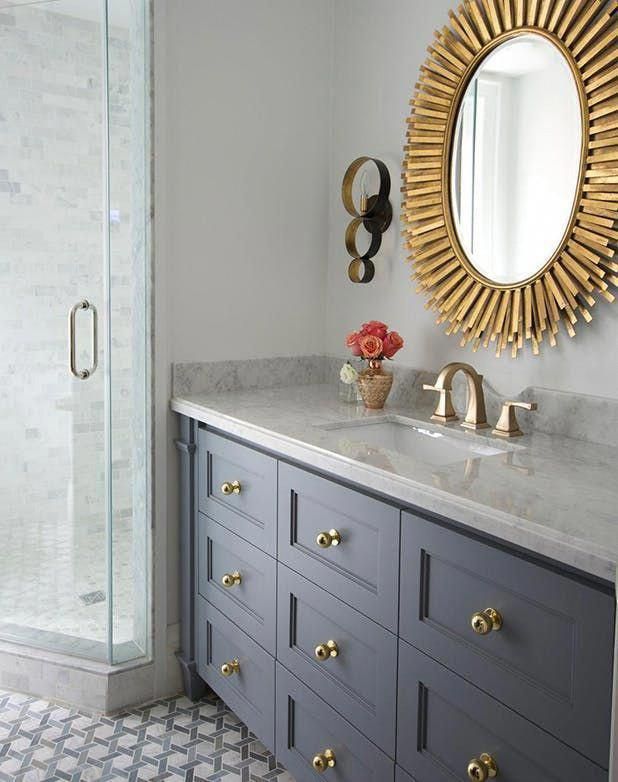
This will instantly give your bathroom an update – turning it from a cluttered messy space to a clean, fresh zen area in which to relax.
But if you're wondering how to determine what goes into the trash can, take a look at the back of your packaging and look for a tub icon. This will indicate how many months the product should be kept for after opening. So off you go - tidy up like Marie Kondo!
And if you're reluctant to get rid of your haul, creating DIY bathroom shelving ideas or a ladder using reclaimed wood is a budget-friendly and thrifty idea. Dollar stores will also stock drawer dividers and other cheap ways to efficiently organize your space.
7. Paint a bathroom ceiling anything but white
(Image credit: Dulux)
Painted ceilings (that aren't white!) are a massive trend at the moment and are a really great way to add interest to a space, especially a smaller space like a bathroom. If you are a keen DIYer and want to give this a go yourself, just check out our guide to how to paint a ceiling.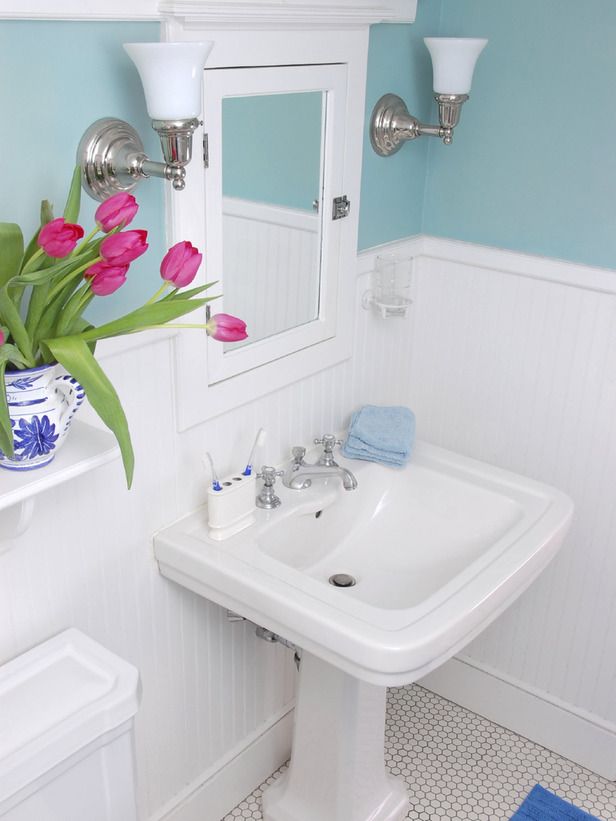
If you're feeling brave and want to copy this gothic look above, we recommend going for a combo of Farrow & Ball Down Pipe and Railings, and investing in good bathroom lighting. Designing a bathroom from scratch? Head over to our feature for an in-depth guide.
Shop Farrow and Ball Down Pipe:
Low Stock
£28
View Deal
Low Stock
£53
View Deal
No price information
Check Amazon
8. Paint a bathroom floor for a quick and affordable update
Painting floorboards has also become a bit of a trend, so if you have floorboards in your bathroom, consider this as a cheap but chic bathroom update. You'll need to use one of the best wood paints, but if you can, use a paint designed for floors as it will be more durable and less slippery – if more limited in color choices.
You can also paint tiles – sometimes, the bolder the better, as seen above!
9. Or paint bathroom walls an unexpected shade
(Image credit: Cult Furniture )
There are few cheaper and easier ways to update a space than by giving it a new lick of paint. Pink room ideas are among our favorites at the moment, and softer shades are a space-enhancing choice for a small room. So if you are looking for an on-trend bathroom update, we say go for a rosy hue. Something like Farrow & Ball's Sulking Room Pink, which despite the name is actually a really grown-up take on the color, would be our fave choice.
Shop Farrow and Ball Sulking Room Pink:
Low Stock
£5
View Deal
£31
View Deal
Low Stock
£31
View Deal
Show More Deals
10.
 Paint your bathroom tiles
 (Image credit: Ikea)
If you don't want the expense (and mess!) of taking down bathroom tiles and starting all over again, consider painting over your bathroom tiles. This is a relatively quick and cheap bathroom tile idea for bathrooms on a budget.
Whether you want to paint your tiles one color, or create a gradient ombre finish, a pot of paint goes a long way to achieving a luxury bathroom design for less.
Most tile paint only needs one coat, but with its high VOC content, be sure to keep it out of reach of children and keep the room well-ventilated to extract the fumes from this solvent-based solution.
It's also worth noting that gleaming grouting goes a long way, so you remove any grubby gunk before ploughing ahead.
11. Create an ombré paint effect
(Image credit: Annie Sloan)
Experimenting with on-trend paint ideas is an easy and affordable way of creating a new vibe in a tired looking space, on a budget. Copy this idea and pick two or three shades of varying tones (we'd recommend blues for a bathroom) and create a stylish finish with the help of our guide to how to paint an ombré accent wall.
12. Experiment with bathroom wallpaper
(Image credit: Drummonds)
Bathrooms and wallpaper? Surely that's not a good mix? Well, actually, it can work if you just follow a few extra steps when choosing and hanging your wallpaper. First, don't hang wallpaper anywhere that will be in constant contact with water (such as inside a shower!) – and if your bathroom isn't very well ventilated we would recommend sticking to wallpaper specifically designed for bathrooms. Otherwise, you can use any wallpaper you like, but make sure you use extra strong wallpaper adhesive; a layer of clear varnish can help protect it further, too.
13. Invest in stylish bathroom storage to make more space
(Image credit: katie lee)
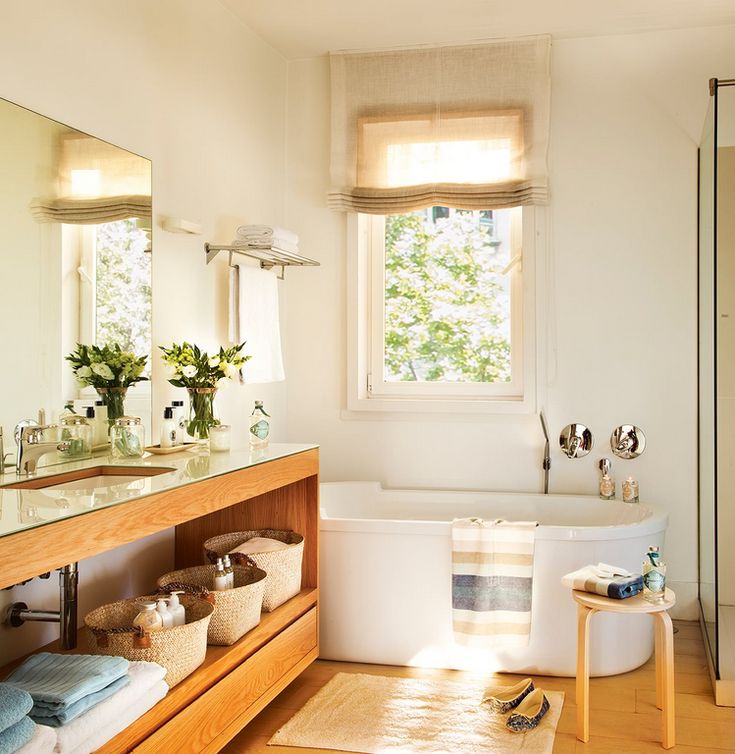
Obviously, shelves are a good bathroom storage solution, but make them both practical and stylish by choosing open shelving that you could also make a bit of a feature of. Use them to store your essentials, your soaps, cotton wool, floss and whatnot (stick them in some pretty glass jars if you want) – but also mix in some more decorative pieces like candles, house plants and cute folded towels.
Get some more tips on how to style shelves in our dedicated feature.
Shop open shelving:
10 Amazon customer reviews
☆☆☆☆☆
£18.97
View Deal
£43.99
View Deal
£45
View Deal
Show More Deals
14. Update towels – and how you store them
(Image credit: Dunelm)
Literally the cheapest way to update your bathroom is to get yourself a few new towels.![]() Also think about mixing up the way you store them. You didn't spend money on new towels to fold them away in a cupboard, so get your fancy new towels out on show! Something like a gorgeously simple wooden ladder would be perfect.
Also think about mixing up the way you store them. You didn't spend money on new towels to fold them away in a cupboard, so get your fancy new towels out on show! Something like a gorgeously simple wooden ladder would be perfect.
Shop towel ladders:
126 Amazon customer reviews
☆☆☆☆☆
£37.99
View Deal
15. Add simple bathroom accessories for a fresh feel
(Image credit: Jeremy Phillips)
A quick, inexpensive (and often practical) way of updating your bathroom is with accessories. We are talking soap dispensers, toothbrush holders, caddies, storage jars, all the fun stuff. Look out for cheap bathroom accessories when you next do your food shop; supermarkets like Walmart, Target, and Tesco and Sainsbury's in the UK all have really lovely and super affordable pieces.
Shop stylish bathroom accessories:
144 Amazon customer reviews
☆☆☆☆☆
£6.75
View Deal
Reduced Price
£15
£9.99
View Deal
Deal ends in 14h 48m 23s
£10
View Deal
Show More Deals
16. Brighten and enlargen a bathroom with a mirror
(Image credit: Fritz Fryer)
It's interior design 101 that mirrors can add a ton of space and light to a room, which is obviously going to make your bathroom feel fresher. So, you know what we are going to say: buy a new bathroom mirror. Go as large as your space can handle to bounce as much light around as possible.
Have we persuaded you to invest? We've rounded up the best bathroom mirrors in our buying guide, so go and have a scroll through those.
Shop mirrors:
7 Amazon customer reviews
☆☆☆☆☆
No price information
Check Amazon
17. Decorate with tile stickers
(Image credit: Drummonds)
We only recently discovered the life-changing properties of tile stickers. They mostly come in at under $10/£10 a pack and you can use them pretty much anywhere. Look out for ones that are water-resistant (most of them are), and you can stick them over the existing tiles in your shower to recreate this look – no messy grout or expensive patterned tiles needed.
(Image credit: Simon Whitmore)
Oooooh look, you can use them on the floor too! Stick on tiles for your floor are available at most good DIY stores, and are so easy to use/install.
Shop tile stickers:
£8.22
View Deal
£10.46
View Deal
£18.99
View Deal
Show More Deals
18. Get rid of grime in between your wall tiles
(Image credit: Original Style)
Want to update your bathroom tile for free? Well, almost. Then learn how to clean tile grout like a pro.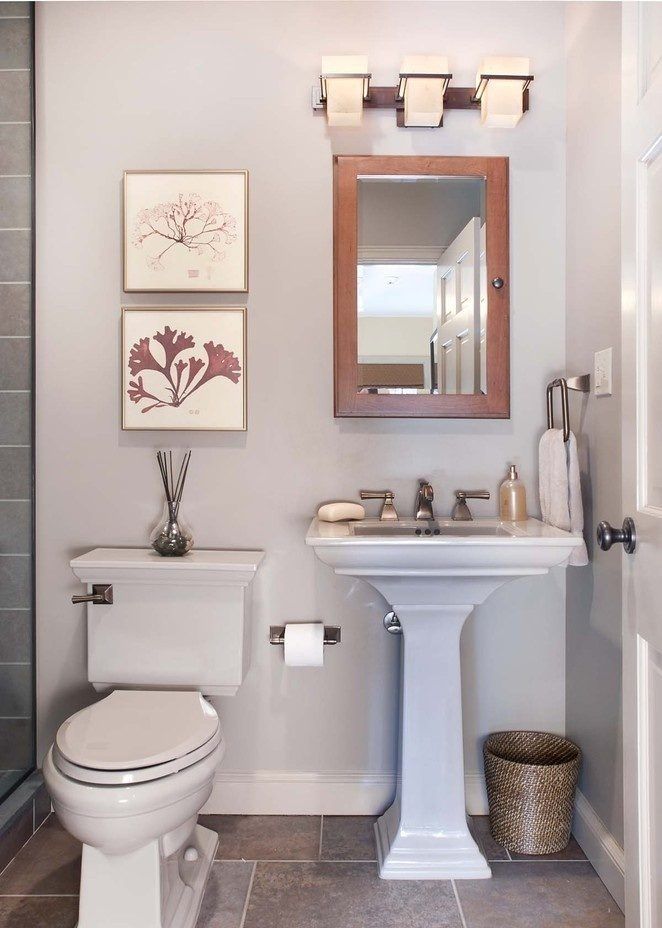 All you need is a toothbrush, a good cream cleaner and a little bit of elbow grease. By getting rid of dirt and debris in between your grout, you'll instantly brighten up your bathroom walls for barely any cash at all.
Get the paste into all the nooks and crannies and then leave for about 30 minutes to let it work its magic. Once you’ve left it for a while, simply rinse off with clean water and wipe up any residue with a microfiber towel.
Top tip: Baking soda and vinegar mixed makes for a great natural cream cleaner that will leave your grout sparkling. We actually have a whole feature on natural cleaning hacks, so make sure you go and check that out too. But if the stains still remain, an affordable grout pen should do the trick once and for all.
Shop grout pens:
925 Amazon customer reviews
☆☆☆☆☆
£1.99
View Deal
£10.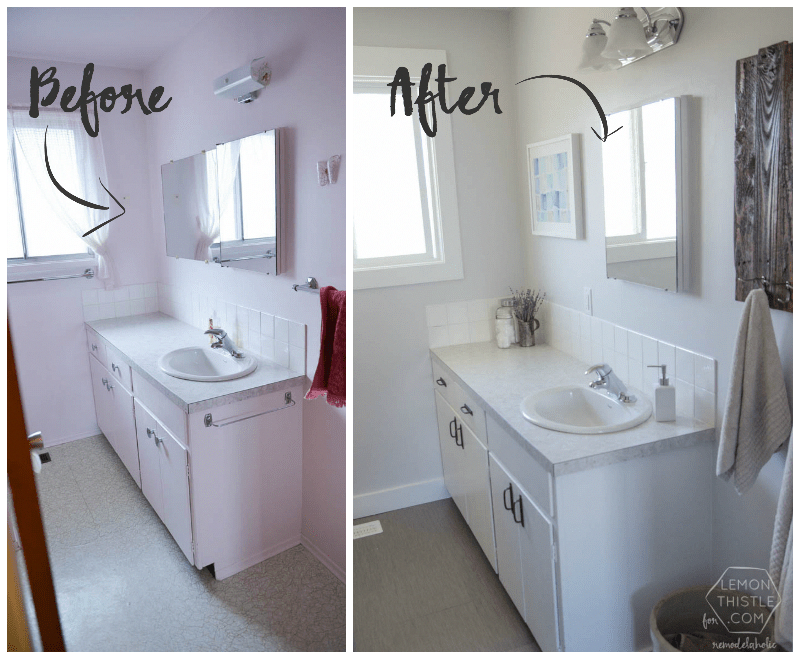 29
29
View Deal
£11.95
View Deal
Show More Deals
19. Fill your bathroom with house plants
(Image credit: Nest)
Bang on the biophillic trend, adding the best air purifying plants to your scheme is a budget bathroom idea that will bring the outdoors in and detox your space. From increasing productivity and boosting your mood, the list of health benefits of houseplants just keeps growing and growing.
From handmade macrame hangers to ceramic pots, DIY plant shelves and living walls, there are endless ways to style your plant babies.
Be sure to choose high-humidity bathroom plants that will thrive in this space. Some hardier varieties simply need a regular mist or spray of water to keep them hydrated, but set your alarms to ensure they don't die from dehydration.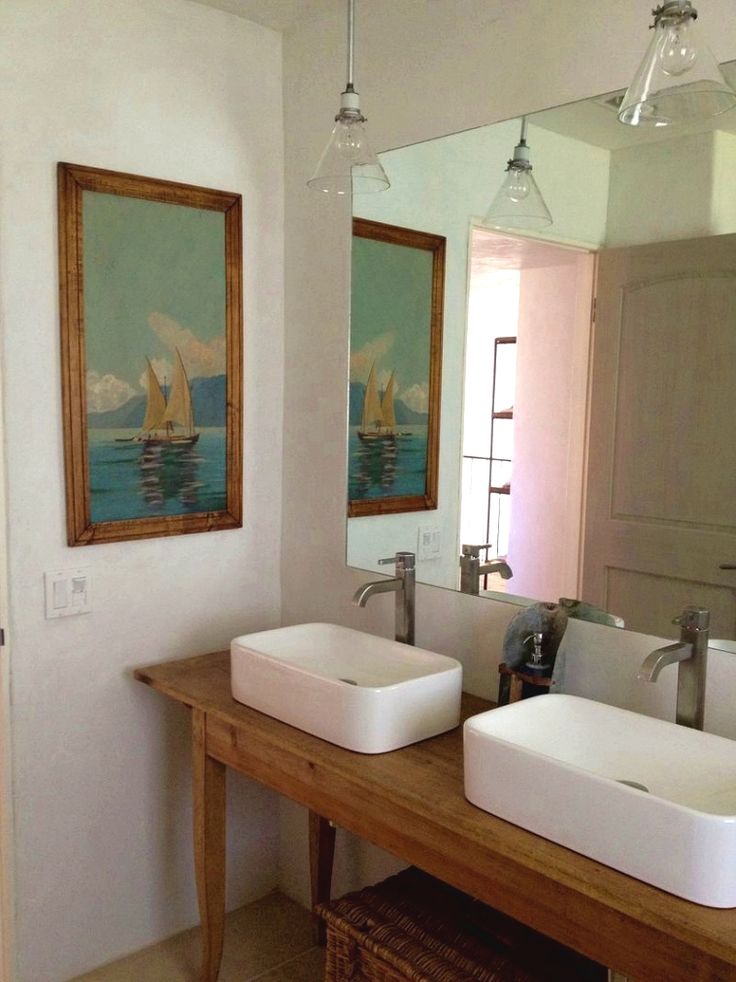
Top tip: If your bathroom is windowless, we recommend opting for fake plants. You'll find a load of fake (and real) options in our round up of the best indoor plants.
Shop house plants:
£3.59
View Deal
Low Stock
£23.99
View Deal
£135
View Deal
Show More Deals
20. Switch up your shower curtain
(Image credit: H&M)
Throw away that yellowing, ever so slightly moldy shower curtain. Go on, do it now. And get yourself a gorgeous shiny new one. It will give your bathroom an instant update, especially if you choose a neutral option that'll let the other standout features in your room shine.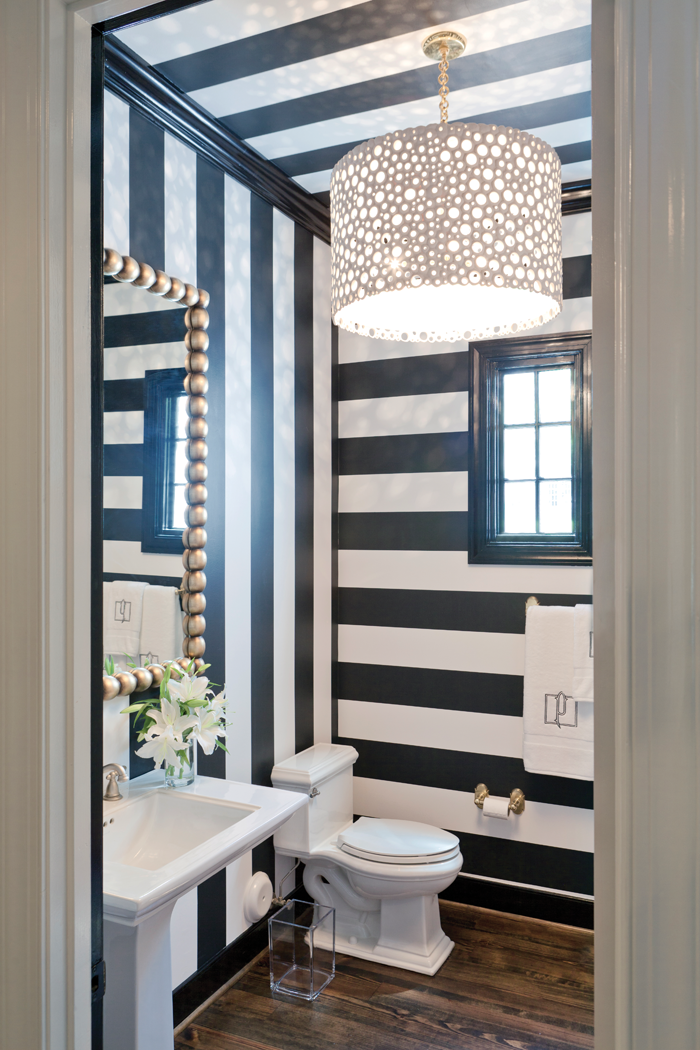
Shop stylish shower curtains:
£8
View Deal
£10
View Deal
No price information
Check Amazon
Show More Deals
21. Hang a gallery wall
(Image credit: Waters Baths of Ashbourne)
Treating your bathroom decor and styling like you would that of your living room or bedroom is one of the quickest (and cheapest) shortcuts you can take to giving it a bold new look. Hanging a gallery wall is one way to do this – and you needn't even spend to get this finish; simply repurpose pictures you're not using or want to swap out from other rooms.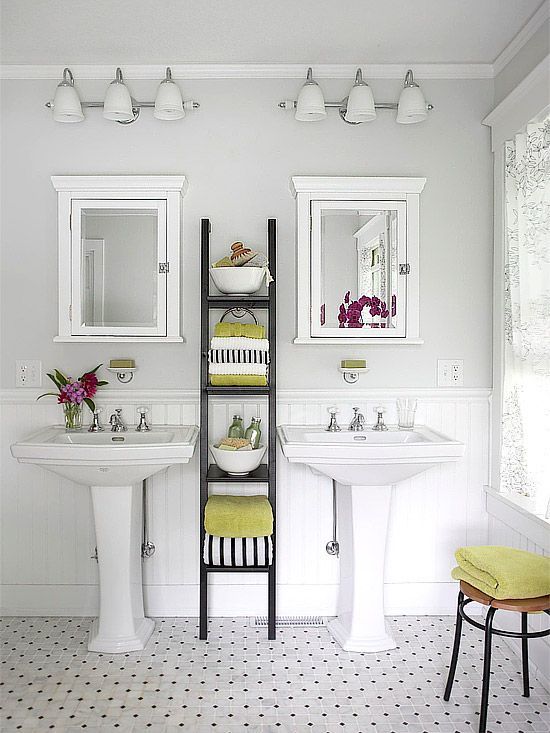
Bathrooms on a budget: under $100/£100
So, you've got a bit more of a budget to spend on your bathroom, but still want to keep your spend under $100/£100? Here are some ideas that will have more of an impact, but still won't break the bank...
22. Illuminate your bathroom with inexpensive lighting
(Image credit: Leader floors)
As budget bathroom ideas go, lighting is one of the brightest ways to make your suite look expensive. From sophisticated wall lights to stunning ceiling chandeliers, statement pendants and modern lampshades, these bathroom lighting ideas fittings and fixtures will make your space shine.
Be sure not to overlook bulb sizes and light color temperatures. While cool light is generally considered better for tasks such as applying makeup, you'll want warm light for creating a calm and tranquil bathtime atmosphere.
But, as we know, water and electricity do not mix well. So ensure you put safety first by consider bathroom lighting zones and IP (Ingress Protection) ratings. Put simply, these ratings will determine how well the electrical enclosures are sealed away from moisture, dirt and debris which can be a health hazard.
23. Wow with window treatments
(Image credit: 247 Blinds)
From cut-price curtains, to discount drapes, low-cost window films and bargain blinds, there are loads of bathroom window treatment ideas that can add privacy and style to your decor.
What's more, many of today's modern materials can block UV rays, offer customized levels of light and keep the room cool by blocking out the sun's heat. But rather than going straight to the leading manufacturer, it pays to shop around.
When working out how to measure up for curtains, making sure you get your measurements correct is absolutely essential. Fittings that fit flush to your window space and look bespoke will make the space appear more expensive.
Once you've chosen your material, another way to save with this budget bathroom decor is by fitting the window treatment yourself. Ensuring you know how to put up a curtain pole is just one step towards a successful project.
Shop roller blinds:
£14.72
View Deal
£35
View Deal
No price information
Check Amazon
Show More Deals
24. Upgrade your shower head
(Image credit: Big Bathroom Shop )
Changing your shower fitting is one of the best ideas for updating your bathrooms on a budget.
Opulent finishes like brass can quickly turn your bathroom into an expensive-looking haven. Just be sure to keep abreast of the advice on how to clean brass to ensure this luxe look stays well-maintained.
As technology and the demand for creative options grow, you're literally showered with options. Choose from a fixed or handheld shower head, and even fixtures with jet or spray options for a sensual spa bathroom experience.
25. Swap time-consuming tiling for a sheet wall covering
(Image credit: Showerwall / Victorian Plumbing)
We're sure you can agree that dodgy DIY tiling or cowboy builders cost a small fortune, and are a stress that absolutely NO ONE needs in their life when updating their bathrooms on a budget.
So instead of running the risk of botched bathroom tile ideas, why not invest in a sheet wall covering that you can install yourself? These large decorative wall panes come in various material types including marble and natural stone for a luxurious look at a lower cost price.
26. Buy some new pieces of bathroom furniture
(Image credit: Barker & Stonehouse)
We aren't talking a new bath here, or even a new sink – something like a side table or a new statement stool will do. Look for pieces that aren't necessarily made for bathrooms that will add more interest to your space. We love these rustic wooden stools from Etsy , which could actually be pretty practical for chucking towels over or keeping things handy near the bath.
The gorgeous little cabinet in the bathroom above is definitely on our lust list!
27. DIY a stylish bath panel
(Image credit: Nick Smith)
The queen of amazing DIYs @thisenglishhome totally transformed her bathroom by making a new cane bath panel on a budget. You can find all the steps you need to know over on Victoria's Instagra – just check out the Bathroom highlight for everything you need to recreate this look.
Or, just head over to our guide for how to DIY a bath panel for everything you need to know.
28. Or, paint your bath panel
(Image credit: Genie)
If you don't fancy that big of a DIY project though, revamping a plain white tub with a bright bath panel is easy to do and a quick way to refresh a tired-looking scheme, injecting a bit of pattern and color.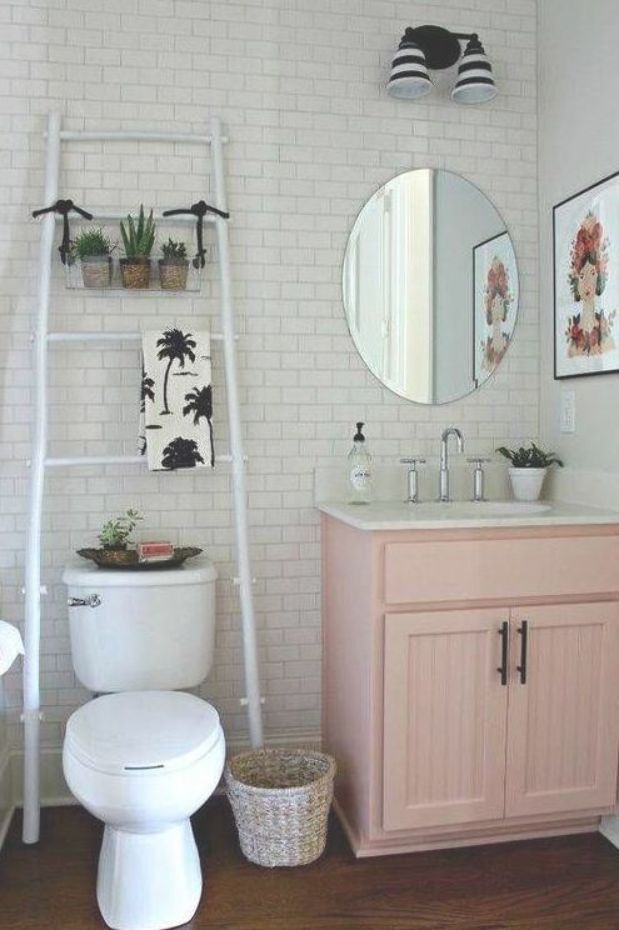
Choose the correct bathroom paints and make sure you pick an option that goes with the rest of your color scheme.
Bathrooms on a budget: under $500/£500
Still not blowing all your budget – but if you've got a touch more to spend on your space, here are some affordable ideas that still come in at under $500/£500...
29. Choose bespoke bathroom pieces
(Image credit: Neptune)
Opting for unique or bespoke pieces can be a great way of adding character into bathrooms on a budget. If you're an experienced DIY-er, consider customizing pieces you have already got; we love the idea of turning a cabinet into a washstand, and it's much more straightforward than you might think. Simply cut out a hole where the basin should be – most come with a template.
If you are on the hunt for a vanity unit, we have load of inspiration over in our bathroom vanity ideas gallery.
Shop vanity units:
No price information
Check Amazon
30.
 Or trawl online marketplaces for one-off finds
(Image credit: Jody Stewart)
Buying a whole new bathroom might not quite be in your budget, but you'd be surprised what cool pieces you can find second hand. We know, you are probably thinking, 'Err... I don't want anyone's second hand toilet, thanks'. But how about a reclaimed freestanding bathtub with ball and claw feet? Or a vintage Victorian sink? A hand-me-down bathroom doesn't sound so gross now does it? Keep an eye on sites like eBay and Etsy for these kind of unique pieces.
31. Buy an ex-display or sale suite
(Image credit: Mereway Kitchens & Bathrooms)
A great tip to help you control your budget is to buy ex-display bathroom hardware. More often than not, these items are do not carry any cosmetic defaults - they are simply surplus stock or end-of-range items from the store.
While in some cases you're still covered until the brand's guarantee or warranty, it's worth double checking with the store you purchased the goods from.
Make sure to keep hold of any receipts and documentation to manage your expectations on what can be refunded or exchanged as the terms may differ from 'normal' policy.
32. Replace your bathroom fittings
(Image credit: Chris Snook)
If your bathroom fittings – taps, showerheads and the like – are looking a bit worse for wear, maybe it's time to get them replaced. They aren't really something you notice until you change them up and realise you've put up with that gross showerhead for way too long. Black fixtures are bang on trend at the moment and there are loads of affordable options out there. Or, for an equally trendy but slightly warmer look, try bronze or copper fixtures.
Shop cheap bathroom fittings:
41 Amazon customer reviews
☆☆☆☆☆
Low Stock
£35
View Deal
£60. 96
96
View Deal
Reduced Price
£396.99
£329
View Deal
Show More Deals
33. Update your bathroom with wall paneling
(Image credit: Graham & Green)
Wall paneling is a more affordable alternative to wall tiles, especially if you can fit it yourself, which most experienced DIYers would be able to do. Just be aware when using paneling in bathrooms that although, MDF designs painted with an oil-based finish are water-resistant, they shouldn't be used where they will be soaked. This is one of the best bathrooms on a budget ideas for a really premium finish.
How can I modernize my bathroom cheaply?
1. Work with the bathroom you have got
The first rule of renovating any room on a budget is to salvage whatever you can from the current design. This could potentially save you lots of money in replacing items that are serviceable but just need a little TLC. However, don't keep something if it will have a cost impact in another way. For example, it might be cheaper to replace a whole bathroom suite, than try to find separate replacements to match one another.
The most important thing though is to try to maintain the existing plumbing layout if possible. Keep the waste and water inlets as they are and try to place sanitaryware accordingly to keep plumbing costs down. Acquainting yourself with the rudiments of bathroom plumbing can help you make the right choices for your budget, too.
2. Take on bathroom renovation work yourself
As mentioned in many of our ideas for doing your bathrooms on a budget, doing things yourself can save you huge amounts. Take on DIY tasks that you feel confident with, but leave anything that involves the cutting or adjustment of expensive materials to a professional.
3. Choose sanitaryware on a budget
Other than shopping around online or waiting for sales, what can you to do maximize savings on sanitaryware?
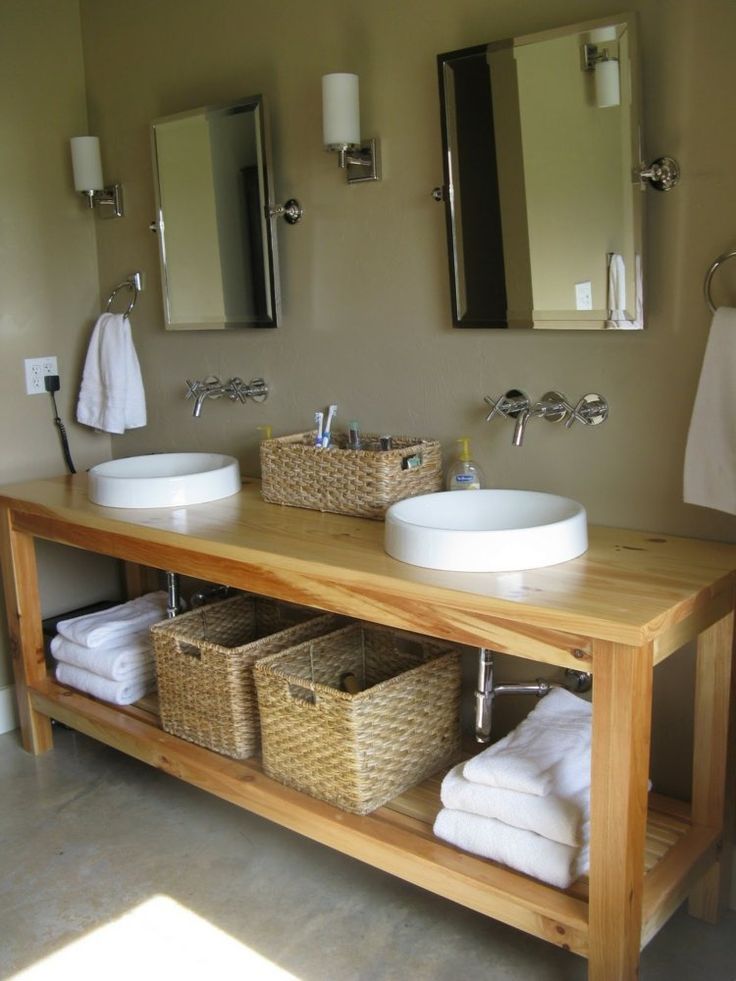
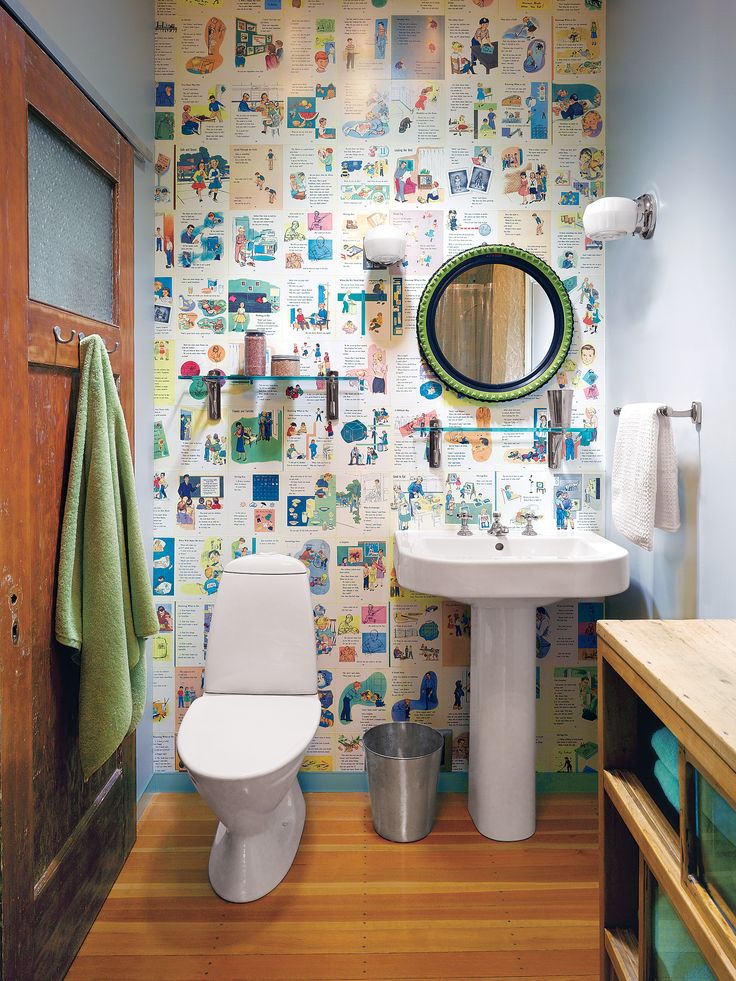
When it comes to choosing bathroom sinks, a pedestal model or wash-stand, which has legs, is usually less expensive than a vanity unit or cabinet and makes a striking standalone piece. If you need more storage space than this type of sink can offer, add simple shelves to an alcove, and supplement with smaller bathroom storage solutions such as baskets, caddies and hooks.
To make savings, you may be tempted to mix and match sanitaryware from different brands. This can work where styles are similar, but do check the colors very closely, as not all whites are the same. This also goes for adding a pristine new item into an existing, slightly aging suite.
If you are buying the fittings for your builder to install, before purchasing double check the practical matters, such as changing an old-fashioned high-level cistern over to one that is close coupled, or if the position of bathroom taps and/or waste is due to change. Moving taps and waste pipes will involve extra work and expense.
Hebe joined the Real Homes team in early 2018 as Staff Writer before moving to the Livingetc team in 2021 where she took on a role as Digital Editor. She loves boho and 70's style and is a big fan of Instagram as a source of interiors inspiration.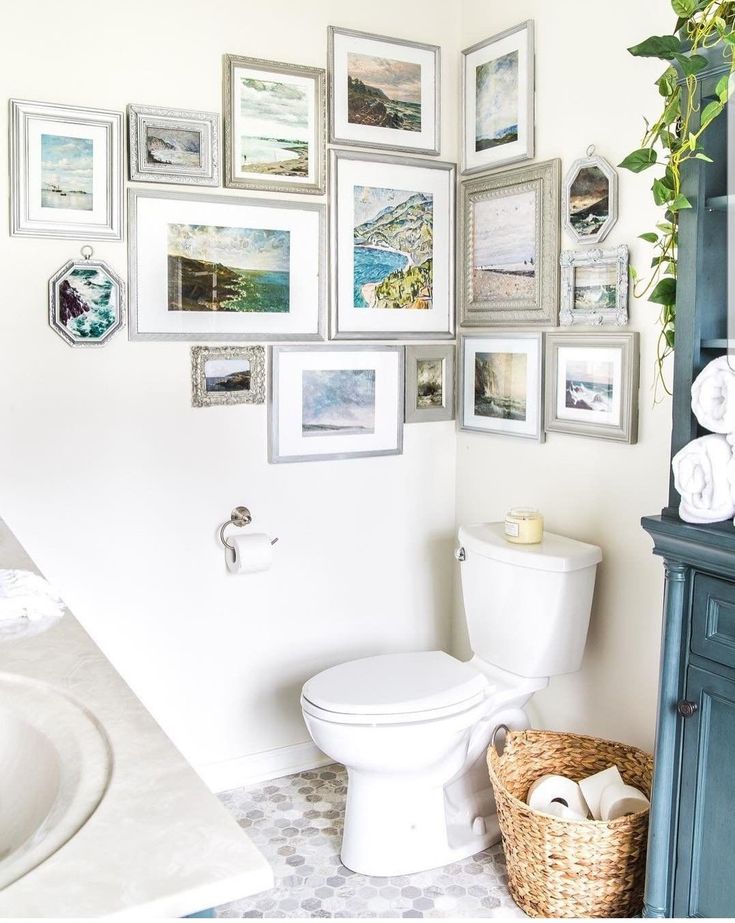 When she isn't writing about interiors, she is renovating her own spaces – be it wallpapering a hallway, painting kitchen cupboards or converting a van.
How to finish a bathroom cheaply? 7 most budget options
Painting the ceiling
See also
13 ways to finish the bathroom instead of tiles
The cheapest way to update the ceiling in the bathroom is to simply paint or whitewash it. Painting will not take much time, and will not change the height of the room.
The material used is water-based, latex, acrylic or silicone paint. The matte composition hides small irregularities, and the glossy composition slightly raises the ceiling visually. Before painting, it is important to level the ceiling with a moisture-resistant putty and sand it, eliminating all defects.
One of the main advantages of paint is that the ceiling can become any color: just add color. An unusual accent will give the room originality.
Wall Painting
Some people still associate wall painting with horrible oil paint that peels off in chunks over time.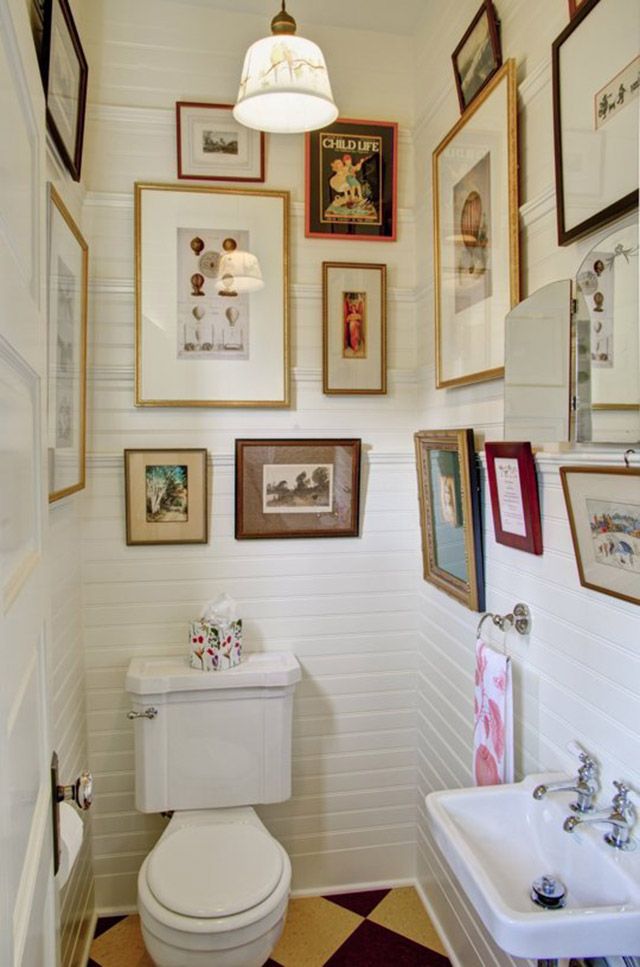 But today's materials have come a long way in their performance properties, and many designers use paint in their projects.
This is especially true if you want to save money on repairs: the shower area should be tiled, creating a bright accent, and the remaining areas should be painted. The material gives a wide field for creativity, besides, it allows you to design a bathroom in any shade and change its appearance in a couple of days.
Alkyd enamel is suitable for painting, which will form a film and protect the walls from moisture. Another good option is water-dispersion formulations, which are almost odorless. They dry quickly, but are not resistant to abrasives and washing with hard brushes.
See also
How to glue back the fallen tiles in the bathroom? Reliable way
If the tiles in the bathroom hold well, the seams do not sag, and the elements themselves do not have chips, the surface can simply be painted.
This solution is suitable for those who want to renovate their bathroom but don't want to spend time and money on new tiles.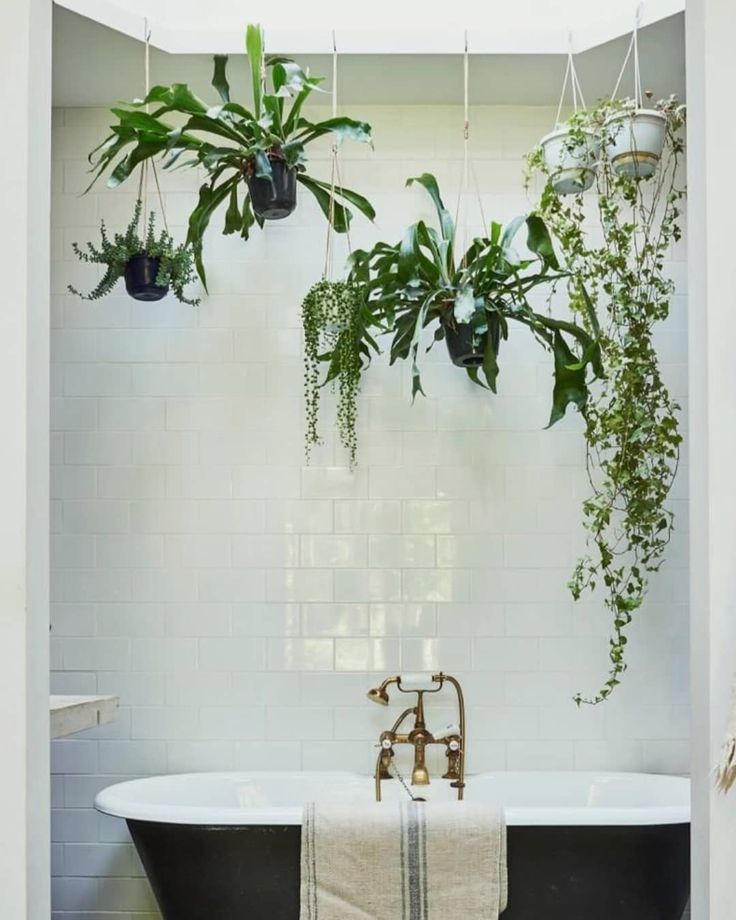 At first glance, the idea seems doubtful, but practice shows that, subject to technology, the paint fits well on the tile and keeps well.
It is important to wash the surface, degrease it and sand it with sandpaper (a grinder will do it faster). Further, it is necessary to apply a primer, for example, Otex. After the primer is completely dry, the tiles are covered with 2-3 layers of wet room paint
Wall panels instead of tiles
The range of modern bathroom panels is so rich that their choice is not difficult. The simplest and cheapest option is PVC, better and more expensive is MDF. PVC panels are long sheets of plastic with internal perforation and an external pattern. They can be matte, glossy, imitate stone, wood, tile and mosaic, or have a neutral shade.
PVC panels are installed without the help of specialists, easy to clean. Goes well with coloring. To install the panels, it is necessary to fix a frame made of wood, metal or plastic on the facing wall, purchase a special fixing solution, primer, sealant and corners.
Wallpaper or self-adhesive
Another way to save the family budget is to use moisture-resistant wallpaper instead of tiles, bypassing wet areas. This material allows you to make the bathroom more "residential" and cozy, great for recreating the classic style, as well as country and contemporary. In any case, beautiful wallpaper will give the room character and surprise guests.
When choosing wallpaper, you should give preference to canvases that show markings in the form of three waves and a brush. The optimal solution is vinyl, which masks the imperfections of the walls and is easy to clean. By decorating the bathroom with wallpaper, you will save money and time: unlike tiles, they are cheaper, and it takes no more than two days to stick.
Another option: self-adhesive film. It has a wide choice of colors, and its back side already contains glue. The front side consists of a pattern with a polymer coating that protects the material from moisture.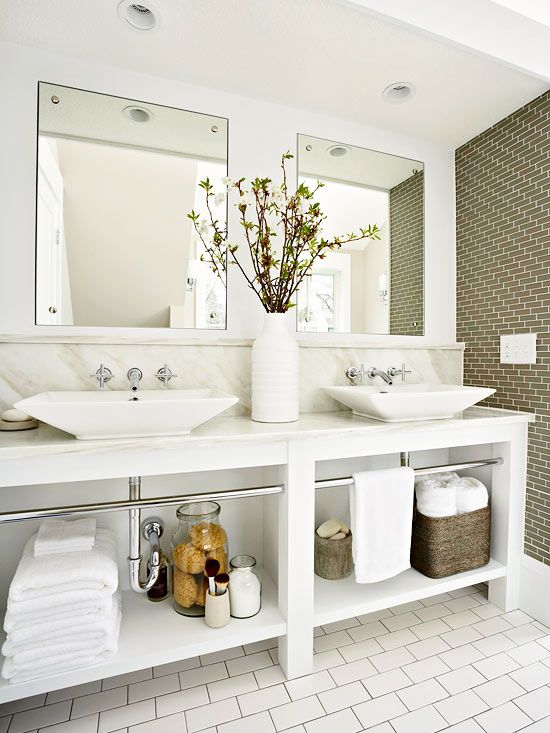
Before pasting the walls, they must be degreased and carefully leveled, since the film does not hide, but often emphasizes defects. Another advantage of the self-adhesive film is the quick "commissioning" as there is no need to wait for the adhesive to dry. The material is easy to care for - just wipe with a damp cloth.
Lining
Often used in baths and saunas, where the operating load is much higher than in urban bathrooms. When decorating with clapboard, it is important to observe certain conditions:
- Coat the walls with an antifungal agent before installation.
- For fixing on the walls, it is necessary to use a load-bearing frame made of a metal profile.
- Reiki must be treated with moisture-proof compounds - wax, oil or varnish.
Advantages over tiles: high machinability (easier to cut and drill), economy, natural wood pattern. It is allowed to mount shelves on the lining, but not wall cabinets. For the bathroom, it is better to use budget pine or a slightly more expensive larch.
Clapboard is suitable for both walls and ceilings. She can also close the bathroom by creating a protective screen.
Bathroom without decorative finishes
Exposed bricks and concrete have long been perceived as something rough and cheap: this is an actual design technique actively used in loft interiors. Brickwork adds relief to the room, so it looks interesting and attractive.
Gray concrete makes a great backdrop for any bright accessories and snow-white sanitary ware. Such surfaces must be treated with antiseptic impregnation, and the bricks must be coated with moisture-resistant varnish. 9See also Modern companies produce linoleum, which imitates the texture of wood, tile or stone well, so the bathroom will look dignified and aesthetically pleasing.
The coating is easy to install and clean, and its tactile properties are much more pleasant than porcelain stoneware.
Another synthetic but durable and cost-effective floor covering is PVC floor tiles. It is also easy to install, does not swell or swell, perfectly protecting the floor from moisture.
Despite the relatively low cost of the materials used, the bathroom can look stylish and aesthetically pleasing: the main thing is to carefully prepare the surfaces and act with the utmost care.
3 best finishing technologies, with panels, how to make it yourself beautifully cheaper, budget repair option, simple, inexpensive, cheapest, interesting ideas, bathroom, how to finish a bathroom cheaply, budget decoration, than to paste over walls inexpensively, than to finish, paste over , sheathe, a bathroom except for tiles is cheap, how to repair inexpensively, economical, cosmetic, photo, design.
A bathroom can be elegantly refurbished with even the simplest building materials. It is not necessary to purchase elite porcelain stoneware and lay out walls with it up to the ceiling, order stretch ceilings, spend money on arranging underfloor heating with marble, it is enough to have a desire to do repairs, the ability to handle tools and a small fraction of good taste.
Budget renovation in the bathroom
Material content
- 1 What does "budget" mean?
- 2 DIY wall painting
- 2.1 Step 1. Choose the paint for the bathroom
- 2.2 Step 2. Prepare the walls for painting
- 2.3 Step 3. Prepare materials and tools
- 2.4 Step 4. Prepare the workplace
- 2.4 Step 5. Start painting
- 2.6 Step 6. Painting technology
- 3 Wall decoration with PVC panels
- 3.1 Step 1. Installing the battens
- 3.2 Step 2. Installing plastic panels
- 3.3 Video: Finishing the walls in the bathroom in 1 day with plastic panels. Inexpensive repairs in the bathroom with your own hands
- 4 Wall wallpaper with wallpaper
- 4.1 What wallpaper for pasting the bathroom
- 4.2 Step Preparation
- 4.3 Step 2. Algorithm for gluing vinyl wallpapers
- 5 How to renovate a bathroom loft-style room
- 5.
 1 Video: How to save money on bathroom renovation
- 5.
What does "budgetary" mean?
Under the word "budget" in the article will be considered options for finishing the most affordable materials:
- paintwork;
- PVC panels;
- wallpaper.
In addition, the secret of creating an interior in the loft style will be revealed and it will be proved that brick as a finishing material in the bathroom is not inferior to other materials. After all, "budget repairs" can also be stylish.
Budget bathroom design
Loft style in the bathroom
Vintage bathroom
DIY wall painting
Wall painting is considered one of the easiest and least expensive ways to finish. It is important to choose the right paint and prepare the surface of the walls.
Painted bathroom walls
Bathroom decor
Tip! Design your bathroom. It is not recommended to cover absolutely all surfaces with paint, it is advisable to close the areas near the bathtub and sink with moisture-resistant panels or finish with an apron made of inexpensive ceramic tiles.
Step 1. Choose a bathroom paint
Bathroom paint should be antibacterial and moisture resistant. Otherwise, the appearance of fungus and peeling of the coating cannot be avoided.
- MOHY -resistant paint
- MOHY -resistant paint for walls and ceilings
- MOHY -resistant painting for walls and ceilings "Optimum"
Due to their low cost and excellent performance, latex, silicone, and acrylic paints are most widely used. At the same time, water-based mixtures do not have an unpleasant pungent odor, and silicone paints can act as a hydrobarrier.
NovaTech Interior Wall and Ceiling Paint
Conventional oil paints lack that merit and also crack quickly, so this option is best discarded right away.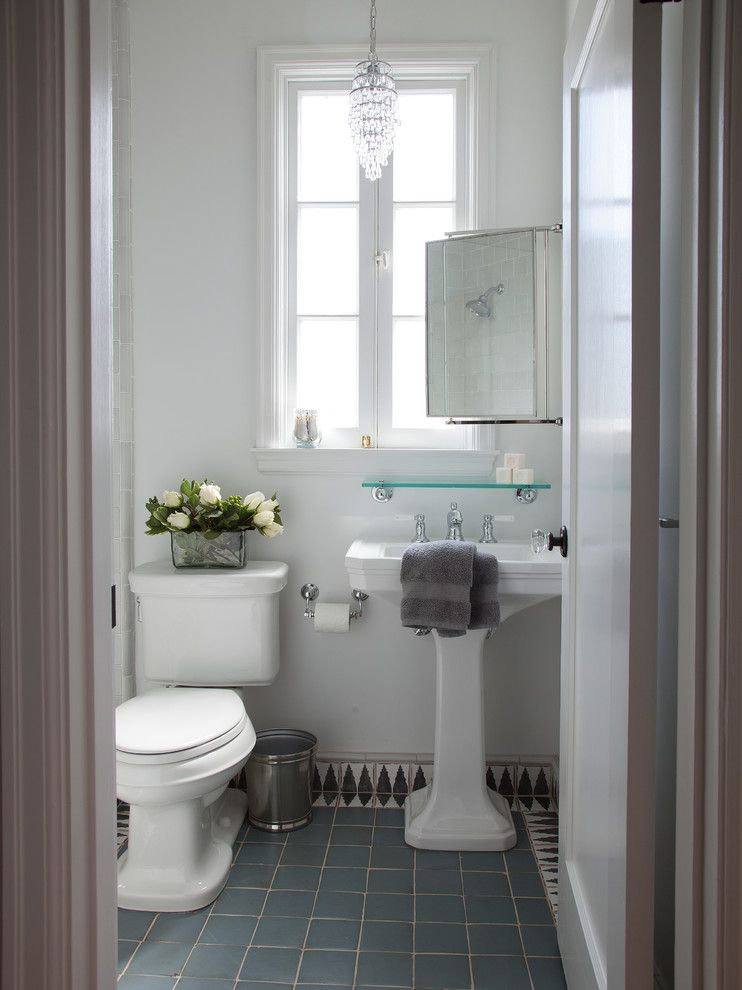
Oil paint
When choosing shades, remember that it is inappropriate to paint small bathrooms in dark colors, as this will visually reduce the space even more. Do not overdo it with the number of bright spots or complex patterns and their number so that the interior does not look vulgar. Soft pastel colors will visually expand the room and fill it with light.
Choose colors from the manufacturer's catalog
Please note that colors can be matte, glossy and semi-gloss. Of this variety, it is matte enamels that hide small defects on the walls best of all, while drops and streaks are clearly visible on glossy surfaces. However, if you can't make a choice, consider combining glossy and matte finishes. This technique will make the bathroom modern and stylish without significant costs.
The photo shows a combination of matte and glossy paints
bathroom paint
Step 2. Preparing the walls for painting newspapers, because preparing the walls for painting is the dirtiest and most time-consuming step.
Do not apply new layers of paint over the old peeling, nothing good will come of it. If you have a drill in your arsenal, get a couple of sanding attachments for it and clean off the old paintwork from the walls. Remember safety precautions. 9No drill? Use paint strippers, a scraper, and a spatula. The method is effective, but it is better to work in a respirator and gloves made of thick rubber.
Old paint remover
Chemical paint removal
Scraper
If the paint has been applied to the walls for a long time, chemicals will not cope with it. Heat the wall section and scrape off the peeled coating with a narrow spatula.
Removing old paint from the walls with a gas burner
When all the old paint is removed from the walls, it is necessary to repair cracks and potholes, knock down the ledges.
Fill cracks and gouges in the wall
Crack Repair
Step 3: Prepare Materials and Tools
Prepare paint and tools, following manufacturer's instructions.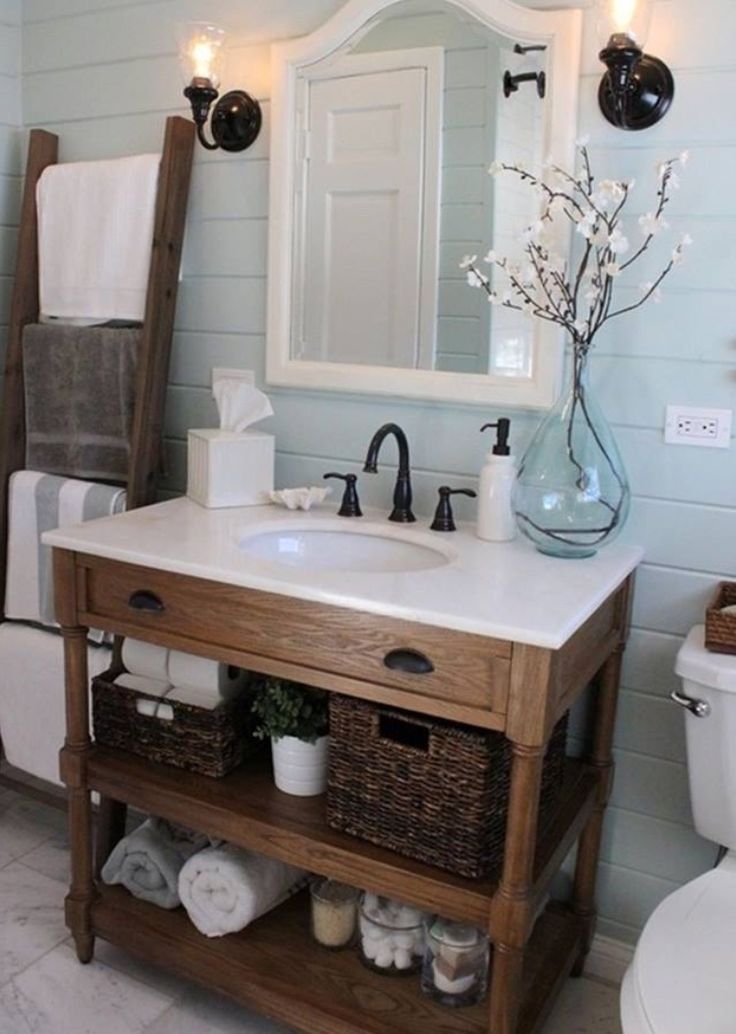 To apply paint, you will need a roller, brushes, if you have an airbrush - great. Before purchasing, measure the area of the surfaces to be coated, adjust the amount of material, taking into account the volume. For high-quality painting, it is better to apply two layers, keep this in mind at the time of purchase.
Brushes, rollers, ditch
Step 4. Workplace preparation
Clear the workspace near the walls from unnecessary items, if you are not going to redo the floor coverings, then cover them with film or paper. Carefully protect the tub and sink from dirt.
Protecting surfaces with masking tape
Protecting surfaces when painting walls
Start work from the most inconspicuous corner, in this place you can learn in practice the properties of the paint and, if necessary, dilute it to the optimum consistency. We recommend painting the walls with a roller, and with a brush, treat only hard-to-reach areas, corners and borders of joints of various colors.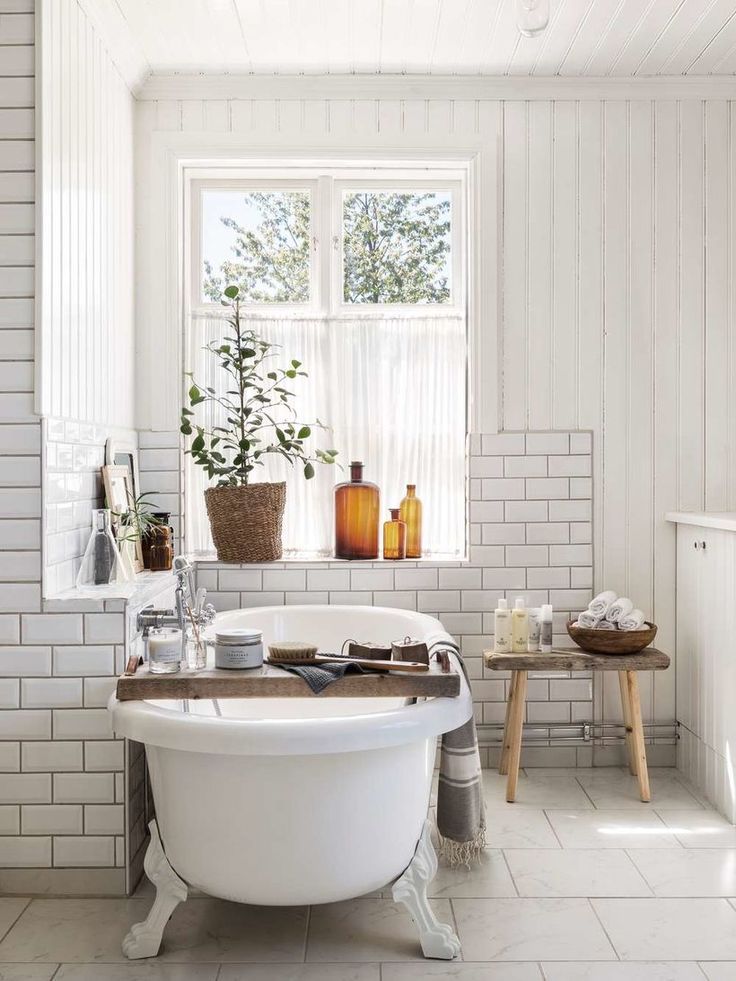 Panels in the bathroom are still in vogue, if you plan to make them, then mark the height on the wall, draw a horizontal line.
Step 5: Start painting
Apply a deep penetration primer to the wall. It will not only improve the appearance, but also increase the strength of the coating, reduce the likelihood of paint peeling.
Apply primer
Allow primer to dry for 3-6 hours
Apply a second coat of primer over first and wait 24 hours
Pour a batch of paint into a special plastic roller tray. Dip a roller into it, rotate it several times, remove excess paint on a horizontal platform.
Practical advice. To minimize the chance of paint spilling onto the floor, rotate the roller before blowing it out of the tray.
Step 6. Painting procedure
First paint the surface with a brush along the edges
Start painting from top to bottom, this method reduces the likelihood of streaks, they are immediately smeared, the roller “rolls” on them. Paint carefully, do not allow gaps. Don't be upset if the first layer looks ugly, this is expected. The fact is that on the wall there are areas with old and new plaster, the remains of an unremoved coating, etc. All of them absorb paint in different ways, which is displayed on the outside. The second layer will fix all problems, the finish will be monophonic.
Apply the first coat
How to paint walls with a roller
Paint in small areas, straighten difficult spots with a brush. The paint should smooth out the lint marks on its own. If this does not happen, add a solvent to it. Pay attention so that he is conscientious, read the instructions for use. If in doubt - test the solvent for compatibility with a small amount of material, if the paint has curled - change the solvent.
It is advisable to apply the second layer when the first one is not completely dry, as this increases the adhesion coefficient between them. Checking the readiness of the surface is simple - run your fingertips over it, they should not get dirty, but only “creak” a little.
Paint pattern
Smooth the paint along the ceiling by long horizontal rolling of the roller without loading it with paint. In this case, start working from the top of the wall, the panel is finished last. So you insure against paint getting on already finished areas. Apply masking tape along the border line. Make sure that the paint does not flow under it, paint only with a brush, the direction of movement is in the direction opposite to the adhesive tape. Never stick adhesive tape on paint that is not completely dry, this is very important. If you stick it on a freshly painted surface, then during removal, with a high probability, part of the paint will also be removed with it, you will have to redo everything.
Marking walls for painting
Stick a painting tape
apply paint
Creating lanes
lanes can be horizontal
Original wall decoration
The color transition is achieved by the use of the King
Wall decoration with PVC panels
The cost is slightly more expensive than the first method, but in terms of design indicators it is much better. Yes, and the preparatory work is greatly facilitated, there is no need to remove old coatings, level the walls and close up gaps on them. The crate under the panels can be made of wooden slats or special plastic profiles with clips. We recommend using the second option. The cost of plastic additional elements has almost no effect on the price of repairs, and the work is greatly simplified. In addition, the plastic profile is not afraid of moisture, which is very important for bathrooms. Wooden slats need to be impregnated with antiseptics - an additional loss of time.
Selection of panels for finishing
Calculate the number of panels needed, reserve 5-10%. If you have little experience, and the bathroom has a lot of engineering communications, to close which you need to cut the panels, then take a margin of 10%. At the same time, estimate the number of starting profiles, external and internal corners. They are sold in a standard dyne, they cost a penny, there is no need to save.
Parts for mounting plastic panels
Step 1. Installing the purlin
The panels are arranged vertically, the crate must be made horizontal. The distance between the planks is 50–60 cm. Make markings on the wall, make sure that the lines are parallel. The crate is fixed with dowels, drill holes with a drill with a perforator, use drills with victorious soldering. To prevent the floor from getting dirty with building dust, cover the place near the wall with film or paper. As soon as all the holes are made - immediately remove it. Do not leave cleaning for later, practice shows that no matter how carefully you work, the garbage will surely spread throughout the bathroom.
Make holes a few centimeters deeper than the length of the plastic part of the dowels, otherwise you will not be able to insert them all the way, dust will interfere. First, drill two extreme holes, attach the profile, then fix it in several more places. The horizontal distance between the dowels is 60–70 cm.
The spacing of the battens along the bathroom wall should be 40–50 cm
How to fix the elements in one plane?
- Check the condition of the wall with a plumb bob, paying special attention to the fixing points of plastic profiles or rails.
- Level the two end pieces, recheck their position. If there are large recesses at the place where the profiles are attached, then use linings made of various materials. The dowels must attract the profile over the entire plane; there cannot be a gap between it and the wall at the attachment point.
- Pull the ropes between them, two are enough at the ends of the profiles or laths.
- Install all other profiles under the rope, use it to control the position of the rails.
Step 2 Installing Plastic Panels
Installing PVC Wall Panels
Panel Installation Diagram
Measure the wall in at least three places. If they have a spread of no more than a centimeter, then the work is noticeably simplified - all panels can be cut to size at the same time. To do this, you need to find out the shortest, cut all the rest along it. Stack the panels in a stack of 5-10 pieces. cut off on a flat plane and grinder with a disk for metal. A discrepancy of up to one centimeter will be hidden by the ceiling and floor profile. It is installed at the top between the wall and the flow and at the bottom at the junction of the wall and the floor. Put plastic corners on the sides.
Place the first panel, check its position. Everything is fine - fix it with clips. If you have wooden slats, then fasten with staples with a stapler. Both options provide sufficient security for fixing the panels. The first is mounted - install the second, press it against the first until a characteristic click. It indicates that the elements are connected by a lock. According to this algorithm, continue to work until the last plastic panel remains. Insert the ends immediately into the corners.
How to fasten the panels to the clamps
Take the exact dimensions of the last panel, cut it lengthwise. You can cut with a mounting knife or a grinder. If you use a knife, then the operation must be done in two stages. First - cut the top and transverse stiffeners. Second - bend the panel, at the bend on the second side, completely cut off the desired part with a mounting knife.
Finish the rest of the walls in the same way. Practice shows that it is better to make a place near the bathtub from ceramic tiles. It is possible not in the entire wall, but only an apron. The main thing is to close the area, which constantly comes across water during the adoption of water procedures.
Wall paneling
Video: Wall decoration in the bathroom in 1 day with plastic panels. Inexpensive do-it-yourself bathroom renovation
Wallpapering the walls
Wallpaper for the bathroom
Wall decoration with wallpaper
Only waterproof types can be used for wallpapering. This method of finishing has a number of undeniable advantages.
- Low cost allows for an exclusive and reliable coverage with little material loss.
- High technology. Among all the possible ways to finish the walls in the bathroom, wallpapering is the easiest. The work is carried out within a few hours, the room can be used for its intended purpose the very next day.
- It is possible to frequently change the design of the premises. In some cases, re-pasting can be performed without removing the old one - the repair time is significantly reduced, and the amount of construction debris is minimized.
Washable wallpaper
Waterproof wallpaper
The disadvantage is that in terms of physical strength, wallpaper is inferior to traditional materials. But, if you behave carefully and avoid mechanical damage, then the period is calculated for many years. In addition, defects on the wallpaper are easily eliminated, after pasting there will always be a small amount of materials left. Don't throw it away, keep it "just in case" for repairs.
What wallpaper to choose for your bathroom
It goes without saying that only water-resistant ones.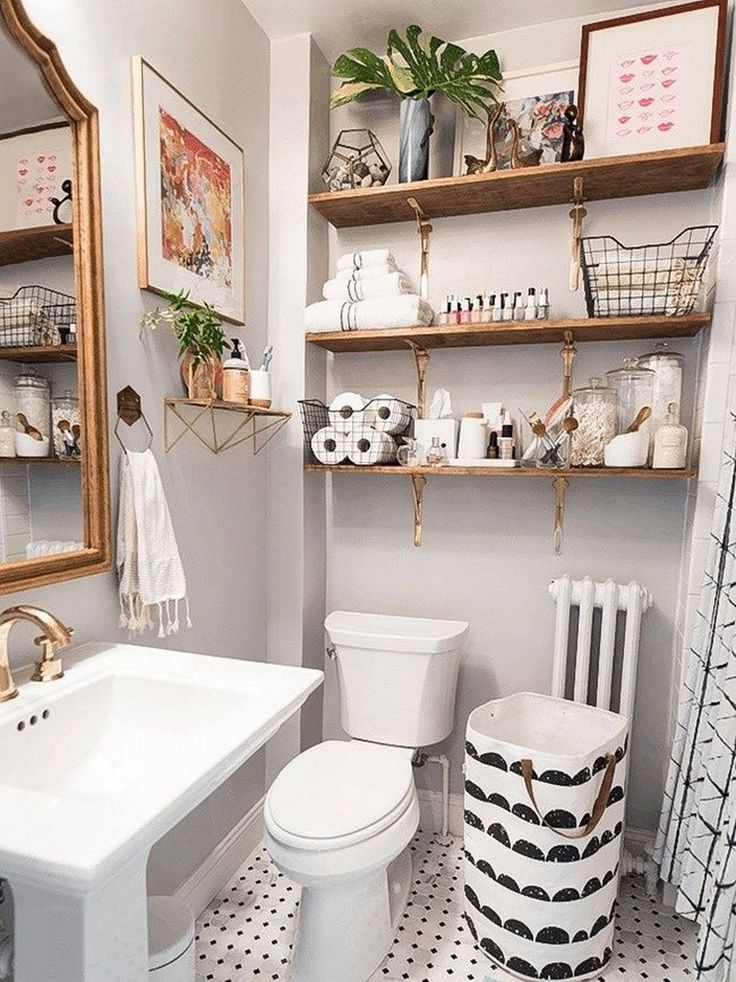 During the purchase, pay attention to physical strength, and it depends on the material of manufacture.
| Type of wallpaper | Brief performance indicators |
|---|---|
| Vinyl on non-woven base | The most modern, can have high indicators of direct mechanical strength Available in a wide range of colors, they can be plain or with various patterns and ornaments, with a structured or smooth front surface. Disadvantages - relatively high price, the need to use special glue. |
| Washable | Cheaper segment, inferior to vinyl in terms of performance. It is recommended to use on wall areas that are not exposed to water splashes. |
| Self-adhesive | Made from a special polymer film, they have a huge number of design solutions. Disadvantages - relatively high price and complexity of finishing. In addition, they can only be used on perfectly flat surfaces.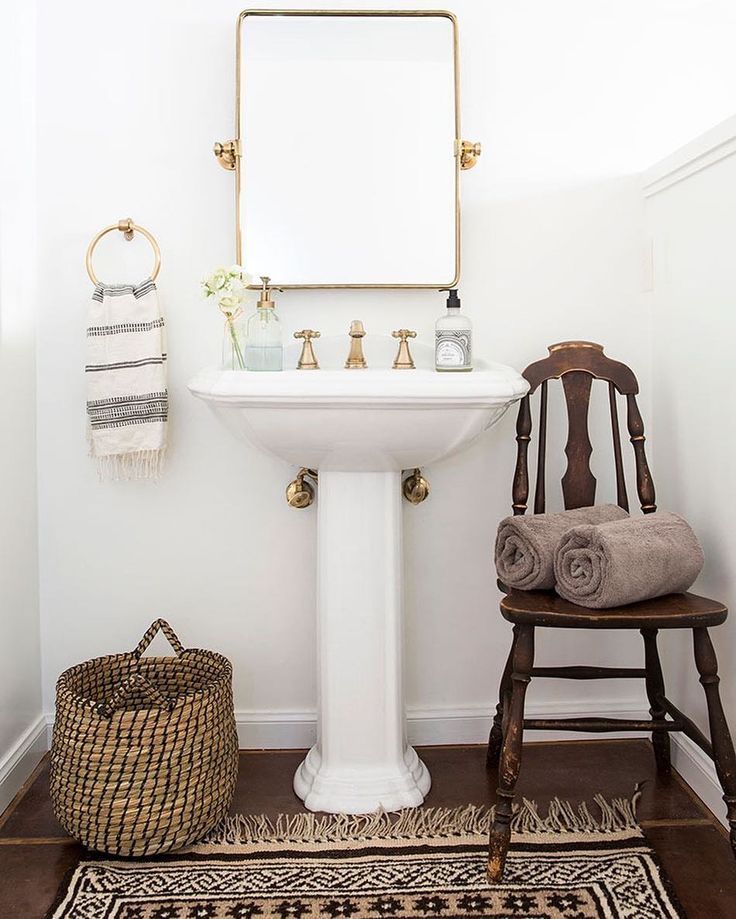 |
What is the correct way to glue wallpaper so that you don't have to constantly re-glue peeled off areas?
Step 1. Surface preparation
The most important part of the work, of course, apart from the right choice of wallpaper. Wall linearity parameters affect not only the appearance of the wall, which is very important, of course. On an uneven wall, it is even theoretically impossible to glue waterproof wallpaper. And this means that there will definitely be air pockets and other places where the wallpaper is not glued. During the use of the bathroom, these areas constantly increase in size, this continues until the peeling becomes noticeable. Repair will be required, it is quite difficult to perfectly align the wallpaper after repair, and in some cases it is impossible. What are the requirements for the wall surface?
- Roughness must not exceed ± 1 mm. Run your hand along the wall, the palm is severely scratched - a problem.
 Use a strong steel scraper to cut off all the protrusions.
 Sand roughness
- For plastering, use only strong cement-sand mixtures. All the rest, under the influence of moisture, significantly reduce the strength indicators, the glue falls off along with the smallest pieces of the solution, the wallpaper sags.
- Surface must be perfectly dry. There is no air gap between the wall and the wallpaper, there is no natural ventilation at all. A fungus will inevitably appear on a damp wall, and it will certainly destroy the plaster. You will have to make expensive repairs, remove old plaster, impregnate the surface with special chemical compounds (very poisonous, by the way), plaster again and paste over the walls.
- The maximum size of recesses and protrusions may not exceed a few millimetres. Manufacturers tell the truth that some types of wallpaper hide small bumps. But they do not say anything about the fact that non-glued areas appear in these places with all the negative consequences described above.

Surfaces must always be primed in two coats, this improves adhesion and provides additional protection against moisture penetration.
Wall primer
Calculate the surface area, make a small margin. Each roll of wallpaper indicates the length, width and total area. Use this information when purchasing materials. Do the same when choosing glue.
Step 2: How to apply vinyl wallpaper
Prepare the tools
Pay attention to the manufacturer's recommendations on which side to apply the adhesive. There are options for spreading on the wallpaper, on the wall or on both surfaces, it all depends on the specific characteristics of the wallpaper.
Preparing the adhesive
Mix thoroughly
Ready-made wallpaper paste
Measure the height and width of the wall, cut the required number of strips. Stripes, depending on the pattern, can be applied end-to-end or overlap. Cut off with a small margin in length, it will then be removed with a knife, an uneven cut will be buried by ceiling and floor plinths.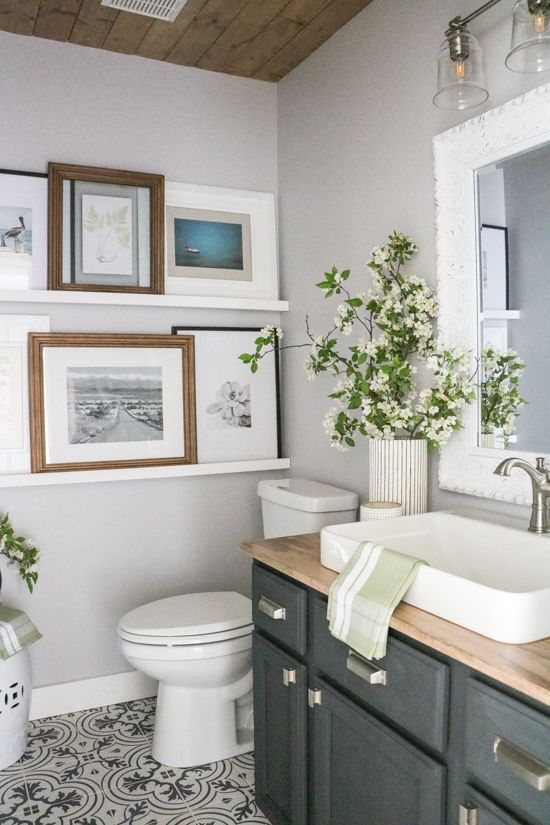
Cut off the strip of wallpaper with scissors or a decorative knife
Make sure that the cut is exactly at right angles
Practical advice. The most difficult thing to glue wallpaper in the corners of the room. The fact is that they can have slopes, and this has a negative impact on quality. To prevent such consequences, never make junctions of strips at the corners, try to have their middle in these places.
Next, you need to do this.
- Glue the strip smeared with glue to one wall of the corner, align it strictly vertically.
- Gently fold the wallpaper, but not all the way into the corner, stick the strip lightly to the second wall.
- Slowly begin to fold the wallpaper towards the corner, keeping an eye on the offset of the second edge, it must always be in a vertical position. The corner of the wall is uneven - not a problem, let there be air pockets in some places, the main thing is that the edge of the wallpaper on the second wall is vertical.
Determining the vertical
Apply a thick layer of glue evenly with a brush
After applying the glue, fold the left edge of the wallpaper strip towards the middle
Read on the wallpaper label how long the glue must be left on the wallpaper before sticking to the wall
If you do not follow this nuance, then on the entire adjacent wall the stripes of wallpaper will be sloping, and this is a big defect.
Glueing will require a large room, the bathroom, as a rule, does not have such dimensions. Decide where exactly you will prepare the wallpaper. Take measures to prevent contamination of floor coverings, do not allow glue to get on the front surface. When pasting walls with wallpaper, accuracy is one of the important conditions for high-quality work.
gluing the first wallpaper
Deflated folds and bubbles under the wallpaper
Cut excess
Excess glue immediately wipe the
glue the second clip
Alert
Carefully squeeze the air from the wallpaper. You can use rubber spatulas or rollers. But it is best to do the work with clean, dry hands. So you will feel the bumps and be able to eliminate them in a timely manner. It happens that the air pocket is discovered late, several strips of wallpaper have already been pasted. It's not a problem. Pierce the air bubble in 2-3 places with a needle, after that you can press the wallpaper again, they will take the desired position.
In the inner corners, stick one strip so that it overlaps the corner by 1-2 cm
Stick the wallpaper over the outer vertical edge of the door frame with a small allowance, smooth or cut the allowance immediately
Glue the next strip also over the frame, smooth and cut the rest from the bottom
Without pressing, cover the switch with wallpaper and make a diagonal cut through it. Carefully cut out the edges and press the wallpaper to the wall
After the glue is completely dry, cut off the excess length and attach the skirting boards. Skirting boards are fixed with liquid nails or in other ways, taking into account the material of their manufacture.
Wallpaper in the bathroom
How to renovate a bathroom in a loft style
A rather fashionable style among young people, it is difficult for older people to get used to it. Loft style is a method of repairing various premises, including industrial ones, with minimal financial losses. All structures remain in the same place, construction work on surface finishing is carried out without the use of additional materials. Leave old water and sewer pipes in the same place, you can remove the old paint from them and apply a new one. No need to try to make them match the wall, on the contrary, use contrasting colors that emphasize the placement of pipelines. If problem areas are identified, correct them immediately.
Loft-style bathroom interior
As for the walls, you can remove the old plaster to the brick, fill large depressions with cement-sand mortar, but do not level or rub. Scrub the brickwork with a wire brush, trying to highlight the position of each brick. The older the seam and brick, the better, the more modern the loft will be considered. Everything should be simple and natural, no plastic sheathing, plasterboard and other finishing materials.
Brick wall
Brick goes well with wood
It is recommended to protect the surfaces from the inevitable gradual destruction to cover them with a moisture-resistant varnish. Before varnishing, carefully remove the dust, it is advisable to vacuum the surfaces with a powerful unit. Lacquer use only transparent. Varnish preferably with a pneumatic spray gun. The air jet allows you to process even hard-to-reach areas of the seams, and the strong impact of the varnish drops on the surface increases penetration and adhesion. In addition, repair work is significantly accelerated. And one more plus - old seams can collapse while working with a brush, sand will get into the varnish. This is very noticeable on the front surfaces of the brick.