Change bathroom faucet washer
7 easy steps to follow |
(Image credit: Mint Images / Getty Images)
If you want to replace faucet washers on your own, there are a few simple steps you will need to follow.
Some jobs around the home will need a professional with experience and expertize. Others can be done yourself. This not only saves money but can also save time too, as you can simply get on with it without having to wait for a plumber to be free.
Replacing faucet washers is one of those tasks. It is also worth knowing how to unclog a toilet without a plunger and how to fix a leaky faucet by yourself – and how to prevent such problems from occurring.
‘Washers don’t last forever,’ confirms Lucy Searle, global editor in chief for Homes & Gardens. ‘When old or damaged, they will cause the faucet to leak, as the washer can’t form a watertight seal. This is easy enough to fix though and it won’t take long either.’
Martha Stewart is a firm advocate of doing jobs like this yourself. ‘When the sink is clogged or the toilet runs, don't rush to phone the plumber,’ she says. ‘With the right tools and basic instructions, you can solve most minor plumbing problems in your home, including knowing when to drip faucets.’
How to replace faucet washers
The good news is that this is one of the simplest DIY plumbing tasks and it shouldn’t take long either. In fact, it should only take a few minutes and it won’t need much in the way of tools. You won’t need to do any drilling or mess around with any pipes and, as Polly Shearer, bathroom expert at Tap Warehouse confirms, replacing faucet washers is simple, satisfying and totally safe.
You need to check first whether the faucet has a washer or ceramic disc cartridge. This guide deals with changing a washer so if your faucet has a ceramic disc cartridge then you need to do things differently.
‘Many people are unaware that the cause of a leaky faucet can come from the washer itself. When they get worn, they start to become less effective, so a solution to this is to change the washer,’ says Polly.
Shopping List
You will need:
• Flat-head screwdriver: here are some highly-rated options from Amazon
• Spanner: this 9-piece set from Amazon will do the trick
• WD-40: you can buy this from Amazon
• Old cloth
• New washer
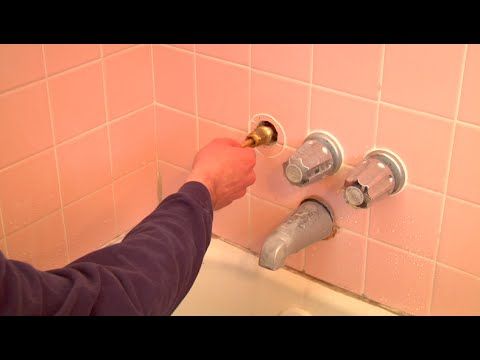
1. Turn off the water supply
There should be an isolation valve underneath the faucet, which can be used to turn off the water to that particular sink. If you don’t have one of these, turn off the water at the mains. If you’re changing the washer on the hot water faucet then you will need to turn off the boiler and immersion heater too.
2. Insert the drain stopper
This will prevent you losing any screws or components down the drain if you drop them. It’s also a good idea to place an old towel inside the sink to avoid damaging the surface if you drop something.
3. Remove the cover from the faucet
Do this using your screwdriver, carefully. This will expose the valve, which can then be removed using the spanner. If it is stiff then hold the faucet in place with a wrench if you have one, but protect the faucet with a cloth first.
4. Secure the washer
The washer is underneath the valve, secured in place with either a screw or a nut. Remove the washer with a spanner or, if it’s too difficult to undo, spray some WD-40 around it and allow this to soak in before trying again.
5. Replace the old washer
Replace the old, worn washer with a new washer in the same size.
6. Put the faucet back together again
Screw the valve back into place, being careful not to overtighten as this can damage the faucet. Fasten the top back onto the faucet and you’re all done.
7. Turn the water back on
Remove the towel from your sink, take out the plug and turn the water back on.
Why do faucet washers need replacing?
Most faucets, whether kitchen or bathroom, comprise two parts – the seat and washer.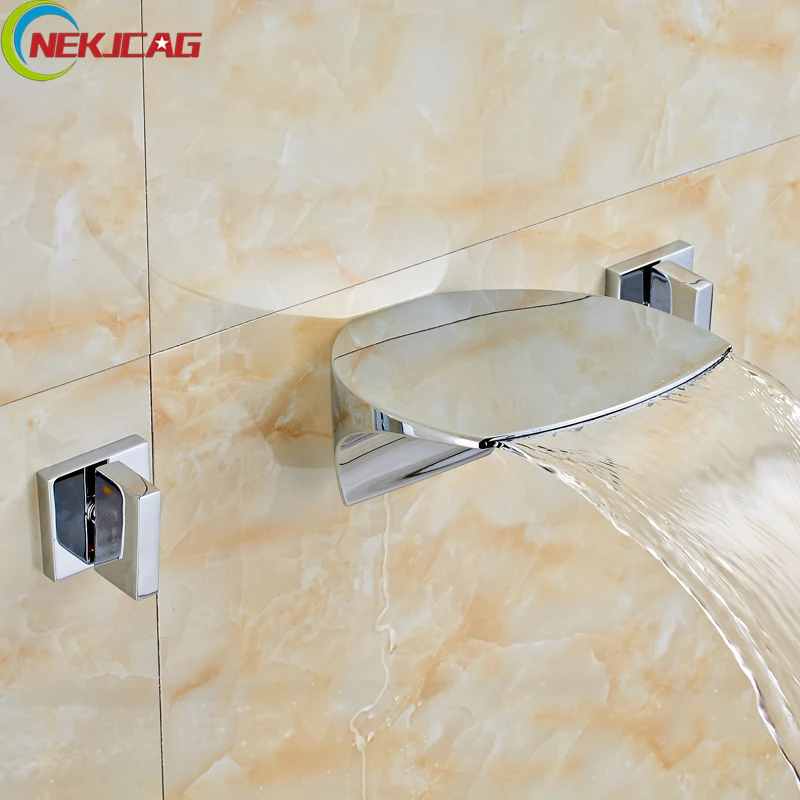
When you turn the faucet on, the washer is directed towards the seat, creating pressure. This in turn forces water out through the spout. When you turn the faucet off, the washer creates a watertight seal by pushing against the seat, ensuring no water flows through.
When washers are old and worn, they don’t create this watertight seal and can cause the faucet to leak. When a faucet starts to leak, the first thing to check is if it needs a new washer. They cost very little and can be purchased from DIY or hardware stores as well as online and tend to be sold in packs with different sizes to choose from to match your existing washer.
Do I have to turn the water off to replace a washer?
Mixer units may also have a separate 'o-ring' seal at the base of the spout. This can be replaced without turning off the water supply, but make sure you get the correct size replacement before starting work.
How often should I replace a faucet washer?
As they are prone to constant wear and tear, you can expect to change a washer every one to two years.
Hayley is an interiors journalist, content provider and copywriter with 26 years experience who has contributed to a wide range of consumer magazines, trade titles, newspapers, blogs and online content. Specialising in kitchens and bathrooms, she has twice won the CEDIA Award for Best Technology feature. Hayley writes for H&G about kitchens, bathrooms, cleaning, DIY and organizing.
How to Change a Faucet Washer
hennessey_adminBlogs
If you have a leaky faucet, you may have heard that changing the faucet washer will stop the leak. It’s certainly worth a try and is a relatively simple task. The first step in how to change a faucet washer is to determine if your faucet actually has a washer. The majority of new faucets today are so-called washerless faucets. A compression faucet is the only type of faucet that uses a neoprene washer.
How to Identify a Compression Water Faucet
Compression water faucets are an older style faucet. They can be installed in the kitchen, at the bathroom sink, or in the bathtub. You can identify a compression washer faucet by the separate hot and cold water handles and their action requiring you to tighten the handles down to close off the water flow. These faucets work by using a compression stem which is sort of like a screw with a washer at the end of it that presses down on the valve seat. Just because your faucet has two handles doesn’t mean it’s a compression faucet.
There are double handle cartridge faucets that are newer. The way to tell the difference is that with the cartridge faucet, half a turn on a handle is all it takes to turn the water on or off. With a compression faucet, you have to use extra effort to turn it on or off, often requiring more than one full turn of the handle.
Step By Step Directions to Change a Faucet Washer
So now that you’ve identified your faucet as a compression faucet, it’s time to see if changing the washer will fix your leaky faucet. You might as well replace another part, called the O-ring, at the same time, as you are going to be taking the faucet apart and reassembling it. Here are your step-by-step directions:
- Turn off the water supply valves. These will be found on the wall under the sink. For a bathtub, you may not have access to the water supply valves. You may want to call a plumber.
- Turn both of the faucet’s handles to the “on” position to empty any water from the pipes.
- Close the drain or put a cloth over it to prevent small parts from going down the drain.
- Lay out a towel that you can place the parts on, in the order in which you removed them. This will make it easier to reassemble the faucet later.
- Remove both handles or knobs by prying off the temperature cap (a plastic piece with H or C) to uncover the screw. Unscrew the screw, and remove the screw and the knob or handle.
- Removing the knobs or handles will reveal the valve stem. Use a wrench to loosen the locking nut.
 Remove the valve stem.
 - On the stem, you will see a screw, and underneath that is the black washer, and underneath that is the white O-ring. Remove them all.
- Take the old parts to the hardware store so you get the right replacement parts. Ask someone in the plumbing aisle for assistance, if needed.
- Coat the valve stem with plumbers grease and install a new O-ring and washer. Replace the screw.
- Replace the valve stem, and reassemble the handles or knobs.
- Turn the water supply lines back on.
- Slowly turn the water on. If there’s no leak, you’re done. If water sprays everywhere, or there’s still a leak, either start over or call a local plumber.
Is It Time for a New Faucet?
If you’ve repaired your faucet multiple times, it may be time for a new faucet. Or if you’re remodeling, you may want to put in new faucets to update your bathroom or kitchen. Do your homework before deciding on what type of faucet to buy. Consider the pros and cons of each, and read the reviews for each type of faucet. And remember that you get what you pay for. Moen and other similar faucets may cost more, but they are better made and will last longer. Consider calling a plumber to install your new faucets so that everything is up to code.
Call Plumbing By Jake for Plumbing Repair and Installation
Call 928-377-5910 for an emergency plumber 24/7 or during regular business hours if it’s not an emergency. You can use our contact form to schedule plumbing repair or installation of a water softener system for your home or business. At Plumbing By Jake, we back every repair or installation with a 100% satisfaction guarantee. We serve Kingman, Bullhead City, Golden Valley, Lake Havasu, and all of Mohave County, Arizona.
how to replace it with a new one
This question may arise at a completely inopportune moment, when it is impossible or expensive to call a plumber. Replacing a mixer with your own hands is not particularly difficult with a shallow immersion in the topic and brief preparation.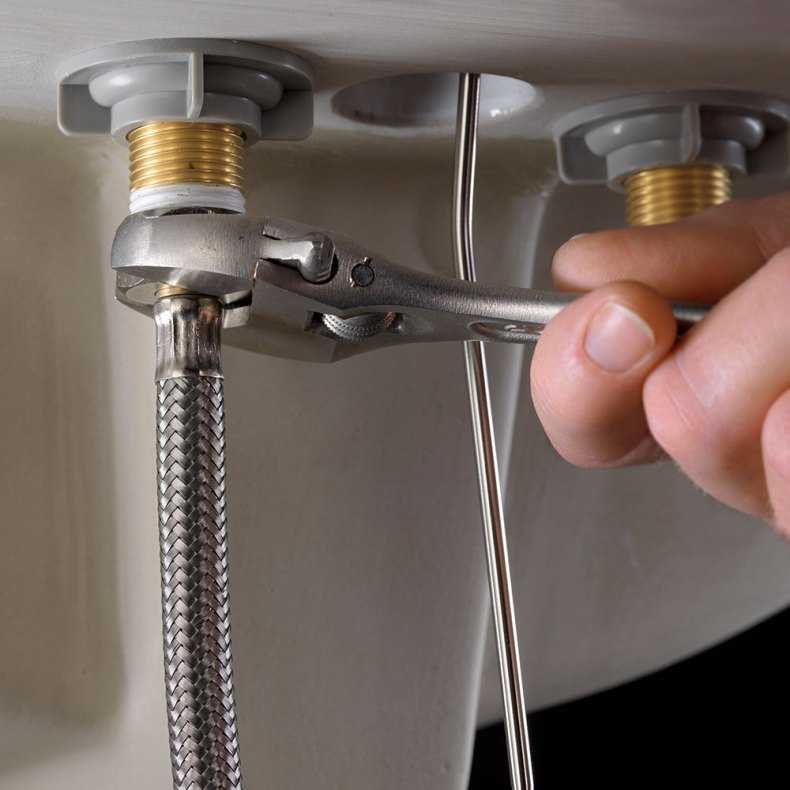
| Advice! First you need to turn off the water supply. Do not be lazy before removing the old faucet, check on it how securely the water is blocked - this will save you from injury. |
How to remove the faucet
Faucets do not shine with a special variety and there are only two types:
- Wall mounted,
- Tabletop.
The device is also represented by two types:
- Two separate revolving taps for water supply (colloquially "herringbone"),
- One lever that can be lifted and rotated to the side, it both regulates the water temperature and controls the water flow (more/less).
Usually, a limited set of materials is used for the manufacture of plumbing fixtures: ceramics, bronze, brass and silumin. Ceramics and bronze are rare. They are usually taken for the implementation of some "antique" design solutions.
| Advice! A mixer made of silumin is cheaper, but quickly fails. It is better to purchase a brass mixer. |
How to unscrew the kitchen faucet
For replacement, in addition to theory, you will need tools and accessories. Usually, all sorts of small things (nuts, screws, hoses, and so on) are already offered together with the mixer and are included in the installation kit.
You can also find instructions there. From the tools you will need wrenches - adjustable (one), wrenches (10 by 12 and 13 by 14), end wrenches (with the same values as wrenches), as well as tape (PTFE) and a brush, preferably wire.
Advice! For the convenience of work, it is better to get a flashlight in advance - a miniature one in your hand or on your head. This will make it easier for you to work in the dark under the sink. This will make it easier for you to work in the dark under the sink. |
Dismantling steps
-
- Remove connecting hoses.
- They are secured with nuts and can be removed with an adjustable wrench. The fittings that secure the hoses themselves must be removed with a wrench.
-
- Remove the faucet from the sink.
- It is usually secured with nuts and washer. Use socket wrench. As a rule, fasteners are located directly under the sink.
-
- If you are facing a desktop model.
- There will be no flexible connection - the mixer will be fixed directly on the sleeves coming from the central line. You won’t get access to the pipes themselves - they are in the wall, on the surface there are only threaded ends.
- Remove the nuts and then dismantle the instrument.
Now that we figured out how to remove the faucet, let's move on to replacing it.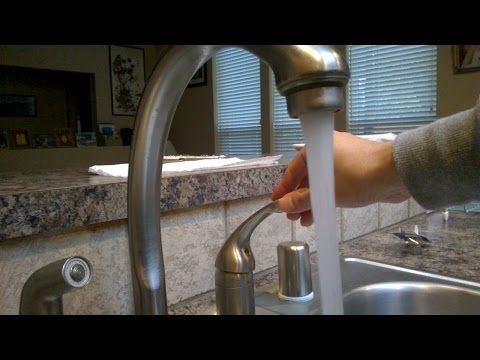
How to install mixer
In addition to the type and diameter of the thread on the connection to the pipe, in the purchased set, you need to pay attention to flexible hoses. We are interested in their length and quality. The standard set usually comes with 300 mm hoses, and, as a rule, this length is not enough. They may need to be replaced with longer ones.
After installation, make sure that the hose does not hang "in tension", it should sag a little. You should have a margin of about 80 mm. It is also not necessary to wind endless rings - when water flows through the hose, it will begin to vibrate, and the vibration destroys the rubber tube, which is hidden by the braid. Wear will be very strong. Eventually the tube will fray and start leaking.
By the way, carefully check the condition of the metal braid on the hoses. If you are a supporter of the idea that it is better to spend money once and then not suffer, you should take corrugated stainless steel hoses.
It is also possible to supply water to the tap using a metal or plastic pipe, but it is better not to carry out such an operation on your own - it is much more difficult to perform.
The second thing you should pay attention to is the type and diameter of the thread on the pipe connection.
| Advice! Stores in case of defects, change the product or return the money for it. Do not rush to get rid of the sales receipt - it may come in handy. |
How to attach the faucet to the sink
Before attaching the mixer to the sink, all outlets must be cleaned. If the faucet has been used for a long time, you will almost certainly find rust or scale flakes there. The thread on the pipe itself must also be checked to ensure that there is no sealing material left.
All this work is best done with a metal brush, which we called in the list of tools necessary for working on changing the mixer.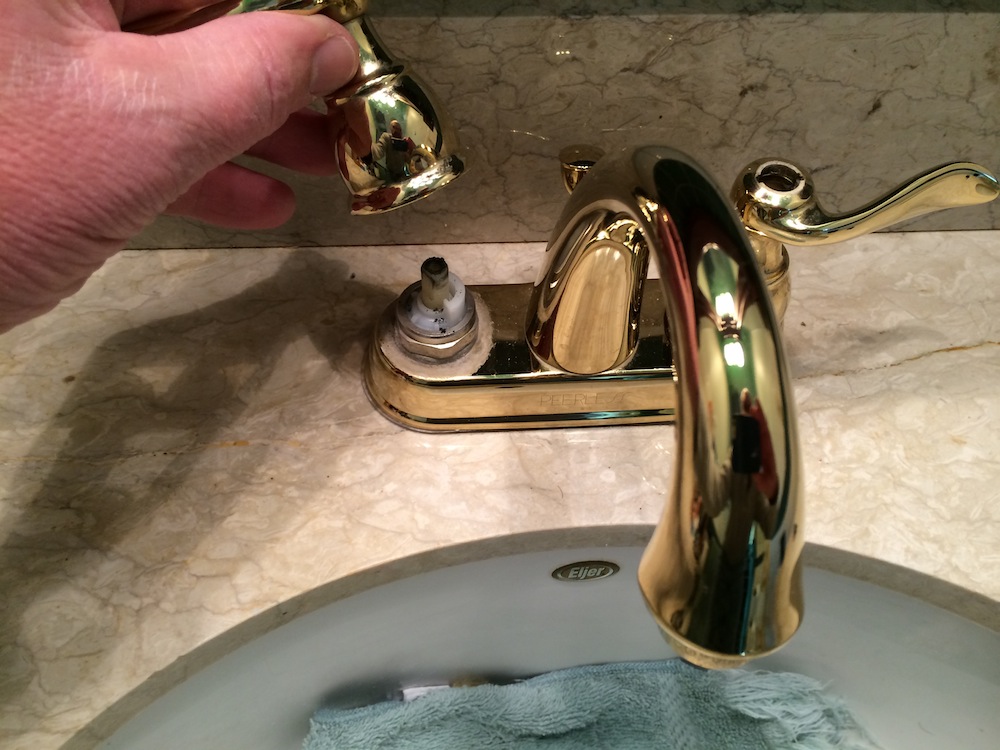 And it is better to clean the landing site of the mixer with a rag. We install flexible hoses on the mixer - for hot and cold water.
As a rule, the faucet is color-coded, respectively, red and blue. First tighten the hoses by hand and add 3-4 turns with a wrench. Do not overdo it - a show of strength is not needed here. Do not forget about the rubber gaskets that are worn on the tubular fittings.
How to attach the faucet to the sink
If the sink is removed from the sink, it is better to put the faucet on the sink first, and then transfer the entire structure. Once the hoses are attached to the faucet, install it on the sink by inserting the hoses into the appropriate holes in the sink. Gently lower the mixer onto the canvas.
We move under the sink and find the lower part of the mixer, put the sealing washer and pull it to the canvas with nuts - also not very tight. If you immediately tighten the nuts tightly, the mixer body cannot be moved. As soon as you make sure that the device is clearly in the center of the mounting hole, tighten it until it stops.
After the faucet is fixed on the sink, flexible hoses are connected to the lines through which water flows. Please note that the union nuts are already equipped with rubber gaskets. Put the nuts on the end of the pipes, screw along the threads and add 3-4 turns with a gas (adjustable) wrench.
Switch on mixer
Before you turn on the mixer, you need to check whether we managed to achieve tightness - start the pressure test. To do this, the valves located on the mixer itself must be tightly closed, and the valves on the highways, on the contrary, must be opened. Within half an hour, observe if there are any leaks at the installation connections or in the mixer itself. If after this time the water has not gone, we can assume that the installation is completed.
Advice! Many modern faucets are equipped with a special strainer - a filter. Scientifically speaking, an aerator. Scientifically speaking, an aerator. |
After you have installed a new mixer, let the water run for 10-15 minutes so that it can take out scale, oxides, rust that have accumulated during operation in the main pipelines.
After that, put the filter and see how effective it works. If the filter is installed correctly, the jet should be solid, dense. If it is not fitted, water will splash out to the sides.
Do-it-yourself bathroom faucet replacement
Any homeowner will need to replace the faucet in the bathroom sooner or later - the wear and tear of such equipment is very high. This is possible if you clearly follow the instructions to perform all actions scrupulously, slowly.
When do you need a replacement and when do you need a repair?
If the mixer has the following defects, it is either impossible to repair it or unreasonably expensive (it’s easier to buy a new one):
- Hull cracked.
 With cheap faucet models, this happens very often. Need a replacement.
 - The body is corroded from the inside. This means that a corrosion-resistant compound was used as the material that went to the mixer. Also needs replacement.
- The thread on the nut at the point of attachment to the pipe is broken, or the nut has simply burst. Most likely, these are the consequences of careless installation or mechanical impact on the mixer.
For example, a person fell and hit the mixer.
It is not always necessary to completely replace the mixer. If the water just flows in a thin stream, the problem is most likely in the inside of the faucet, and you only need to replace the consumables - these are:
- Valve gasket.
- Cartridge in a half-turn or lever faucet.
In the second case, you may suddenly find a small metal ball with holes instead of a ceramic cartridge. In this case, you need to pay attention to the polymer insert that surrounds the ball - most likely, it is torn.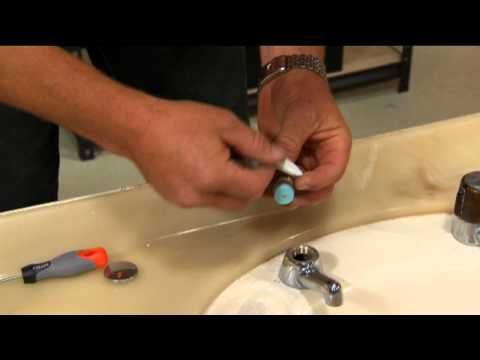
How to choose a crane and get started
The most popular, cheap material is made from the same alloy of silicon and aluminum - that is, silumin, a material that, in addition to being cheap and light, is distinguished by low corrosion resistance.
Most likely, the use of such material in the mixer will lead to the fact that one far from perfect day the tap will burst, and water will flood the neighbors. Preference should be given to a mixer made of brass or stainless steel. Heavy, reliable, but expensive.
How to remove the bathroom faucet
You should decide where the mixer will be installed, and with the type of locking mechanism. In addition to the two types of faucets used in the kitchen and listed above, there is also a third type for the bathroom - installed on the side of the washbasin.
Usually this option is used if a shower cabin is installed instead of the usual bath. The type of locking mechanism in faucets mounted in bathrooms does not differ from kitchen ones - the same "herringbones" or levers.
Lever taps are considered a more advanced model, but there is one subtlety here: as we have already said, there is a ceramic cartridge inside this design, inside which two streams of water - hot and cold - are mixed.
The problem is that in most Russian cities the water is very bad. The metal impurities contained in it quickly corrode ceramics, and water begins to leak. Therefore, if the water supply does not have special filters, it is better to give preference to a conventional valve mixer - it is practically not afraid of mechanical pollution.
How to install a faucet in the bathroom
We need tools:
- Same keys,
- Pliers,
- Sealing material for threaded connections.
For accuracy, you should take electrical tape or simple tape. They are glued to chrome parts so as not to scratch them during operation. In principle, you can do without electrical tape or adhesive tape.
Advice! Think about what sealing material to take.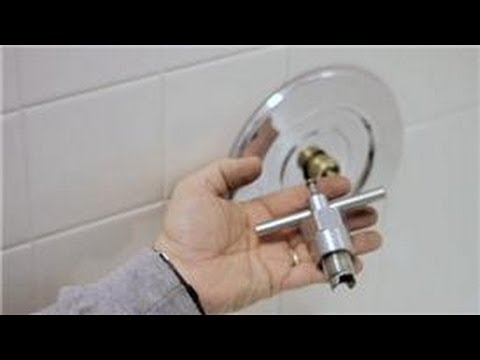 We recommend linen thread. FUM tape, with ease of installation, has a lot of disadvantages. First of all, it is demanding on the thread: rust or deformation is unacceptable. We recommend linen thread. FUM tape, with ease of installation, has a lot of disadvantages. First of all, it is demanding on the thread: rust or deformation is unacceptable. |
Professional plumbers usually use tow or special plumbing linen. But for a person who does not do such work every day, it is problematic to deal with such materials - you can not report or, worse, shift. Both will have dire consequences.
Removing the bathroom faucet
Turn off the valve on the water supply, open the taps on the mixer all the way - this will help relieve excess pressure. Cover the tub or sink with an old thick blanket. If tools or parts fall during work, this will help to avoid damage to the enamel.
Plug the drain with a rubber stopper so that any small parts do not accidentally fall there. Take a wrench and unscrew the nuts located on the eccentrics. In about 80% of cases, this is difficult to do due to years of lime deposits - the nuts stick.
As a softener, you can take a special liquid that dissolves rust and similar elements. Or if the tapes go to the store for kerosene. Remove the nuts from the removed mixer and put it in a bucket - some water may remain in it. As a final step, it is necessary to inspect the eccentrics and decide what condition they are in - whether stripping will be enough, or a complete replacement will be required. In any case, it is necessary to change the sealing material on the “pipe-eccentric” section.
Installing a new bathroom faucet
If you decide to leave the eccentrics in place, thoroughly clean the threads with a wire brush. If necessary, set the eccentrics to the desired position. Apply a sealant to the threads, taking into account that the nut will go further and will spread it along the threads.
Wrap the nuts of the new mixer with electrical tape to prevent damage - it can be removed after work. Tighten the nuts first by hand, then tighten with a wrench - 2-3 turns. Further installation steps depend on which mixer model you have: whether it is attached directly to the pipe (that is, wall or floor models) or connected to the water supply using flexible hoses.
If you are dealing with flexible piping, use a drill to make a hole in the side of the bathroom according to the diameter of the faucet, install the gasket, put the faucet on top. The crane itself is attached with a special washer. Don't forget to pre-install the gasket as well. Connect the flexible hoses from the faucet side to the pipe side. There is no need to wind any materials - there are already gaskets in the factory nuts.
Work carefully, especially when tightening the nuts. With too much force, they can burst. At the end of the installation, the same crimping is carried out as when installing the mixer in the kitchen.
How to drill an artificial stone sink
Such sinks have recently become fashionable among people with a delicate taste. This is a serious question, which is worth paying attention to, because although this material is called a stone, in its properties it is more similar to plastic.
Outwardly, it is a polymer mixed with stone chips in different consistency.
Practice shows that the most common drill and cutter (diameter 35 mm) is best suited for work. Be very careful when working with a drill and first make sure that the design does not provide for special cast plugs that need to be knocked out - this option is also possible.
| Advice! Carefully study the instructions supplied by the mixer manufacturer. |
How to change the faucet in the bathroom + How to assemble the faucet + Video assembly and installation of the faucet.
In this material you will find a detailed debriefing on the topic of replacing a faucet in the bathroom. In the photo and video material, we will show you in detail and tell you how to change the old faucet, faucet in the bathroom to a new one.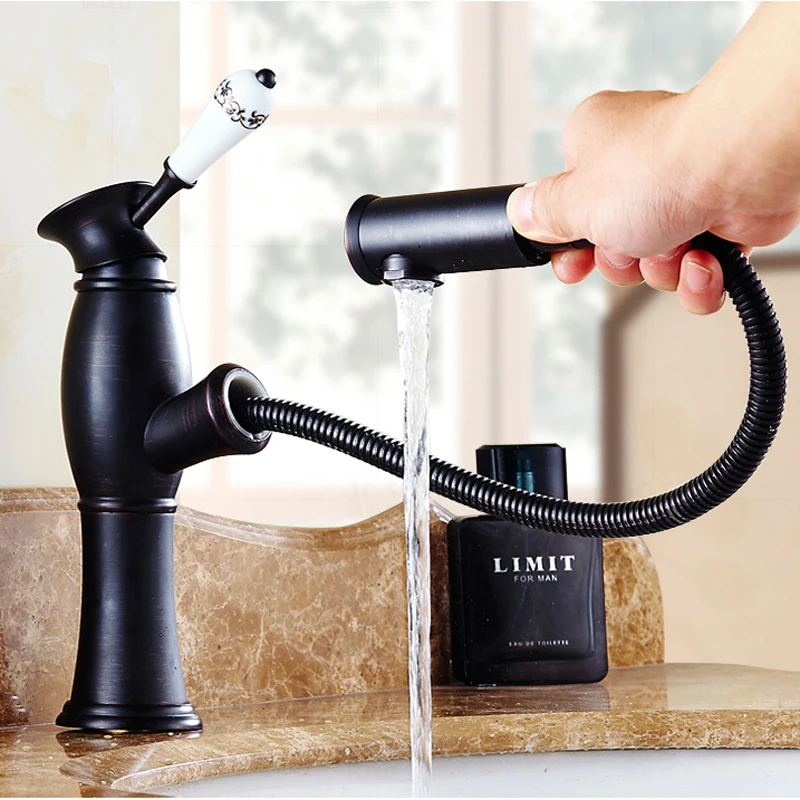 Let's go...
Faucets and all kinds of faucets have tightly entered our life, and the quality of the products themselves - WISHES THE BEST!!! If you take it offhand, in each apartment there are two or even three mixers that are installed in the kitchen and two in the bathroom. Each of them breaks and is replaced approximately once every 5-6 years. That's such depressing statistics! That is, every inhabitant of the planet is faced with the replacement of a faucet in the bathroom every 5 years, and if you delve into the topic, then most likely more than 1000 faucets per day are changed on the planet per day, and maybe per hour. Well, as we understand,0247 If you don't create the same size of eccentrics and place them the same distance apart, replacing a bathroom faucet would be a hell of a job! And so manufacturers slap bathroom faucets of different configurations but with the same mounting elements, located clearly in size.
From the middle of the circle of the eccentric, to the middle of the circle of the second eccentric, the distance is = 14. 5 cm .
All bath faucets are designed for such parameters, so that it would be easy and simple for the home master to replace them.
Well then. Let's describe this whole simple process of replacing an old bathroom faucet with a new one.
To the topic - How to replace the cartridge in the faucet *;
How to replace the faucet in the bathroom with your own hands according to the technology:
Unscrew the old faucet: | |
| | The old faucet in the bathroom is very easy to remove. To do this, we need a key for 30. With it, we will unscrew the clamping, holding nuts of the mixer counterclockwise. Which nut on the mixer you will unscrew first, to the end or not, does not play a special role, there will be no distortion of the mixer !!! Old eccentrics can not be unscrewed, in terms of quality they can be an order of magnitude better than new ones. |
| We wind the fum tape on the eccentric: | |
| | There are a lot of myths about the process of winding the fum tape, but we adhere to four rules: |
| | |
| | |
Installation of the mixer in the bathroom: | |
| The first thing we set the gaskets, which will not be approved by the sequences, which do not allow the sections and germinet. 
| |
 You need to look at the state of the previous ones.