Can you paint vinyl
Can You Paint Vinyl Siding? You Bet. Here’s How — Advice from Bob Vila
A sensible siding solution, vinyl remains a popular and budget-friendly choice for home exteriors. Many homeowners have chosen vinyl for its low maintenance requirements, and the material has only gotten easier to maintain and longer lasting, benefiting over the years from advancements in manufacturing. Even so, it’s not—and will never likely be—invincible. If your siding is looking faded or worn, or if you’ve just grown tired of the color, you might be wondering: “Can vinyl siding be painted?” The answer is: Yes, vinyl siding can indeed be painted!
On homes in which siding covers most of the exterior, painting vinyl siding can be a large project. However, the good news is that it’s not a particularly complicated task. You may fear that in order to paint vinyl successfully, you will need to learn a new set of idiosyncratic, vinyl-only techniques. Fortunately, that’s not the case. If you’ve painted anything else before, most of the following steps for how to paint vinyl siding will probably be familiar. Plus, we’ll detail the handful of vinyl-specific considerations that you’ll need to keep in mind to get the job done right.
- Laundry detergent
- Powdered household cleaner
- Bleach
- 1 gallon water
- Soft-bristled brush or cloth
- Garden hose
- See full list «
- Drop cloth
- Ladder
- Primer
- Paint
- Paint roller or paint sprayer
- Paintbrush
- Paint tray
For some, the first step may be the most difficult. There are so many colors that it can be difficult to know where to start. Fortunately, there are a few ways to narrow down the options and feel confident about the exterior house paint color you choose.
Advertisement
Basing color choice on the home’s style can help. Many paint makers offer historically accurate collections of colors for specific house styles. For example, Sherwin-Williams offers exterior color palettes for Queen Anne, Craftsman, Georgian, Suburban Modern, and other styles of homes.
Another way to choose an exterior siding color is to consider the home’s other exterior features. Look for colors that go with the roof color, and any brick or stone that is part of the facade. In order to help envision a new color on your home, search for inspiration images of homes that have the same fixed feature colors.
Climate and neighborhood restrictions may also help narrow the choices. While the roof has a larger impact on heat gain in a home, the color of the walls can also make an impact. Cooler colors lead to less heat gain. Plus, many communities have regulations dictating and limiting paint colors, and some homeowners may need to gain approval from the homeowners association before painting a house.
Finally, keep in mind that it’s easiest and most cost-effective for the homeowner if the new exterior paint color they choose is the same color or a lighter hue than the current color. This is because darker colors retain more heat, can leave the siding vulnerable to premature warping, and may also create other maintenance problems.
istockphoto.com
STEP 2: Make sure the vinyl siding paint you choose contains the right ingredients.Although it can be tempting, don’t try to save time and money by purchasing the least expensive and most easy-to-reach can of paint. For a paint job to look good and last on vinyl siding, the product needs to have a few specific qualities.
Paint for vinyl siding contains acrylic and urethane resins. These ingredients accommodate the expansion and contraction of vinyl and help the coating stick. Vinyl siding paint requires a latex urethane paint formulated for exterior use.
Advertisement
STEP 3: Check the weather forecast for painting day.Before heading outdoors to start painting your vinyl siding, first consult the weather forecast for your area. The ideal weather condition for exterior painting is a mild temperature, low relative humidity, and an overcast sky.
If the weather is too hot, too sunny, or even too windy, the paint may fail to go on properly. While it might look fine in the short term, paint applied on a hot, humid, or gusty day may adhere poorly as it cures and be more prone to cracking and flaking over time. Also make sure the weather forecast predicts clear skies for at least one day after the paint job is complete.
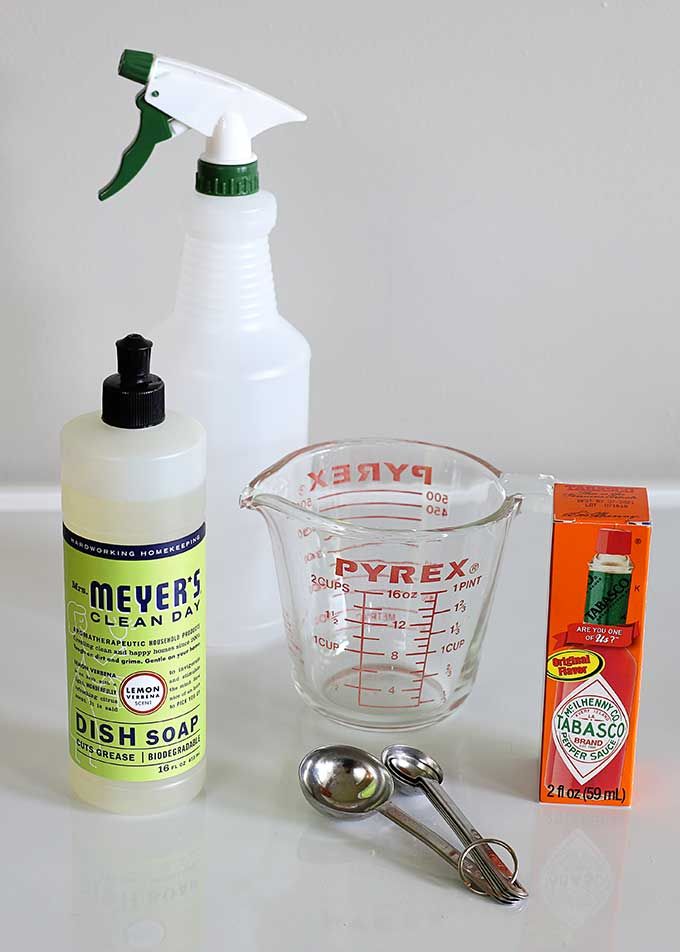
STEP 4: Prepare the vinyl surface.A thorough cleaning is a critical step toward achieving a professional-quality paint job—not only on vinyl, but on any material that’s inside or outside. Simply rinsing the house’s siding with running water from a garden hose won’t cut it.
The goal is to remove all mold, mildew, chalky buildup, and debris from the surface. For best results, make a cleaning solution that contains the following ingredients.
- 1/3 cup laundry detergent
- 2/3 cup powdered household cleaner
- 1 quart liquid laundry bleach
- 1 gallon water
Use a cloth or a soft-bristled brush to apply the cleaning solution before painting vinyl siding, then be sure to rinse off any remaining residue. Before going any further, allow enough time for the siding to dry completely.
For specific tips about this process, check out our other article on how to clean vinyl siding.
istockphoto.com
STEP 5: Set up paint supplies and apply primer, if necessary.Before applying paint, set up a drop cloth to protect any plants or other surfaces from paint splatters. If needed, set up a ladder on a stable, flat surface and ask a helper to hold the ladder while you use it.
Advertisement
After the work area is set up and the supplies are gathered, it’s time to start painting. However, before applying the chosen color, primer may be needed. Primer is recommended to make sure the finished paint job is consistent and has good adhesion. It may not be necessary if the original color hasn’t completely or partially worn away. If the vinyl is pitted or porous, it will also benefit from primer.
STEP 6: Apply two coats of vinyl paint.After the primer is dry, apply your chosen paint with a roller or a paint sprayer, saving brushwork for corners and edges. Evenly coat the entire surface, taking care not to apply too much paint in any one section. As for most other types of paint jobs, it’s better to do multiple light coats than one thick coat.
Upon finishing the first coat, let the paint dry before continuing on to the second coat. The second coat, however, must be given enough time (24 hours at least) to dry completely before the project can be considered complete.
Most of the time two coats are sufficient, but that doesn’t always do the trick. Once you have allowed the second coat of paint to dry completely, assess its appearance to determine whether an additional coat may be needed.
istockphoto.com
Final ThoughtsPainting a home’s exterior (and painting vinyl siding) is a laborious job. The silver lining to completing such a large-scale is this: Assuming that you properly cleaned the siding prior to painting and had ideal weather conditions during paint application, you can reasonably expect the new coat of paint to last 10 years or more.
Now that you know the answer to the question of can you paint vinyl siding, remember that it’s easier said than done. Depending on the size of a home and how much vinyl siding is covering the home, painting vinyl siding can take a day or it can take an entire weekend or more to properly clean, apply primer, and coat twice with the chosen paint color. Because jobs like this typically involve climbing on tall ladders, it’s also important to enlist a helper for safety reasons —and to make the job easier and faster.
Advertisement
FAQs About How to Paint Vinyl SidingFreshly painted vinyl siding can transform the look of a home in about a weekend. It’s a laborious project, but the cost savings and satisfaction of a home makeover can be worth it. While we’ve shared the steps in painting vinyl siding, there may be some lingering questions. Below are answers to some of the most popular questions about how to paint vinyl siding.
Q. How long will my vinyl siding last if I paint it?With regular maintenance and cleaning, vinyl siding can last from 20 to 40 years. Paint may need to be applied every 10 years or so, depending on local weather conditions.
istockphoto.com
Q. How do you make vinyl siding look modern?Paint colors can help make vinyl siding look more modern. Choosing rich neutrals over pastels can infuse a sided home with modernity. Also, pairing the siding with exterior elements like modern furniture on a porch, statement-making door decor, and carefully chosen landscaping also helps make the entire house facade feel more modern.
Q. How much does it cost to paint over vinyl siding?On average, it can cost $4,000 to paint a 2,000-square-foot home, according to Fixr. Costs vary by location, number of coats, the age of the siding, and whether you paint it yourself or hire a professional painter.
Q. Is it bad to pressure-wash vinyl siding before painting?Vinyl siding should be washed and dried prior to painting. If it’s dirty, paint will stick to the dirt and grime on the vinyl siding and be unable to adhere to the siding. When the dirt finally flakes off, it will leave behind blemishes in the cured paint.
The best colors for home resale include neutrals and traditional colors like off-white, yellow, light blue, gray, taupe, putty, and blue gray.
Get a pro to do it for you
Receive free, no-commitment estimates from pro painters near you.
Find local pros
+Can You Paint Vinyl Siding? 5 Factors to Consider
If your home is ready for an exterior facelift, painting your vinyl siding may seem like a quick solution.
However, painting your vinyl siding may not be the best long-term solution for your home. There are five key factors to consider before you decide if you should paint or install new vinyl siding:
-
Warranty
-
Cost
-
Color
-
Integrity & Durability
-
Insulation
1.
 Vinyl Siding Warranty
Most major vinyl siding manufacturers do not honor warranties if the vinyl siding is painted, even for brand new vinyl siding. Be sure to check the specific warranty for the siding currently on your home to determine if paint negates the warranty.
If the siding warranty is expired or no longer valid, or you aren’t concerned with voiding the warranty, paint might be a low-cost option.
One final word of caution: if your home suffers damage that requires a claim, your insurance agency may not honor the claim if the vinyl is painted.
2. Vinyl Siding Cost vs. Painting
According to Home Advisor, the typical cost to paint a home’s exterior is $1687 - $3,907.
You may be able to save money by doing the project yourself, but plan to dedicate many hours to the project. Don’t underestimate how large the exterior surface of the home is and how much paint you will need. Also, don't forget the cost of additional tools like sprayers or scaffolding.
New vinyl siding costs between $5,000 - $14,050, according to Home Advisor.
(Check out this article on 5 Factors that Influence the Cost of Vinyl Siding.)
Although new siding comes with a higher price tag, it requires no regular painting or maintenance and is guaranteed by the manufacturer for 30 years or more.
You can also expect to recoup 76.4% of the total cost of new siding according to Remodeling Magazine, reducing the true cost of the project over time!
On average, painted homes will need a new coat of paint every five years. You may be required to repaint if the paint didn’t adhere well to the siding, or if your home gets exposed to extreme elements of sunlight and moisture. If you plan to stay in your home, the cost of painting can quickly add up to the price of a new siding job.
If you do not properly paint vinyl siding, it can take your home’s appearance from bad to worse, and the money you spent on the paint job will have been wasted.
3.
 Integrity of the Siding and the Home
Photo credit: http://hugohd.com/editor/
Your siding serves as the first line of defense between your home and the outdoor elements. Making changes to your home that could degrade that defense could be detrimental to your home.
When new siding is installed, the old siding is typically removed. Professional contractors then inspect the home for any damage from moisture, pests, or walls settling over time. Any problems are corrected before the contractor installs new siding. In addition, insulated vinyl siding products come with contoured insulation attached to the back, providing superior impact resistance after installation.
What is Insulated Vinyl Siding? Materials, Pros, Cons, and Installation
Read the full article >>
When painting, any underlying problems are not made visible before going over the existing siding.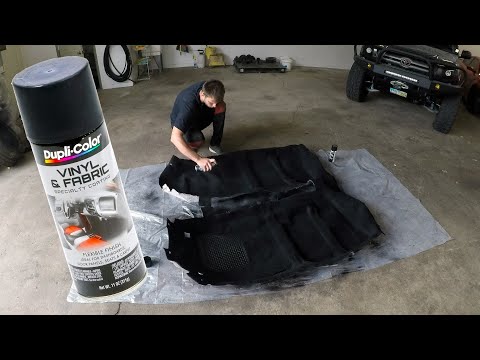 In addition, damage to the siding from wind, hail, or rocks thrown from the lawn mower are not corrected by painting siding. Damage spots can serve as points of infiltration for moisture or pests, causing problems like mold and nesting.
4. Paint Color Selection
If you decide to paint vinyl siding, be sure to select an appropriate color based on your siding brand and current color. Too dark of a color can cause the lighter siding underneath to warp. It is generally recommended to use a siding color that is similar or lighter than the color of your current siding.
Some major paint companies, such as Benjamin Moore, offer a curated palette of 59 colors that they consider to be safe for vinyl siding.
Installing new vinyl siding provides you thousands of color options and profiles to choose from.
Photo credit: http://www.royalbuildingproducts.com/
5.
 Siding and Insulation
If you’re looking to change the appearance of your home, you might not be thinking about insulation. Adding insulation under new siding can provide real energy savings by keeping heat where it belongs. Products like insulated vinyl siding have insulation permanently attached to the back, improving your home’s appearance, energy efficiency, and durability.
Painting old siding doesn’t give you an opportunity to add a layer of insulation underneath, so you will keep paying the utility companies month after month.
Summary
It is possible to paint vinyl siding and has been done by many. But once you paint a vinyl sided home, it can’t be undone, so be sure to weigh the pros and cons before opening the paint can.
Vinyl Wallpaper Paint - Paint Selection and Painting Rules
Interior decoration can be changed in a short time if the walls are finished with vinyl wallpaper. You need to paint them a different color. But in order for the new shade to match your preferences, not to fade, you need to choose the right paint for vinyl wallpaper.
Today, manufacturers offer a variety of coloring compositions. Using them, you can change the shade of the walls completely, tint them or paint them in different colors, and even apply a picture. Our article will help you achieve the desired effect. But first, let's deal with the types of vinyl wallpaper, since not all coatings can be painted.
Types of vinyl wallpaper
Before you start painting, make sure that the material can be subjected to this treatment. Vinyl coverings have two layers, so they are more durable and resistant to moisture than standard wallpaper. Available in 4 types of material:
- For kitchen and bathroom. Coverings from two layers of vinyl. Differ in durability, resistance to moisture. Easy to clean, have a variety of textures. You can paint such wallpapers.
- Foamed vinyl. They also consist of two layers, but one is vinyl, and the other layer is PVC, which is applied by spraying.
 The material is soft, embossed, well hides small irregularities of the walls. Wallpapers are suitable for repeated staining - you can apply the composition on them up to 10 times.
 - Flat sheets. They consist of a vinyl bottom layer and a thin PVC and silk fiber surface. Coatings have an interesting texture, which is smoothed out when stained. Therefore, this type of wallpaper is not recommended to be painted.
- Non-woven vinyl. The material, which is durable, does not deform, is easily glued to the walls without prior priming. Wallpaper can be painted up to 10 times.
When buying vinyl wallpaper, it is better to immediately pay attention to the presence of the inscription "for painting". This will help to avoid unpleasant consequences in the process of finishing the walls.
How to choose the right paint
Vinyl wallpaper paint is selected based on a number of parameters. First you need to choose the method of staining, then the color, type and type of coloring composition. After the material is purchased, you can start decorating the walls.
There are 4 ways to color the wallpaper:
- Before gluing. Using this method, the cut webs are dyed before gluing. First, the required amount of material is measured from the roll, then cut off, painted, wait 1 hour and glued to the wall. When using this method, you can get a beautiful convex relief.
- After gluing. First, the canvases are glued, they are waiting for complete drying and after about three days they are painted. The surface is less rough.
- Wipe. The wallpaper is painted after gluing, then wiped with a dry cloth to make the pattern lighter. This method is complex and time consuming. You will need to perform the manipulations together.
- Electoral drawing. First, the main composition is applied, then with a brush - a different color only on the wallpaper pattern. This process is even more complicated than the previous one.
Once you have decided on the type of staining, select the type of vinyl wallpaper paint that is suitable for the vinyl wallpaper. Please note that water-based formulations should be preferred. There are several types of paint and varnish coatings: acrylic, latex, water-based, dispersion.
The best option is acrylic or latex paint. The compositions are resistant to fading, detergents, they are durable, environmentally friendly, dry quickly. Do not buy water-based formulations. These are water-based paints that have low strength and are washed off with water. The cover cannot be washed. From exposure to sunlight, it quickly fades, and after drying, the shade of the paint noticeably brightens. Water-based coatings are not practical, especially if you plan to apply them to the walls in the kitchen or bathroom.
Manufacturers offer the material in white with the possibility of tinting. It is recommended to use computer tinting to give the composition the desired shade. Mixing pigment with paint using a computer method allows you to avoid mistakes and achieve the desired result in a short time.
Also decide on the choice of surface. It can be glossy, matte, pearlescent. For small and dark rooms, a glossy texture is suitable, but the walls must be perfectly even. Gloss makes visible even the smallest defects. Matte paint is best used in large rooms. Satin (mother-of-pearl) surfaces will look good in any room.
Preparation for painting
So you have chosen the type of paint. Now calculate its consumption, taking into account the quadrature of the room, the number of layers that will be applied to the wallpaper. You also need to prepare and buy tools that will be useful in the finishing process.
To paint the walls you will need:
- A container in which the paint will be added.
- Sheepskin or velor roller or spray bottle.
- Brush and paint tray.shoe, masking tape.
- Protective equipment - goggles, gloves.
If the walls are to be painted before pasting, they must first be prepared. Remove the old finish, putty cracks, prime the surface. If the wallpaper is already pasted, clean it of dirt and dust, then degrease, wipe with a soft cloth dampened with detergent. When the fabrics are dry, start painting.
Wall self-painting technology
Wallpaper painting is done in stages:
- Tape the door panels to the skirting boards and door openings with masking tape. Cover the floor to prevent paint from getting on it.
- Dilute the coloring composition in the amount necessary for applying to the walls.
- Painting is done from the bottom up.
- Do not use rollers with foam rubber, which spoils the texture of the material. Places where the roller does not reach, paint over with a brush.
- If painting is carried out for the first time, the composition is applied in two layers. The first layer must dry for at least 1 hour.
- It is better to paint vinyl wallpaper with a non-woven base with a spray gun.
The finished shade can only be judged when the paint is completely dry. If the texture is glossy, it will only show up after 3 days.
Pros and cons of wallpaper painting
Wallpaper painting has a number of advantages, among them:
- Minimum cost of changing the interior of the room.
- Possibility to do the finishing on your own, spending very little time and effort on it.
- Space for imagination and creativity.
Painted wallpaper is said to not "breathe". This is not the case if you are using acrylic paint. It allows air to pass through, so mold and fungus do not appear on the surface of the walls.
Painting wallpaper is a simple and easy task. The main thing is to choose the right coloring composition and decide on the color of the coating. If you do not know which paint is suitable for your case, and how to achieve the desired tone for interior decoration, Atik's managers will help you.
We not only offer a wide range of paints and varnishes from German manufacturers, but also carry out computer tinting of paint.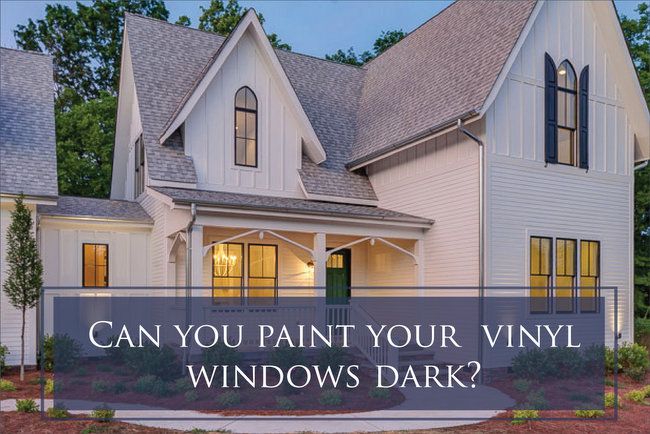 You only need to choose a shade from the catalog of brands that supply coloring compositions. We will take care of everything else.
tips and instructions. Paintable non-woven wallpaper
Paintable non-woven wallpaper is an ideal solution for those who value individuality and like to change the atmosphere around. This wall covering opens up many possibilities for the manifestation of imagination.
Paintable non-woven fabrics are an ideal solution for those who value individuality and like to change the atmosphere around. This wall covering opens up many possibilities for the manifestation of imagination. Modern brands guarantee that non-woven wallpaper for painting can be repainted 10-15 times. In the BackGround online store, non-woven wallpaper for painting is presented: a huge assortment, various styles and patterns, a wide range of prices.
Non-woven fabrics for painting are popular with European designers - in addition to a variety of textures and stylistic solutions, this finish is durable and looks spectacular in any interior.
Preparing the surface for painting
Apply wallpaper only when the adhesive is completely dry. Otherwise, the canvases may peel off the walls, and the repair will have to be started again.
If you want to renovate old wallpaper and give the room a fresh look, all walls must be vacuumed. It is also necessary to carefully glue all the joints, check if the wallpaper has moved away from the walls in the corners, if necessary, cut the coating and glue it.
Using film and masking tape, isolate adjacent objects and surfaces that cannot be painted. It is better to spend a little time on this procedure than to wash the paint off the ceiling or skirting boards later.
Choosing a paint
For painting non-woven wallpaper, you can use one of two types of paint:
1. Latex paint
It can be water-dispersion acrylic or just water-based. Both options are well suited for painting structural wallpapers. Latex paint can be used in all areas, as it is practically odorless and dries quickly. It usually comes in white. The desired shade is achieved by coloring. The disadvantage of this paint is that it is almost impossible to achieve a bright color. But if you need soft pastel colors, this paint is ideal.
2. Acrylic paint
Water-based. Its cost is slightly higher than latex. Acrylic paint does not harm human health, it has absolutely no smell. The surface treated with acrylic paint is breathable. Acrylic paint can be used in any room. For the kitchen and bathroom, it is better to choose a paint that is resistant to high humidity. The color palette consists of many bright tones. You can choose the right shade in a special studio, where the required amount of color will be added to the white paint. The process is controlled by a special program, so automatic tinting always gives a perfect result.
Recommended: Paint for non-woven wallpaper can be matt or glossy. The first option will well hide minor flaws in the coating, the second will emphasize the relief of the wallpaper.
It is not recommended to use matte and glossy paints in the same room.
Required tools
- Paint container
- Roller tray with reservoir
- Velor or fur roller
- Pieces of foam rubber (sponges)
- Brushes
Painting wallpaper
The work is carried out in several stages.
Step 1. Test
The shade of fresh paint is slightly different than when dry. To be sure of a positive result, you need to make a brush stroke on a small area of the wallpaper. Wait for complete drying and, if necessary, adjust the color.
Stage 2: Brushing
Carefully paint over the corners, under the ceiling and along the skirting board with a brush. This must be done, since it will be difficult to paint over these areas with a roller.
Step 3. Roller
Pour paint into the reservoir, carefully dip the roller into it.
Learn more
- Texture a ceiling techniques

- French kitchen cabinets
- Best white for bedrooms
- Garden party centerpiece ideas
- How to care for bell pepper plants
- Decorations above kitchen cabinets
- Best squirrel repellent for attic
- Bedroom decor black
- Practical bathroom design ideas
- Tiny front garden design
- Design a toilet
