Average cost of wet room
Cost To Install a Wet Room
Cost To Install a Wet RoomPhoto: Anatoli Igolkin / iStock / Getty Images Plus / Getty Images
Highlights
It costs an average of $9,000 to install a wet room, but you may pay as little as $2,000 or more than $30,000 for this project.
The biggest driving factors on cost are size, plumbing complexity, and tiling.
You can save $1,000 to $6,000 on labor by doing it yourself, but it’s best to leave this job to a pro.
You can save money by shrinking the space, shopping around for tiles, and eliminating extra features.
Get quotes from up to 3 pros!
Enter a zip below and get matched to top-rated pros near you.
A wet room is a fantastic addition to any home that will give it a wow factor. It's an entirely waterproof, self-contained bathroom that typically features a sleek, modern design. As a result, it's become a trendy addition in modern homes. If you're looking to install a wet room in your home, expect to pay an average of $9,000, with a typical range between $4,000 and $15,000.
However, the final price depends heavily on how big of a space you want to convert and how complex the plumbing job will be.
| National Average Cost | Minimum Cost | Maximum Cost |
|---|---|---|
| $9,000 | $2,000 | $30,000+ |
How Much Does It Cost to Install a Wet Room per Square Foot?
You can expect to pay about $30 per square foot of surface area to install a wet room on average; however, it can range between $11.50 and $70 per square foot, depending on how much labor is needed and the complexity of the plumbing work. You can break down the project into the following categories.
| Wet Room Project Category | Price per Square Foot |
|---|---|
| Plumbing | $3 – $30 per sq. ft. ft. |
| Labor | $3 – $20 per sq. ft. |
| Drywall or plasterboard | $1.50 – $3.00 per sq. ft. |
| Bathroom tiles | $3 – $15 per sq. ft. |
| Miscellaneous materials | $1 – $2 per sq. ft. |
These categories don’t include vanities, which you’ll pay for by the unit.
Wet Room Installation Cost Breakdown
Photo: Martin Barraud / OJO Images / Getty Images
Installing a wet room will involve stripping down the room to the joists, plumbing the room, laying down drywall or plasterboard, waterproofing the space, laying tile, and installing vanities.
“There are many details in designing and building a wet room,” says Bob Tschudi, Expert Review Board member and Raleigh, NC-based general contractor. “Toilet paper holders need covers, floors need to be anti-slip, and there should be grab bars all around.”
Here’s how the costs break down in terms of materials and labor.
Photo: sihuo0860371 / E+ / Getty Images
Materials
For this project, you will need the following supplies:
| Supplies | Cost |
|---|---|
| Waterproof adhesive | $25 – $100 |
| Plasterboard or drywall | $1. 50 – $3.00 per sq. ft. 50 – $3.00 per sq. ft. |
| Screws | $15 – $25 |
| Fixing washers | $15 – $25 |
| Sealing tape | $25 – $50 |
| Shower drain | $50 – $100 |
| Showerhead | $75 – $1,500 |
| Bathroom tiles | $3 – $15 per sq. ft. |
| Vanities | $300 – $5,000 |
| Mirror | $40 – $300 |
| Grab bars and handrails | $100 – $500 each |
| Bathtub (optional) | $500 – $4,000 |
Additionally, if you’re doing the project yourself, you will need at least the following tools:
Craft knife: $10–$20
Circular saw: $50–$200
Electric screwdriver: $20–$60
Plumbing
Finally, you will most likely pay between $1,000 and $10,000 to plumb the wet room. If the room is close to existing plumbing and it’s a relatively simple hookup, then costs will be on the lower end of the range. However, if it’s a complex job far away from existing plumbing, it will cost closer to the higher end.
For example, if you install a 40-square-foot wet room—requiring about 300 square feet of tiling, including the walls—with a standard showerhead, sink, and mirror and are working with existing plumbing, you will most likely pay about $1,000.
Labor
The cost of hiring a plumber is about $50 to $200 per hour. For a standard 40-square-foot space, it will take about 20 to 30 hours to complete the job, so you're looking at paying anywhere from $1,000 to $6,000 to get the project done in addition to the cost of materials. If you have a larger space, you will add more hours to the project; therefore, the labor cost will go up.
Cost to Install a Wet Room Yourself
If you install a wet room yourself, it’ll cost you as little as $2,000 and as much as $18,000 for a standard 40-square-foot space based on the typical price range for materials alone. The cost will be higher if the space is larger than 40 square feet.
That means you could save $1,000 to $6,000 on labor by doing this project on your own. However, this is a difficult project that requires expertise. If you don’t do it correctly, you may have to tear out all the tiling and plumbing and do it again, which will add a huge cost to the project.
Labor is not the bulk of the cost of this project; the majority of the cost goes towards materials. So in the grand scheme of things, hiring a pro is the best way to go. Contact a bathroom remodeling near you for an estimate.
Tips to Reduce Costs While Installing a Wet Room
Fortunately, there are a lot of ways to save money on installing a wet room besides doing the work yourself.
Shrink the Space
Size is the biggest cost factor for this project, so consider trimming down on the planned size of your wet room. Reducing size by about 10 square feet will significantly affect the final price.
Shop Around for Tiles
The type of bathroom tile you choose makes a big difference in price. Ceramic and porcelain tiles have a wide range in cost based on their quality and brand. Shop around or ask your contractor to find tiles in the $3 to $5 per square foot range, rather than in the $10+ per square foot range.
Perhaps you were planning on installing a shower, bathtub, sink, and vanity in your wet room. You can potentially save thousands of dollars if you opt for a walk-in shower in place of a tub.
Even if you want to keep all of those extras, they usually have wide price ranges. Perhaps instead of a full jacuzzi, you get a regular tub. Instead of that high-end showerhead, you can get a standard one for a fraction of the price.
Wet Room Installation Questions and Answers
What’s the difference between a wet room and a bathroom?
The difference between a wet room and a bathroom is that a wet room is entirely waterproof, even outside of the tub or shower. Wet rooms usually feature tile floors, walls, and a walk-in shower that’s level with the floor. The shower in your bathroom is basically a mini-wet-room, so think of that concept expanded to the entire room. Any water that ends up on the floor of a wet room flows into a drain in the room, which is not the case in a traditional bathroom.
“In a way, a wet room is a giant shower with a sloped floor that channels all water to a central drain,” says Tschudi. “Then it’s a matter of disguising it to make it look like a traditional bath.”
Can I turn my bathroom into a wet room?
Turning an existing bathroom into a wet room is possible, but you will likely have to tear out existing walls and tiles and install tiling up the walls and floor to waterproof the room.
Does a wet room add value?
Yes, a properly installed and waterproofed wet room will add value to your home. It's a nice modern feature that is sure to impress prospective homebuyers and can make your bathroom look bigger.
Need professional help with your project?
Get quotes from top-rated pros.
Recommended Articles
9 Things That Will Slow Down Your Home Renovation
By Jenna Jonaitis • January 3, 2022
13 Steps to Complete Your Bathroom Remodel
By Jenna Jonaitis • January 12, 2022
9 Kitchen Remodel Mistakes You Want to Avoid
By Ginny Bartolone • October 1, 2021
How much does it cost to install a wet room? All your questions answered
Homes & Gardens is supported by its audience. When you purchase through links on our site, we may earn an affiliate commission. Here’s why you can trust us.
(Image credit: Future / Davide Lovatti)
Wet room installation costs are somewhat more unknown to seasoned bathroom renovators, but this room is becoming an increasingly popular commodity in a busy family home, thanks to its practicality and durability.
Chris Scott, Joint MD, Mascot Bespoke , says: 'Wet rooms are now a staple feature of most luxury developments and refurbishments. Well-travelled clients, often time-poor, are looking to recreate that five-star luxury hotel spa experience within their own homes.'
So how much does it cost to install a wet room? As with all other bathroom ideas, installation costs for wet rooms really depend on how much reworking of pipework is needed, whether new drainage needs installing, the awkwardness of the configuration of the room, and its size, fittings and finishes.
Chris says: 'The key to success when designing and installing a wet room is ensuring that you have the basics right. While choice of tiles, vanity units and taps may be the exciting tactile elements of the scheme you notice once the work has been done, its actually the less inspiring items that sit behind the scenes that will inform the end look and feel of the wet room.
'For a true wet room experience, it’s preferable to avoid using a shower tray and instead tile your whole wet room, floors and walls. Over time, grout and silicone will inevitably fail, it’s therefore key to ensure that you have the correct waterproofing system in place, which is laid on-top of the under-floor heating system and can be tiled directly onto.
'Adding this layer does increase the cost in the short term, but pays dividends when you’re not having to pay for repairs to other rooms in the home as a result of water damage.'
We've tapped top bathroom experts to explain the costs of installing a wet room in your home below.
How much does it cost to install a wet room?
(Image credit: Future / Mark Bolton )
Nick Cryer, founder of Berkeley Place , has installed many wet rooms during renovation projects. He says: 'On average we would expect circa $11,000 (£8,000) to $18,000 (£13,000) for a medium-sized wet room, compared to say $8,000 (£6,000) to $14,000 (£10,000) for a similar traditional bathroom.
'Overall, we would say the wet room is worth an uplift in cost. We would expect a 20% to 30% uplift for a wet room over a traditional bathroom. Most of this uplift relates to the preparation work associated with waterproofing the area. Some additional ventilation may also be required and, any radiant heating installation needs to be better planned. '
'
Gemma Holsgrove, associate director at interior design agency Sims Hilditch , suggests even higher. 'I would anticipate a wet room costing anything between $20,000-$40,000 (£15,000-30,000) depending on the size and level of specification.'
Average costs to install wet room components
Wet rooms can be costly. Nick Cryer says: 'Wet room installations are more specialist, more time consuming and more expensive. All the materials and kit is very readily available, however, we recommend only experts are employed to complete the installation.'
Discover how much each wet room stage might cost below. Remember that prices will vary depending on the size of the room, how complicated your wet room ideas are, and level of finishes that you choose.
- Fittings: Generally if you have a joisted floor, the tray can be set flush (depending on joist positions). However, if it is a concrete floor you will need to raise the tray. Jo Sangster, senior designer at Ripples Bathrooms , says: 'Trays and waterproofing can range between $800-$1,400 (£600-£1,000) depending on size.
 The bigger you go the higher the price! A lot of suppliers will also offer options for trays that can be made in bespoke sizes and waste positions.' Gemma Holsgrove, associate director at Sims Hilditch, says you can expect to pay anywhere from $11000 (£8,000) to $20,000 (£15,000) for higher end finishes.
 - Tiles: Ripples' Jo Sangster says an average cost for tiles is anywhere between $70-$140 (£50-£100) per square meter. She adds: 'When choosing tiles for use within a wet room tray these will need to be anti-slip. You also need to consider the size and I generally suggest not too large or too small. Smaller tiles generally have more anti-slip properties however there are more grout lines. I usually like to design wet floors using the same tile across the whole bathroom floor.' Gemma Holsgrove suggests putting aside $2,000-$5,500 (£1,500-£4,000) depending on size and finish.
- Drainage and plumbing: The task of tanking (also known as waterproofing) is the process of adding an extra layer of protection between the walls and floor and the tiling or flooring you use in the wet room.
 According to Gemma, you'll need from around $2,700-$4,000 (£2,000-£3,000) for plumbing. Jo says: 'Don't forget to consider the drainage position based on your shower glass and shower head. Ideally not directly below where you are standing and as far away from the entrance to the shower as possible.'
 - Labor: 'There is more labor involved when fitting a wet floor as it requires extra tanking and cutting the tiles to the fall of the tray, however the finished look is well worth it!' says Jo. Put aside anything from $700-4,000 (£500-£3,000) for tiling, depending on the size of the room.
Are there any hidden wet room costs to consider?
When browsing walk-in shower ideas, you may have noticed that many of the surfaces are hard – and therefore cold and unwelcoming. Therefore, you may want to add underfloor heating to your wet room for added luxury.
Jo says: 'I believe underfloor heating is a must when fitting a wet floor tray. This can go all the way underneath the tiles in the shower so it helps to dry up water and create a much more pleasant showering area with warmth underfoot and help to combat any damp in the bathroom. '
'
Chris Scott, Joint MD, Mascot Bespoke , says many people are extending underfloor heating to walls, too, adding: 'Another consideration is how you will heat and vent the space. It’s no longer uncommon for clients to extend their underfloor heating systems to cover the walls of a wet room as well as the floor. This luxurious option helps keep the room at a perfect temperature but also speeds up the rate at which the tiled walls dry. Ideal for maintaining clean grout lines and a less soggy space. '
Costs for this will vary: electric underfloor heating is easy to install under tiling in an upstairs room – you can buy underfloor heating mats that are simply wired in by an electrician to your mains. If you are completing a more dramatic renovation of your entire house, and particularly on the ground floor, it is possible to have wet underfloor heating which is connected to the boiler just as radiators are.
Are wet rooms worth the added cost?
Wet rooms are worth the added costs, particularly if you are looking for small bathroom ideas for a second bathroom or en suite.
'The finished look of a wet room is always fantastic and really finishes off a space, in particular if you have an open walk-in shower,' says Jo Sangster of Ripples. 'Of course there are alternatives on the market with many new products and tray types that can also be set flush to floor, however this will still create a divide across the bathroom and will usually make the space feel smaller.'
Ruth Doherty is an experienced digital writer and editor specializing in interiors, travel and lifestyle. With 20 years of writing for national sites under her belt, she’s worked for the likes of Livingetc.com, Standard, Ideal Home, Stylist and Marie Claire as well as Homes & Gardens.
Wet facade technology: description, pros and cons
Russia is a northern country, and owners of dachas and private houses think about how to insulate their future housing immediately after acquiring a land plot for construction. Even at the beginning of the 2000s, the issue of high-quality insulation of small buildings was a real headache for builders, but today all this can be solved with the help of an elegant and truly effective method of exterior decoration, whose name is “wet facade”.
Wet facade principle
The very word "wet" this finish received because of the thin layer of wet plaster (or other water-based solutions), which the facades are faced with after the completion of other works. Otherwise, the wet facade is a rather difficult five-layer cake to assemble: first, an adhesive base for insulation is applied to the wall of the building, onto which foam plastic, extruded polystyrene foam, stone or mineral wool is attached, after which the insulation is fixed with a reinforcing fiberglass mesh and covered with a decorative finish . Sometimes to give designs b o For more strength, an additional layer of fasteners between the insulation and the reinforced mesh is added to the composition of the cake. As a result, the house acquires not only a neat appearance, but also retains a spacious inner area - due to the insulation taken out to the outside.
Advantages of a wet facade
- One of the most important advantages of a wet facade is the almost ideal balance of humidity and temperature inside the room, when the warm and humid air that appears in the house almost immediately goes outside, "without getting stuck" in the insulation and without becoming, thus, a favorable environment for the development of mold and mildew.
 In addition, the same temperature is set over the entire area of the rooms, where in winter it does not blow near windows and doors, and in summer it is pleasantly cool;
 - Insulation placed outside reliably blocks unwanted sounds from the outside, significantly increasing the soundproofing of the room ;
- Wet facade increases the life of the building , protecting its walls from moisture, dust, dirt, cold and direct sunlight;
- The simplicity of the design of the wet facade allows finishing in the shortest possible time with minimal stress on the walls of the building.
- In addition, the total cost of the wet facade is much lower than compared to its layered or vented counterpart.
- Finally, it can be cleaned fairly easy to clean - when using high-quality plaster, a wet facade is perfectly washed off with the simplest pressure washer
Wet facade disadvantages
For all the charm of a wet facade, its arrangement is associated with a number of risks. However, only one thing is relevant to the facade itself - the strong dependence of repair work on good weather.
- Finishing using the "wet" method is possible only in dry spring-summer period : otherwise, there is a high probability of getting cracks going through the plaster and mold deeply rooted in the insulation.
- Façade maintenance required . Over time, there comes a time when the facade needs cosmetic repairs: re-painting, plastering of minor defects arising from external influences.
- Friability . Yes, unfortunately, the insulated facade, if it is not reinforced with additional reinforcement, is very easy to damage. That is why in urban conditions, this technology is practically not used. With a strong blow with a fist, not to mention heavy objects, the facade is damaged at once.
- Local repairs are very problematic . Conventionally, if moisture accumulates under one of the insulation boards, then most of the facade will have to be dismantled.
 Also, having repaired it, it is very difficult to get into the color and structure of the overall picture of the facade.
 - Need a competent builder . Most often, the deplorable final result is associated, rather, with the human factor, such as the use of cheap Chinese components by workers or a violation of installation technology.
Wet facade assembly
Well, let's say it's sunny May or June outside, and you've purchased the best materials and hired a team of skilled builders. Where to start and how to build your work correctly?
Wall preparation
Before proceeding to the actual facade, do not be too lazy to build improvised scaffolding. Cover them with a waterproof film - this will protect the work surface from rain and wind. Make sure that all openings, from windows to doors, are securely closed, in addition, try to finish all work inside the room in advance, including pouring screeds and primary plastering of walls. Moving to the outside of the house, pre-mount all the corners, brackets and brackets that will come in handy later for installing gutters, television antennas or air conditioning. Finally, prepare the facade itself for future work: ruthlessly peel off the old plaster, wash all the grooves and cracks with a hand wash and dry thoroughly, then carefully putty the unnecessary sinuses.
The important thing is that the wall should be as flat as possible. after all, a "wet" facade is not a leveling technology. If the walls are littered to the vertical, they need to be leveled.
Insulation selection
Most often, slabs of expanded polystyrene or mineral wool become insulation for a wet facade. Expanded polystyrene is much cheaper, lighter and easier to fix, but mineral wool is more reliable in operation - it does not burn, is immune to mold and parasites, plus it perfectly lets the steam accumulated in the building out. It is curious that the fiberglass we are used to for a wet facade will not fit categorically: despite all its advantages, it does not cope well with tensile tests, especially in areas with strong winds, and is almost powerless in front of the alkali contained in many building mixtures. Next, you should check the insulation for density (recommended minimum - 90 kg / m2, maximum - 180 kg / m2), for moisture absorption (maximum - one and a half percent, otherwise the facade will be covered with cracks after the first autumn rains) and for steam conductivity.
Insulation fixing
Insulation for a wet facade is usually attached in two stages. First, expanded polystyrene or mineral wool is planted on building glue, and after twenty-four hours (required for the glue to “grab” thoroughly), the required number of dowels, most often plate-shaped, are screwed into the insulation. Such installation ensures that the base of the facade will not only be strong, but also motionless - as mentioned above, the greatest danger to the finish is a strong wind, which loosens plates that are poorly attached to each other and causes the plaster to crack. Each fastener has another important role: the dowels that tightly press the insulation to the wall bear, among other things, the weight of the plates and the decorative mortar, and the adhesive layer allows you to smooth out the bumps that are inevitable for the rough finish of the outer walls of the building.
Reinforcement
After the process of warming the future facade is completed, the reinforcement stage begins - just like in the case of slabs, this happens on average a day after the installation of thermal insulation. The reinforcement process itself includes applying a dense layer of glue to the mounted insulation, immersing the reinforcing mesh in the glue and covering it with a cover layer. The classic material for reinforcement is fiberglass mesh, which not only perfectly holds the weight of the insulation, but is also additionally treated with an anti-alkaline solution that is not afraid of caustic solvents and paints. First, the joints and corners of the future house are reinforced, then, after a daily break, they move to other surfaces, and they do it from top to bottom, moving from the upper floors to the basement. In addition to observing all the necessary installation conditions, it should be borne in mind that it is undesirable to work with adhesive compositions in the open sun and that there must be at least two millimeters of adhesive solution between the reinforcing mesh and the insulation.
Finish
The final stage of work on a wet facade can be started no earlier than three days after the adhesive of the reinforcing mortar has dried and only in good weather, with a temperature of at least five degrees Celsius, without rain and strong wind, and preferably in the shade.
When choosing a finishing material, it should be remembered that facade plaster is an extremely heterogeneous thing and is divided into several types, each of which has its own advantages and disadvantages. So, mineral plaster is the cheapest, but it is also of the most average quality, acrylic-based plaster holds the weight of the structure well and practically does not absorb moisture, but it does not remove steam well and easily catches fire. Sufficiently elastic silicate plaster requires a special primer, and the highest quality plaster - based on silicone - copes with all difficulties, but also costs much more than others.
Relocation of the wet zone in the apartment.
 All features in 2022.
 Relocation of wet areas, as well as other types of repair work on the redevelopment and / or reorganization of the apartment, must comply with the current building and sanitary standards for multi-apartment buildings, providing comfortable living conditions and safe living for all residents of the house.
Therefore, the first thing to do at the stage of redevelopment planning is to find out how, according to the current legislation, it is possible and how not to carry out the transfer of a wet spot in an apartment building. And the second - how and where to issue permits for the legal implementation of such redevelopment.
You can find answers to all these questions in our article.
Premises with wet processes
However, before moving on to the essence of the issue under consideration, let's determine which rooms in the apartment belong to wet zones.
Real estate wet spot: what is it?
A wet zone or a wet point is a room with high humidity (because there is a source of water), in which floor waterproofing is mandatory. These include: bathrooms, latrines, toilets, showers and shared bathrooms.
Is the kitchen a wet area or not?
FAQ: Is the kitchen a wet area? No, the kitchen area is not considered a wet spot. If you need detailed information on how to legally carry out a kitchen relocation in an apartment, go here.
Redevelopment with the transfer of wet spots
Before the owner, who has set himself such a task, there will be two sides of the issue: technical and legal. We'll take it apart from both sides. And let's start with a review of the technical nuances of this procedure.
Is it possible to move the wet area in the apartment?
From a technical point of view, it is not so difficult to carry out such a redevelopment. First of all, when transferring a bathroom, it is necessary to bring under the place of the future restroom communication, in simple words - a drain riser and cold water for draining. A drain riser with a diameter of 100 mm is allowed under a slope of 2 mm, and with a diameter of 50 mm - under a slope of 3 mm. Cold water can be supplied using any available materials, be it metal, polypropylene or metal-plastic.
Of course, no one wants to enjoy the sight of open pipes in their apartment, and therefore the desire to somehow hide them in the wall is understandable. In this case, you can arrange a plumbing box, but a mandatory item in this case will be the installation of an inspection hatch on it, with the help of which access to those pipes will be provided.
This scheme works only if the bathroom is planned to move at a distance of no more than 5 meters. Otherwise, it would not make sense to implement such a project due to the fact that the natural slope of the drain pipe will raise the toilet bowl to a height unacceptable by the layout of an average apartment, and a half-meter podium will turn your toilet into a throne room.
But even in this situation there is a solution: a forced sewage system. If you do not go into the nuances, then it is a pump with a grinder.
The forced sewage system has two significant advantages: the discharge takes place through pipes of smaller diameter (20 and 32 mm) and can be carried out not only horizontally, but also vertically up to seven meters high. Currently, there are many models of forced sewage systems with different designs and from different manufacturers.
However, the technical side is not the only thing that should worry you. In addition, there are a number of sanitary and construction rules that must be followed when moving a wet zone to the territory of a former kitchen or a corridor in an apartment.
Wet areas in the room and kitchen
According to SP 54.13330.2016, it is strictly forbidden to place wet areas above living rooms and kitchens (including kitchen-dining rooms and kitchen niches).
Basically, apartment buildings are built in such a way that one riser on all floors of the apartment has the same layout. That is, toilets are above toilets, bathrooms are above bathrooms, kitchens are above kitchens, rooms are above rooms.
During the redevelopment, the location of the premises in the apartment where renovation work is being carried out relative to other apartments will be changed. It is not prohibited by law to change the planning solution of an apartment, but at the same time it is impossible to worsen the living conditions of neighbors.
If, for example, a toilet is moved to a part of the area of the living room of your apartment, then it will be above the living room of the apartment located on the floor below. And clause 9.22 of SP 54.13330.2016 prohibits doing this, so this option for redevelopment of the apartment cannot be agreed upon.
The same applies to moving the toilet to part of the kitchen area. The existing rules do not allow the location of wet spots directly above the kitchens.
Therefore, in most apartments it is impossible to coordinate the redevelopment with the transfer of wet areas to the territory of the room or kitchen. However, there are several exceptions that allow this event to be carried out without violating the above-mentioned norms:
- The apartment in which the transfer of the wet spot is planned is located on the first floor - below the first floor there are most often non-residential technical premises.
- The apartment is located above the first floor, but under it there is a non-residential area of some organization.
- A two-level apartment is being redesigned, and in this type of living quarters it is allowed to place a toilet directly above the kitchen.
- A similar redevelopment was agreed and carried out at the neighbors from below.
Let's briefly comment on the listed exceptions, in which the wet spots in the apartment can be moved/expanded to the area of the kitchen or living room.
The owner's apartment is located on the first floor of a residential building. In this case, there are no obstacles in coordinating the redevelopment project, since there can be no residential premises below. And even if there is a basement under this apartment, this will not affect the approval process in any way.
The floor below is completely occupied by non-residential premises. As a rule, this applies to apartments on the second floor. Or when the first floor was originally non-residential. Or when the ground floor apartment was transferred to a non-residential fund to be converted into a shop, boutique, service center, etc.
In this case, it will be necessary to additionally attach to the set of documents submitted for consideration any document proving that a non-residential premises is located below. There is no clear regulation on the form. This can be like a certificate from the management company that there is a non-residential premises under your apartment on the ground floor, a BTI certificate, photographs of the facade with a clear link between your apartment and the premises on the lower floor, etc.
Under the area of expansion / transfer of a bathroom or a bathroom to a kitchen or a room, there is a non-residential premises of apartment , for example, a dressing room, pantry or corridor.![]() This option is possible if the owner of the apartment below has completed and officially agreed on the redevelopment of the transfer or increase in the area of the above premises at the expense of the kitchen / room.
This option is possible if the owner of the apartment below has completed and officially agreed on the redevelopment of the transfer or increase in the area of the above premises at the expense of the kitchen / room.
That is, in this case, we are not located above the area of the kitchen / room, but above the area of another room, which, before the redevelopment was agreed, belonged to the kitchen / room of the neighbors below.
The second floor of a duplex apartment. In practice, such a case is extremely rare. However, it is also an exception in which the owner has the right to place his wet area above his own kitchen.
If the bathroom (toilet) in the apartment on the floor below has already been enlarged by part of the kitchen (room) area. In practice, we have not seen such a case, but theoretically it is possible. Here, again, there must be non-residential premises under your neighbor’s apartment below, otherwise he would not be able to agree on this redevelopment. And then, within the same boundaries as that of a neighbor, you can transfer or enlarge the bathroom at the expense of the kitchen (living room).
This option looks something like this.
Suppose there is an apartment on the first floor. The owner can safely enlarge the bathroom at the expense of the kitchen. He did and agreed. Further, the owner on the second floor can make exactly the same extension, and so on. We also note that if any of the owners, for example, on the fourth floor does not want to do such a redevelopment, then on the fifth floor the homeowner will no longer be able to agree on this, despite the fact that on the first, second and third it is already agreed.
Redevelopment project with the transfer of the wet area to the kitchen.
Comments on the approved redevelopment project. The apartment is located on the second floor. During the redevelopment, the kitchen (4) was moved to room (3). This became possible because the neighbors downstairs also have a kitchen in this place. And a bathroom (6) with a toilet (5) in the form of a combined bathroom (4) was transferred to the former kitchen. Such redevelopment became possible because below, under the new bathroom, there is not an apartment, but a landing.
Transfer of the wet spot to the corridor
If there are serious restrictions when moving the premises of the wet zones to the living room and kitchen, which have already been mentioned, then the transfer of the wet zone to the corridor or storage room / built-in wardrobe / dressing room is almost always possible to agree, although carrying out such redevelopment also has some nuances.
As already mentioned, SP 54.13330.2016 prohibits the location of bathrooms and toilets above living rooms and kitchens.
Therefore, if a neighbor living in the apartment below officially made a redevelopment with the extension of the room (kitchen) to the corridor, then this fact will make it impossible to agree on the transfer of the toilet or bathroom to the corridor in your apartment, since your toilet / bathroom in this case will be above the extended part of the neighbor's room (kitchen), which would be a violation of current regulations.

If the downstairs neighbor did not re-plan with the addition of the corridor or part of its area to the kitchen or living quarters, then you can agree on expanding the wet zone due to the corridor or arranging the wet zone in the corridor by transferring it in your apartment.
Redevelopment project with the transfer of the wet spot (toilet) to the corridor.
Comments on the redevelopment. In this case, the toilet (6) was moved to the corridor (8). As a result, the passage to the kitchen (5) was blocked. To create a new entrance in the load-bearing wall between the kitchen and the room (4), a doorway was cut out and reinforced with metal structures. The former toilet room was combined with an adjacent bathroom (7) and thus arranged a combined bathroom (7).
Relocation of the wet area to a closet with access from a hallway, hallway or hallway is a permitted renovation measure. But if the entrance to the pantry leads from the kitchen or room, then the transfer of the toilet or bathroom to the pantry is carried out according to the same rules as the transfer of a wet point to the room or kitchen.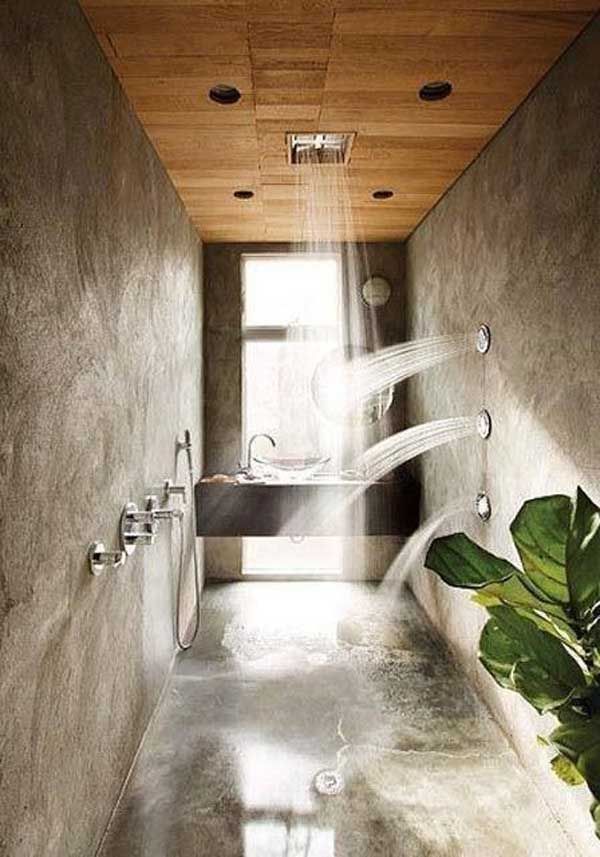
An example of moving a toilet to a storage area.
Comments on redevelopment. The toilet (2) in the apartment was moved to the closet (7), the entrance to which was originally arranged from the corridor (6). As a result, a combined bathroom (7) with an entrance from the bedroom (5) was arranged on the site of the pantry and part of the corridor area. It turned out to be possible to arrange an entrance to the bathroom from the living room, because the apartment has one more combined bathroom (8) with an entrance from the corridor (10).
In general, the transfer or extension of the wet zone due to a corridor, a pantry or a built-in closet does not cause problems in coordination. To agree on this redevelopment, design documentation is required as part of the redevelopment project and a technical report. In general, such work can be coordinated both by the owner independently and with the help of an organization that specializes in redevelopment design.
Can the wet zone be reduced?
Since usually in residential buildings wet spots are rooms that have a small area, the goals of redevelopment, as a rule, are:
- bathroom combination;
- extension of wet areas to adjoining premises.
But in rare cases, the owners ask if it is possible to reduce the wet zone in the apartment?
Redevelopment of the wet zone in the apartment, when it is required to reduce its area, is allowed, but only the norms mentioned above must be observed. That is, it is of fundamental importance how the area freed from the bathroom or bathroom will be used in the future.
An increase due to the wet zone of the corridor, pantry or utility rooms is quite feasible. But using a wet point to expand a room or kitchen is allowed only on the top floor, because in other cases the kitchen / room will be under the wet zone of the neighbors from above, which will not be agreed upon.
What must not be done when moving wet areas?
Speaking about prohibitions when moving a toilet, it is worth noting that when carrying out this type of redevelopment, it is prohibited:
- Use a balcony or loggia to accommodate a room equipped with a toilet.
 It is forbidden to transfer a bathroom, as well as a bathroom, to a balcony (loggia), regardless of which building and on which floor the re-planned apartment is located.
 - Arrange the floor in the toilet / bathroom without waterproofing, drawing up acts for hidden work. That is, floors in wet rooms must be lined with waterproofing material .
- Attach plumbing and plumbing fixtures to walls and partitions that separate the toilet from living rooms.
- Violate the requirements of the Code of Rules "Floors" (SP 29.13330.2011), according to which the floor in the toilet and bathroom must be 15-20 mm lower than in the adjacent corridor, or separated by a threshold also 15-20 mm high.
Continuation of the topic of prohibitions in our article "Do's and Don'ts when redevelopment of an apartment", for reading which you need to click the link.
Coordination of wet areas in an apartment
As for the process of coordinating a redevelopment with the transfer of wet areas, it differs little from other types of apartment renovations. You can learn more about the procedure by clicking on this link. In short, you will need:
- BTI documents for an apartment;
- redevelopment project;
- technical opinion on the possibility of redevelopment;
- title documents.
It should be added that in some cases an atypical set of documents is required. All the details about the documents for redevelopment here.
Our organization has all SRO approvals. If necessary, we are ready to develop a project for the redevelopment of wet points.
In the event that it is required to legalize the redevelopment of the wet zone, carried out without approval, you will need a floor plan with an explication before the redevelopment and a technical opinion on the admissibility of the repair measures carried out, which you can also order from us.
You can entrust us with the preparation of project documents for independent approval of redevelopment with the supervisory authority.