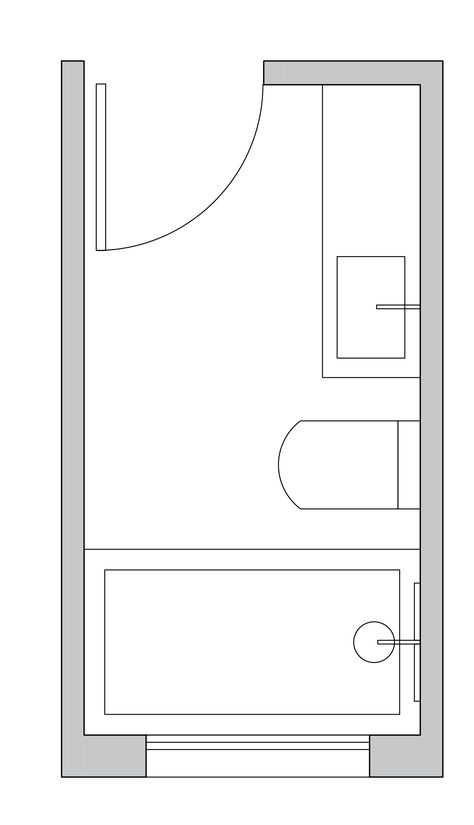
10X15 bathroom layout
Get the Ideal Bathroom Layout From These Floor Plans
By
Lee Wallender
Lee Wallender
Lee has over two decades of hands-on experience remodeling, fixing, and improving homes, and has been providing home improvement advice for over 13 years.
Learn more about The Spruce's Editorial Process
Updated on 11/23/21
The Spruce / Theresa Chiechi
It makes sense to sketch out floor plans for a whole-house remodel, so why not for the bathroom layout, too? Yet some homeowners skip making bathroom floor plans, perhaps assuming that bathrooms are so simple that physical plans are pointless.
In reality, a tight bathroom layout calls for rigorous planning. For example, a bathtub placed too close to a toilet or sink cabinet without adequate buffering can spell disaster for the small space. Creating bathroom floor plans can help you anticipate these problems and adjust your design prior to any remodeling work taking place.
Here are 15 free bathroom floor plans to help inspire your next project.
The 10 Best Bath Mats on the Market, Confirmed by Our Tests
-
01 of 15
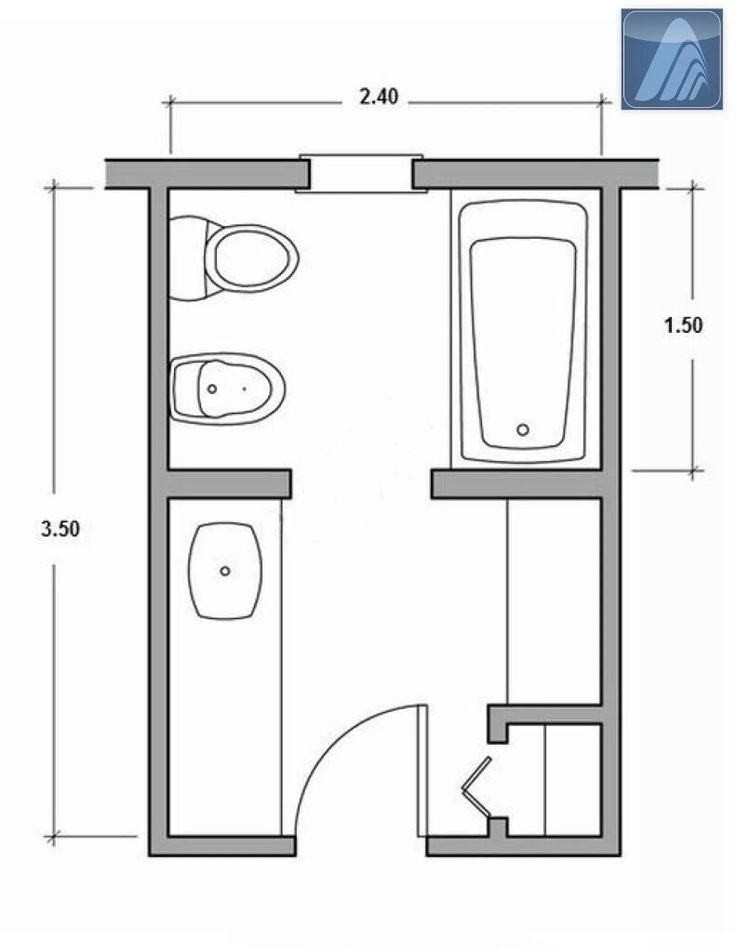
Small 48-Square-Foot Full Bathroom
The Spruce / Theresa Chiechi
Small and smart are the names of the game in this bathroom layout, which effectively fits a toilet, tub, and sink—all in a mere 48 square feet. As tiny as it is, this bathroom is perfectly sufficient as a full main bathroom for a small house or as a guest bathroom for a larger house.
Dimensions
- Length: 96 inches
- Width: 72 inches
- Area: 48 square feet
Features
- A supersize 72-inch bathtub occupies one end of the room.
- Sconce lights are located on either side of the sink.
- Lower plumbing and electrical costs are achieved by confining the water and drain lines and electrical lines along one wall.
- Using a pedestal sink rather than a vanity maximizes available space.
- Open wall to the right of the door can accommodate a small cabinet for towels.
- The room includes space for a bathtub or shower stall.
-
02 of 15
61-Square-Foot Full Bathroom
The Spruce / Theresa Chiechi
More floor space in a bathroom remodel gives you more design options. This bathroom floor plan can accommodate a single or double sink, a full-size tub or large shower, and a full-height linen cabinet or storage closet. And it still manages to create a private corner for the toilet. Instead of loading up the plan with more features, this bathroom layout implements smarter spacing of the basic features.
Dimensions
- Length: 98 inches
- Width: 90 inches
- Area: 61 square feet
Features
- A spacious and airy feeling is created through the effective spacing of basic features.
- Careful planning provides space to accommodate a large shower if desired.
- A large vanity could be used for double sinks or one sink plus an extra-long countertop.
- The room could accommodate a partition wall and door to enclose the toilet area for privacy.
-
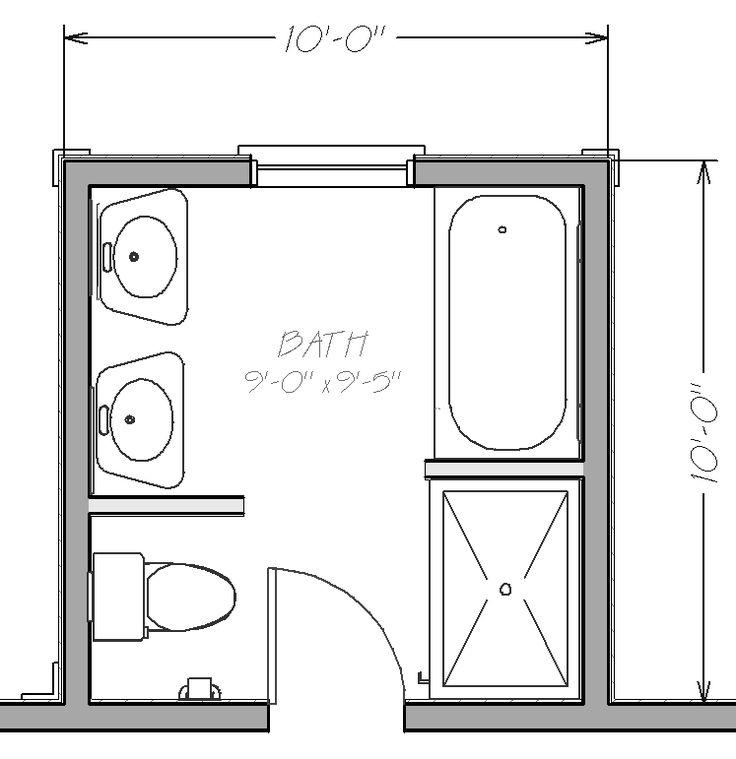
03 of 15
80-Square-Foot Bathroom With Tub and Shower
The Spruce / Theresa Chiechi
If you have the budget, this is an excellent bathroom floor plan that provides tons of flexibility. This plan features a shower stall and a bathtub, both of which are valuable for those busy mornings when two people need to bathe at once. The key to making this tight plan work is the corner shower stall with a rounded front, which maximizes space and allows for easier traffic flow.
Dimensions
- Length: 98 inches
- Width: 118 inches
- Area: 80 square feet
Features
- A true primary bathroom is created in a limited space.
- The room offers two ways to bathe, either with a shower or a bathtub.
- A shallow cabinet for towels and other bathroom accessories can be located in the front space away from moisture.
About This Term: Primary Bathroom
Many real estate associations, including the National Association of Home Builders, have classified the term "Master Bedroom" (or "Master Bathroom") as discriminatory. "Primary Bedroom" is the name now widely used among the real estate community and better reflects the purpose of the room.
Read more about our Diversity and Inclusion Pledge to make The Spruce a site where all feel welcome.
-
04 of 15
Tiny 17-Square-Foot Half Bath
The Spruce / Theresa Chiechi
This bathroom plan is little more than a toilet and a sink, suitable for hand-washing and toilet duties only. It is an ideal half bath for short-term guests who are not spending the night. Such a small bathroom is known as a powder room, guest bathroom, or half bath.
Dimensions
- Length: 52 inches
- Width: 48 inches
- Area: 17 square feet
Features
- A pedestal sink makes the best use of limited space.
- Plumbing fixtures confined to one wall make for simple plumbing work.
-
05 of 15
Basic Three-Quarter Bathroom
The Spruce / Theresa Chiechi
This rectangular room is fairly small, but it still manages to squeeze a toilet, sink, and shower into the space. Using a shower rather than a bathtub saves space, as showers generally have a smaller footprint.
Dimensions
- Length: 94 inches
- Width: 68 inches
- Area: 44 square feet
Features
- Wide 36-inch vanity provides ample counter space.
- Shower sized at 36 inches by 36 inches visually balances the vanity.
- The careful arrangement prevents the toilet from facing the doorway.
- The layout provides room for the door to swing open.
- Use of a shower instead of a tub retains enough space for a cabinet.
-
06 of 15
Bathroom With Bump-Out Alcove for Tub
The Spruce / Theresa Chiechi
If you're fortunate enough to have a bump-out area, this layout is for you. Install a whirlpool or an oversized 72-inch bathtub in the window alcove area, tile the walls up to the bottom of the windows, and enjoy the light and view as you bathe.
Dimensions
- Length (main room): 132 inches
- Width (main room): 60 inches
- Length: (tub alcove): 72 inches
- Width: (tub alcove): 48 inches
- Area (main room): 55 square feet
- Area (tub alcove): 24 square feet
- Area (total): 79 square feet
Features
- This bathroom features a generous space for the bathtub as the focus of the room.
- The clever layout allows an awkwardly shaped space to become a unique bathroom haven.
- The space could accommodate a long, wall-to-wall vanity with double sinks.
-
07 of 15
Bathroom for an Awkward Room Shape
The Spruce / Theresa Chiechi
Sometimes the available space for a bathroom is not perfectly rectangular. It might be that a furnace closet, coat closet, or structural components impinge on the bathroom space. This 64-square-foot bathroom plan is an example of how to tuck all of the features needed for a full bathroom into spaces that are available.
Dimensions
- Length: 96 inches
- Width: 96 inches
- Area: 64 square feet
Features
- An offset vanity makes efficient use of a long, narrow space.
- The bathing space is isolated from the toilet with an alcove wall.
- Space behind the entry door can be used for utilities, a coat closet, or other storage.
-
08 of 15
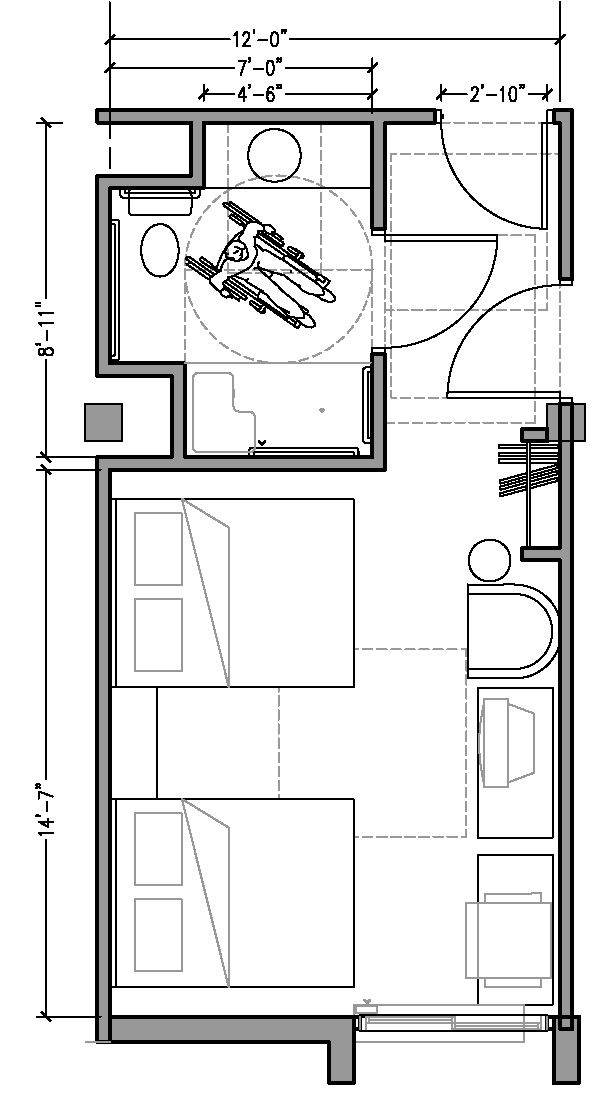
64-Square-Foot Bathroom Plan With a Private Toilet
The Spruce / Theresa Chiechi
In a home where the bathroom must be used by more than one person at a time, a walled-in private space for the toilet can greatly improve the space's functionality.
 This plan provides partition walls and a space-saving pocket door to create a toilet alcove. A conventional door wastes space because you need to account for its swing. Using a pocket door instead reclaims that space.
 Dimensions
- Length: 96 inches
- Width: 96 inches
- Area: 64 square feet
Features
- A long vanity and countertop make a double sink possible.
- The layout includes generous private space for the toilet.
- Use of a pocket door maximizes available space by eliminating door swing.
-
09 of 15
Three-Quarter Bathroom Plan With a Storage Room
The Spruce / Theresa Chiechi
Can you fit a toilet, tub, double sink, and floor-to-ceiling cabinet into a mere 64 square feet? While tight, this is possible, especially when privacy walls isolate the bathtub and toilet areas. One limitation of this bathroom layout is the entry door will swing into the cabinet.
Dimensions
- Length: 96 inches
- Width: 96 inches
- Area: 64 square feet
Features
- A careful layout and a standard 60-inch bathtub allow space for a storage cabinet.
- The room allows space for a double sink.
- The bathtub and toilet receive privacy thanks to inner partition walls.
-
10 of 15
Large Bathroom Plan With Open Floor Space
The Spruce / Theresa Chiechi
The best of all worlds is a large bathroom space with relatively square dimensions. With this bathroom layout, it is possible to retain maximum open floor space by arranging the fixtures on opposite walls and using a shower rather than a full bathtub.
Dimensions
- Length: 114 inches
- Width: 108 inches
- Area: 85.5 square feet
Features
- This bathroom plan offers considerable open floor space.
- It includes all features and has both a bathtub and shower.
- An extra-wide vanity with double sink is included.
-
11 of 15
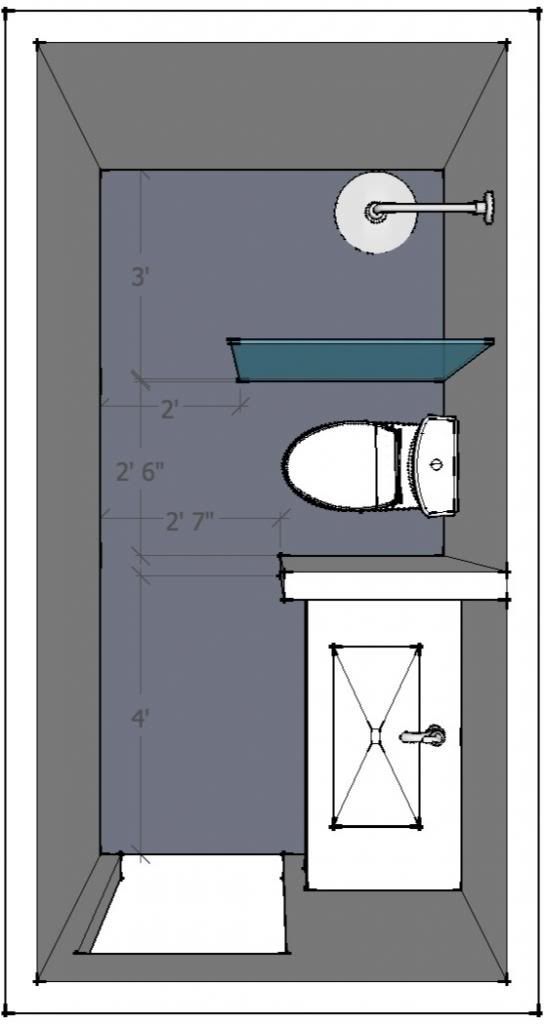
Long, Narrow 50-Square-Foot Bathroom Plan
The Spruce / Theresa Chiechi
A long and narrow bathroom space can be difficult to plan around.
 One idea is to cap the end of the bathroom with a custom shower. This effectively shortens the length of the room and makes it easier to integrate the remaining features. This bathroom floor plan could work with a door almost anywhere along the open long wall. Ideally, you would want to avoid placing the toilet directly in front of the door unless absolutely necessary.
 Dimensions
- Length: 120 inches
- Width: 60 inches
- Area: 50 square feet
Features
- A custom shower at the end maximizes the usage of the room's 5-foot width.
- The shape of the room makes a very long vanity and countertop possible. Two sink basins are easily accommodated. Another option is to have a single sink basin and a very long countertop.
- This layout can be adapted to feature a shorter vanity integrated with a tall linen closet.
-
12 of 15
Fun and Simple Kids Bathroom
The Spruce / Theresa Chiechi
This large, square bathroom features a clawfoot tub, pedestal sink, and plenty of floor space for wrangling kids into the bathtub.
 Treat this wide open space as your canvas for fun and fanciful designs.
 Dimensions
- Length: 144 inches
- Width: 144 inches
- Area: 144 square feet
Features
- The clawfoot bathtub is a fun addition that kids love.
- There's plenty of space for a chair to create a comfy sitting area to use when keeping an eye on the kids.
14 Creative Kids Bathroom Decor Ideas
-
13 of 15
Long Space for a Custom Shower
The Spruce / Theresa Chiechi
This bathroom floor plan uses the end of a narrow room for a custom tile shower. A clawfoot tub and a small vanity leave flexibility for the position of the toilet. The toilet could be tucked in between the end of the bathtub and the shower wall or positioned to the side of the vanity and the sink.
Dimensions
- Length: 144 inches
- Width: 96 inches
- Area: 96 square feet
Features
- The room features both a clawfoot tub and a walk-in, custom tile shower.
- This bathroom layout provides flexibility in the positioning of the toilet.
-
14 of 15
Unique Double-Door Shower With an Exterior Exit
The Spruce / Theresa Chiechi
Not many homes can accommodate a bathroom floor plan that has a door leading outdoors from the shower. But with enough landscape privacy, this bathroom would be truly unique. It features a large frameless glass shower with an exterior door leading onto a deck.
Dimensions
- Length: 144 inches
- Width: 72 inches
- Area: 72 square feet
Features
- The large glass shower has an exterior door, providing access to a deck or pool area.
- This layout gives you plenty of space near the vanity.
-
15 of 15
Bathroom With Alcove Tub and Surround
The Spruce / Theresa Chiechi
Many bathrooms make use of a design in which the bathtub/shower is recessed into a framed alcove, with the three alcove walls covered with surround panels.
 An advantage of this layout is the room retains open floor space, which is ideal for family bathrooms.
 Dimensions
- Length: 144 inches
- Width: 90 inches
- Area: 90 square feet
Features
- The alcove tub allows for a wide open floor area.
- The long wall adjacent to the door could accommodate a linen cabinet or other storage units.
Bathroom Space Planning for Toilets, Sinks, and Counters
The best layouts for bathrooms |
Homes & Gardens is supported by its audience. When you purchase through links on our site, we may earn an affiliate commission. Here’s why you can trust us.
(Image credit: Anna Stathaki | Davide Lovatti | Neptune)
A carefully planned bathroom layout is key to a successful, functional and long-lasting bathroom design, so, getting your bathroom layout ideas right first time is vital.
When planning your bathroom ideas, working out the layout first is essential, as this will then allow for you to pick designs and objects that are suited perfectly to the exact needs of your space.
A bathroom needs to be an organized space that can help you feel energized at the start of the day and calm in the evenings, so choosing a layout that finds the perfect balance between function and relaxation will always be a success.
'Getting a bathroom layout right will make a huge difference to the enjoyment of the space’, says Yousef Mansuri, head of design at luxury bathroom brand C.P. Hart.
Bathroom layout ideas – 17 inspiring ideas for your space
If you're wondering how to design a bathroom, before you begin browsing ideas, check the measurements of your bathroom and make a scale plan. Include elements that will affect your design, such as window positions and heights, external walls, drainage and door openings.
Then, create the main elements – a bath, shower cubicle, toilet, basic storage – to-scale so that you can better see what works where.
You should also consider your local planning and building codes for small things such as how much space you need between a toilet and a shower to prevent landing yourself in hot water.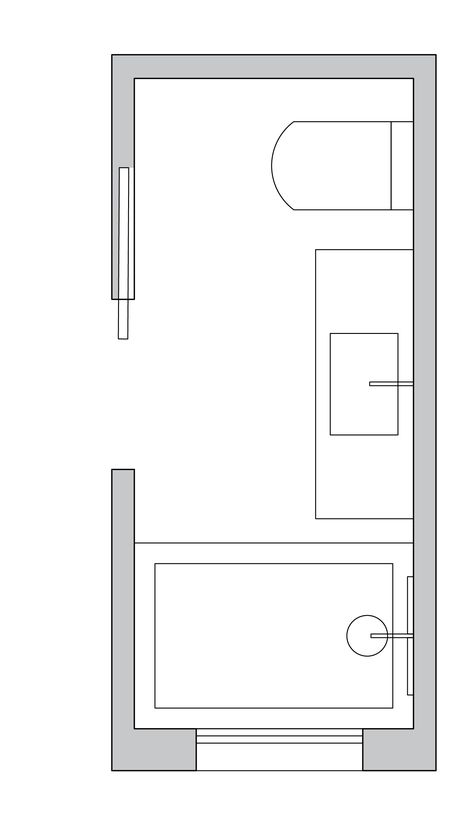
'The room size undoubtedly has the biggest impact on what can be achieved, but you also need to consider door and window positions, as well as any fixed features like a fireplace or existing paneling,' agrees Yousef Mansuri.
'For a separate shower and bath, plus toilet and basin, we’d suggest a bathroom of at least 1.7m x 3m. Almost all bathrooms require compromises. If you want a large, luxurious shower, prepare to settle for a small vanity. Prioritizing your preferences is a good place to start.'
To help with the bathroom layout ideas for your space, we have gathered some beautiful bathrooms for inspiration, as well as speaking to the experts to find out what works best when planning the layout for your bathroom.
1. Make the most out of natural light
(Image credit: Neptune)
Having lots of natural light in the home is not only good for your mindset and physical health, it can make a room feel more inviting, relaxing and functional.
For your bathroom layout ideas, positioning key pieces, such as a sink, bathtub or mirror, near a window can make your bathroom routine feel more refreshing and uplifting, as well as helping you to save on using artificial light at certain times of the day.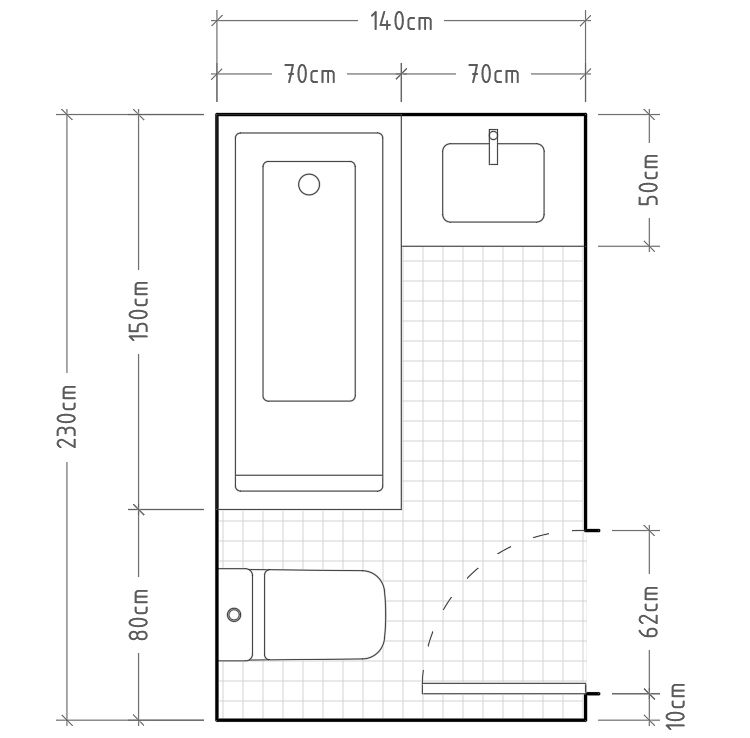
In this bathroom by Neptune , the basin has been placed so it faces the window – a common design idea often used for kitchen Feng Shui ideas. This layout idea embraces the natural light that floods into the bathroom space by positioning an essential, everyday bathroom appliance near the window.
2. Create a room within a room
(Image credit: Davide Lovatti)
Great for large bathroom ideas, creating a room within a room can establish a beautiful, zoned bathroom space.
With luxurious shower designs surging in popularity, from walk in shower ideas to unique walk in shower tile ideas, when planning your bathroom layout, why not section off your shower space to create a luxurious, spa-like layout in your own home.
In this unique bathroom, sleek glass and metal panels have been used to create a sectioned bath and shower room. The overall design makes for a stunning bathroom space, with a modern, Art Deco feel. The room within a room design not only showcases a beautiful collection of materials, but creates an inviting bathing area with an enhanced feel of relaxation and calm.
3. Establish unique focal points
(Image credit: Little Greene)
'When planning your bathroom layout ideas, you may come across certain features or awkward room layouts that you are unable change, so why not use these as an opportunity to create a unique focal point in the space,' says Homes & Gardens' Editor in Chief Lucy Searle.
In this bathroom, where contemporary colors and paint ideas by Little Greene have been used to uplift a traditional interior, the room shape leaves an alcove with a small window to the left of the bath. The perfect cozy corner for a small seat, the petite window is beautifully framed by a mix of soft blue paint and traditional stone, creating both an elegant contrast with the dark gray walls and a charming focal point in the space.
Paying attention to small features and awkward spaces like these when organizing your bathroom layout ideas can make a difference to how you use and appreciate your space, allowing for unique design opportunities where you can get creative with paint and object placement.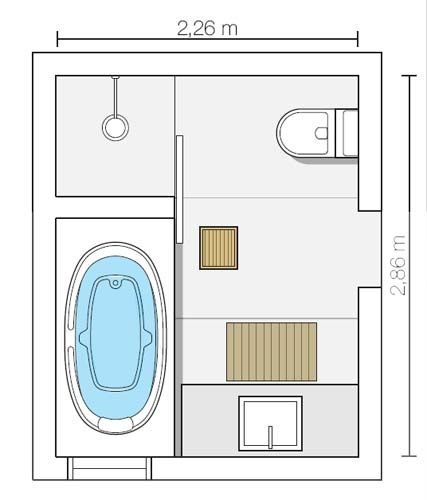
4. Consider the view
(Image credit: Neptune)
One to consider for ensuite ideas or open-plan bedroom-bathroom designs, considering the view as you look into your bathroom space will ensure you create a layout that is not only pleasing to look at, but works in harmony with the rest of your scheme.
In this bathroom by Neptune, the beautiful wooden and glass doors lead onto a relaxed bathroom space that embraces the same natural textures and neutral color palettes to the bedroom.
By placing the twin basin and wooden cabinet design in this location, a unique, calming focal point is created as you look on from the other room. Enhanced by accessories such as the rounded mirrors and plants, this bathroom layout creates an attractive space that can be appreciated from up close and from afar.
5. Incorporate seating
(Image credit: Anna Stathaki)
Creating an area where you can sit – other than the toilet – in your bathroom can add a luxurious, relaxing feel to the space, great for master bathroom ideas.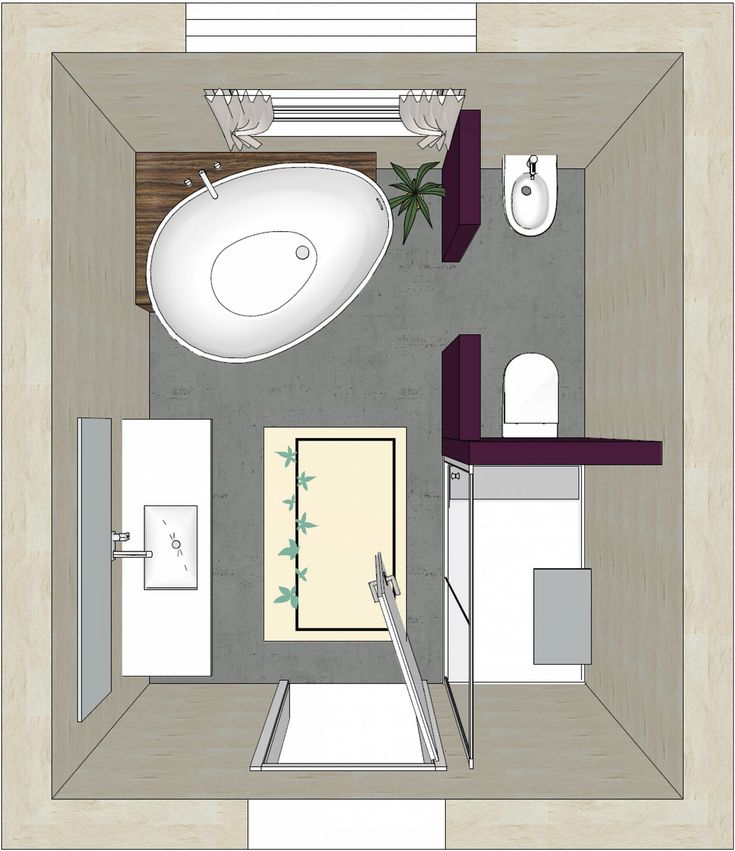
George Miller, Home Designer at Neptune states, 'there is nothing more homely than a petite armchair in a bathroom if you have room, because it introduces the softness of fabric. It’ll also make a nice spot for someone to perch and chat to you while you’re in the bath, or simply be a place to temporarily drape your clothes. Try to incorporate a little stool or a side table next to the bath too, where you can keep soap or a candle - being comfortable is all about having everything you need within arm’s reach.'
When planning your bathroom layout ideas, if there is an empty area of space which you want to fill but are unsure how, incorporating seating can be both a practical and aesthetically pleasing solution.
For larger bathrooms like above, to make a space feel more cozy and intimate, why not place an ottoman or bench in the center of the room, this can effortlessly make the room design feel more united and inviting – one to remember for ottoman ideas.
For small bathroom ideas, folding seats or stools can also neatly slot into place.
6. Use raised platforms
(Image credit: Ripples)
Experimenting with different height levels and platforms when planning your bathroom layout ideas can help with both practical needs, such as storage and pipes, as well as help to create cleverly zoned areas and space dividers.
In this stand out bathroom space by Ripples , the raised platform allows for the stunning bathtub to truly take center-stage. Working in harmony with cleverly positioned mirrors and lighting, the layout of the this bathroom creates a unique design that unites art with design – a beautiful example of luxury bathroom ideas.
With raised platforms for baths an enduringly popular design feature, considering raised platforms when planning your bathroom layout ideas can help you make the most out of the space available, as well as make an elegant design statement.
7. Cater to your bathroom layout's negative space
(Image credit: Alexander James)
As you begin to experiment with them, remember the negative space, too; in other words, the space between the different elements of your bathroom layout.
'There must be sufficient space between fitting for usability, cleaning, and aesthetics,' advises Youself Mansuri at C.P Hart. 'Leave at least 10cm between a vanity unit and a wall or shower screen, and allow 80cm-width for the WC, to provide elbow room. The same for a shower; I wouldn’t like to go below 80cm wide inside.
'Consider circulation space in the center of a room. Can you move around comfortably and is there enough space to fully extend the vanity unit drawer, or to bend your legs when sat on the toilet?'
8. Avoid emptiness in a bathroom layout
(Image credit: C. P. Hart)
'In very large rooms, putting fittings around the edges can make the center feel cold and empty,' says Yousef Mansuri.
'I often try to play with interior architecture in big bathrooms. For example, using stud walls for separate shower and WC areas, placing large baths centrally, or creating double-entry shower scenarios.
It’s also lovely to include seating.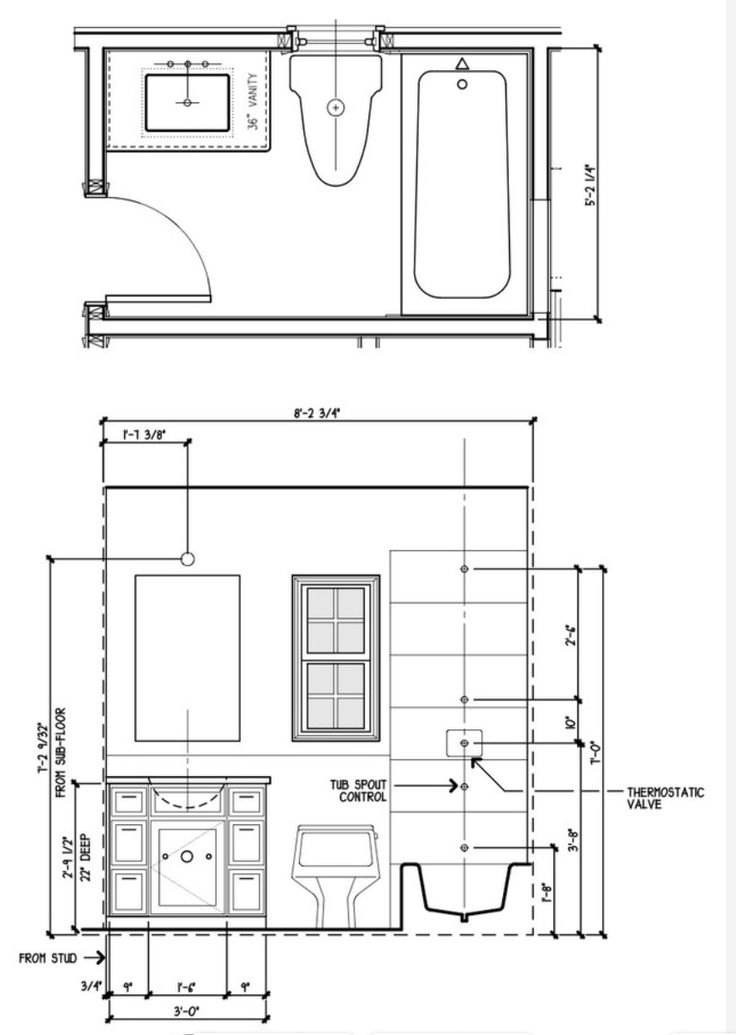 A bench, a side chair, or even a glamorous chaise lounge, to create space for relaxation.'
In bathroom Feng Shui, the layout of your space is vital. Having a bathroom directly opposite the front door means that when you walk into your home, the bathroom is the first thing you notice, and it is one of the Feng Shui features to avoid.
9. Revolve your bathroom layout around a key feature
(Image credit: Adam Carter)
'Take a look at your space and consider your wish list,' says Louise Ashdown of West One Bathrooms . 'The fittings for a family bathroom are likely to be different to a luxurious ensuite bathroom; a compact wet room different to a large spa-like bathroom.
'Decide on your key feature, be it a sculptural freestanding bath, a glamorous vanity unit or a double shower, and try to position it as the focal point, visible from the door.'
Yousef Mansuri agrees, 'Establish a focal point upon entering your bathroom. This could be a lovely vanity unit with mirrors and wall lights, or a beautiful freestanding bath.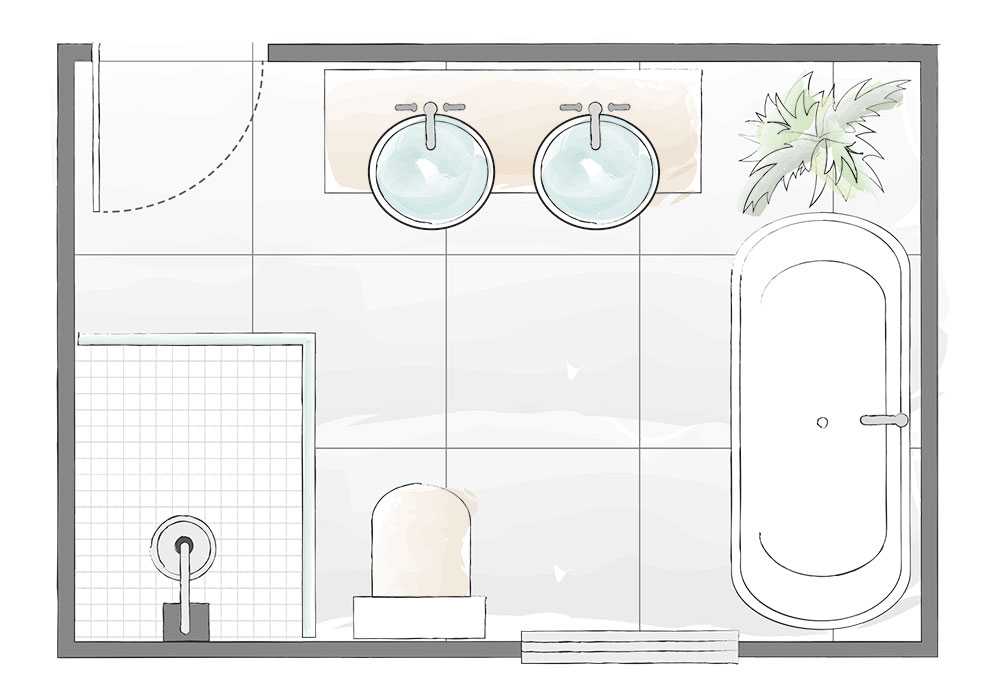 It should not be the toilet, if at all possible.
Where there is a window, the sill height is very important. Can you fit that toilet cistern frame under the window? If the window is large or particularly beautiful, you may wish to highlight it by positioning a bath below.'
(Image credit: CP Hart/Kit Kemp)
For anyone with a large bathroom or a master bathroom, putting the bath center-stage is often a priority.
The best place to position the bath in this case is centrally against the focal wall – usually the wall opposite the door to the bathroom or beneath the window. If you have plenty of floor space, a bath placed in the center of the room can give the space a real sense of occasion.
'A freestanding bath can look stunning, but it needs space to show off its shape, so may be better suited to a larger bathroom,' continues Louise Ashdown. 'A standard bath is L1700mm, but there are plenty of larger and smaller options: try out the bath before you buy, because comfort is king. '
'
If you are taking this approach, ensure the bath deserves the stardom you are giving it: a shapely freestanding bath will be most appropriate here.
And, of course, max out this bathroom layout by ensuring the bath is framed with beautiful bathroom tile ideas, a stunning window treatment of even just a stand-out paint color.
11. Pick the bath and separate shower layout for large bathrooms
(Image credit: Future)
If you have the space for a shower and bath in your bathroom, it is best to install them as separate elements. But do consider how you use your bathroom before devoting precious floor space to both.
If, for example, your family tends to shower more than take baths, consider sacrificing bath-size to ensure there is plenty of room for a spacious shower. By contrast, if you rarely shower, a smaller or space-efficient corner cubicle or even an over-bath shower (see more on that below) might be a better use of your space.
If you do have just enough space to include both a bath and separate shower, there are many inventive ways of maximizing the space.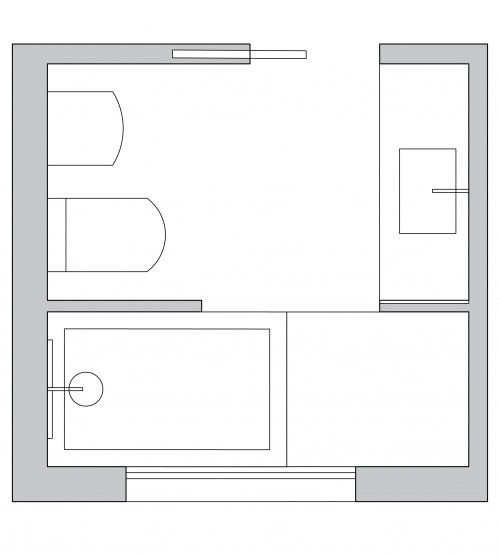
One is to divide the room with a partition wall that the bath can sit against and which can be used as one side of the shower cubicle.
In modern bathrooms, using a glazed shower screen to create the division, as in the bathroom above, can make the bathroom layout feel more spacious. And, of course, it allows light to flow freely through the room.
12. Save space with the over-bath shower layout
(Image credit: Annie Sloan)
If floor space is tight and you are looking for small bathroom ideas, it is wiser to incorporate the shower into the bath. A quality pairing can give you the best of both worlds: a spacious feeling bathroom, with all the functionality you need.
The over-bath shower above is beautifully decorative but if you are serious about practicalities, and the shower will be used very regularly, look for a bath designed specifically for showering.
L-shaped or bow-end baths will give you more room to stand in the shower end, without taking up too much floor space.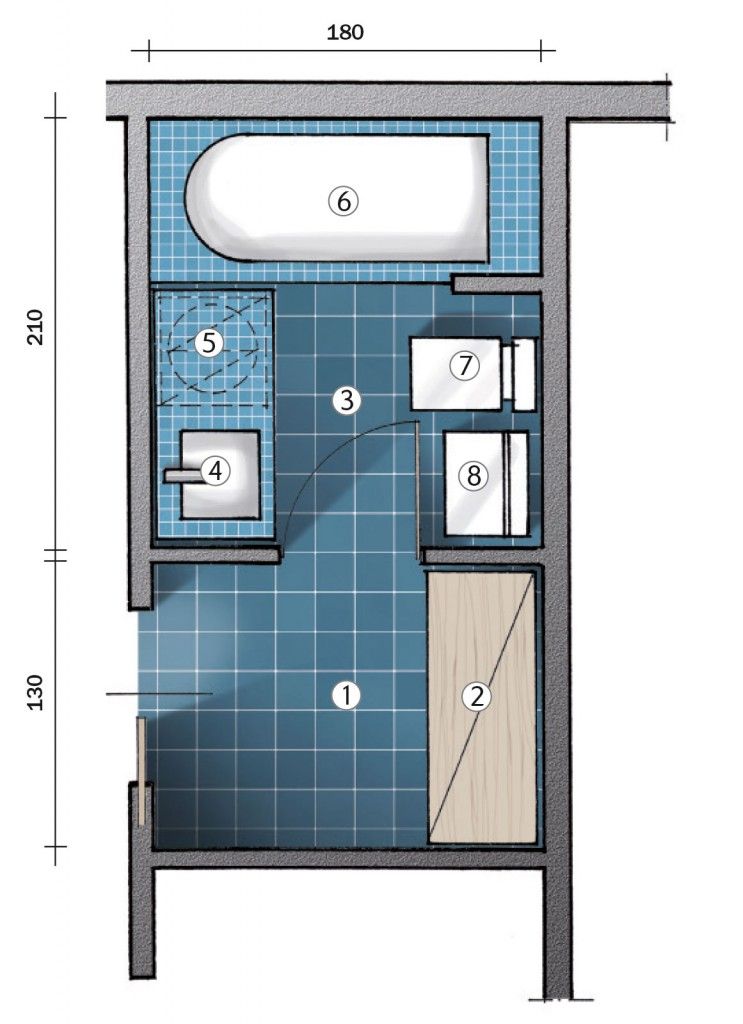
Relying on a hand-held shower attachment is the least preferred option. Having a proper shower fitted at the shower end of the bath is a must if it will be used often.
13. Select the shower room layout for small spaces
(Image credit: Wall&decò)
If you are looking for shower room ideas or wet room ideas, your bathroom layout may already be decided due to lack of floor space and, of course, drainage, which will be a major consideration and cost.
'You could decide to tank the whole floor for a wet room or a less expensive option is to create a walk-in design using a simple glass panel or panels to screen off a shower area with a flush-fitted tray or flush-tiled floor above a floor former.
In this case, you need a minimum of 1200mm x 900mm to be able to shower in comfort and prevent water splashing outside the shower area,' says Louise Ashdown.
'In a smaller space, an enclosure will prevent splashes and a minimum comfortable size is 900mm x 900mm.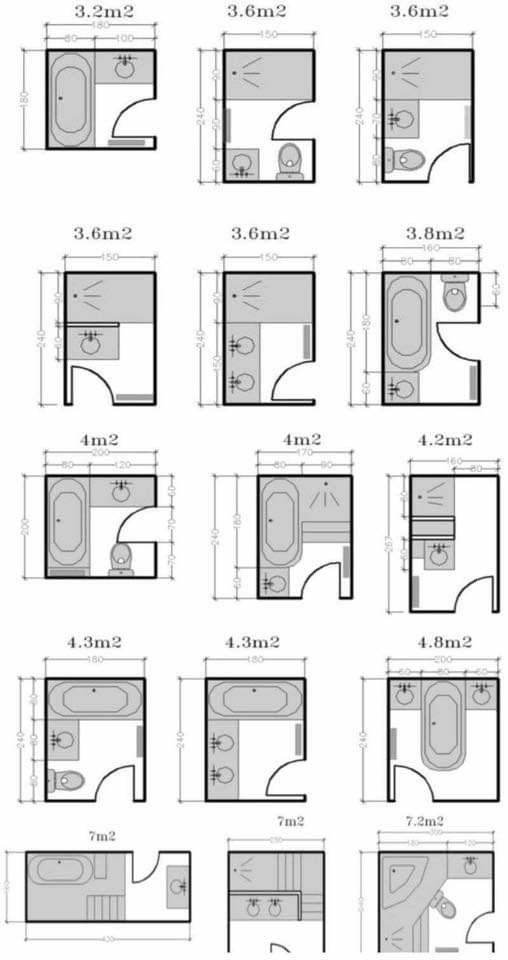 An enclosure is also essential if you want to install a steam shower, in which case you need a roof to the enclosure with a maximum height of 2200mm.'
14. Boost space with wall-hung fittings
(Image credit: C. P. Hart)
Wall-hung fittings are amongst the most vital of bathroom layout ideas – even in larger spaces. They make bathrooms not just bigger-looking – because you can see right beneath them to the walls of the room – they also make them easier to clean, too.
The space-enhancing trick wall-hung units and fittings create is really useful if you are choosing large fittings, such as double vanity units or wall storage units. But the even smaller elements of your bathroom layout can contribute.
'A wall-hung toilet, supported on a concealed frame, frees up the floor and maximizes the sense of space in your bathroom,' says Louise Ashdown.
Yousef Mansuri discusses the practicalities: 'Wall-hung fittings allow you to see underneath, giving a better sense of space.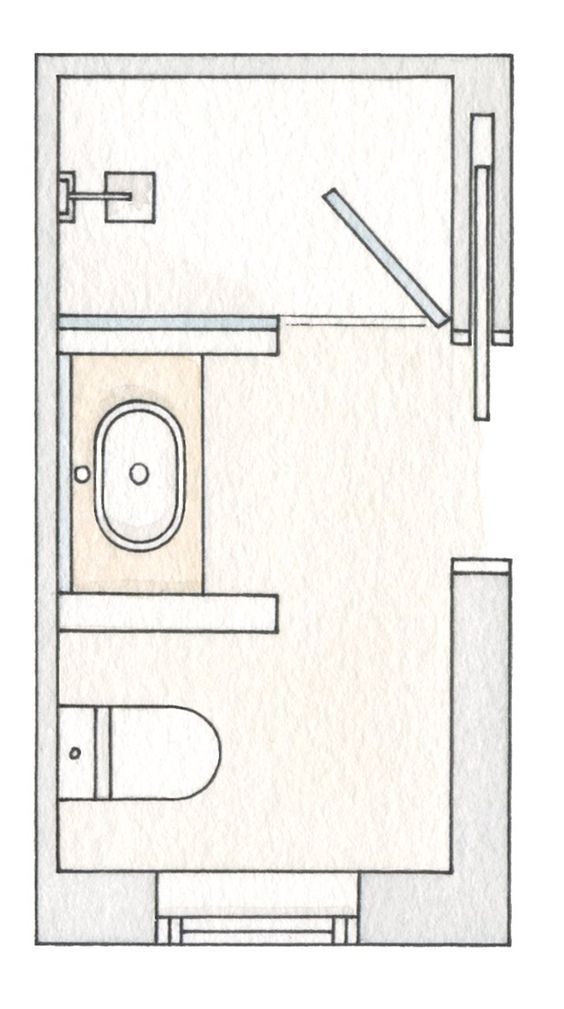 A stud wall is built out by at least 12cm to 20cm to hide cistern and pipes but if you have a stud-partition wall already, for example it’s a newly created en-suite, you can utilise the interior voids.'
If the wall-hung look is too contemporary for the bathroom style you have in mind, pick furniture and fittings with streamlined or neat proportions, or sleek, narrow legs.
15. Think vertically
(Image credit: Future)
You may not consider it immediately but your bathroom's height needs to be included in layout planning.
'If ceilings are particularly high, then I would stop the tiling at 2.2m or 2.4m high (picture rail height) and paint above,' advises Yousef Mansuri.
'High ceilings can push lighting out of IP-rating zones, affording more design choice – consider a glamorous chandelier. A low ceiling requires careful showerhead positioning. A flush-to-ceiling shower can help gain extra headroom, as will a low-level shower tray.'
16. Consider flooring in your bathroom layout, too
(Image credit: Nick Smith)
A change of level in a large bathroom layout can look wonderful – perhaps creating a stage for a centerpiece bath – and it can be a useful way of solving plumbing issues.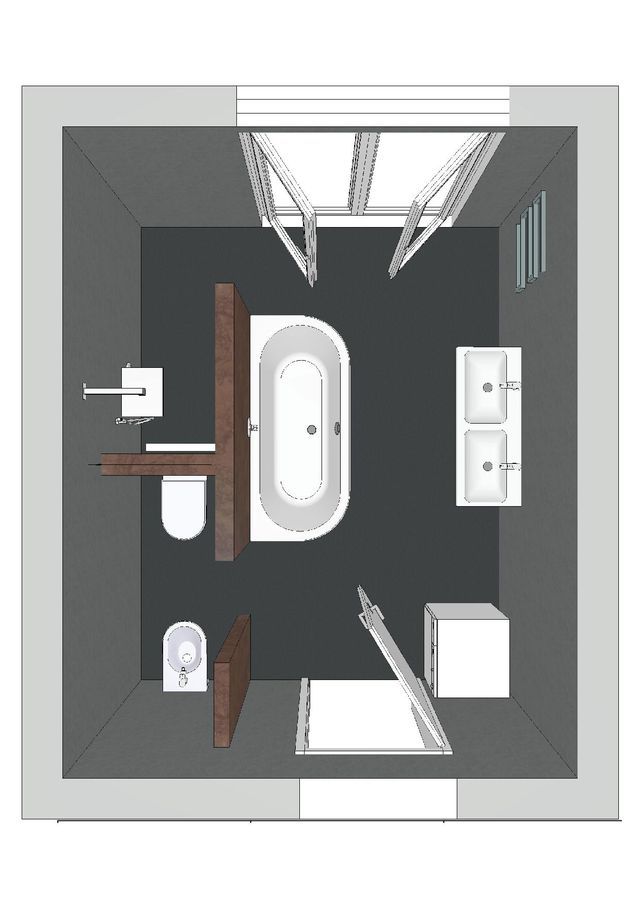
However, if your bathroom layout ideas revolve around furnishing a smaller bathroom, or maximizing space in a large bathroom, one-level, uninterrupted bathroom flooring ideas will have a similar effect to wall-hung furniture, making the room feel bigger.
'Wet room floors can give the illusion of extra space as there is no break in the floor type. Underfloor heating can free up wall space for other fittings,' advises Yousef Mansuri.
17. Consider storage right from the start
(Image credit: Future)
No bathroom can function without cleverly thought-out bathroom storage ideas, so this needs to be one of your earliest researched elements.
Using otherwise dead space is the most-efficient way to furnish your bathroom with storage. Think bathroom shelf ideas like shelving over a toilet or other small bathroom storage ideas, such as drawers beneath vanity units; niches within partition walls over baths or within shower cubicles and over-basin mirrors with storage hidden behind.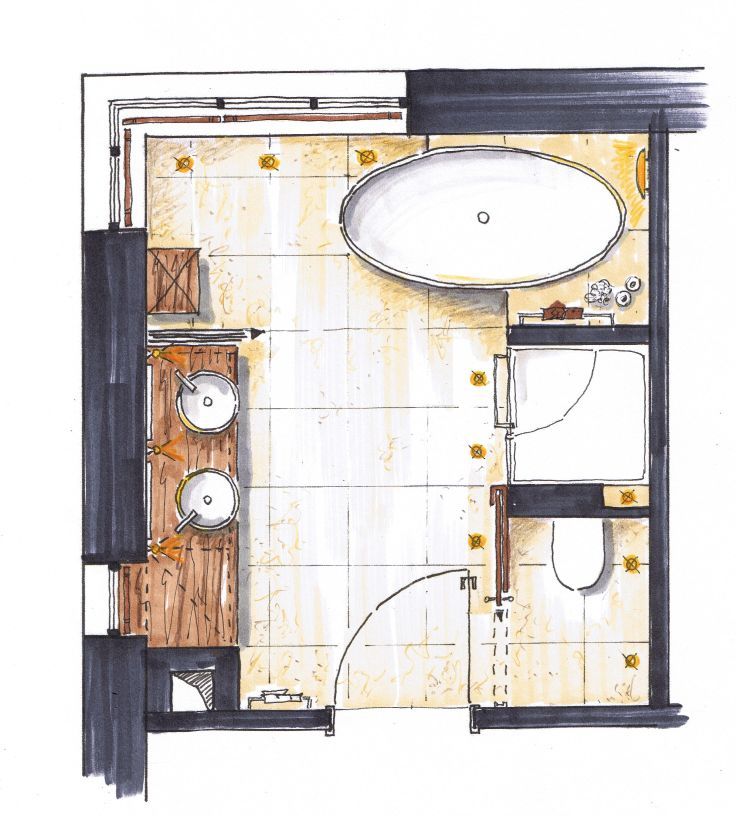
For bathrooms with little floor space, think tall, narrow storage that can either be wall-hung or floorstanding. These units can usefully hold everything you need them to but take up little room.
Adding a mirror to the front of this type of storage will help your bathroom layout feel more spacious and will help the storage blend away.
If, of course, you have plenty of space, a floor to ceiling run of mirrored cabinetry is a wonderful option. Consider the reflections cast, though, as few people want to see themselves on the toilet or in a shower. And remember, sliding doors are more space efficient than those that open outwards.
And, bear in mind that storage with doors is always going to be a better choice in what is often a small space than open shelving.
How do you lay out a small bathroom?
To lay out a small bathroom, draw out a to-scale plan and use cut outs of the priority elements – bath, toilet, basin, storage – to see what can fit comfortably.
Then, being careful to measure the space between each element to ensure there is enough room to move around, consider whether there is space for a separate shower or whether you have to consider an over-bath shower, a bath-only option or a shower room that sacrifices the bath.
Good ways to save space in a small bathroom layout is to choose underfloor heating over wall-hung heating options, and to pick slim but tall storage units or those that can be hung in otherwise dead wall space.
Finally, consider wall-hung bathroom vanity ideas and other fittings, as these will give an impression of space.
Where should a toilet be placed in a bathroom?
You may well find that there is little choice in where you place a toilet in a bathroom due to the position of the soil pipe.
However, if you can be flexible, never place the toilet opposite the door to the room and ideally, always tuck it away out of sight from the room's entrance.
You want your bathroom to look like a spa space as you enter it and a visible WC doesn't promote that.
Linda graduated from university with a First in Journalism, Film and Broadcasting. Her career began on a trade title for the kitchen and bathroom industry, and she has worked for Homes & Gardens, and sister-brands Livingetc, Country Homes & Interiors and Ideal Home, since 2006, covering interiors topics, though kitchens and bathrooms are her specialism.
With contributions from
- Zara StaceyContent Editor
Project of a house made of timber 10x15 Landskrona with a terrace and a porch: photo of the project and prices.
- Home
- Projects
- House from Landskron Brus
-
Fixed price
The cost specified in the contract does not change during the construction of -
Flexible payment system
You make 5% of the cost when signing the contract. The rest is paid in instalments. -
Maternity capital and on credit
Find out the list of required documents and conditions -
Changing the project
When building with us - changing the standard project or adapting the project of another company - free of charge
Cost of equipment
Contents of the packagefrom 1,844,025 rubles
On credit: from 20,000 rubles / month Calculate
Description
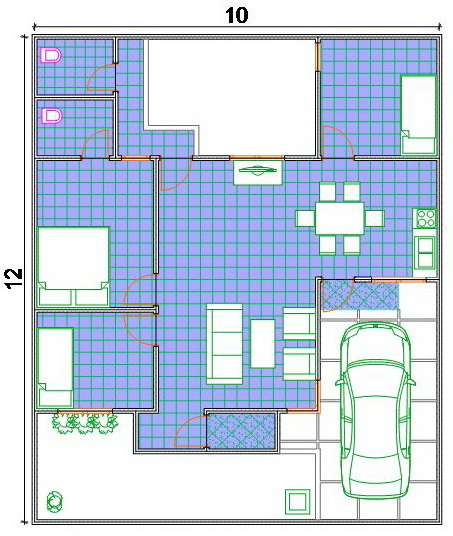
Aesthetic one-storey Finnish-style house made of timber 10x15 with a huge summer terrace. The house has two separate entrances. The layout includes a kitchen, a large living room, a technical room with a utility unit, two bathrooms and four rooms in which you can equip bedrooms, a nursery, an office. Such a house will become a cozy family nest for a permanent place of residence or a break from the bustle of the city on the weekends.
The project did not fit? Download the catalog with the 10 best projects of 2018
- Detailed configurations
- Photos from the constructed facilities
- Several options for the planning of the house
What is included in the cost of
Design documentation
We are building only carefully worked out project documentation. For builders, this is an exact instruction on what the object should be: the distance between the lags, the height of the steps of the stairs - each element must comply with the requirements of the project documentation.
For the customer, this is a guarantee that the built house will meet your expectations.
Technical supervision
We have set ourselves high quality standards so that you enjoy life in your new home. To meet these standards, we design projects in detail, train each builder, and most importantly, each key stage of work is checked by a technical supervision specialist, demanding and attentive to detail.
Inspections by technical supervision specialists reduce the number of defects during construction by an average of 70%.
We check the energy efficiency of the house with thermal imagers
Rest assured that you will get a truly energy efficient house with close to zero heat loss. All connection and installation elements are checked for cracks due to which cold penetrates.
This is especially important if you have small children.
Construction experts help
During the discussion of the start of construction, you will be able to receive advice from our designers, architects, geologists and engineers. They will help you choose the best construction option, taking into account the possibilities of the site and your wishes.
In addition, you can order
Installation of cameras on the site. These cameras can later be used as a home surveillance system.
Individual design. Create a unique home tailored to your individual wishes
Landscaping and interior design. Complex development of a site with all additional zones
Service maintenance or extension of the warranty period
Complete set of houses from timber
1 844 025 ₽
on request
on request
on request
Antiseptic first tie. Depending on the type of foundation: pile - double strapping of timber; slate - lining board)
External walls: profiled beams 150x150mm (140x140mm) or 200x150mm (190x140mm)
Internal partitions: Profiled beam 100x150mm (90x140mm)
Lagi of the basement (when there is a volume): Oblema -shaped 50hm. floors: Edged board 50x200mm
Fencing elements of terraces and balconies: Dry planed board
Terrace/balcony decking: Terrace board 27x143mm (Velvet), Larch
Drainage system: Drainage system Docke Premium (plastic)
Painting of the facade and all exterior elements: paint 9010 Teknos3
Roof insulation: Rockwool 200mm basalt slabs
Basement insulation (if any): Rockwool 200mm basalt slabs
Interfloor ceiling insulation (if any): Rockwool 100mm basalt slabs
Vapor barrier of insulation with glued seams (creating a hermetic contour)
Wooden casing of window openings
Windows: metal-plastic Rehau (white), profile 70mm, with double-glazed windows and a metal sheen
Entrance door: metal (Russia), protection class 4
Interior doors: laminated with fittings
Subflooring: FSF plywood, 18mm (with a slab foundation, a floor screed is made)0013
Window decoration (window sills, architraves), installation of corners, skirting boards, fillets
Ventilation (natural/forced/with heat recovery)
installation of cold water and hot water pipes)
Electricity (electrical works)
Heating (boiler room, installation of radiators, underfloor heating systems)
Depending on the type of foundation: pile - double strapping of timber; slab - lining board)
Roof wind and moisture protection
Control grating: Bar 50x50mm
Lathing: Edged board 25x100mm
Metal tile with additional elements Grandline
on request
Depending on the type of foundation: pile - double strapping of timber; slab - lining board)
External walls: Profiled timber 150x150mm (140x140mm) or 200x150mm (190x140mm)
Internal partitions: Profiled timber 100x150mm (90x140mm)
Lagi of the basement (if any): Oblane board 50x200mm
of the inter -story floor beams: Oblane board 50x200mm
RaPLE SYSTEMS: Oblastic board 50x200mm, Stairs of the House: Temporary construction
Complex for the bone interventional insulation, hardware, foundation waterproofing
Roofing wind and moisture protection
Counter-lattice: Beam 50x50mm
Lathing: Edged board 25x100mm
Metal tile with additional elements Grandline
Decoration of window, doorways, frontal and cornice boards, hemming of roof overhangs: Dry planed board
Enclosing elements of terraces and balconies: Dry planed board
), Larch
Drainage system: Drainage system Docke Premium (plastic)
Painting of the facade and all exterior elements: Teknos paint
Roof insulation: Rockwool 200mm basalt slabs
Basement insulation (if any): Rockwool 200mm basalt slabs
Floor insulation (if any): Rockwool basalt slabs 100mm
Wooden casing of window openings
Windows: metal-plastic Rehau (white), profile 70mm, with double-glazed windows and metal sheen
Entrance door: metal (Russia), protection class 4
on request
The first antiseptic binding ring. Depending on the type of foundation: pile - double strapping of timber; slab - lining board)
External walls: Profiled beam 150x150mm (140x140mm) or 200x150mm (190x140mm)
Internal partitions: Profiled beam 100x150mm (90x140mm)
Edged timber 90 mm (200 mm)0013
Interface beams: Oblane board 50x200mm
Ritter system: Oblane board 50x200mm
Stairs Inter -story: Temporary construction
Combining for assembly of the house, Intervented U control, Metiza, Hydroelectric Driving
Vetrovaries 50x50mm
Lathing: Edged board 25x100mm
Metal tile with additional elements Grandline
Decoration of window, doorways, frontal and cornice boards, hemming of roof overhangs: Dry planed board
Enclosing elements of terraces and balconies: Dry planed board
Terrace/balcony decking: Terrace board 27x143mm (Velvet), Larch
9001: Docke Premium gutter system (plastic)Painting of the facade and all exterior elements: Teknos paint
Roof insulation: Rockwool 200mm basalt slabs
Basement insulation (if any): Rockwool 200mm basalt slabs
Interfloor insulation (if any): Rockwool 100mm basalt slabs
Vapor barrier of insulation with glued seams (creating a hermetic contour)
Wooden casing of window openings metallic sheen
Entrance door: metal (Russia), protection class 4
Interior doors: laminated with fittings
Subflooring: FSF plywood, 18mm (with a slab foundation a floor screed is made)
Interior finishing of ceilings: Clapboard 13x122mm (needles), Calm/Strong drywall 15mm
Window decoration (window sills, architraves), installation of corners, skirting boards, fillets
upon request Depending on the type of foundation: pile - double strapping of timber; slab - lining board)
External walls: Profiled timber 150x150mm (140x140mm) or 200x150mm (190x140mm)
Internal partitions: Profiled timber 100x150mm (90x140mm)
Lagi of the basement (if any): Oblane board 50x200mm
of the inter -story floor beams: Oblane board 50x200mm
RaPLE SYSTEMS: Oblastic board 50x200mm, Stairs of the House: Temporary construction
Complex for the bone interventional insulation, hardware, foundation waterproofing
Roofing wind and moisture protection
Counter-lattice: Beam 50x50mm
Lathing: Edged board 25x100mm
Metal tile with additional elements Grandline
Decoration of window, doorways, frontal and cornice boards, hemming of roof overhangs: Dry planed board
Enclosing elements of terraces and balconies: Dry planed board
), Larch
Drainage system: Drainage system Docke Premium (plastic)
Painting of the facade and all exterior elements: Teknos paint
Roof insulation: Rockwool 200mm basalt slabs
Basement insulation (if any): Rockwool 200mm basalt slabs
Floor insulation (if any): Rockwool basalt slabs 100mm
Wooden casing of window openings
Windows: metal-plastic Rehau (white), profile 70mm, with double-glazed windows and metal sheen
Entrance door: metal (Russia), 4th protection class
Interior doors: laminated with fittings
Subflooring: FSF plywood, 18mm (floor screed is made with slab foundation) , "Shtil"/Strong drywall 15mm
Window decoration (window sills, architraves), installation of corners, skirting boards, fillets
Ventilation (natural/forced/with heat recovery)
Sewerage (installation of engineering plumbing, installation of a septic tank/VOC)
Water supply (well/well construction, installation of cold water and hot water pipes)
Electricity (electrical works)
Heating (boiler room, installation of radiators, underfloor heating systems)
Do you have any questions about the project?
- We will answer all your questions
- We will select a project individually for your needs
- We will make any changes to the project
Free consultation of professionals
Look at other popular projects
Read more
more
Read more
more
Read more
Read more
more
Read more
Read more in choosing a project, and it is better for our architects to create new ones.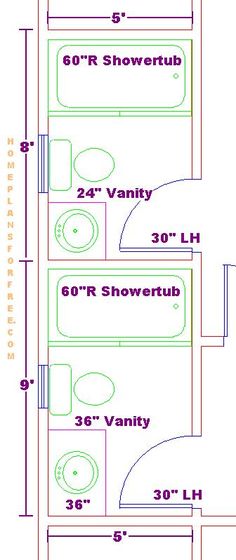
Two-storey house 10x15 meters with a second light. Project BENPAN BP-238
- Main
- Projects of houses
- Project catalog
- Project BP-238
Two-storey house with a second light, balcony and terrace
- 1
- 2
- 3
- 4
- 5
Total votes: 462
Share
- 1
- 2
- 3
- 4
- 5
Total votes: 462
Share
Description of the project
Two-storey house with a gable roof with a total area of 203 square meters. On the ground floor there is a kitchen-living room, two bedrooms, a bathroom, a vestibule and a boiler room. Also on the main porch is the entrance to the technical room. On the second floor there is a spacious hall, a bathroom and 4 bedrooms. One of them has its own dressing room, the other two have access to a shared balcony. Large panoramic windows let a lot of light into the house.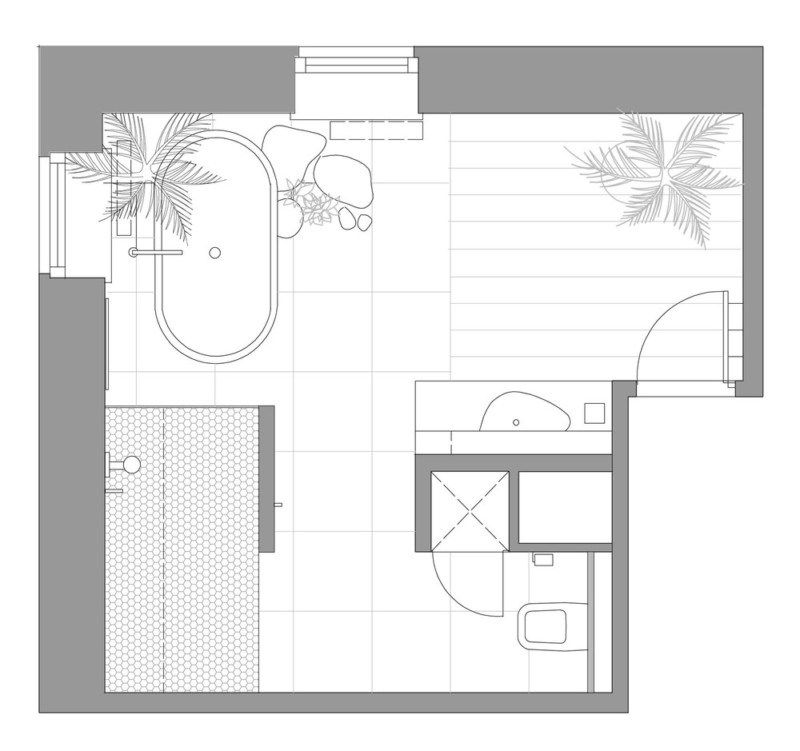
The house is suitable for a family of 8-9human. A large number of bedrooms make it possible to have your own secluded space. And the kitchen-living room will gather everyone at a single table.
Select the completion:
Benpan-D
dated 4 019 867 ₽
Banpan+
from 4 061 317 ₽
Banpan premium 907 193 193 ₽
Banpan-Drizniy. intended for capital housing construction.
The pre-installed insulation is designed for the "Wet" facade.
BENPAN technology
Equipment
| Equipment | Domo kit | Basic | warm contour | Warm contour + |
|---|---|---|---|---|
| Domokomplekt Wall height 2. | ||||
| Foundation Monolithic slab 250 mm | ||||
| Roof Metal tile | ||||
| Windows PVC with Rehau profile 60 mm | ||||
| Partitions Polystyrene concrete 100mm | ||||
| Facade decoration Bark beetle plaster | ||||
| Roof vent box | ||||
| Snow retention | ||||
| Soffit device | ||||
| Gutter system | ||||
| Built-in communications in BENPAN panels Regardless of the technology you choose to build your house, you need project documentation for such sections as HV (heating, ventilation and air conditioning), VK (water supply and sewerage), EM (electricity supply and lighting). The BENPAN technology allows, in the presence of design documentation at the stage of development of design documentation for the production of BENPAN panels, to provide all the required channels for engineering and construction work. In this case, the elements of ventilation (see 1) and socket boxes (see 2) will be pre-installed. The internal surface of the walls (external walls and partitions) corresponds to the class A3-A4. Thus, when ordering BENPAN panels with communications, the effect is obvious: speed, price, quality, production culture. | 4 019 867 ₽ Select | 5 613 447 ₽ Select | 8 538 064 ₽ Select | 11 260 029 ₽ Select |
 72 m
72 m  The availability of project documentation allows you to initially select and agree with you the necessary materials, obtain an estimate and ensure further control over the quality of work in accordance with the project documentation at your request.
 BENPAN Premium is a three-layer reinforced concrete ribbed insulated panels designed for permanent housing construction.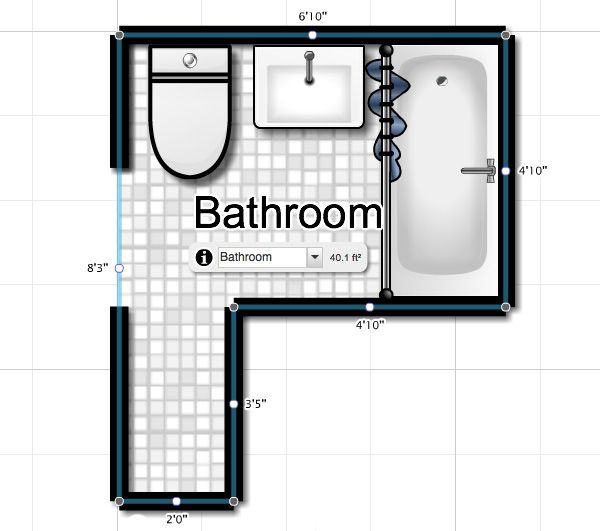
Stiffening ribs of BENPAN Premium reinforced concrete panels are hidden inside. The outer surfaces of the panel are formed by fiber-reinforced concrete layers, between which a layer of insulation is laid.
BENPAN technology
Equipment
| Equipment | Domokomplekt | Basic | warm contour | Warm contour + |
|---|---|---|---|---|
| Domokomplekt Wall height 2. | ||||
| Foundation Monolithic slab 250 mm | ||||
| Roof Metal tile | ||||
| Windows PVC with Rehau profile 60 mm | ||||
| Partitions Polystyrene concrete 100mm | ||||
| Facade decoration Bark beetle plaster | ||||
| Roof vent box | ||||
| Snow retention | ||||
| Soffit device | ||||
| Gutter system | ||||
| Built-in communications in BENPAN panels Regardless of the technology you choose to build your house, you need project documentation for such sections as HV (heating, ventilation and air conditioning), VK (water supply and sewerage), EM (electricity supply and lighting). The BENPAN technology allows, in the presence of design documentation at the stage of development of design documentation for the production of BENPAN panels, to provide all the required channels for engineering and construction work. In this case, the elements of ventilation (see 1) and socket boxes (see 2) will be pre-installed. The internal surface of the walls (external walls and partitions) corresponds to the class A3-A4. Thus, when ordering BENPAN panels with communications, the effect is obvious: speed, price, quality, production culture. | 3 907 193 ₽ Select | 5 500 773 ₽ Select | 8 425 391 ₽ Select | 10 398 831 ₽ Select |
 72 m
72 m  The availability of project documentation allows you to initially select and agree with you the necessary materials, obtain an estimate and ensure further control over the quality of work in accordance with the project documentation at your request.
 BENPAN+ are reinforced concrete ribbed insulated panels designed for permanent housing construction.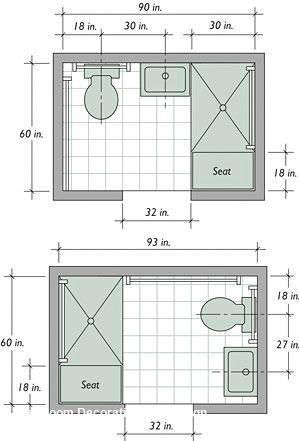
Stiffening ribs of BENPAN+ reinforced concrete panels are facing outward and serve as a ready-made mounting subsystem for a ventilated facade. Installation of a house from reinforced concrete panels BENPAN +, including facade work, is possible at any time of the year.
BENPAN technology
Equipment
| Equipment | Domokomplekt | Basic | warm contour | Warm contour + |
|---|---|---|---|---|
| Domokomplekt Wall height 2. | ||||
| Foundation Monolithic slab 250 mm | ||||
| Roof Metal tile | ||||
| Windows PVC with Rehau profile 60 mm | ||||
| Partitions Polystyrene concrete 100mm | ||||
| Facade decoration FTP Cedral | ||||
| Roof vent box | ||||
| Snow retention | ||||
| Soffit device | ||||
| Gutter system | ||||
| Built-in communications in BENPAN panels Regardless of the technology you choose to build your house, you need project documentation for such sections as HV (heating, ventilation and air conditioning), VK (water supply and sewerage), EM (electricity supply and lighting). The BENPAN technology allows, in the presence of design documentation at the stage of development of design documentation for the production of BENPAN panels, to provide all the required channels for engineering and construction work. In this case, the elements of ventilation (see 1) and socket boxes (see 2) will be pre-installed. The internal surface of the walls (external walls and partitions) corresponds to the class A3-A4. Thus, when ordering BENPAN panels with communications, the effect is obvious: speed, price, quality, production culture. | 4 061 317 ₽ Select | 5 654 897 ₽ Select | 8 579 514 ₽ Select | 11 157 931 ₽ Select |
 72 m
72 m  The availability of project documentation allows you to initially select and agree with you the necessary materials, obtain an estimate and ensure further control over the quality of work in accordance with the project documentation at your request.
 None of the options fit?
Assemble your unique equipment in our constructor
Our managers are ready to advise you and choose the best configuration option
Assemble your kit
To get the consultationReviews
Completed objects
Implemented objects
Tatyana Nikolaevna
BP-150
railway Panels Banpan premium
BP-127
veneles Banchan -296
railway panels Banpan premium
Ivan
MS-202/2
railway panels Banpan premium
MS-146/1
zh/b panels Banpan+
Yuri
ms ms -113
BENPAN Premium reinforced concrete panels
See all reviews of
Similar projects
BP-272/1
211.