Why does my toilet keep running water
Why Won’t My Toilet Stop Running?
September 19, 2017 Plumbing
When the toilet is continually running, you are potentially wasting gallons of water and creating a higher water bill. No need to worry, a running toilet is usually a simple fix. The three most common causes are a broken or dirty flapper, too long or too short of a chain between the flush lever and the flapper or a float that is out of position.
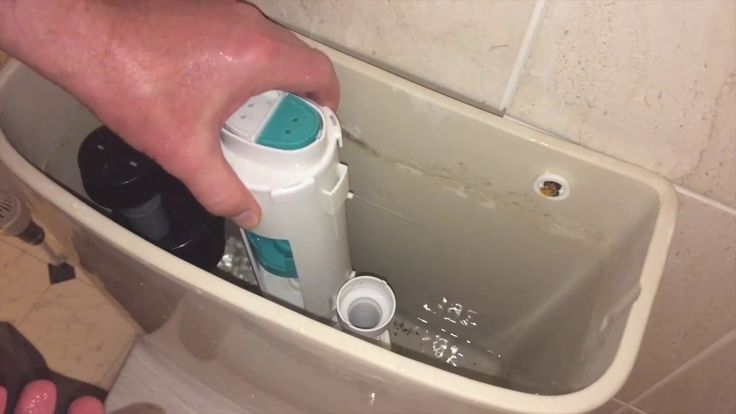
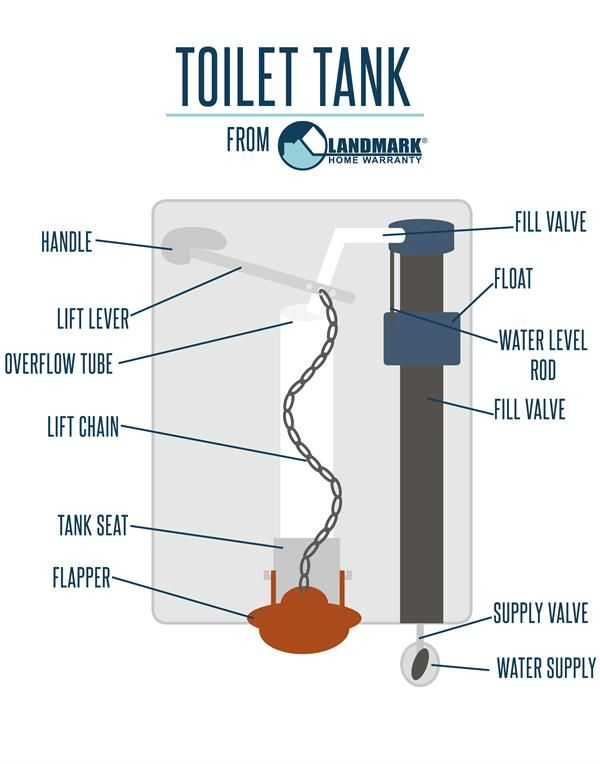
The first thing you will need to do is turn off the water feeding into the toilet. Find the silver knob on the back of the wall behind the toilet and turn it to the right. Second, take off the tank lid and start to identify all the components and how they all work together.
A. The toilet flush lever (on the outside) is connected to the rubber flapper (inside).
B The rubber flapper stops the tank water from going into the bowl.
C. The pump is what refills the tank after a flush.
D. The float raises and lowers with the water level to tell the pump when to stop.
E. The overflow tube sets where the water level should be in the tank.
Cause 1 – Flapper Chain
First, make sure the chain is connecting the flush lever and the rubber flapper correctly. Sometimes the chain will become disconnected. Next, shake the flush lever and see if there is too little or too much slack in the chain. If it’s too short, water will continue to leak into the bowl because the flapper isn’t sealed. If it’s too long, the chain won’t open the flapper when the lever is pushed. If you need to, cut off the excess chain. The chain may also have a float attached to it, adjust the float so that it sits on top the water’s surface.
Cause 2 – Dirty or Broken Flapper
Over time, the flapper may not seal the drain properly because it has become dirty, warped or broken. If you need to clean or replace it, first completely drain the tank and then unhook it from the chain. The store will have a variety of replacement options. If you can, match the brand or find a “universal” label that looks close to what you have. After you have reattached the flapper, test it with water to see if it seals correctly.
If you find that the flush valve (what holds the flapper in place) may be the cause of a water leak and needs replaced, read these step by step instructions.
Cause 3 – Float out of Position
The water level inside the tank is controlled by an adjustable float. If the float is set too low, it creates a weak flush. If it’s set too high, water will spill into the overflow tube and continually run. Look for a fill level mark on the inside back of the tank and mark it on the overflow tube so it’s easily seen. If you don’t see a mark, measure approximately 1 inch down on the overflow tube and make a mark.
Next, turn on the water and flush the toilet to see where the water level stops in comparison to the mark. If the water goes over, then the float for the pump is too high. Adjust the float up or down accordingly. On an older toilet, you may need to bend the brass rod that’s connected to the float. Newer toilets only require you to turn a screw or slide a clip along a rod. Sometimes, the fill valve (what the float connects to) won’t actually shut off and may be defective. In this case, you will need to buy a replacement valve.
If your toilet continues to run and these solutions don’t solve the problem, call the professionals at Bailey Brothers Plumbing at 405-896-9988. Our experts will get your toilet up and running quickly and correctly.
3 Reasons Your Toilet Keeps Running
Why Does My Toilet Keep Running?
When a toilet won't stop running after the normal flush cycle, people often stare blankly at the tank wondering what the problem is, or jiggle the flush valve to see if that fixes anything. While those solutions won’t do you any good, there are a few simple things you can do to fix a running toilet. The first step is to determine the cause, and then you can act accordingly to stop the toilet from running.
Toilets that won't stop running may have one of the following problems:
- The float height needs to be adjusted
- The flapper is leaking and needs to be replaced
- The refill tube needs to be shortened
Tools and materials you may need:
- Rubber gloves
- Replacement fill valve
- Toilet replacement parts
- Multi-bit screwdriver
- Cutting pliers
We strongly advise that you contact an expert plumber to inspect the situation for you, as there could be other issues with your toilet that may need repair and maintenance. However, that doesn't mean that you can't inspect your toilet yourself! Here are some things that you can do to help fix your running toilet in the meantime.
1. You Need to Lower the Float
Among the most common causes for a running toilet is overflow water leaking down into the bowl from the tank via the overflow tube. This happens when there's too much water in the tank. You can adjust the water level by adjusting the height of the float.
To lower the water in a toilet with a float arm, loosen or tighten the screw until the float arm lowers.
To lower the water in a toilet with a column float attached to the fill valve, loosen the screw or clip, push down the float, and tighten everything back up again.
2. The Flapper Is Leaking and Needs Replacing
Perhaps the most common reason for a running toilet is an old flapper that needs to be replaced. When flappers get old, they don’t seal the way they should, and this allows water to pass constantly from the toilet tank into the bowl.
To replace the flapper, simply remove the old one and replace it with a new one from the hardware store. Remove the old one by detaching the chain and taking the flapper off the pins on the side of the overflow tube. To attach the new one, connect the chain and attach the sides to the pins.
Tip: Drain the water from the tank before you replace the flapper. Shut off the water supply to the toilet, and then flush the toilet to drain the water.
Tip: If the chain is too long on the new flapper, you may need to shorten it. If it’s long enough to get caught underneath the flapper, you won’t get a good seal, and the toilet will continue to run.
3. You Have to Shorten the Refill Tube
Another cause behind your running toilet could be that the refill tube is always pumping water into the bowl, and this happens when the tube is too long and isn't positioned properly in the overflow tube.
To shorten a refill tube, pull the tube out of the overflow and hold it just above the opening of the overflow, trim it off there, and clip it to the side of the overflow tube to keep it in place.
Note: The reason this causes the toilet to run is that the refill valve will create a suction effect that pulls water out of the fill valve.
Get Expert Toilet Repair
All City Plumbing in Rancho Cucamonga, CA has been fixing running toilets for years, and we can certainly help you with your project too. Our team of plumbing experts can help inspect the situation for you and figure out exactly why your toilet won't stop running. This way, our professionals can fix and repair the root of the problem, to ensure that the job is done correctly, and prevent future damage from happening again. We make sure to use high-quality equipment and toilet repair parts that help ensure optimal functioning.
If your toilet won't stop running or if you have any other plumbing issues or emergencies in San Bernardino County, contact us online or give us a call at (909) 552-7550 and we'll fix the problem for you right away.
the toilet cistern is leaking, how to fix it, the causes of breakdowns
Found that the toilet cistern is leaking? Do not rush to call a plumber - you can solve the problem on your own, which will help you save a lot.
And the main reasons why water flows from the tank to the toilet are listed below.
Contents
- 1 Leaks due to overflow
- 2 Leaks at the junction of the cistern and toilet
- 3 The flow as a result of a defect in the hoses
- 4 flows due to rubber pear
- 5 proceeds due to siphon
- 6 violations of the sealant joints
- 7 leaks due to cracks
- 8 Water flowing after pressing the button of water drainage
- 9 float valve
Leaks due to overfilling
In some cases, leakage is due to a malfunction of the locking mechanisms.
This is a very common problem that can be solved in several ways:
- Remove the cover from the installation.
- Raise the float and hold it.
- If you raised the float and the leak is not noticed, then the problem is in the lever. He is simply unable to block the outflow of water. The problem is solved elementarily - by bending the float to the required angle.

- If there is a leak, then there is a defect in the valve. Examine it and the hairpin fixing it. There should be no signs of deformation or corrosion. Check it for offset. The hairpin is easy to replace with a thick copper wire. nine0012
- Is everything okay with the hairpin? Check valve opening. In the event of a breakdown, a comprehensive replacement is required.
- The gasket may also be defective. Try pushing the valve against it. If the leak has stopped, then you need to change it or adjust the pressure.
If the toilet is constantly running water, this is most likely the problem. The easiest way is to replace the valve.
Leaks at the junction of the cistern and toilet
Why does the toilet constantly run water? nine0003
There may be a connection problem. In this case, you will have to do a diagnostic disassembly:
- Shut off the riser.
- Drain all water from the tank.
- Remove the supply pipes.
- Now remove the fastener. Sometimes they rust and it is impossible to remove them. In this case, a hacksaw and any liquid key will help.
- Remove the tank.
- Pull out the cuff attachment tab.
- Drain off any remaining water.
- Remove any traces of corrosion. nine0012
Now you need to replace everything in reverse order. All gaskets must be replaced with new ones.
Leak due to defective hoses
The tank often leaks due to a bad hose connection.
In general, flexible wiring is strong enough and rarely leaks. The only vulnerability is the connection to the tank. The problem is solved in an elementary way - by simply tightening the fasteners.
If the fasteners have nothing to do with it, the defect is in the gasket. Then the problem is solved by a simple replacement. nine0003
Even if it has not lost its integrity, elasticity is lost over time and it becomes wooden.
Be careful with plastic fasteners. It happens that water flows due to constriction.
It just cracks if you put too much pressure on it.
Leaking from behind a rubber bulb
If water is leaking from the tank into the toilet, the bulb is most likely the problem.
This is the rubber seal at the very bottom of the tank that holds the liquid inside. nine0003
It is rubber, which means it loses elasticity over time. Becoming wooden, it ceases to be airtight and forms micro-slits. Therefore, as a rule, water does not flow in a continuous stream, but in a thin stream.
What to do if the pear becomes unusable? Just take it off and go to the plumbing store - buy a similar one. Trying to restore a broken part is pointless.
Plumbing is leaking due to a misaligned float
If the toilet is leaking due to a misaligned float arm, it must be replaced. This is a natural breakdown that occurs over time. Just buy a similar part in the plumbing store and put it in its place. nine0003
It happens that a hole is noticed on the float, then it can be heated with a lighter and try to “close up”. The measure is temporary, but it will still help to use the plumbing a little more.
Siphon leaking
The siphon membrane also wears out. You can repair it as follows:
- Place a crossbar together with the tank cover and tie the float arm.
- Drain all water.
- Disassemble the hose connection to the tank. nine0012
- Slightly loosen the nuts holding the siphon.
- Replace the diaphragm with a new one.
Reassemble the system in reverse order.
Joint leaks
Why is water flowing in the toilet?
The sealant may have leaked and needs to be replaced.
All you have to do is change the gasket according to these instructions:
- Drain the water and sponge off the residual water.
- Loosen the drain nuts slightly. nine0012
- Remove all tank hardware.
- Remove lock nuts.
- You now have access to the seal. If it is dry, buy a new one and replace it with it.
Leaks due to cracks
If the toilet is leaking before and after flushing, and the water is clearly not coming from the joints, it is most likely that a crack has formed. Often this is due to the age of plumbing or due to damage.
In this case, the tank must be removed and cleaned of water. Dry it with a sponge and a hair dryer so that there is no water left at all. When the moisture is gone, clean the crack with a brush. nine0003
It is better to drill the crack on both sides with a thin drill bit.
In that case, she won't go any further. When the preparation is finished, fill it with sanitary sealant. Be careful and do not spare the silicone so that it closes all the sections of the fault.
You can also use epoxy resin, type EDA-20.
Polyester must not be used! She can pass water.
Until completely dry (in all cases, this is a day), it is not recommended to use toilet bowls. Epoxy resin may boil on contact with water. nine0003
Water leaks after pressing the water drain button
If water leaks from the tank into the toilet, then you need to look for the cause of the leak in the entire plumbing complex.
Carry out a thorough diagnosis:
- Press the valve. If the water no longer drains, then the gasket needs to be replaced.
- Try to pull the valve in different directions. If the leak has passed, most likely the lever has shifted.
Clogged float valve
The problem is easily diagnosed - try to move the valve. If he moves with difficulty, the cause is most likely clogged. Because of this, he cannot close the water intake and it flows in a forward flow without obstacles.
Cleaning it is quite simple - with a long needle, knitting needle or wire.
Toilet cistern leaking - 9 reasons why it's leaking and instructions for fixing a leak
Contents:
- Why the cistern is leaking - the main reasons
- Necessary tools and materials
- How to fix a toilet cistern leak
- pears
- Plumbing is leaking due to a misaligned float
- Leaking due to a siphon
- Joint leaks
- Check valve problem
- Leaking due to cracks
- What to do if the toilet cistern with a button starts to leak
- Preventive measures
In order to fix the cistern, in most cases, it is necessary to replace the membrane.
To do this, we drain the water from the tank so that there is no leakage. We unscrew the nut connecting the drain tank to the flush pipe. We loosen the siphon nut, which is located at the base of the tank. Disconnect the siphon from the water release lever and remove it. After that, we replace the membrane and assemble the drain tank in the reverse order. nine0003
What to do if the toilet tank is leaking? A device malfunction may be caused by damage to one of the structural components. In most cases, the functioning is impaired due to a malfunction of the siphon, fasteners, locking mechanism, rubber bulb or gasket.
Sometimes a toilet leaks due to physical damage to the tank or bowl of the plumbing fixture.
Such malfunctions can bring a lot of trouble to the residents of the apartment, so it is recommended not to postpone the repair. nine0003
You can carry out the repair procedure yourself. In this article, we will analyze in detail the causes of this malfunction and methods for their elimination.

Why the cistern is leaking - the main reasons
If you wondered why the toilet cistern is leaking, then the problem has already begun. Now it remains to find out the reason why this can happen. The most common is ordinary overflow, in which excess fluid is washed off. There are several main factors that in most cases lead to disruption of work:
- deterioration of the elastic properties of the rubber seal. Over time, this material wears out, as a result of which the water flow cannot be tightly blocked and plumbing leaks. The deformed part perfectly passes water;
- The rubber seal has not lost elasticity or warped, but it does not fit too tightly against the outlet near the valve mechanism. As a result of loose pressing of the part, the toilet cistern is leaking; nine0012
- The valve train stud is corroded or physically damaged. This part keeps the float in the required position, but during prolonged use the element is frayed;
- The valve body has been damaged - another cause of leakage.
 However, the cracks that caused the toilet cistern to flow occur only on plastic products. If parts made of brass are installed, these problems will not arise, because. brass components are known for their increased strength. nine0012
Other common causes of a leaking toilet cistern include:
- bolts or other fasteners that connect the cistern to the toilet are damaged. After a long service life, metal elements often corrode, and plastic ones break;
- if there is a leak from under the toilet bowl when draining, then the problem may be in the pear, which has lost its elasticity over time. After prolonged use, this part loses its original properties, as a result of which the ability to acquire the necessary shape disappears .; nine0012
- displacement of the lever that fixes the position of the float. This can happen due to prolonged use, as a result of which the float loses its tightness. Therefore, liquid can enter the float. Sometimes low-quality components also cause a similar malfunction and plumbing leaks;
- broken siphon or tank hoses;
- Water may leak between the cistern and the toilet due to a leak in the connection.
 As a rule, this happens when the shape of the seal made of rubber changes; nine0012
 - shut-off valve mechanism damaged;
- cracked.
The main signs of a leaking cistern are:
The appearance of even one of the above problems indicates that the toilet bowl is leaking. In this case, repair work is required. We suggest that you familiarize yourself with the device of the toilet cistern, common malfunctions and their repair.
Tools and Materials Required
If the plumbing is leaking, turn off the water before making any repairs. Due to the fact that the liquid is supplied to the system under pressure, in the process of troubleshooting, we can flood the premises. Repair requires the following tools:
- Sealant suitable for sanitary fittings;
- sandpaper;
- screwdriver;
- burlap, twine or tow;
- hammer;
- knife;
- pliers;
- When a component needs to be replaced, a certain type of work piece will be required.
When the necessary tools are assembled, the repair work can begin.
How to fix a toilet cistern leak
After the cause of the toilet leak has been found, you can start repair and restoration work. It should be noted that the elimination of the problem is slightly different in individual cases, in many respects the procedure depends on the shape of the model.
A quick and 100% way to fix a toilet cistern leak
Watch this video on YouTube
All of the following algorithms of actions are given for the case when a classic cistern is leaking.
nine0003
Leaking due to overflow
What should I do if the toilet is leaking due to overflow? First of all, it is required to check which element malfunction caused the system to malfunction. You can determine this yourself by doing a simple test:
- Remove the toilet lid.
- Raise the float slightly and hold it.
- If the reservoir does not leak when raised a few centimeters, the float arm is defective. Its placement does not contribute to blocking the water. To fix the problem, you need to slightly bend the lever and fix it in a position that can stop the water intake and stop the leak. nine0012
- If the toilet is still leaking even after lifting the float, the valve should be carefully inspected. The pin intended for fixing the part must not be deformed, there should be no signs of corrosion or other damage on it, it is also recommended to check that the pin has not moved. Normally, the pin is placed inside the valve and stops the float arm.
 If the problem is in it, it is often replaced with copper wire with a large diameter.
- If there is no damage to the stud, it is advisable to check the hole where this element enters. Sometimes water flows from the tank into the toilet when the hole is deformed. In this case, a new valve mechanism is installed.
- Check gasket. To do this, it should be gently but firmly pressed against the valve. If the toilet is no longer leaking, it is necessary to adjust its pressure. If this is not possible, it will need to be replaced.
The above steps in 80% of cases will help to determine the cause of the malfunction and eliminate it. However, if they did not help, then you will need to look for damage in other components of the system. nine0003
Leaks at the junction of the cistern and the toilet
The cause of water flowing from under the toilet may be damage to the bolts that secure the cistern to the toilet. A similar malfunction can occur with fasteners made of any material: both plastic and metal. What to do if the toilet bowl is leaking due to bolted connections?
A careful visual inspection of all components is required, which will require a complete disassembly of the cistern (because in some cases the failure is not visible until the cistern is assembled). nine0003
It is possible that only one part is damaged, so only that part will also need to be replaced. However, in most cases, several elements will need to be replaced, it is advisable to purchase a complete set of plumbing spare parts.
Disassembly steps:
- Make sure that the water riser is closed.
- Drain all liquid from the tank.
- Remove the flexible hose that brings water into the tank.
- Unscrew the fasteners. Sometimes, after prolonged use, the surface of the bolts rusts, this corrosive layer can be removed with a hacksaw. nine0012
- Move the reservoir.
- The flap located on the cuff can be removed.

- Remaining fluid needs to be drained.
- Any traces of corrosion found must be removed.
Reassemble in reverse order. Rubber gaskets are changed, new fasteners are put in. It is important to avoid distortions in the process of fastening the bolts. It is also required to remember that when tightening, it is necessary to apply small efforts, because. too much pressure can damage the faience. nine0003
Leak due to defective hoses
The pipe that connects the water supply and the tank is quite strong. The weak point is the area where the flexible hose connects to the float system. A clear sign of breakdown - plumbing is leaking at the hose attachment point.
Quite often the cause of such a malfunction is a loose connection of fasteners. It is not difficult to fix this: you will need to firmly fasten the nuts and tighten the fasteners. In some cases, it is also necessary to replace the gasket if it has lost its elasticity and has ceased to perform its functions. nine0003
Watch this video on YouTube
However, it should be noted that in the presence of components made of plastic, it is necessary to tighten the fasteners with the utmost care. Careless movement or too much applied force will result in breakage. Also in this case, it is better not to use metal tools, because. this may cause the thread to break.
If the toilet bellow is leaking, it will need to be replaced. Corrugated pipe is inexpensive, so if the tenant of the house discovers that it is leaking, it is required to replace it as soon as possible. nine0003
Rubber bulb leaking
Watch this video on YouTube
Bulb deformation is a fairly common cause of water leaking from the tank into the toilet. Especially often this happens after many years of operation, during which the rubber has lost its elasticity.
The solution to this problem is quite simple, it is considered the least resource-intensive of all recovery methods.
What should I do if the toilet cistern is leaking due to a broken bulb? Repairing an old broken part is not recommended. It is best to buy a new one from a plumbing supply store. nine0003
When purchasing, it is recommended to choose the softest and most elastic pear, then this element will be able to function without problems for a long period.
The accessory is fastened with a thread. To remove the element from the tank, it must be turned clockwise. During installation, the pear is fixed when turning in the other direction.
If, for some reason, a new part cannot be purchased, it can be temporarily replaced with a small weight (heavy nut can be used) that hangs on the stem. nine0003
Plumbing is leaking due to a misaligned float
The toilet is leaking, what should I do? Option 1 - the float is broken
Watch this video on YouTube
The float arm may be misaligned. This can happen as a result of external influences or prolonged use of plumbing. What to do if the toilet is leaking due to skew?
First check the float. If there is no visible damage, then it will need to be replaced. It is recommended to save on this part and purchase a better one, this will avoid the occurrence of leaks in the future. nine0003
If a small hole in the component is found during visual inspection, it can be repaired in the following ways:
- seal with polyethylene;
- Use a lighter to heat up a small piece of plastic and close the hole tightly with melted material.
However, it should be noted that such methods are only a temporary solution to the problem. In the end, you still need to purchase a new component.
Leakage due to siphon
WE REPAIR THE DRAIN TANK. REPAIR THE WATER DRAIN UNIT.
Watch this video on YouTube
The siphon membrane prevents water from leaking even if there is no drain. Over time, this component of the system wears out, as a result of which it must be replaced.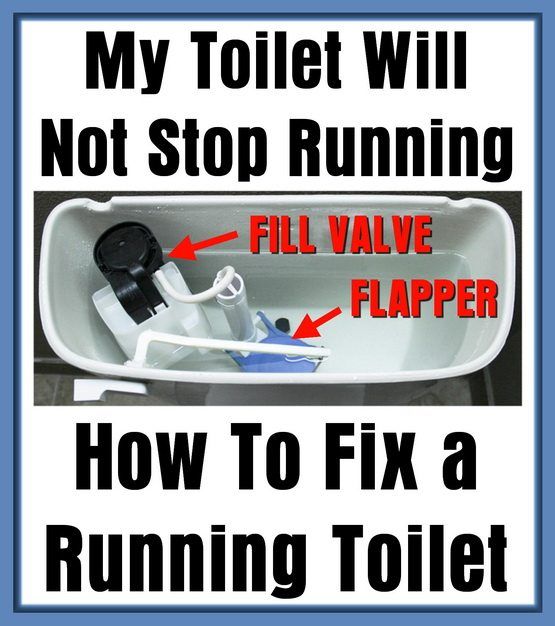
To do this, it is recommended to buy a new part that perfectly matches the size and shape of the plumbing model. If it is incorrectly selected, then the disadvantage will not be eliminated. nine0003
Algorithm for eliminating the problem:
- Instead of the tank cover, a crossbar is placed connected to the float.
- Water washes out.
- Unscrew the nut that connects the pipe to the tank.
- Loosen the siphon nut slightly.
- The siphon is removed.
- Then remove the broken membrane and install a new one.
- Install the system in reverse order.
Seam leaks
If the seal breaks, the result is depressurization of the connections. What to do if the toilet is leaking for this reason? You will need to place a new gasket between the toilet bowl and the tank. Let's analyze the steps of action:
- Remaining liquid is removed with a soft sponge.
- Slightly unscrew the drain nut located under the valve.

- Remove all tank fasteners and dismantle it.
- Remove the locknut holding the drain, then remove it. nine0012
- A new rubber gasket is installed. This element prevents plumbing from leaking, so it must be carefully selected. When choosing, it is recommended to know the appropriate dimensions and shape. If you choose the wrong part (too large or small), the plumbing fixture will continue to leak.
- The drain is secured with locknuts.
- Retractable tank, fixed with screws.
Is the toilet leaking? Fix it yourself! Easy!✓ Transparent tank. nine0003
Watch this video on YouTube
Shut-off valve problem
If the toilet is constantly running water, the valve mechanism is likely to break. You should not waste your energy on disassembling and repairing it, because. in most cases, these actions do not bring the expected result. The best solution would be to replace the drain assembly or the entire tank.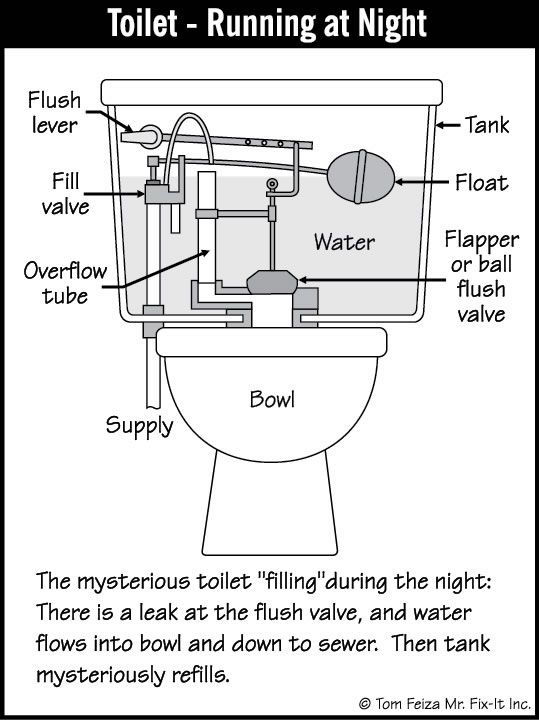
Is your toilet bowl leaking?
Watch this video on YouTube
Instruction:
- Wash off all liquid.
- Remove the top cover and remove any remaining moisture.
- Remove fixing screws.
- Remove the tank.
- Remove seal.
- Loosen the lock nuts securing the drain assembly.
- Remove the previous mechanism.
- Install a new valve.
- Fasten the drain in reverse order, fit the gasket and install the toilet tank.
It is advisable to buy the mechanism of the same brand as the waste tank. It is best if it is exactly the same model as it was in the plumbing before it started to leak. It is worth noting that when installing a new system, it is required to use new nuts and install a sealant. nine0003
Leaking due to cracks
Has the toilet cistern burst? no problem, we'll fix it.
Watch this video on YouTube
Sometimes cracks and other physical damage can appear on plumbing fixtures. You can fix such a malfunction at home yourself. The procedure requires only standard tools and a sealant designed for plumbing.
Instructions:
- Drain all liquid. nine0012
- Carefully remove the tank.
- Dry it from the inside to remove any residual moisture.
- Seal all cracks with sealant.
- Replace the reservoir.
If the toilet is leaking from the bottom and a crack is found in the bowl itself, it can also be repaired with plumbing sealants. However, such a solution to the problem cannot be long-term; it will certainly be necessary to replace the damaged structural element.
What to do if the toilet cistern with button 9 starts to leak0031
How to fix a water leak from the toilet bowl, HOW TO REALLY SAVE WATER SUPER!
Watch this video on YouTube
In such a case, the condition of the switch should be checked first. In the event of a malfunction of the return spring mechanism, the drain button may remain in the tank, which will lead to a permanent open position of the lid.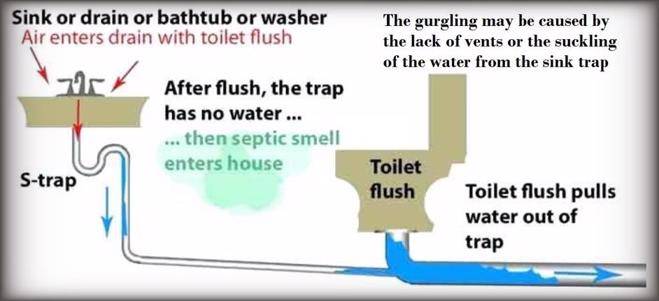
How to fix a toilet cistern leak with a button:
- Remove the top panel. nine0012
- Remove the switch that is stuck.
- Change the return spring.
- Center the seating point which is directly under the hole in the cover.
- Assemble the system in reverse order.
Preventive measures
To prevent the situation when the toilet bowl leaks with or without a button, certain preventive procedures should be carried out regularly, and the operating rules should be followed. nine0003
Prevention may include:
- Minimize the likelihood of mechanical deformation of the toilet bowl;
- minimize sudden temperature changes;
- clean the toilet bowl and cistern every six months;
- regularly check the condition of plumbing fixtures, fittings and other parts so that they cannot leak;
- Avoid condensation.
Thus, if plumbing is leaking, it is easy to carry out repairs with your own hands, without contacting a plumber.