Walk in wardrobes diy
A Step-By-Step Guide To DIY Walk In Closet
(Many of the links in this article redirect to a specific reviewed product. Your purchase of these products through affiliate links helps to generate commission for Storables.com, at no extra cost. Learn more)
Are you tired of cramming your expensive dresses into a small and completely inaccessible closet? Do you spend hours every day searching for your favorite pants just to find them rolled up in the corner of an overloaded wardrobe? If yes, then this article is the solution to all your storage problems. A walk-in closet is a must-have for every homeowner looking for a practical, effective and aesthetically pleasing storage unit.
A walk-in wardrobe instantly adds a touch of finesse to your house whilst fulfilling its purpose. In addition to being an effective storage unit, a walk-in closet also provides plenty of privacy. It offers a completely isolated space within your bedroom where you can get dressed peacefully without the fear of someone barging in. A carefully designed wardrobe can do wonders for the interior décor of your bedroom.
With a well-planned walk-in closet, you wouldn’t need to cover the odd nook and crannies of your room with bland showpieces and wall coverings. Due to the versatile and customizable nature of these storage units, there is a huge number of closet designs to choose from. You can find a lot of decorative and creative walk-in closet design ideas, small walk-in closet ideas DIY and also walk-in closet design pictures on the Internet. In this article, we will go through the process of building a walk-in closet along with a personalized DIY closet organizer.
Advantages & Disadvantages Of A Walk-In Closet
PROS
Optimal For Organization
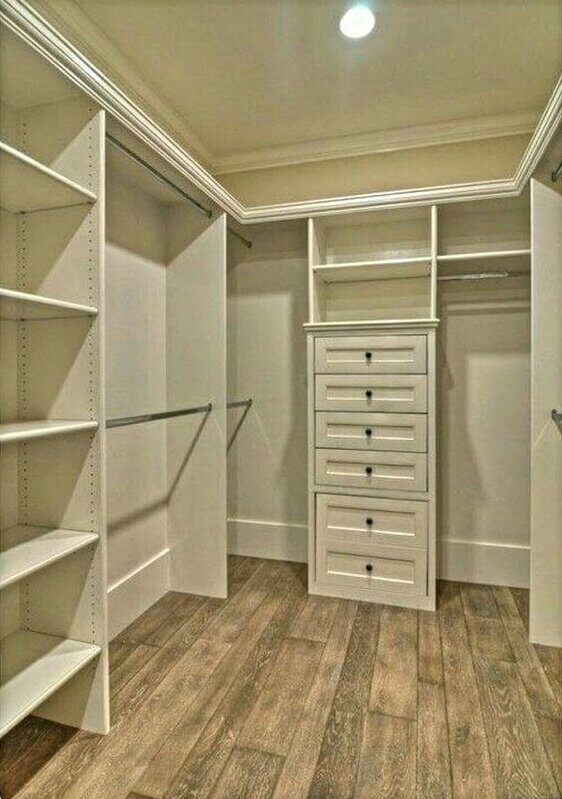
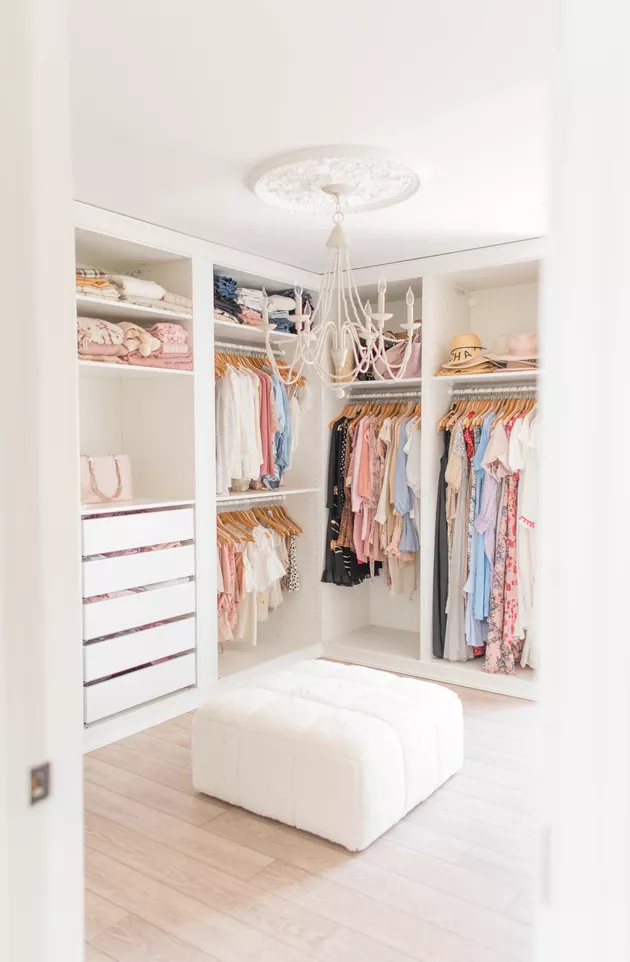
The best part about walk-in closet systems is the versatility it provides. If you are the kind of person who owns a lot of clothes, footwear, and accessories.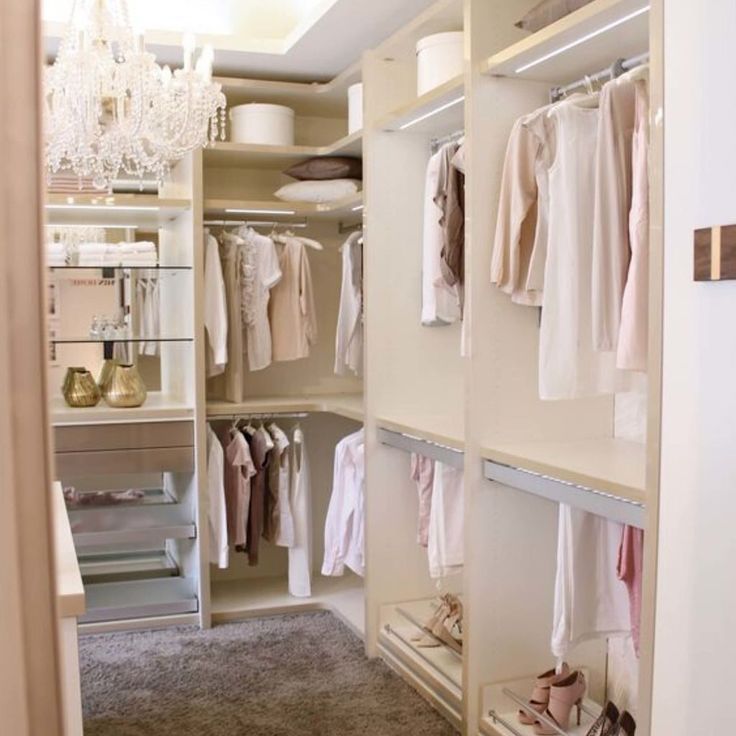 A walk-in closet can be the answer to all your storage problems. Unlike traditional/regular closets, a walk-in closet provides you with the luxury to spread out your clothes and make them look neatly organized at the same time. Especially when you browse through the great walk-in closet designs for a master bedroom. Now you won’t need to empty the entire closet just to find the one dress you wanted to wear to a date, with a walk-in closet every piece of your clothing will be right in front of you.
Perfect For Privacy
Another upside to a walk-in closet is the privacy it offers. If you are one of those slow dressers who hog up the bedroom while getting ready, then a walk-in closet is the right option for you. It will provide you space and the privacy to get dressed and look your best for the dinner date. A walk-in closet can also be utilized as a safe house to secure your jewelry and other valuable items.
Utilizes Space Efficiently
A walk-in closet maximizes the use of available space in your room.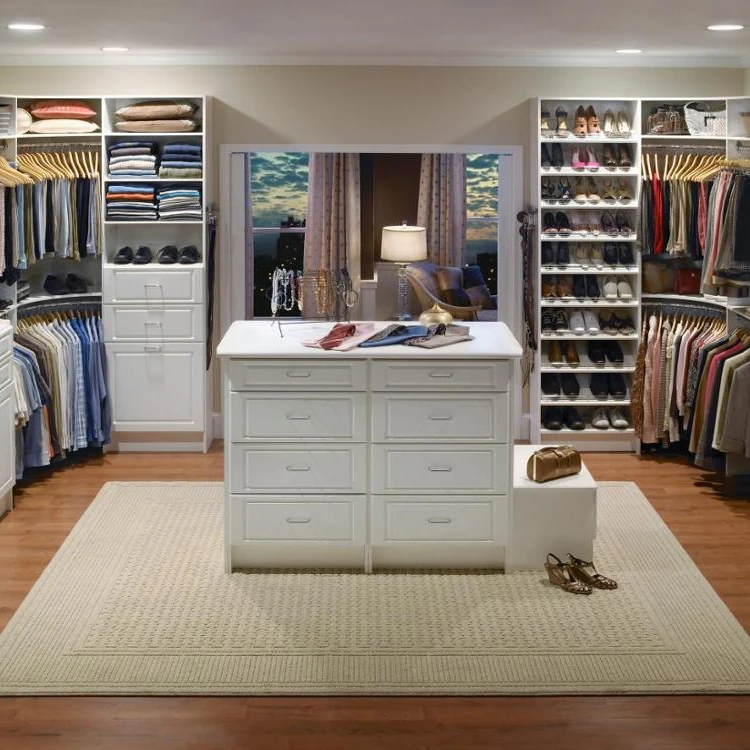 If a custom closet organization system is implemented, these wardrobes can be particularly useful for utilizing the nooks and corners of an unconventionally shaped room.
CONS:
It Can Be Costly
A custom-built walk-in closet can be really expensive because of the added costs of lighting and carpentry. Without the lighting, your wardrobe would not be able to serve its purpose, as you wouldn’t be able to browse through all the clothes you have carefully arranged.
The Excess Space Can Be Overwhelming
Without a proper storage system, a walk-in closet can become more of a curse than a blessing. Due to the added space and the complexity of its design, there are a lot of nooks and corners in a walk-in wardrobe where stuff could go missing. So, if you’re not very organized, be prepared to waste hours just to find that one pair of shoes that was not in the right spot.
Budget
As a homeowner, being aware of how much you can spend on your closet helps speed up the planning process and finalizing the resources you will need for your desired closet design.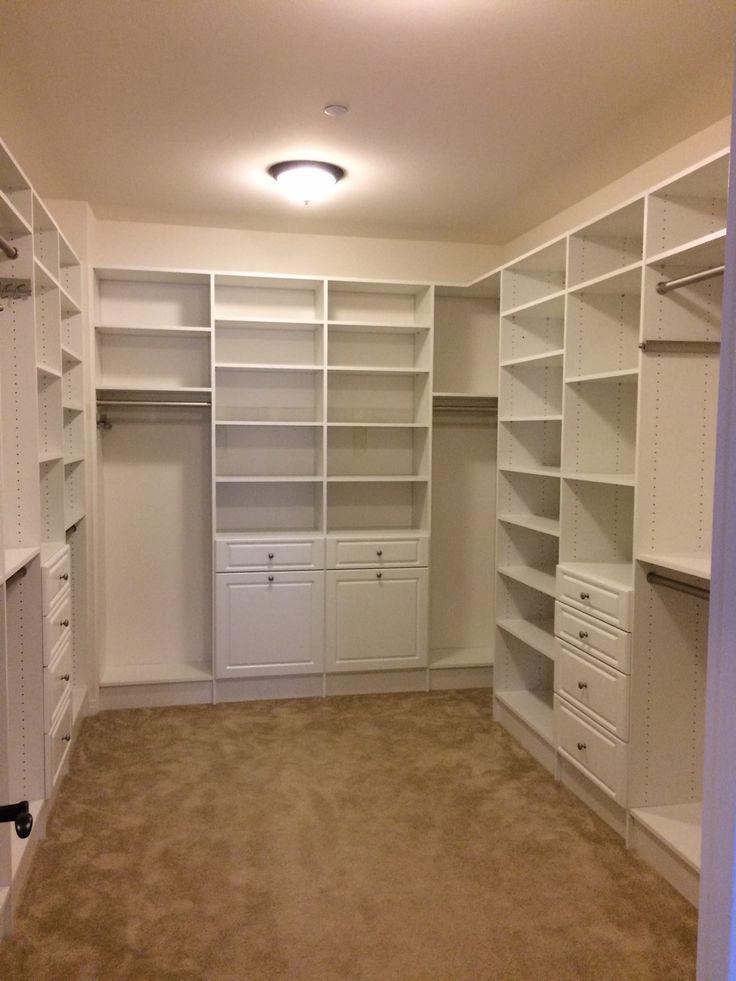 Without a budget in mind, it can get really difficult to design a practical storage unit.
You might just end up squeezing out important components of the design when the hole in your pocket starts to deepen more than you had expected. In 2020, on average a regular DIY walk-in closet can cost you around $150-$200. We are talking the standard six by six-foot space, with materials included. The cost goes up for any extra shelves, compartments or other sets of furniture that are added.
Space
If you are just starting on renovations, one of the first things to consider is the space that will go into building a custom walk-in wardrobe. Is your room large enough to accommodate a closet for your extra storage needs?
The upside to a custom-built wardrobe is that if the space is planned out and designed properly, you will be able to enjoy a comprehensive storage unit with minimal use of space.
To maximize the use of available space, the walk-in closet should span the entire length of the wall to provide greater storage space. Also, the doors of the closet should open outwards or slide from side to side so that no storage space is wasted inside the closet.
Storage Needs
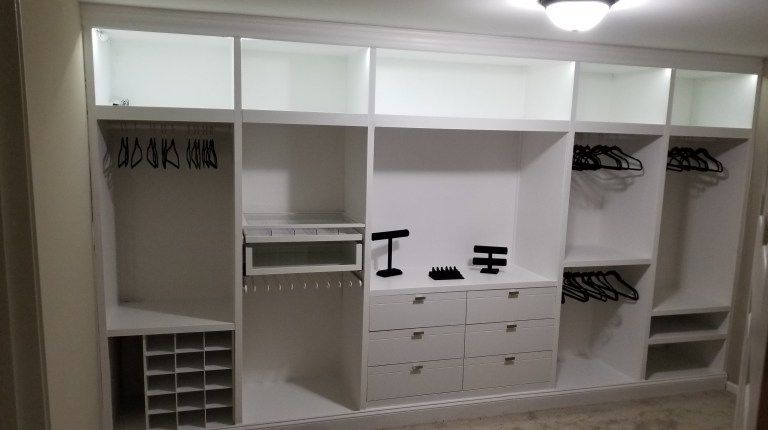
Make a list of all the things that you will store in the walk-in closet. This will help you plan out the most practical closet design according to your storage needs. A detailed inventory of your apparels will assist in determining what kind of furniture goes inside the closet.
For example, if you want a display for your footwear, you will need a separate compartment for your shoes. If you want to store accessories like watches, belts, and jewellery, then you could design specific shelves in the wardrobe. If you still have enough leftover space, additional sets of furniture like a dressing table or an island counter can also be included.
Step-by-Step Guide On How To DIY Storage Closet
A personalized walk-in closet is every homeowner’s dream. If you are one of those homeowners, then this article is definitely for you. If you have never built a DIY project before, constructing a complete storage unit from the ground up might seem like a very daunting task. But to be honest, creating a DIY closet does not require special carpentry skills.
All you’ve got to do is go to Google and search for different walk-in closet design ideas. Choose the design that is aesthetically pleasing and best fits your storage needs. Now that you know what you want to build, you can start with the building procedure. The following DIY article will hold your hand through the entire process of building your very own DIY closet organizer and wardrobe.
Things You’ll Need:
- 2×4 boards
- 16D nails
- Stud Finder
- 3-inch Screws
- Dowel
- Level
- Framing Square
- L-shaped Brackets
- Circular Saw
- Glue
- Tape measure
- Carpenter’s Pencil and/or Permanent Marker
- Drywall
- Door(s)
- Paint
Step #1: Choosing A Space And Clearing It
The first step would be to choose a space where you want to build your walk-in closet. It’s preferable to select a space that is adjacent to your bedroom and has square or rectangular dimensions. Avoid irregularly shaped rooms. This is because it is trickier to work with awkward angles. Also, the majority of walk-in closet design ideas work best in a square or rectangular setting. Do not select a room with too many windows, because windows reduce wall area.
If you do not have a spare room available, you can body off an alcove in one of your bedrooms or you can build an enclosed area between the walls in one of the larger rooms. Now that you have selected the space to build the closet, the next step would be to declutter the area. Remove everything from the room like carpets, wall pictures, blinds and anything that you can see. Once you’ve cleared the room, use cleaning supplies to clean any dust or dirt that has gathered in your spare room. You can also sanitize the floor by using disinfectants.
Step #2: Measuring The Space Required For Each Item In Your Walk In Closet
Use a measuring tape to measure the dimensions of your room. Write down the length and width of all the walls in the room, do not forget the corners. In order to draw a blueprint for your walk-in closet, you would need to ask yourself a few questions like: Do I want more hanging space or drawers? Do I want shelves for keeping my shoes? Do I want separate compartments for my accessories or can I store them without a specifically designated space?
What should be the length of my hanging space? Do I want a sliding door or a folding door? Before chalking up a layout, keep an estimate of the hanging space you need for each piece of clothing. As a general rule of thumb, allocate 1 inch of hanging space per item. For the heavier winter clothes, keep an additional 1-1.5 inches. The standard length of the hanging space is around 48-50 inches.
According to your answers and measurements, make a rough design of your DIY closet organizer on a piece of paper. You can look up different walk-in closet design ideas on Google.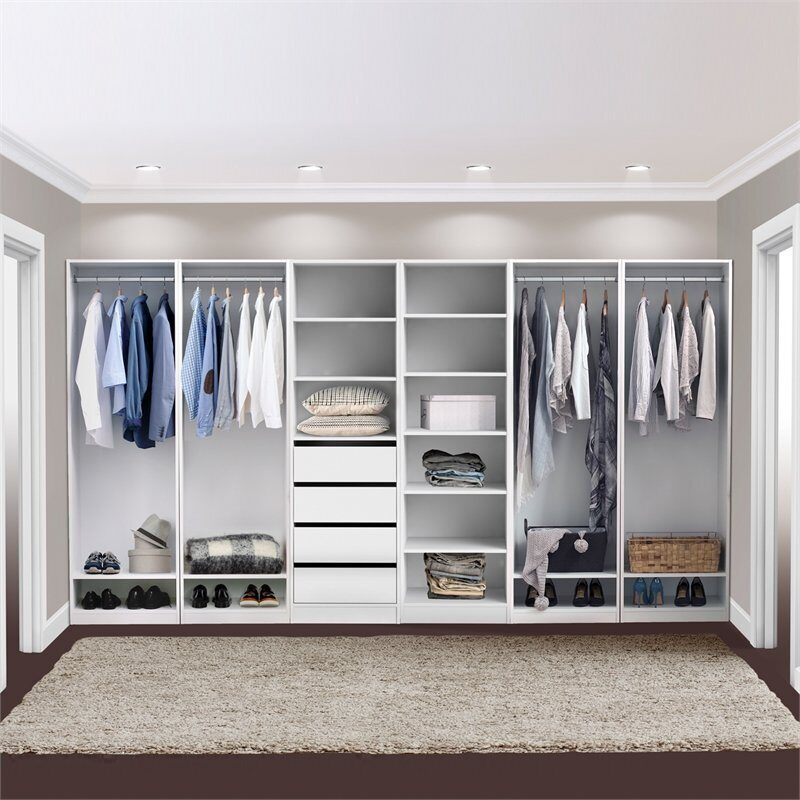 Remember to keep the designs minimalistic and practical. Try breaking down small areas into sections dedicated to specific clothing articles. For example, shirts, tops, pants, jackets, and shoes, etc. This will help the closet space look much more organized.
Grab a great measuring tape right away! Check the latest price and Read More Reviews here
Step #3: Lay The Foundation
Now you will need to lay out a foundation for your closet, starting with the woodwork. Remember to regularly refer to the closet design that you have drawn up. Start by cutting up wooden pieces for the units on each of your wall, the sizes will vary according to the different measurements for each wall.
To avoid wastage of the building materials, make sure that you measure twice and then cut the wooden pieces. To assemble the main drawer units, you can use dowels and glue. Allocating two dowels for the divider on each side.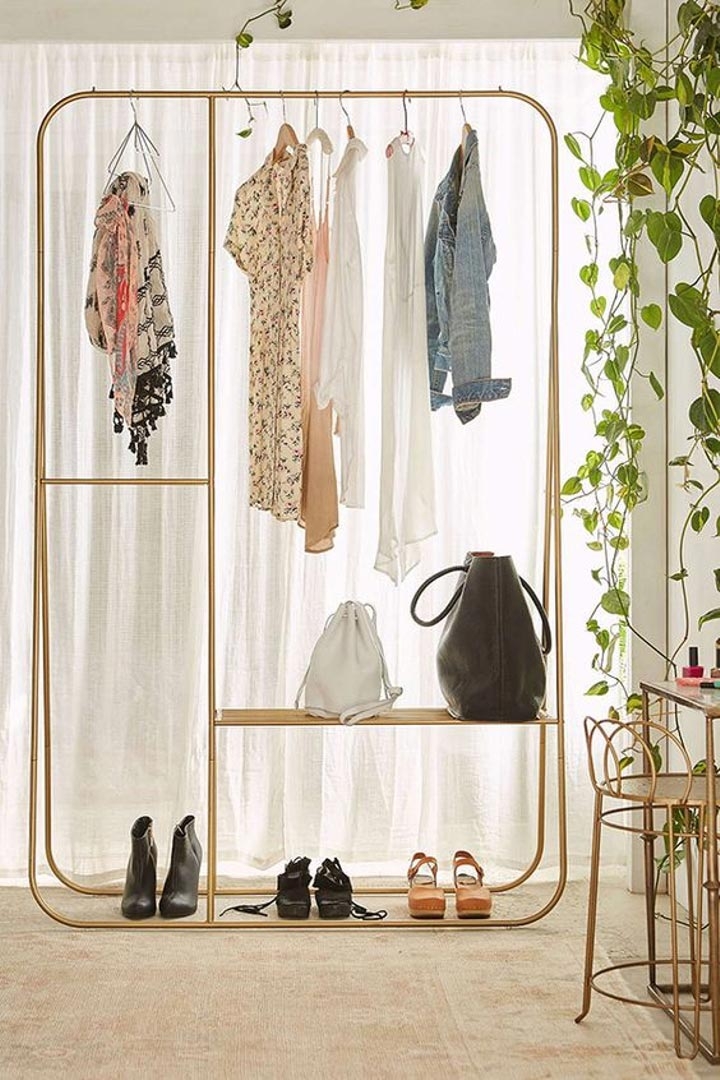 To install the drawer faces, insert all the drawers and the drawer slides first. Use some tape to position the face of the drawer while screwing it from the inside of the drawer. Use wooden buttons to cover up the holes created to fix in the screws.
Step #4: Start Installing Shelves
Now that you are done with the basic setup for the closet. We can start installing the units on the wall. For each unit, you can use steel pipes to make L-shaped brackets for support. Secure each bracket to the wall at a height of about 12 inches from the ground. Attach the same bracket at the top of the unit about 12 inches from the ceiling. To fix the L- brackets to the wall, you can locate the studs and mark the location of each bracket.
Then screw the studs in using 3-inch screws for each unit. After you have installed the main units, you can secure the first section of hangers in between the three main units. You can utilize this section for hanging clothes that you wear regularly.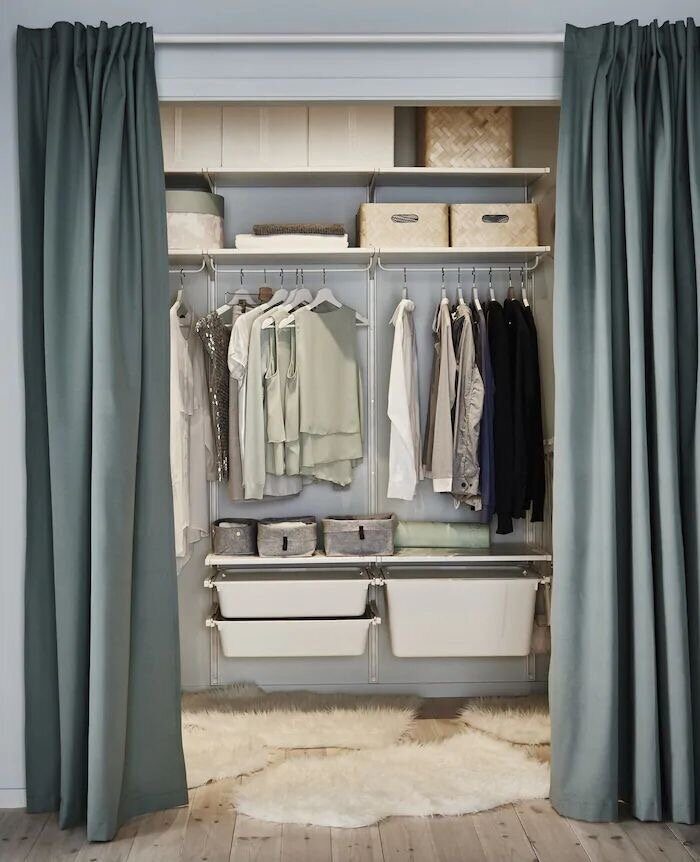 Now, you can insert the drawers to the middle unit and start filling them. Voila, you have planned and perfected your personalized DIY closet organizer. Put all those funky sunglasses, over the top bracelets and the imitation necklaces inside the drawers. Maybe it’s better not to wear them outside but they can definitely rest peacefully within the newly constructed storage unit.
Find some amazing wardrobe shelves here! Check the latest price and Read More Reviews here
Finishing Touches: Install lighting
Now that you’re done with all the handiwork, your closet is finally ready to be lit up. You might want to choose a lighting fixture capable of illuminating the entire room. LED strip lighting is a popular choice for light installation in walk-in closets. It is also a good idea to use bright lights. Try emulating natural light to help see colors in detail.
Find some wonderful lighting for your wardrobe here. Check the latest price and Read More Reviews here
You did it, give yourself a pat on the back. You have finally built your own walk-in closet from scratch. It’s time to celebrate.
How to build the perfect DIY walk-in wardrobe
Adding space to your property is one way to add value.
But using the space you have in a better way can boost your property’s appeal and make your life easier at the same time.
One way to utilise your space is building a walk-in wardrobe – and they’re far easier to construct than you might think.
Here, we’ll explain exactly how you can build one for your property and showcase some great examples of DIY walk-in wardrobes to inspire you…
How do you make a homemade walk-in wardrobe?
Firstly, decide where your walk-in wardrobe will be.
Are you going to steal some space from your bedroom or build your wardrobe in a spare room?
If you have a bedroom alcove, this could be a great space for your walk-in wardrobe – you’ll just need to create it by building some partition walls…
What you’ll need to build a walk-in wardrobe
- Lengths of 2x4
- A nail gun or hammer and nails
- A circular saw or hand saw
- A spirit level
- Framing square
- A tape measure and pencil
- Plasterboard
Step one: Take measurements
- Measure the height of your proposed wardrobe space from floor to ceiling
- Measure the length of the wall space you’ll use for storage
- Measure the depth of the wardrobe space
Step two: Prepare your space
- Lift up the carpet, if you have it, where your wardrobe will be – you can cut and lay again once your space is complete
- Pull off skirting boards on walls where you’ll be installing storage units
Step three: Build your partition wall and door space
- Mark lines on your floor and ceiling where your top plate and footer plate frames will sit
- Cut two lengths of 2x4 for the length you want your partition wall to be.
 Make marks on your top plate and footer plate at 16-inch intervals, which is where your vertical studs will sit
 - Remember to leave the desired space for either a door or opening to your wardrobe
- Cut as many lengths of 2x4 that you’ll need for the studs, to match the height from the floor to the ceiling, minus the depth of the top plate and footer plate
- Nail your studs to your footer plate at 16-inch intervals, leaving the space for the door or opening, and then nail your top plate on top
- Lift your partition wall into place and position along the marks you made on your floor and ceiling
- Use a level to make sure your wall is straight and then nail to ceiling joists and floorboards through the top plate and footer plate between the studs
- Repeat the process for any side walls if required
Step four: Fix your drywall
- Cut your plasterboard using the height and width of your partition walls and fix to your studs using drywall screws
- Once your drywalls are up, fill the gaps between boards with filler or bring in a plasterer to skim your walls before painting and installing storage inside your wardrobe
How much does it cost to build a walk-in closet?
A DIY walk-in wardrobe can cost anything from a few hundred pounds to thousands – depending on the work and materials you choose and the space you have.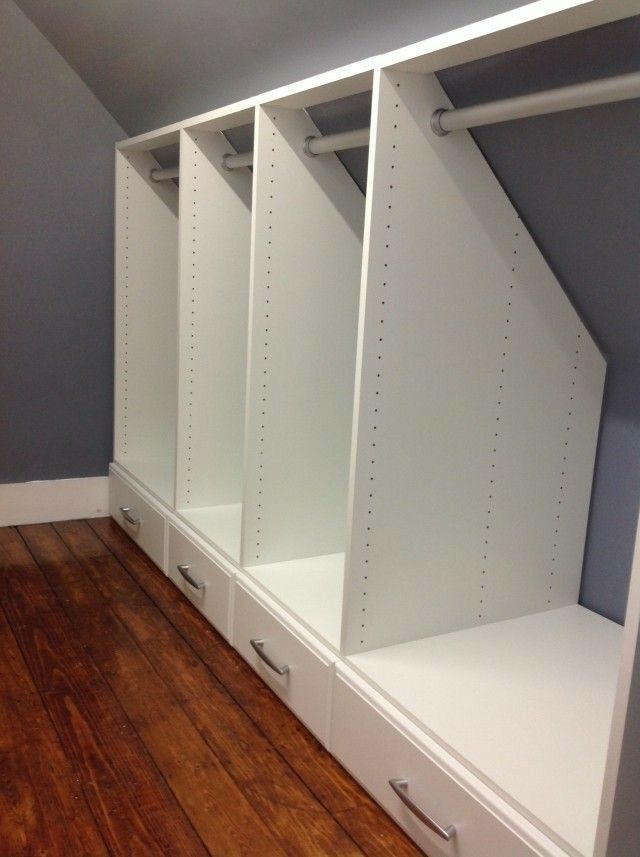
If you’re creating your walk-in wardrobe in a spare room, the bulk of the work will be in creating storage through shelving and drawers.
But if you’re creating a space within your bedroom, you’ll need to build and board stud walls, meaning your costs will be higher.
Should a walk-in wardrobe have doors?
Whether or not you choose to have doors on your walk-in wardrobe comes down your personal preference.
Using mirrored sliding doors can make your wardrobe space feel bigger, while classic double doors can add a real feeling of quality to your space.
However, ventilation is key with any walk-in wardrobe so your clothes and items are protected from mould, and a walk-in space with no doors can mean better air flow.
DIY walk-in wardrobe ideas to inspire you
The main aim with any walk-in wardrobe is to create order and make your life easier.
The space you have will usually dictate what you can and can’t do when building your new walk-in wardrobe, but here are some amazing ideas to get you thinking…
1.
 Convert an existing room
 If you’re lucky enough to have a spare room available for your walk-in wardrobe, your options for the space will be almost limitless.
This amazing space was created in a spare bedroom and doubles up as a wardrobe and dressing room – a really spacious and organised room that also shows off your clothing in a great way, too.
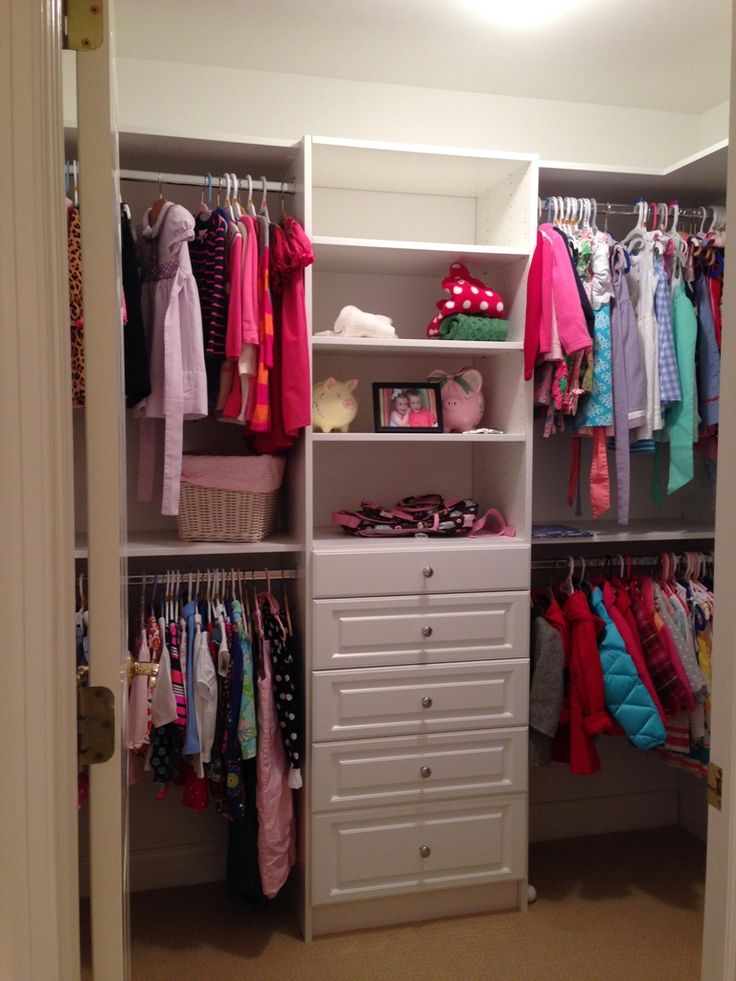
2. Frame off part of your bedroom
Not all walk-in wardrobes need to be huge, expansive spaces.
Sometimes, all you need is functionality and good order, which means if you have a large enough bedroom, you can steal some space for your walk-in wardrobe.
This example is a great use of space and shows what can be achieved by pinching a little square footage and putting it to better use.
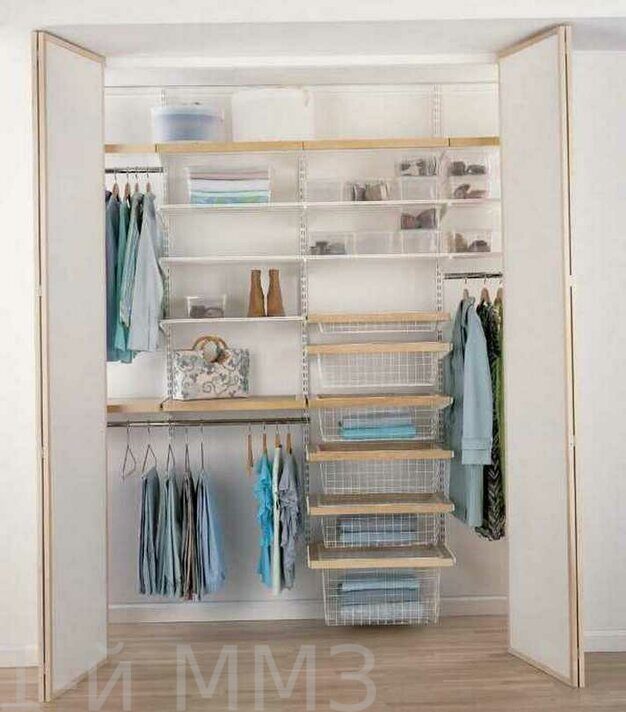
3. Keep things simple on a small budget
Looking through examples of amazing walk-in wardrobes online, you could be forgiven for thinking that you need a huge budget to do the work.
This simple, but effective space, shows that’s not always the case.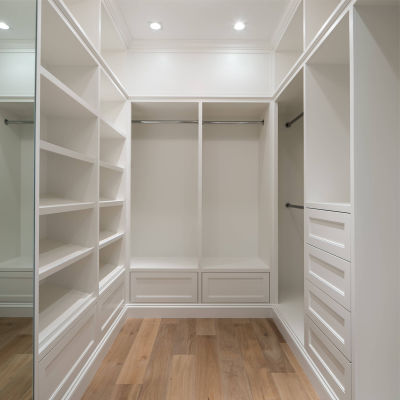
Whether you’re using a spare room for your walk-in wardrobe, or you’re taking some space from your bedroom, using simple storage solutions will help keep your budget in check.
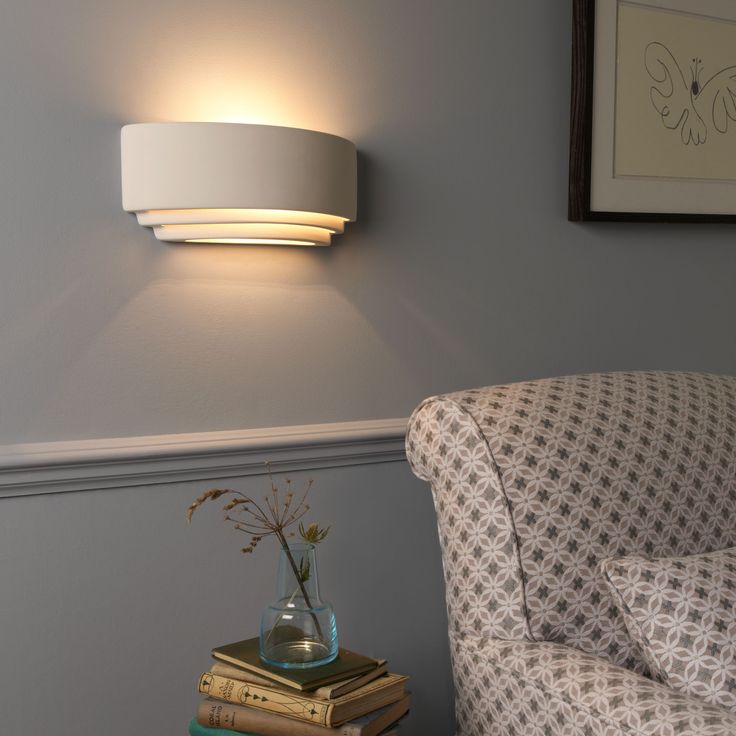
4. The importance of lighting
Your walk-in wardrobe shouldn’t just be a space to store your clothes effectively.
Its design should stand out and complement the rest of your property.
The key to great walk-in wardrobe design is often lighting – as most spaces won’t have the luxury of windows unless you’re using a stand-alone room.
In this example, the owner has used clever lighting to really lift their walk-in wardrobe, meaning it’s not only functional, but looks great, too.
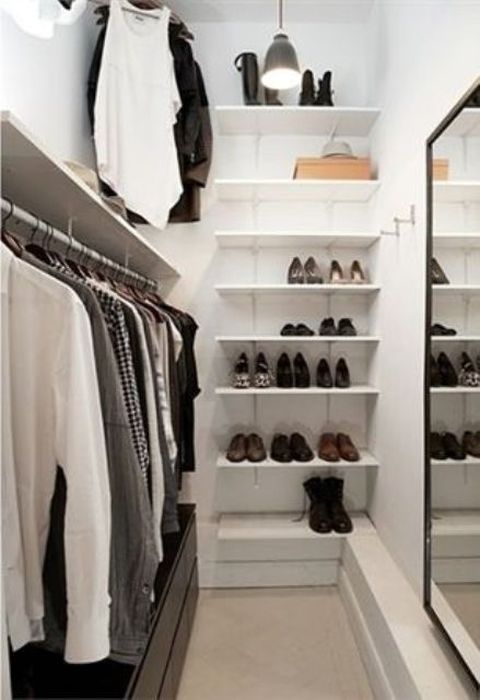
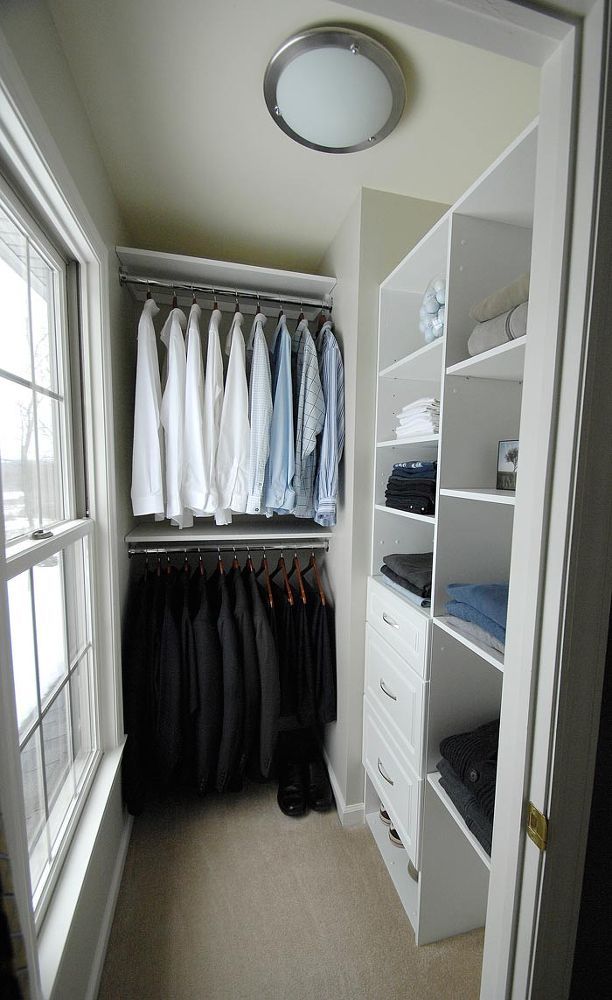
Small walk-in wardrobe ideas
Having limited space doesn’t mean you can’t make a real statement with your walk-in wardrobe…
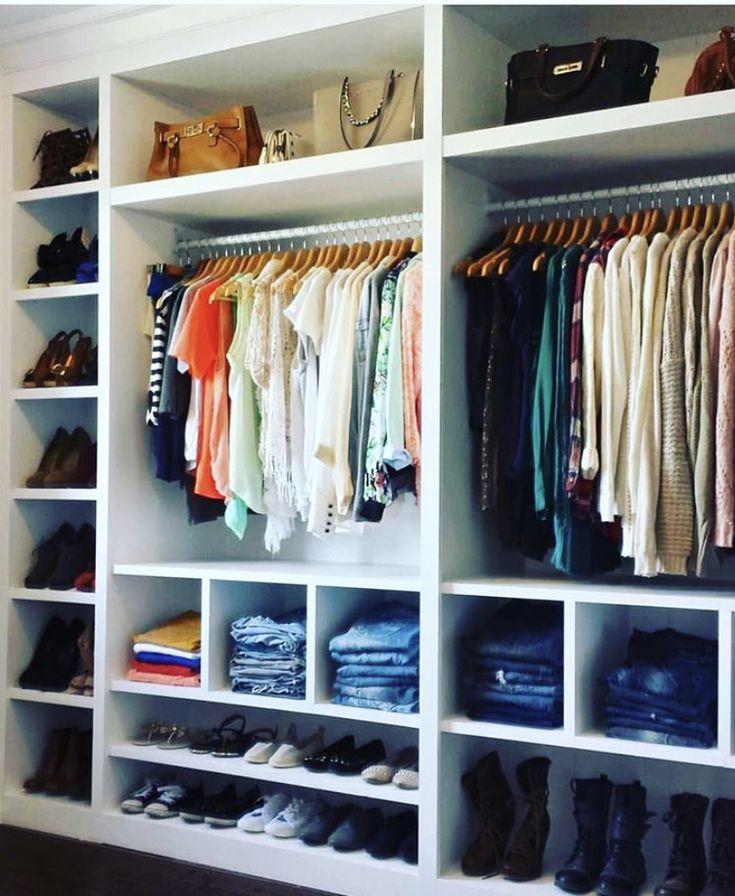
1. Use your space effectively
Making use of every inch is key when building a walk-in wardrobe in a tight space.
And that can mean getting creative with your storage solutions.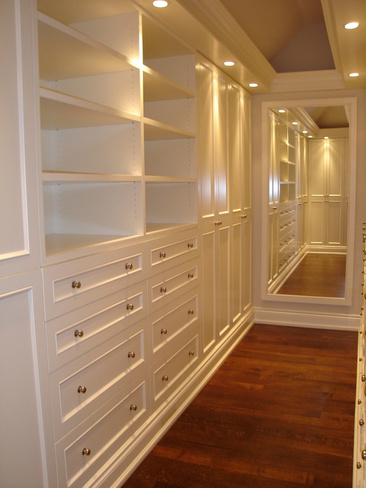
In this walk-in wardrobe, the owner has crammed a huge amount into a small space by using different sized drawers.
2. Think about shoe storage
Shoes can be difficult items to store without using large amounts of space – especially if you have lots of them!
The creator of this walk-in wardrobe clearly thought this issue through and the neat shoe drawer system means their footwear is nicely stored away in a small space but also easily accessible, too.
3. Space-saving storage
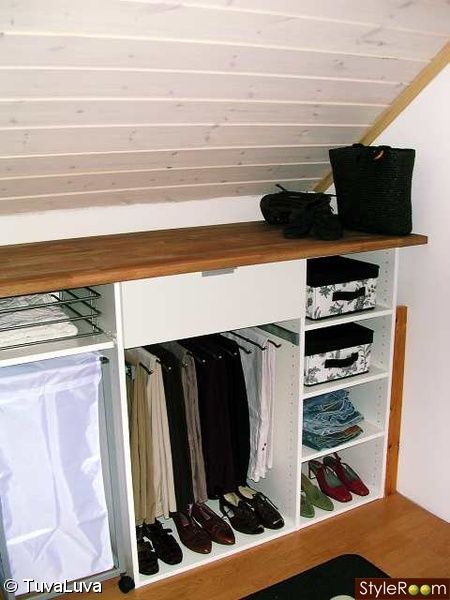
Utilising corners of your wardrobe space is a great way to grab a few extra inches to store your things.
The builder of this walk-in wardrobe had that in mind when they installed a revolving floor-to-ceiling shoe cupboard neatly in a corner.
Further reading…
- The ultimate guide to doing up a property
- Five ways to add value to your rental property
- House renovation costs you can expect
Keeping things in the closet: the most useful tips
In this article you will learn:
- What you need to do first to organize compact storage of things in the closet
- How to store things according to the Konmari method
- How to properly fold things in a closet
- What to do if your storage cabinet is too small
Many can only imagine in their dreams that they have a whole separate room allocated for storing clothes - a dressing room. In reality, you have to cram a large number of things into not very spacious cabinets. And this is an occasion to make every effort to correctly place clothes in a small space. Moreover, the smaller the storage, the more compactly you need to place wardrobe items in it, leaving not a single corner “idle”. Proper storage of things in the closet requires a careful and scrupulous approach. Our article is about just that. nine0003
What needs to be done for compact storage of things in the closet
Almost every woman from time to time comes up with the idea that it is time to rethink things and carefully fold them for storage in the closet. It is clear that it is necessary to spend quite a long period of time on this, and people postpone the process until later. Sometimes there is such chaos in the wardrobe that it is no longer possible to restore order. There is a desire to just throw everything in one heap in the trash. nine0003
Take your time! Better use a simple and effective storage system in the closet.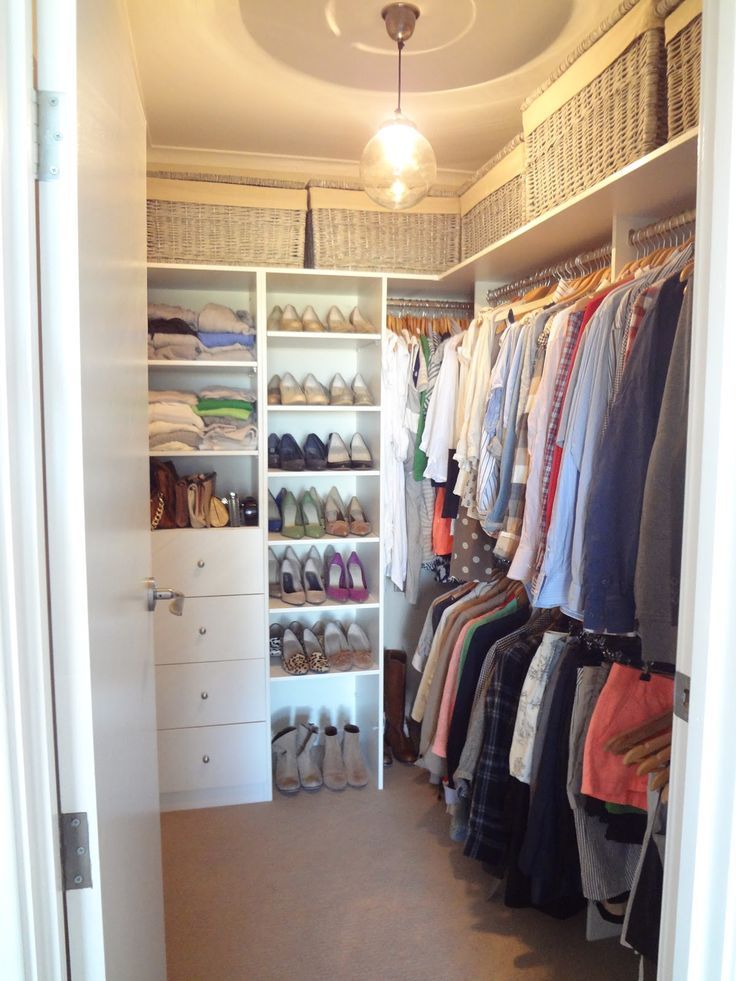 Its essence is to get rid of what you absolutely do not need and only takes up space. It's better to take steps.
Step #1: Try to spend less on things.
Running after a new thing as soon as it seems that “there is absolutely nothing to wear” is the wrong solution to the problem. In such a mood, in order to please yourself, the poor, unfortunate, buy any unnecessary nonsense that will clutter up your wardrobe even more, and such outfits will be worn at best once or twice. Therefore, dear women (and men too), remember: before you go to the store for a new thing, first clean up the rubble in your existing wardrobe. nine0003
Step #2: Always, Occasionally, Never.
The process is time-consuming, it can take a whole day, but it's worth it. Rate each item in your wardrobe in terms of how often you wear it. If you wear it regularly and with pleasure, send it to the "always" pile. If you put it on sometimes, and even then reluctantly - in a bunch of "occasionally". What has been on the shelves untouched for a couple of years, or even just one year, goes into the "never" pile.
The essence of this idea of storing things in the closet is that the clothes from the last category will have to be removed from the wardrobe unconditionally and forever. It’s a pity to throw it away - give it to friends or the poor. Get rid of things that do not suit you, are fat, do not sit well. New, comfortable and beautiful ones will appear in their place. nine0003
Step 3: Analyze each item of clothing.
Blouses, dresses, skirts, trousers from the “always” and “occasionally” categories should be subjected to this procedure. Find time for this procedure, for example, a day off. Pick up things one by one and consider each from the following points of view:
- Does it suit your color type?
- Does it emphasize the advantages of the figure and hide the flaws?
- Does it match your style? nine0006
- What wardrobe items can it be grouped with?
And pay attention to whether it will be possible to combine the item in question with other items in a new way, in a way that you have not tried yet.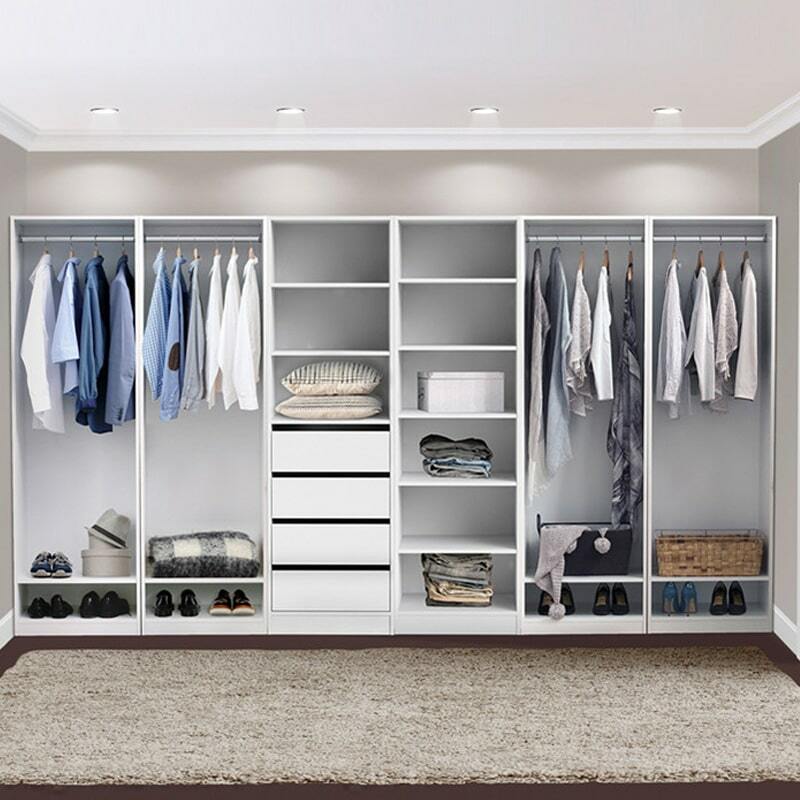 Following this scheme, it is easy to come up with interesting ensembles.
Step 4: Choose sets that you really like and fit perfectly.
In any wardrobe there are things that a person wears more often than others. They are suitable for different situations in life and seem perfect, even if they have become unfashionable and quite thoroughly worn. And when you still have to throw them away, then the dream remains to buy something like that again. Take a look at these wardrobe items. How did they captivate you, how are they good for you? nine0003
And one more closet storage idea: analyze what would be a good addition to your wardrobe. For example, the Rare stack will most likely contain items that you like but don't have anything to pair with. Knowing your physique and general style, try to complement it with clothes with which you can make successful ensembles.
Make two separate lists of models that you really like. The first is what you would like to have, but have not yet bought. The second is favorite items that are already quite worn out and need to be replaced. As a result, you will have in your hands a list of things that really should be added to the wardrobe. Now, when you go shopping, carry this list with you and refer to it if you feel like buying this or that item. Thus, the problem of an overcrowded closet will be solved, it will contain only the best and most necessary. nine0003
These are clothes that are suitable for pairing with other things and that you especially like. Anything you buy will be a great addition to your existing wardrobe. It remains to decide how to properly organize the storage of things.
Konmari Vertical Closet Storage
Perhaps many will find Marie Kondo's method a little confusing and unusual. Its principles are as follows:
- all wardrobe items are stored together, not distributed over different wardrobes or rooms; nine0006
- all clothes are categorized, eg dresses, skirts, underwear, etc.
 ;
; - things that do not correspond to the season do not need to be stored in the mezzanine or somewhere else.
Simply put, a warm sweater is not hidden in the far corner of the closet for the summer. The bathrobe in which you walk at home should not be left on a hook in the bathroom, but put in a chest of drawers with other things. The fundamental principle of storage according to the method of Marie Kondo is to stack things in boxes vertically. What does it give? nine0003
First of all, the drawers are not as spacious as they might seem. And one day there comes a moment when some of the things need to be removed somewhere or stop buying new ones. And secondly, clothes folded in this way become much more compact and take up less space.
Konmari recommends rolling things into small rolls for storage or folding them into thin, even rectangles. Then the clothes do not wrinkle, but are neatly located in the box. From the outside, it looks like folded books or folders. nine0003
Organize your wardrobe items in the storage drawers in your closet. At the same time, divide everything into categories, for example, T-shirts, jeans, underwear, etc. The edges of clothes should not protrude beyond the drawers. Roll up small items. Well, if you immediately distribute everything according to the color scheme, then it will be easier to select sets later.
You can buy special baskets or boxes for compact storage of things in the closet according to the Konmari system. However, “containers” like shoe boxes, cardboard dividers, and so on are also perfect for this. It will cost less, and in use - no worse. nine0003
In addition, this system offers recommendations on how to correctly distribute clothes on the coat hanger. Again, group things (shirts to shirts, dresses to dresses, etc.) so that you don’t have to look for the right blouse one day among jackets and suits all over the closet. A great scheme is to group long things with long ones (on one end of the closet) and move to shorter ones (to the other end).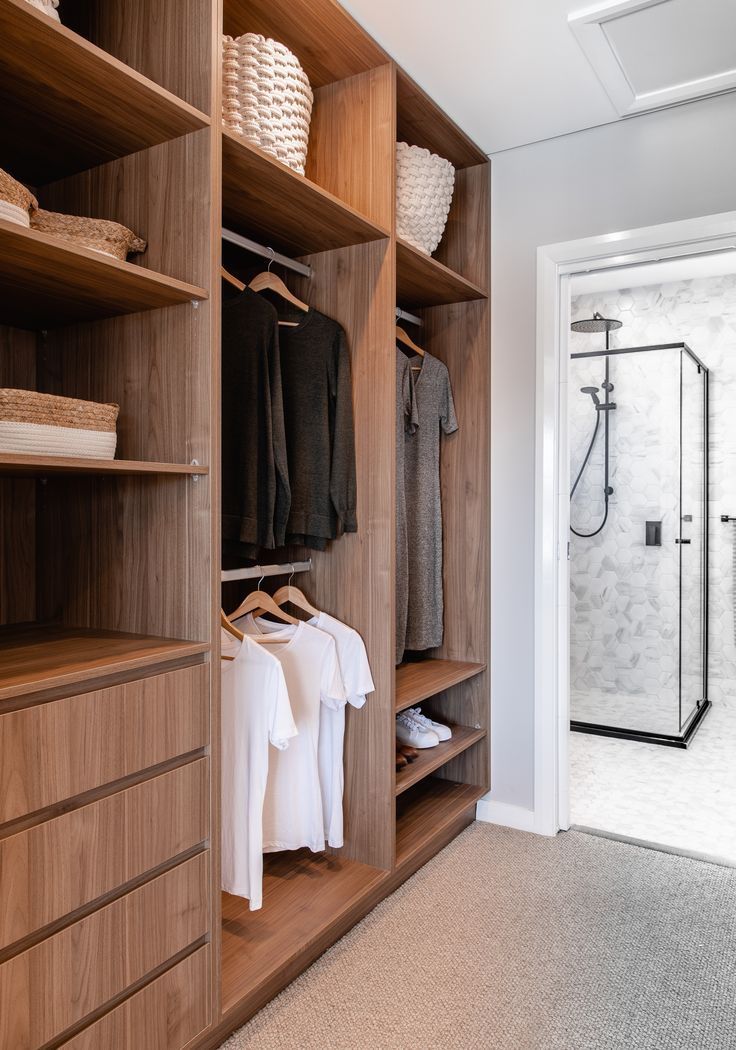
Storing things in a closet according to this scheme is really very convenient, and, according to Konmari, it also contributes to the formation of positive energy. nine0003
Bags are mentioned separately in this system. Konmari recommends storing them one inside the other in threes, no more. For convenience, distribute separately, for example, small clutches for evening outings, bags for work or outings, for children's things, etc. fold for storage any, even the smallest detail of the wardrobe. It is clear that for large items like dresses, suits and outerwear, there is nothing more suitable than coat hangers. But for other items of clothing, shelves or cells in a closet for storing things are perfect. nine0003
- Compact storage of linen and hosiery
Find a pair for each sock or stocking. Now take two paired socks, fold one evenly on top of the other and gently wrap from the fingers towards the elastic, leaving about 3 cm of its edge. Then fold in half again two more times.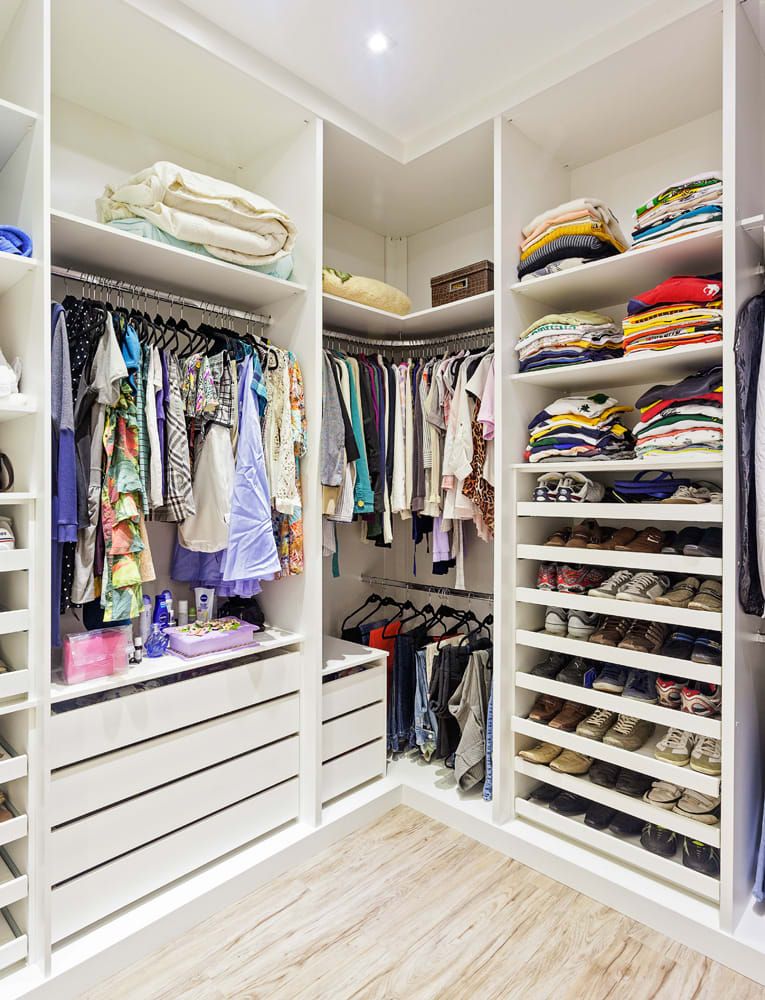 It turned out to be a compact package. Such rolls can be folded for storage in a low box or simply on a shelf. Roll your panties in the same way. Straighten, wrap the gusset towards the elastic, the side halves towards the center, then fold in half and send the organizer. nine0003
- How to fold trousers, jeans
The principle is the same for any underwear, i.e. skirts, trousers or jeans. Lay the trousers on a flat surface, align the legs, and tuck the crotch in the direction of the middle so that it does not stick out at an angle.
Fold the resulting rectangle in half, leaving a couple of centimeters indent from the belt. Fold in half again and again, if necessary, until the bundle is stable. Follow the same principle with skirts (of course, there is no step seam in them, skip this moment). nine0003
- How to properly fold shirts, t-shirts
If the garment has short sleeves, then the course of action is as follows: straighten the shirt or T-shirt, and then fold to the middle about a third of the width in turn each front.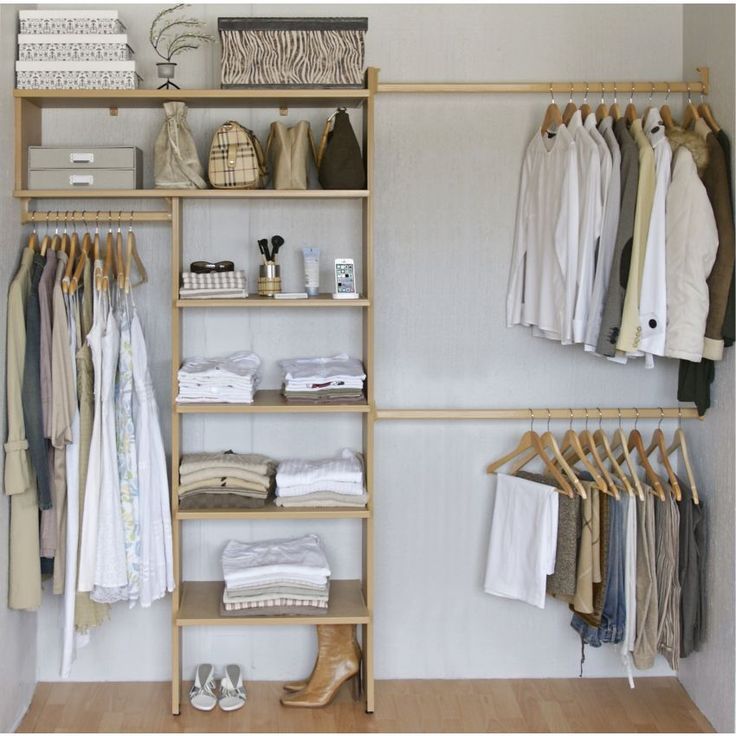 At the same time, smooth the sleeves, and then bend them to the side in the direction from the middle. After that, fold in half, without bringing the neck to the edge by a few centimeters. Now again in half and again until you get a stable rectangle that can be sent to a shelf, in a box or in the cells of a cabinet for storage. nine0003
- Folding children's clothing
In the method of Marie Kondo, the schemes for folding things for children and adults are the same. With the only difference being that folded clothes of small sizes will not be stable on ordinary shelves, they will need containers or boxes. However, when a chest of drawers is defined for storing children's clothes, this, perhaps, will not come in handy.
How to organize the storage of things in a closet on deep shelves
Here you can limit yourself to the correct sorting of items of clothing or "swing" at the global reconstruction of the inside of the closet. nine0003
1. Place on the shelves of the box or basket.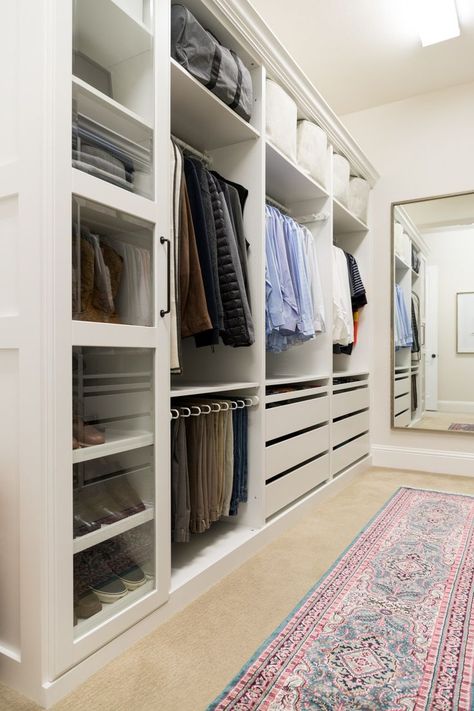
This will help you to use the entire deep shelf space, including the furthest corners. Here's what you can do:
- Clothes that you don't wear often, or that don't match the season, send to the very depths. And on the edge, place open boxes or baskets with folded stacks of wardrobe items.
- Install a retractable module, and put everything in it for storage according to the method of the same Marie Kondo, that is, in a vertical way, so that you can immediately see where everything is. nine0006
- To give the contents of the shelves an aesthetic look, purchase special lockable boxes for storing things in the closet. Those that are not yet needed, let them lie unassembled, without taking up much space. Put sweaters, jeans, knitwear in baskets and boxes. Choose suitable organizers where you can fold laundry.
Be sure to measure your shelves accurately before purchasing baskets and boxes. Consider in advance how it will be more convenient for you to equip the interior of the cabinet, consider different options for boxes, perhaps even a whole set of products of different sizes will come in handy.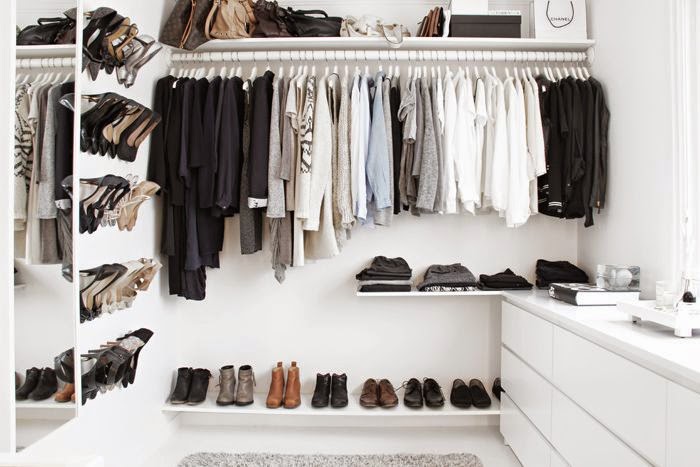 nine0003
2. Install a special wire storage system in the closet
This is a great opportunity to reorganize the space with modern wire structures. They are produced in special sizes to suit existing furniture standards and allow for a significant increase in the amount of usable space on the shelves. Especially convenient are the options made in the form of a grid - they open all their contents for viewing at once, and it is easy to find any thing without digging. nine0003
For convenient arrangement of deep shelves, several options for wire structures are suitable:
- Internal shelving shelves placed at different levels. With their help, items can be placed on two or three tiers, for example, underwear - in the bottom, T-shirts and T-shirts - in the middle, and pajamas - at the very top.
- Hanging mesh structures (baskets). They are often used in bathrooms or in the kitchen, but they are also great for deep shelves. Baskets are mobile, freely slide in and out, if necessary, they are folded into one another, forming a kind of modular cabinet for storing things.
 nine0006
 - Special small inner shelves. They allow you to divide the compartment into zones, and lift objects located in the very depths and make them more accessible. You can choose any of the offered accessories to help organize your closet space and give it an updated look.
3. Equip the closet with compartments for storing personal items.
It means that all the same piles of clothes are formed on the shelves, but each of them is placed in a separate cell intended for it. You can divide the space into sections in different ways. nine0003
- Use plastic, polycarbonate or wire vertical dividers to create separate compartments for each stack of wardrobe items.
- Small, low shelves that divide the common space horizontally allow you to add another layer of clothing at the farthest part of the large shelf. It is more common to see such delimiters in kitchen sets, but try using them to store things in a closet, and you will see that it is very convenient.
 nine0006
First of all, such a reorganization of space is good because you don't have to look through the entire shelf when you need to find something. Each pile of clothes will be available to you separately. The second plus is that it is not at all necessary to look for and buy special separators, you can make them yourself from anything. Even simple cardboard boxes will do.
Please note that closet organizers often advise you to fold wardrobe items by color. However, you must admit that it is difficult, if necessary, to immediately notice the right white T-shirt in a whole stack of T-shirts and tops of the same color. Perhaps it is still more convenient to sort the wardrobe according to its intended purpose, while bright objects, standing out from the rest, will be excellent reference points in the search. nine0003
4. Organize clothes.
They are especially useful for storing small items such as hosiery, underwear, T-shirts, tops, shorts, etc.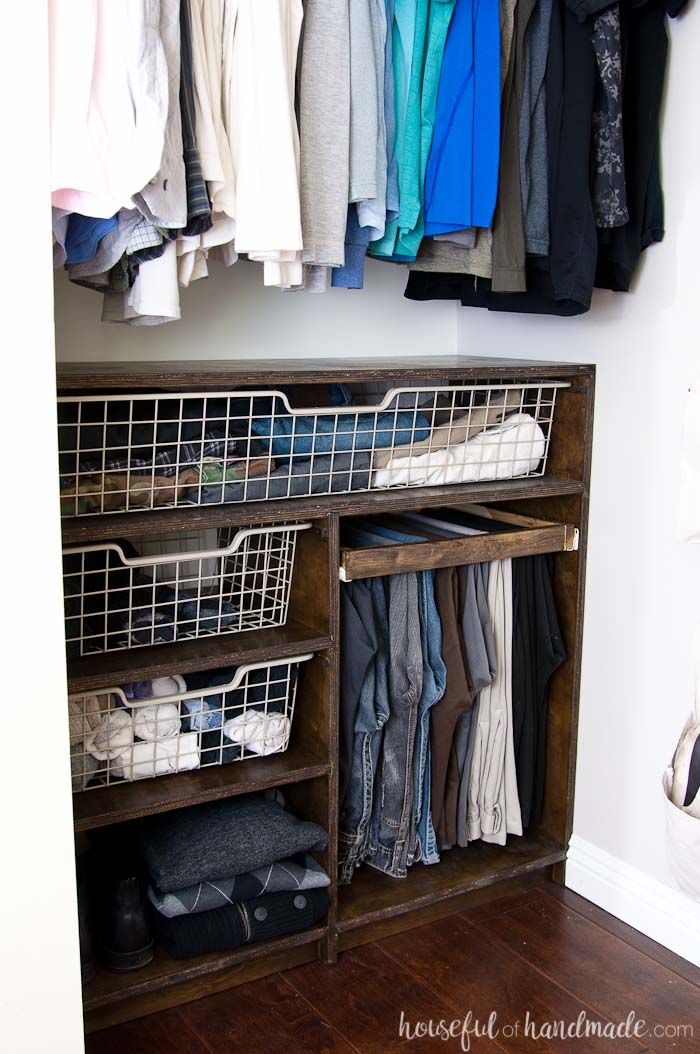 Now on sale you can find very different designs made of hard or soft materials, closed and open, with intermediate removable ( or not) delimiters.
You can make large organizers to order, for the entire shelf or a number of small ones. Many fit shoe trunks for this, which is also very convenient. nine0003
For larger spaces, lockable compartments can be used and stacked one on top of the other. Or - which is perhaps more convenient - buy and place custom-made intermediate shelves.
5. Store bulky or out-of-season clothing on large shelves.
No additional tools are required for this. In deep shelves you can put:
- All textiles such as blankets, bedspreads, large terry towels, duvet covers and sheets. Just stack it in big piles. nine0006
- Shoe boxes (most convenient to place them at the very bottom).
- Bulky garments such as warm winter jackets, sweaters, men's jeans, etc. So that the latter are not too wrinkled, it is best to roll them into rolls.

- Wardrobe items that are not suitable for the season are also better to push deep into large shelves, and place what is now in demand closer to the edge.
5 rules for storing things in a wardrobe
Almost every home has had wardrobes for a long time, and principles for storing clothes are often formed based on this. There are seven fundamental ideas that will help you competently organize the storage of things in the closet. nine0003
- Consider the size of your wardrobe items.
- Divide the space for hangers: some in one tier, and some in two. nine0006
Review all the clothes and divide them into two parts according to their length. You can hang blouses, shirts, trousers in two tiers. But dresses and coats - only in one, for something else there will be no room under them.
In accordance with this, distribute the storage space in the closet. Leave more space for long clothes or short ones, as needed.
- Make the most of the space in the corners.
- Hide your shoes in the closet.
- Organize a place where you will store your accessories.
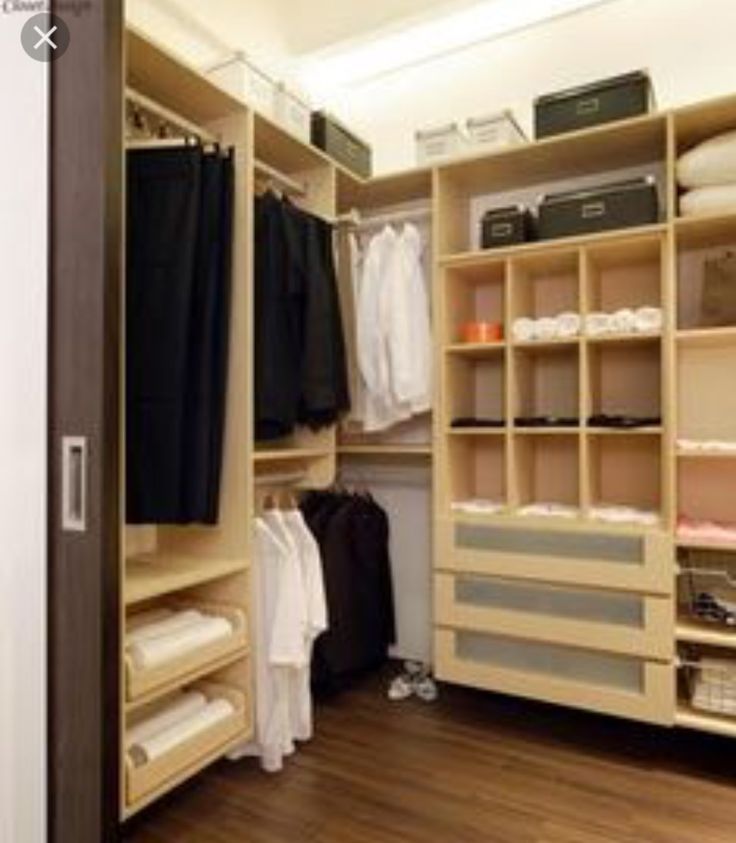
This is really important, because then it becomes clear what the optimal dimensions of the shelves should be in order to neatly manage to fold the maximum amount of clothes. They are usually about 35-60 cm deep.
Practice shows that the deepest shelves, up to 60 cm, are needed to store most of the shirts, blouses, jackets. Otherwise, the clothes will wrinkle or even stick out and press when the flaps are closed. nine0003
The following information will be useful here:
- To hang jeans and trousers, you need 127 cm of space, and to put them on a shelf - half as much.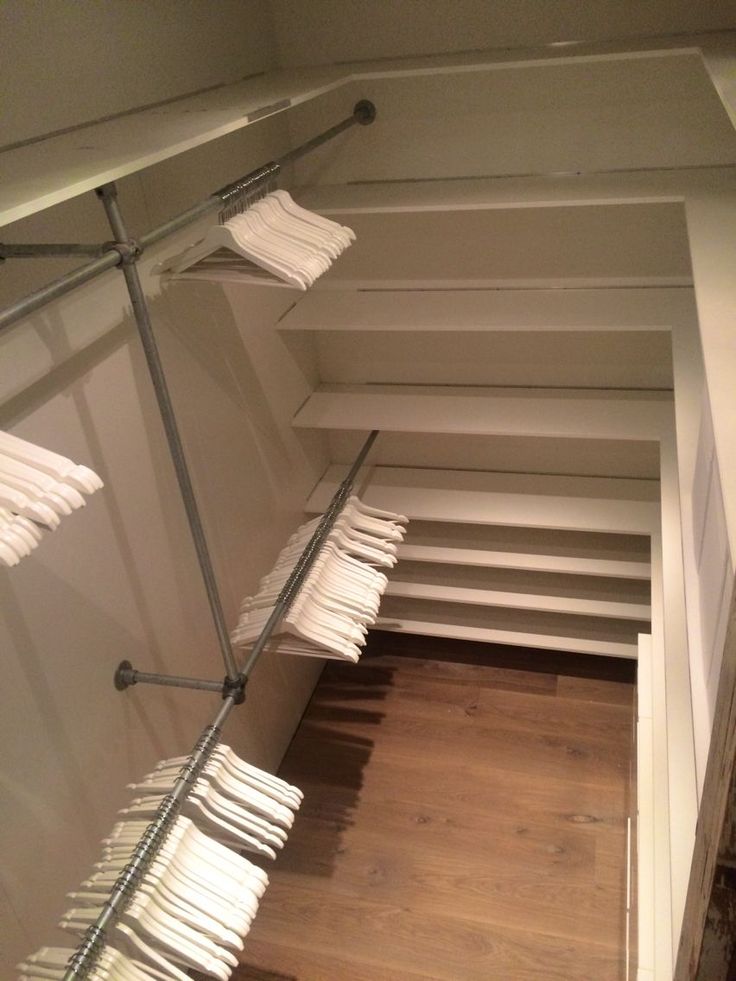
- Even more space needed for outerwear, up to 173 cm.
- Shirts and sweaters, depending on the size, can take from 23 to 38 cm in width.
- Skirts need approximately 115 cm of wardrobe height.
There is not much free space here, but it is. Having made additional shelves in the corners, you can put bags and suitcases there for storage. nine0003
For a small dressing room, it is enough to simply make shelves that will completely cover the corners and do not need to buy special modules for this.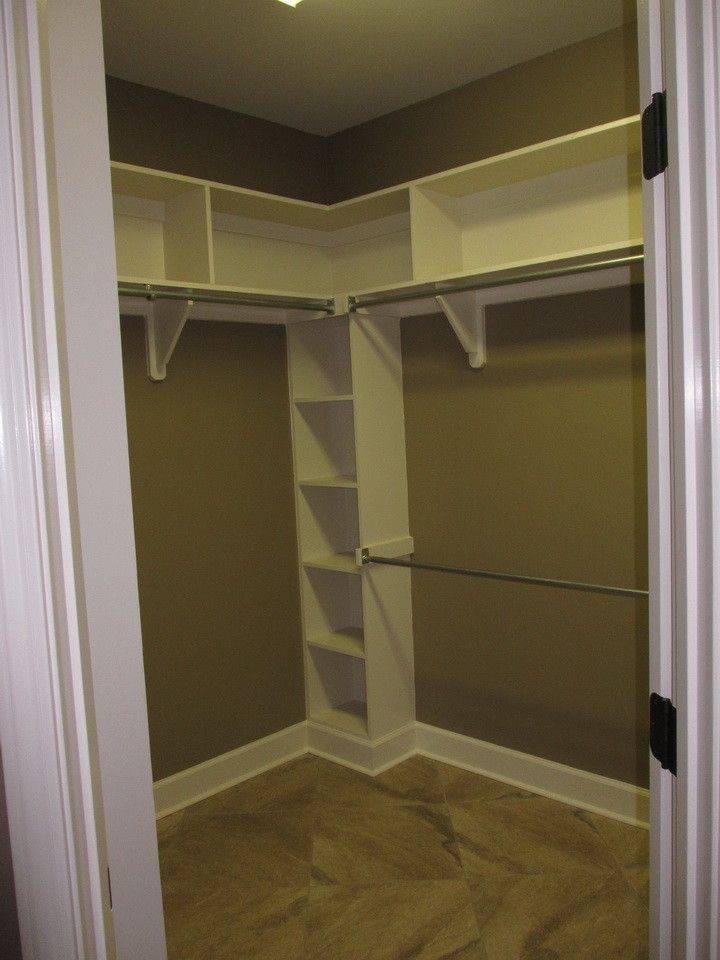
A very handy device for folding shoes - a special rack. When buying it, keep in mind that you will have to put shoes for everyday wear into it, plus the one that is waiting for its season. Women's shoes need approx. 15-20 cm of space, men's need 16-26 cm.
nine0002You will need higher shelves for boots. The lowest pairs are about 7 cm high. Next in ascending order are ankle boots and high boots, up to about 22-44 cm.
Accessories are an important and necessary addition to any wardrobe; absolutely every person has them. These are handbags, jewelry, belts, ties and so on. Make sure that all these items do not roll around the house, let everyone have their own place. Place large and small bags in the rack, if necessary, they will all be immediately in front of your eyes. Ties and belts are perfectly placed on wall mounts. nine0003
The above trendy ways of arranging the wardrobe space fit perfectly into modern interiors.
12 tips for storing personal belongings when the closet is very small
It is clear that in a small space it is not so easy to fit all the available clothes, and even so that it looks aesthetically pleasing and there is no problem finding something quickly. Here are some actionable tips.
- Clothes that are not needed for the current season, put away somewhere, for example, in the attic in a chest or in a garage or in a distant mezzanine. nine0006
- Not everyone has such places where they can take out the wardrobe items that are not needed at the moment. Then just put them in the far corners of deep shelves, and put what you wear every day on the edge.
- Add more shelves to your wardrobe, fixed or removable. This is a great closet storage idea that will make the most of the available space.
- Be sure to use special baskets, boxes and crates to store small items. As for wicker containers, it is better to choose those that are equipped with a fabric lining.
 In them, things will be safer, because they will not catch on the sharp edges of the mesh. nine0006
 - Try to use the space inside the cabinet directly above the door. If it is not busy, arrange hooks there and identify handbags or something else that you do not use very often.
- If space permits, attach hooks on the inside of the door, plus a basket (one or more) and store something small there like gloves, scarves, belts or hats.
- Can be stowed away in a closet and shoe rack, then all the space will be used to the maximum. nine0006
- Usually there is a free space between the bar with hangers and the containers below. There you can mount another cornice for storing things in the closet on hangers.
- Install a perforated panel inside the cabinet. It will perfectly accommodate jewelry, glasses and other small things.
- You may have already taken up all the free space inside the wardrobe with containers, boxes and baskets, but there are still items that have nowhere to put.
 Hang a roomy bag on a coat hanger
process description, drawings and diagrams with dimensions, step-by-step instructions
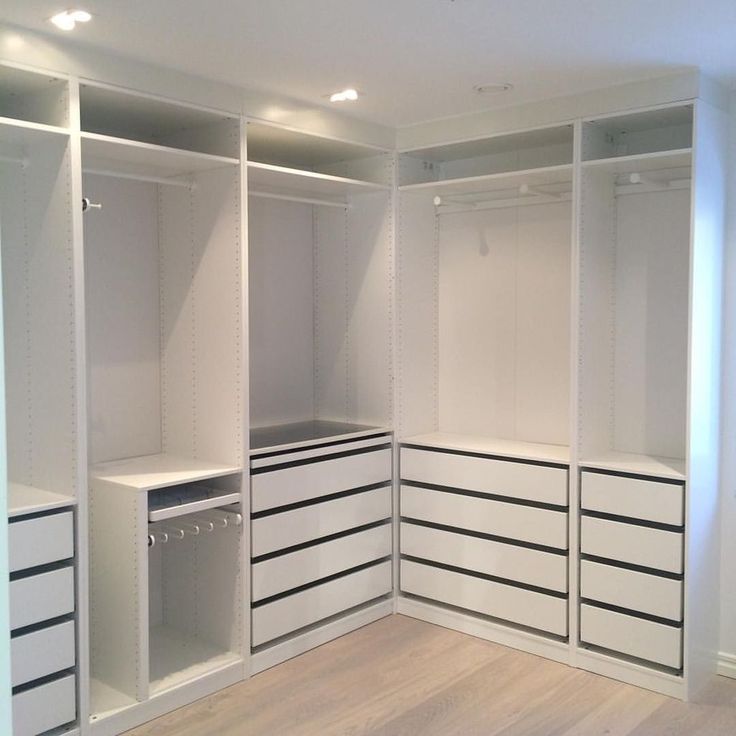
The sliding wardrobe is an extremely popular type of wardrobe, due to its spaciousness, compactness and functionality. There are quite a few models of this design on the market, however, if the parameters of the room are non-standard or you want to get a unique product, then you can make a wardrobe yourself.
- Definition with the type of wardrobe nine0004
- L-shaped
- Radius (radial)
- Trapezoidal
- Five-walled (pentagonal)
- Diagonal (triangular)
- Plywood
- Chipboard
- Wood
- In the hallway or hallway
- In the bedroom
- In the living room
- In the children's room
Definition with the type of wardrobe
Structurally, all wardrobes are divided into two types:
- Case.
 Such furniture is formed from several elements, so its second name is modular. A feature of the cabinet cabinet is the ability to optionally complement the design with a variety of external and internal elements. Initially, the product is designed in such a way that all the details are in harmony with each other and combined with the case. nine0002 Bottom, roof, side and rear walls are required to form the hull. All elements can be made in the form of removable horizontal shelves on which things will be placed. You can complement the design with a pull-out cabinet designed for shoes or accessories.
 - Embedded. Their distinctive feature is the special ease of hand-made execution using improvised materials. This is possible because the cabinet is installed in niches or places where it is impossible to place standard furniture. For the construction of such a cabinet, a one-piece body is not needed, and usually it does not have one or more walls, which are replaced by a ceiling, floor, or walls of the room.
 Elements of internal filling are performed similarly to cabinet furniture. nine0006
Please note! A do-it-yourself built-in wardrobe, unlike a cabinet one, cannot be transported, since it is attached directly to the wall.
Wardrobes differ in shape and can be as follows.
L-shaped
They have the appearance of a pair of separate cabinets located along the walls and connected at right angles so that the letter "L" is formed. These cases can be either equal in size or asymmetrical. L-shaped corner cabinets are the most compact type of furniture, and therefore are optimal for small rooms. nine0003 L-shaped cabinet is located along two walls.
Radius (radial)
They are distinguished by a facade that has the shape of a part of a circle, the center of which is shifted to a corner. Such a cabinet can have:
There are also semi-circular corner cabinets. They are assigned the role of a miniature dressing room, and therefore they are usually installed in extremely cramped rooms. The main features of radius cabinets are the original appearance and the absence of sharp corners. This allows them to be used in interiors where there are not enough smooth lines, and in children's rooms. nine0003
Trapezoidal
This type of wardrobe looks like a trapezoid, which can have a different shape - isosceles or rectangular. This design provides for fewer doors than L-shaped models. This, along with other design features, leads to a reduction in the cost of the finished product.
Trapezoidal wardrobe in shape corresponds to the geometric figure.Pay attention! Trapezoidal cabinets occupy a fairly large area, while having a relatively small capacity. nine0003
Five-walled (pentagonal)
Shaped like an equilateral pentagon. This model is similar to the trapezoid, but differs in an additional side wall. The five-wall wardrobe is the most massive, very deep and easy to use. This made it quite popular, especially for placement in the bedroom, because the design can store everything from personal items to household appliances.
Seen from above, this cabinet looks like a triangle. It harmonizes well with the rest of the furniture of the room and accommodates a fairly large number of things, but at the same time, the diagonal cabinet takes up a significant amount of space. Because of this, it is recommended to install it in rooms with sufficient dimensions.
The triangular cabinet is located in the corner and has three sides.Material selection
The choice of material directly determines the technology by which the cabinet will be manufactured. Options may be as follows. nine0003
Plywood
This is a multi-layered material characterized by high strength and wear resistance. It is environmentally friendly and therefore harmless to health. The plywood is produced in the form of solid boards, which simplifies the assembly process.
chipboard
Sheets of this material are most in demand for creating home furniture.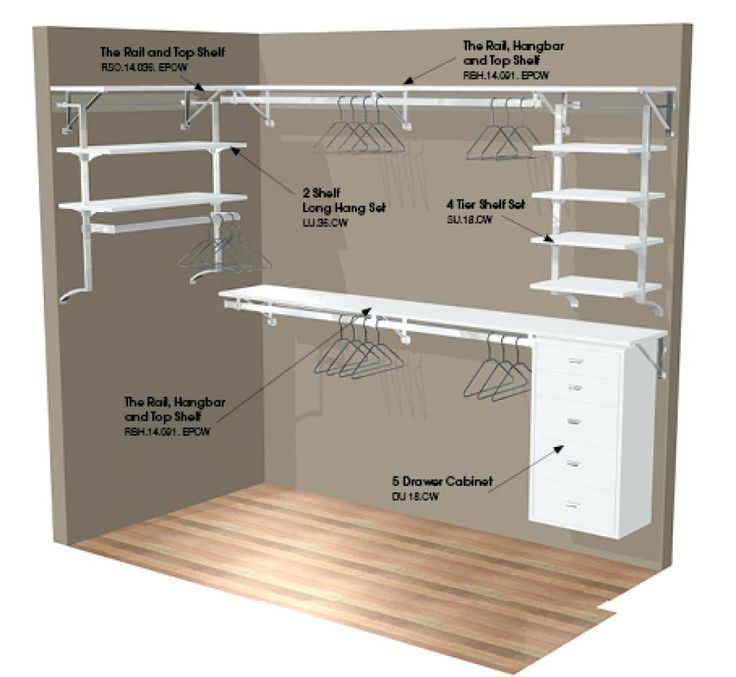 This is due to the fact that chipboard combines good quality and affordable cost. The material is resistant to changes in moisture and temperature, aggressive environmental influences and is characterized by increased strength. nine0003 chipboard is a fairly durable material, while it has an affordable price.
Pay attention! When choosing chipboard, you should check the safety certificates to exclude the possibility of the release of harmful substances.
Wood
Solid wood boards of various types can be used. They are produced in different dimensional lines, have different processing and quality of carpentry work. For the design of the cabinet, boards made of birch, pine and oak are considered optimal, since these species are durable and resistant to changes in air humidity and temperature. nine0003 Natural wood is the most expensive and high-quality material.
Preparing tools
The following tools are required for the job:
- sander, necessary for polishing the wood surface;
- hand saw for sawing wood;
- ruler or meter tape required for measurements;
- protractor used to measure tilt angles;
- metal corners, necessary to fasten parts of the structure; nine0006
- wooden dowels used to fasten the product and its internal filling;
- mastic, which is used to seal the structure;
- blockboard used to create shelving;
- is a water-based acrylic paint that gives the desired color to the product.
Step-by-step description of the assembly process
Before you make a built-in wardrobe with your own hands, using step-by-step instructions, you need to mark the location in the room and draw up a drawing. In the schemes, it is required to take into account the width and height of the structure, so first you should measure the intended place of its installation with a tape measure. nine0003 The location of the cabinet needs to be carefully considered.
When taking measurements, it is important to take into account distances from window sills, skirting boards, pipes and electrical outlets. Ignoring these aspects can lead to the fact that the cabinet either does not fit in the planned place, or acts as an obstacle when opening doors or approaching an outlet. It should take into account all the features of the apartment, such as uneven walls, curved ceiling and floor.
When creating a wardrobe with your own hands, you will need drawings and descriptions for them.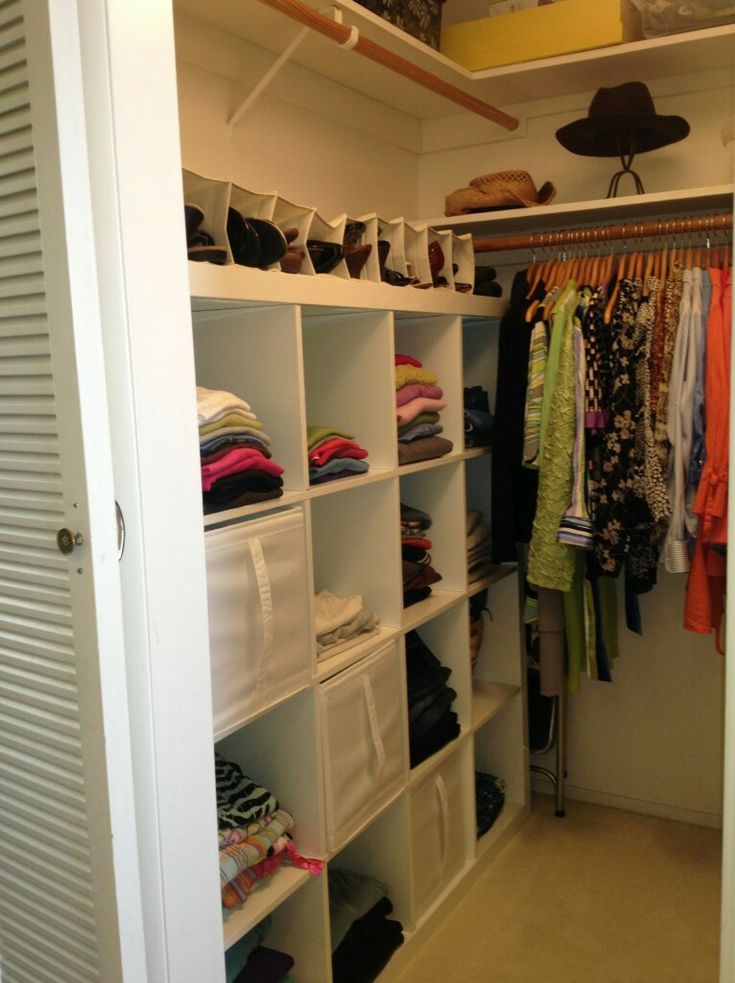 They should include:
- Front view. This sketch includes the height and width of the structure, the size of the sections, the height of the plinth and the distance of the shelves. When drawing up a diagram, it is important to take into account the selected wall thickness of the frame and filling. On the sketch, you need to indicate all the points at which the shelves and doors will be fastened.
- Side and top view. In this projection, you should specify the depth of the frame and shelves. When applying the values, it is important to take into account the fastening of the doors.
Additionally on the drawing, it is required to indicate the rounding of the shelves using a radius.
In addition to the indicated housing values, it is necessary to fix the dimensions of the internal filling elements on the diagram.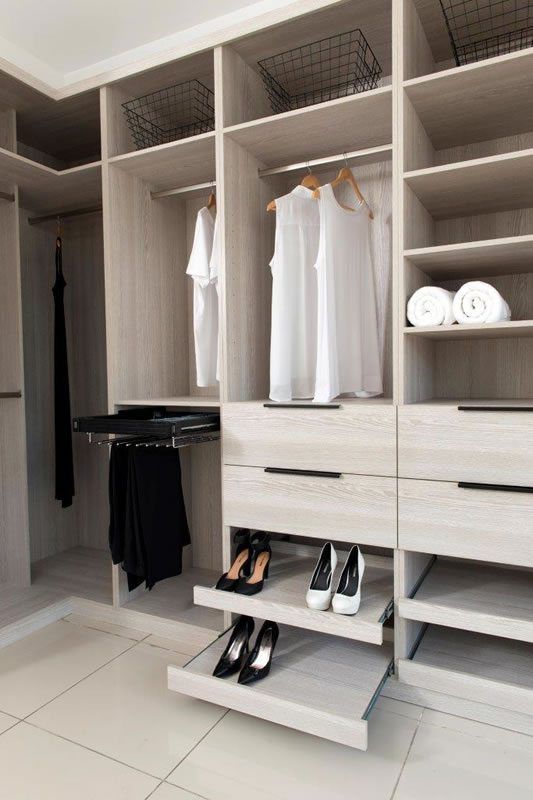 Shelves can have different configurations and thicknesses, but they must be of the right size.
Fittings and sawing
After the drawing has been prepared, the construction details must be produced. To do this, using a meter and a pencil, the dimensions of the following elements should be transferred to the chipboard sheet:
- upper part;
- pair of side walls;
- bottom;
- rear wall;
- shelves.
Using a saw, it is necessary to carry out a step-by-step cutting along the marked lines.
Important! When cutting, the thickness of the saw should be taken into account so that the pieces of furniture after completion of work do not have a size smaller than expected. nine0003
After preparing the elements, they need to be lined with melamine film. It must be put on structural elements and heated with an iron or a building hair dryer, and after setting, remove excess residue with a clerical knife.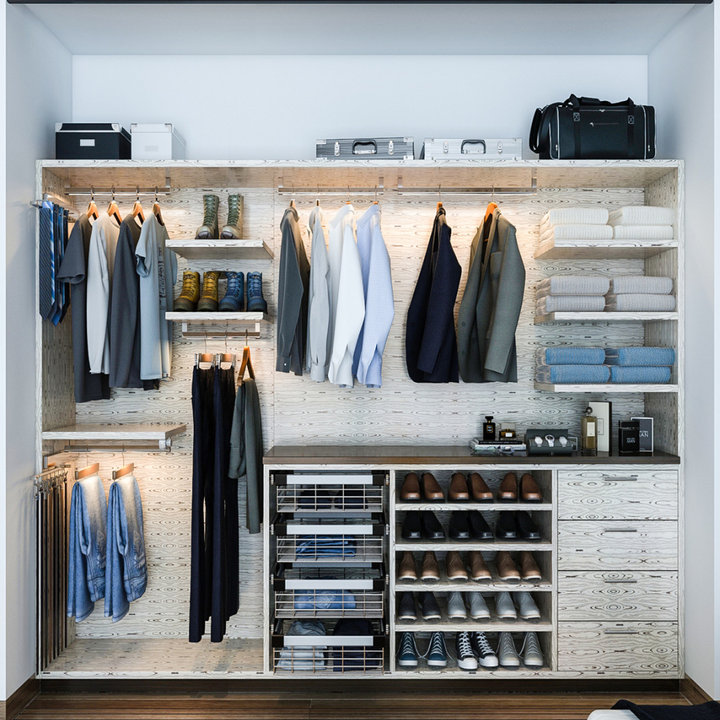
Fastening the frame and shelves
It is most convenient to assemble the cabinet in a pre-marked place where it is planned to place it, as this will prevent damage to the walls and floor of the room during transportation of finished furniture. First, it is necessary to lay sheets of cardboard on the marked floor, on which the structure will be assembled. nine0003
The assembly procedure is as follows:
- Place the first side sheet on the floor.
- Fix the fasteners to connect the top and bottom sides of the cabinet vertically.
- Install and fix the top and bottom of the structure on the sides.
- Position and fasten the second side panel of the cabinet from above.
- Check the strength of the fasteners.
- Turn the front of the cabinet onto the floor, then lay and secure the back. nine0006
- Lift the cabinet and place it firmly against the wall in the space provided.
- Use a level to level the structure.
 Next, you need to install the doors and filling.
Painting and installing a mirror on the door
If you plan to paint the cabinet, this should be done before installing the shelves. This will allow the door leafs to dry out during the installation of the internal filling. For wardrobes, it is optimal to use acrylic enamels, which give a rich color and gloss to the surface and are easy to wash. nine0003
Please note! If the structure is covered with drying oil, then the surface should be primed before painting to ensure even laying and good fixing of the paint.
For interior surfaces, choose a material that is easy to clean and does not leave marks on clothing. Preference should be given to high-quality options so that you do not have to repaint soon. After painting, if desired, a mirror can be attached to the doors, which can be either full-length or small or fragmented. nine0003 Often a mirror is installed on the closet door.
Door assembly
Sliding doors are typical for wardrobes. They look like a sliding system in which, when the cabinet is opened, one door slides into another. Installation of this type of structure requires special skills, therefore, before starting installation, you should familiarize yourself with the complete set of doors and the position of the parts:
- wheels for movement, installed in the lower and upper parts of the doors; nine0005 bottom guide structure, the grooves of which are used to move the wheels;
This design can only be used in cabinet furniture equipped with a threshold. If you plan to install a built-in wardrobe, then you can not mount the lower guide elements on the floor. nine0003
Production of inner drawers
For the manufacture of drawers you need:
- side walls made of wood or chipboard;
- fiberboard bottoms;
- guides.
When installing drawers, it is desirable to use mortise handles. If ordinary ones are used, then the drawers must be moved deep into the furniture, because otherwise they will interfere with the facade and the cabinet will not be able to fully function.
Examples of wardrobe placement in the interior
In the hallway or hallway
The sliding wardrobe is optimal for placement in the hallway, as it allows you to create a capacious storage space even in modest space conditions. In such a closet, you can store not only outerwear and seasonal clothes, but also sports equipment, accessories and toys used by children for walking. The corner design can replace all other bulky storage systems in other rooms.
It is convenient to store outerwear and other things in the closet in the hallway. nine0002 Pay attention! The use of mirror inserts provides not only a visual expansion of the space, but also the convenience of inspecting the appearance before going out.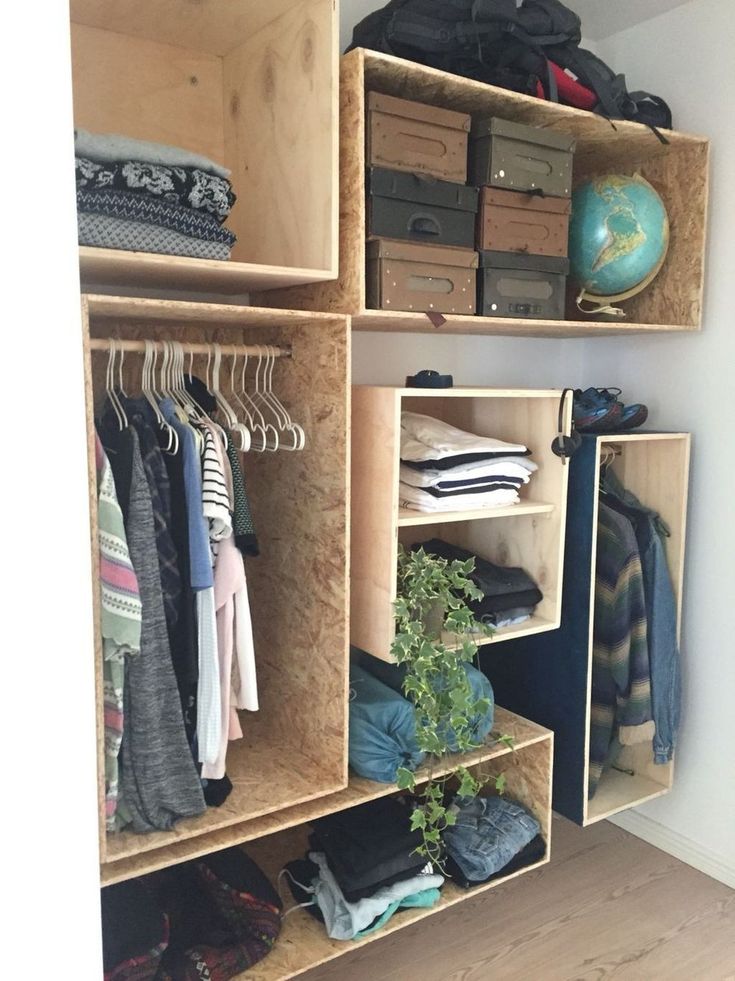
In the bedroom
In the bedroom wardrobes are installed most often, because they can fully replace the dressing room. To form a harmonious image of the room, you should select a wardrobe, the material of which is similar to other pieces of furniture. For large structures, light colors of facades and the use of mirrors of various sizes are optimal. nine0003 The bedroom is the most popular place to install wardrobes.
Additionally, the upper part of the cabinet can be decorated with lighting. This will not only allow you to get better visibility of the contents, but also create a special atmosphere in the room.
In the living room
In living rooms wardrobes are used infrequently, which is due to the unwillingness to clutter up the room with massive furniture, which is successfully replaced by low modules. However, if the space of the apartment is very limited, then the closet in the living room can become not only a storage system, but also an effective zoning element.