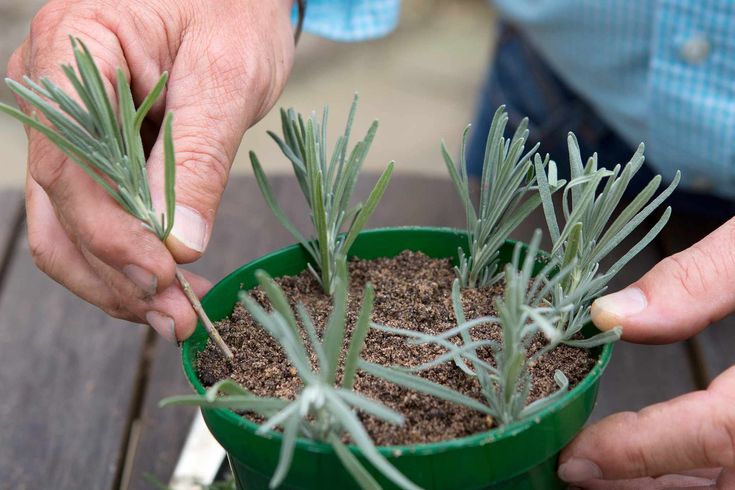
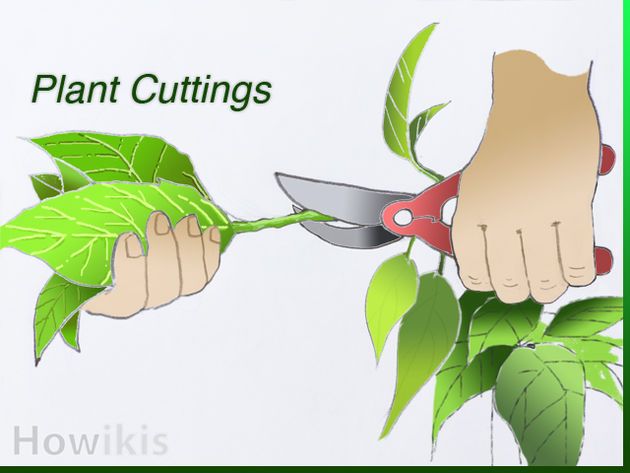
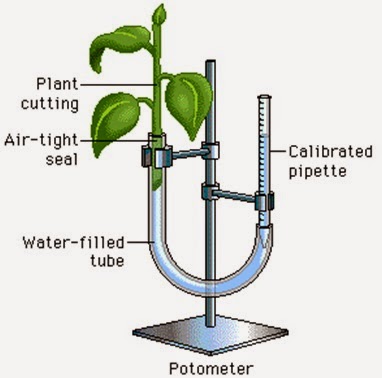
Take plant cuttings
How to Grow Plants From Cuttings
Grow New Plants at Home With This Easy Propagation Method
By
Marie Iannotti
Marie Iannotti
Marie Iannotti is a life-long gardener and a veteran Master Gardener with nearly three decades of experience. She's also an author of three gardening books, a plant photographer, public speaker, and a former Cornell Cooperative Extension Horticulture Educator. Marie's garden writing has been featured in newspapers and magazines nationwide and she has been interviewed for Martha Stewart Radio, National Public Radio, and numerous articles.
Learn more about The Spruce's Editorial Process
Updated on 10/25/22
Reviewed by
Kathleen Miller
Reviewed by Kathleen Miller
Kathleen Miller is a highly-regarded Master Gardener and Horticulturist who shares her knowledge of sustainable living, organic gardening, farming, and landscape design. She founded Gaia's Farm and Gardens, a working sustainable permaculture farm, and writes for Gaia Grows, a local newspaper column. She has over 30 years of experience in gardening and sustainable farming.
Learn more about The Spruce's Review Board
The Spruce / Jiaqi Zhou
Project Overview
Garden plants can be propagated in many ways, but one of the easiest methods is taking stem cuttings. How to grow plants from cuttings is simple: Trim off a healthy portion of stem, place it in water or a growing medium until it develops roots, and then plant it in a pot or the ground.
Growing plants from cuttings is a common way to create new houseplants, but it can also work for many garden plants. In cold-weather zones, some gardeners take clippings of tender annuals and root them indoors to prepare a supply of new plants for garden planting in the spring.
Here's what to know about how you grow a plant from a stem cutting.
Watch Now: How to Propagate Dipladenia
When to Take Stem Cuttings
Stem cuttings can be taken and rooted at almost any time during the parent plant's active growth period.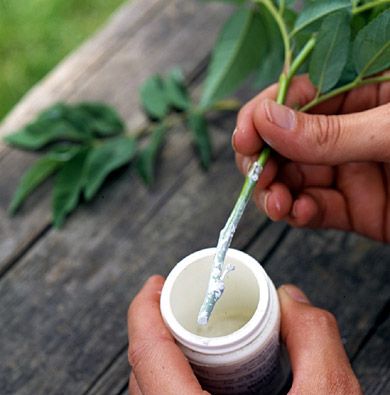 You also can take cuttings from many woody plants (plants with hard stems) during their dormancy. In cold climates, you can take cuttings in the fall before frost arrives, root them indoors, and then transfer them to pots. By springtime, you will have vigorous potted plants that can go back into the garden.
Types of Plants to Grow From Cuttings
Soft-stemmed herbaceous plants are the easiest to grow from cuttings, but many woody plants can also be propagated with this method. The following list includes examples of plants that grow from cuttings.
- Semi-hardwood cuttings are woody around their base but have softer stems up top. Examples of plants that can be propagated via semi-hardwood cuttings include holly, hydrangeas, and azaleas.
- Hardwood cuttings have woody stems throughout. Examples of plants that can be propagated via hardwood cuttings include crepe myrtle, forsythia, and rose species.
- Softwood cuttings have flexible soft stems.
 Examples of plants that can be propagated via softwood cuttings include clematis, asters, and chrysanthemums.
 - Greenwood cuttings are very similar to softwood cuttings, except that their base is slightly harder and they take a bit longer to grow. Examples of plants that can be propagated via greenwood cuttings include boxwoods, dahlias, and gardenias.
Before You Begin
The key to successful rooting of stem clippings is to find the moisture and temperature level appropriate for each type of plant. Do some research on the species you are trying to propagate to learn the conditions it likes best. You can make your plant cuttings grow faster not only by providing the conditions they like but also by applying rooting hormone to the cut end, which helps to encourage root production. It's also best to take several clippings to maximize your chances of success.
How long plant cuttings take to root varies widely depending on the type of plant. Many herbaceous annuals will quickly grow to maturity. But cuttings from perennials and woody plants, such as shrubs, can be harder to root and take longer to reach maturity.
Tip
It is possible to grow a plant from a cutting in water. Simply place the cut end down in a container partially filled with plain water, and refresh the water every few days until a substantial root system has formed. However, transferring a water-rooted seedling to soil is not always successful, so it's generally better to plant cuttings straight into soil.
Equipment / Tools
- Razor blade or scissors
- Small container for rooting hormone (optional)
- Pencil or stick
Materials
- 6-inch containers for planting
- Soilless potting mix
- Existing plant (parent plant)
- Alcohol
- Rooting hormone (optional)
- Plastic bag
The Spruce / Loren Probish
How to Grow Plants From Cuttings
-
Prepare a Container
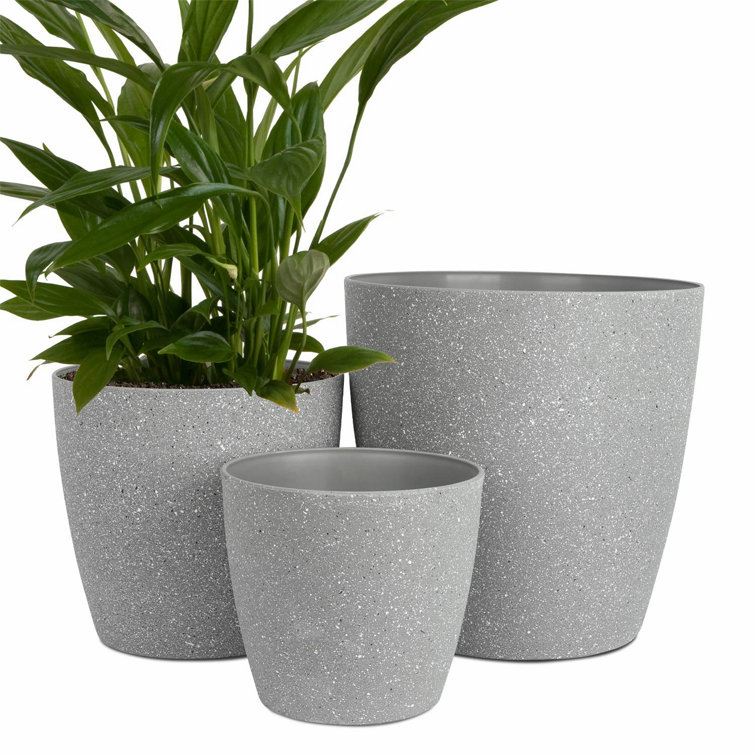
Fill a clean 6-inch-deep container with soilless potting mix to hold cuttings for rooting.
 A soilless mix drains well and provides suitably moist conditions that encourage the cutting to root. Don't use ordinary garden soil, as it might contain pathogens that can kill the cutting before it ever takes root.
 The Spruce / Loren Probish
-
Choose a Parent Plant
Select a healthy parent plant from which to take cuttings. Avoid plants with diseases or lots of drooping or dying foliage. The best specimens for cuttings will have plenty of new growth and be large enough that taking cuttings will not harm them.
Tip
Good green growth is more important in a parent plant than plentiful flower buds. Too many flowers can actually hinder the ability of a cutting to grow roots.
The Spruce / Loren Probish
-
Find the Best Stems for Cutting
Choose green, soft (non-woody) stems for cuttings. Newer growth is easier to root than woody, older stems. Look for a stem with a node—a bump along the stem where a leaf or flower bud attaches.
 This point is where new roots will emerge.
 The Spruce / Loren Probish
-
Take the Plant Cutting
Use a pair of scissors or a razor blade that has been sterilized in alcohol to make a clean cut just below a node. The cutting doesn’t need to be long, but it should contain at least two leaves and one node. A cutting that is 4 to 6 inches long is usually sufficient. Longer cuttings sometimes dry out when placed in their growing medium.
The Spruce / Loren Probish
-
Prepare the Cutting
Place the cutting on a flat, hard surface, and make a clean, partial slice through the middle of the node with a sterilized razor blade. Scarring the node will increase the chances of roots emerging from this spot.
Then, remove all but one or two leaves on the cutting. The cutting needs some leaf growth to continue photosynthesis, but too many leaves will consume energy that would otherwise go to root creation. If the leaves are very large in proportion to the stem, cut off the top halves of the leaves.
The Spruce / Loren Probish
-
Apply Rooting Hormone (Optional)
Wet the node end of the cutting, and then dip it in a small container of rooting hormone. Tap off any excess hormone; too much actually hinders chances for success. This step is optional. Some plants root easily on their own, but rooting hormone can help others by stimulating the cutting into sending out new roots.
The Spruce / Candace Madonna
-
Bore a Planting Hole
Use a pencil or similar pointed object to poke a planting hole into the potting mix, rather than planting the cutting straight into the soil. Make the hole slightly larger than the stem diameter. Doing so will prevent rooting hormone from being wiped away when you embed the stem in the pot, and it's also gentler on the stem.
The Spruce / Loren Probish
-
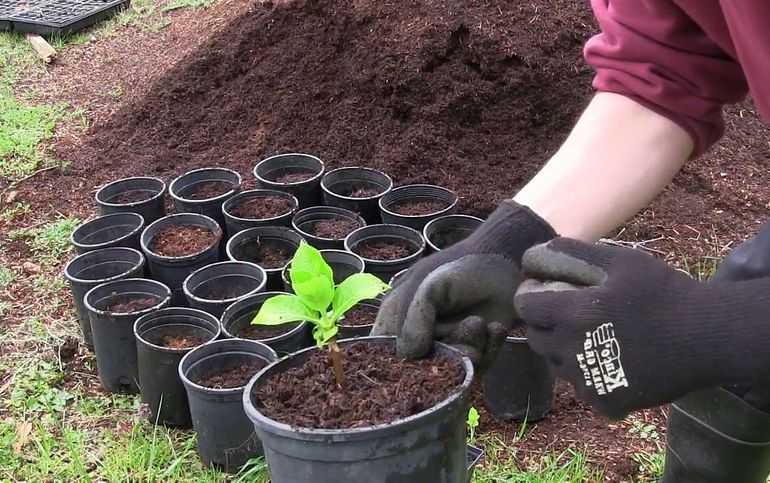
Plant the Cutting in the Soil
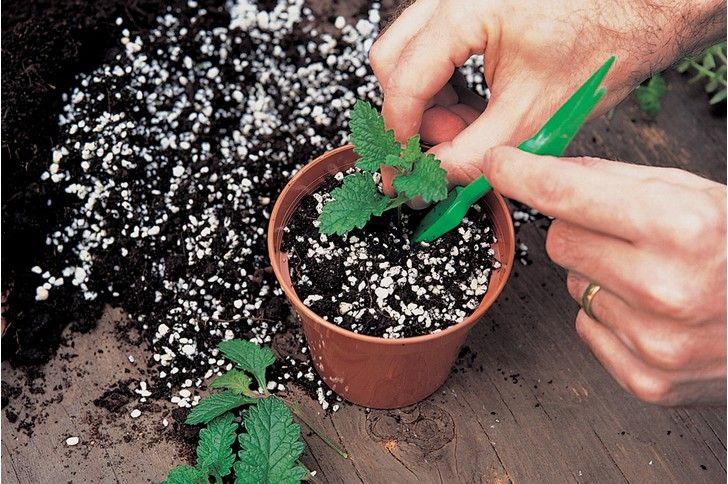
Carefully plant the cutting in the hole you made in the potting mix, and gently tamp the soil around it.
 You can fit several cuttings into one container, but space them so the leaves do not touch one another.
 The Spruce / Loren Probish
-
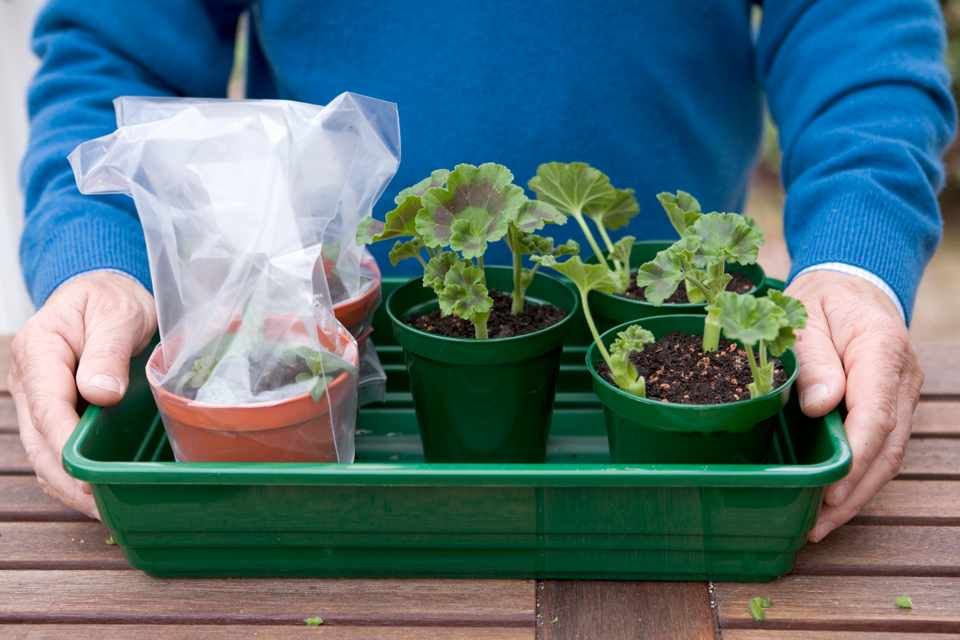
Cover the Pot With Plastic
Place the container with the cutting into a plastic bag. The bag will keep the humidity high and hold in heat. But don’t seal the bag completely because some airflow is necessary to prevent fungal rot.
Keep the container in a warm spot in the house, ideally in an area that has indirect bright light. Don’t put the cutting in full sunlight until new leaves begin appearing along the stem.
The Spruce / Loren Probish
-
Monitor the Cutting
Until roots form, keep the soil slightly moist but not so wet that condensation forms on the inside of the plastic bag. Check regularly for signs of rot, and remove any suspect cuttings as soon as you spot trouble.
After two to three weeks, begin checking for roots by tugging gently on the cutting. When you begin to feel resistance, it means roots have developed.
 At this point, you can transplant the cutting into its own pot or the ground.
 The Spruce / Loren Probish
30 Plants That Grow From Cuttings in Soil
Article Sources
The Spruce uses only high-quality sources, including peer-reviewed studies, to support the facts within our articles. Read our editorial process to learn more about how we fact-check and keep our content accurate, reliable, and trustworthy.
Plant Propagation. University of Maine Extension.
How to take plant cuttings: grow more of your best plants
(Image credit: Leigh Clapp)
Learn how to take plant cuttings, and you will be able to fill your pots and borders with an unlimited supply of your favorite varieties.
Not only is taking plant cuttings one of the most frugal and sustainable garden ideas, but it is also one of the most enjoyable. There is no greater pleasure than propagating and nurturing new plants – watching them grow large enough to eventually take pride of place in your garden.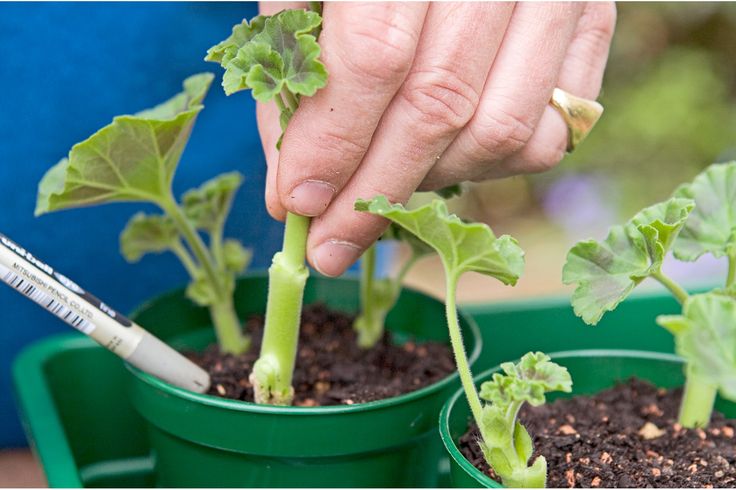
‘It will take time to grow new plants from cuttings, but it won’t cost you anything, and you will be able to replicate the specific plant,’ says Period Living’s gardening expert Leigh Clapp.
‘There are many plants that can be grown from cuttings. It is like a little bit of magic that with a few careful cuts you can create a new plant. It takes practice, preparation and patience, but rewards with the results.’
Bear in mind that cuttings are not the only way of propagating plants – as well as sowing seeds, learning how to divide plants will also allow you to recreate many varieties. So it’s worth checking what the most reliable method is for your individual plant.
How to take plant cuttings – a step-by-step guide
(Image credit: Leigh Clapp)
‘Taking cuttings from plants, or propagating as it is technically called, is easy once you know how to do it,’ says Sarah Raven, plantswoman and founder of the Sarah Raven gardening brand.
‘We tend to take cuttings each year to give us plants for next spring and as insurance in case we need to replace any frost-killed plants.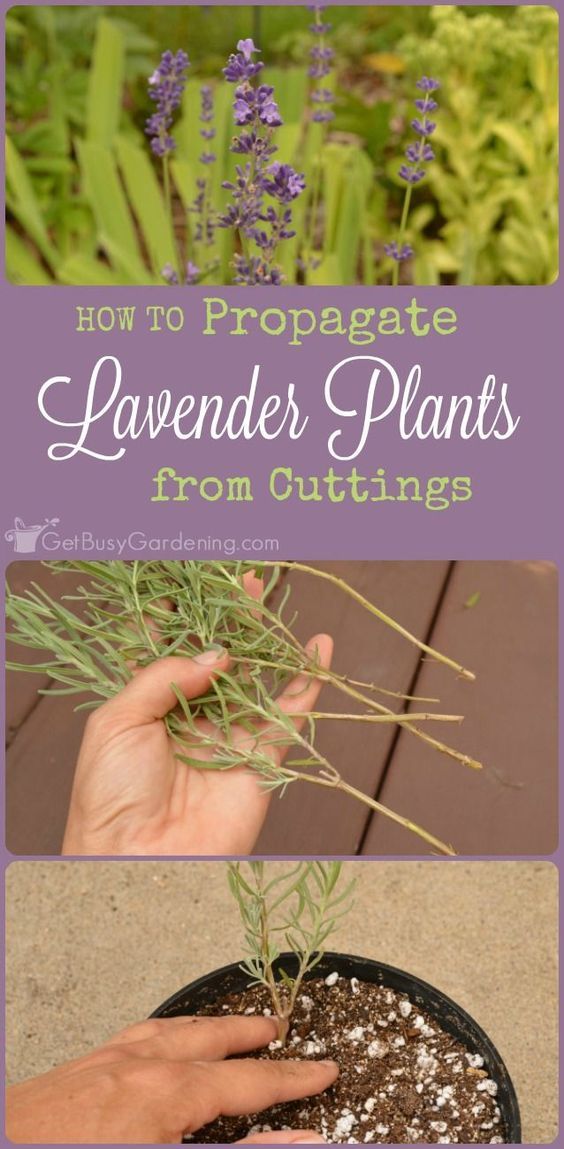 ’
’
Different plants benefit from having cuttings taken at different stages – for example, when learning how to take rose cuttings, is often recommended that taking hardwood cuttings (from more mature growth) is more reliable, while softwood (fresh) and semi-ripe cuttings work best for other plant types. Check before making the cut.
1. Choose the best places to cut
The most important part of knowing how to take plant cuttings, is choosing the best possible growth. Always select healthy, straight growth – it should be a non-flowering stem, so check there are no buds present.
With softwood and semi-ripe cuttings, examine the plant for the most vigorous growth. ‘Try to select plant growth that has toughened up a little, so it is not too soft or bendy,’ says Clapp.
If you are taking cuttings from hardwood plants, then you are looking for growth produced this year that has had time to mature. ‘Ideally you are looking for material the thickness of a pencil,’ says Charlene Chick-Seward, propagator at the National Trust’s Nymans , a well-known Grade II-listed garden in West Sussex, England.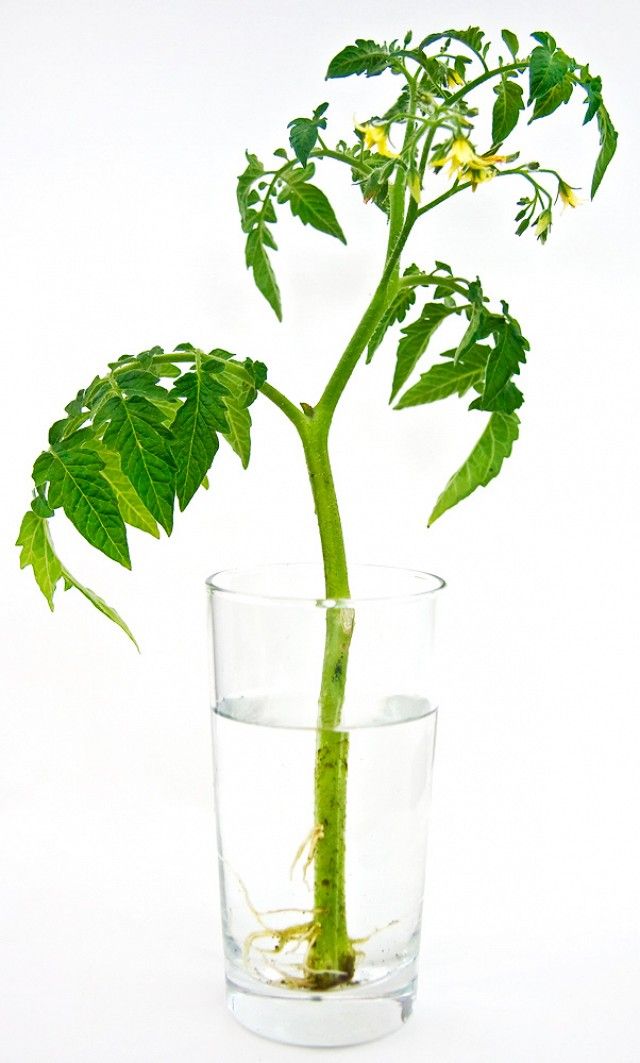
2. Take your cuttings
Ideally take plant cuttings in the morning – ‘this is when the plant is turgid, or full of water,’ says Clapp.
Always use clean tools, to minimize the risk of disease transference.
‘Using a very sharp knife, take a short piece of stem from the main plant,’ says Sarah Raven. ‘Trim to just below a leaf joint, so the cutting is 2 inches (5-6cm) long. Just below a leaf node is where there is the highest concentration of natural rooting hormone.'
If you aren’t able to immediately plant your cuttings, then you can temporarily put them into a polythene bag to keep in the moisture. But you must plant them within a few hours.
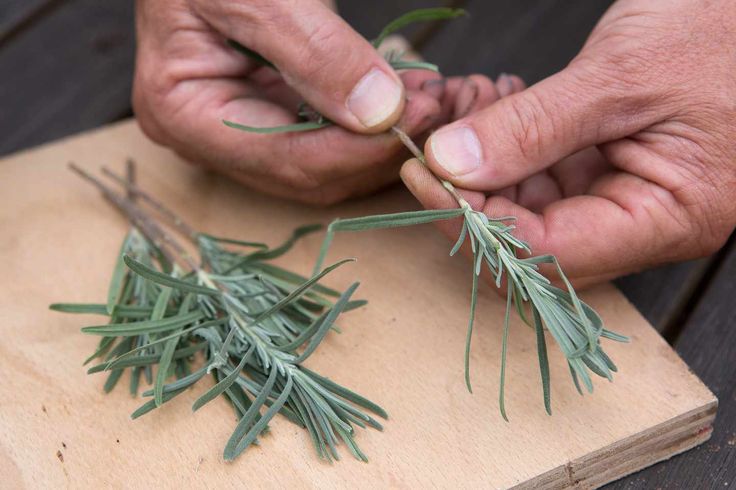
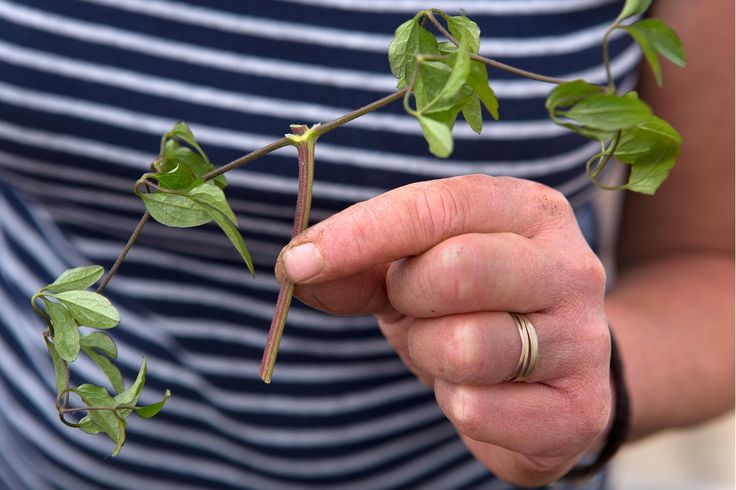
3. Prepare the cuttings for planting
To prepare your cuttings for planting, strip off all the leaves, leaving only the top pair.
'If the top pair of leaves is large, cut these in half across-ways,’ says Raven. ‘This seems brutal, but they will stay alive and continue to photosynthesize, and with half the surface area they won’t place as much demand on the stem to draw up water to support them. This makes the cutting more likely to root than flop.’
Next, remove the stem tip. ‘It’s at the top that the growth hormone concentrates, so by pinching it out, there’s nowhere for it to go but down, in order to encourage root formation,’ adds Raven.
For hardwood cuttings, make a diagonal cut at the top, above a node. ‘Make sure your top cut is on a slant to help avoid the top of the cutting rotting through the winter months,’ says Chick-Seward.
(Image credit: Mariia Boiko / Alamy Stock Photo)
4. How to plant cuttings in soil
Plant your cuttings in free-draining compost. ‘Use a 50/50 mix of peat-free propagation compost and coarse grit,’ advises Chick-Seward.
Fill up your pots and then water your potting mix, prior to planting the cuttings. When researching how to take plant cuttings, you will often be advised to dip the cuttings into hormone rooting powder before planting them, to encourage growth. However, this is not strictly necessary.
Clapp also suggests that honey is a natural alternative, due to its anti-bacterial and anti-fungal properties.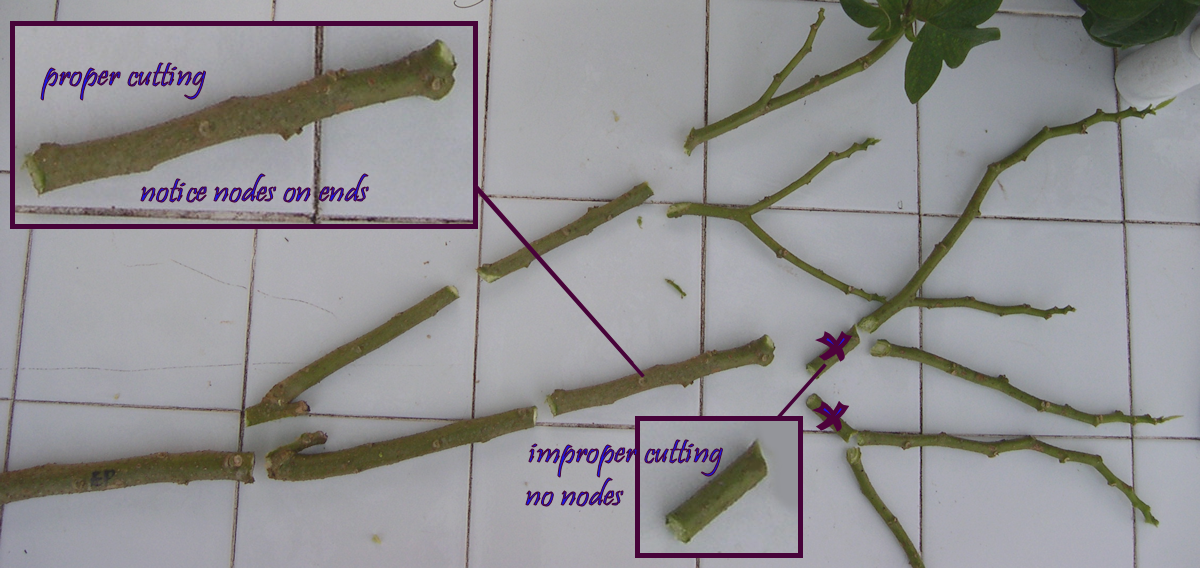 ‘Put a few cuttings in each pot, as success is not always guaranteed,’ she adds.
‘Insert your plant cuttings, well spaced, around the edge of the pots, about 2 inches (4-5cm) apart,' says Sarah Raven. 'By placing them around the edge, you encourage quicker root formation as the new roots quickly hit the side of the pot, break, and then branch into more lateral rootlets.’
However, if using long pots, you can plant the cuttings in a row. ‘We place 8-10 cuttings in a long pot – but a small trench in the ground will also do,’ adds Chick-Seward.
Push your cuttings into the compost nice and deep. ‘Each cutting needs to have at least one node underground and one above,’ says Clapp.
Water the compost again, as it’s vital that the cuttings aren’t allowed to dry out.
5. Protecting your cuttings
How much protection your cuttings require will depend on how tender they are – softwood cuttings are much more delicate than hardwood cuttings.
‘Cover the pot with a plastic bag supported on small canes to enclose the moisture,’ says Sarah Raven.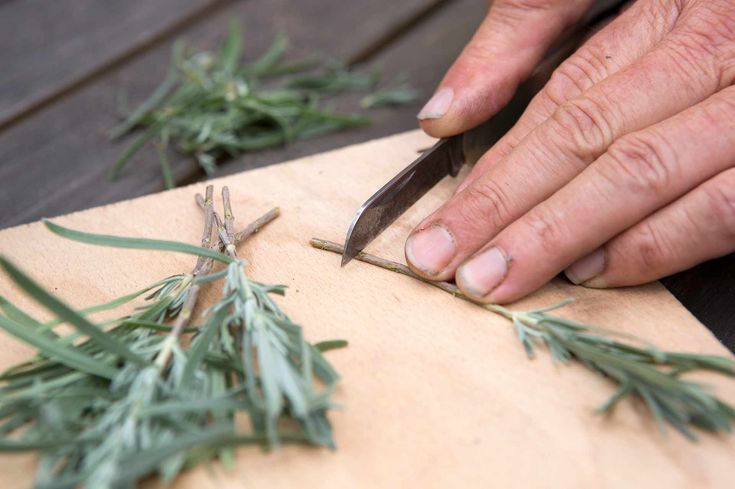 ‘Pelargoniums are the exception of the tender perennials and don't need covering, but most things benefit from enclosure. If you have one, put them in a propagator with a bit of basal heat.’
Hardwood cuttings don't need much protection, although you should make sure the potting mix doesn’t dry out. ‘We find hardwood cuttings do best outside in a sheltered position,’ says Chick-Seward.
'During the summer months, make sure you keep your cuttings moist, and by late summer into early fall, you can pot your cuttings on.’
Cuttings need good light but not direct sun.
(Image credit: The National Trust Photolibrary / Alamy Stock Photo)
How long do plant cuttings take to root?
‘Plant cuttings should root within two to three weeks,’ says Raven. ‘You'll know they have taken when you see new growth at their tips. Turn over the pot and check for new white roots.
‘Take them out of the propagator and, if it's before October, pot them on. Water only when the compost is dry when you poke a finger down 2 inches (5cm) below the compost surface. ’
’
Bear in mind that hardwood cuttings will take a lot longer to root, and you may find there isn’t much progress until early the following spring.
Your cuttings should be ready to plant out in the spring.
How to take softwood cuttings
A key aspect of learning how to take plant cuttings is to know the right stage for your chosen plant. Softwood cuttings are taken from fresh growth, when the stems are fairly soft and flexible. This method works best with plants that produce lots of new growth in the spring.
‘Softwood cuttings are generally taken in spring or early summer,’ says Clapp.
Though the cuttings will be more delicate than semi-ripe or hardwood cuttings, softwood cuttings are quick to root. However, they can easily die off, so work quickly and give them as much protection as possible.
How to take semi-ripe cuttings
Semi-ripe cuttings are taken from plants in late summer or early fall, once the current season’s growth has had more time to become established.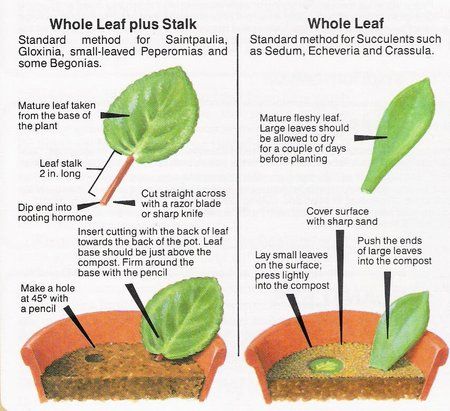
The method works well with almost any type of shrub, and has a high success rate.
The cuttings may take root during the fall, otherwise they will come along quickly the following spring.
(Image credit: Future)
How to take hardwood cuttings
Hardwood cuttings are taken from this year’s growth, which has had a chance to develop and mature into a strong ‘woody’ stem.
‘Late fall into winter is a great time for hardwood cuttings – it's a reliable method to help bulk out the shrubs in your garden,’ says Chick-Seward.
‘Here at Nymans we take many hardwood cuttings of dogwood (Cornus) – their beautiful colored stems make this a fun January or February job to help beat the winter blues.’
Hardwood cuttings are slow to root, but have a high success rate, and need little care or protection. It’s a great method for many shrubs, fruits and trees.
Best time to take cuttings from plants
‘Many gardeners take cuttings in spring – we do our dahlias and chrysanths then,’ says Sarah Raven.
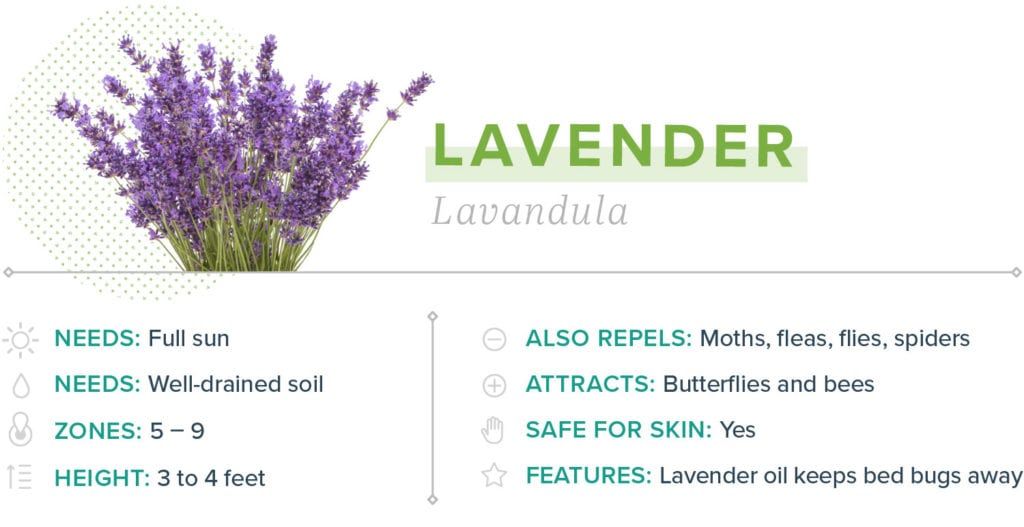
‘In summer, when plants like nemesia, arctotis, osteospermums and lavender start their main growth spurt, we find that’s when they root the fastest.
‘We take salvia cuttings a bit later, in September or October, along with cobaea, fuschias and heliotropes. Pelargoniums are one of the easiest plants to propagate from and a good place to start.
List of plants that grow from stem cuttings
There is a huge range of plants that will grow from cuttings.
- Most shrubs – including roses, hydrangeas, lavender, azaleas, philadelphus, buddleia, erica, hebe, mahonia, and viburnum.
- Hardy and tender perennials – such as salvias, fuchsias, delphiniums, oriental poppies, osteospermum, petunias, verbena, and pelargoniums.
- Hedging plants such as boxwood, holly, lonicera nitida, and privet.
- Climbing plants – including honeysuckle, clematis, jasmine, and Virginia creeper.
- Fruits – including gooseberries, currants, figs, and mulberry.
- Trees – such as plane, poplar, magnolia, conifers, yew, maple, and willow.

- Herbs – including bay, lavender, rosemary, sage, and thyme.
(Image credit: Leigh Clapp)
Can you take cuttings from any plant?
While it is not possible to take cuttings from every type of plant, it is certainly a successful method for a large number of them.
Research the best method of propagation for your chosen plant, and if unsure, it’s worth having a go to see if the cuttings will take.
Though delicate, softwood cuttings offer the best chance of success for more difficult-to-propagate plants.
Can you put cuttings straight into soil?
You can put cuttings straight into soil as long as you have prepared them correctly. ‘Cut under a node at the bottom and above a node at the top,’ says Chick-Seward.
You must also remove the lower leaves, leaving only two or three at the top.
Bear in mind the soil needs to be well draining, so if your garden soil is heavy clay, for example, then you need to create a good potting mix. ‘Fill small pots with compost mixed with about one part grit to two parts compost,’ says Raven.
How to grow a plant from a cutting in water
It is possible to grow some plants from cuttings that are simply placed in water. This method works best for common herbs, as well as some vegetables such as pak choi and celery, which will regrow from scraps. However, it is also a suitable method for some house plants, such as pothos, English ivy, philodendron, and even begonias.
Simply place the base of the cutting, or root section if growing a vegetable, into a bowl of water. Within a few days, the cutting should have grown roots. Make sure you change the water regularly, so that it does not stagnate.
Once you can see signs of growth, plant the cutting into well-draining potting mix.
As editor of Period Living, Britain's best-selling period homes magazine, Melanie loves the charm of older properties. I live in a rural village just outside the Cotswolds in England, so am lucky to be surrounded by beautiful homes and countryside, where I enjoy exploring. Having worked in the industry for almost two decades, Melanie is interested in all aspects of homes and gardens. Her previous roles include working on Real Homes and Homebuilding & Renovating, and she has also contributed to Gardening Etc. She has an English degree and has also studied interior design. Melanie frequently writes for Homes & Gardens about property restoration and gardening.
how to breed more plants by cuttings
Why is this method so popular? And because the offspring during cuttings will be an exact copy of the parent, will quickly take root in a new place and will please with endurance in harsh conditions. And most importantly, you will receive a new planting material for free.
Types of cuttings
Cuttings are different. Which option to choose depends on the type of plant.
Green cuttings
In most cases, lignified cuttings are used for propagation, but some plants prefer to propagate by young green shoots. nine0003
Suitable for: barberry, weigela, hydrangea, deren, viburnum, vesicle, lilac, chaenomeles, mock orange.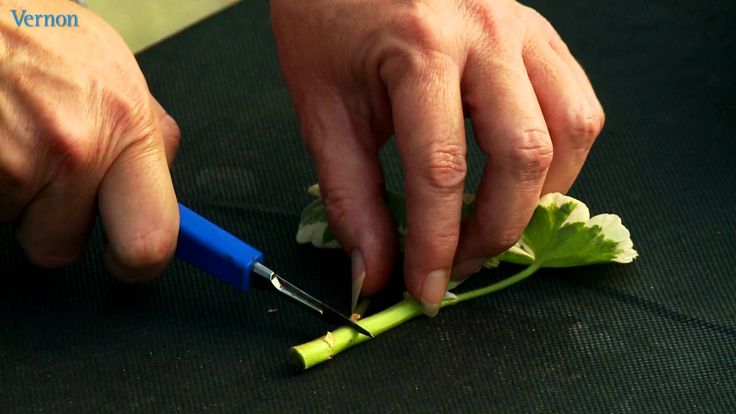
How to root. Actively growing young lateral shoots are cut with a sharp knife into segments with 2 to 3 internodes. The lower cut should be oblique at a distance of 0.5 - 1 cm from the kidney. The top cut is straight. It is even more reliable not to cut the cuttings, but to tear them off with the "heel" - the part of the stem from which they depart. Cut off the lower leaves.
Then the cuttings are treated with a root formation stimulator - Kornevin or Heterauxin (1): either the lower part of the shoot is powdered with powder, or the drug is diluted in water and the cuttings are placed there for 6 hours. Then they are planted in a garden or pot to a depth of 2 cm. 3–5 cm of coarse sand must be poured over the ground: it protects the cuttings from decay. nine0003
Stem cuttings
This variant is suitable for herbaceous perennials, which use cuttings for propagation. They are cut until mid-summer.
Suitable for: aquilegia, astilbe, cornflower, gelenium, delphinium, sedum, phlox paniculata.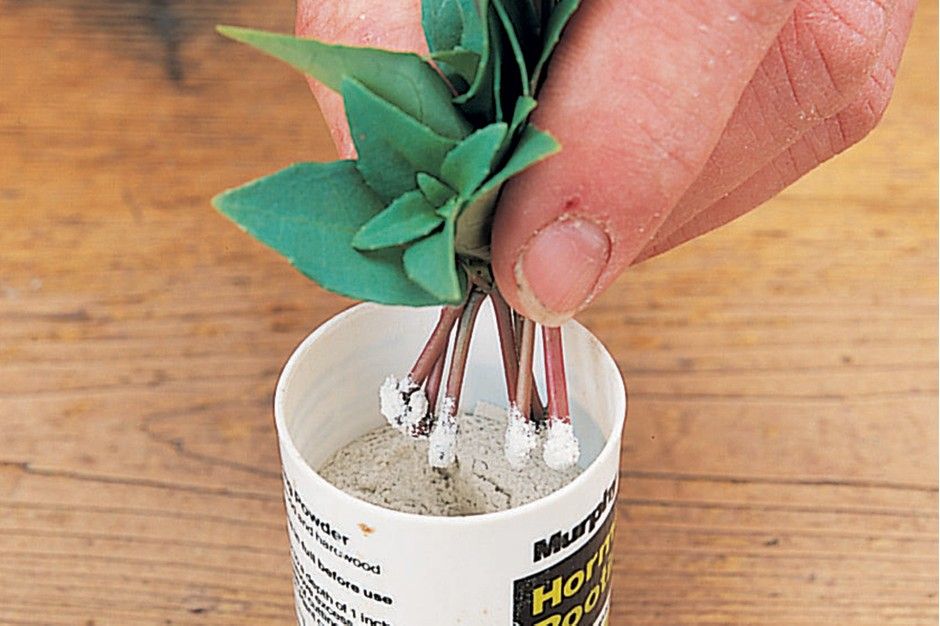
How to root. The stems are cut into pieces with two internodes. They are dusted with any root formation stimulant and planted in the ground - preferably in a greenhouse. Such cuttings will take root quickly - if, for example, at the end of June you plant cuttings of panicled phlox, then in August you will get young plants with roots - they can already be transplanted into a flower garden. nine0003
Semi-lignified cuttings
These are shoots that have begun to bark on the bottom, but the top is still green.
Suitable for: hydrangeas, rhododendrons.
How to root. At the end of June, the tops of semi-lignified shoots of the current year are cut off and cut into cuttings with two internodes. Cut off the lower leaves. Longitudinal incisions 1–2 cm long are made on the bark. The cuttings are powdered with a root formation stimulator and planted in pots in a mixture of peat and sand in equal amounts. After 2 - 3 months roots are formed, and young plants can be transplanted into open ground. nine0003
General rules for cuttings
Each type of cuttings has its own characteristics, but there are also general rules that must also be taken into account.
Cut in the morning or on cloudy days. At this time, there is more juice in the cuttings - such ones take root better.
Cover with bottle. No matter where the cuttings are planted - in pots or directly in the garden - they need to arrange a mini-greenhouse. The easiest way is to cover them with a plastic 5-liter bottle without a bottom, or put them in a large jar with a lid (2). Such a shelter will help maintain high humidity around the cutting. nine0003
In a few weeks young shoots will emerge from the buds. At the end of summer, they begin to gradually open the bottle so that the seedlings get used to the fresh air, and then the shelter is completely removed.
Spray. One shelter with a bottle is not enough, because it is very hot in summer. Cuttings should be regularly sprayed with warm water. Ideally, daily. It is possible once a week (many people come to the country house for the weekend), but in this case, the soil around the cuttings should be constantly moist. So water them properly. nine0003
Protect from the sun. During rooting cuttings should be in partial shade.
Insulate in winter. Rooted cuttings are left to winter where they were planted. And so that they do not freeze, in late October - early November, the soil around them is covered with a thick layer of fallen leaves or covered with several layers of non-woven fabric.
In the spring or autumn of the following year, young plants are transplanted to a permanent place.
Popular questions and answers
Typical questions of gardeners about plant cuttings we asked agronomist-breeder Svetlana Mikhailova.
Which fruit crops can be propagated by cuttings?
Many varieties of cherries, almost all varieties of cherry plums and some plums propagate well with green cuttings. But cherries and apricots do not give roots on cuttings.
Can apple trees be propagated by cuttings?
In the vast majority of apple varieties, cuttings do not take root. But there are pleasant exceptions. The roots on the cuttings form: Altai ruddy, Gornoaltayskoye, Zhebrovskoye, Zhigulevskoye, Kuznetsovskoye, Moscow red, Pepin saffron, Gift for gardeners, Ranetka purple, Ural bulk, Flashlight. nine0003
Is it possible to propagate pear cuttings?
Pears, like apple trees, in most cases cannot be propagated by cuttings. But this culture also has varieties that give roots: Lada, Moskvichka, Smart Efimova, Autumn Yakovleva, Memory Zhegalova.
Sources
- State catalog of pesticides and agrochemicals permitted for use on the territory of the Russian Federation as of July 6, 2021 // Ministry of Agriculture of the Russian Federation https://mcx.
 gov.ru/ministry/departments/ departament-rastenievodstva-mekhanizatsii-khimizatsii-i-zashchity-rasteniy/industry-information/info-gosudarstvennaya-usluga-po-gosudarstvennoy-registratsii-pestitsidov-i-agrokhimikatov/
 - Kudryavets D.B., Petrenko N.A. How to grow flowers // M .: Education, 1993 - 176 p.
Plant cuttings: several effective ways
Plant cuttings are also known as cloning. This propagation method assumes that some part is taken from the mother plant, for example, a leaf or a shoot. Further, this part is placed in a favorable environment, where it develops roots.
Cutting at home does not require large financial costs and has a number of advantages: nine0003
- Compared to seedlings, cuttings enter the vegetative phase faster.
- When grown under artificial light, clones can turn to color earlier, resulting in harvest time much earlier than when using seeds.
- Cloning makes it possible to obtain plants with predictable genetic characteristics that will be completely borrowed from the "donor", while with seeds, the size, appearance and yield of the plant will be much more unpredictable.
 nine0098
It seems to many inexperienced flower growers that it is enough to cut off the shoot, put it in water and wait for the roots to appear. But in such conditions, not every species can take root, often the cuttings simply rot.
To get strong and healthy plants through vegetative propagation, it is important to choose the right cutting, cut it correctly, and also avoid mistakes when planting it and in subsequent care.
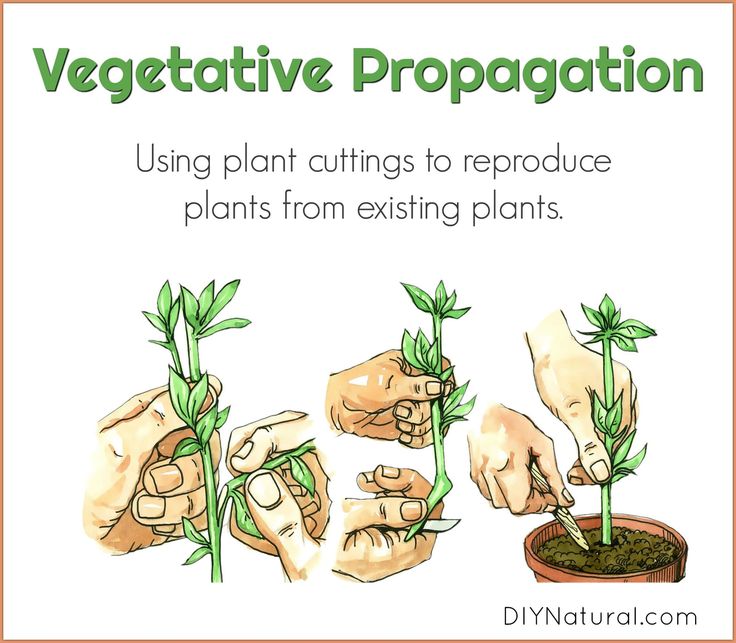
Plant cuttings: methods
Before harvesting clones, it is worthwhile to understand in more detail how this is done for a particular species. Cuttings of indoor plants are carried out in three ways: using stems, leaves or roots.
You need to choose which part to take, starting from the variety. Unfortunately, some plants cannot be propagated in this way at all. But almost all species reproduce perfectly by stem cloning. Such a cutting will consist of a stem, buds and foliage. The clone will take root at the cut site, and new shoots will sprout from the buds. nine0003
Before the procedure, prepare suitable dishes and soil for rooting, as well as check the serviceability of all devices that you plan to use. You can keep the cuttings under lamps such as ESL or LL with a cold color spectrum (6500 K). The recommended light regime is 18/6. In the early stages of development, clones should not receive too much light, as this will become stressful for them. Therefore, if development takes place under the sun, choose a place for cuttings in the shade. nine0003
You should not cut off thin stems with scissors, although this seems to many to be the most convenient option, but in this way the cut point will be compressed, which injures plant tissues. As a result, the stalk, most likely, will begin to rot. It is better to cut the stems with a sharp knife or scalpel, and a pruner is suitable for stiff shoots.
It is important to cut cuttings only from completely healthy plants, and they should not be in the flowering phase. It is advisable to treat the cut site with a root growth activator, which will significantly speed up the process.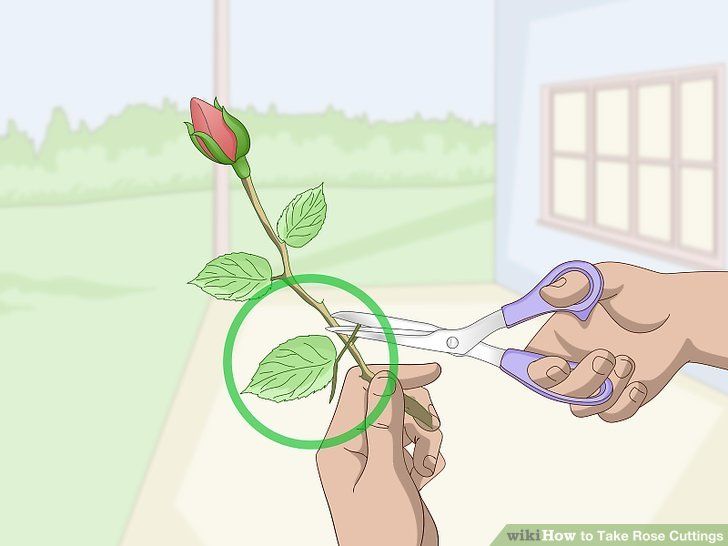 nine0003
Plant cuttings: sequence of steps
The process of cutting or cloning your green pets is done in this order:
- We sterilize a knife, scalpel or secateurs, that is, those tools that will be in direct contact with the cuttings.
- We prepare the growing medium: you can take mineral wool, moisten it with a buffer solution (this will help remove excess alkali from this material) and wring it out slightly to prevent excess nutrients. nine0098
- Select a donor. The mother plant should not be sick or blooming.
- Cut a side branch with at least three internodes.
- Use the scalpel to prepare the clones. So, you need to remove the bottom pair of leaves to avoid decay, and just below the last internode, a cut is made at an angle of 45.
- If the plant has large foliage, it is worth trimming the leaf blades by a third or half. This is done so that too much moisture does not evaporate through them. In addition, too large leaves may wither in the first days after planting.
 nine0098
 - Cut cuttings should not be immediately sent to water or soil, most plants need the clones to lie down for a couple of hours in the open air. Or you can put a fresh cut in a rooting powder or gel like Hesi Clonfix, Clonex or MaxiClon.
- Immerse the clone in the prepared medium, for this a hole is made, in which the cutting should be placed approximately one third. In addition to mineral wool, you can take the Root Riot cube. nine0097 A heated mat or a transparent cap that covers the cuttings helps to increase the success of the process. This is necessary to maintain the optimum temperature (21-25°C) and humidity level (80-90%).
- Spray the clones daily with water or foliar application, and use a nutrient solution at EC 0.3-0.8 (about a third of the standard dosage) to irrigate the media. It is important to avoid overflows and immediately remove rotten leaves.
Usually, the first roots hatch after a week and a half, which depends on the type and variety of the plant.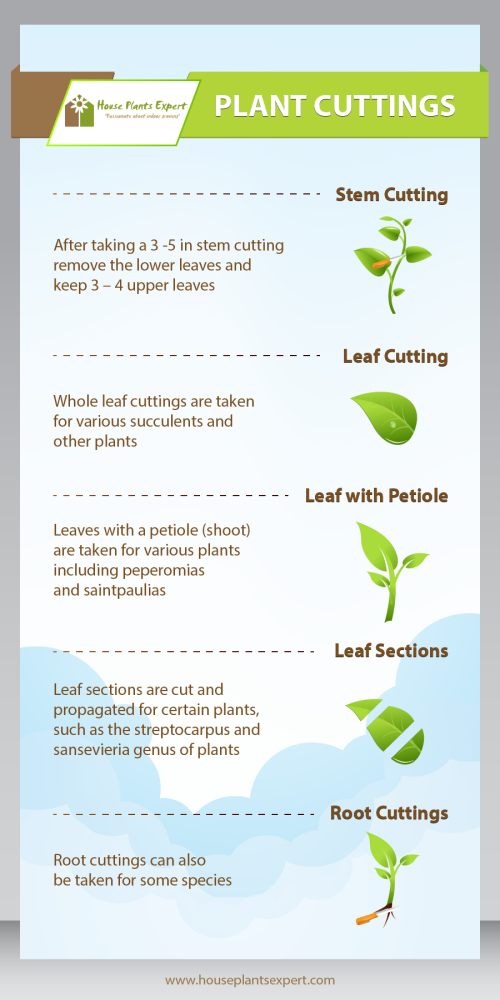 After their appearance, you need to gradually "accustom" clones to future conditions. However, sudden changes in temperature, humidity, amount of lighting and nutrients should not be allowed, otherwise the cuttings may die. nine0003
If we talk about the optimal moment for harvesting clones, then the lunar calendar for cutting plants will come to the rescue. The most favorable time for this procedure is at the junction between the first and second phases of the moon, that is, from 6 to 9 lunar days.
How to root cuttings?
In addition to all the tips above. It is worth remembering the following rules for cutting plants:
- Firstly, the less capricious culture the florist deals with, the more likely it is that the cutting will take root even in plain water, but the classic method of rooting is in the ground. nine0098
- Secondly, species whose natural environment is tropical forests or swamps perfectly form roots in the water, but it is better to immediately place the "inhabitant" of arid places in the soil.
Beginners often think that rooting in the substrate is more difficult than in water, but this is not the case. The cuttings are simply placed in recesses previously made with a small spatula or stick, cut down. It is important not to compact the soil or place the clones too close together. Next, a small watering is carried out and a cap is installed. nine0003
As for top dressing, its amount should be increased gradually until it reaches the dosage, as in the vegetative stage. It is also necessary to remove the cap for about half an hour 1-2 times a day. Later, the cuttings should be kept open longer and more frequently until they are ready to be transplanted.
Water rooting
First you need to take any plastic or glassware of small sizes. A glass of dark glass is best: in this case, the roots form faster. The stems are placed in such a way that the lower part does not sink too deep, because the roots appear precisely at the border of air and water.