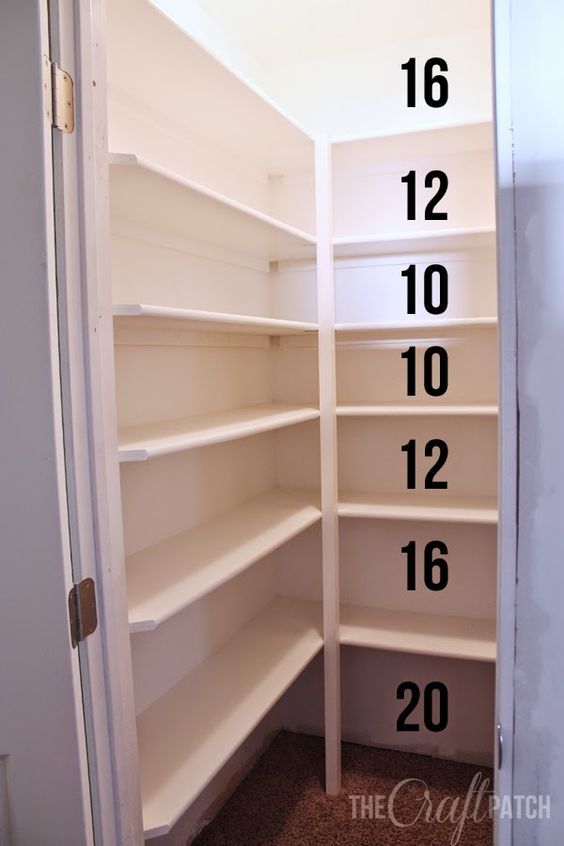
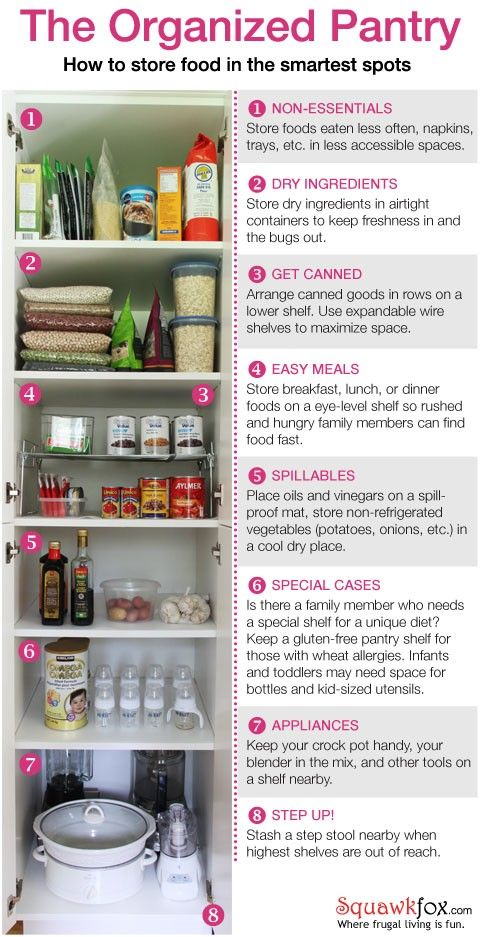
Standard pantry shelf spacing
Read This Before You Put in a Pantry
85 percent of home buyers considered a kitchen pantry “essential” or “desirable,” the National Association of Home Builders reports. In existing homes, there’s a clear drive to add and improve pantries, ranging from walk-in pantries to improvised solutions like open pantry shelving along basement stairs.
Pantries typically hold groceries, but no one says you can’t squeeze in a few platters, small appliances, and baskets to hold linens, paper goods, and cleaning supplies. Go ahead: Add the dog bowl too.
Organize Your Space with Kitchen Pantry Shelving
Shown: This compact, well-lighted place has many of the features found in larger pantries, including sturdy shelves, the bottom ones topped by a useful work surface and finished with a face frame and baseboard-style trim. Paneled, windowed doors and stone-like flooring offer function while also giving the pantry an inviting look and integrating it with the surrounding space.What’s key is a pleasing sense of order—another way of saying that even the tallest pantries need a place for everything and everything in its place. Read on for the details, whether you are building from scratch or reworking what you have.
Take Stock of What You Store in Your Pantry
Groceries
To start, figure out what you want to stash—or plug in—right there, whether it’s a lifetime supply of vanilla, a blender, cookbooks, your grandmother’s soup tureen, a folding ladder, or fondue forks you unearth once a year. Don’t wait until the shelves and niches are in—plan for your inventory and any outlets first.
Extra Cookware
Turn the top shelf into a colorful display of occasional-use pots and pans.
Countertop Appliances
Pull forward the ones you forgot you had. (Like you, Mr. Pasta Machine.)
Big Items
Got a step stool, an ice-cream maker, enough kibble to feed a kennel?
Select the Ideal Placement for Your Pantry Shelving
Michelle DrewesThe ideal spot is cool, dry, and convenient.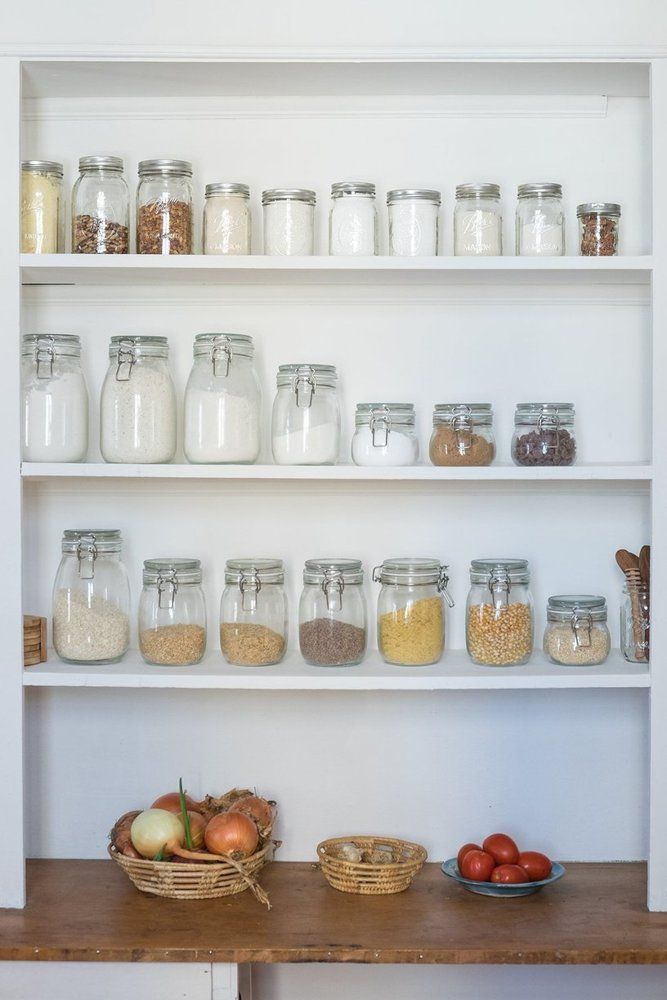 A gut reno offers the most options, but it’s not the only way to go.
Annex Space
Instead of taking down an interior wall to, say, open up the kitchen to the dining room, consider moving that wall to create space for a pantry on the kitchen side.
Tap a Recess
Pantry shelves can be added to a wall near prep space or can even fit between studs.
RepurposeIf you aren’t getting a lot of use out of a coat or broom closet, picture it as a pantry. There’s no law against setting aside a spot in it for the dustpan, too.
Bump OutColonial pantries were often unheated, shed-like lean-tos. Today’s equivalent is a one-story rear addition that could include a half bath or mudroom.
Look Down
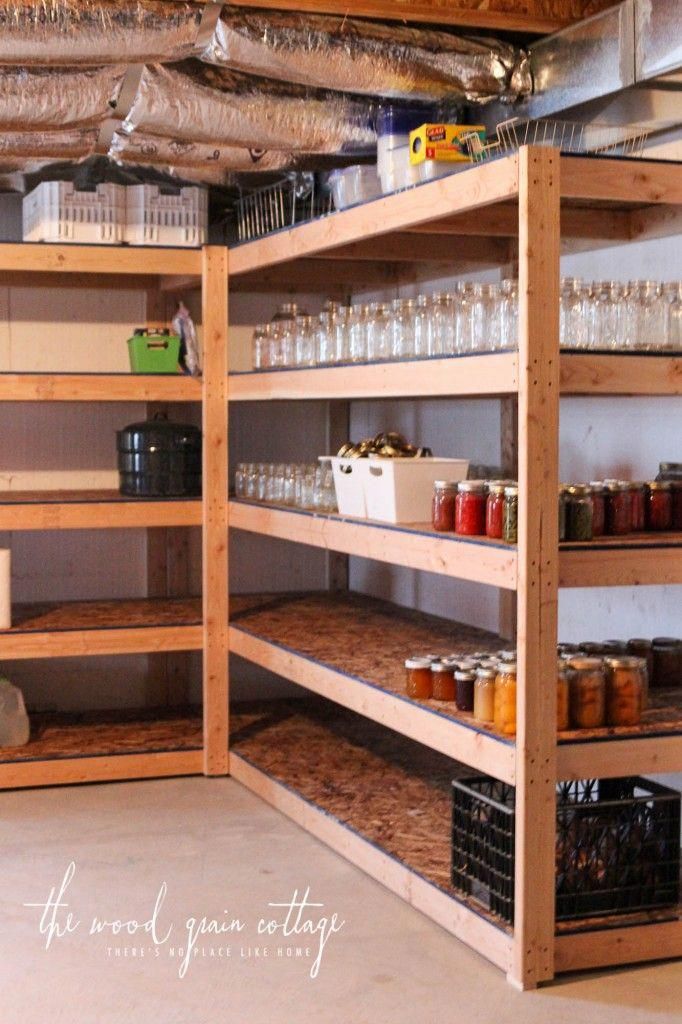
If you have a cool, dry basement, pop in a freestanding unit; sturdy, open wire shelves hold everything and are easy to access. Or hang boxed open shelves along the stairs—the steps will be a built-in ladder.
Consider Your Shelving Options
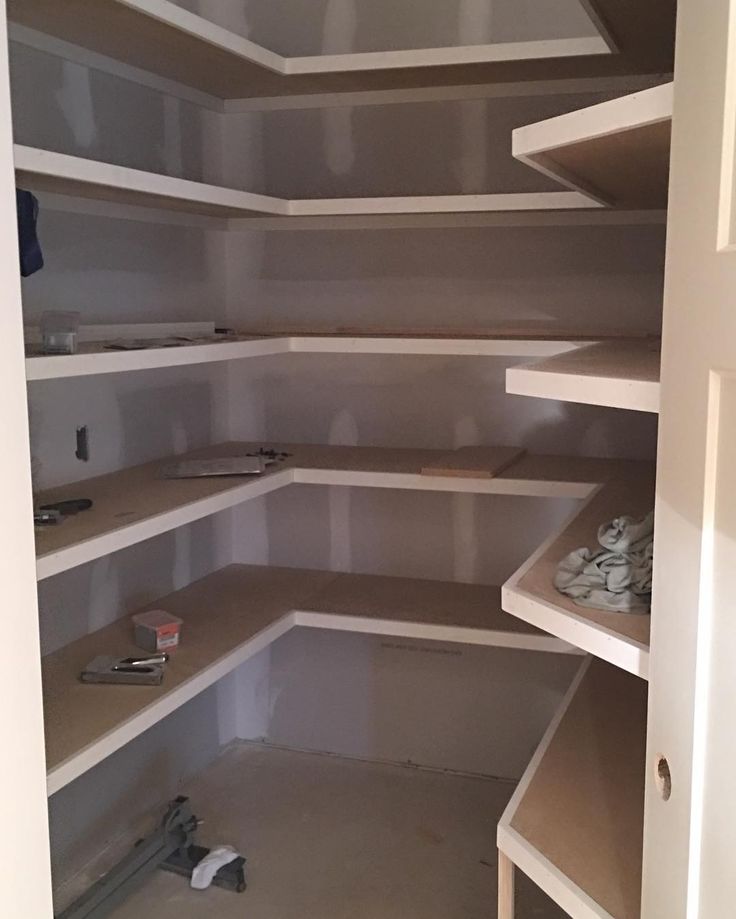
Laura MossSize and Depth for a Walk-In Pantry and Adjustable Pantry Shelves
Typically about 5 by 5 feet, walk-ins can be lined with U-shaped open shelves or cabinets and finished with or without a countertop.
Adjustable shelves offer flexibility. Start with bottom shelves 16 to 18 inches deep and spaced about 18 to 24 inches apart, for bulky items; make shelves at eye level 12 to 14 inches deep and spaced 14 to 16 inches apart to fit cereal boxes and canisters. Shelves for spices and cans may need no more than 6 inches front to back. When planning for any item, add 2 inches of vertical space so you can tip or slide it in and out easily.
Tips for Selection or Building Your Pantry Shelves- Plywood is the go-to material for shelves—edges can be finished with iron-on veneer banding or wood trim—but other materials can work, too (if you’re careful; see below).
- If you hate looking at stuff, install cabinets. If dust is the issue, not clutter, opt for uppers with traditional glass fronts.
- Avoid door jams by paying careful attention to where doors swing, whether it’s on a cupboard inside the pantry or leading to the pantry itself. Some pantries omit doors altogether.
- Light it up with a ceiling fixture—a pendant can be pretty—or rechargeable puck lights with motion sensors.
- Avoid hide-and-seek by storing smaller items on organizers like lazy Susans and tiered shelf inserts.
- Keep it cool and dry, ideally below 70°F and 45 percent humidity. No AC? Plug in a small dehumidifier. No outlet? Try a moisture-absorber like those made by Arm & Hammer.
TIP: Think about adding outlets behind shelved small appliances, including a microwave.
Make Sure There is Enough Space Between Shelves
Before choosing a material for the shelves (3⁄4-inch plywood, half-inch MDF…), search “Sagulator” online to figure out how far the shelf can span before bowing under the weight of books and canned goods.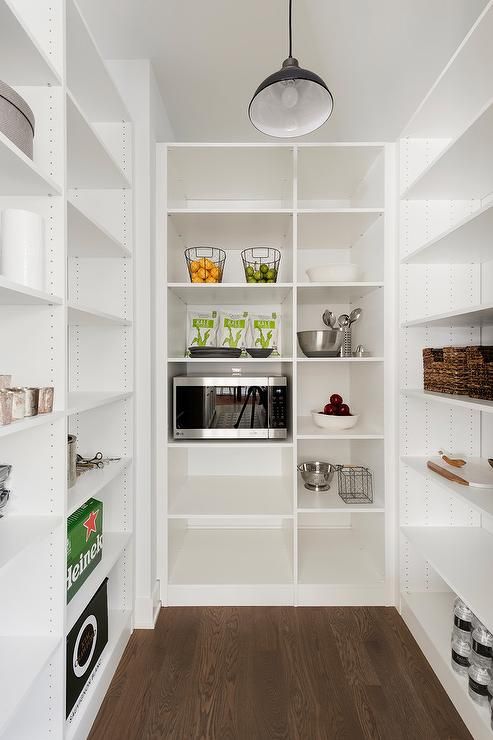
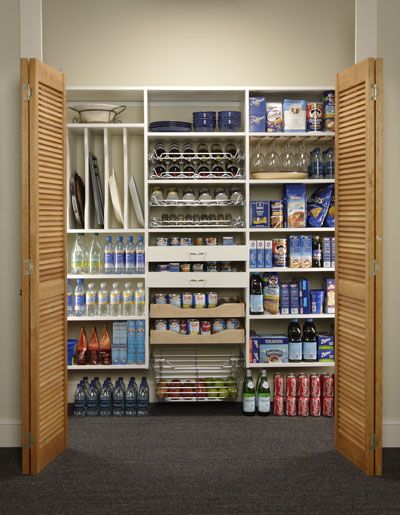
Reach-In
Courtesy Starmark CabinetryTypically about 5 feet wide and 2 feet deep, reach-ins can also be as shallow as 16 inches, making them a natural fit along a wall with a recess or soffit. The reach-in at left was customized with paneled sliding doors and enough vertical space to stash a trash can during parties.
Decide How Big Your Pantry Should Be- Maximize floor space by opting for pocket or sliding doors. Keep in mind that they can be heavy and require maneuvering to get full access. Doors that swing out ease access; just make sure they don’t block traffic if left open. Doors can be omitted, of course, but they do hide things.
- Accommodate oversize items by letting them sit on the floor, no bottom shelf needed.
- Measure and allocate space to meet your needs—extra head space for tall canisters, for example. Create cubbies, maybe one for trays and platters, another for a baking or coffee station.
 (You remembered the outlets, right?)
 - Unify the pantry and adjacent space with coordinated finishes, especially when omitting doors.
TIP: Doors that slide or fold are prone to wobbling and sticking, so don’t skimp on the track hardware.
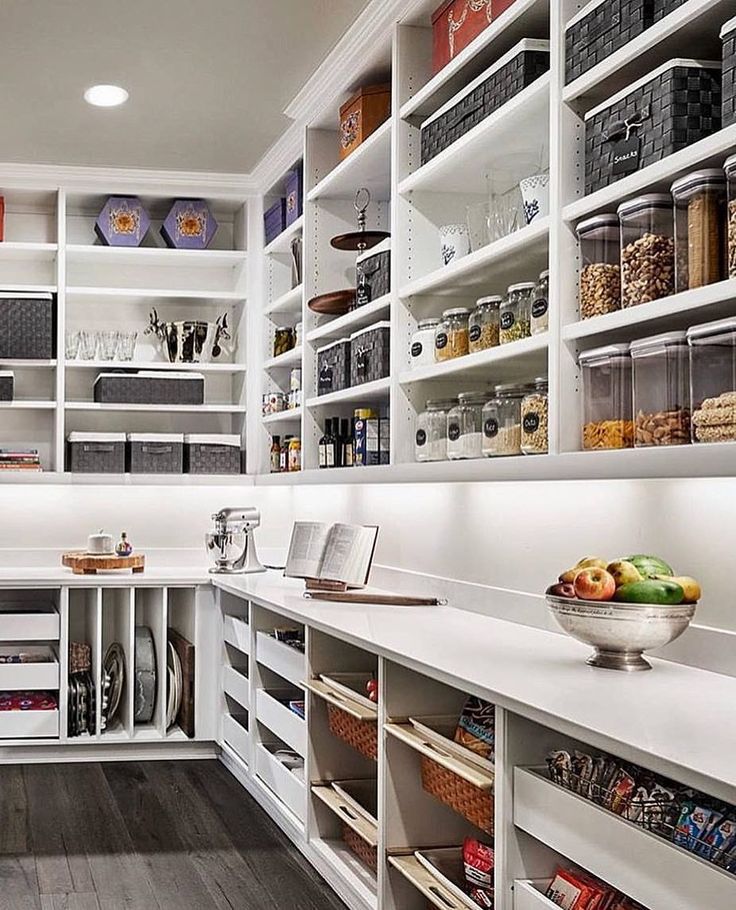
Wall-To-Wall Pantry with Sliding Barn Doors
Sliding barn doors with exposed hardware, as shown, double as a focal point.Brian Vanden BrinkIf you have a windowless wall in the kitchen or a nearby hall or mudroom, consider building in shelves with or without doors. Open shelves offer the convenience of being able to quickly grab what you need, but they can also be a magnet for clutter and dust.
Wall-To-Wall Pantry with Open Shelves
Brianne WilliamsOpen shelves are typically a uniform depth. Pro organizers favor shelves no deeper than 14 inches to keep everything front and center.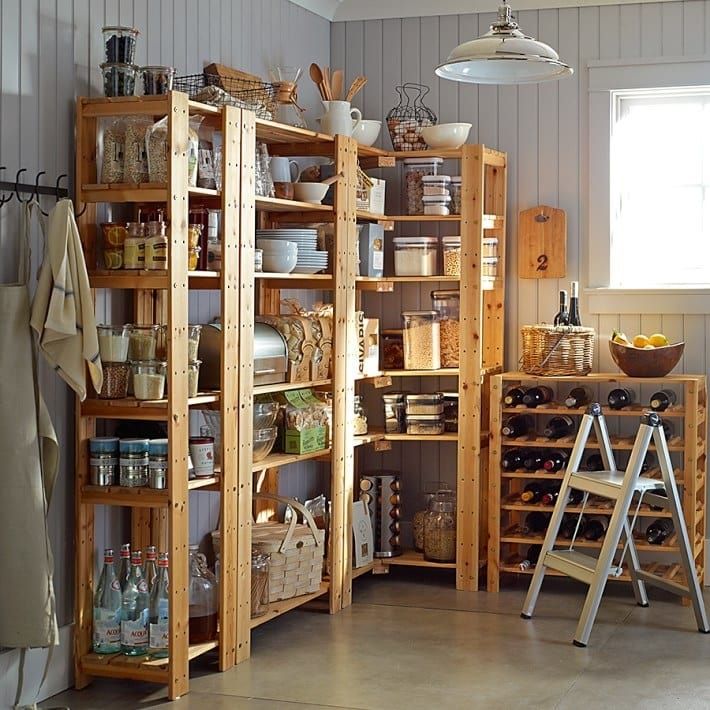
Group like items so you don’t have to scan the entire wall or move doors looking for the pretzels.
Use baskets and ceramics (shown) to create a nice shelfscape.
Pantry Cabinet Options: “Batwing”
Courtesy Lewis Alderson & Co.To answer the call for pantry-style storage, cabinetmakers now offer options that blend in with the rest of the kitchen storage, from simple upgrades like a tall pullout to full-blown built-ins with hutch-like appeal.
TIP: Before lining cabinet doors with extra shelves, make sure there’s room inside for the doors to close.
“Batwing” pantry cabinets mirror French-door refrigerators, with restricted door swings and bottom-mount drawers. Custom models, like the one shown above, allow quick access to essentials, while drawers hide other stuff.
Pantry Cabinet Options: Narrow Slide-Outs
Andrea RuggNarrow slide-outs, (pictured), are open on both sides and make use of awkward space; Rev-A-Shelf makes a retrofit just 3 inches wide. Try before buying: Heavy-duty hardware is a must.
Cabinet upgrades include wooden rollout trays that come in different widths and depths and can be installed at varying heights, depending on what you want to store. Again,it’s worth paying extra for heavy-duty glides. They should operate smoothly under a weighty load.
Found Spaces: Tucked Under Stairs
Gina BiancanielloOlder houses aren’t famous for their surplus closets and rooms, but they do have nooks and crannies that can be converted into pantries or colonized by freestanding furniture.
Tucked under the stairs, this hideaway makes creative use of former dead space, complete with push-latch doors that blend with the paneled wall, shallow built-in shelves, lighting, and a baking cart that rolls right into the kitchen.
Found Spaces: Freestanding Kitchen Pantry Cabinet
Gridley + GravesFreestanding storage like this unpainted vintage hutch can add warmth as well as function.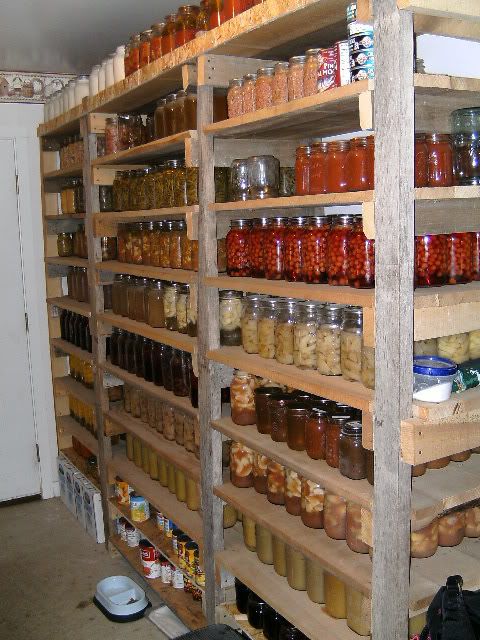 Look for strong shelves that keep everyday items easy to see and reach.
Safe Pantry Storage
Store your goods in containers suited to their contents. From left: Woven baskets with handles, like these Sedona totes, are ideal for linens and come lidded or not; from $25, Crate & Barrel.
BPA-free, dishwasher-safe Brilliance containers make rapid-turnover items like cereal and pasta easy to see; from $4.99, Rubbermaid.
Stoneware canisters with tight-fitting, gasket-equipped lids protect whole spices like cinnamon sticks and bay leaves from light and premature aging; from $25, Le Creuset.
Erasable food labels (not shown) can post purchase dates; $6.50, Jokari.
It’s Not a Morgue
Always a good idea to check an item’s shelf life, available online, or you may risk SES (sudden expiration syndrome).
- Olive oil is vulnerable to heat, light, oxygen—and time.
 Open it within six months, then store it in the fridge.
 - Whole grains-—brown rice, popcorn-, oatmeal—and flours can get stale in months. Think about refrigerating or vacuum-packing them (Foodsaver) once open.
- Nuts can also turn rancid—pine nuts after only a month, pecans after four. Hoarders should stash them in the freezer.
- Ground spices fade fast. Freezing can cause condensation; keep them in the pantry, but replace them once or twice a year.
Make It Special: Throw a Curve
Ellen McDermottYes, it’s a hardworking space where function trumps frills. But that doesn’t mean your pantry shouldn’t strut some style. Here, three colorful upgrades to consider.
THROW A CURVE. Rounded shelves eliminate sharp corners; shallow ones for spices and condiments can be made with perforated aluminum (McNichols).
Make It Special: Hang a Decorative Door
Tria GiovanHelp define the space while offering glimpses inside with a salvaged screen door or a reproduction like this (Vintage Doors).
Make It Special: Trim It Out
Corey GafferEvoke period lace shelf edging with easy-to-paint MDF Victorian Running Trim (Victorian Woodshop) and add wood brackets (Vintage Woodworks).
Design: Martha O’Hara Interiors
Thanks to: The Kennebec Company, Bath, ME; Catherine Seiberling Pond; Kathy Marshall; Scott Davis, Closet Maid; Tori Cohen.
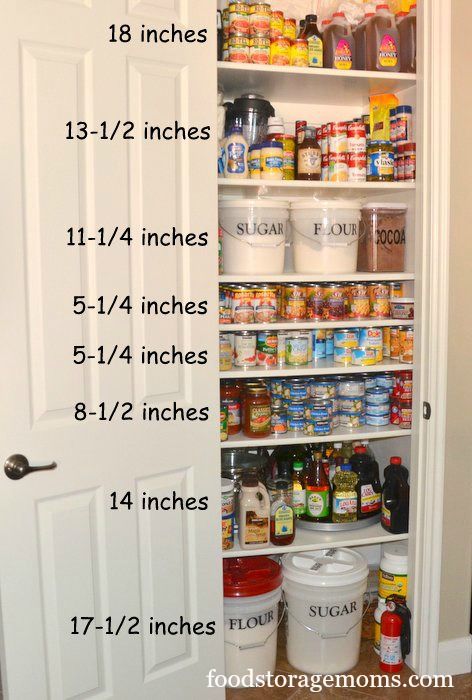
The Ideal Measurements for Your Pantry Shelves
Kitchen
Expert Interview
pantry
Tips & Techniques
Ayn-Monique Klahre
updated Aug 21, 2022
We independently select these products—if you buy from one of our links, we may earn a commission. All prices were accurate at the time of publishing.
Even if you’re lucky enough to have a pantry, you still might not feel like all of your food-storage prayers have been answered. Sure, it’s nice to have some extra shelves beyond your cabinets, but why can’t you ever find what you’re looking for?
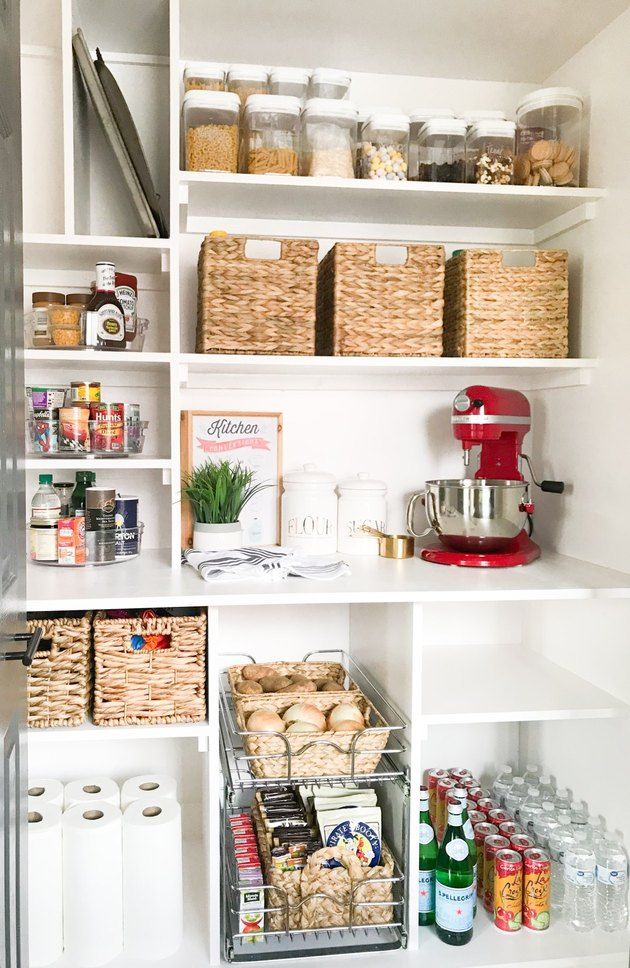
We talk a lot about using bins, organizers, and plenty of labels to keep order in a pantry.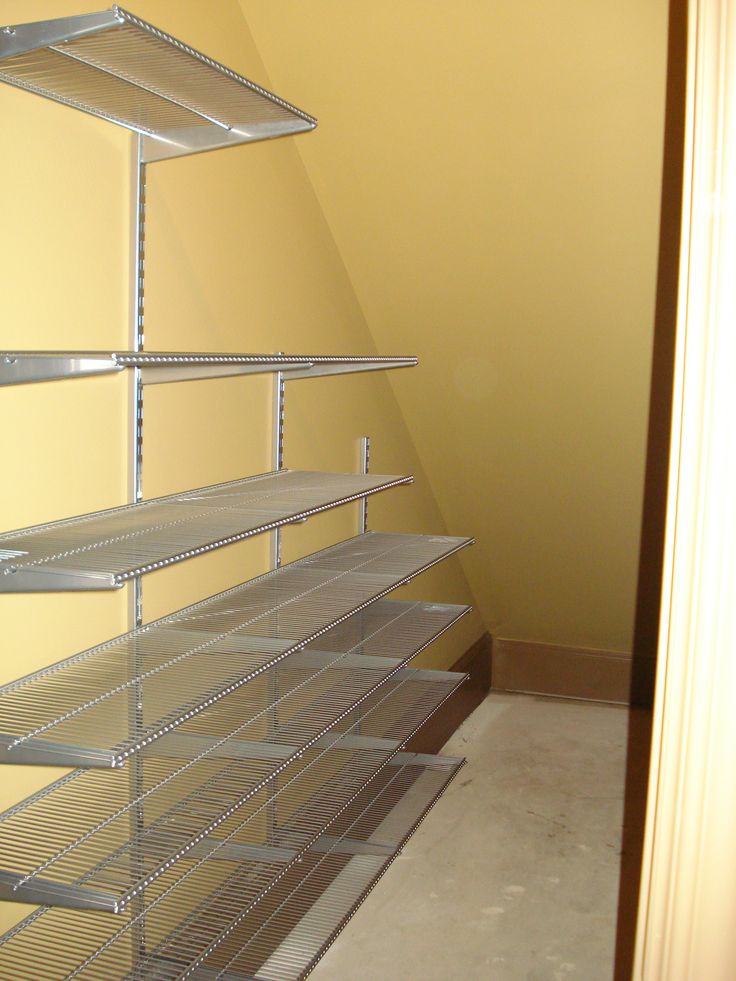 And while those are great helpers, you also might need to take a look at the shelves themselves — specifically the depth, placement, and measurement of each pantry shelf. So says Scott Davis, vice president of product development and marketing at Closetmaid, a storage system manufacturer.
Because Closetmaid designs pantries both for consumers and for builders, we thought Davis would be the perfect person to share the ideal measurements for pantry shelves. Here’s what he says you need to know.
1. The shelves shouldn’t be too deep.
The standard depth of most shelves is 16 to 20 inches deep. The highest shelf should be shallower, like 12 inches deep, to make those items easier to access. If you find that stuff seems to get pushed to the back and forgotten about, you should consider even shallower shelves.
2. You need floor space.
The bottom-most shelf is typically 20 to 24 inches from the floor. If you need to raise it even higher, do it.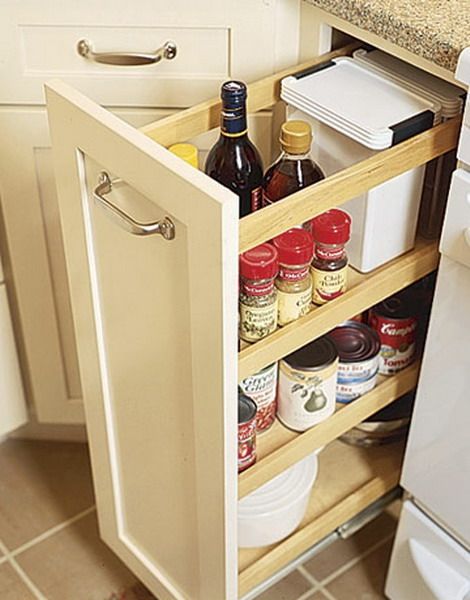 This will give you room to store bulk items like pet food, paper towels, or even crates on wheels (which essentially become rolling drawers).
3. There are magic numbers to figuring out shelf heights.
Depending on what you store on each one, raise or lower the shelves accordingly. Plan at least two inches of clearance above the tallest item on the shelf. This will make each item easy to access and help cut back on wasted space. Here are some general rules.
- Allow 6.5 to 7 inches for a shelf of canned goods.
- Allow 14 to 16 inches for cereal boxes.
- Allow 18 to 20 inches for large items, like bins of potatoes.
4. Pay extra attention to a few key shelves.
The shelves between waist and eye level are easiest to access, so put your most frequently used items there. If you’re only going to use a few bins or organizers, these are the shelves to use them on. This way, people will put things back in the same place they found them — versus just placing them toward the front of the shelf.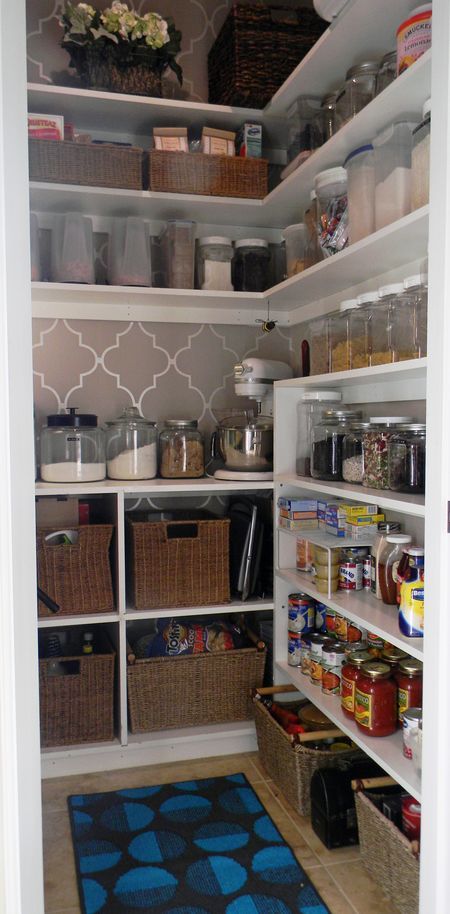
5. Don’t be afraid to rearrange.
Once you get your system in place, you’ll want to revisit it periodically. “My wife and I are amazed at how much our pantry has evolved over the years,” Davis says. If you have kids, for example, you may (or may not!) want to place snacks someplace they can reach. And if the snack shelf now has eight inches of clearance space, you’re wasting valuable real estate. Once in a while, it’s worth taking a step back to reevaluate.
How to make shelves in the pantry with your own hands? 40+ photos and videos
Features of planning storage systems
The most important thing when arranging a pantry in an apartment or private house is to decide what things it will be intended for and correlate the load with the dimensions of the room.
- For a small closet, several rows of shelves placed one above the other are suitable. At the bottom it is better to leave room for boxes and boxes: this way the area will be used optimally.
 nine0008
 - The dimensions of the compartments must be done in accordance with the dimensions of the items that will be removed in the pantry.
- If the room has a high ceiling, it is worth providing a place for a stool or stepladder: it will be more convenient to get things from the upper shelves.
- Some pantries have enough free space to make deep shelves. This is not always convenient, and besides, you should leave a distance for the passage and bringing in objects.
Preparation
Before installing storage systems, the pantry needs to be repaired: clean the space, carry out dry and wet cleaning, remove old wallpaper and flooring. If necessary, the walls of the pantry or attic are leveled and also put in order: painted or pasted over.
It is recommended to use a primer containing antifungal impregnations.
Laminate, parquet or linoleum is laid on the floor. It is also worth equipping the pantry with ventilation and lighting, which will greatly facilitate the use of the room.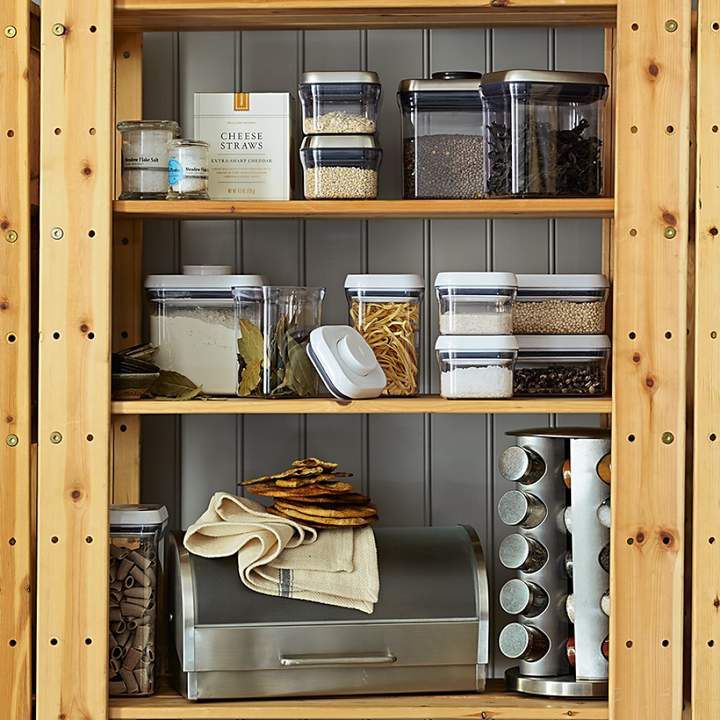 nine0005
Which material can be used?
One of the most affordable and durable materials for creating shelves in the pantry is wood. Boards made of natural wood (pine, larch), as well as chipboard, are fixed to metal fasteners. The heavier the items that will be stored in the pantry, the thicker the boards should be. For conservation, large equipment, construction tools and other heavy things, it is worth providing an additional stiffener.
If you make shelves in the pantry with your own hands, you can use what is at hand - wooden pallets, old unnecessary furniture, plastic fruit boxes. Plywood is considered a budget option, but thin sheets are not suitable for heavy items. Lightweight but durable plastic is suitable for storing books, clothes and bulk products. It is easy to care for it, besides, the material is not afraid of moisture. nine0005
Metal racks are considered the most durable and do not require additional reinforcement. Modern products have a collapsible design, they are easy to rearrange and transport, in addition, the material easily withstands temperature changes.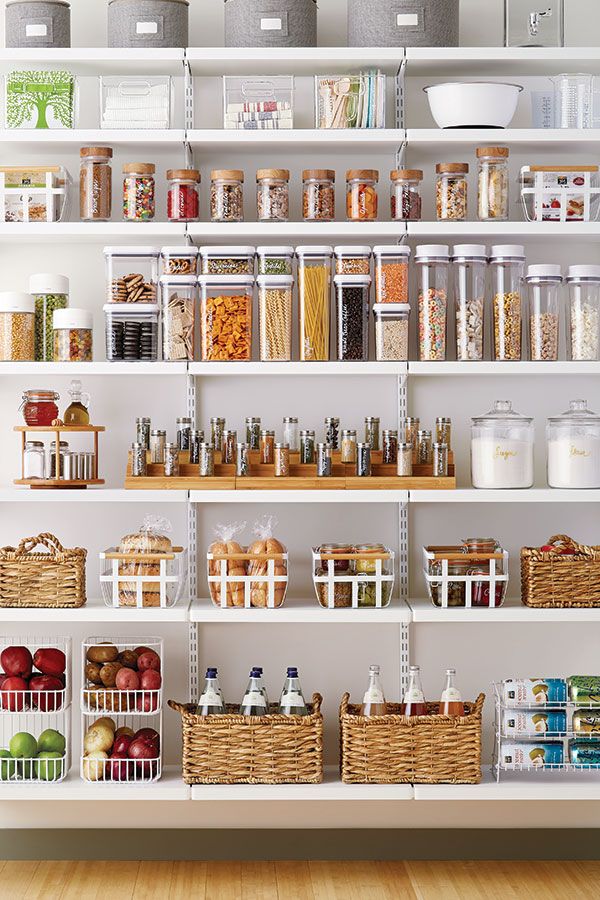 When buying, you should pay attention to the coating - it must be protected from corrosion with a special composition.
Pictured are shelving, drawers and wall shelves for a spacious pantry.
How best to arrange the shelves in the closet?
The size of the utility room primarily affects the placement of shelves.
- A small closet (about 2 meters) allows you to install shelves in only one row - linearly, along one wall. Sometimes designs are made rounded - this shape allows you to win a few centimeters and use three walls.
- The corner arrangement in the form of the letter "L" is considered much more practical, but the storage area must exceed 2 meters. For maneuvers, you need to leave a small passage, especially if the room is elongated and narrow. nine0008
- In a large utility room, it is best to place shelves in the shape of the letter "P". In this case, it is necessary to calculate the depth of the structures so that there is room for movement in the middle.
The photo shows a pantry in which the racks are functionally arranged in the shape of the letter "P".
Deciding on the dimensions
The most popular and practical form of shelves is straight. The length of the shelf is usually equal to the length of the wall. If the distance between opposite walls is 2 meters or less, then the shelf does not need additional support. Otherwise, the structure should be strengthened, especially if it is planned to store rolls and tools. nine0005
The thicker the wooden shelf, the more fasteners it requires. Also, its strength is determined by the distance between the support posts: the more massive the structure, the smaller the gaps.
In order to use the shelves comfortably and safely, the heaviest items must be stowed down. The width of the protrusions should decrease from bottom to top. The standard shelf width for cans with preservation is 30 cm. The height depends on the dimensions of things.
Pictured is a pantry with a wide aisle between wooden shelving.
DIY Shelf Options: Step-by-Step Instructions
You can save your family budget with homemade pantry shelves and detailed tutorials below.
How to make a wooden shelving unit for a pantry?
Before starting work, it is necessary to measure the walls of the pantry and create a drawing of the desired structure. Next, prepare in advance the consumables necessary for the manufacture of functional shelves. nine0005
The photo shows a linear self-made shelving made of wood, occupying the entire wall of the closet.
Tools and materials
For work you will need:
- Planed block for a vertical post (8 pcs, about 2 m).
- Beam for horizontal supports (12 pieces, approx. 50 cm, depending on the depth of the rack).
- Boards or lining for shelves (the number depends on the depth of the shelves, the length - on the length of the wall).
- 16 metal corner fasteners (corners). nine0008
- 45 screws (3.5x25).
- About 70 thin studs.
- Wood impregnation and brush.
- Building level.
- Roulette.
- Hammer.
- Electric jigsaw.
- Screwdriver.
Step-by-step instructions
- First you need to prepare the material. Using a hacksaw or electric jigsaw, we cut the bars and lining in accordance with the dimensions of the future pantry rack. nine0004
- We apply impregnation, carefully processing every detail. You need to dry for as long as indicated in the instructions on the bank.
- We fix the corners with screws at the level where the shelves will be located:
- We fix horizontal bars as follows (4 such structures should be obtained):
- We install the lining horizontally, nail it with thin nails:
nine0004 - We make the second shelf in the same way: we fasten the corners, fix the horizontal bars, attach the lining.

- We lay the upper horizontal bars, fasten them.
-
The shelves in the pantry are ready. In this way, you can make a rack of any height, depth and shape.
You can learn more about how to make shelves in the pantry from this video:
DIY wall shelves
This is the easiest and most economical way to make hanging shelves for a small closet. The amount of material for the shelves depends on the size of the room and the number of floors.
In the photo there are pantries in small apartments such as Khrushchev or Leningradka, equipped with simple shelves.
Tools and materials
To make shelves in the pantry with your own hands, you will need:
- Planed bars.
- Plywood, chipboard, boards or remnants of old furniture. nine0008
- Self-tapping screws for fastening.
- Screwdriver.
- Thin nails.
- Hammer.
- Level.
- Jigsaw or hacksaw.
Step-by-step instructions
- Sawing timber and plywood according to the size of the pantry. If desired, they can be painted or varnished. For the frame of one shelf, you will need 1 long and 2 short bars, for the base - a plywood sheet or boards of the required size and thickness. We make markings on the walls and securely fasten the bars. nine0004
- Making markings for the next shelf.
- We mount the shelf in the pantry.
- We fix it with nails.
And this video shows how to install a wall shelf in the pantry in two ways: on the brackets for chipboard and on the standard brackets.
Shelves in the pantry from the profile
Solid U-shaped shelving for a spacious pantry is obtained from metal profiles.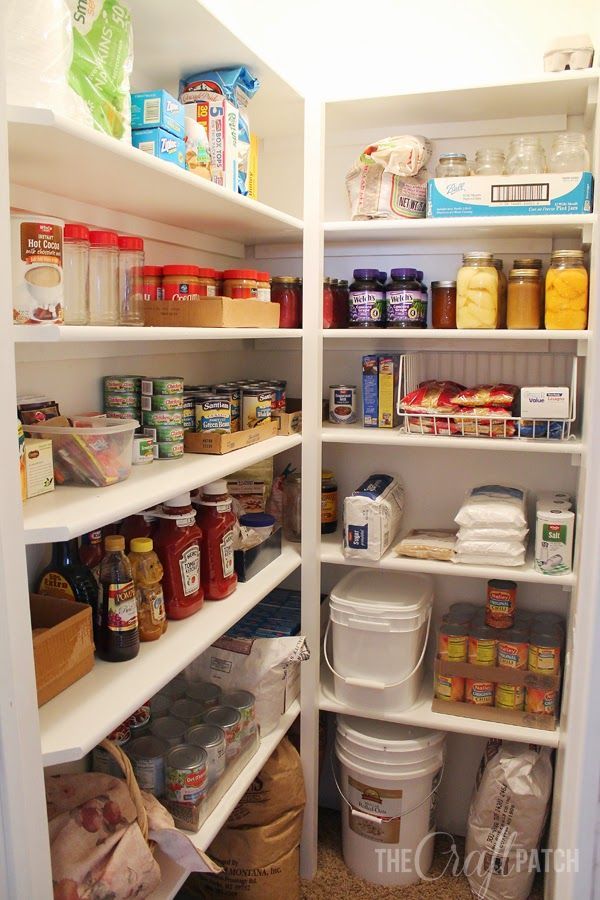 Having understood the principle of operation, you can make shelves of any configuration, replace plywood with wood, cover the metal profile with paint and create a loft-style rack. nine0005
The photo shows two types of shelves for the pantry, made by hand from metal profiles and wood.
Tools and materials
- Guide profiles 50x40.
- Guide profiles 50x50.
- Plywood or wooden boards.
- Roulette.
- Building level.
- Metal shears.
- Electric jigsaw.
- Screwdriver.
- Dowel-nails.
- Self-tapping screws.
- Ladder. nine0008
Step-by-step instructions
- We make a drawing and calculate the amount of materials. We cut the profile into components in accordance with the dimensions.
- Marking out horizontal lines. We fasten guide profiles 50x40 to the walls using dowel-nails.
- We make the frame of the first shelf, put it on temporary supports from the profile.
- We cut a sheet of plywood with an electric jigsaw:
nine0008 - We fix the finished parts with self-tapping screws.
- We replace temporary racks with rails. Shelves on the walls in the pantry are ready.
This video clearly shows how to make shelves in the pantry from the profile:
Photo gallery
You can see other options for shelves in the pantry in the photo selection below.
Shelves in the pantry: how to make shelving with your own hands
Top
01/23/2019
1 star2 stars3 stars4 stars5 stars
Shelves and racks - that's what will help organize the storage of food stocks and things. We suggest what and how to make them in order to organize a comfortable space in the pantry. nine0005
Photo: Instagram @Pixabay
Making shelving in a closet is easy, and in some cases even faster than finding a store-bought one. Indeed, each house or apartment has its own layout, and some of them do not imply a place for storage in principle. Then the owners try to optimize for organizing things a small area on the balcony, under the stairs, in the hallway, in the built-in drywall niche. nine0005
It is clear that shop furniture may not be suitable in such conditions and an individual sketch will be required. We will tell you in more detail how you can equip a utility room and what to prepare for work.
Preparatory stage: choosing the location of the shelves and materials
Usually the shelves are attached to the wall separately or made of them stationary and mobile shelving for the pantry. This is equipment with side racks or walls. By location in space, they can be:
- Linear. Elements are located on one or two opposite walls. Suitable for small areas up to 2 m.
- Corner. More capacious designs in the form of the letter G, but in a small space may not fit.
- U-shaped. Ideal if you have a large or elongated and narrow closet at your disposal. But you need to consider whether there is free space in the middle so that you can easily enter and take something. nine0007 With rounded edges. It is convenient to make such surfaces in cramped pantries. They save a little space and are less traumatic.
Less common storage systems with drawers and in the form of a constructor - when the compartments have different lengths, widths and are located not only horizontally. This is understandable: to make such furniture, you need more time and knowledge than for a simple design. There are also prefabricated or modular open cabinets.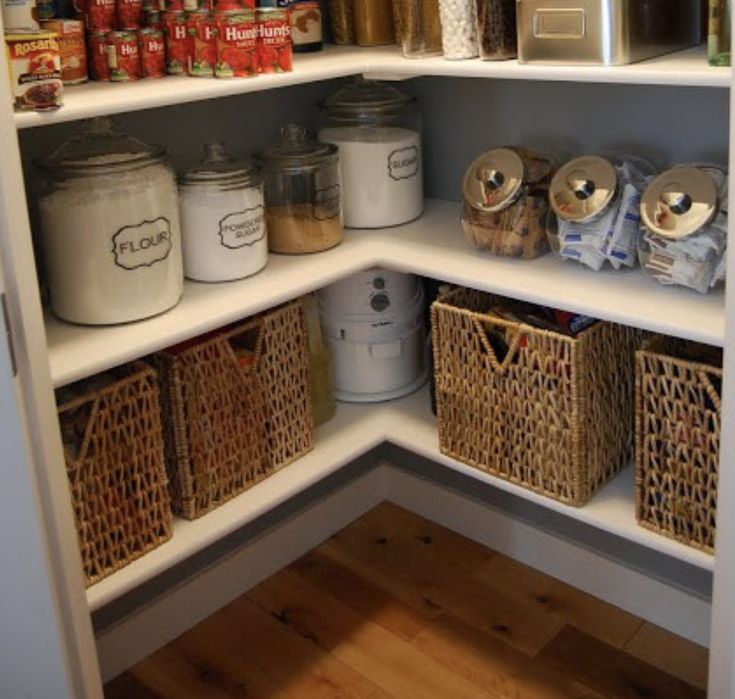 They include different elements: shelves and containers that can be easily swapped, assembled and disassembled.
Which material is suitable for the manufacture of shelves: photo of racks
If you plan to put the preservation in three-liter jars, large appliances or other heavy things into the closet , choose wooden or metal parts . They are stable, they can even be loaded with building materials. True, in this case it is recommended to install a stiffener. The alternative is plastic: it is lightweight, also withstands a serious load, does not require additional processing and does not mold, it is easy to wash. nine0005
Wooden shelves can withstand a lot of weight. It is only necessary to choose the right thickness of the product and the number of fasteners.
Reinforced glass, MDF, plywood can be used to store bulk products in containers, vegetables, small items or collectibles, light dishes, clothes, books.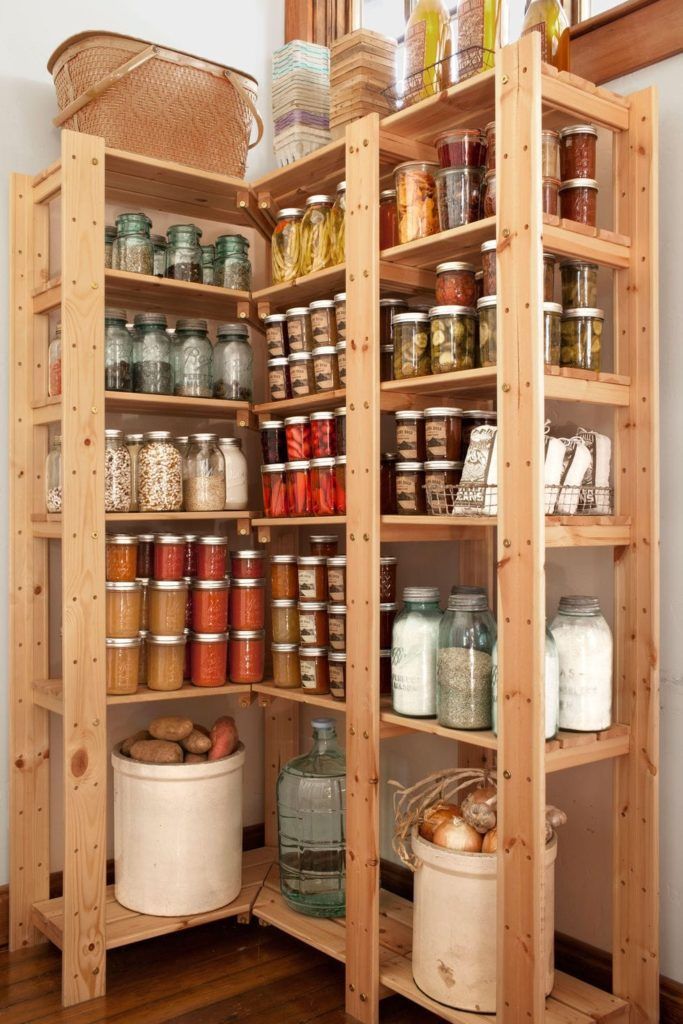 If you will keep fragile items in the back room, attach bumpers to the compartments so as not to lose property due to awkward movement.
Wood (preferably pine or larch) is considered the best option for arranging a home closet. It looks aesthetically pleasing and is easier to use. Another plus is that most of the tools to work with it are usually at home or easier to find. nine0005
We have not listed all of the shelving materials. Often the choice of craftsmen falls on what is at hand. For example, wooden pallets, plastic boxes for vegetables and fruits, disassembled old furniture. From all this, convenient storage systems can also turn out. The main thing is to think over all the little things well: what you will clean in the closet, in what quantity and in what order.
If nothing comes to mind, check out the pictures we've put together. In the photo - do-it-yourself options for shelves in the pantry. Perhaps among them you will find an idea for your apartment. nine0025
For structures made of wood you may need: building level, tape measure or ruler, jigsaw or hacksaw, hammer, drill or perforator, screwdrivers, screws, self-tapping screws, sandpaper, protective impregnation (stain, paint), stands, brackets , scissors for metal (if a profile is used), a marking pencil.
What to consider when planning storage in the closet
As we have said, it is important to think about what exactly you want to keep in the closet and relate it to the area. If it is small, then it is better to equip roomy mezzanines, and put drawers or baskets below for items that you use less often than others. This option is not suitable for building materials. nine0005
Don't get carried away when calculating the depth of your shelves. Remember that you need to leave free space between them so that it is convenient for you to enter, take something, turn around, take out bulky items. It is desirable that the passage occupies at least 70 cm. In a room with a high ceiling and an upper tier directly below it, provide a place for a ladder or ladder.
Measure the longest containers you plan to store and make a few compartments just for them. nine0005
A few more tips for arranging shelving for a pantry in an apartment
- Straight shelves without intermediate supports are suitable only for small closets with a distance of no more than 2 m from wall to wall.
 Otherwise, the board will sag.
 - The width of the projections increases from top to bottom, the heaviest items should be stowed down. It has to do with safety and convenience.
- Use the rule: the larger the load, the thicker the material (this applies to wood, plywood), more fasteners and less space between the support posts. nine0008
- The optimal width of the mezzanine for jars with blanks is 30 cm or more.
- Light equipment should preferably be fixed against the wall, massive buildings are stable due to their weight.
- Provide separate pantry lighting before starting other work.
- Before installing storage systems, the utility room must be prepared: carry out a thorough cleaning, if possible, align the walls, re-paste them, paint or veneer. nine0008
- If necessary, coat the walls with antiseptic impregnation to protect against mold.
- If the room will be open, paint its walls in bright colors that match the surrounding interior.
Considering all the tips and features of your room, draw a sketch of the future closet with the designation of the design parameters and proceed to its creation.
How to make shelves in the pantry with your own hands: step by step instructions
Manufacturing technology depends on what type of equipment you have in mind and what materials you will use. Consider first the option of attaching a frame made of aluminum or steel corners to the wall. The first material is lighter, the second is stronger and is suitable for structures with heavy loads. nine0005
Shelving with fixing
- Start by marking. Transfer the dimensions of the parts in accordance with the drawing to the corners using a marker and mark the places for the holes for attaching the elements to each other and to the wall.
- Saw the blanks with a grinder or hacksaw, drill the marked holes. Next, bend the frames, fasten them together with bolts, screw them to the racks.
 Lean the resulting structure against the wall, mark the attachment points on it. Drill the wall at the marked points, insert dowels and attach the rack with self-tapping screws. nine0008
 - The penultimate stage is the manufacture of shelves. Cut them out with a jigsaw or hacksaw according to the dimensions from the sketch, attach them to the corners and correct the errors. In order not to be mistaken, you can first use a cardboard template, according to which the part is adjusted. After all the parameters are verified, you need to remove the roughness on the sections. Use a file and abrasive paper for this. Then impregnate the wood with a stain or other protective solution, dry it, varnish it and dry it again. nine0008
- The final step is fixing the rack elements. According to this instruction, you can mount the corner, U-shaped and conventional linear storage system. Instead of metal parts, you can use a bar with a section of 50 * 50. The procedure will be the same.
Photo: Instagram @metallperm
Photo: Instagram @stavsvarman
DIY wall shelves
If your apartment has a very small closet and you plan to store not too heavy things in it, hang some ordinary shelves no more than 1.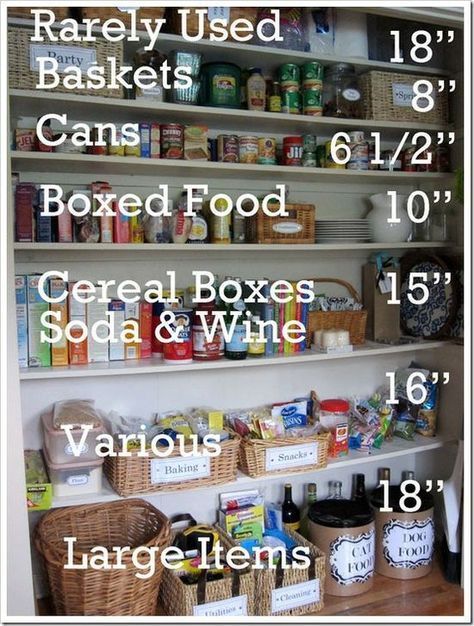 5 m in length. For this you will need:
- Rectangular, iron brackets
- Wood, plywood, 2 cm boards, or other shelving material
- Fasteners
- Electric jigsaw
- Screwdriver or perforator for attaching elements to each other
- Building level
- Pencil
First, mark the wall, make holes for the brackets and screw them to the surface with self-tapping screws. After that, cut out the details of a suitable size, sand them with sandpaper, paint with stain and varnish. Wait until they dry. If you use boards to make the structure, connect them together with bars located across. Attach the parts to each other with self-tapping screws. The distance between the tiers of the bookcase should be approximately 50 cm.
These shelves are suitable for storing seasonal products, bulk products, household appliances and any light items.
Storage shelving unit without fixing
Let's consider the production process of a shelving unit that does not need to be fixed to the wall.
In addition to the set of tools from the previous instructions, you will need a hand router. Prepare the beam for the side racks, chipboard or other floor material.
- On the support bars of the same height (approximately 2 m), make grooves on one side. The width of the recesses is 20 mm, the gap between them is 12-13 cm.
- To secure the structure, pin the upper and lower subframes together and cover them with plywood sheets. These will be the bottom and top shelves.
- Cut or join other elements and insert them into the slots at a comfortable level.
The result is an almost modular system. At any time, you can change the height of the ledges and fill the room with more bulky things, or vice versa, add details and organize the storage of accumulated little things. nine0005
A back wall can be attached to increase the stability of the rack.
Photo: Instagram @woodmood_ukraine
You will get a similar design.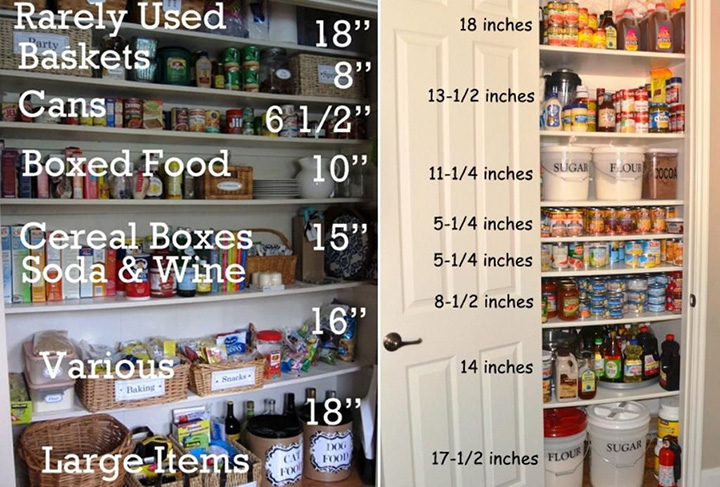
There are a lot of variations of racks - it will not be possible to describe all possible designs within the framework of the article, but the three listed are enough to equip almost any closet.
Do you have a small niche in your apartment? Watch this video. It tells in detail how to make shelves in a drywall pantry. nine0005
Prepared by
Nelli Kirgintseva
Was the article interesting?
Share link
By clicking on the "Subscribe" button,
you consent to the processing of personal data
Recommended
6 easy ways to personalize your interior
Shelf in the bathroom: views, placement options and 72 stylish photos in the interior nine0005
Wallpaper in the kitchen: 6 incredible interiors that will make you fall in love with this finish
Cool before and after: how a designer transformed an apartment of 60 sq.