Replacing washers in faucets
7 easy steps to follow |
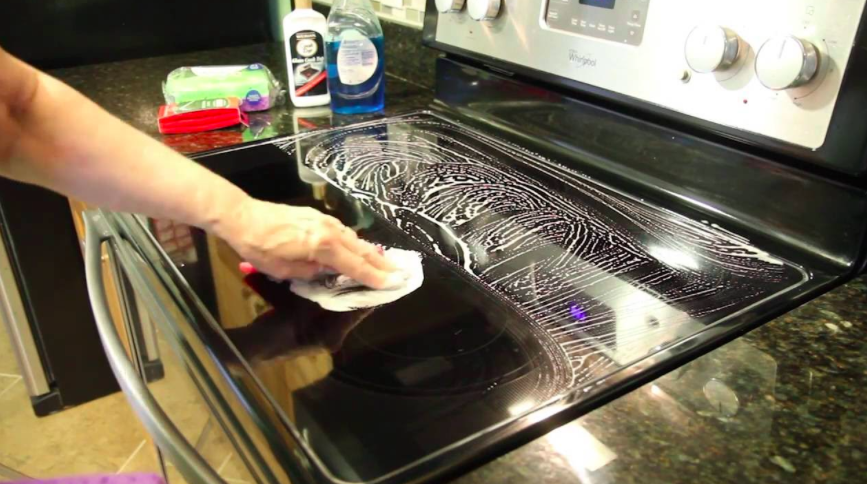
(Image credit: Mint Images / Getty Images)
If you want to replace faucet washers on your own, there are a few simple steps you will need to follow.
Some jobs around the home will need a professional with experience and expertize. Others can be done yourself. This not only saves money but can also save time too, as you can simply get on with it without having to wait for a plumber to be free.
Replacing faucet washers is one of those tasks. It is also worth knowing how to unclog a toilet without a plunger and how to fix a leaky faucet by yourself – and how to prevent such problems from occurring.
‘Washers don’t last forever,’ confirms Lucy Searle, global editor in chief for Homes & Gardens. ‘When old or damaged, they will cause the faucet to leak, as the washer can’t form a watertight seal. This is easy enough to fix though and it won’t take long either.’
Martha Stewart is a firm advocate of doing jobs like this yourself. ‘When the sink is clogged or the toilet runs, don't rush to phone the plumber,’ she says. ‘With the right tools and basic instructions, you can solve most minor plumbing problems in your home, including knowing when to drip faucets.’
How to replace faucet washers
The good news is that this is one of the simplest DIY plumbing tasks and it shouldn’t take long either. In fact, it should only take a few minutes and it won’t need much in the way of tools. You won’t need to do any drilling or mess around with any pipes and, as Polly Shearer, bathroom expert at Tap Warehouse confirms, replacing faucet washers is simple, satisfying and totally safe.
You need to check first whether the faucet has a washer or ceramic disc cartridge. This guide deals with changing a washer so if your faucet has a ceramic disc cartridge then you need to do things differently.
‘Many people are unaware that the cause of a leaky faucet can come from the washer itself. When they get worn, they start to become less effective, so a solution to this is to change the washer,’ says Polly.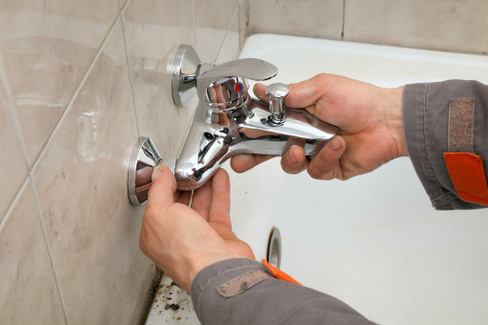
Shopping List
You will need:
• Flat-head screwdriver: here are some highly-rated options from Amazon
• Spanner: this 9-piece set from Amazon will do the trick
• WD-40: you can buy this from Amazon
• Old cloth
• New washer
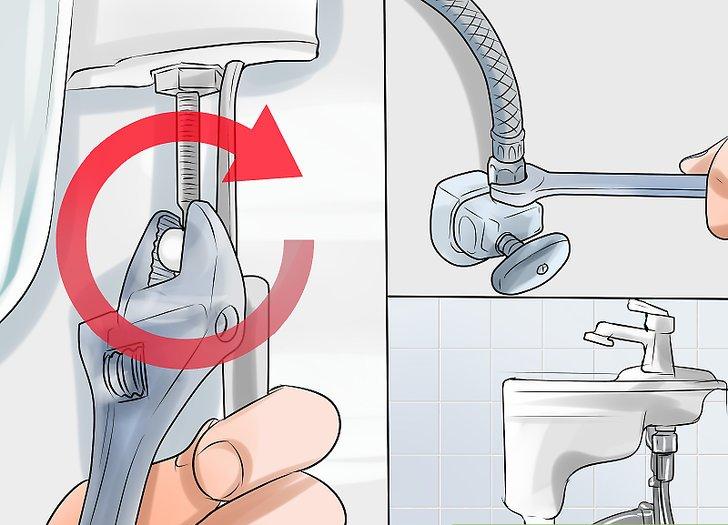
1. Turn off the water supply
There should be an isolation valve underneath the faucet, which can be used to turn off the water to that particular sink. If you don’t have one of these, turn off the water at the mains. If you’re changing the washer on the hot water faucet then you will need to turn off the boiler and immersion heater too.
2. Insert the drain stopper
This will prevent you losing any screws or components down the drain if you drop them. It’s also a good idea to place an old towel inside the sink to avoid damaging the surface if you drop something.
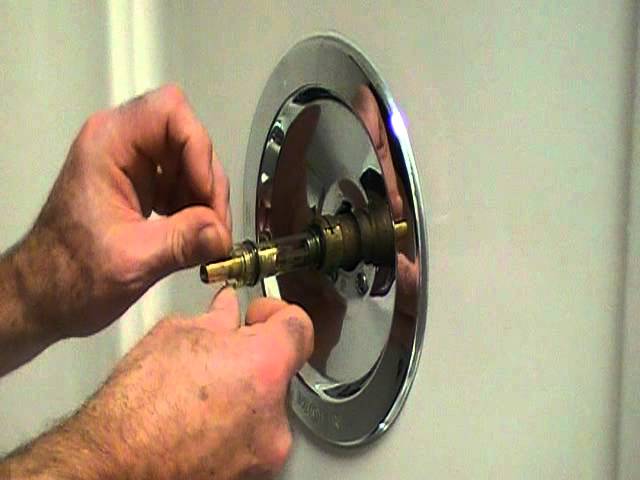
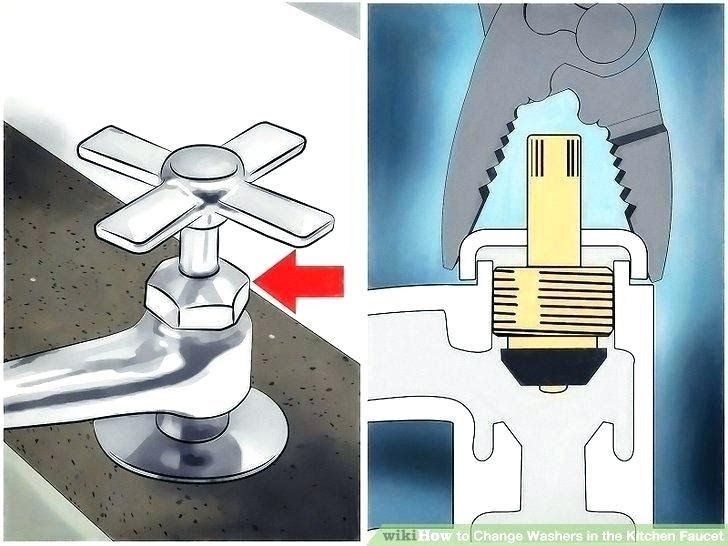
3. Remove the cover from the faucet
Do this using your screwdriver, carefully. This will expose the valve, which can then be removed using the spanner. If it is stiff then hold the faucet in place with a wrench if you have one, but protect the faucet with a cloth first.
4. Secure the washer
The washer is underneath the valve, secured in place with either a screw or a nut. Remove the washer with a spanner or, if it’s too difficult to undo, spray some WD-40 around it and allow this to soak in before trying again.
5. Replace the old washer
Replace the old, worn washer with a new washer in the same size.
6. Put the faucet back together again
Screw the valve back into place, being careful not to overtighten as this can damage the faucet. Fasten the top back onto the faucet and you’re all done.
7. Turn the water back on
Remove the towel from your sink, take out the plug and turn the water back on.
Why do faucet washers need replacing?
Most faucets, whether kitchen or bathroom, comprise two parts – the seat and washer.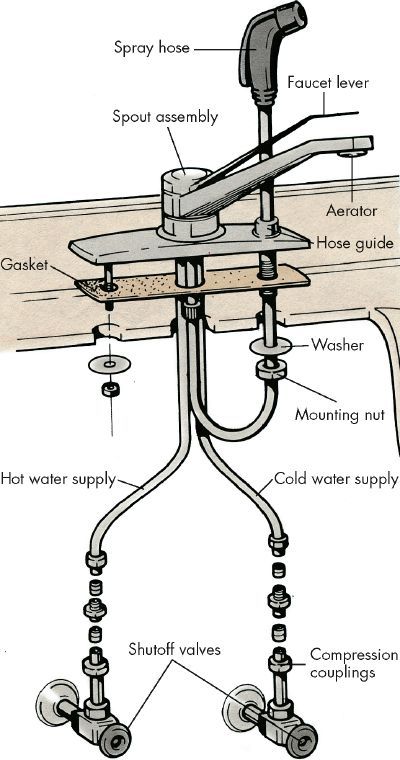
When you turn the faucet on, the washer is directed towards the seat, creating pressure. This in turn forces water out through the spout. When you turn the faucet off, the washer creates a watertight seal by pushing against the seat, ensuring no water flows through.
When washers are old and worn, they don’t create this watertight seal and can cause the faucet to leak. When a faucet starts to leak, the first thing to check is if it needs a new washer. They cost very little and can be purchased from DIY or hardware stores as well as online and tend to be sold in packs with different sizes to choose from to match your existing washer.
Do I have to turn the water off to replace a washer?
Mixer units may also have a separate 'o-ring' seal at the base of the spout. This can be replaced without turning off the water supply, but make sure you get the correct size replacement before starting work.
How often should I replace a faucet washer?
As they are prone to constant wear and tear, you can expect to change a washer every one to two years.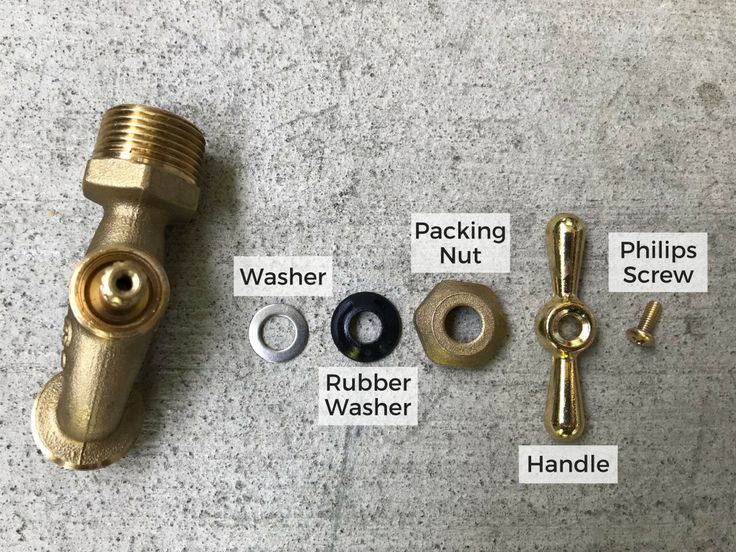
Hayley is an interiors journalist, content provider and copywriter with 26 years experience who has contributed to a wide range of consumer magazines, trade titles, newspapers, blogs and online content. Specialising in kitchens and bathrooms, she has twice won the CEDIA Award for Best Technology feature. Hayley writes for H&G about kitchens, bathrooms, cleaning, DIY and organizing.
How to Change a Faucet Washer
hennessey_adminBlogs
If you have a leaky faucet, you may have heard that changing the faucet washer will stop the leak. It’s certainly worth a try and is a relatively simple task. The first step in how to change a faucet washer is to determine if your faucet actually has a washer. The majority of new faucets today are so-called washerless faucets. A compression faucet is the only type of faucet that uses a neoprene washer.
How to Identify a Compression Water Faucet
Compression water faucets are an older style faucet. They can be installed in the kitchen, at the bathroom sink, or in the bathtub. You can identify a compression washer faucet by the separate hot and cold water handles and their action requiring you to tighten the handles down to close off the water flow. These faucets work by using a compression stem which is sort of like a screw with a washer at the end of it that presses down on the valve seat. Just because your faucet has two handles doesn’t mean it’s a compression faucet.
There are double handle cartridge faucets that are newer. The way to tell the difference is that with the cartridge faucet, half a turn on a handle is all it takes to turn the water on or off. With a compression faucet, you have to use extra effort to turn it on or off, often requiring more than one full turn of the handle.
Step By Step Directions to Change a Faucet Washer
So now that you’ve identified your faucet as a compression faucet, it’s time to see if changing the washer will fix your leaky faucet.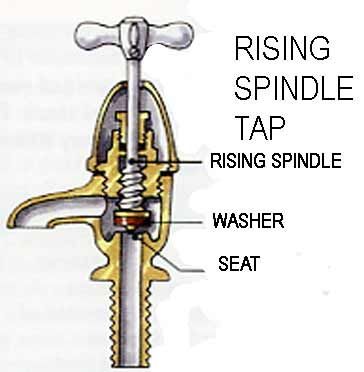 You might as well replace another part, called the O-ring, at the same time, as you are going to be taking the faucet apart and reassembling it. Here are your step-by-step directions:
- Turn off the water supply valves. These will be found on the wall under the sink. For a bathtub, you may not have access to the water supply valves. You may want to call a plumber.
- Turn both of the faucet’s handles to the “on” position to empty any water from the pipes.
- Close the drain or put a cloth over it to prevent small parts from going down the drain.
- Lay out a towel that you can place the parts on, in the order in which you removed them. This will make it easier to reassemble the faucet later.
- Remove both handles or knobs by prying off the temperature cap (a plastic piece with H or C) to uncover the screw. Unscrew the screw, and remove the screw and the knob or handle.
- Removing the knobs or handles will reveal the valve stem. Use a wrench to loosen the locking nut.
 Remove the valve stem.
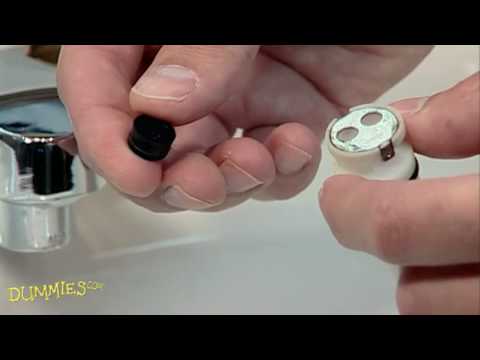
 - On the stem, you will see a screw, and underneath that is the black washer, and underneath that is the white O-ring. Remove them all.
- Take the old parts to the hardware store so you get the right replacement parts. Ask someone in the plumbing aisle for assistance, if needed.
- Coat the valve stem with plumbers grease and install a new O-ring and washer. Replace the screw.
- Replace the valve stem, and reassemble the handles or knobs.
- Turn the water supply lines back on.
- Slowly turn the water on. If there’s no leak, you’re done. If water sprays everywhere, or there’s still a leak, either start over or call a local plumber.
Is It Time for a New Faucet?
If you’ve repaired your faucet multiple times, it may be time for a new faucet. Or if you’re remodeling, you may want to put in new faucets to update your bathroom or kitchen. Do your homework before deciding on what type of faucet to buy. Consider the pros and cons of each, and read the reviews for each type of faucet. And remember that you get what you pay for. Moen and other similar faucets may cost more, but they are better made and will last longer. Consider calling a plumber to install your new faucets so that everything is up to code.
Call Plumbing By Jake for Plumbing Repair and Installation
Call 928-377-5910 for an emergency plumber 24/7 or during regular business hours if it’s not an emergency. You can use our contact form to schedule plumbing repair or installation of a water softener system for your home or business. At Plumbing By Jake, we back every repair or installation with a 100% satisfaction guarantee. We serve Kingman, Bullhead City, Golden Valley, Lake Havasu, and all of Mohave County, Arizona.
Replacing the cartridge in the faucet
Remove the old cartridge from the faucet
1. Turn off the water in front of the faucet.
2. Remove the colored indicator from the hole in the handle, in front under the protrusion. It fits in there like a cork in a bottle.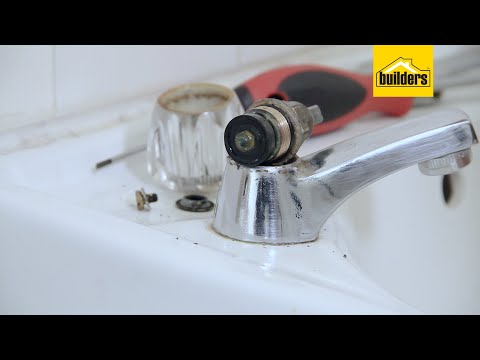
Remove the colored indicator in the mixer handle
3. Locate the screw under the indicator, loosen it. Usually this requires a 2.5 hex socket. Then remove the handle by pulling it up slightly.
Loosen the screw and remove the handle
4. Unscrew the decorative apron.
Unscrew and remove the decorative apron
5. Using a large wrench, can be adjusted, unscrew the nut located under the decorative apron.
Using an adjustable wrench, unscrew the nut located under the decorative apron.
6. Gently rock the old cartridge out.
Removing the old cartridge
Wipe the cartridge seat with a cloth to keep dirt and scale off the cartridge seat. If possible, lubricate the rubber rings of the cartridge with sanitary vaseline or something similar.
Installing a new cartridge
1. Insert the cartridge into the slot so that the legs fit into the blind holes in the bottom.
2. Screw on the nut, apron, install the handle and insert the indicator.
Nut tightening torque - 10-12 Nm - or, if in a simple way, tighten the nut more tightly, but without fanaticism.
Done!
It should be added that sometimes the faucet handle can be screwed on from above (in the Varion faucet nomenclature, this is the Wega series). In this case, carefully remove the decorative cap, for example with a kitchen knife.
When fitting the handle, make sure that the lower edge of the handle does not catch on the apron when turning. If it catches, it is necessary to loosen the screw, slightly raise the handle and fix it in this position by tightening the screw. In order not to catch the position, you can put a few thin washers under the handle. If the handle is fixed with a vertical screw, then this adjustment can only be carried out using washers.
And in general about cartridges
The most common ones are with diameters d40 and d35, with and without legs (see our article “Mixer cartridge device”). In different cartridges, the location of the holes in the bottom may vary slightly. You should pay special attention to this when replacing the cartridge with legs: the holes in the cartridge must match in location and diameter with the holes in the mixer body.
The situation is simpler in the case of cartridges without legs. In models such as, for example, KCG d35 or KCG d40, the holes on the bottom are very large and are likely to block possible deviations.
You can buy a Varion faucet cartridge in almost any plumbing store. Models of cartridges installed in Varion faucets, see our website:
Catalog > Accessories > Locking elements.
It remains to add that KCG cartridges (manufactured in Taiwan) withstand more than 50 thousand switching cycles, are equipped with noise compensators and, most importantly, are adapted to working conditions in Russia (dirt in water supply networks, pressure and temperature drops, increased aeration of the supplied water and etc. )
)
Faucet installation and maintenance
If you think that after choosing and purchasing a bathroom or kitchen faucet there will be no more problems with it - you are mistaken. After all, the device will not install itself and will not connect to water pipes, so your direct participation is necessary. Do not forget also that the faucet, like any other equipment, wears out and breaks over time, which will require its repair or complete replacement. Of course, you can use the services of professional plumbers - but what if this is not possible for one reason or another? Installation of the mixer and its repair are quite accessible to a non-professional. Of course, this will require you to have certain experience, skills and knowledge, but in general, this procedure does not pose a particularly serious problem.
Crane structure
But in order to properly mount or repair this equipment, you need to have an idea of what it is and how it works. Although there is a wide variety of models on the market, different in shape, size, individual design elements, in general, the design of mixers is similar and includes the following main details:
- Housing.
 Provides mixing of hot and cold water, gives the necessary rigidity to the whole structure, serves to fix the faucet on the sink (sink) or wall. Made from corrosion resistant stainless steel or brass.
 - Spout. Shapes and directs the water jet. It is made of the same materials as the body, it can be rotating or stationary. At the end of the spout is an aerator that reduces splashing. Often this element is made rotating or retractable, which allows you to adjust the height of the fall and the direction of the water jet.
- Locking and regulating element. Designed to adjust the pressure and temperature of the water jet, as well as its complete overlap. In single-lever models, its role is played by a metal ball or ceramic disc cartridge connected to a lever-switch, in two-valve models - two crane boxes with rotating valves.
The faucet is assembled and connected to the plumbing system using the connecting elements supplied in the kit (nuts, gaskets, flexible pipes). Shower models can also have an additional shut-off and control element for switching the water supply from a spout to a watering can, and kitchen models - another lever for supplying filtered drinking water.
This faucet layout is of a general nature and therefore somewhat arbitrary - what the mixer consists of is determined by its purpose and design solutions adopted in a particular model. For example, there are their electronic varieties, the design of which has fundamental differences - in particular, they do not have moving controls. However, such models are presented on the market in a small number, so further we will talk about their most common mechanical counterparts.
Bathroom faucet installation
The most common solution for this room is the separate installation of taps for the sink and the bath itself. In both cases, they can be installed on a horizontal plane (countertop, washbasin and bathtub edge) or on a vertical wall. In general terms, the installation of mixers includes the following steps.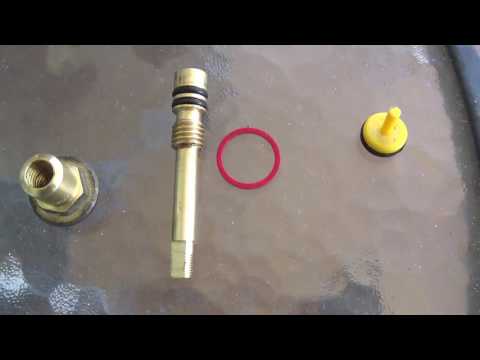
Checking the contents. Taps are usually sold partially assembled, excluding fittings and fasteners. In the case of bath faucets, the shower head or column, connecting hose and bracket for it are also supplied separately. Before installing the mixer, you must make sure that the complete set is complete - that is, check the availability of all components with the instructions. It is also necessary to check the functionality of the equipment, the absence of any defects and damage.
Preparation. For the correct installation of faucets on a sink or bath, you will need the appropriate tool - a suitable screwdriver, a set of wrenches (or an adjustable wrench), pliers, tape measure, building level. To prevent leaks at the joints, a sealing plumbing tape or linen tow with Unipack paste is used. Before installation, it is necessary to completely block the pipes for hot and cold water supply in order to avoid flooding the room.
Tow and paste are successfully replaced by anaerobic sealants, which are a polymer gel.In the absence of air, the gel solidifies and provides a reliable hermetic connection.
Marking the installation site. For faucets installed on the wall of the room, there are generally accepted rules for their location:
- the standard for the height of the faucet above the bath (more precisely, the outlet pipes of the plumbing system) is 20 cm (counting from the top edge of the tank), and relative to the floor - 80 cm;
- if the faucet will serve both the bath and the washbasin, then it must be placed at a level of 1 m above the floor, while at least 25 cm must remain between it and the sink;
- If a faucet with a shower column is to be installed, its height must be at least 120 cm in relation to the bottom of the bathtub.
It is worth noting that these standards are not mandatory, but recommended - in the end, the specific installation height of the mixers is determined by the location of the outlet pipes of communications, as well as the convenience of users.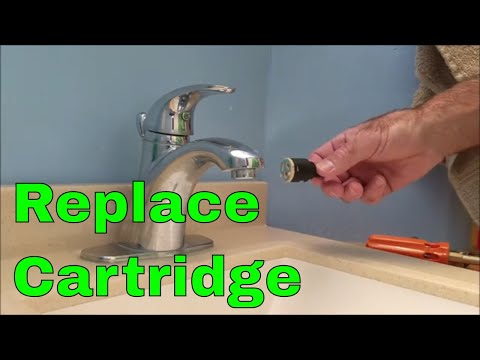 It is important that the connecting fittings for hot and cold water pipes are located at a distance of 15 cm from each other, located strictly on the same level and do not extend beyond the wall cladding. If the distance between the pipes is smaller or larger, eccentrics are first installed on their outlet pipes to correct this discrepancy. For faucets installed separately on the washbasin, the installation height is determined by the placement of the bowl itself, and their connection to the plumbing system is carried out using a flexible hose.
Vertical mounting. To mount the taps on the wall, proceed as follows:
- if necessary, corrective eccentrics are screwed onto the pipes of communications - in this case, it is necessary to pre-wrap the thread with tow with a sealant or sealing rubber tape;
- then cups are screwed onto the inlets of the mixer, closing the holes in the wall, after which, using union nuts and rubber gaskets, the tap is connected to eccentric bushings;
- when the main unit is connected to the plumbing system, a spout and a hose with a shower head are connected to it.

All joints must be sealed with the supplied sealing washers to prevent leakage.
Horizontal mounting. Installing the faucet on a sink, countertop or bathtub edge is carried out in a hole specially provided for this (in metal and acrylic plumbing, as well as countertops, you can do it yourself):
- before mounting the faucet on the supporting surface, it is necessary to connect flexible hoses to it and pass the whole structure through the hole;
- then fix the mixer with a pressure washer and a sealing gasket - alternatively, using the studs supplied in the kit, which are screwed into the faucet foot and then secured with nuts;
- , the supply hoses must then be connected to the outlets of the hot and cold water pipes.
All connections are made using gaskets, rubber tape or sealant tow.
Check. When the faucet is installed and fully connected, carefully wipe all connections with a cloth and check the fit of the fittings. Then the pre-shut off pipes for supplying hot and cold water are opened, and the faucet is tested for leaks. If there are none and the device demonstrates stable operation without pressure drops, the installation was successful. Otherwise, it is necessary to shut off the water supply again, disassemble and remove the mixer, check the integrity of the sealing and connecting elements and repeat the procedure. Useful advice - for installation, use tools (wrenches and pliers) without a notch, which can damage the surface of the nuts to be tightened. The tightening of the connecting elements should be carried out carefully so as not to strip the threads on the nozzles.
Kitchen faucet installation
Currently, kitchen faucets are installed horizontally on the sink or countertop. It is carried out similarly to the installation of faucets on the sink in the bathroom and includes the same steps:
- connection of a flexible hose to the tap inlets;
- screwing the fixing pins into the faucet base;
- installation of the assembled faucet in the hole of the sink or countertop and fix it;
- connection of supply hoses to the outlet pipes of the water supply system.
As in the previous cases, all threaded connections are first wrapped with tow with sealant (or rubber tape), and sealing washers are installed in the places provided. Some kitchen faucets provide for connection to a drinking water filter - for this, a separate flexible hose and connecting elements are included in the kit.
Mixer replacement
If the house already has plumbing installed, but during the repair process it is required to mount a new one instead, it is necessary to perform a preliminary dismantling of the old equipment. The replacement of the faucet in the bathroom is carried out after shutting off the pipes for supplying cold and hot water and draining the remaining water through the faucet. After that, the spout is sequentially removed, the shower head or rack, the flexible hoses or the mixer body are disconnected from the communications. The old equipment is removed from the installation site, the threads on the outlet pipes are again wrapped with tow with sealant or rubber tape.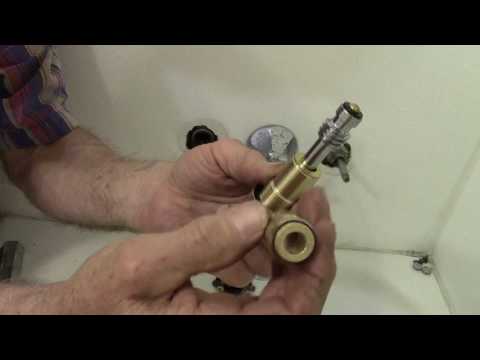 After that, the installation of a new crane is carried out according to the previously indicated scheme. Replacing the faucet in the kitchen is carried out in a similar manner. The main point is that it is necessary to carefully control the tightness of the connections, as well as the integrity of the threads on the outlet pipes. If the notch is torn off or damaged by rust, it will not work to install a new tap on your own - you need to seek help from a specialist.
Replacement of the shut-off and control element
During the operation of the faucet in the kitchen or in the bathroom, it is this part that experiences the greatest load due to the mechanical interaction of moving parts, the influence of water and small particles suspended in it, water hammer, and careless handling of the equipment. Therefore, it is often necessary to replace not the entire mixer, but only the shut-off and control elements - fortunately, they are removable and can be easily bought separately at any plumbing store.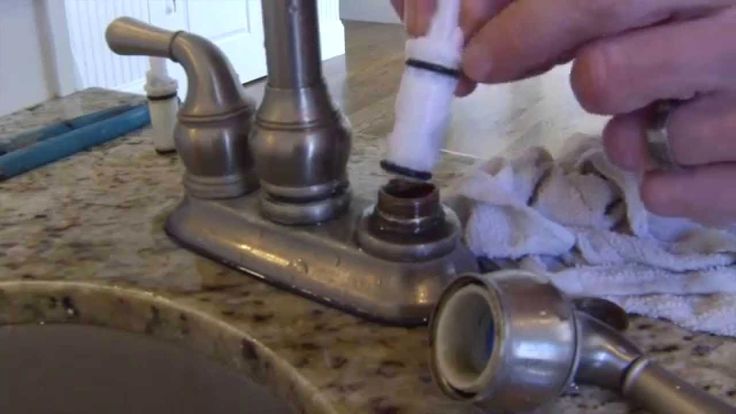 Depending on the design of the crane, we consider two options for this procedure.
Replacing the cartridge in the faucet. Single-lever models have only one such element. It is recommended not to purchase a cartridge in advance, as it may not fit your specific faucet - it is better to do this after removing the faulty part, with which you can go to the plumbing store and buy a similar one. To replace, follow these steps:
- remove the decorative cover from the mixer lever and unscrew the fixing screw located under it;
- carefully remove the handle and detach the protective ring located under it;
- Unscrew the clamping nut with a wrench and remove the defective cartridge;
- clean the inside of the mixer from salt deposits and rust;
- install a new locking and regulating element so that its fixing protrusions coincide with the corresponding grooves in the mixer;
- Screw on the clamping nut and the protective ring again, install the control lever, fix it with a screw and insert the decorative insert into place.
Procedures do not require any specialized tools and professional skills - only standard screwdrivers or hexagons, wrenches of the appropriate size are needed.
Replacement of the faucet box in the mixer. This locking and regulating element is used in valve cocks. As in the previous case, you should not buy a new faucet box in advance, as it may not be suitable for a specific mixer model. Its replacement is performed in the following order:
- a decorative cap is removed from the defective valve and the fixing screw closed by it is unscrewed;
- , the valve handle is removed and the crane box itself is unscrewed with a wrench or pliers - sometimes for this it is necessary to first loosen the counternut, if any;
- the mixer is cleaned inside from salt and rust deposits, after which a new crane box is screwed into it, on the thread of which a sealing tape or tow with sealant is pre-wound;
- , the valve handle is again put on the stem, the fixing screw is screwed in and a decorative plastic plug is inserted.
Learn more