Pruning and transplanting azaleas
How, When and Where to Move an Established Azalea Bush
For most of us, there comes a time when we need to relocate an established shrub, like an Azalea. Maybe it isn’t thriving where it is. Maybe you’re redoing your landscaping. Maybe you’re moving, and you can’t bear to part with a favorite plant. Whatever the reason, you found yourself needing to transplant. So how can you move your established, mature Azalea with little or no damage to the plant?
In most cases, it’s easy to transplant Azaleas. First, prep the new planting hole. Then, dig up the Azalea, preserving as much of the root system as possible. Azalea roots are wide but not deep. Transfer the plant to the new hole and fill in around it with soil. Mulch, water, and you’re all set.
Transplanting an established Azalea can seem intimidating, but don’t worry – we’ve got your back. Keep reading for all the details on when, where, and how to move an Azalea.
Can I Move an Established Azalea to a New Spot?
Azaleas can usually be relocated easily, even when they’re well established. In fact, transplanting may be what’s best for an Azalea that isn’t doing well where it is.
Generally, evergreen Azaleas are easier to transplant than deciduous Azaleas. This is because deciduous Azaleas tend to have more widespread roots, making them more challenging to dig up. Small deciduous Azaleas usually do fine, but large ones can be more challenging.
The one situation in which it may not be possible to move an Azalea is if it is well established amid trees or other shrubs, which would mean that the roots have grown intertwined with nearby plants. In this situation, try propagating your Azalea instead of relocating it to get a clone of your existing plant. (More on that here)
What Locations are Best for Azaleas?
Before you dig up your favorite Azalea bush, make sure that you’ve got the perfect place to transplant it to. The key to happy, low-maintenance Azaleas is to plant them in the right spot. Azaleas should be planted in:
Acidic soil If your soil isn’t naturally acidic, you’ll need to either amend it or create a raised bed for your Azaleas. For more information on Azaleas and acidic soil, read this article.
Well-drained soil Azaleas like moist soil, but they can’t tolerate wet feet. If you have heavy soil, mix in some organic matter before planting Azaleas. Learn more about the best soil for Azaleas here.
Part sun Sunshine helps Azaleas grow and bloom, but most can’t tolerate full sun. Shade in the afternoon or dappled sunlight throughout the day is best. This article has more information on the ideal light situation for your Azalea plants.
When is the Best Time to Move Azaleas?
The ideal time of year to transplant Azaleas depends on your climate. No matter where you live, the root system will need plenty of time to get established in the new location before the most stressful time of year. Winter is the most challenging time for Azaleas in a cold climate, while hot summers are the most stressful in a warmer climate.
That means that if you have really hot summers, the ideal time to move Azaleas is in the fall.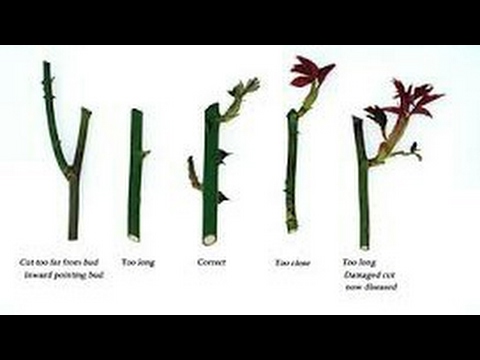 On the other hand, if you have freezing cold winters, it’s best to transplant Azaleas in the spring before spring growth starts. In a pinch, though, you can move an Azalea anytime except the hottest months of summer or while the ground is frozen in winter.
If your Azalea is deciduous, you should try to move it while it’s dormant. Think early spring before it leafs out and blooms, or in the fall after the leaves have turned color or dropped off.
If the weather is warm, don’t dig up your Azalea in the middle of the afternoon. Heat will stress and dry out the roots, so move the Azalea in the morning or on a cool, cloudy day.
What You’ll Need
- A spade, preferably a sharp one. A nursery spade can be helpful if you have one.
- Optionally, a piece of burlap or other fabric to wrap the root ball.
- A wheelbarrow or a tarp if the Azalea is too heavy to carry. You may also want a buddy to help you.
- Mulch
- If the Azalea is large and established, you may need pruners.
How To Move Your Azalea
You’ve gathered up your supplies, picked the perfect new location for your Azalea, and now you’re ready to dig it up and move it. Below you’ll find step-by-step instructions for transplanting your established Azalea.
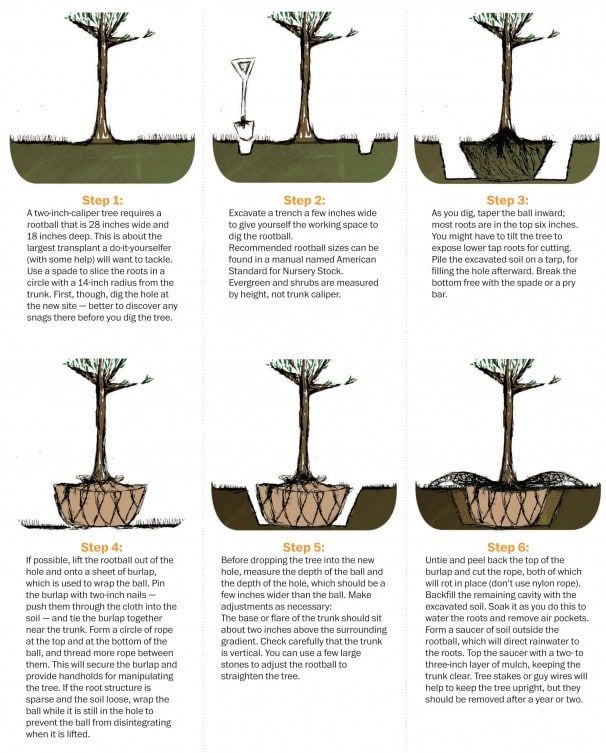
Step 1: Prep the New Planting Hole
After you dig it up, you’ll need to get your Azalea back in the ground again as quickly as possible (otherwise, it can dry out), so get your new planting hole ready beforehand.
The planting hole should be the same depth as the hole you dig the Azalea out of and twice as wide. If necessary, prep the soil with any amendments.
Step 2: Dig Up the Azalea
Azaleas’ root systems are typically wider than their foliage but not very deep – usually a foot or less. The best way to ensure you dig up as many roots as possible is to start at the dripline (the outer circumference of the shrub’s branches and stems), dig down about a foot, and then work your way under the shrub at a downward angle.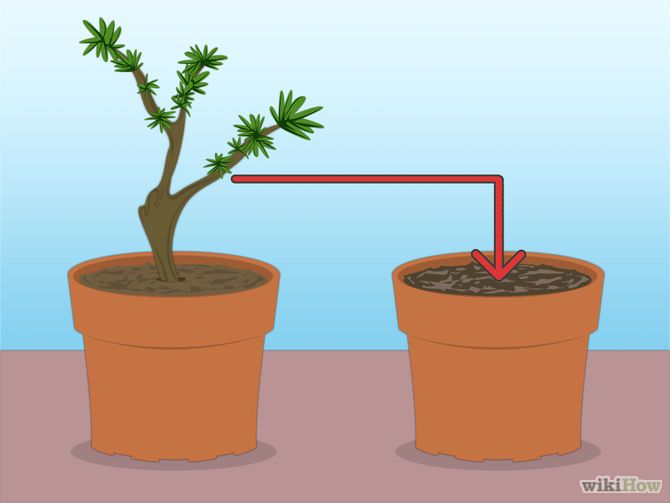
Of course, digging up a root ball as wide as the foliage is more feasible with small Azaleas. If the Azalea is large, you can start your root ball halfway to the dripline. You can also play it by ear, feeling for the roots as you carefully dig down.
Step 3: Wrap the Root Ball (Optional)
Once you’ve loosened the root ball in the soil, it can be helpful to wrap it in fabric. Burlap is perfect, but an old sheet or towel will work just fine. Drop the fabric into the hole and then tilt the Azalea back and forth so you can work the fabric underneath it. Wrap up the roots and use some string to tie the fabric at the top or tie the opposite corners together.
Wrapping up the root ball helps to hold the soil in and limit damage to fragile roots. It’s also a good handhold when you’re moving the Azalea.
Step 4: Move the Azalea to its New Home
Lift the Azalea by the root ball – don’t pull on the stems to lift it. Use your shovel to lever it out of the hole. To move the Azalea to its new location, you can use a wheelbarrow or lie the Azalea on a tarp and drag it.
Step 5: Plant, Mulch, and Water
First, make sure your planting hole is the right size for your root ball. The Azalea should be planted at the same depth it was when you dug it up. If you need to fill in any soil at the bottom, pack the soil down so that the Azalea doesn’t sink into it later and end up buried too deeply.
Remove the fabric before filling in the hole unless it is real burlap, which will rot away. Place the root ball in the hole – making sure the Azalea is facing the right direction if you have a preference – and then fill in soil around it. You may want to water about halfway through filling the hole to ensure the soil is settling without any air pockets.
Finally, cover the soil with mulch (find more on the best mulch for Azaleas here) and water the Azalea thoroughly. Water every couple of days for the first few weeks.
Step 6: If Necessary, Prune the Azalea
If you had to cut back a lot of roots to move the Azalea, you might need to prune the above-ground portion as well.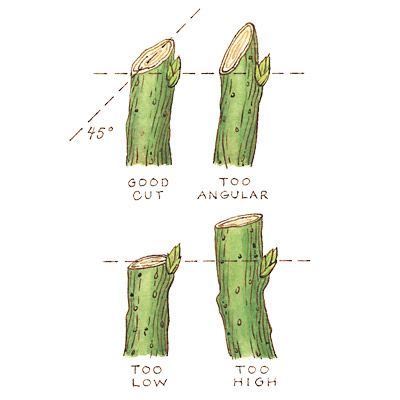 The smaller root system won’t be able to support as much foliage.
If necessary, you can prune the Azalea down to less than a foot tall, but usually, you don’t have to be that drastic. Think about it in terms of percentages – if you lost 50% of the roots, you should cut back 50% of the branches.
Will Azaleas Bloom After Transplanting?
Moving Azaleas shouldn’t interfere much with blooming as long as you do it correctly and at the right time. The exception is if you need to prune. Azaleas put out their buds for next year soon after flowering, so if you prune after that, you’ll lose next year’s buds. But don’t worry – they’ll come back the following year.
What To Expect From Your New Transplant
With a little extra love and care, it doesn’t take long for a transplanted Azalea to be as good as new (or better!). Keep a close eye on it until the root system is reestablished. The Azalea may need extra water and will be more prone to damage and disease until it gets settled. So what are you waiting for? Go ahead, get your hands dirty and move that Azalea to its beautiful new home.
When and How to Transplant Azalea Shrubs – Perfect Plants Nursery
It happens to all gardeners eventually: A favorite perennial or shrub is in the wrong place, and needs to be moved. Transplanting azaleas is no different.
If it’s an azalea, you’re in luck because azaleas have shallow roots, are easy to dig up, and recover quickly from the stress of moving. Even mature azaleas can be moved if you are careful to minimize damage to the root systems. Read on if you are interested in learning how to transplant azalea bushes.
Best Selling Azalea Shrubs
Formosa Azalea Shrub
$ 29.99
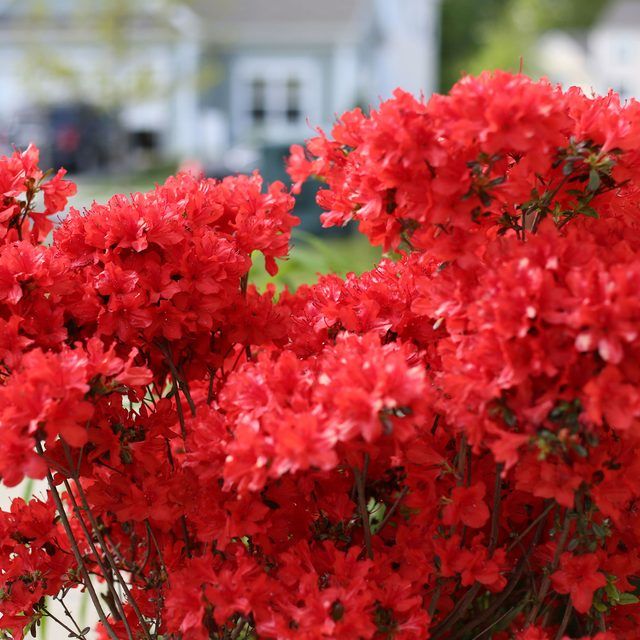
Red Ruffles Azalea Shrub
$29.99
George Taber Azalea Shrub
$ 29.99
Autumn Empress™ Encore® Azalea Shrub
$ 54.99Prune the azalea roots a year before transplanting for best results
The best time to move a shrub – any shrub – is early in the morning or late in the afternoon on a cool, cloudy day in early spring or fall.
Avoid transplanting azaleas or any shrub during extended dry periods, or when daytime temperatures are above 80°F.
The single most important thing you can do to insure success when transplanting is to root-prune a year before the move.
(If you’re careful, you can move an azalea successfully without prior root-pruning, but it will recover quicker if you plan ahead and prune those roots before transplanting.)
How to Prune Azalea Roots
Dig a donut-like trench all around the azalea 8-12 inches out from the trunk. This will sever all the shallow outward growing roots. Make the trench about six inches wide and about a foot deep. Fill the trench back in with the same, now loosened, soil. Soon, new fibrous roots and root hairs will grow into the soil within the trench.
Most of an azalea’s roots are shallow, not deep. When it comes to digging one up, wider trumps deeper. The wider, the better.
Transplanting the Azalea
Prune the azaleas leaves back by 1/3 before transplanting to encourage new growth when it is planted in its new location
When you are ready to move the azalea (ideally a year or so after root-pruning), prune the top back by about one-third. Read more about Basic Pruning for Shrubs in this blog.
Dig the new hole. Free the azalea by slicing a circle just outside the original root-prune trench, and 12-18 inches deep. (If you didn’t root-prune, make the cut 12-18 inches out from the azalea’s trunk.) Water thoroughly.
Force the shovel all around and up under the root mass and lift it up, keeping as much soil as possible in contact with the roots. (Any of the fibrous, hairlike roots that get dry will die.) Slide a tarp under the root ball and wrap it up the sides before moving it.
The root ball must be kept constantly moist and the shrub shaded until it is transplanted into its new hole.
Leave the root ball in tact when transplanting azaleas
The new planting hole should be a foot or two wider than the root ball and about the same depth. Do not put fertilizer in the hole as this can damage tender roots. Use the tarp to slide the azalea to its new location.
Drop the root ball into the hole and refill with the same native soil, stopping to water a few times to make sure the soil settles in around the roots and there are no air pockets.
Be sure the shrub is set no deeper in the new hole than it was in its original location.
To Do Post Transplanting
Watering every day for the first 2 weeks is essential to keep your azalea healthy
Water thoroughly to settle the soil in around the roots. Build up a dike around the trunk a few feet out that will hold water over the root zone so it percolates into the soil rather than running off.
Cover the ground around the trunk out to a foot or so beyond where the roots ended with an organic mulch 3-6 inches deep.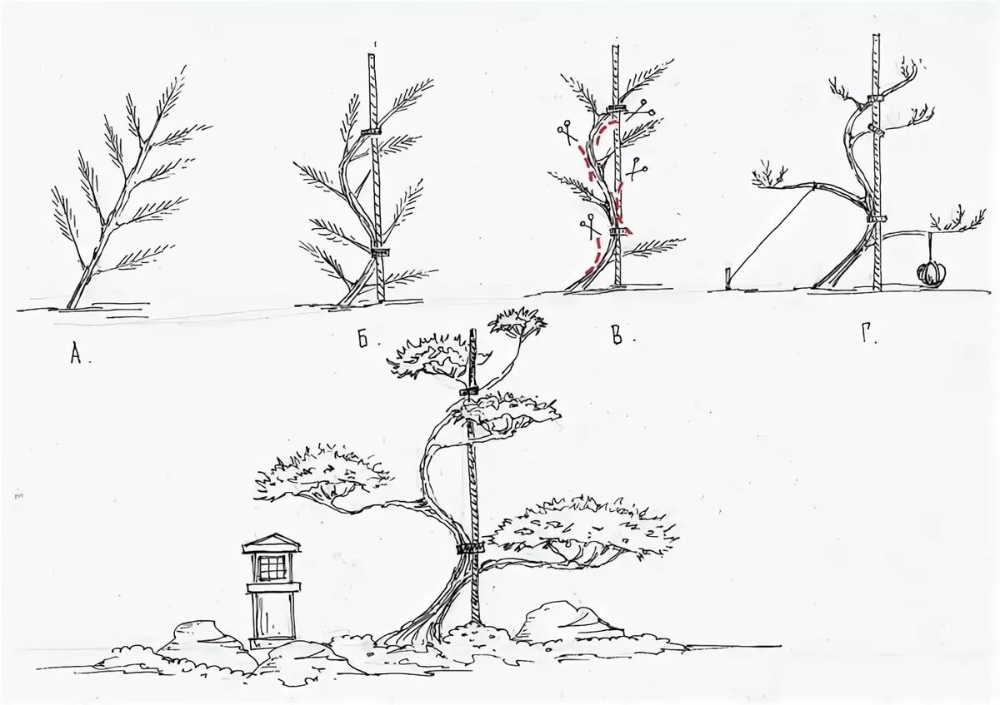 Keep the mulch or organic matter an inch or two away from the trunk. You can use hay, straw, pine needles, dry leaves, bark chips, or well rotted compost. Azaleas are acid lovers, so don’t use a mulch that has a basic pH.You can always amend your native soil with our Acidic Potting Soil if your soil is not acidic enough after performing a pH test.
Once your azalea is in its new position, it will need to be babied for several months. If it doesn’t get an inch of rain per week, you will want to supply the difference. Water thoroughly and deeply once a week or when the soil gets almost (but not completely) dry. Do not keep the soil around the roots constantly wet, because that will prevent air from reaching the roots and lead to rot. Transplanted shrubs are more at risk for dying of dehydration or disease so watch your azalea plant closely.
Gorgeous azalea bushes will bounce back after being transplanted in no time with a little TLC
When it comes to landscaping with azaleas, you CAN change your mind and transplant at the right time of year.
Check out the Azalea Grow Guide for more information on growing these beautiful flowering shrubs and having them flourish for many years!
Happy planting!
Please enable JavaScript to view the comments powered by Disqus.
More from: pruning shrubs transplanting
Back to Bloghow and when to do it right at home, is it necessary after flowering, as well as the nuances of care and photos of indoor rhododendron Dacha expert
Azalea is one of the ornamental shrubs. Belongs to the heather family. In the wild, this plant is found in some areas of Europe, as well as Asia and North America.
It gained great popularity in the twentieth century, and is grown in special nurseries and botanical gardens. It is in great demand because of the beautiful flowering. This plant is quite finicky, but only during flowering. In this article, we will show a photo of a beautifully "trimmed" rhododendron and tell you when and how to properly prune this plant, whether it can be done after flowering, and what further care should be at home.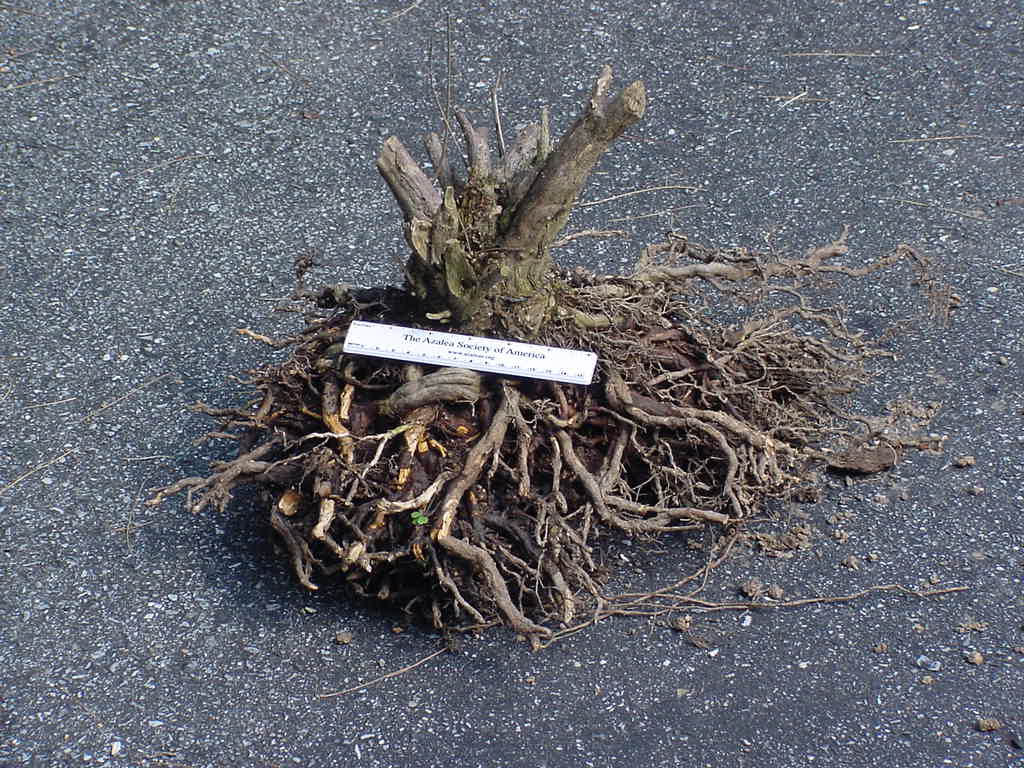
Show content
- What is pruning and why does indoor rhododendron need it?
- When is it recommended?
- How to trim after flowering?
- How many times a year is the procedure required?
- Step-by-step instructions
- Possible mistakes and how to avoid them
- Photo
- Aftercare at home
- Related video:
What is pruning and why is it necessary for an indoor rhododendron?
Pruning in plants is the main procedure. This is done so that the plant is healthy and does not hurt.
It is necessary to prune almost all types of plants that are fertile. Pruning for plants is very important, because it is thanks to it that you can regulate the size and growth of the plant. In addition, there is the possibility of correcting and changing the shape and the ability to influence the fruiting processes and the qualities of already ripening fruits. There are several types of pruning.
Help! It is not necessary to remove all branches, but only those that are sufficiently extended. Before you start pruning an azalea, you should check with the lunar calendar.
This plant can be not only cut, but also pinched. This is done so that the plant grows and develops better, in order to be able to adjust the shape of the azalea. This is also done so that the plant has many flower buds.
When is it recommended?
Proper pruning of the plant is necessary for the azalea flowers to grow and develop faster, as well as to bloom well and intensively. Pruning should only be done after the plant has finished flowering.
Since the Azalea blooms from the end of autumn to the end of spring, the pruning procedure can be started from the beginning of June. In addition, at this time, the plant has a dormant period.
Under no circumstances should the plant be pruned during flowering.
How to trim after flowering?
Only the long shoots of the plant need to be pruned after flowering, if they reach the middle of the length of the other shoots and are densely growing.
In addition, there is a need to trim weak or diseased shoots.
How many times a year is the procedure required?
Azaleas should be pruned once a year, as there is no need for pruning otherwise. It can be carried out before flowering only if some of the shoots start to hurt, grow poorly, or if pests appear on them.
Step-by-step instructions
- Preparing instruments . To trim this plant, a knife is used, which will be very well sharpened, but a pruner is best suited for this procedure. In any case, the knife or pruner must be treated with a solution that contains 70 to 90 percent alcohol.
- Choice of cutting location . The cut point of the plant can be anywhere, as you can adjust the shape to your taste. Therefore, there is not much difference.
- Section of a plant part. First you need to remove the largest and largest branches. To make the plant beautiful, it is better to give it a shape in the form of a ball.
Some gardeners remove shoots in the middle of the plant, particularly those that grow inside the bush.
Next, already diseased and weak azalea shoots are removed. To determine which plant shoots are weak and which are not, you need to look at the leaves of the azalea. If there are no buds on the leaves, there should be two or one on healthy shoots. If there are many buds on a leaf, then they will be an obstacle in obtaining other leaves of sunlight.
Too much pruning will harm the plant itself and it will hurt for a long time. Also, with strong pruning, the azalea will not be able to bloom, since it simply will not have the strength to do so.
Attention! Weak pruning of a plant can also greatly harm it. As a result of such pruning, the azalea will release only a small number of inflorescences.
- Finishing the cut . After pruning, it is imperative to disinfect those parts of the plant where the pruning procedure was carried out.
For disinfection, you can use a special paste for this, called "RANNET". It will help save the plant from pathogens. In addition, it will help in the rapid growth of leaves and twigs.
Possible mistakes and how to avoid them
Plants should be pruned at least once a year. There are twelve most common mistakes in pruning shrubs:
- Pruning only those branches that are broken or cracked. The main mistake here is that there is an opinion that if you remove only dry and cracked branches, then everything will be fine. But this is not the case and it is necessary to delete the entire branch.
- Large leaf growth. Stems and branches should not be allowed to grow, as this may cause problems with flowering, since the plant will not receive enough light.
In addition, due to the lack of sun, especially if it grows in the shade, pests and diseases can appear. Therefore, too little pruning can also harm the plant.

- Inaccurate and incorrect bud pruning. This cutting is the most difficult, since there is a high probability of making a mistake with the angle at which the cut will be made, with the height of the cut. You can accidentally hook the bark and burrs can form on it.
To carry out such pruning correctly, it is necessary to attach a knife from the base and to the top of the shoot from the side of the branch that is opposite to the kidney. The cutting angle must not exceed 45 degrees.
In order for the shoot not to dry out, in no case should a stump be left.
- Poorly sharpened tool. As a rule, tools such as pruning shears, secateurs, saws and hacksaws are used for pruning. If they are poorly sharpened, then it will simply not be possible to carry out the trimming process without damaging the bark. Such tools will leave injuries to plants, torn and pointed scars. In addition, a person can inflict injury on himself.
Poorly sharpened power tools are especially dangerous.

- Trims only those branches that are outside. If the center of the plant is too dense, then problems such as: Disease and pests of the plant may arise as a result. Only one or two main shoots should be in the center, they will be quite enough. Now the plant will receive the amount of light and air it needs.
- Many competing shoots. Most often, the plant produces several main shoots at once. Thus, they begin to fight for vital resources and nutrients. Because of this, the entire plant weakens and may even die. Therefore, you should remove all these shoots and leave the most hardy ones. Others are best shortened by 35 percent.
Shoots that do not grow well or are diseased should be removed first.
- Kidney damage. To avoid damaging the buds in any way while cutting the shoots, the pruner must be placed at the correct angle for cutting. To begin with, the largest and longest branches are removed, and then the small ones.
Tip! First of all, you need to delete external, and then internal branches.
- Not pruning blind shoots. Blind shoots are those without flowers. Also, the shoots must be removed to the lowest kidney.
- A plant disease that has not been cured in time. If old shoots are not removed during pruning, diseases such as:
- rust;
- powdery mildew;
- spotting;
- mold.
- Lots of trimmed flowering shoots.
- Unsuitable cutting tool. If you need to cut 6 centimeters, then you should choose a saw, and if you need to cut only 2 centimeters, then you can use a pruner or garden shears.
- Untimely pruning of the plant. If you do not prune in time, the plant begins to dry, hurt and rot.
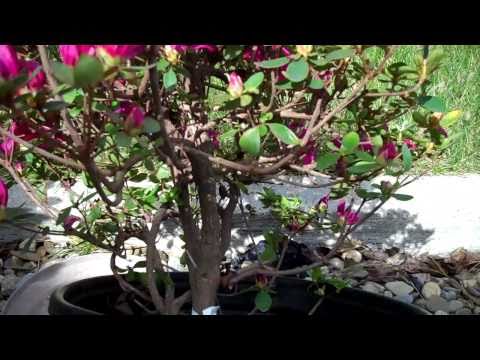
Picture
See what an indoor rhododendron looks like after pruning.
Aftercare at home
After the pruning procedure, care for the azalea should continue the same as before.
For this procedure to be successful, all the features of this plant should be taken into account. In order to know them well, you need to carefully monitor your plant (you can find out about the optimal home conditions for azalea here). Only in this case it will delight everyone around with its flowering for a long time.
Related videos:
Watch a video on how to prune an azalea:
Top
Transplanting and pruning an azalea after flowering Watering, azalea pruning, transplanting and many other care requirements are set by this plant, so they must be done correctly so that the flower pleases with its appearance. The rules for caring for an azalea are identical with growing a rhododendron, since both plants belong to the same family and practically do not differ from each other.
 Many experts argue that the rhododendron has a more massive main stem, which is the main difference. So, one of the main conditions for the appearance of beautiful flowers on a plant is considered to be exactly the right pruning and pinching.
 Content
- 1. Perplitude period
- 2. Pruning, as a method of propagation of azale
- 3. Care and irrigation rules
period of pruning
We recommend that you familiarize yourself with
The most suitable time for circumcision of azalea is the period when flowering is the period when flowering is already ending. It is better to make the first pruning in the spring, and in the summer the bush will again start up young shoots and gain density due to foliage. At the end of summer, you may have to thin out the bush a little and prune weak shoots. When viewed on a plant, you can find a considerable number of young buds that have not blossomed, they began their formation a long time ago, but the process has not been completed. It is these processes that should be safely removed, since the plant devotes too much energy to their nutrition and forcing the stems that spoil its shape. In addition to immature buds, it is worth removing all kinds of dry and weak processes. Experts recommend not being afraid to remove a large number of these buds, this procedure will allow the plant to look neat and receive enough nutrients to provide large and lush flowers.
It is worth carefully studying the rules for caring for each type of azalea, since, for example, deciduous azalea is cut only once a year, in the spring and after the procedure it is placed in a cool and dark place.
There is an opinion that buds appear later after pruning than after pinching. It is worth pinching at a time when the azalea bush begins to grow to the sides, and not in growth. It is worth plucking at the moment when the young shoot grows by 5-7 cm, there are several leaves on top, which you need to pinch off with your hands.
Pruning as a propagation method for Azaleas
In principle, pruning is one of the propagation methods for this plant. The cut off shoot serves as planting material, it is placed in special containers with earth, some gardeners advise purchasing a ready-made substrate for planting azalea. These containers must be covered with polyethylene and placed in a dry room with diffused light. It is important to ensure that the soil in the containers does not dry out and is not waterlogged. The rooting process takes quite a long time: from 1 to 1.5 months. As soon as it is seen that the stalk has begun, the film should be removed and after a while each seedling is transplanted into separate pots.
Care and watering rules
No matter what anyone says, but the azalea is a rather capricious plant. It is necessary to care for this flower competently and competently. This northern beauty requires a certain temperature regime in the room where she is. So, the optimal temperature for it is considered to be from 10 to 18 ° C of heat. Of course, this temperature is not always observed in homes, but there are ways to help create optimal conditions. For example, regular spraying and watering with cool, boiled water will help the flower tolerate higher temperatures.
Winter is the best time for this plant to grow comfortably. Azalea winters well on balconies and loggias, the main thing is that the temperature does not fall below +5 ° C. On the windows in the house, it is better to place the plant on the north and west sides of the dwelling.
Lighting also plays an important role for the azalea, it likes a lot of light, but direct sunlight can harm it. From sunburn, her leaves can curl and dry out. But in winter, quite often the plant experiences a lack of natural light. This situation can be corrected with the help of fluorescent lamps.
Indoor azalea requires special care after flowering. Azalea blooms under favorable conditions from 2 to 3 months, the main condition for flowers is the low temperature in the room where they are located. In a hot and stuffy room, the plant may even shed its young buds. Large and beautiful flowers during the flowering period magnificently cover the entire bush, which sometimes green leaves are not visible. As soon as it finishes flowering, dried buds and dry twigs can be removed and, in principle, the same pruning is carried out, which will help form the crown.
Since the plant originates from England and loves moist soil, watering should be strictly regulated depending on the condition of the soil and the air temperature in the room. If the flower is in a dry and cool room, then watering is carried out infrequently, but in a dry and warm place, the plant should be watered more often. If the soil near the flower dries out, the pot must be placed in a large container with water and allowed to soak the earth for 2-4 hours, depending on the size of the plant.
Water for irrigation is only suitable for boiled or separated water, it is not recommended to water it with water from the water supply. Likes, in addition to watering, the English beauty and regular spraying on hot days.
The genus of rhododendrons does not require frequent replanting, it is worth doing it only when the root system has filled the entire pot and the flower becomes crowded. A young plant can be transplanted 1 time per year, but a mature rhododendron bush no more than 1 time in 2-3 years. It is necessary to purchase a special substrate in flower shops. It is worth remembering that the azalea is very whimsical and capricious in its care, and if the flower was recently bought, then it is not worth transplanting it in the near future, as it needs to adapt and get used to new conditions.
As for the diseases of this plant, they are usually caused by violations in care. Improper watering can lead to rotting and damage to the root system, stunting and dropping foliage. Uncomfortable temperature conditions for the plant will lead to bud disease and lack of flowering.