Orange star care
How To Grow And Care For An Orange Star Plant
- Home
- Gardening
Buy Now
Fewer plants got a name that aptly describes their appearance and qualities as the orange star plants. In this case, the name tells you all you need to know about this hardy perennial and why you should have it in your garden. It’s an easy plant to grow and propagate and you won’t have much trouble caring for it. That said, certain issues usually crop up with the orange star plant that need your attention. In this post, we cover the orange star plants from all angles from planting and caring for it to the different methods of propagation.
All about Orange Star Plants
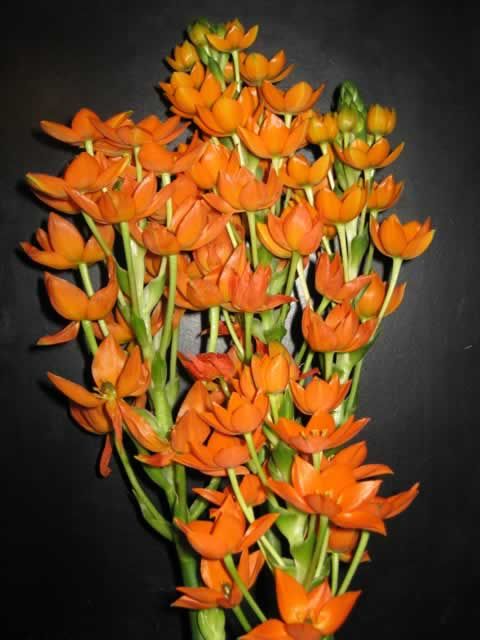
The orange star plant (Ornithogalum arabicum) is also known by other names including the star of Bethlehem. This bloomer has sturdy leaves that make it the right landscaping plant for your home even in the absence of the blooms. As bulb plants, you can grow them in a container as long as it gets enough full sun.
The most outstanding feature of the plant and the one that gave it its name are the flowers. The star-shaped blooms grow in clusters of about 12 to 15 on upright stems with each flower about one to two inches in diameter at most. Despite their small size, the blooms are very fragrant and their overpowering scent will fill your house in the summer.
Once the blooms fade in the fall, the plant tends to go into a dormant state. The sturdy leaves fall and for all intents and purposes, the orange start plant seems dead. But that couldn’t be further from the truth. In fact, the plant is just dormant. You need to repot it and in the next spring, it will come back to life with plenty of dark green leaves and orange or white flowers.
The USDA places the orange star plant on a hardiness zone between 10 and 11. This makes it ideal to grow inside your home. You can grow it in a pot or as a centerpiece on a table. Either way, it will definitely get all the attention.
How to Grow Orange Star Plants
So how would you go about planting this showboat of a plant? The complexity of planting and growing the orange start plant depends on how much horticultural experience you have. While experienced gardeners wouldn’t have a problem planting and caring for it, beginners might find it a little challenging. So let’s simplify this process for you.
- Soil is one of the key elements in the success of the orange star plants. So start with a potting mix of the best quality. It should be light, pest-free, and sterile. If the potting mix has a fertilizer in it that’s even better.
- Choose a medium-sized pot that can either be made of clay or plastic. Make sure it has plenty of drainage holes at the bottom.

- Fill the pot with soil up to 2 inches from the edge.
- Make a hole in the soil slightly bigger than the rootball of the orange star plant.
- Place the plant in the hole and fill it with soil. Press the soil firmly around the rootball to push out any air trapped there.
- Water the soil thoroughly until the excess water flows out of the bottom holes. This helps the soil settle.
- Place the pot in a sunny spot and make sure it gets 6 hours of sun every day. If it’s in a room, place it near a west or south-facing window.
Orange Star Plants Care
So far so good. Planting the orange star plant doesn’t seem any different from any other flowering plant you have planted before. The steps we detailed there are enough to give your plant a good start. Once the roots establish and the plant shows signs of growth, that’s when the care process starts. From watering to maintaining adequate temperature and light, you got your hands full.
Watering
Whether the orange star plant is growing and flowering or dormant, water is something you should pay attention to and get right.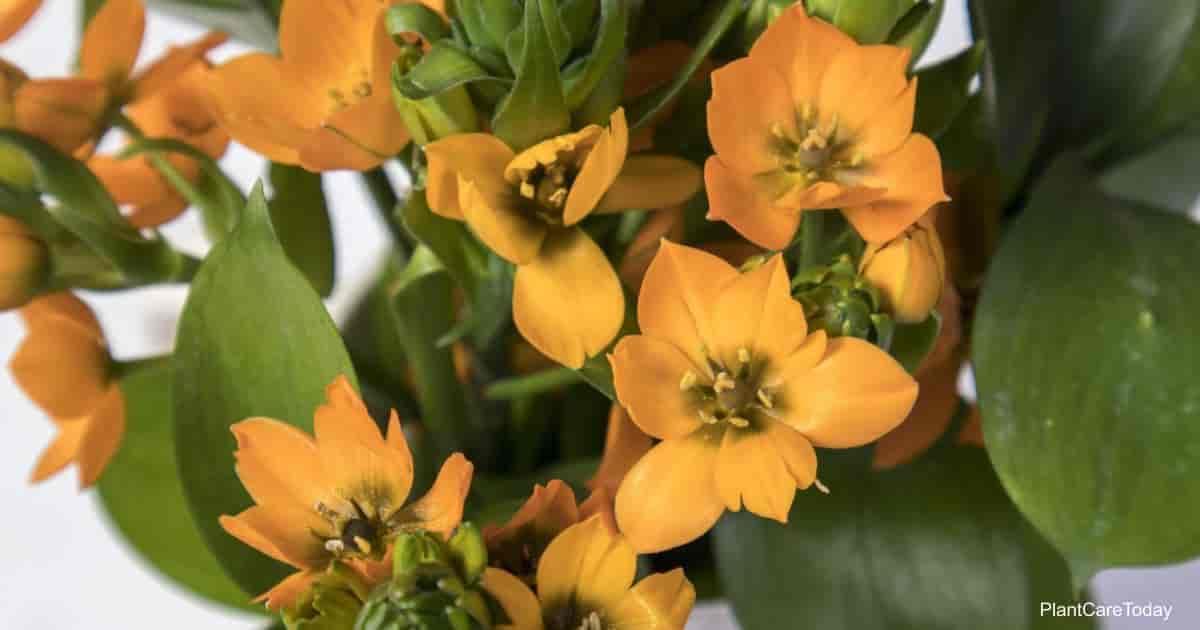 More water than it needs leads to root rot. The same applies to when the plant has shed its faded flowers and leaves. It will need less water than during the growing cycle. This is where the drainage holes in the pot come in handy. They’re the safety valve against waterlogging. Water the pot when the first inch of the topsoil goes dry in the summer. Aim the water to the center of the plant and let the water drop to the soil. Humidity is important for this plant, so place the pot in a tray of water in the summer.
Fertilizer
Just as with most flowering houseplants, the little soil in the pot is hardly enough to give the plant the nutrition it needs. Especially when it starts to flower. Flowering consumes a lot of the plant’s resources and energy, so you’ll need to supplement it with enough fertilizers to encourage a successful bloom. Just keep in mind that you don’t need to overfeed the plant. Use small doses of a well-balanced fertilizer once every week during the blooming cycle. Plant food supplements also help the orange star plant produce buds that are necessary for restarting the plant anew after it goes dormant in the winter.
Pruning
We mentioned the buds or offshoots as important for keeping the plant alive. Most often you’ll need to prune the orange star plant, especially after the flowers start to fade in the fall. This will motivate the plant to produce more offshoots right before it goes dormant. But even while the orange star is still in full bloom, you might need to prune it, removing wilted flowers, or dead or infected leaves. Sometimes you will need to trim it back to signal to the plant that it needs to grow more buds. Use clean and sterilized shears to prevent contamination.
Pests and Diseases
Like all flowering houseplants, your orange star plants fall victim to an attack by pests and bugs. It’s an unavoidable part of having this plant under your roof. Most common are mealybugs, spidery mites, and scales. But as with other plants, you can easily prevent them from inflicting more damage on the plant if you spot them early. In that case, just pick the few bugs scurrying around the leaves and flowers with your gloved hand and dispose of them safely in a bucket full of water with some washing detergent mixed in.
If the infestation is too large and the plant shows signs of stress, you can use neem oil. Coat the leaves and stalks liberally with the odorless oil to suffocate the little pests. Use a tissue to wipe off the excess oil along with the dead bugs. Don’t leave the oil on the leaves since it could lead to them withering away and dying.
As for diseases, root rot is by far the most common problem you might come across. It’s often caused by too much watering or bad drainage soil. The roots of the orange star are sensitive and can’t function in the excess water. When they rot, the plant will show signs of it. The leaves turn yellow and droop and if you don’t intervene, the leaves will drop and the plant will die. Hold off the water until the topsoil goes dry. If the problem persists, you might need to repot the plant after removing all the damaged roots.
Propagation of Orange Star Plants
Another issue you’ll have with growing and caring for the orange star is the need to propagate it. After it goes dormant, you’ll need to use either seeds or the dormant plant’s offshoots to start a new plant. Here are the two ways you can do that.
Offsets
Every mature orange star plant grows offshoots or buds around its base. These are your key to starting as many new orange star plants as you like. You’ll need to remove all the leaves when the plant goes dormant, cut a section of the plant where buds grow, and take the buds you need. This is best done in the fall, although some plants go dormant in the late summer and the offsets are ready for you to divide then. Choose the healthiest bulbs and use them to grow new plants.
To plant the bulb, prepare a pot with potting mix and push the bulb in a hole twice the height of the bulb then fill it with soil. Water the pot to keep the soil moist and put it in a warm room.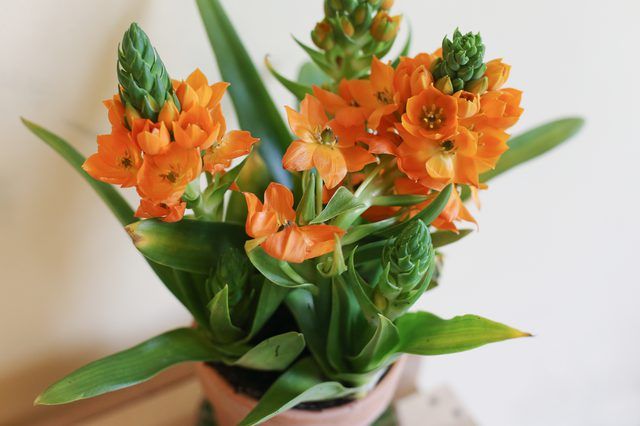 In the next spring, the bulbs will sprout and grow into a full plant.
Seeds
Once the flowers lose their fragrance and start to wilt, keep a close eye on them. Soon you’ll see seeds developing in the middle of the small blooms. Wait for the seeds to ripen and turn brown in their pods before you collect them. If you wait for too long, the seeds will fall in the pot.
To plant the seeds, use the same potting mix you used to plant the bulbs. Cover it with a light layer of shredded bark, peat, or perlite. Sprinkle the seeds on the top of the soil then add a thin layer of dust. Fill the pot to the rim with aquarium gravel to prevent the seeds from flying in the wind. Water the pot gently just enough to keep the soil from being dry and place the pot outdoors in a shaded area. Come spring, the seeds will germinate and you can separate the seedlings and plant each in its own pot.
How to care for an orange star plant |
(Image credit: Alamy)
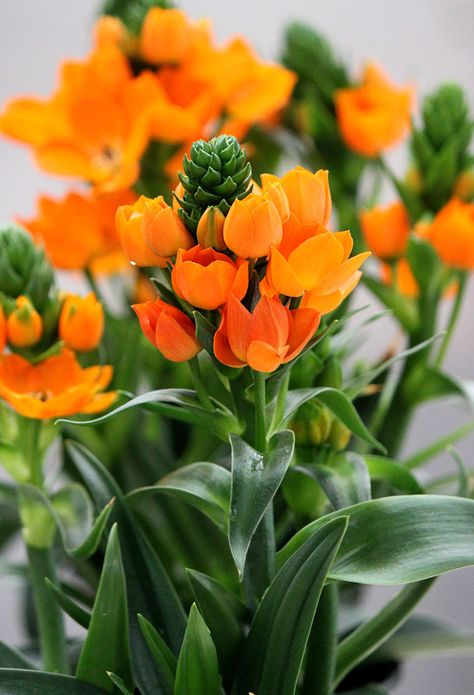
Caring for an orange star plant is pretty easy, once you get to know their growing habits. Also known as the Star of Bethlehem, snake flower and sun star, these vibrant flowering bulbs – with their clusters of bright orange flowers - will brighten up pots and borders year after year. They also make fabulous cut flowers for displaying indoors.
Originating from South Africa, these eye-catching spring blooms are real sun lovers, so if your yard is on the shady side, it’s well worth growing these in pots so they can be easily moved around.
Growing up to 1ft (30cm) tall they boast up to 15-20 star-shaped flowers on each stem and if naturalized in the ground, make a stunning display. Do be warned though, if growing conditions are just right, these bulbs can spread rapidly and be tricky to get rid of as flower bed ideas. Another reason to raise them in container garden ideas instead.
When and where to plant an orange star plant
(Image credit: Alamy)
‘If you decide to plant Star of Bethlehem flower bulbs in your landscape, do it in fall,’ say the team at Caribbean Garden Seed . ‘The plant is hardy in USDA Zone 3 with mulch and grows in Zones 4 to 8 without mulch.’ If you live in cooler climes this bold beauty can be raised in a conservatory or glass house and will bloom any time from late winter to spring for up to three months.
Total sun lovers these bulbs like nothing more than free-draining soil in a sunny spot. They can tolerate a little, occasional shade but this will reduce the number of flowers. Thriving in sandy, rocky situations they do like to be watered regularly – particularly during the growing period, prior to flowering – but can rot if left in waterlogged soil.
How to keep an orange star plant looking good
Outside, orange star plants bloom every spring for a couple of months. If planted inside they can keep producing flowers for upto three months straight, but there are a couple tips to keep these bulbs looking good, wherever they are. ‘Remove any faded flowers by pulling gently to separate them from the main stem,’ say the team at Bakker. com. ‘When the leaves turn yellow the foliage can be cut back.’ This ensures that the plant has stored up enough energy to form flowers for the following year.
Feeding with a slow-release liquid fertiliser throughout the growing period will encourage strong healthy growth and prolific flowering for this season and the next. This is particularly worth doing if growing in containers.
Can orange star plants become overcrowded?
In some growing situations this stunning plant can spread rapidly if left unchecked in borders. If you want to keep them in check or create a separate clump elsewhere in your yard, divide after flowering. Lift with a long-handled fork and carefully break into smaller clumps before replanting. Bulbs like to be planted about 2 inches (5 cm.) apart and at a depth of 5 inches (13 cm.).
If you wish to totally remove a clump do be sure to lift every part of the bulb, as the slightest section can quickly regrow.
Can you grow orange star plants in a pot?
Orange Star plants are well suited to growing in pots – particularly if you are in a cooler climate – below HDSA zone 7. ‘This variety is not so hardy, best planted in pots and protected over the winter months,’ says Tracey Coyne of The Anglia Bulb Company .
For the best results be sure to choose a pot with good drainage. Fill with specialist bulb compost with added grit or sand and be sure to keep well-watered but not waterlogged.
Are orange star plants prone to pests and diseases?
Orange star plants tend to be healthy and strong growers in the right conditions. They are not generally prone to pests and diseases, but all parts of the plant are toxic and the sap can irritate the skin, so do wear gloves and long sleeves when handling.
Jill Morgan has spent the last 20 years writing for Interior and Gardening magazines both in print and online. Titles she has been lucky enough to work on include House Beautiful, The English
Home, Ideal Home, Modern Gardens and Gardeningetc.com. Although much of her career has involved commissioning and writing about reader homes and home improvement projects, her
everlasting passion is for gardens and outdoor living, which is what she writes about for Homes & Gardens.
Latin name օ rnithogalum formed formed from Greek words: ornis - bird and gala - milk. Both the Latin and Russian names owe their creation to the shade of perennial inflorescences - in nature they are most often white, like "bird's milk". An exception to the rule, the exotic wild flowers of Poultry dubious are yellow, orange, and even red.
In English, the plant is poetically called the "Star of Bethlehem", Star of Bethlehem, for the shape of small flowers, similar to a guiding star, which symbolized the birth of Christ. The Germans call the Birdman simply - Milchsterne , i.e. "milk stars".
This genus includes more than 130 species from the subtropical and temperate zones of Africa, Asia and Europe.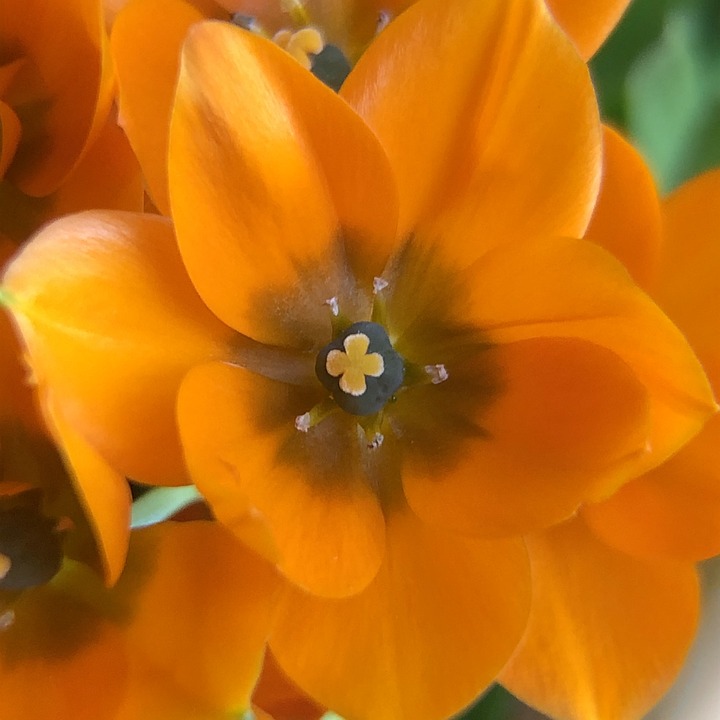
Homeland Umbelliferae - Western Europe. Large poultry farmer comes from Transcaucasia, Arabic - from the Mediterranean. The unusually bright and attractive Poultryman is dubious brought to our latitudes from South Africa.
Herbaceous bulbous perennials have long been attributed to Liliaceae, but later they were assigned to the Asparagus family (subfamily Hyacinthaceae).
Description
Mature Poultry plant reaches 30–85 cm in height. Basal belt-like leaves usually appear earlier than flower stalks (with the exception of a few varieties of the genus). A distinctive feature of the flowers is a green stripe on the outer part of the perianth leaf plates.
IN THE PHOTO: The snow-white flowers of the Poultryman look more tender than "bird's milk".
Inflorescences at the top of the stems may be corymbose or racemose. After the end of flowering, fruits appear and ripen - boxes with rounded flat black seeds. The ovoid, oblong-ovate or round bulb of the Poultryman is protected by dense scales.
ON THE PHOTO: Arabian Poultry Bulbs.
Popular varieties
Extraordinarily decorative and therefore favorite varieties of Ornitogaluma - the so-called "stars": 'Queen Star', 'King Star', 'Super Star', 'Orange Star', 'Magic Star', etc. They will not go unnoticed in the flower bed due to their bright, attractive and larger than wild species, inflorescences.
PICTURED: Poultry hybrid 'Yellow Star of Bethlehem' ․
Russian gardens, conservatories and homes are often adorned with the graceful yellow-flowered 'Sunshine' and the deep orange 'Ballerina' (the most popular indoor bird breeder).
Growing
Poultry farmers usually grow as garden and greenhouse flowering plants, less often as indoor plants. In the garden, they decorate paths (if the variety has low peduncles) or groups of plantings (when choosing larger and more decorative forms).![]() The bird farmer can become an organic and attractive part of the alpine slide.
The bird farmer can become an organic and attractive part of the alpine slide.
Poultry plants are sun-loving, so it is better to plant them in the garden in a place with a sufficient amount of diffused sunlight.
IN THE PHOTO: Even modest white Birds will emphasize the beauty of other plants in the garden.
Poultry grower indoors requires a container suitable for a large bulb and a developed root system of the plant. It is best to keep pots of Poultry Farmers in a southeast or southwest window.
In room conditions Poultry farmers, like other bulbous plants, can be "expelled" by a certain date. For such a purpose, it is best to take the bulbs of the Arabian Poultry Farmer. The general rules and subtleties of this process are described in the article on forcing bulbous plants for the holidays.
During the growing season, the Poultry Farmer needs regular fertilization (every two to three weeks). He is suitable for special dressings for indoor bulbous or universal. Read more about them in the material on the use of fertilizers for plants in open and closed ground.
Diseases and pests
Poultry farmers may suffer from blackleg if nitrogen supplements are abused. For the prevention and treatment of this disease, fungicides Baktofit and Fitosporin are used.
Frequent pests of poultry farmers are nematodes, spider mites and mealybugs. Infection with nematodes is dangerous because they infect the bulb, and the waste products of these roundworms make the soil unsuitable for growing other plants. Treatment with Vidat L will help prevent the appearance of the pest. If the damage to the bulbs is small, you can treat them with Actara or Confidor. Penetrating into the tissues of plants, these drugs will destroy the nematodes.
Acaricides (for example, Vermitek) can expel spider mites on indoor plants, more toxic Actellik can be used outdoors. The mealybug is successfully exterminated by systemic insecticides, for example, Confidor Maxi and Aktara.
Reproduction
Poultry breeder easily propagates vegetatively, by "kids". These are daughter bulbs, which are formed at the base of the mother at the end of the growing season (end of summer-autumn - in open ground, and autumn-early winter - in closed ground). Seed propagation is less common due to the fact that varietal characteristics may be lost. And in order to wait for the flowering of natural species, it may take two to three years.
Poultry chicks are planted in open ground at the end of September, deepening them into the soil by 6-10 cm (depending on size). Optimum planting density - 60 pcs/m 2 . With this method of reproduction, the Poultry Farmer can grow in the same area for 5–6 years.
Poultry seeds require cold stratification for 3-4 months before sowing. For her seed in clip-bags and/or special containers should be placed in a humid place with a temperature of 0-10°C. You can pre-wrap the seeds for a day in a hygroscopic cloth moistened with a solution of Heteroauxin (2 tablets of the drug per 1 tsp of alcohol and 60–80 ml of water).
This will greatly increase their germination.
In the middle lane Poultry farmers are sown in the last month of autumn.
First steps after purchase
Purchased bulbs must be stored at a temperature of +25°C (only a month before the planned planting, it is lowered to +17°C).
If bulbs with damage or cuts are found among the planting material, it is better to get rid of them as a possible source of disease.
If it is decided to grow Poultry immediately after the purchase of planting material, the bulbs are planted in the ground (preferably poor), watered and kept warm. As soon as the first leaves appear, the seedlings move to a warm, bright place and are fed with fertilizer for bulbs.
ON THE PHOTO: A young plant of the Poultry farmer.
Secrets of success
During the budding period, the Poultry Farmer will require more frequent watering. However, stagnant water in the ground is strictly unacceptable. In dry, hot weather, it is useful to spray the leaves with clean water at room temperature.
At the first signs of drying of the tips of the leaves, it is necessary to add succinic acid to the water for irrigation and spraying at the rate of 1 g per 1 liter. water, as well as potassium nitrate - 1.5 g per 1 liter.
In order to preserve the health of plants, it is desirable to provide a temperature of +10–15°C during their rooting, then gradually increase it to +20°C.
ON THE PHOTO: Compliance with the rules of care will provide the Poultry Farmer with bright and long flowering.
Possible difficulties
Loss of ornamental leaves.
Causes:
- excessive air dryness.
- clogging of leaf stomata with dust.
Poor or no flowering.
Causes:
- lack of sunlight.
- violation of the fertilization regime (too much nitrogen fertilizer and / or lack of phosphorus).
Wilting and shedding of inflorescences.
Cause: insufficient watering during bud formation.
Bulb and/or leaf rot.
Reason: waterlogging of the earth.
LePlants.ru editorshome care, transplantation and reproduction
Among all members of the Asparagus family, chlorophytum is the most popular in indoor culture. Such a perennial herbaceous plant has a large number of species and is thermophilic. Orange chlorophytum (Chlorophytum amaniense) is one of the numerous species, while it is also called orchidastrum. It is not as widespread in home culture as its relatives, but it is also a highly ornamental plant, and thanks to it, the air in the room also becomes much cleaner.
Content
- 1 Features of orange chlorophytum
- 2 Care at home
- 2.
 1 Light
 - 2.2 Temperature regime
- 2.3 How to Water
- 2.4 Milishness
- 2.5 Fertilizer 9000
- 2.8 Pruning
- 2.
- 3 Propagation methods
- 3.1 Growing from seeds
- 3.2 Dividing the bush
- 4 Possible problems
- 5 Useful properties
Features of orange chlorophytum
Crested chlorophytum, which has long and narrow leaf plates, is the most popular among flower growers. At the same time, orange chlorophytum has obvious external differences. The shape of its wide leaves is lanceolate, while the plates are narrowed towards the base. They form a dense leaf rosette, which can reach a height of about 0.4 m. The leaf plates have a beautiful emerald color, but their orange-pink petioles look most impressive. It is thanks to these bright petioles that the species got its name. In the people, such a plant is also called orchid-star, or winged.
When the bush blooms, not very long peduncles form in the axils of its leaves. The buds on them are placed spirally. Opened flowers have a mild pleasant aroma. During the formation of seeds, the peduncle becomes similar to a corncob.
There are several varieties of orange chlorophytum. Some of them differ from the main species in that not only the petiole, but also the median vein, has an orange color.
Indoor plants. Chlorophytum orange. Care and maintenance.
Watch this video on YouTube
Home care
Chlorophytum orange feels great indoors. He is undemanding to care and does not differ in a capricious character.
Light
This plant needs quite a lot of bright light, but avoid direct sunlight. For him, window sills of western or eastern orientation are perfect. Despite the fact that the bush will not die even with slight shading, the color of its petioles and leaves in this case may become more faded.
If the flower is on a southern windowsill, then it will need some shade from the midday sun.![]() In order for the bush not to lose its decorative appearance, direct rays of the sun should fall on its leaves for no longer than 2-3 hours a day. In winter, the plant also needs a lot of light, so it may need additional lighting.
In order for the bush not to lose its decorative appearance, direct rays of the sun should fall on its leaves for no longer than 2-3 hours a day. In winter, the plant also needs a lot of light, so it may need additional lighting.
Temperature
This variety of Chlorophytum feels great in warmth. The temperature should be close to room temperature, while its optimal value is 25-27 degrees. In summer, the bush is not afraid of heat. In the spring and summer months, when it is warm outside, the bush can be moved to fresh air (in the garden or on the balcony). Thanks to the constant influx of fresh air, the bush will begin to grow and develop much faster. However, for him choose a place that will be protected from precipitation and gusts of strong winds. Monitor the air temperature while the bush is outside. It should not be below 11 degrees. When it gets cold, bring yellow chlorophytum into the house in a timely manner.
In winter, the bush can not be moved to a cool place.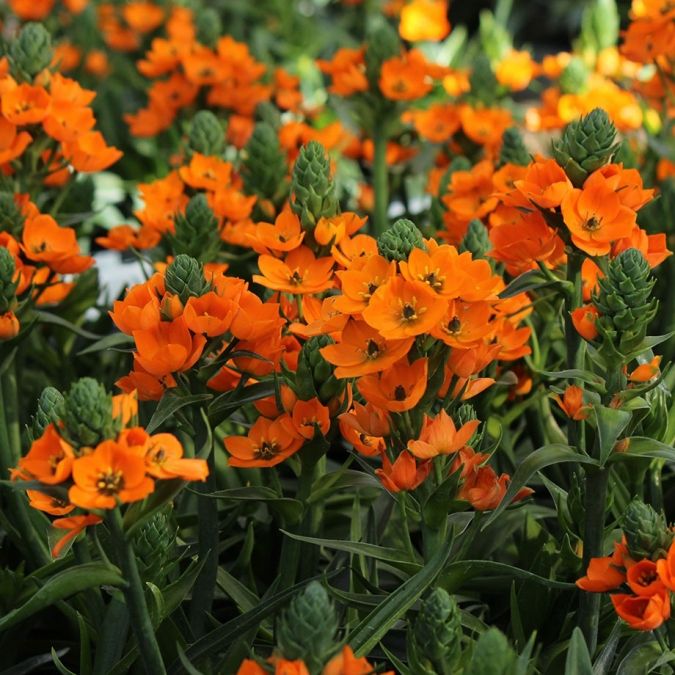 However, it should still be kept away from working heating appliances.
How to water
In order for this perennial to develop within the normal range, it must be watered systematically. The root system is quite well developed in him, while it is able to make moisture reserves that are spent during the drought period. But these reserves are small, so one should not forget about watering.
With the onset of the spring period and until the first autumn days, watering should be carried out approximately 1 time in 2 days. In this case, the substrate is moistened only after its surface dries. In the cold season, orange chlorophytum should be watered less. The fact is that during this period the moisture consumption of the bush decreases, and if it is watered abundantly, this can cause rot on the root system.
Humidity
The plant prefers high humidity, so it is recommended to moisten its leaves regularly with a spray bottle. At the same time, on hot summer days, the bush is provided with mandatory systematic spraying. Also, chlorophytum responds well to a warm shower, which should be done about twice every 7 days. Thanks to him, you can wash away dirt and dust from the surface of the foliage. Instead, you can clean the sheet plates with a pre-moistened soft sponge or cloth.
To increase the level of humidity, they often resort to this method: an open vessel filled with water is placed near the pot. And the container with the flower can be placed on a high tray, which is pre-filled with moistened sphagnum.
Substrate
For planting and transplanting, it is recommended to use a loose, neutral soil mixture rich in nutrients. Such chlorophytum is undemanding to the substrate. In this regard, a universal soil mixture for indoor crops is quite suitable for him, or you can even do it yourself. To prepare the substrate, it is necessary to combine humus, leafy soil, sand and turf (1: 2: 1: 2). Be sure to disinfect the finished substrate in any way convenient for you (heating in the oven, using potassium manganese, or by steaming).
Fertilizer
Systematic fertilization will ensure the correct development of the plant. And this will lead to the fact that the crown will be more dense and spectacular. For top dressing, you can use both mineral complexes and organic matter, the main thing is that they are suitable for decorative leafy plants. As a rule, experts recommend using such fertilizers alternately. In this case, the optimal frequency of top dressing is 1 time in 15 days.
Pre-fertilizers are dissolved in water. At the same time, the feeding procedure itself is combined with watering. Experienced flower growers also recommend regularly adding a solution of chalk, starch or activated carbon to the substrate.
Transplanting orange chlorophytum
If the bush is provided with optimal conditions for growth, then the pot becomes small rather quickly. At the same time, while the flower is young, it has the highest growth rates. That is why this chlorophytum is recommended to be replanted annually in the spring, and the pot must be replaced.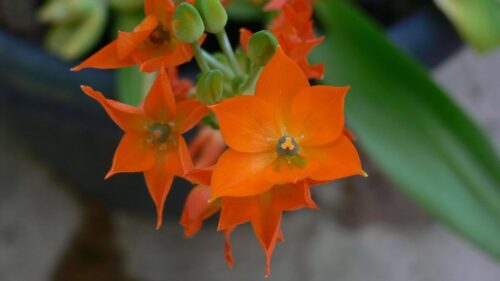 After the bush becomes an adult, the frequency of planting can be reduced to once every 3 or 4 years. Often, several chlorophytum bushes are planted in one larger container (often such plants can be found in specialized stores).
It is recommended to transplant perennials in the last weeks of winter or the first weeks of spring. You need to be in time before the growing season begins. A new container is chosen taking into account the fact that it should be slightly larger than the old one. It is better to choose a pot with drainage holes at the bottom.
Be sure to make a high-quality drainage layer at the bottom of the container, for this you can use pieces of brick, expanded clay, shells, etc. This layer is sprinkled with a small amount of soil mixture. Carefully remove the bush from the pot along with a clod of earth. In order not to injure the roots, it is recommended to water the plant with plenty of water about 24 hours before transplanting. Plant the bush in a new pot, use fresh soil mixture to eliminate all voids.![]()
After transplanting, the surface of the substrate should be lightly compacted, and then the bush should be watered. Experts recommend putting the plant in a shaded place for several days.
Chlorophytum transplant | How to transplant chlorophytum without problems - quickly and competently
Watch this video on YouTube
Pruning
Since orange chlorophytum consists of leaf rosettes, it does not need forming pruning. However, it is necessary to cut out the dried leaf plates in a timely manner, as well as remove the dried tops, while not damaging the healthy part of the leaf.
When working with the plant, be careful with the leaves. The fact is that they are not very flexible and can break off. If you are not going to collect seeds, then after the bush has faded, it is recommended to cut the peduncle. This will help save the plant strength, as well as avoid unwanted self-seeding.
Propagation methods
Growing from seeds
Most often, orange chlorophytum is propagated by seed.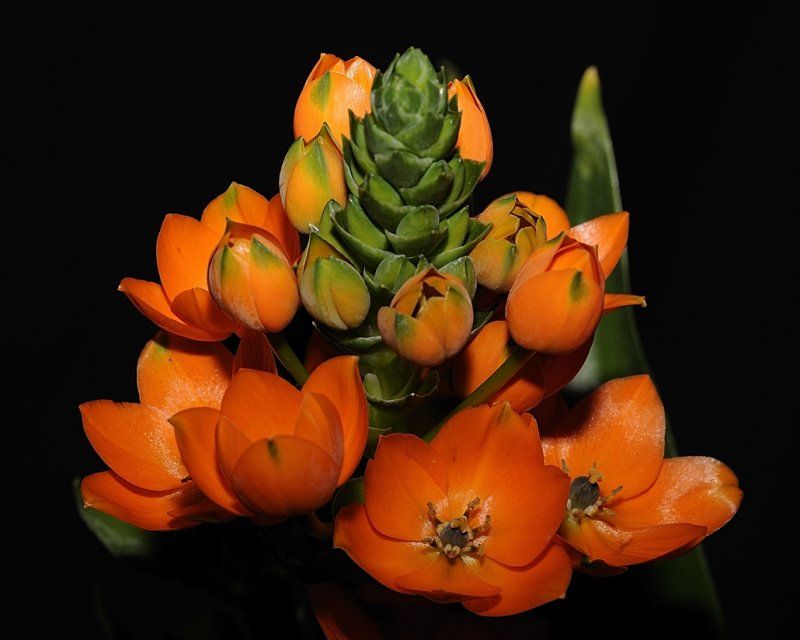 Moreover, it should be noted that the seed material of such a plant has a low germination rate, and in order to succeed, you need to be extremely careful and follow all the rules described below.
The first weeks of spring are best suited for sowing seeds of this variety of Chlorophytum. When about 24 hours remain before sowing, it is necessary to soak the seeds. To do this, they are poured with warm water, which is replaced with fresh water once every few hours. To make it more convenient, the seeds can be placed in a napkin.
It is recommended to fill the box intended for sowing with a fertile and light mixture of sand and peat. The finished soil mixture must be disinfected, and any method convenient for you is suitable for this.
Spread the seed evenly over the dampened substrate. Just press the seeds a little into the soil mixture and cover the crops on top with glass or film. The box is transferred to a place where it is always warm (not lower than 22 degrees). Crops need a lot of light, but they must be protected from direct sunlight.
Be prepared for the fact that the first seedlings will not appear soon. Sometimes the germination process takes up to 6 weeks. All this time, you need to ensure that the substrate is always slightly moist. If necessary, it is moistened from a spray bottle, using water, the temperature of which is close to room temperature. Do not forget to ventilate the crops every day, removing them for the duration of the shelter. Be sure to remove any condensation that has accumulated on the surface of the film or glass.
After sprouts appear, do not remove the cover immediately. Do this gradually so that the sprouts can adapt to new conditions. After 2 or 3 true leaf plates are formed in young bushes, they are picked in separate pots. And for this, they use the soil mixture that is suitable for planting adult plants.
However, this method of propagation has 2 main disadvantages, namely: it is necessary to provide special care for crops and seedlings, and it will also take time for a young bush to become a full-fledged plant. Leaf petioles acquire a beautiful orange hue only a few months after the sprouts appear. This happens only when the leaf plates of the orange chlorophytum grow to a certain size.
Indoor flowers in November / Chlorophytum Orange / Reproduction
Watch this video on YouTube
The division of the bush
This variety differs from the crested chlorophytum in that it does not form a mustache on which the children are located in the process of growth. However, it often happens that lateral processes form in the bush in the axils of the leaves.
Some growers advise to remove such shoots, as they can cause the plant to thicken. At the same time, these processes can also be used for the reproduction of chlorophytum. Also, if during the transplantation process you find shoots with roots, then they can also be used to obtain a young plant. To do this, carefully separate them from the mother plant and plant them in a fresh potting mix.
Possible problems
If Chlorophytum orange is provided with proper care and suitable conditions for normal growth and development, it will please you not only with its spectacular appearance, but also with good health. As a rule, pests prefer to settle on bushes that have weakened due to regular violations in the rules of care. The following pests can settle on such a spectacular flower: aphids, spider mites, mealybugs and thrips. If there are few insects, then they can be removed from the bush by treatment with a soap solution. Repeated procedures are carried out at intervals of three to four days, until the pests completely die. If there are a lot of pests on the bush, then only treatment with an insecticidal preparation will help in this case.
In a healthy plant, leaf blades are strong with a glossy surface, while their color should be characteristic of a particular variety. Also, the bush should grow and develop within the normal range. If there are any violations in care, then chlorophytum will definitely “report” this, the main thing is to notice signs of trouble in time and eliminate the cause. If everything is done on time, then you will be able to prevent a decrease in decorativeness or the appearance of a disease.
Most common Chlorophytum orange problems:
- Leaves turn dark and dry out . As a rule, this is observed when it is hot outside, and the plant does not have enough moisture. This can be corrected by more frequent watering and systematic moistening from a spray bottle.
- Tips of leaf plates dry out . There is too much sodium in the substrate or dry air. Try increasing the humidity or changing the fertilizer.
- Leaves turn yellow . Most often this is due to nutritional deficiencies or too poor lighting. If the plant is in the shade, then it is transferred to a more suitable place. If there are no positive changes, then the frequency of feeding should be increased.
- Lower leaf blades turn yellow or black . As a rule, this happens due to regular stagnation of moisture in the roots and due to the appearance of rot.
 Cut off all the rotten parts and plant the plant in a new soil mixture that passes moisture well. Then you need to try to correct all the mistakes in care.
 - Brown spots on foliage . The room is too cold + excessively frequent wetting of the substrate.
- The color of petioles has become more faded . Very poor lighting.
- Mature plant does not flower and does not develop side shoots . Move the bush to a brighter place or transplant it.
- In winter, the leaves become faded and fly around . The room is very hot and the plant does not have enough light. Keep the bush away from heating appliances. For him, it is recommended to choose a cool and well-lit place.
Benefits
Orange chlorophytum, like other varieties of chlorophytum, perfectly cleans the air in the room. Its wide leaf plates intensively absorb carbon dioxide, and they also release phytoncides into the air, which exterminate pathogens.