Milk painting furniture
Here's How And Why You Should Do It
Skip to contentOne of the greatest things about milk paint is that you can achieve such an incredible range of looks and finishes with the medium. Suitable for numerous projects on porous surfaces indoors and out, milk paint like Real Milk Paint offers smooth, even coverage that stays put on old furniture and is safe for kids and pets. This incredible versatility makes milk paints the go-to choice for furniture makers, designers, and do-it-yourselfers when they want to achieve a professional-looking finish makeover of your wood piece.
A short visit to Pinterest can provide endless inspiration for milk paint furniture refinishing projects to work on if you’re looking for a practical way to spend your weekend. In fact, you may already have a furniture paint to-do list on your phone or notepad. But if you don’t know just where to begin when it comes to painting furniture using milk paint, we’ve prepared a few easy tips to get you started with this nontoxic medium that utilizes natural pigments.
Refer to this primer on using milk paint for furniture to learn how to bring new life to old pieces, but keep in mind these tips work equally well on most any milk paint project. No matter if you want to add color to raw wood chairs you’ve built, refinish furniture like china cabinets handed down from family members or restore an old table you snagged at a tag sale, Real Milk Paint has you covered.
Paint Furniture With Milk Paint
Reasons abound for using Real Milk Paint in your furniture makeovers rather than other paints like chalk paint. Made from all-natural ingredients including milk protein, lime, and pigment, our milk paints offer complete environmentally friendliness with a formulation that’s free of volatile organic compounds (VOCs). The mostly odorless formulation also makes our medium safe to use in areas without a lot of ventilation where you want to paint furniture with milk paint.
Since Real Milk Paint comes in powder form and you mix it yourself, it’s likely thinner than other paints you’ve used, so it may take you a bit of time to get used to it.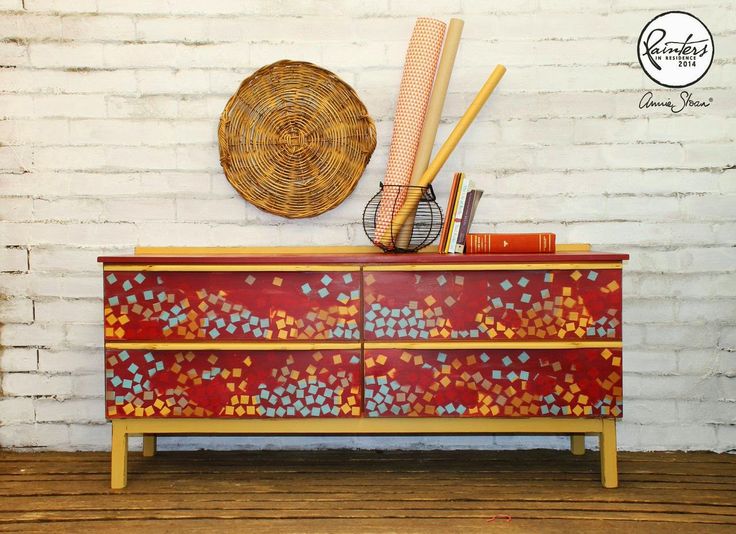 This variable consistency, however, helps you achieve the right thinness or thickness for your projects. Unlike milk paint brands that come ready to use, our milk paint powder lets you mix paint to the perfect consistency and create only as much or as little as you need to paint furniture, and it simplifies storage of the milk paint powder between projects.
Painting Wood Furniture Technique: Untreated or Raw Wood
There’s no need to use a primer or do much prep work before using milk paint to paint furniture or home decor, but keep in mind that it’s always best to follow the grain when painting raw wood. Since this medium comes in a powder form, you must first mix milk paint before you begin your project. To do this, you need water and an empty container in which to shake or stir the water and milk paint powder formulation.
Typically, our milk paint mix has a 1:1 ratio with water. Tap water is suitable, but for best results use distilled water. Simply add the mixture to an empty container, then mix it up until the contents are blended completely. After you mix milk paint, let the paint sit for roughly 20 minutes for any naturally occurring foam to settle. If you’d rather avoid letting the paint sit, add our Anti-Foaming Agent to the mixture according to the instructions so you can use your mixture immediately.
Painting Two Colors for a Rustic Look
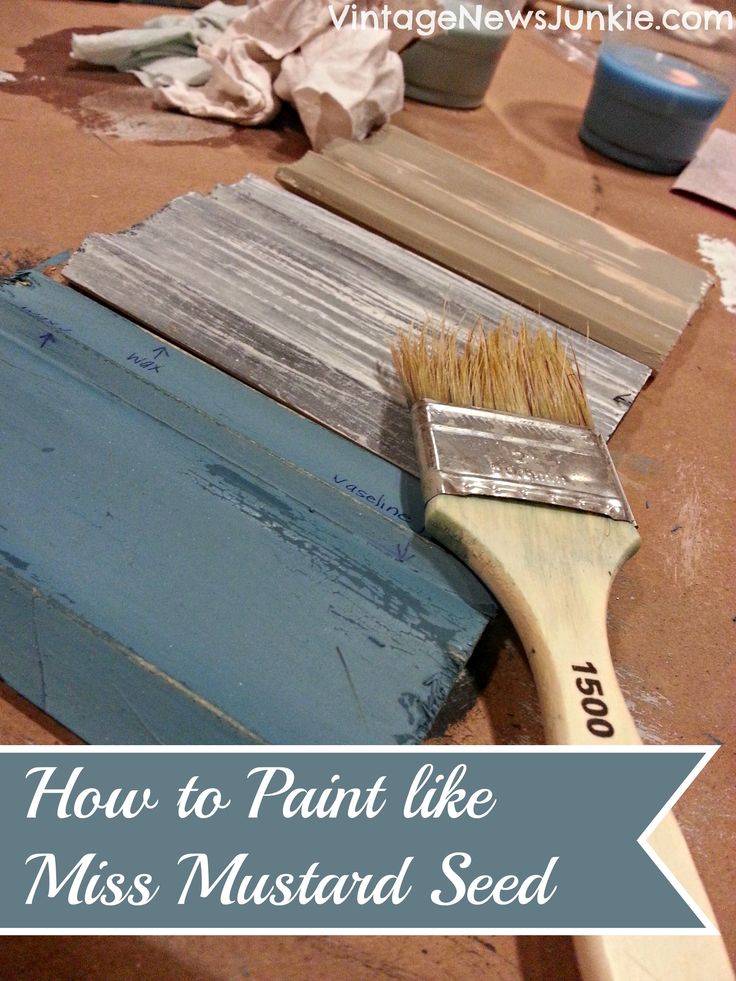
Choose two complementary yet contrasting paint colors, like blue and white milk paint. For this DIY project, start painting the undercoat color. Lightly sand the surface to which you’re applying milk paint to help the paint adhere, wipe away the dust, then use a paintbrush to apply one coat thinly.
Let that first coat dry for a half hout to an hour depending on the ambient conditions, then apply a second coat. Allow the freshly painted surface to dry overnight, because allowing the undercoat color to dry completely usually prevents the colors from mixing or muddling.
Next, apply one coat of paint in the second color and wait 20 minutes to an hour for it to dry.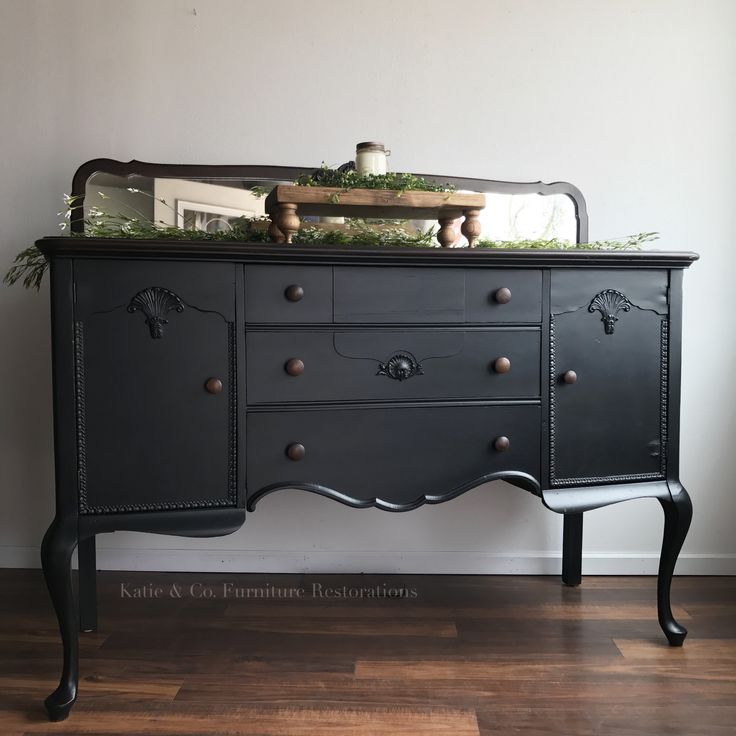 Then, dip a clean cloth in a bucket of water, wring it out well, then wipe it across areas where you’d like the undercoat color to show. Usually, those areas, including edges and spaces near handles, are best suited to distressed paint techniques. The cloth should slowly lift some color from the painted surface for a unique look.
If you’d like the rustic appearance to be more pronounced and look more antiqued, you can use fine-grit sandpaper to rough up a tough coat of milk paint a bit. Keep in mind, however, that sandpaper is much harder to control during the distressing process.
Painting Over a Finished Surface
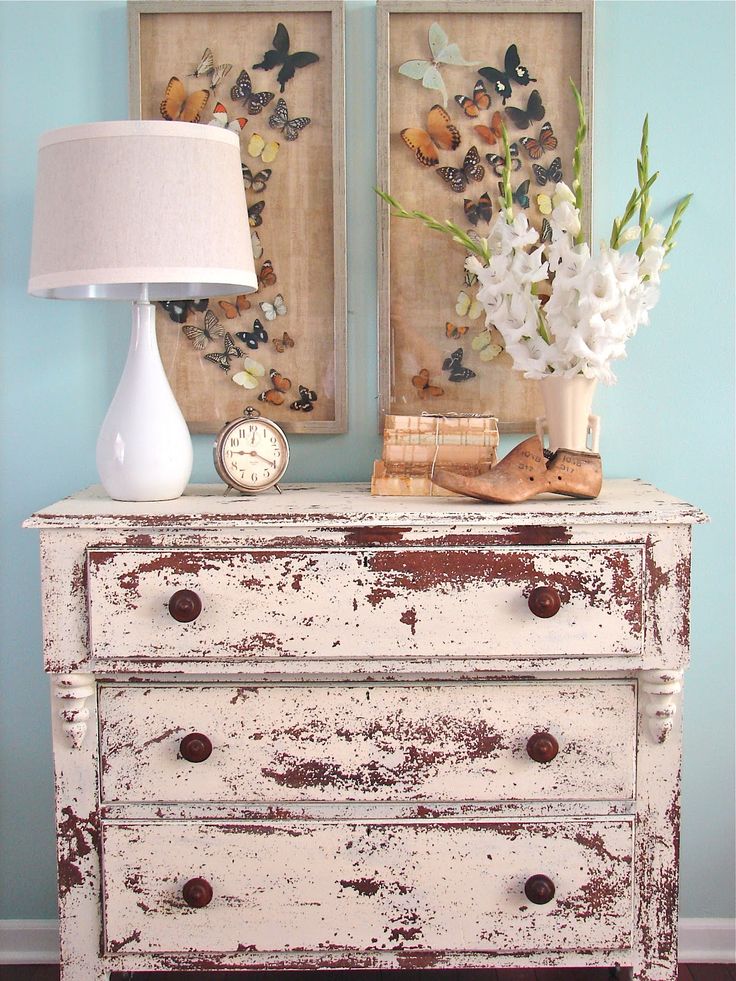
In most cases, you can apply milk paint directly over an already finished surface. To get a uniform and not a distressed finish, however, you may need to add a bonding agent like our Ultra Bond Adhesion Promoter to your milk paint powder mixture to ensure the paint adheres well to your surface. On the other hand, if you prefer a distressed or chippy look, apply the paint directly to the finished surface, making sure it’s clean first. When using true milk paint, chipping or flaking can occur when applied to a finished surface, giving you a natural antiqued look.
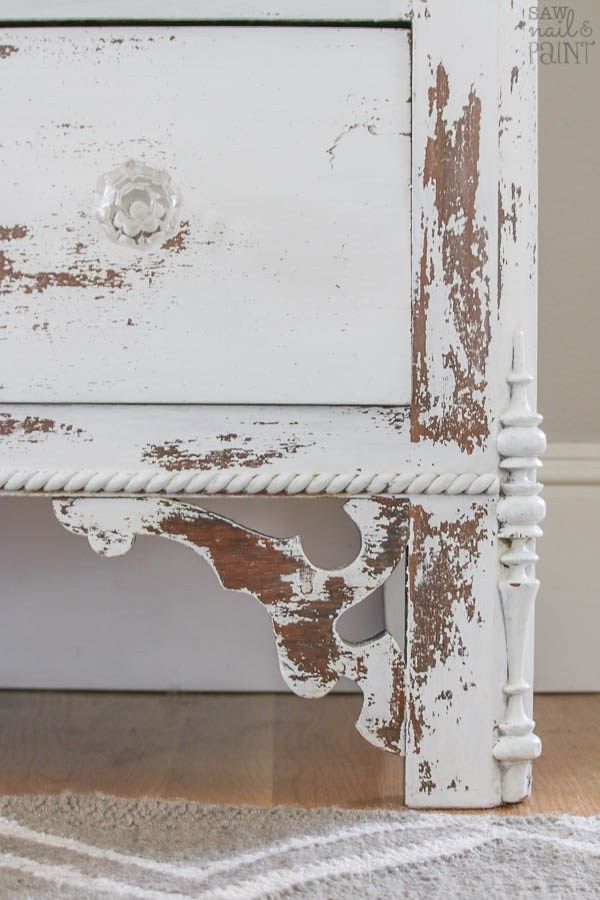
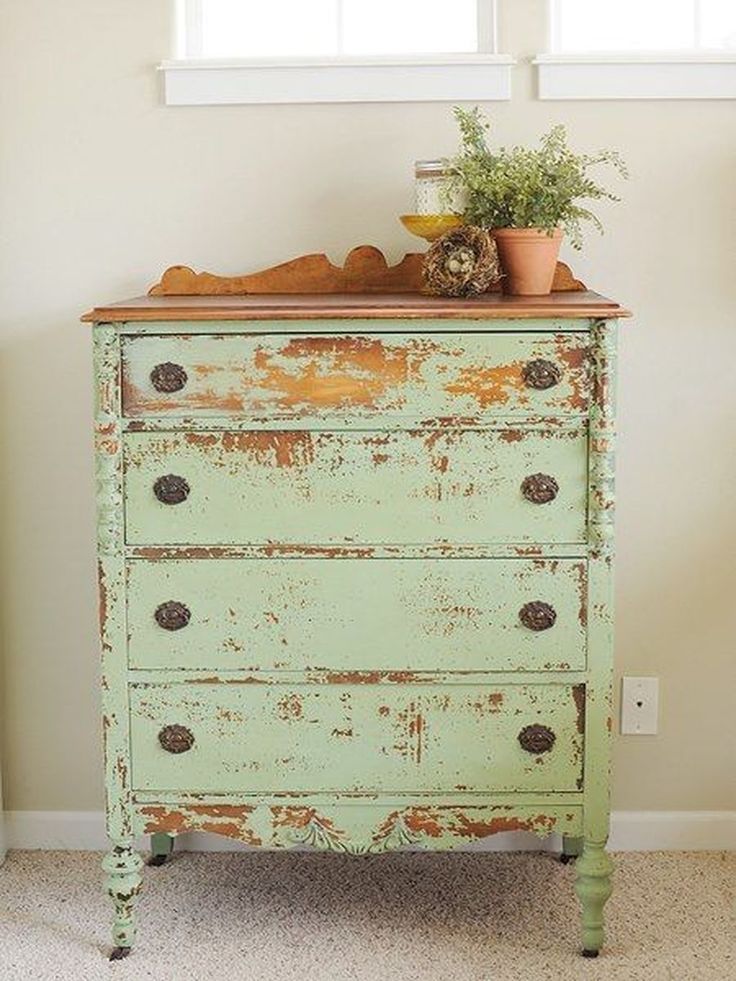
Getting a More Distressed Look
When painting your piece of furniture, if you want to achieve an even more rustic look, you can apply some Chippy Paste where you want it to look like the paint has chipped off for an authentically antique look.
For a crackled look, apply two thin coats of Natural Crackle Paint Finish as a topcoat over the first coat of milk paint you want to show through, allowing each coat to dry. Then, apply two coats of the top color of milk paint. The first coat should still be a bit wet when you apply the second coat. When you’re done, you can protect the existing finish of your painted furniture with a coat of pure tung oil, a finishing cream, a glaze or furniture wax.
Now that you understand the basics of distressing furniture, here’s an expert at the craft — Christina from Pretty Distressed — to help you learn more. If you’re looking for more painting tips, check out the blog for tons more DIY painting techniques and tips.
What is your business or online name?
Pretty Distressed
What is your first name?
Christina
If you had to give a 140 character summary of who you are and what you do, what would that be? (Don’t worry, you can cheat a bit on the character count!)
I’m a full time YouTuber and the creative force behind Pretty Distressed. You can find me making over thrifted furniture on my YouTube channel with over 385K subscribers as well as on Instagram and Tik Tok. I started Pretty Distressed in 2014 as a creative outlet from my day-to-day duties as a stay-at-home mom and have grown my brand into an authority in the furniture flipping space across all social platforms.
Could you explain your journey in how you came to be in the craft/trade that you are currently in?
I started thrifting and flipping furniture as a hobby back in 2014.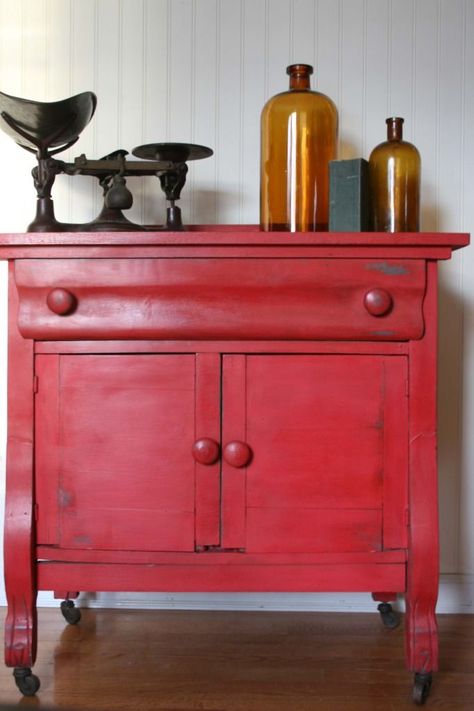 We had recently relocated to be near family, and bought quite a fixer upper. After new floors, carpet, lights, etc. there just wasn’t any budget left to furnish our home. It gave me the push I needed to start making over furniture we had and things I thrifted. I quickly fell in love with transforming old, discarded furniture. And it wasn’t long after that I started doing furniture flips for clients and selling online.
What is your favorite part about your craft/trade?
I love the symbolism behind what I do. I’m taking things that are discarded that someone thinks don’t hold value anymore, and redeeming them and giving them new life for someone else to enjoy. I love the message that anything can be brought back to life with a little love and care.
How did you find out about Real Milk Paint Co?
I found the Real Milk Paint Co through some amazing projects on Pinterest. I’m based in Tennessee where it is made, and just love the intention behind the brand and its products.
What is your favorite project to do with our products?
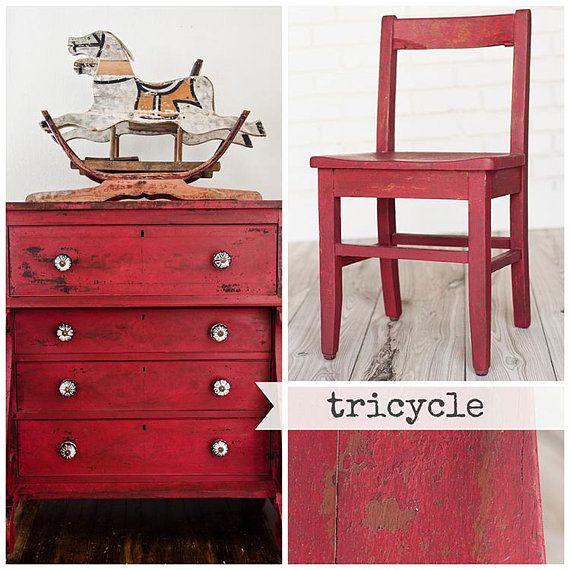
I’m a sucker for a chippy, old world finish, so I love using The Real Milk Paint Co. on really old furniture to give it that lived in look.
Do you have a particularly favorite product of ours? If so, what would be one tip/trick to offer to others that you have found produced great results?
I love all sealing waxes and how they give a rich finish free of brush strokes. I recently used the Wood Wax on a two toned piece that had natural wood and milk painted portions. I love that it is all natural and even food safe, and gave a beautiful finish on both substrates. When I’m applying it to a dark color, I like to use a dark old t-shirt to reduce any white lint popping up on my piece.
If you had to give one tip to those looking to “follow in your footsteps” what would it be?
Just create and don’t worry about what other people think.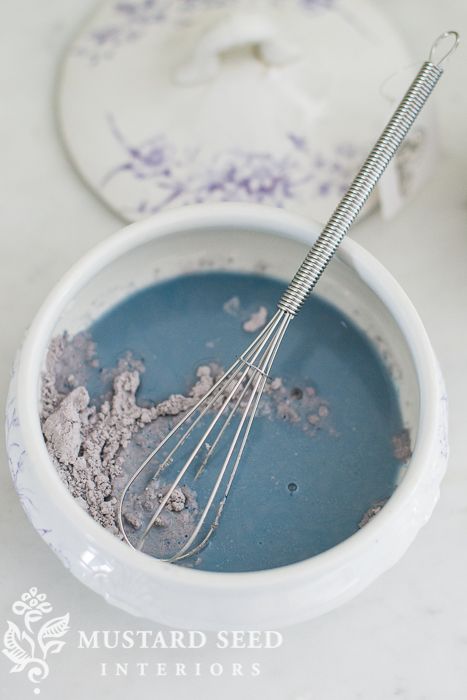 You will have people who love your projects and some that really hate them. You don’t have to please everyone, so don’t be afraid to be creative.
Where can people see your work or contact you?
https://www.prettydistressed.com/ https://www.instagram.com/pretty_distressed/ https://www.facebook.com/prettydistressed
https://www.youtube.com/christinamuscari https://www.tiktok.com/@pretty_distressed
Products Used:
Milk paint Mustard, Soft Wax Clear, Milk Paint Cheesecake, Arabian Night, Wood Wax
What is the best email to contact you by? This will only be used by us if we need additional information, clarification, or notifying you about your feature.
[email protected]
Trustpilot
Page load linkEasy Steps on How to Paint with Milk Paint on Furniture
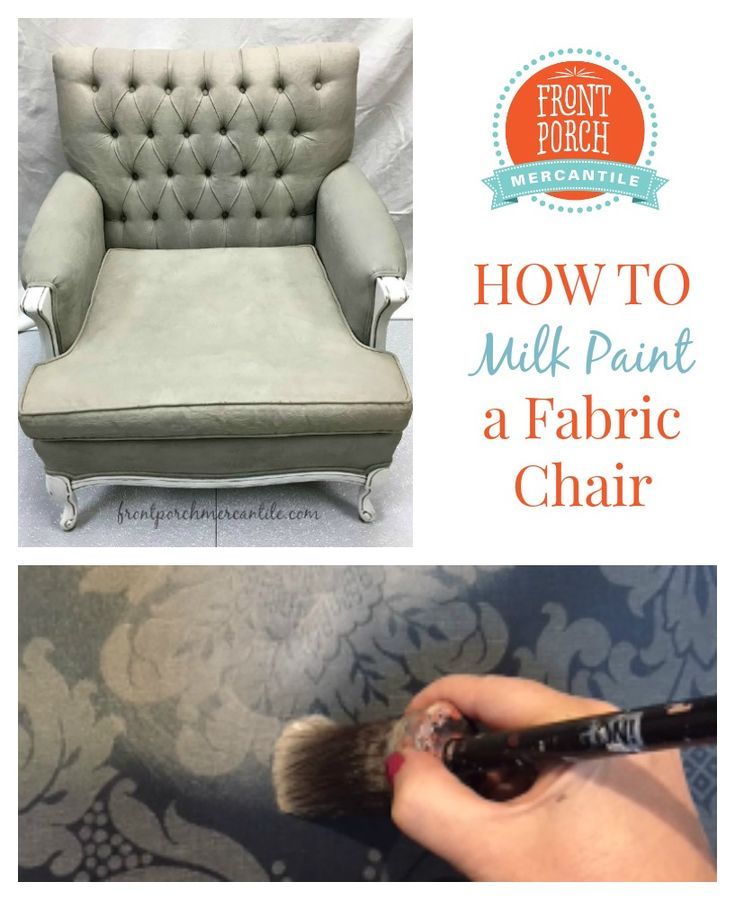
Here is a tutorial on how to paint with milk paint using the best milk paint brand on the market.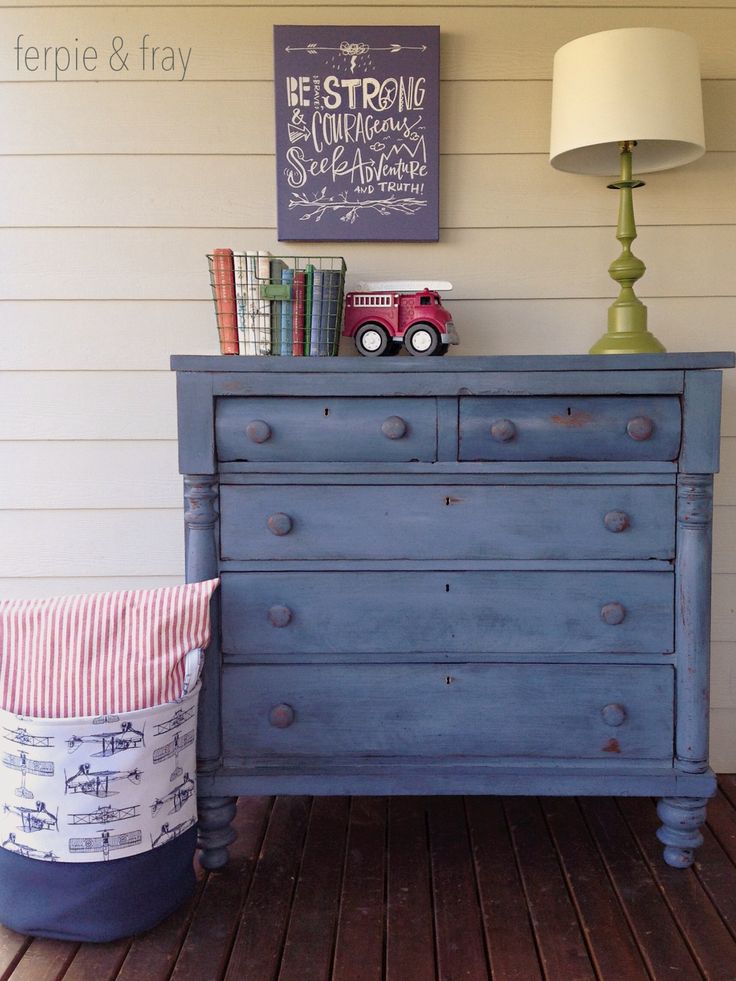 Do you know that yummy old fashioned milk paint finish on furniture at Grandma's house? Well, that look is achieved with real milk paint furniture look.
HOW TO PAINT WITH MILK PAINT
How to paint with milk paint is much easier than it looks.
There are so many milk paint brands out in the world, but I like Miss Mustard Seed's paint over others. I will share more about why I think it is the best milk paint brand on the market at the bottom of this post.
Update: Three years have passed since I painted this chair and the finish has not chipped and still looks beautiful.
Her paint has a long shelf life because it comes in natural paint powder form and is nontoxic. And her milk paint colors are AMAZING! There is a variety of colors to choose from that create that farmhouse vibe. Make sure to store this powder form paint at room temperature.
This post contains affiliate links, which means I receive a commission if you purchase at no cost to you using the links below.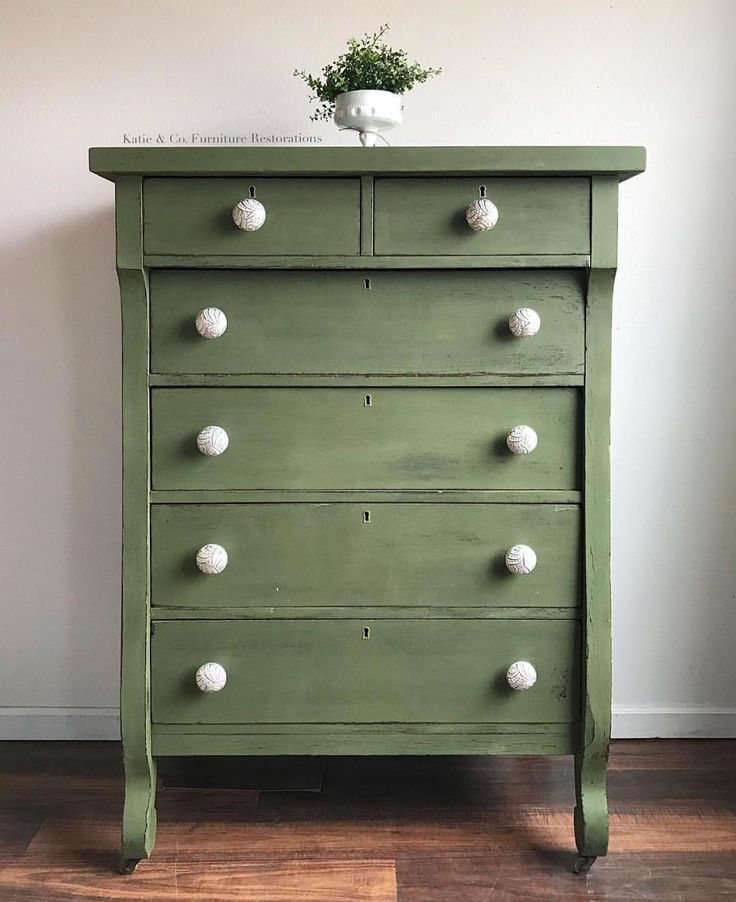 All opinions are all my own.
Check out this roundup we did of furniture transformed with Miss Mustard Seed milk paint colors for some great ideas.
But instead of me trying to convince you about MMS paint follow along as I take you through a tutorial on how to paint with milk paint.
WINDSOR CHAIR STORY
Long before I decided to try out natural paint, I found this beat-up Windsor chair on the side of the road along with its twin sister. One chair gave its life for the other by giving up some of its parts to make the other one whole.
So now it is going to get a natural paint transformation and here are the steps, so you too can transform a piece of furniture with milk paint.
1. SANDING THE CHAIR
The old finish on this chair is not level and needs a little prep work. If your old furniture is like mine start with sanding. I like to use180-200 grit sandpaper on a sponge block. A sponge block allows the sandpaper to mold around the edges.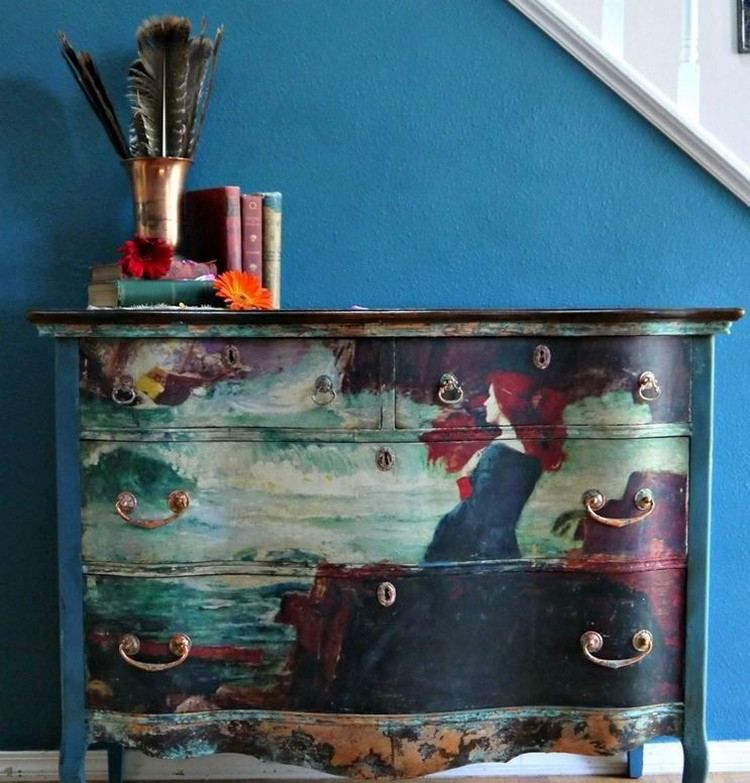 And boy, there are many edges on a Windsor chair.
The most important thing is to sand any areas where the paint is coming up. Make sure to get the area smooth. I like to run my hand across it and feel it to see if it is smooth after I sand it. It helps me to determine if I have it level.
2. WIPING OFF THE GRIT FROM THE SANDPAPER
Now the next step is relatively easy. Just dampen a paper towel and wipe down the chair. Make sure the paper towel is barely damp.
Also, if your chair is dirty go ahead and give it a washing. Then let it dry real good before the next step.
Ready Set Paint: A step by step guide to all things paint.
Discover a strategy to pick a paint color you will love. Read my privacy policy here.
3. PRIMER
In the world of milk paint, you do not always have to do prep work or use primer, but in my case, this chair's existing finish was peeling and shiny. It was recommended to me by Jennifer at Eight Hundred Furniture to add in a primer step.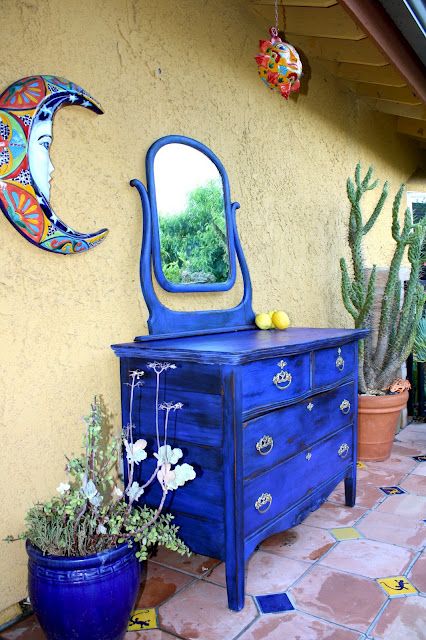
I am so glad she recommended this because not only did it help the paint adhere to the chair but the primer helped block the black color from running through the natural paint.
So if you need a primer to consider look at Kilz 2 or Extreme Bond Primer by Sherwin Williams, I have to say the Extreme Bond Primer worked like a charm.
Because this chair is black and milk paint is thin, you will probably need to add two coats of primer.
4. MIXING MILK PAINT
Before we dive into mixing the paint, you're probably asking where to buy milk paint? Well, you can purchase it on Amazon or go to Miss Mustard Seeds Website to find a list of retailers that might be close to you.
Okay, so now on to mixing the paint. Remember me saying that MMS paint has a long shelf life. Well, it comes in powder form, so you need to mix it. But please don't procrastinate on this step because it is super, super easy.
For my chair, I mixed a 1/4 cup of Ironstone milk powder, 1/4 cup of water and 1/4 cup of bonding agent.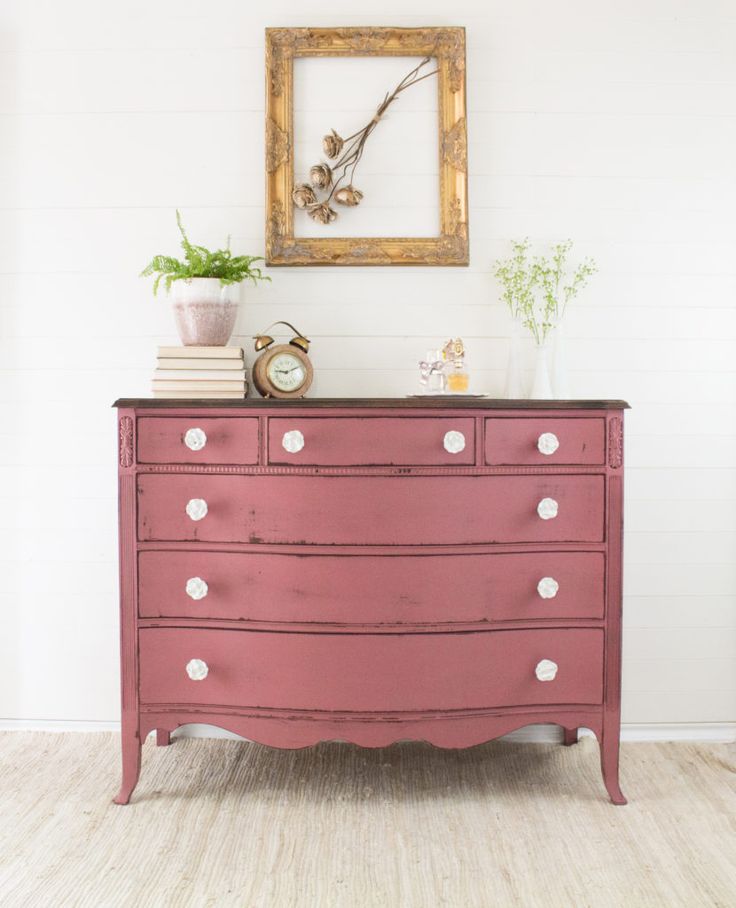
Start mixing the milk powder and a small amount of water first and as you stir keep adding water. Give it a good stir until you feel like all the clumps have dissolved. Then add your bonding agent. It is kind of like a runny glue and mixes in very easily.
See learning how to paint with natural paint is pretty easy.
Now let the paint sit for about 5 minutes. The paint sitting helps it to thicken a little, and now you are ready to paint.
5. PAINTING WITH MILK PAINT
Painting the natural paint was a little more tricky than expected. For the first coat of paint lightly add some paint to the end of your brush and tap it on the edge of the cup to move the paint downward.
Then apply it to the chair working from the top and moving your way down. Make sure to check for drips as you go. I worked on the drips with a dryer brush.
Natural paint is pretty forgiving so if you miss a drip go back over it with no problem. However, if you let the drip sit too long, it will want to stay for a while. So continually give all the edges a good look for those pesky drips.
Also, keep your stir stick in the cup while you are painting and stir it now and then to keep it blended.
Another detail I want to share is the brush I used. For the primer, I used the cheap wood handle brush. But for the paint, I went with the short handle Wooster synthetic brush. I found it help onto the paint easier and moved the paint onto the chair nicely.
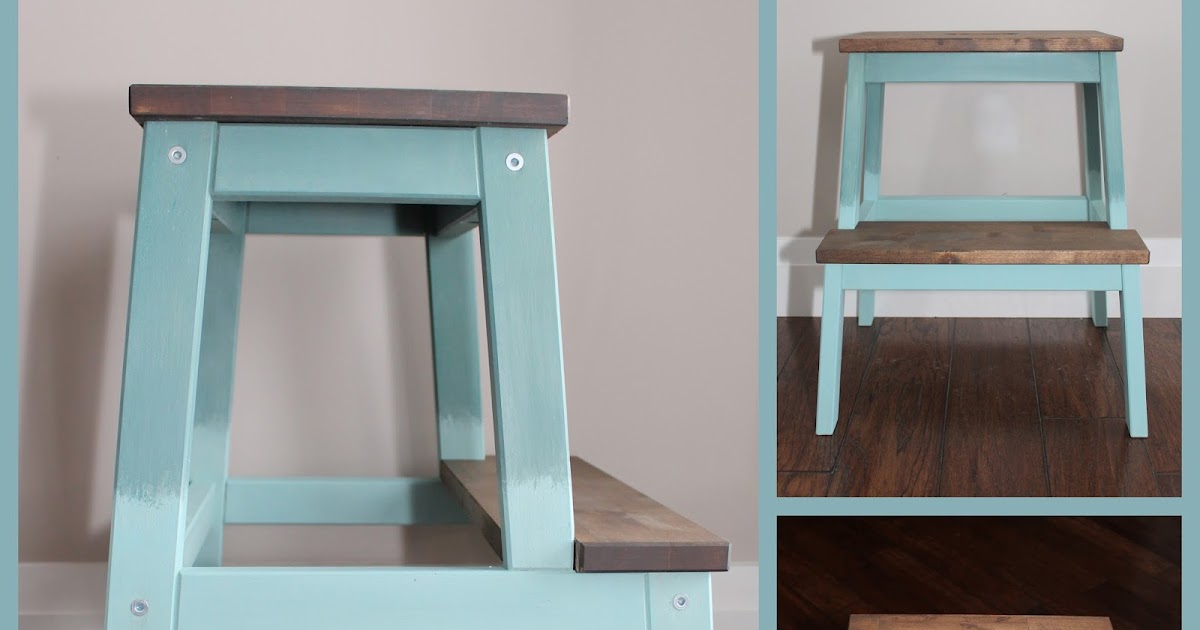
6. ONE COAT OF MILK PAINT
Here is an example of how one coat of Ironstone paint looks. It is a lovely matte finish. As you can see I need to add another layer.
7. SECOND COAT OF MILK PAINT
Now add another coat of paint after letting the first coat dry for an hour or so. It doesn't take long for the paint to dry so you can add another layer. Here is a photo of the second coat and honestly I think it dries less and less transparent. How to paint with milk paint is truly so easy!
8. Apply Top Coat (optional)
After you finish you can add a top coat of furniture wax or tough coat liquid form in a thin layer.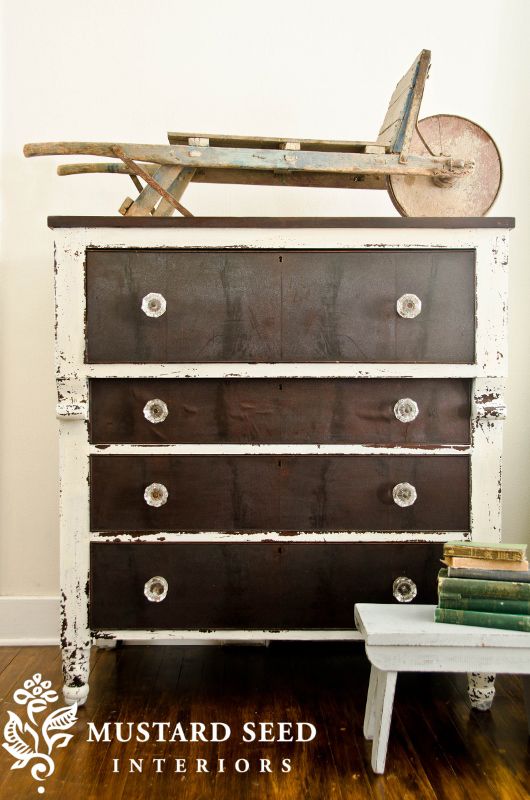 This will give it a harder smooth finish and make the chair more water-resistant. The more thin layers you add the tougher the finish.
I added the tough coat to my chair. Tough Coat is a much harder finish and is even more durable. I love this tough coat product because it is self-leveling and non-yellowing.
Once I added this top coat I let it dry for 24 hours before I sat anything on the piece of furniture.
FINISHED PRODUCT
I have to say I have fallen in love with the Miss Mustard Seed milk paint. Teaching you all how to paint with milk paint was so easy thanks to Jennifer and Miss Mustard Seeds videos on YouTube.
I cannot get over how beautiful this chair is now.
The natural paint color we used is Ironstone. It is a beautiful creamy white!
The chair is so pretty until all I wanted to do was style it instead of sitting in it. Just happens I got this candle and pillow recently so I think it has found a new home for a while until the chair will end up at my daughters' desk.
Last I said I would share more about this wonderful paint. Here are common questions I get about milk paint.
What ingredients are in milk paint?
The main ingredients in milk paint consist of milk protein, lime (calcium carbonate), pigments (pigment powders), and borax as a preservative but Miss Mustard Seed's milk paint has natural ingredients of milk protein, chalk, clay, limestone, and natural pigments. Her paint is true natural paint and has a very long shelf life because it comes in powder form. Milk paints are generally non-toxic but check your ingredients just in case.
What is easier to use milk paint or chalk paint?
Chalk paint is easier to use because you don't have to mix it and it has self-leveling qualities. However, milk paint gives a gorgeous finish and is much easier to get a farmhouse chippy look. I recommend making sure your surface is sanded smooth first and primed if you use natural paint.
If you want to learn more about chalk paint try my how to paint with chalk paint post.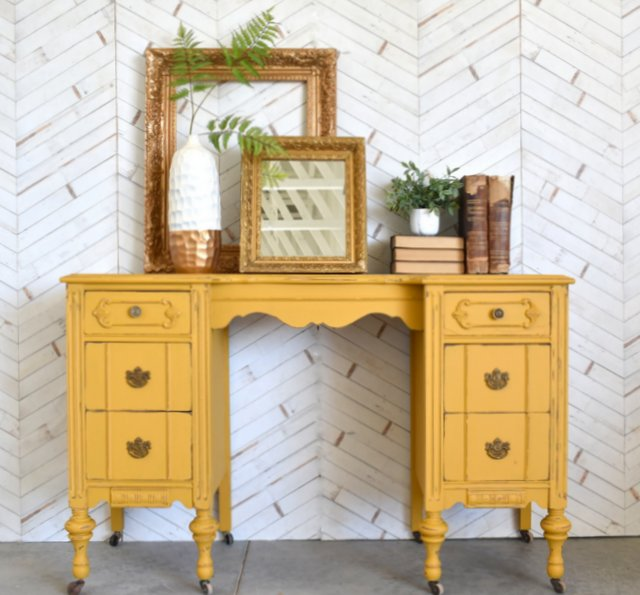 And if you are looking for more farmhouse paint colors try these paint colors at Life on Summerhill.
Is milk paint good for furniture?
Milk paint is great for furniture. You can paint it directly on raw wood or over a painted finish. I do recommend sanding and priming first to get a more flawless finish but if you are wanting an aged look skip the sanding and primer. Milk paint furniture gives the most beautiful look!
CONCLUSION
Overall I highly recommend the Miss Mustard Seed's milk paint. There are many beautiful paint colors to choose from like Eulalie's Sky, French Enamel, Layla's Mint, and Aviary. I have not tried other milkpaint brands, but MMS seems to be of good quality and I have heard General Finishes milk paint is good too. And it's the best milk paint furniture brand.
MILK PAINT FURNITURE PAINTING TIPS
I did run out of paint towards the end. I grabbed a tablespoon of powder, water and bonding agent and mixed up some more right in the jar I was using.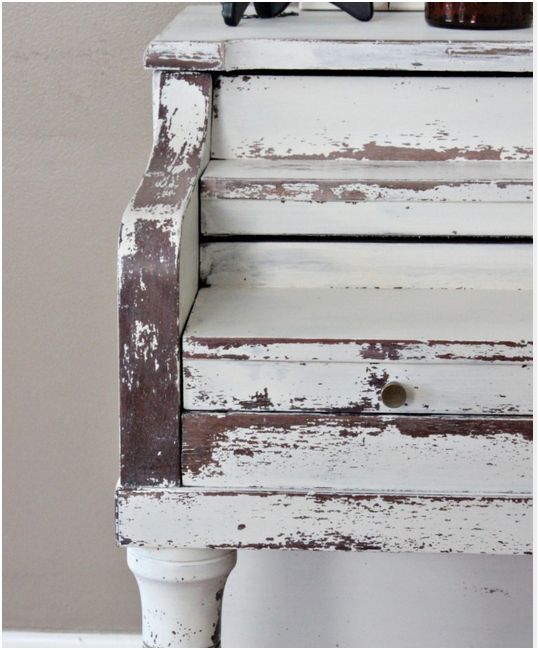
Also, let me encourage you to put the piece of furniture on a table. It saves your back and because the chair is elevated it is easier to see the drips.
And last, don't forget a drop cloth. You will for sure need it for this project because this paint is drippy. Or at least my paint was drippy. Haha!
Here is a recap of the steps on how to paint with milk paint over a painted piece of furniture.
- Begin by sanding over the existing paint. Paint carefully in areas where the existing paint is coming up
- Remove dust from sanding with a damp paper towel or tack cloth (clean the chair if needed at this step)
- Brush on primer starting at the top and move your way down
- Add another coat of primer if the first coat of milk paint doesn't cover well
- Mix paint and add the bonding agent
- Brush first layer milk paint onto chair working from the top and move down (watch for drips)
- Brush the second layer of milk paint if needed.
 Most likely you will need two unless you like the look
I hope you have enjoyed this DIY and I hope you try out milk-paint to get that delicious vintage painted look. What are you considering painting?
Since this post went live we have lived with our natural painted chair for a while now. The paint has stayed on the piece of furniture beautifully. I have no complaints and only good things to say about MMS paint. I do believe it is the best milk paint brand.
Happy Decorating!
If you enjoyed these ideas, please sign up for emails, so you don’t miss out on more fun decorating tips and ideas HERE.
Prep Time 30 minutes
Active Time 2 hours
Additional Time 1 day
Total Time 1 day 2 hours 30 minutes
Difficulty Easy
Estimated Cost 40.00
Materials
- Milk Paint
- Primer
- Bonding agent
- Furniture wax or tough coat liquid form
Tools
- 180-200 grit sandpaper on a sponge block
- Paper towels
- Wood handle paint brush
- Synthetic paint brush
Instructions
- Sand any areas where the paint is coming up.
 Make sure to get the area smooth.
 - Dampen a paper towel and wipe down the chair. Make sure the paper towel is barely damp.
- If your chair is dirty go ahead and give it a washing. Then let it dry real good before the next step.
- You do not always have to do prep work or use primer, but if the surface finish is peeling and shiny you may want to. Apply one or two coats using an inexpensive wood handle paint brush.
- Next, you'll mix the milk paint. Start mixing the milk powder and a small amount of water first and as you stir keep adding water. Give it a good stir until you feel like all the clumps have dissolved. Then add your bonding agent. It is kind of like a runny glue and mixes in very easily. Let the paint sit for about 5 minutes to thicken.
- For the first coat of paint, lightly add some paint to the end of your brush and tap it on the edge of the cup to move the paint downward. I recommend using a synthetic paint brush which will be easier and move the paint onto the furniture nicely.
- Apply the paint working from the top and moving your way down. Make sure to check for drips as you go.
- Keep your stir stick in the cup while you are painting and stir it now and then to keep it blended.
- Let the first coat dry for an hour and add another coat of paint if desired.
- After you finish you can add a top coat of furniture wax or tough coat liquid form in a thin layer.
- Let it dry for 24 hours before placing anything on the furniture.
Notes
- Put the piece of furniture on a table. It saves your back and because the chair is elevated it is easier to see the drips.
- If you let a drip sit too long, it will want to stay for a while. So continually give all the edges a good look for those pesky drips.
- Don't forget a drop cloth. You will for sure need it for this project because this paint is drippy.
Wall paintings and designer furniture in the artist's house in California
- Photo
- Lance Gerber
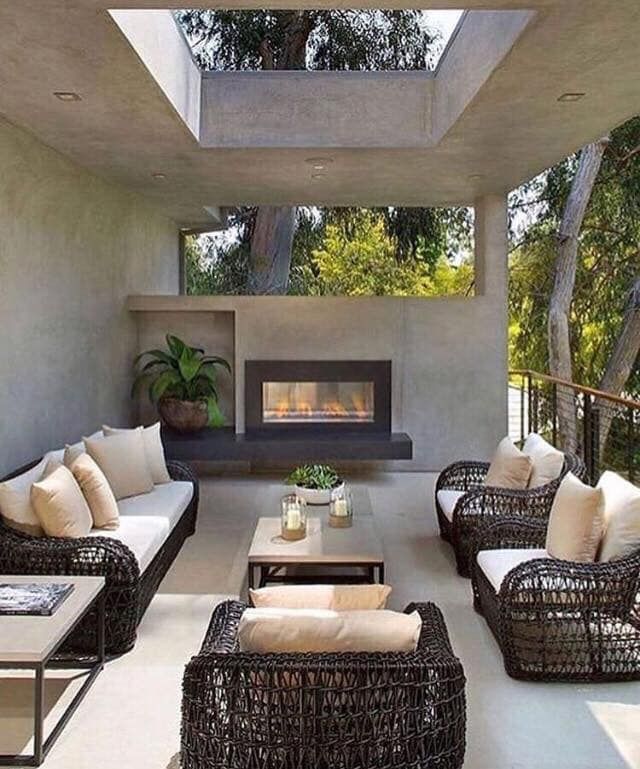
What can inspire creativity better than sunny California? For the owner of this house, California's Joshua Tree National Park became such a place of power, and soon he bought a house here to be creative, walk around the neighborhood and draw inspiration from desert landscapes.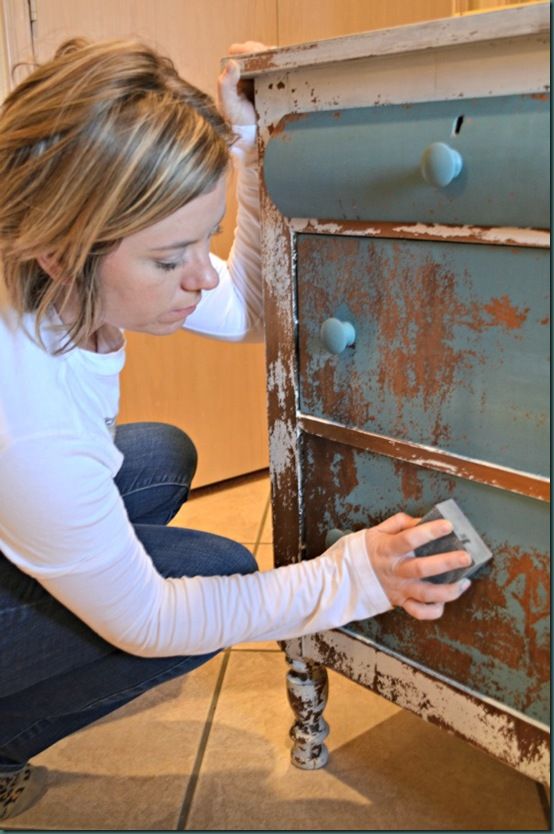
- Photo
- Lance Gerber
Los Angeles-based design studio Petronio has taken on the task of transforming an old home into a creative home. Its founders Mattia Feroni and Manuel Tortora were born and raised in Italy, so they absorbed the love of art and beauty with their mother's milk. In their projects, designers often draw inspiration from childhood memories of luxurious Italian palazzos, and also love European and American modernism. But in this case, they did not limit themselves to any particular style, but proceeded from the creative nature of the owner of the house and what their heart told them.
- Photo
- Lance Gerber
- Photo
- Lance Gerber
The interior is full of handicrafts, vintage furniture and art objects.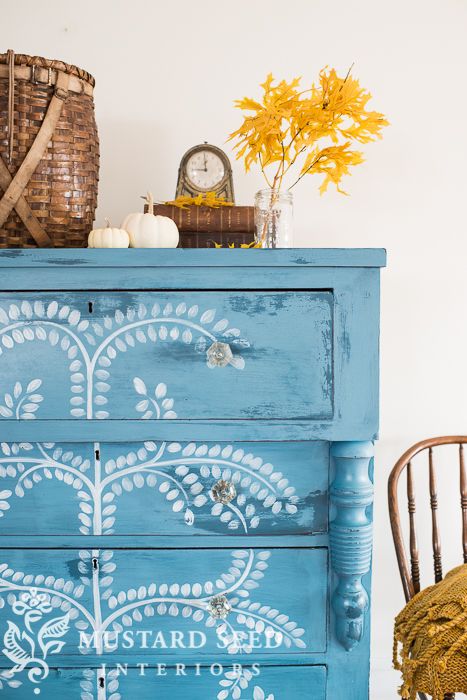 The centerpiece of the dining room is a mural by Californian artist Violet Hopkins that is reminiscent of the art of Jean Cocteau. The intricate forms of the pedestals and columns are sometimes reminiscent of the workshop of the sculptor Constantin Brancusi, while the overall palette reflects the richness of the natural world that opens from the windows.
- Photo
- Lance Gerber
“We drew inspiration in nature outside the window and mystical energy, which is filled with the Joshua Desert
- Photo
- Lancer ,000
“ Palette of this interior can be found in the palette of this interior richness of colors and soft silhouettes of magnificent landscapes outside, - the authors of the project say.
 “We wanted to fill the house with furniture in the spirit of Mediterranean villas, the ultra-modern workshops of artists such as Picasso or Brancusi, while not forgetting the original pieces of midcentury, Italian brutalism and American artisans.” By the way, soon everyone will be able to see the atmosphere of this “house of creativity” with their own eyes: the owner is going to rent it out through Airbnb. Want to take a vacation among the sand dunes in California? Take note!
 - photo
- Lancer
-
- Lancer Gerber
Tags
- America
How the restorer of furniture works - what does it do, how it does furniture
Aleksei Alexey Pavlov
Author
Share
We met at one of our jobs where we were assembling unmanned aerial vehicles.
 Prior to that, Sasha worked in industrial production, visited a construction site and was associated with nuclear energy. And Nastya was looking for herself: she was engaged in painting magnets, she lost a little time in the office (where she secretly killed time under the table, busying herself with sewing toys, embroidering; she even managed to glue a pinata to order), taught art lessons for children and adults, prepared for admission to creative universities, opened her own studio, worked as a furniture designer.
 I work as a stoker at the bush area
How is the shift work of the boiler house operator in the North
Sasha wanted to become a sailor and tried to get a job at the North-Western Shipping Company, although he forgot to get a specialized education for this. It’s easier for Nastya: she wanted to be an admiral, but when she entered the naval college, as a girl, she was given only two checkboxes - opposite the specialties that she could choose.
 They were far from her dream, because she would not even work for the ship in the end. The second dream was the pedagogical sphere - relatives were against it. But it still turned out to be more realistic than becoming an admiral.
 -
+
Now we work as furniture restorers. I would like to clarify: there is a museum restoration, and there is a commercial one. In the first case, we are talking about the restoration and preservation of the original state of objects of art and culture. We are not talking about such a restoration. Our case is about preserving the important and the past, but in the things of the customer! If there is no request from him to preserve the original appearance, then the thing will be updated using modern materials. Our task is to make it so that after our hands another master after many years could return everything back without spoiling anything. Ultimately, we are engaged in accurate and competent restoration of things: repair, manufacturing of lost elements, decorative work.
 The most important thing is to save the item from destruction. Most often, customers want to fit a thing into the new design of the apartment, but there are those who ask to stick to the original look as much as possible. All these works are the same in essence: we did not cause any harm, did not cause new scratches during cleaning, did not erase the veneer, did not break anything during disassembly - we did everything so that the thing was updated and the structure became strong.
 Thoughts about the profession appeared when we found ourselves in an apartment that had not been renovated for many years. There was no money to change everything, but I wanted to. I then watched a master class on repainting, sitting at a job that did not suit me. My parents taught me this approach: “If you want to be a designer, become an architect, learn the basics and then complete design courses, in this way you will become a good professional.” I decided to do it according to the same principle - not just “paint” with a brush, but learn the basics of restoration.
 Sasha and I agreed to start working together in this area and with great difficulty found a workshop where we were invited to work. We wrote and addressed each master, asked for apprentices, described and presented works that indirectly show that we can work with our hands.
 I work as a Kirchenmusikdirektor in Petrikirche on Nevsky Prospekt
Two centuries ago, Johann Sebastian Bach held the same position in Leipzig
We stayed in this workshop for a year. It was very difficult: life faded into the background, work was in full swing from early morning until late at night, sometimes I even had to stay overnight. There were three of us - two on site restorations, and I was alone in the studio. We found ourselves in seemingly unsolvable situations and always got out of them, encouraging each other that we were getting an indescribable experience. When the working conditions began to change for the worse, we decided to move on. We were looking for someone to become an apprentice, and Victor and Maria responded to us.
 In their workshop, they managed to learn the principles of working in the now popular mid-century style. After some time, we began to look for our own customers, a little later we managed to rent our premises. At first we rented a small garage in the city of Tosno, where it soon became crowded. Now we have a spacious room, but it is also temporary - we are building our own small building, where our workshop will be, cozy and comfortable. A separate painting room and a large room for work with a recreation area are planned.
 -
+
Each of our working days can be radically different from the previous one. We ourselves come and pick up things, and in the end we deliver them to customers. We also go and buy the necessary material ourselves. Sometimes we work late or at night. Everything is always different. In general, we are not afraid of complex work that requires non-standard solutions. For example, we lengthened the legs for a shell chair, changed the shape of the legs at the table, took orders that other craftsmen refused, calling it impossible.
 The only thing is that it is unpleasant to work with people who begin to "teach" and argue. We have our own store of knowledge and experience in work, we love to learn and gain new knowledge from other masters, but not from those people who are more important not to teach, but to seem smarter.
There are creative orders for which you first need to come up with and draw a sketch. The client has some unusual idea, which may involve painting, drawing on furniture, some unusual fabric for a chair. We think it over and sketch it. This work is already called a redesign, as the look of the furniture is completely changed or something new is added where it was not originally. In addition, we also have a lot of our own ideas. We are waiting for the appearance of free time: as soon as it appears, we will begin to translate them into reality, and then try to find a furniture house with our design. A trend that I like is mass individualization. Design is not for everyone, but for everyone.
 The designers we work with have recently chosen an eclectic interior: a mix of styles and stylistics best expresses the personality and its passions.
 -
+
I like to help people who come to us for help. Most importantly, treat things with respect, like a person who is many times older than you. The pieces of furniture that come to us have a huge amount of “knowledge”, and each has its own story. At a previous job, there was a case when the person who took the order listened to the request that during the restoration of the table it was required to save his autograph. I gave it to the master and did not pass on the information, as I considered it not so important; after the table was dismantled and cleaned. Only at the time of delivery of the order this nuance was remembered. I had to call the customer and explain everything. The table was handed over, but such an important moment was missed and greatly upset everyone.
There were many such orders, and even when we are not asked, we never touch this: we leave all the inscriptions, paintings and messages.
It is necessary to approach furniture with a soul, it is impossible in another way. The passage of time cannot be stopped, and what is lost is lost forever. Restoration, as far as possible, slows down this process - this is the peculiarity of this profession. We often jokingly call things “patients”, because our most important rule, like doctors, is “do no harm”. Previously, people bought furniture for life, not only their children, but also grandchildren and great-grandchildren managed to sit on the chairs of that time. And they, growing up and moving, take chairs and chairs with them, because this is a piece of their childhood.
Profession - shipbuilder
How and why Victor builds a copy of the sailing ship "Lord of the Seas" in the Crimea
If we talk about antique furniture, then it is more durable than what they do now. Armchairs, which are 50 years old today, stand firmly on their feet and, after restoration, will live the same amount. Now many are accustomed to the cult of consumption: you buy it, install it, after a while you get tired, you sell it or throw it away, you buy a new one.
 With this approach, no one requires durability from furniture, quality is associated with cost. In the middle price segment, it is almost impossible to find something that will combine excellent quality and meet fashion trends.
 -
+
Our very first order was probably crazy - a set of Viennese chairs. We made it wherever we could, we constantly took it with us, since we did not have a workshop, horrifying our parents, who already did not appreciate our profession and wanted us to find a normal and official job. They painted these chairs in dad's bathhouse, thereby spoiling only the purchased Jacuzzi, after which he kicked us out into the street; we built a small greenhouse, where we finished the work, spending a lot of effort and nerves. The chairs turned out well, they still delight customers.
Once we restored a table for a woman for whom it was very important. He reminded her of her son, who was an architect and once wanted to take on the restoration himself, but did not have time to finish the work: he died.
 The customer searched for and chose the masters for a very long time, and finally came to us. The table stood in a room that was all hung with the works and drawings of her son.
 A stamping painter shows how dishes are made at the Imperial Porcelain Factory
“If everything is added to taste, the result will be wonderful”
We love what we do. Although sometimes it is difficult for us, but the emotions of people are worth it. It's not just handwork - it's tactile work. We have always wanted to be engaged in crafts and creativity, to open our own business and invest in it all the time and effort. We wanted to be involved in something more, not to waste time, and in the end we also help someone's creation to continue to exist and be needed.
-
+
We are shoemakers without boots. Now we are just solving the issue with our apartment, after which we will begin the repair. In the meantime, we collect and force our workshop with things that are waiting for their time.
Learn more