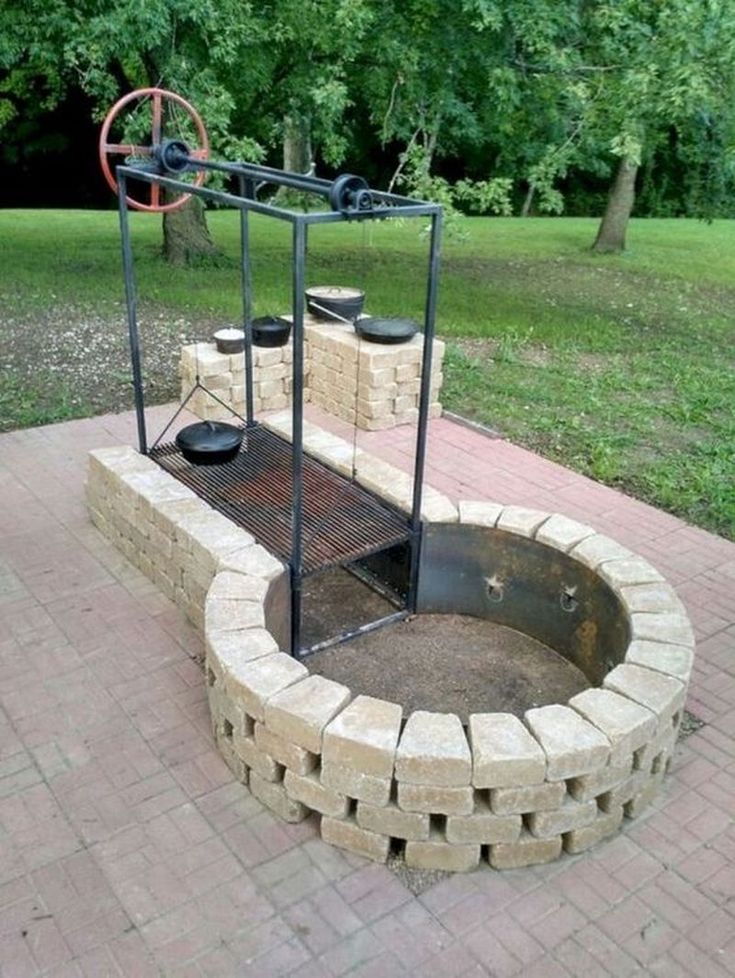
Making a pond
How to Create a Backyard Pond
Project details
Skill
1 out of 5 Easy It's all digging and small-rock moving, though you might need a hand pulling the liner taut
Cost
$100 to $300 for a 40-square-foot pond
Estimated Time
6 hours
Dan Gibbon may have spent the last three and a half decades around Wisconsin's flat farmlands, but the lapping waters of Lake Superior, where he grew up, were always on his mind. So recently he got out the shovel and started making a pond. His wife, Gloria, had her doubts ("I wasn't that excited with the idea of digging up the backyard," she says). But her hesitance melted away when she saw the fruits of Dan's labor.
Dan's pond attracts birds, frogs, butterflies, and crickets (no mosquitoes, though, thanks to the moving water). It also attracts Dan and Gloria. The couple often sip their coffees there while watching the sunrise, and lounge by the gurgling water after dark. "My wife is actually really glad I did this," says Dan. "And so am I—it's so relaxing."
Related
3 Ways to Reduce Road Noise in Your Backyard
Now, we figure if a retired schoolteacher can build a pond in a weekend, so can you. So we asked This Old House senior technical editor Mark Powers to show you how to make the one you see here—just like Dan's. All you need is a shovel and a few materials, and before you know it, you'll have your own little "great lake" to enjoy.
Creating a Backyard Pond: An Overview
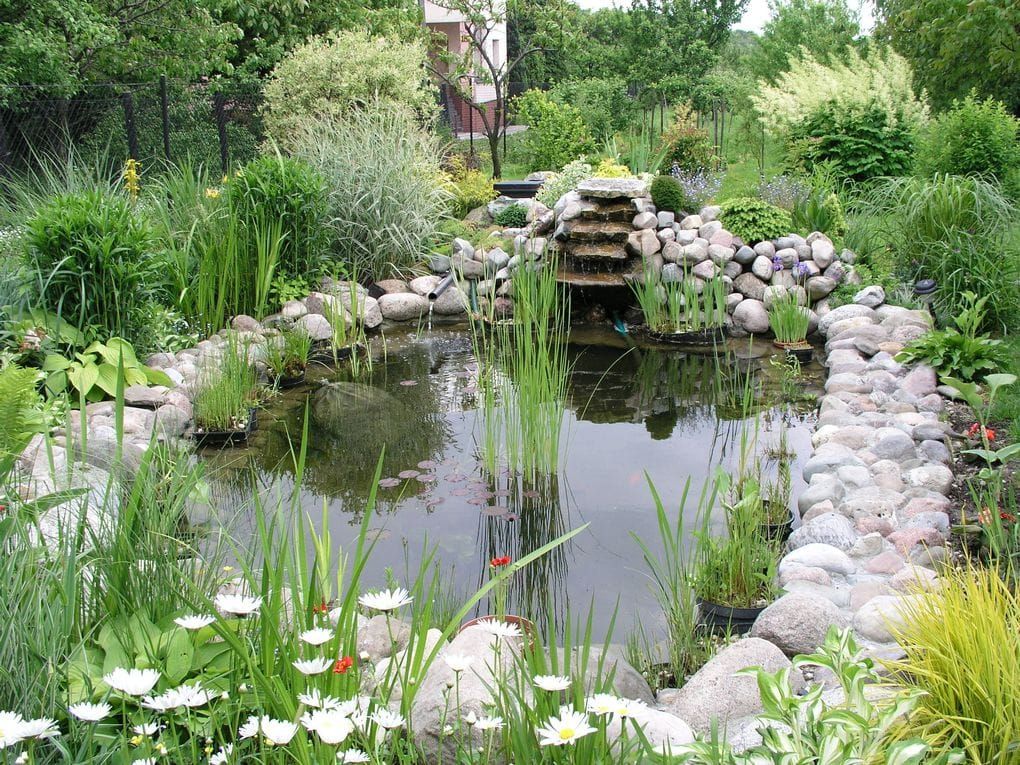
Gregory NemecA free-form pond like Dan Gibbon's can be customized for any landscape, with different rocks, plants, shapes, and waterfalls. But we'll give you some helpful points on placement, size, and materials.
Where to build your pond
Before you start, call 811 or your local one-call center to have electric and gas lines marked so you know where to dig to steer clear of them. Then, when you map out the location of your pond, put it where it will be noticed—visible from a window, off a patio, or along a walkway—but away from the play areas of small children or pets.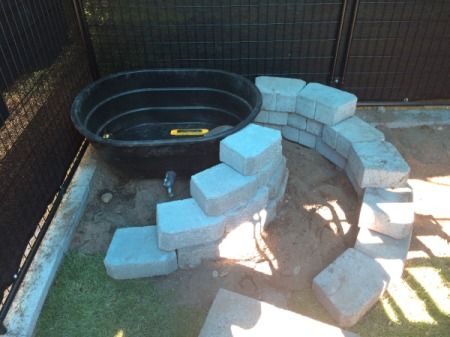
Keep clear of major root systems or mature trees, which can block too much of the sunlight plants and fish need. You'll also need to be within reach of a grounded exterior outlet so you can plug in a pump, an essential tool for keeping the water aerated; most pumps come with a maximum cord length of 25 feet, and extension cords are not recommended. You may need to bury the power cord a few inches down in PVC pipe to hide it.
Space permitting, you need at least 40 cubic feet for your pond—about 7 feet by 4 feet—to keep the water clean. An initial shallow terrace just inside the perimeter of the pond holds rocks that conceal the liner edge and keep it in place. A second, deeper terrace supports plants that live in the water and help balance the pond's ecosystem.
As you dig, you must slope the sides of the pond so that if the water freezes, the ice will push up instead of against the liner. Even in warmer climates, small ponds can change temperature rapidly, so if you're adding fish you'll want a deeper pond that will maintain a more consistent temperature and accommodate the fish—18 to 24 inches for goldfish and at least 3 feet for koi.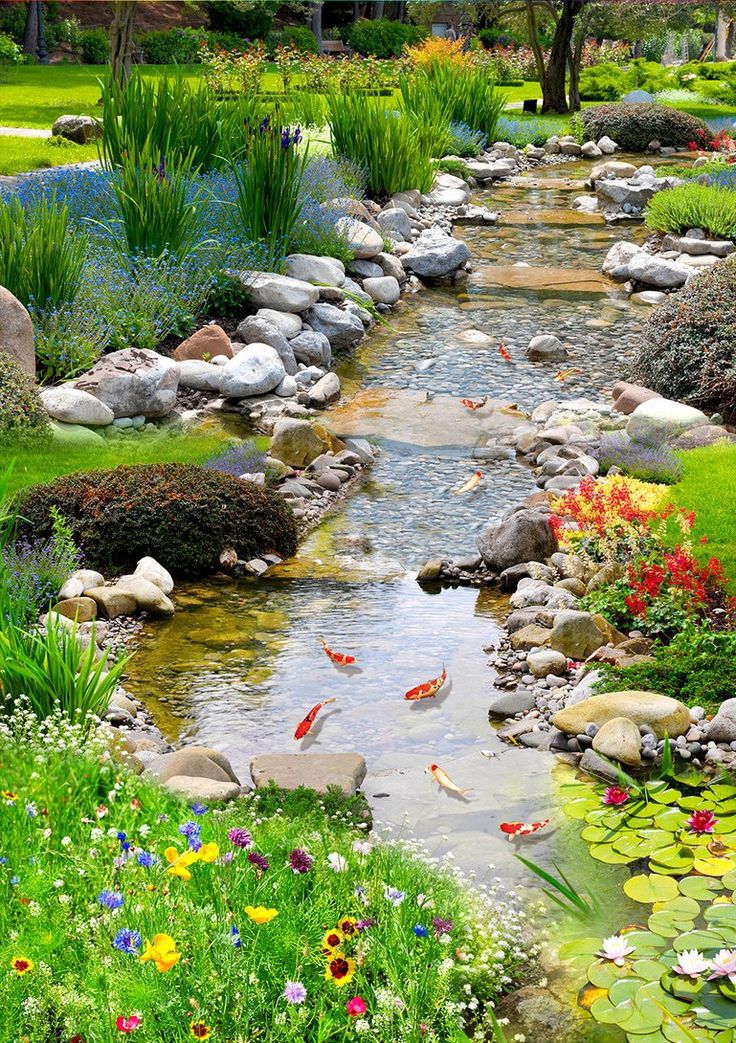
Additional materials
To maintain the consistent depth of the water, you need to line the pond. A thin layer of sand and old newspapers or burlap bags softens the jagged edges of rocks and roots. But over that, you will need to put a waterproof skin.
There are several types of flexible liners meant for small ponds—made from polypropylene and EPDM, among other materials. Look for one that's weather-resistant, so it will stand up to UV rays and freezing temperatures. It should also be rated "fish-safe" if you plan to stock your pond and come with a warranty of 10 to 20 years so your pond will be watertight for many years to come.
How to Build a Backyard Pond: A Step-by-Step Guide
Step 1: Excavate the area
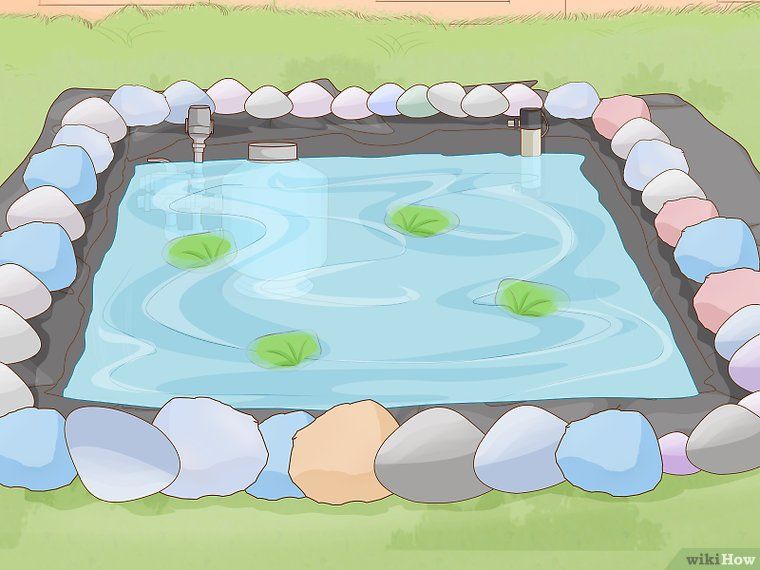
Kolin Smith- Layout the size and shape of your pond with a rope or garden hose. Using a spade, dig down 3 inches in a 1-foot-wide ring outside the outline to create the stone-border shelf.
- Next, create a plant terrace by digging a 1-foot-wide shelf 8 inches deep inside the rope outline.
 Only dig the terrace in areas where you plan to put plants.
 - Continue digging inside the plant terrace to make the bed of the pond—a minimum of 18 inches deep, with a slight slope.
Step 2: Level the pond's edges
- Set a 2x4 across the excavated hole and lay a level on top of it. Roughly level the pond's edges. Then carve out a 6-inch-wide, 1-inch-deep channel on one side to redirect overflow.
- Also dig a shallow trench to the nearest electrical outlet for the PVC conduit, which will hold the pump cord.
Step 3: Prepare the base
- Beginning in the center of the hole, distribute a 1-inch layer of sand around the entire base and on the terraced shelves.
- Cover the sand and the sides of the hole with a ½-inch-thick lining of newspaper to provide a protective layer under the lining.
- Smooth the entire surface by hand and remove any roots or stones that could bulge through the lining.
Step 4: Line the pond
- Cut a piece of liner to be 4 or more feet wider and longer than the pond.
- Center the liner over the hole so there are 1 to 2 feet of excess on one side and the rest of the excess is on the opposite side.
- Set two stones on the shorter excess to hold the liner in place. Beginning at this end, press the liner down along the inside edge and then along the bottom of the hole, working your way around the pond.
- Smooth out creases and folds and push the liner tightly into crevices.
Reader Tip: "Avoid building your pond directly under a tree or you'll find yourself cleaning quite a few soggy leaves in the fall." —Dave Martin, Natick, MA
Kolin SmithStep 5: Fill the pond
- Using a garden hose, fill the pond with water. As it fills, continuously pull the liner taut on each side. If necessary, have a helper pull from the opposite direction.
- Fill the pond until the water reaches the top border shelf.
Reader Tip: "Whenever you water your plant beds, also 'water' your pond to make up for any liquid that has evaporated over the week." —Dan Gibbon, Medford, WI
Step 6: Install the pump
- Thread the pump's cord through a section of PVC conduit cut to length. Place the PVC conduit in the trench and backfill the soil.
- Hold one end of the recirculating hose as you set the pump in the deepest part of the hole.
Step 7: Create a rock border
- Fill the overflow channel with pea gravel for drainage.
- Arrange flat rocks along the border so the liner's edge is covered but no more than one-third of each rock hangs over the water.
- Then, cover this first ring of rocks with a second one. Stagger the seams between the stones, and set them back from the edge of the first ring a bit. Arrange and rearrange the rocks until they sit in an interlocking position. Experiment with your outcropping until you have a natural, staggered look.
Step 8: Secure and conceal the hose
- Where the hose exits the water, wedge it between two rocks without crushing it. Conceal it with a third rock. Arrange and secure the hose through the rocks and over a stack to position the waterfall.
- Once the pump and hose are secure, plug the cord into an exterior GFCI outlet. Watch the water flow and make sure it looks natural leaving the hose but still spills back into the pond.
Step 9: Landscape your pond
Add plants in and around the pond. Keep the pump on during daytime hours, but shut it off at night so it doesn't attract nocturnal animals.
Materials
- Garden hose
Tools
Tools & Materials
-
Shovel
-
Level
-
Tape measure
-
Utility knife
How to build a pond or lake on your property
We interview a permaculture design expert about installing a water feature while avoiding common pitfalls and mistakes.
After years of dreaming, saving and endless searching you’ve found your near-perfect rural property.
It has just the right amount of acreage, a gorgeous home site, unbeatable views and is the ideal distance to and from civilization.
Yes, your dream property is perfect…except for one small thing.
It’s missing a water feature.
Specifically, it’s missing a pond.
A pond offers numerous benefits for landowners, from providing water for livestock, to entertainment for the kids and promoting eco-diversity within the landscape.
But, despite its aesthetic and functional joys there are a lot of factors to consider before installing any size pond.
Factors like:
-
Is your land and soil actually suited for a pond?
-
How much will it cost to build?
-
Can you do it yourself?
-
Whom do you need to contact to install the pond? (Hint: it’s not usually just a guy with a digger.)
-
Are short-term costs worthy of the long-term gain?
In today’s post, Spiral Ridge Permaculture's Cliff Davis, a southeastern permaculture design expert, consultant, lecturer, homesteader and “applied farming ecologist,” will guide you through everything you need to know about installing a pond on your near-perfect piece of land.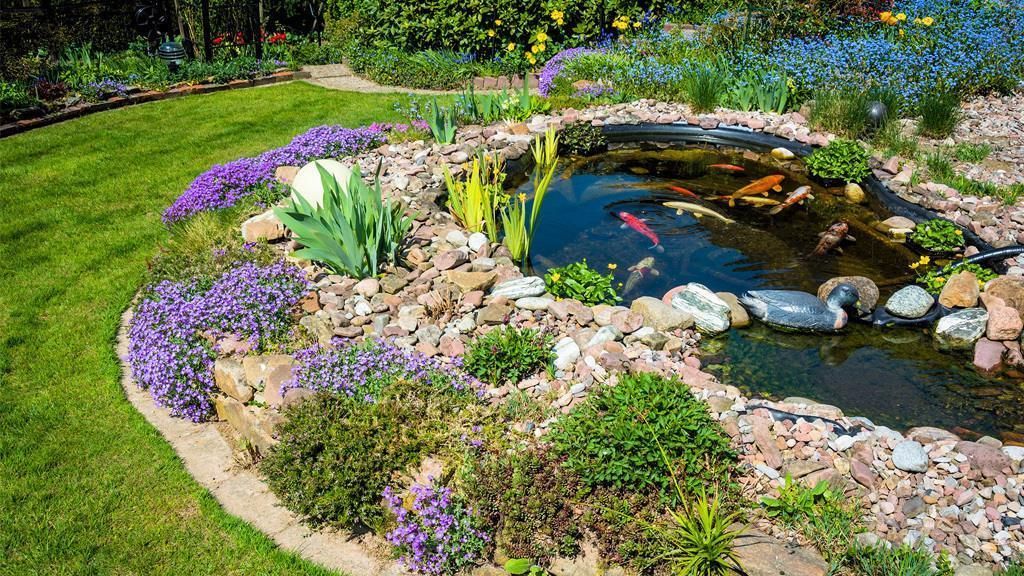
The Significance and Far-Reaching Benefits of Ponds
Permaculture design has become infamous in drought-ridden regions, such as Australia and the Middle East, for restoring barren landscapes to fertile oases through specific systems of water capturing, planting and other land design and animal management principles.
Cliff describes his role in permaculture design as, “Designing regenerative human settlements that mimic nature and the intelligence behind ecosystems. As a permaculture designer, I use the land’s ecology and eco-intelligence to design more effective and resilient farm systems.”
Here’s how it relates to building a beautiful, fertile, functional pond.
“When most people think of a pond’s purpose, they think of them for fishing, irrigation, or watering livestock—which is their primary function in the southeast.”
But, according to Cliff, a permaculture-designed pond, or system of ponds, can offer so much more to both the land and its inhabitants.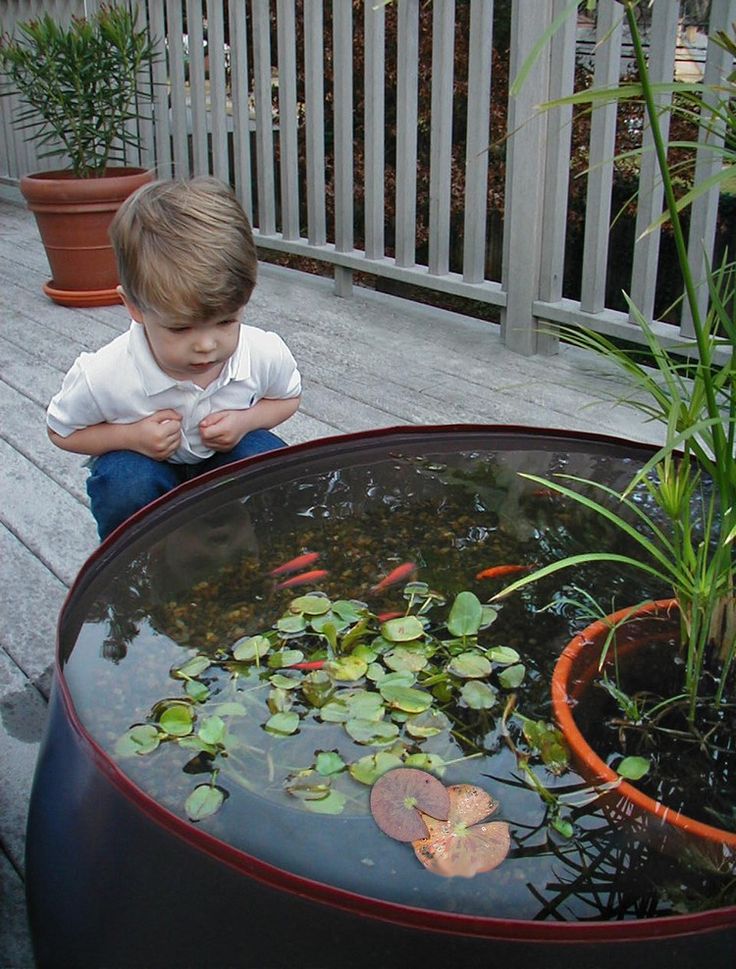
“Properly designed and positioned ponds create microclimates within a property. They help humidify the landscape—water holds a lot of heat, so if you can have a pond ecosystem near your orchards or your house you can stabilize more of the environment around those areas and even prevent frost and delay flowering in spring.”
Cliff also explains that besides creating remarkable microclimates, ponds help create biodiversity by recharging the ground water table and providing habitat for frogs and wildlife that help keep the ecosystem in check.
Ponds positioned on slopes (known as ridge dams) can also help sustain your land and livestock during times of drought (a memory fresh in the minds of Southern landowners everywhere).
“When you begin to view the significance of a pond from this perspective, it helps you start to think about how many functions you can get out of this thing you’re about to spend thousands of dollars on.”
Now that your mind is beginning to brim with possibilities, let’s take a look at Cliff’s step-by-step tips for successful pond integration.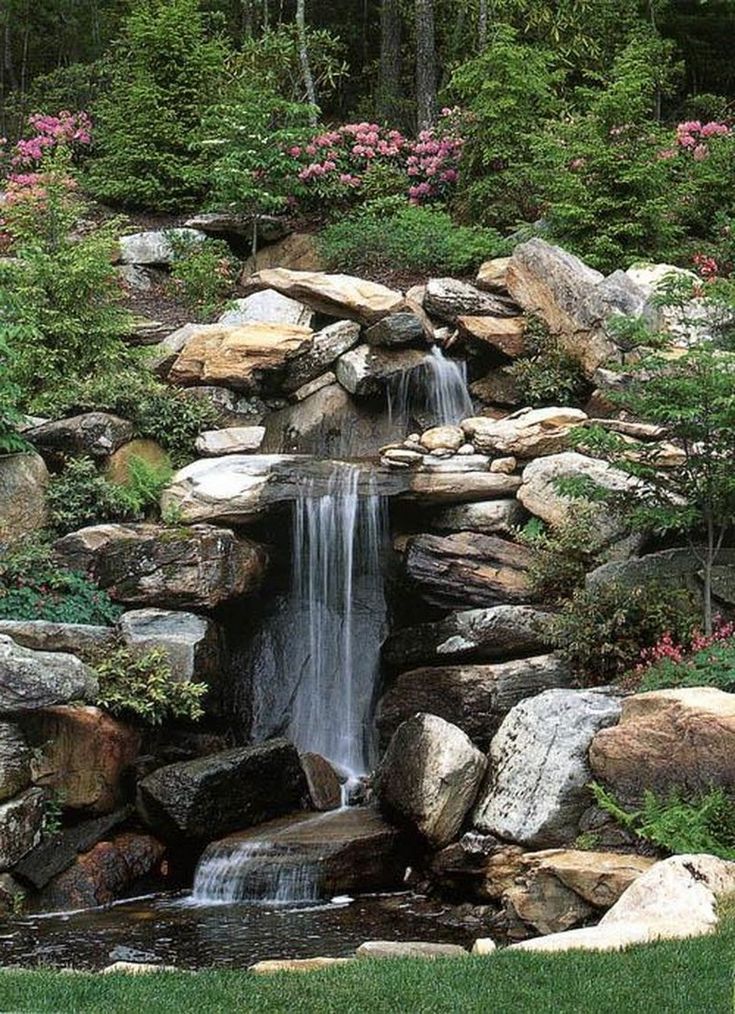
Step 1: Decide what function(s) your pond will serve
Before you start dreaming about your pond’s location, landscaping or size, Cliff recommends asking yourself the big question: Why do I really want a pond, now and in the future?
“You don’t want to just build a pond, you want to build an eco-system. You can irrigate and water livestock from a pond, but you can also use it to create an aquaculture, raise geese, fish, mitigate drought and create microclimates. So there’s a lot to consider in the function of your pond.”
Take some time to carefully consider and research your big WHY before you start calling up contractors.
This will determine a number of crucial design aspects such as the pond’s ideal location, size, expert advice required and the type of aquaculture you want to create.
Step 2: Determine whether or not your land and soil are suited for a pond
Though a pond can be installed on nearly any type of land, your soil has to be compatible or the water won’t hold.
Cliff refers to soil that holds water as “plastic soil."
In the Southeast most of us have clay, which is ideal for ponds, but if your property has sandy, rocky, or dispersive soil you may have to truck in clay such as bentonite clay, which gets expensive.
“At that point you have to do a cost-benefit analysis to see if it’s really worth it for the long-run, because there are other water-capturing features you can consider.”
“Whether or not your land is suited for a pond also depends on what kind of usage you want out of it. If you want to gravity feed water with piping for irrigation using a ridge dam (a pond positioned mid to mid-high slope), then having gentle hills is a must.”
“The best landscape is where you can get the most uses.”
Step 3: Do your due diligence (and avoid the biggest mistake aspiring pond owners make)
As a permaculture design consultant, Cliff has been called in to assess and fix a lot of ponds-gone-wrong.
“I’ve seen a couple-acre pond built that didn’t hold water.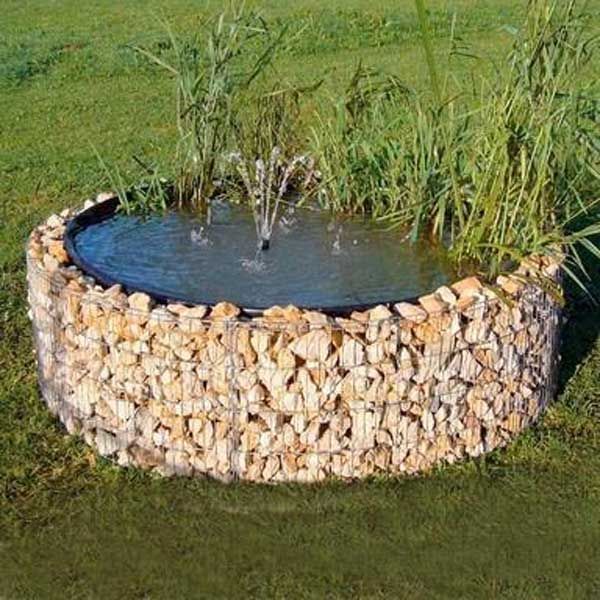 If you can imagine that’s kind of like pumping a 500-foot well dry, and that’s a major problem in the design process.”
“What I typically tell people is due diligence is the best thing you can do in the beginning.”
Cliff references one of his permaculture design mentors, Darren Doherty, co-author of the much-anticipated “The Regrarians Handbook”, who explains there are 28 steps to building a pond - and during the first 14 you’re not even digging.
“Managing water on a landscape is one of the most important things we design for.”
Here are 4 key tips to ensure you've done your due diligence before you build a pond:
1. Do “dry-runs” with help from a professional
“Get a hold of the National Resources Conservation Service (NRSC) or your local extension office, find out who the geologist is and talk to them about your soil and the possibility of putting in a pond in your area. Do exploratory pits to see what the soil looks like.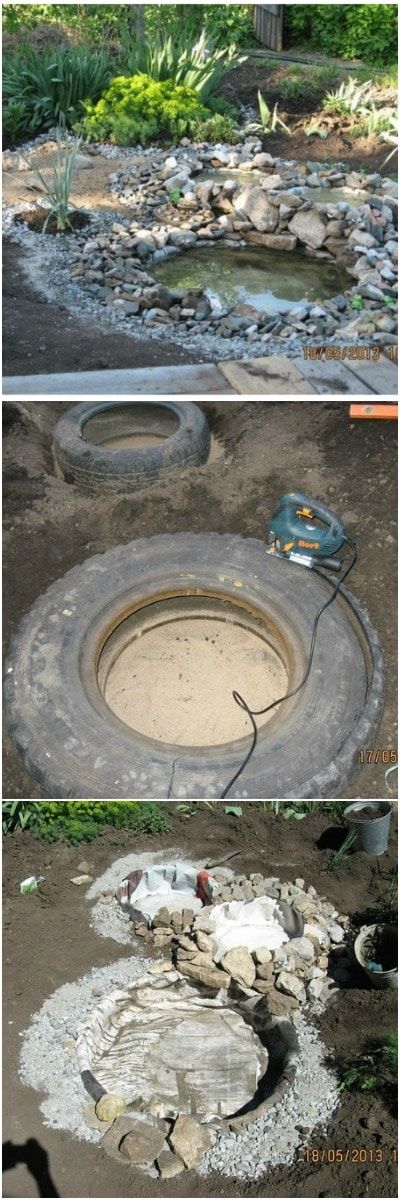 If it’s rocky, then most likely it’s not going to work so well because you can’t build a pond with dispersive soil.”
2. Consider rainfall AND watershed
Though rainfall is an important consideration, Cliff emphasizes you must also account for watershed when determining the best location for your pond.
Watershed is an area of land that feeds all the water running under it and draining off of it into a body of water on your land. In this case that body of water is your pond site.
“You have to do a study of the area and the watershed that is going to be filling up the pond. That’s very important, because I’ve seen ponds that don’t fill up because there’s not enough watershed to fill that size pond, so you have to size your pond accordingly.”
“And you have to build the spillways (for overflow) to be able to handle a lot of water coming out, like a 100 year flood, so it doesn’t spill over the back of the dam wall. Those have to be designed and built very well.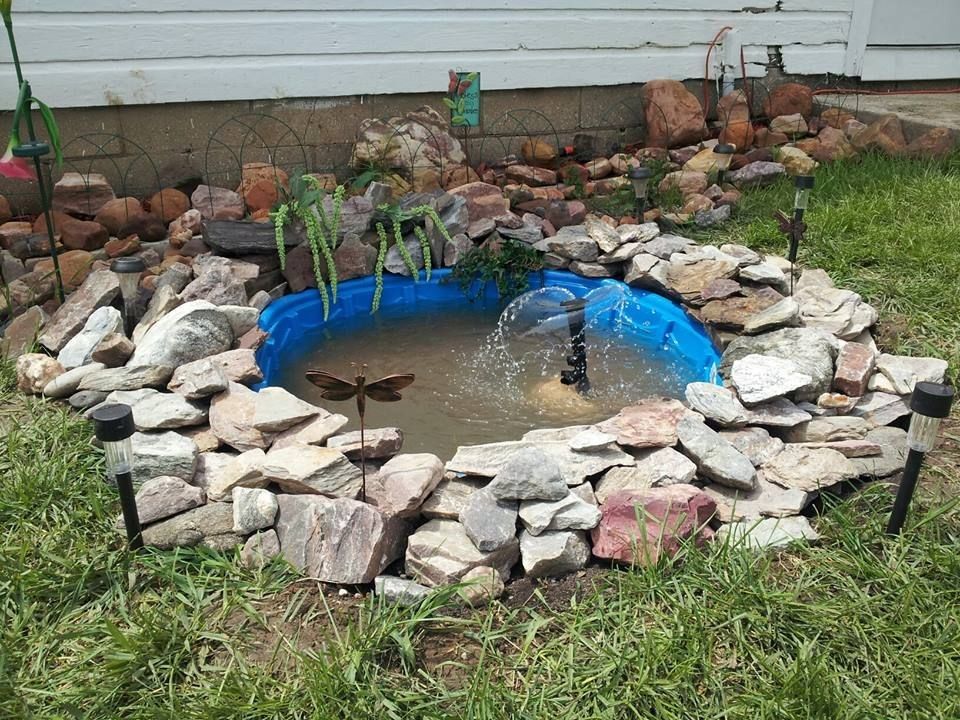 ”
”
3. Want a clean, clear and full pond? Beware of trees.
“The other thing I notice when ponds won’t hold water is they have a lot of the trees growing on the backside of the dam wall.”
“That’s not good, because the trees will either wick the water from the pond or can cause capillaries from the backside of the dam into the pond leading to multiple drainage issues. Then if the tree dies, the roots die, causing a piping network that can drain water.”
“If you want the pond to hold water and for that water to be clean, then it’s best not to have trees around the dam wall at all (no pun intended).”
4. Don’t forget to check on legalities
In most areas there are legal restrictions on how close your dam or pond can be built to an existing creek, stream, river, reservoir, etc. Ignore these to your peril because you could get sued.
Then there’s the what-if factor, “I don’t recommend building a big dam wall up above your house. If you have your house on a slope with the dam above it and the dam wall breaches it could completely destroy what’s beneath it. And you have to consider your neighbors too.”
You also need to research permits, review your insurance policy and determine whether or not your pond will be used for fire protection.
Step 4: Finding and hiring your pond building and design team
Though you may think you can just hire a machine operator to dig a hole (or dig it yourself), you may need to consult with contractors, designers, operators, geologists, insurance agents and even engineers before you break ground.
“First, find the portfolio of the contractor who’s going to build this thing. You’re paying someone $100-$150 an hour so you want to know exactly what they plan to do to your land and what they’ve done in the past.”
“Ask them questions like: Do you know what freeboard is on a pond (that’s the difference between the water level and the still weight on the dam wall)? Do they know about keying in a dam? How do they build the dams? I highly recommend studying and researching how dams are supposed to be built for yourself.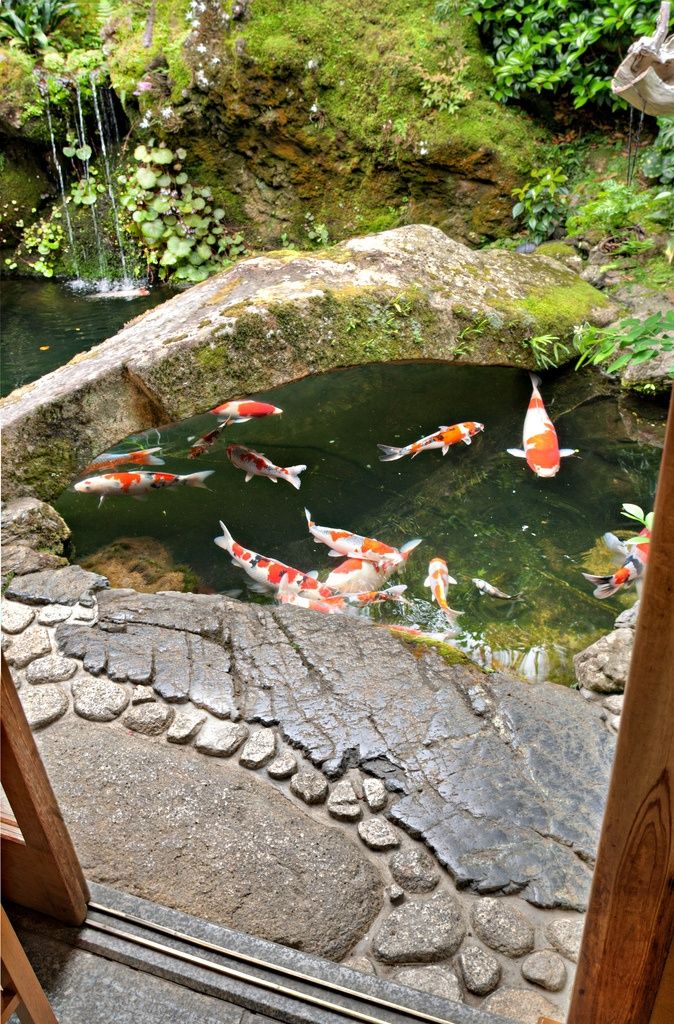 ”
”
“Sometimes the scale of the pond will demand different consultants or different people working on it. If your pond will be more than 2-3 acres you may have to hire hydrological engineers—and remember, engineers don’t cost you money - they save you money.”
If you’re interested in implementing permaculture design principles into your landscape, a regional design expert like Cliff can provide a wealth of knowledge and recommendations for your unique land.
Though there are DIY options for pond building, Cliff recommends getting help when you need it:
“Even though DIY is kind of my MO, I would say don’t be too cheap to hire the right people to help you. You’re making a major change to your landscape that you’re going to have to live with forever, plus ponds are very costly to fix if they’re not installed right in the first place.”
Bottom line, be your own advocate in researching the specifics of building your pond, but seriously consider seeking help from the experts when it comes to the physical task of building it.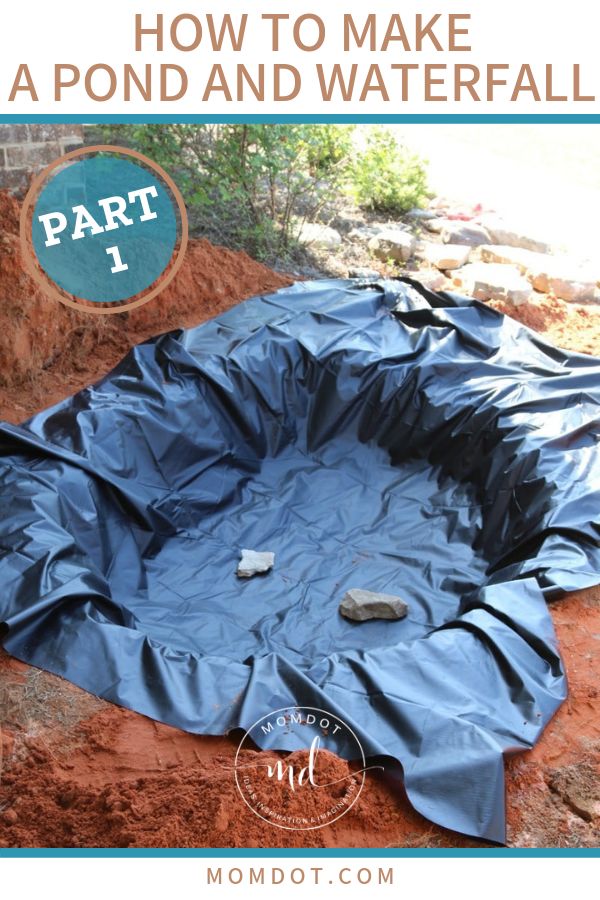
Step 5: Introduce plants and wildlife carefully
“First of all, keep ducks off your pond at first (using fencing) because they’ll consume all the plant material that wants to grow in there.”
“As soon as the pond’s built you need to get some really good perennial grass, like fescue, on the backside of the dam wall. You want to get that covered and mulched right away to help stop any erosion of the wall.”
“You can start planting aquatics on the edges. Contact your fish and wildlife department for help determining stocking rates, and I highly recommend talking to your local extension agent for advice and options.”
Cliff also warns against letting cattle or other livestock walk directly into your pond at any stage in its life, as this destroys the aquatic life and introduces bacteria and parasites that disrupt and pollute the pond’s eco-system.
Ponds within a sustainable water infrastructure
For farmers interested in using a pond or ponds to capture and utilize water sustainably, Cliff emphasizes it is important to view them as only one piece (albeit an important piece) of your water infrastructure.
“There are multiple ways to capture and recycle water, such as cisterns off of your barns that collect run-off, grazing your animals better and building topsoil faster so it can hold water in the system. So when you think of water don’t just think of ponds, think of using them within a tool belt of water infrastructure.”
As you can see, integrating a successful pond into your landscape involves a lot more than just digging a hole and figuring out how to fill it. It takes research, planning, strategic design, investment and team work.
But when built the right way for the right reasons, a pond can offer beauty, recreation and sustainable functionality to your perfect piece of land.
To learn more about Cliff and his permaculture courses and workshops, upcoming lectures, permaculture and pond design consulting, internships, and his farm visit: www.spiralridgepermaculture.com. Cliff will also be speaking at the 2016 Georgia Organics Conference & Expo, February 26-27 in Columbus, GA.
Further reading: To learn more about designing and building your ultimate pond, Cliff recommends: www.regrarians.org.
Are you looking for rural land to set up your dream homesite? Raydient Places + Properties features land for sale throughout the South from Florida to Texas at RaydientPlaces.com.
How to make a pond in the country with your own hands: 4 sure ways and 30 ideas
A pond is a wonderful decoration for a summer residence. It can be equipped even on a small plot without resorting to the help of professionals. If desired, fish can be put into it or plants can be planted.
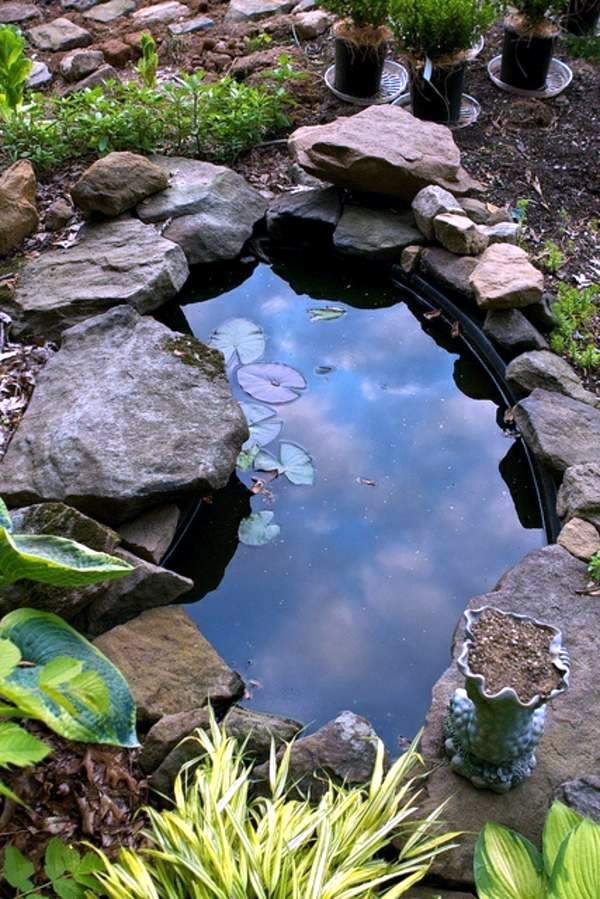
The first thing to think about when choosing a base for a pond is what will be its volume and shape. The pond can have the most natural shape, decorated with stones and aquatic plants.
Photo: Instagram nastya_shi_za
Or have a clear geometric shape. It all depends on the style of the site design.
Photo: Instagram _idei_dizainakrasoti
-
Baths, saunas, swimming pools
How to make a shower in the country with your own hands: tips for installing and choosing materials
1 Concrete Pond Base
Concrete is an inexpensive and durable material that can be used to create a pond of any shape and large enough.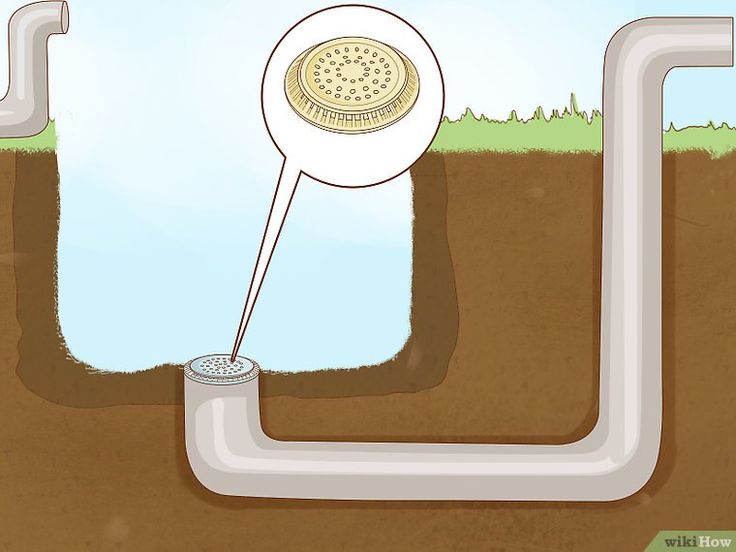 The best place for a concrete pond in a summer cottage will be a sunny area remote from trees and utilities.
First of all, you need to dig a hole for the future pond and make waterproofing using films, clay or a ready-made container.
Photo: Instagram akvarium_org
Next, the first layer of concrete is applied and reinforcement is carried out - strengthening the structure due to the reinforcing mesh, which is pressed into the first layer. When the first layer dries, a second layer is applied, at least 5 cm thick. If necessary, the bottom is leveled with cement mortar, and the protruding parts are smoothed.
After drying, the concrete pond is often decorated with tiles or decorative stones. Pebbles or rubble are poured along the edges of the reservoir. Often figurines of birds and animals are used.
First of all, a pit breaks out on the site. It must match the outline and depth of the pond shape. A form is immersed in it and with the help of a measuring rod it is determined whether it is installed evenly. The gap between the mold and the pit is covered with sand and rammed. After that, soil is laid out in the pond, plants are planted and water is poured. Very often, such ponds are additionally decorated with small fountains.
The first step is to create a pit of the required shape.
Photo: Instagram resttv
After creating the foundation pit and covering it with film, you need to decide whether a layer of pebbles or stone will be laid out on the film. Such a coating will make the pond suitable for planting plants and protect the bottom from mechanical damage.
Photo: Instagram abramovans_vision
On the other hand, such a pond will require regular cleaning, as decay processes of organic particles will occur between the film and stones. Therefore, many prefer to leave the film uncovered.
Photo: Instagram vesna_veda
The size of the required piece of film is calculated as follows: 2 depths and 1 meter of margin should be added to the length, and then to the width of the pond.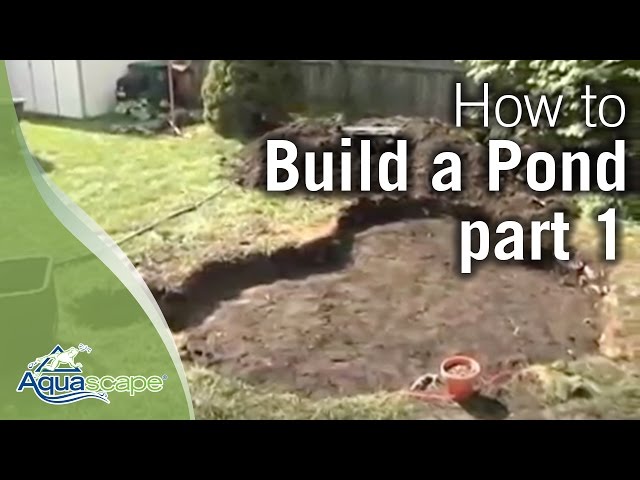 The edges of the film must extend 20 cm beyond the edge of the pond so that they can be fixed without stretching the film.
Photo: Instagram resttv
To fix the film along the perimeter of the pond, a groove 10 cm deep is pulled out. The edge of the film is inserted into it and pressed down with stones.
Photo: Instagram resttv
After that, the film is completely closed with the help of stones, decorative figurines and plants.
Photo: Instagram resttv
4 Pond from improvised materials
For those who are not ready to dig large pits and buy construction and finishing materials, small ponds are suitable, which can be created from an old bathtub, a basin, tires and other items.
Bathtub pond
A hole is dug under the bathtub, repeating its shape, with a small recess in the place where the drain will be located. Pebbles are laid out in this recess so that, if desired, you can remove the plug and the water goes into the ground.
Photo: Instagram tentiru
The bath itself is varnished or covered with paint, immersed in a prepared hole and filled with water. If desired, you can decorate the edges of such a pond with stones and plants.
Photo: Instagram sigmachixa
Photo: Instagram gorodu_net
Photo: Instagram tentiru
Photo: Instagram veronika_zz_nsk
Basin pond
An even easier way to create a pond. For him, you don’t have to dig a deep hole, besides, at any moment you can pull out the basin and cover the place where it was with earth. Or you can decorate the edges of the basin with tiles and use it as a permanent decoration of the site.
Photo: Instagram cop011
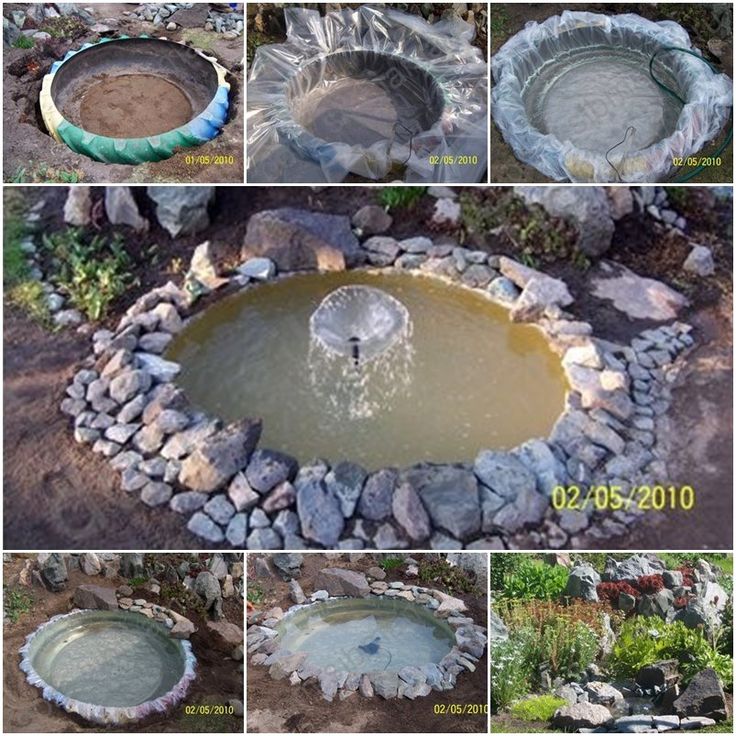
Tire pond
Suitable for those who want to easily make a small pond. The tire is cut in half and placed in a hole dug for it. Then it is covered with a polymer film, so that it goes beyond the edges of the tire by at least 20-30 cm. The film is tucked up and takes root to the tire with a layer of sand and stones. The edges of the resulting pond are decorated and filled with water.
Photo: Instagram polina_baratsevic
Miniature pond in a pot, box and tin barrel
All of these items can be used as a base for a mini pond. In such reservoirs, having carried out isolation with the help of a polymer film, it is quite possible to grow aquatic plants. They will be stylish decorations of the site. Maria Revina
Step-by-step instructions for creating a pond in the country
Today, many summer residents are very attentive to the design of their plot. Any garden composition will look incomplete without a pond. In this article, we will try to step by step consider the process of creating a pond in a summer cottage. We will not dwell on theory in detail, for questions regarding pond styles, plant selection and livestock breeding, see Pond Landscape Design: Styles, Flora and Fauna.
To create an airtight pond bowl, we will use a special film. More information about the choice of material for creating a reservoir in a summer cottage can be found in the article "Technology for creating ponds. "
"
Film for creating an airtight pond bowl
How to start creating a pond?
If all theoretical questions are studied, then you can move on to practice. What tools to start creating a pond? Of course, from a piece of paper and a pencil. With their help, we will try to find the optimal location for the location of the pond on the site.
Variant of the plan for the distribution of shady places on the site
Draw a plan of the site on graph paper, use a compass to determine where north is, make a corresponding mark on the plan. Draw on the plan objects that cast a shadow: a house, large trees, etc. On sunny days, every two hours, put on the paper a full shadow (places where there is no sun), sunny places (lit all day) and partially sunny places (blessed 4-6 hours per day). To do this, you can use pencils of different colors.
As we have already explained in the Pond Technology article, partially sunny locations are ideal for pond placement.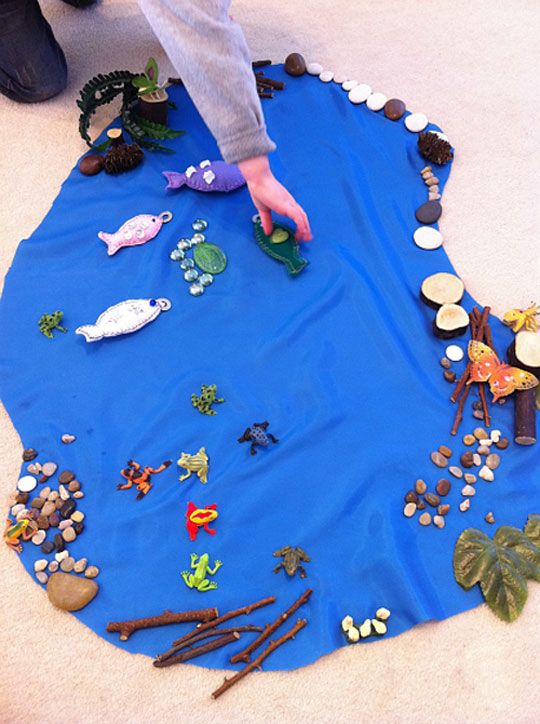 Choose a suitable location away from tall trees and draw the outline of the pond you want.
Now it is necessary to mark on the plan different tiers (terraces) of the depth on which the plants will be located. Mark a zone of coastal plants (depth up to 30 cm), for a change, several tiers can be noted at different depths. Shade the zone for shallow water lilies (depth 60 cm) and deep water zones (up to 1 m). If fish will winter in the pond in the future, mark the wintering pits (depth 1.5 m).
Approximate plan of depths in the pond at the dacha
When the plan is ready, you can move on to excavation.
Ditch swarm
According to the plan, we mark out a place for a pond, for this we use pegs and twine, you can also lay out a garden hose around the perimeter of the future pond. With the help of a shovel, we begin to dig a pit. The level checks the uniformity of heights, the banks of the reservoir should also be equal relative to each other.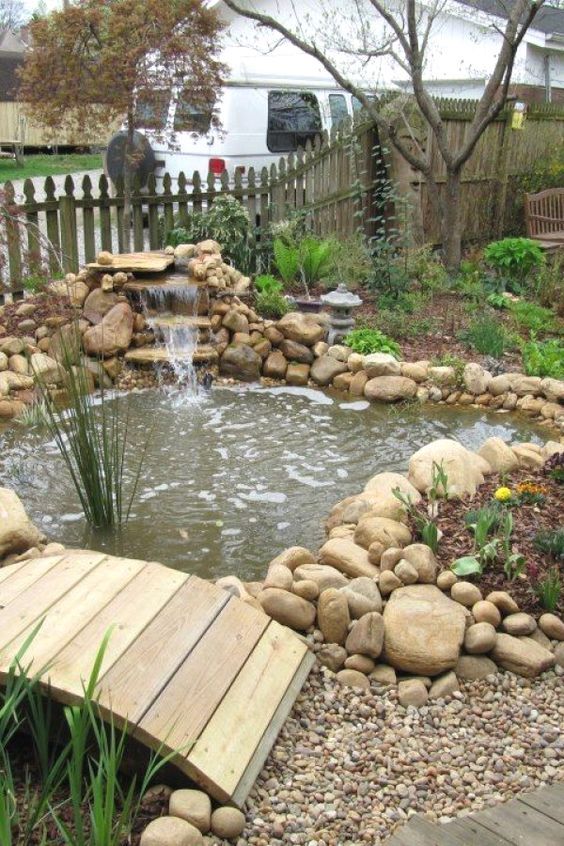 To achieve the same level of the banks, a board can be placed between them, on which the building level is set. Then the coast is corrected with the help of the earth remaining from digging the pit.
The bottom of the tiers can be leveled using a shovel.
In order to measure the bottom level, we put a vertical support on the ground, on which we install a board with a level. As you work, check yourself in this way.
When the depth of the first coastal zone is reached, we level it on both sides, then mark the next tier according to the plan. We consistently complete the creation of all tiers. We try not to make vertical walls at a right angle, the general slope of the pond bowl should be approximately 30 - 45 degrees.
We measure the dimensions of the resulting pit for the purchase of film and geotextiles. The film allowance should be 40 - 50 cm.
Twine will be useful for marking outlines of the future pond and tiers.
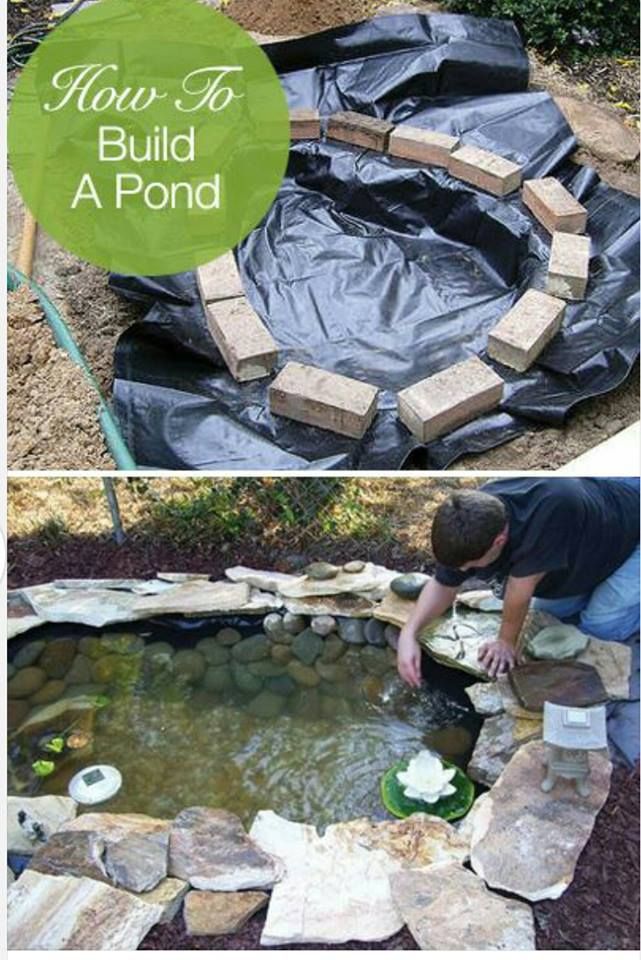
We seal the pond bowl
The bottom of the pit is cleaned of debris and roots, then covered with a layer of clean sand, which is then compacted. To create the first sealing layer, we use geotextiles, then lay the film, distribute it in tiers. Along the perimeter of the reservoir, it is necessary to dig a trench, in which we will fix the film with the help of rubble.
Now you need to leave the future reservoir in this state for a day, so that the film stretches and settles down, numerous folds must be straightened out. When the film evenly covers the bottom of the pond, you can cut off the extra edges.
We leave about a quarter of a meter under the blind area, which will finally fix the coastline.
We choose the material for the blind area according to taste, the framing of flat sandstone or large stones will look most impressive, we fix the coastline with concrete mortar.
A layer of geotextile is placed under the foil.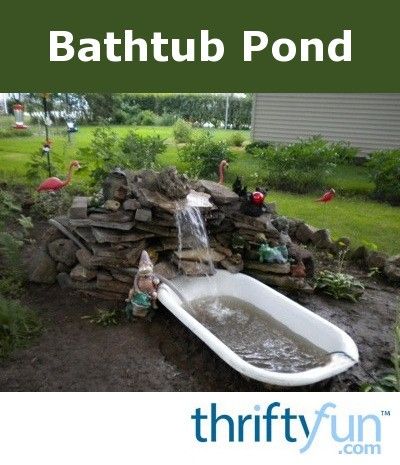 This material is made from polypropylene threads, is acid and alkali resistant
Pond decoration
When the blind area has set, it's time to install coastal plants. It is best to place them in a pond directly in pots or in plastic containers. You should not plant a large number of different species, for starters, limit yourself to 2 - 3 types of unpretentious perennials. At this stage, plants are needed primarily to establish the internal microflora in the reservoir. For tiers up to 30 m, you can take sedge or calamus.
Plants are installed in the pond in pots, this allows in the future to pull out the pots for the winter period and fertilize. Black pots are the least visible in water and can be easily masked with stones
The pond can now be filled with water. At first, blue-green algae can actively develop in the water, so the water may acquire a dull green tint. But after a while they will die, and the water will become clear again.
The next step is to install deep water plants. We will also plant water lilies in a pot, fill the pot with soil for aquatic plants, you can also add top dressing (for example, bone meal mixed with clay). Before the appearance of leaf plates, it is best to install the pot at a shallow depth (tier up to 30 cm). When growth begins, move the water lily to a 60 cm tier or deeper, depending on the variety.
On the shore we plant plants that tolerate wet soil well (hosta, fern, astilba, etc.).
For better circulation of water, you can install a stream or a small waterfall in the pond. This will require a submersible pump, so as not to acquire a powerful pump, you should not make the waterfall high (no more than 1.5 m from the pump installation site).
To create a stream or waterfall, we lay a stepped elevation. For this purpose, flat sandstone is best suited, it will allow you to create a kind of staircase along which water will flow into the pond. The supply hose and electric cable of the pump are masked under stones, then the entire structure is fixed with concrete mortar.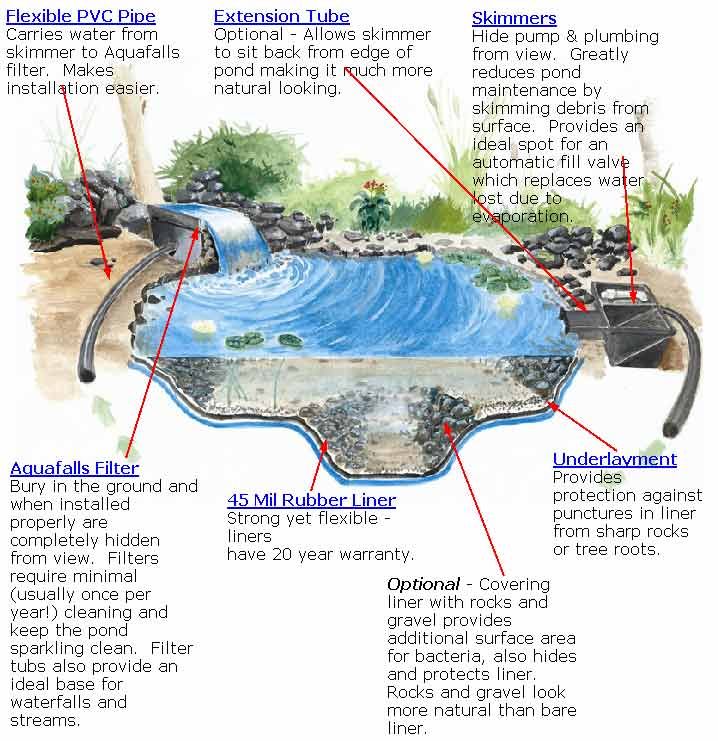
When the water has become transparent, you can launch fish into the pond. Before that, measure the pH level using litmus paper or a tester, determine the acidity level on the scale. For fish, it should be about 7-8 units. To adjust the pH level, use special preparations. Measure the temperature of the water; for most species, the optimum temperature is at least 15 degrees.
Put the fish in a plastic bag with water into the pond without opening the bag. Leave in this state until the temperature of the water in the bag equals the temperature in the pond (otherwise the fish may experience temperature shock).
A small waterfall of pitchers will enliven the composition of the pond
Finishing the decoration of the pond, we add decorations that will emphasize the style of our pond. The stream can be decorated by placing a decorative ancient amphora or jug among the stones. Among coastal plants, an antique-style garden figure will look good; for a Japanese pond, a decorative lantern made of stone or polystone is suitable.