Kitchen plan and design
7 Kitchen Layout Ideas That Work
You may have your cabinets, flooring, tile, appliances, and paint all selected. But what makes a kitchen livable has little to do with the way it looks, and everything to do with functionality.
Blog | Kitchen
Today’s post comes from the home improvement experts at Modernize.
If you’re planning a kitchen, there are a few essential kitchen layout ideas you need to keep in mind as you’re designing and planning.
Before you make any big decisions or get carried away with the aesthetic, here are 7 essential kitchen layout ideas you will want to incorporate to make your kitchen design a success:
1. Reduce Traffic
No matter what, the kitchen is probably going to be a high-traffic area of the house. But there are ways you can get around making the kitchen a catch-all for mail and backpacks and coats.
Create a space before you get into the kitchen, like a mudroom, to control the chaos that can come sweeping in every day. Once in the kitchen, make sure the primary pathway through the kitchen is hazard-free and will not be obstructed by the refrigerator or oven door when open.
2. Make the Distance between Main Fixtures Comfortable
When laying out your kitchen it’s important to keep the main tasks in mind – preparing, serving, and cleaning up from meals. You don’t want to put the stove across the room from the sink, or the fridge too far away from the stove because that will complicate whichever task you are working on.
Lay out kitchen fixtures and appliances within comfortable proximity to each other3. Make Sure the Kitchen Island Isn’t too Close or too Far
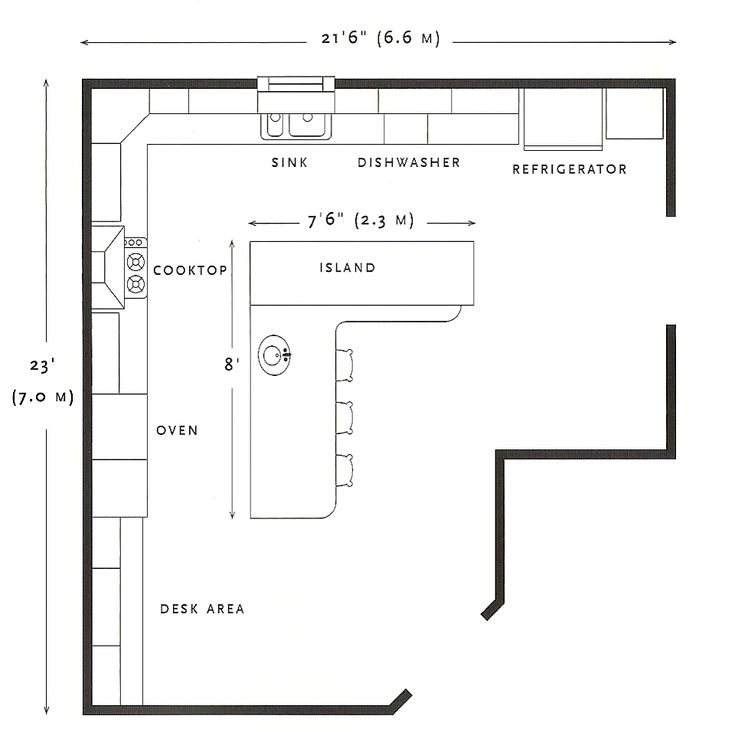
A kitchen island is where much of the meal preparation happens. If your kitchen layout will include one, consider its location carefully. Make sure that it will not block the area in front of your major appliances, such as wall ovens, dishwashers, and refrigerators.
Allow enough space for the appliance door swing plus room to pass when the doors are open. But you also don’t want to place it too far. Make sure your island is located within a comfortable arm’s reach from each of these fixtures.
Keep appliance door swings in mind when placing an island in your kitchen layout4. Place the Sink First
When creating a kitchen layout, many designers place the sink first and then design from there. While this is probably grounded in tradition from the days when people spent a long time scrubbing dishes, it remains a good rule of thumb.
The oven and fridge are vital to preparing meals, but somehow the sink seems to still be the place where we spend the most time. Think about placing the sink where there is a view out a window or into the room. A kitchen island is also a great location for the sink.
Place your sink with a view into the room, out a window, or in a kitchen island for both5. Always Put the Stove on an Exterior Wall
When you’re deciding where to put the stove and oven, remember to put them on an exterior wall rather than an island or interior wall. This will make it easier (and less expensive) to install a proper ventilation system.
6. Keep Vertical Storage in Mind
Instead of focusing all of your energy on creating enough cabinet and drawer storage, put a little of that energy into configuring convenient wall storage.
Storage walls are a great way to incorporate pantry storage, small appliances, baking accessories, extra china, or even a broom closet – in one convenient location. Open shelves, wall hooks, and overhead pot racks are not only convenient – if stocked with the right stuff, they can also add dimension to the aesthetic.
Think Vertical – Combine storage walls, wall hooks, and open shelves for a mix of functional storage7. Create a Floor Plan and Visualize Your Kitchen in 3D
No matter how much designing, measuring, and pinning to your dream kitchen Pinterest boards you do, your completed kitchen can still come as a surprise once the contractors are finished – and not always in a good way.
Save yourself from costly mistakes and unfixable flaws with a kitchen layout tool. RoomSketcher provides an easy-to-use online kitchen planner that you can use to plan your kitchen layout. Draw your kitchen floor plan, add fixtures, finishes, and cabinets, and see them instantly in 3D!
Visualize your kitchen layout ideas in 3D with a kitchen layout toolGet Started on Your Kitchen Design
Create 2D Floor Plans, 3D Floor Plans, and 3D Photos just like these, to share with your family, friends, or contractor for more accurate pricing.
Get Started
Don't forget to share this post!
Recommended Reads
Kitchen Planner Software - Plan Your Kitchen Online
The RoomSketcher App is an easy-to-use kitchen planner. Design a layout of your dream kitchen and visualize in stunning 3D.
Get Started
“RoomSketcher is a great, easy-to-use tool for interior design.”
Antonella Nuredini
Interior Designer, USA
Kitchen Planning Made Easy
Create your kitchen design using the RoomSketcher App on your computer or tablet.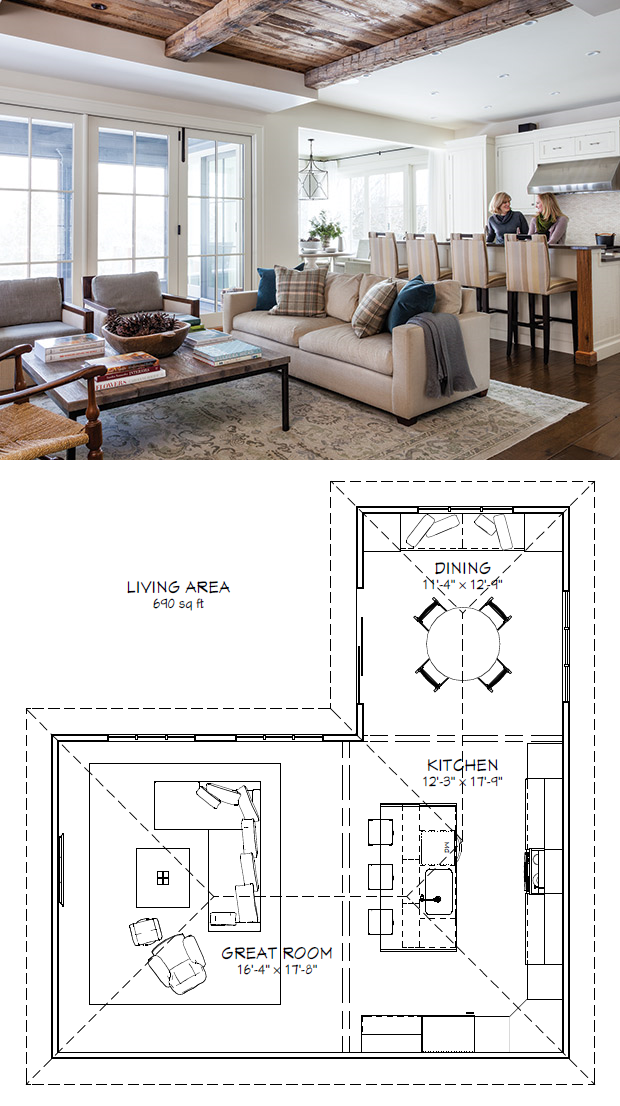 Get started on your kitchen today with our easy-to-use kitchen planner. Draw your floor plan, choose your furnishings, and see your kitchen design in 3D – it’s that easy!
Step 1 - Draw Your Floor Plan
Draw a floor plan of your kitchen in minutes, using simple drag and drop drawing tools. Simply click and drag your cursor to draw or move walls. Select windows and doors from the product library and just drag them into place. Built-in measurement tools make it easy to create an accurate floor plan.
Step 2 - Furnish Your Kitchen
Select kitchen cabinets, appliances, fixtures, and more, and simply drag them into place. Resize items easily, experiment with different finishes, and save your favorite design options to review and compare.
Step 3 - See Your Kitchen in 3D
Use the camera to take instant Snapshots of your kitchen design in 3D. Experience a 3D walkthrough of your kitchen design with our Live 3D feature. When your design is ready, create high-quality 3D Floor Plans, 3D Photos, and 360 Views to show your ideas.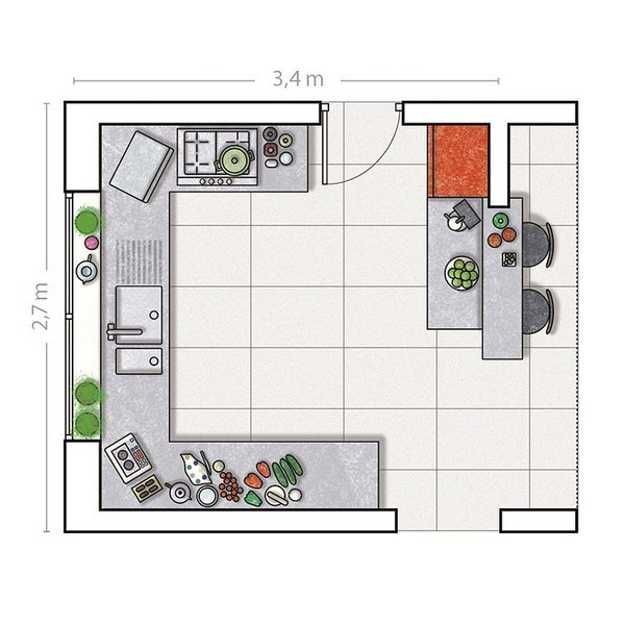
Why RoomSketcher is the Best Kitchen Planner Software:
RoomSketcher makes it easy to create kitchen layouts and 3D images of your kitchen remodel or new design – like a pro! Here are just a few examples of the types of floor plans and images you can create:
2D Kitchen Floor Plans
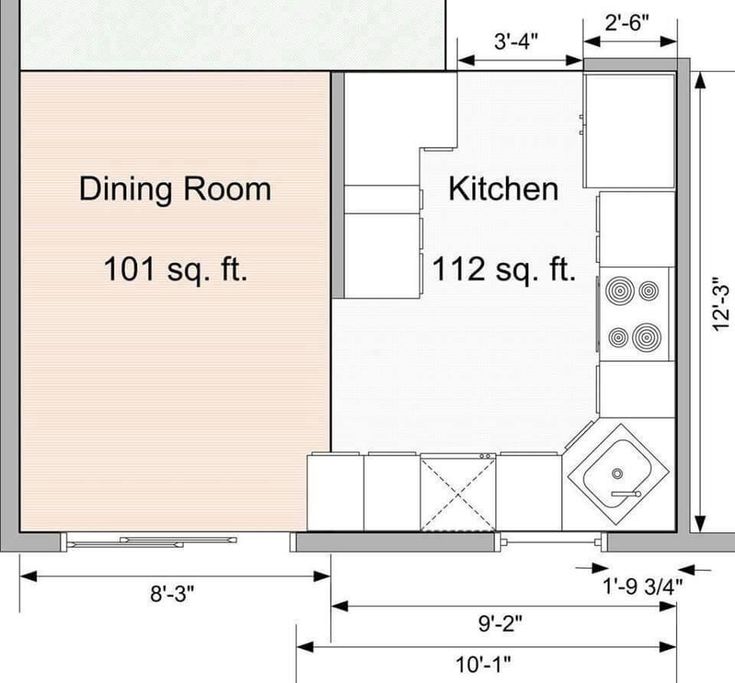
2D Floor Plans are essential for kitchen planning. They help you layout your kitchen correctly, to know what will fit, and get more accurate estimates. Show measurements, the room size in square meters and feet, the locations of kitchen fixtures, and more.
3D Kitchen Floor Plans
With RoomSketcher, you can create a 3D Floor Plan of your kitchen at the click of a button! 3D Floor Plans are ideal for kitchen planning because they help you to visualize your whole room including cabinets, appliances, materials and more.
3D Photos
Create high-quality 3D Photos of your kitchen design from your camera Snapshots. See how your kitchen design will look including colors, textures, and materials. They are the perfect way to see and share your design ideas!
360 Views
Create stunning 360 Views of your kitchen design instantly. View the entire room as if you are standing right there!
Kitchen Plans and Ideas From RoomSketcher
Turn your kitchen dreams into reality. Start with a kitchen layout template that you find in our Floor Plan Gallery.
Kitchen Plans
Island Kitchens
L-Shaped Kitchens
U-Shaped Kitchens
Peninsula Kitchens
Single Wall Kitchens
Frequently Asked Questions (FAQ):
Recommended Reads
7 Kitchen Layout Ideas That Work
Planning a kitchen? These 7 essential kitchen layout ideas will make your new kitchen design a success.
Plan Your Kitchen With RoomSketcher
Need help planning a kitchen design? RoomSketcher shows you how to plan your kitchen with an online kitchen planner.
4 Expert Kitchen Design Tips
Think like a kitchen designer with these 4 expert kitchen design tips.
What are you waiting for?
Get Started
Privacy Policy | Terms of Use | Cookies
Copyright © 2023 RoomSketcher AS.
RoomSketcher®, Live 3D Floor Plans™ and 3D Storefront™ are trademarks of RoomSketcher AS in Norway and other countries.
By continuing to use this website, you consent to the use of cookies in accordance with our Cookie Policy.
10 Steps and Why It's Perverted
I made a 10 point plan to design my own kitchen project. Although there is a free and more adequate option, and, for my taste, doing the project yourself is a perversion.
If you know the basic dimensions of the modules and the basic principles, then making a kitchen project on your own is as easy as shelling pears. You don’t even need programs, just a piece of paper and a pen. But even this is not necessary if you are ready to cheat a little.
- 3 ways to make a kitchen project
- We make a kitchen project on our own
- Designing is not us, drawing is us
- Whether to do redevelopment
- Correct kitchen ergonomics
3 ways to make a kitchen project to create a project
903 ways to make a kitchen project 903 ways kitchens:- Draw on paper
- Draw in a special computer program
- Use the service of free projects
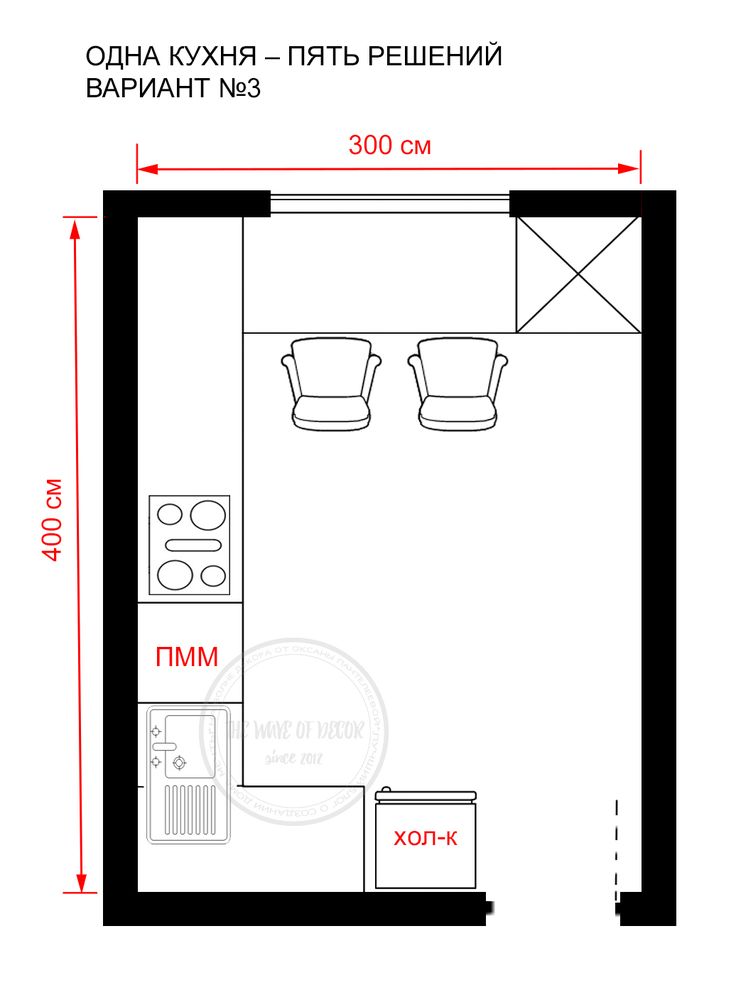
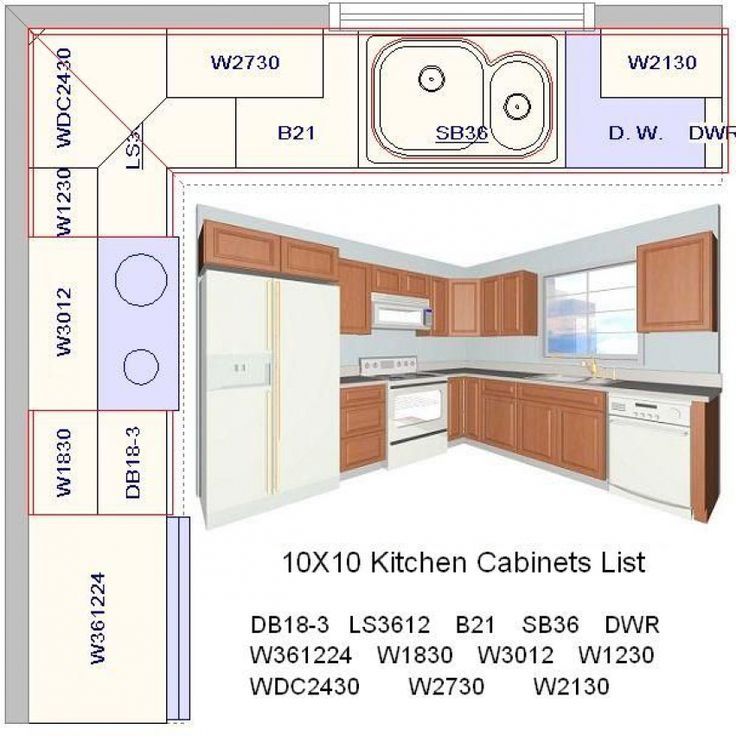
The 2nd is not rational in terms of spending time on mastering the program. If you only need to do a project once for yourself, then the other two ways will suffice. But if you really want to, I advise the Pro100 program. Or take a picture or scan your layout and draw in any graphic editor (photoshop, paint, etc.). An example of a kitchen furniture project in the pro100 program:
The best way to get a kitchen project : go to custom-made furniture manufacturers, make a project with them for free.
Point.
No one forces you to order a kitchen from them. After you can print and slightly correct on paper. In general, drawing a kitchen by hand is not difficult at all. Something like this would be a kitchen project:
Most custom kitchen companies offer free consultations, planning and calculation. One head is good - but many free ones are better.
Doing a kitchen project yourself
If you get a perverse pleasure from making a project yourself and therefore do not want to use kitchen workers, then you are weird, but okay.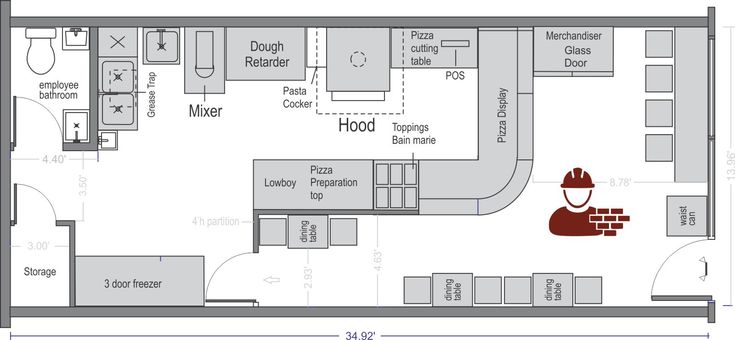
The algorithm for you will be the following:
- We think you need a bar counter (and it's cool).
- Define the shape. Those. Which wall will the kitchen be on?
- We make a list of ALL planned equipment, including non-embedded.
- Next to each item, mark the width for embedding. For example, a 45 cm or 60 cm dishwasher, a 60 cm oven, etc.
- We divide the walls into modules according to the lower drawers, taking into account the dimensions of the built-in appliances.*
- We divide the wall into modules from above, trying to make all the upper drawers of equal width.**
- We make at least 2 options for the relative location of the refrigerator, sink and hob. We show them to everyone we catch, trying to figure out which one is better.
- We choose the type of fittings for opening each module, we think whether they will interfere with each other.
- Ask someone to criticize your project and finish the final version.
- Do you want backsplash lighting from under the upper cabinets? It's time to label it.
*All appliances are built into modules with a width of 45 or 60 centimeters.
**Looks best when all upper cabinets are the same width. Make everything strictly the same, and only the outer cabinet of a different residual width. Less than 40 cm wide is better not to do.
You may be concerned about the depth of the lower and upper modules, the width of the worktop, etc. Absolutely in vain, somewhere you will order furniture or at least cut it, and so they know everything there, these dimensions are standard:
The depth of the upper cabinet is 40 cm, the useful depth is ~ 35 cm.
The depth of the lower cabinet is ~ 50 cm.
Tabletop width ~59 cm.
You can play with the height of the tabletop from the floor, adjusting it to your own height so that your arms are slightly bent at the elbows when cooking. Standard kitchen countertop height range 82-92 cm.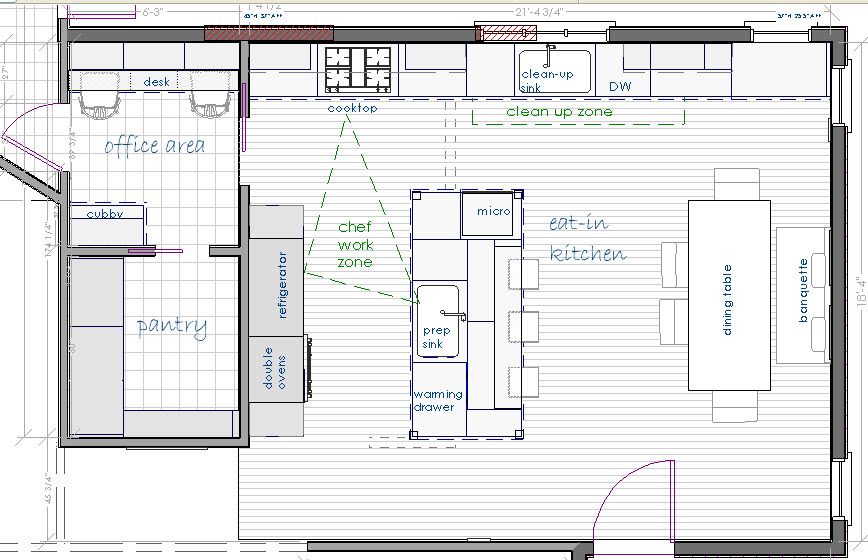
Kitchen worktop height from the floor:
- Height up to 165 cm, height - 82 cm.
- Height 165-175 cm, height 87 cm.
Design is not us, drawing is us
Not everything will be done for you in a free planning solution (and in a paid one too). They will give you a kitchen project with furniture arrangement, design and a drawing for cuts, but we do it ourselves.
- Location of all sockets . To do this, it is important to know not only built-in appliances: coffee maker, kettle, toaster, blender, etc. Separate socket under the sink in case of waste shredder or filter pump.
- All light circuits and location of all switches. Important : the standard for turning on the backlight of the apron with the button on it itself is a mistake. Make the supply of all additional lighting to the normal switch at the entrance to the kitchen - you will use it more often than the overhead light.
 It is especially important to make a normal inclusion in the kitchen-living room.
 - Handles . No, you can't leave it for later. They have a lot to do with appearance. Plus, for corner or small kitchens there may be nuances with opening doors.
- The correct connection of the hood means a tee with a check valve that needs to be led somewhere. If the kitchen is not up to the ceiling, there is no problem. But the right kitchen is made up to the ceiling - think about where to make a free exhaust outlet.
Whether to redevelop
If you have a major renovation and there is a possibility of redevelopment, then first you need to think about whether you want to change the geometry of the room. Answer the following questions to make a decision about the need for redevelopment, answer the following questions:
- How many family members do you have who will be in the kitchen at the same time
- Do you actively use the kitchen for cooking, for receiving guests or generally ordering food and the kitchen is equal to a refrigerator for you
- Communication outlets and the possibility of hiding them during repairs
- If you are young at least at heart and often host guests, it might make sense to combine the kitchen with the living room, because the modern design of the kitchen is usually about open space some advantages, we always advise you to do it.
 Many are unreasonably afraid of it, I think that it is expensive and difficult. This is not so, and not expensive and not difficult, there is nothing to be afraid of. After determining the geometry of your future kitchen, you can proceed to drawing up a furniture plan.
 Proper kitchen ergonomics
You've probably heard of the triangle rule. So this is complete bullshit. Firstly, there is no practical sense in it, and secondly, there are actually four zones:
- Storage area: drawers, wall cabinets, shelves and a refrigerator.
- Washing area: sink, dishwasher, dish dryer.
- Cooking area: oven, hob, microwave, multicooker.
- Free plane between them.
And, BOOM, the most important thing is the last point. We don't do anything by weight. To heat food from the refrigerator, we need to get it out and put it on the table, take a plate out of the cabinet and put it next to it, put the food on and only then put it in the microwave.
 The same ritual for brewing tea or coffee, etc. Those. from each of the first 3 zones, we constantly go to the free area of the table top. Hence the basic rule of ergonomics:
 The free working area should be in the center of the kitchen.
Remember to consider which way the refrigerator doors open. They can be re-hung, and not opening correctly will really make you suffer. All other "rules" of ergonomics are far-fetched. Just be adequate and mentally imagine the full cycle of performing actions in the kitchen, you will understand everything yourself.
To summarize the best kitchen design plan:
- Go to custom kitchen manufacturers with a list of appliances and Wishlist, get free planning options
- Adjust them yourself based on the information from this article, add all the sockets and switches
- Decide to order a kitchen from a company, order a cut yourself or buy ready-made options
When the project is ready, it's time to learn how to choose a kitchen.
 May the well-planned kitchen be with you.
 Save and share - come in handy!
30 photos of visualizations of rooms in different styles
Content
- What does a kitchen design project consist of?
- TOP 10 most beautiful kitchen design projects in different colors
- Interior design styles: popular solutions in 2023-2024
- Kitchen-living room: TOP-10 trendy solutions in design and decoration
Quality kitchen design depends on how well it is planned. In our article you will find the most fashionable solutions for the design and decoration of the culinary and dining areas. We advise you to always turn to professional interior designers for professional execution of any kitchen design project.
If you are not sure what style of interior design, functional equipment, kitchen layout you need, find a smart designer. He will tell you which option suits you best in terms of style and lifestyle.
Best Price Guaranteed!
Show the calculation from any company - and we are guaranteed to offer cheaper.
10% discount for orders before April 1, 2023.
What does a kitchen design project consist of?
A kitchen design project is a comprehensive technical and engineering solution from a professional designer. Part of it is the choice of furniture and finishing materials, but there is also a plan for electrical wiring, plumbing, ventilation, layout of floor and wall finishes, and a stretch ceiling design scheme. A design project can consist of many sheets, especially when it comes to redevelopment.
The design project of the kitchen includes the configuration of the modules of the headset itself. As a rule, the model of a particular brand has modules 45, 50, 60, 80, 90 cm or any other size range. The designer configures functional points and work areas in such a way that the ergonomics of the room are at the highest level.
At the same time, the designer is looking for the most aesthetic solutions for arranging furniture and taking into account access to electricity and running water, a dining area, and built-in lighting. The designer works with the proportionality of the headset and other furniture, with the creation of designer accent zones, perspectives, with the design of the room and decorating the space.
A kitchen design project in a visualization format can look simplistic. In fact, in reality, on the drawings, this is a complex, technically well-thought-out concept. Visualization does not fully reflect 1000 and 1 decisions made by the designer, however, it is an indispensable assistant in the matter of aesthetics. With its help, you can adjust the shades, decorative details, and sometimes the layout. Visualization is primarily performed for the customer. The designer himself and the finishing masters do not need visualization: they use drawings, diagrams and layouts to implement a specific project.
The design project of the living room kitchen includes the issues of zoning and the location of the living room. Sometimes there is an additional front dining room plus a small one in the kitchen or plus a breakfast bar. In the living room, you need to provide all the conditions for the TV zone and the leisure of the whole family. In general, we always advise ordering a complete apartment design project with redevelopment and turnkey renovation along with a kitchen design project. With this approach, you get a comprehensive and practical solution.
The modern interior of the kitchen includes equipment equipment. Built-in appliances are the first echelon, small household appliances are the second. In terms of functionality, a kitchen design project is primarily a technological filling. The main list of appliances is the minimum equipment format, but you can greatly simplify your life if you complement the kitchen with the elements you need.
Built-in appliances for the kitchen are:
- refrigerator and freezer
- hob, oven and extractor
- Dishwasher
- built-in espresso machine and microwave
- refrigerator for drinks
- cupboard for warming dishes
- double boiler
- food processor
– combi-panels for the countertop: wok-panel, salamander grill, barbecue grilling surface (charcoal), steamer, deep fryer, tepan-yaki grill.
- vacuum packing machine
Small appliances are a plethora of gadget options you might need, depending on the type of food you enjoy. Not all of them are mandatory, and some have built-in counterparts. But the built-in option should be chosen only by those who use this item constantly. If you rarely work with it, it makes sense to buy a separate gadget, which after use can be put away in the upper cabinet. List of the most popular gadgets among small household appliances:
- kettle, mixer, toaster, blender
- food processor and meat grinder
- chopper
- coffee machine
- multicooker and steamer
- juicer
- coffee grinder
- yogurt maker, pancake maker and waffle maker
– TV and wireless gadget charging spot
Go to kitchen catalog
The catalog contains all the factories producing Italian kitchens from inexpensive models to premium and elite ones.
Kitchen catalog
Modern kitchens classic kitchens Loft kitchens Kitchen Provence Neoclassical kitchens Art Deco Kitchens
TOP 10 most beautiful kitchen design projects in different colors
Next, we will look at the most interesting kitchen design projects in a variety of color palettes. We have collected the TOP 10 color schemes that are now at the peak of popularity!
Black and blue minimalist kitchen with island and side dining area
The design project of the kitchen with the island in the visualization above is made in black and blue colors with a dark parquet floor and dark blue modules. Please note that the headset has mirrored black modules, and the countertop is white.
Gray kitchen with marble island and large black sideboard
The design project of a kitchen with an island can be especially original.
 The island looks very impressive both in the open plan kitchen-living room and in a separate room.
 Beautiful beige kitchen with white marble top and built-in appliances
The design project of the corner kitchen requires an extremely clear location of the modules. If we are talking about a small set, we should think about a small sink (40–50 cm), a mini dishwasher (45 cm), a two-burner stove. Here it is worth building a microwave in the top cabinet, and an oven under the stove. But in a large kitchen, it is better to build an oven and a microwave in a separate column (pencil case), so it is more convenient to use them. With a professional kitchen design project with thoughtful modules, a corner kitchen can be both beautiful and ergonomic.
Grey-wood kitchen with peninsula and breakfast bar
In a country house, you have more space both in terms of layouts and more complex (and even dark) color schemes. The design project of the kitchen in the house may include a three- or four-color set, unusual accents and furniture.
Fashionable white and gray kitchen with a minimalist design
The design project of a modern kitchen most often includes a minimalist set. But this does not mean that the interior will be neutral. It can have a special atmosphere: Scandinavian, futuristic, German. Italian kitchens look great in any palette and style!
Black and gray stone effect kitchen set
On the visualization above, you see a corner suite with trendy finishes in wood and stone effect. The kitchen interior design project in the style of 2023-2024 will amaze you with multi-module sets and a wide variety of facade finishes.&
Brown and green kitchen with island and black sideboards
The next kitchen project in our selection is presented in a configuration with an island, a side dining area and a large pantry unit in the background. Above the island is a design module for open storage.
Light brown kitchen with gray splashback and black shelving
This futuristic set in gray tones with a stone effect looks very modern! It is suitable for the design of a country house, and for any apartment with panoramic windows.

Scandinavian white kitchen with bright wood accents
The design project of a modern kitchen of 10–20 sq m is often made in modern styles, for example, minimalism and Scandinavian. Light facades, simple finishes, bright accents - this is what visually expands the space. This white kitchen is a great example!
Gray kitchen with beige backsplash and worktop and blue dining area
The last project in the selection will be this U-shaped kitchen with additional columns with built-in appliances. According to the design project, a kitchen of 10 sq. m is complemented by a dining area with an area of about 10 sq. m. The design project of a small kitchen is usually clearly zoned to the culinary and dining rooms and is solved in a neutral range of gray, white and beige tones.
Interior design styles: popular solutions in 2023–2024
Also we would like to pay special attention to popular interior design styles.
 Among them are French Provence, glamorous art deco, European neoclassic, modern and Scandinavian styles. Look!
 French provence
The Provence style is one of the most easily recognizable in the international arena of interior design. Usually we are dealing with white and blue or beige and blue color scheme and wooden furniture in a provincial style.
Art Deco glam
Art Deco is marble and onyx porcelain stoneware or natural stone, furniture on a gold metal frame, dark colors, gold accents and luxurious lamps.
European neoclassical
The European neoclassical style is the most popular among families with school-age children. Most often we are talking about white or beige kitchen units with backsplash and floors in marbled porcelain stoneware or with accents.
Contemporary style
Interior design in a modern style is laconic furniture design lines, built-in lighting, simple shapes and neutral light shades.
 It appreciates seamless finishes, the absence of bright accents and practicality in everything, including built-in appliances.
 Scandinavian comfort
Scandinavian style in interior design is 50% modern and 50% neoclassical, but always in white, black and white, gray and white or gray shades. Scandinavian cuisine can have black/pastel/bright accents, but more often than not it stays almost monochromatic.
Kitchen-living room: TOP-10 trendy solutions in design and decoration
The interior design of the kitchen-living room is a lot of ideas, technical innovations, open layout and modern furniture. Using examples in various design projects, we will consider the TOP 10 trending solutions.
Modern kitchen-living room with a Z-shaped set and zoning shelving
The designer achieved a futuristic image of this kitchen due to panoramic glazing and ultra-modern laconic furniture.
Modern style renovation of the kitchen-living room with a dining area in the culinary area
This modern kitchen renovation is made up of light finish materials and a two-tone set with a dark bottom and white glossy top.
Spacious kitchen-living room in a country house with a U-shaped kitchen set
Another modern interior of the kitchen-living room, this time with a U-shaped suite with multiple pantry modules.
Loft style kitchen with high ceilings and black windows with deglazing
This loft-style kitchen-living room has zoning shelving and a luxurious island with a breakfast bar.
Minimalistic two-level kitchen-living room interior in a country house
The design project of the kitchen with a sofa in the visualization above looks very atmospheric!
Scandinavian style black and white kitchen-living room interior design
This trendy interior of the kitchen-living room in a country house looks extremely stylish.
Minimalist open-plan kitchen with island and panoramic windows
This minimalist kitchen with a super-concise island fits perfectly into this interior.
Learn more