Kitchen counter corners
Kitchen Corner Cabinet Ideas That Optimize Your Usable Space
By Simona Ganea | Published on Reviewed by Rachel Brown
Buy Now
Kitchen corners are the dreaded space in kitchen designs because most kitchen corner cabinet units are awkward and cumbersome to navigate.
Alair Homes DecaturTherefore, we push the items that we don’t use to the dark back corners of these cabinets, and they become the graveyard of unwanted pots and pans.
Ideal Space Architecture and DesignHowever, there are new ideas that improve the functionality of kitchen corner cabinets in ways that make them ideal storage spaces. Therefore, if you are thinking about remodeling or planning a new kitchen altogether, it is worth considering how you will use those tricky spaces in your kitchen.
Kitchen Corner Cabinet Types
Because this is such a common problem, there have been many cabinet designs trying to make the best use of this corner space. There are ideas for the base cabinets and for the top cabinets.
- Base corner corner cabinet – This cabinet is a type of single cabinet that fits into the corner and features a double hinged door with a knuckle hinge that allows the door to open and lay flat. This opens to a large cabinet space. Many people make the most of this space with the addition of a lazy susan to improve access in the back of the cabinet.
- Blind base cabinet – This option features two base cabinets fitted together. One cabinet is longer and fits into the corner and is accessed by a door. However, this option is not as popular because it is difficult to access the items in the back of the corner cabinet without inserts. Some new options to ease this difficulty are swing out storage units that are fitted into the blind corner.
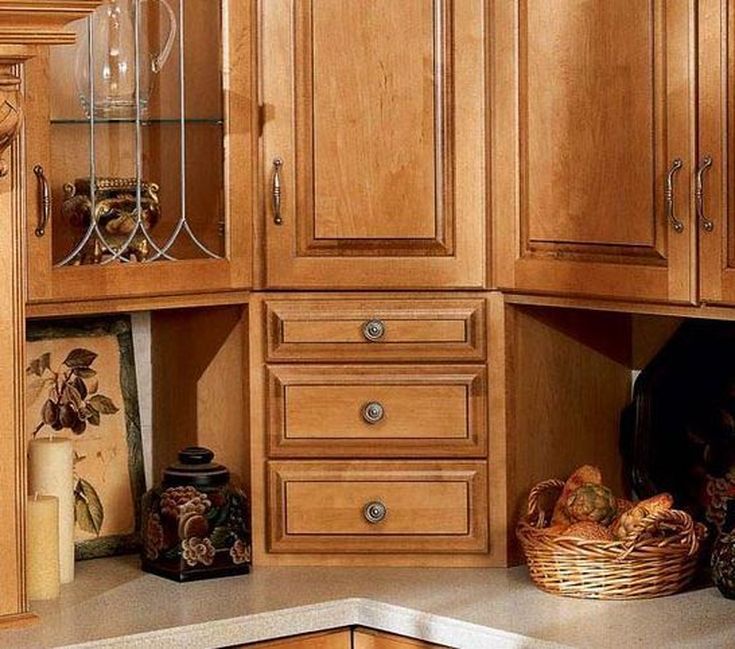
- Corner drawers – These have become one of the more popular corner cabinets for kitchen design in recent years.
 It is one corner cabinet that looks like two cabinets with 3 drawers each. However, it is one cabinet and the drawers are connected at a 90 degree angle.
 - Base angle corners – These cabinets fit at an angle in the corner. Thus, sometimes kitchen designers use this cabinet as a base if there is a sink or oven positioned in the corner.
Many of these cabinets can also be used on the top with the exception of the corner drawers. However, there are some unique upper corner cabinet ideas too.
- Open shelves – Shelves can be fitted into the corner in a way that increases accessibility.
- Straight cabinet – If you have more flexibility in your kitchen cabinet design, you can use a tall straight cabinet in the corner of the upper cabinet space without needing to adjoin other cabinets to it. Further, this allows you to access this cabinet without the hindrance of another cabinet.

There are many amazing ideas for kitchen corner cabinets there is no reason not to make the best use of this available space.
A diagonal cabinetView in galleryDonna Dufresne Interior DesignThe designers have used this kitchen corner to its fullest potential. The corner base kitchen cabinet is angled corner cabinet with three drawers.
Also, the kitchen design left open the top cabinet to house the microwave and a TV. The open shelf at the top features cookbooks that provide a colorful and textured look for the kitchen.
Open corner shelvesView in gallery
Shelves are the perfect way to allow full visibility in the corner. For example, this corner solution works well in this eclectic style kitchen.
Further, the half walls provide enough definition to separate the corner pantry. The wood shelves add a new color and texture to this kitchen design.
Upper corner shelvesView in gallery
If you don’t have the room or the desire for full corner shelves, try just upper shelves. These upper shelves can be shallow and provide extra visual interest in the kitchen.
Further, you can display special items or use well used utensils. Either way, open shelves change things up and add a striking look to any kitchen.
A tall cabinetView in gallery
Of course, open shelves do not work for everyone, but most people love the visual interest they bring to a kitchen. Instead, consider a tall upper cabinet with glass doors instead of open shelves. Thus, it gives you the visual interest you want, without the inconvenience of open shelving that gets dusty.
Angled glass upper cabinetView in galleryRyan Bent PhotographyHere is another upper cabinet option that works well in this casual and contemporary kitchen design. This kitchen features a glass-fronted angled cabinet that is ideal for the display of colorful dishes while still keeping everything away from grease and dust.
Curved corner cabinetView in gallery
If an angled cabinet doesn’t fit the style of your kitchen, there are other styles that you can choose.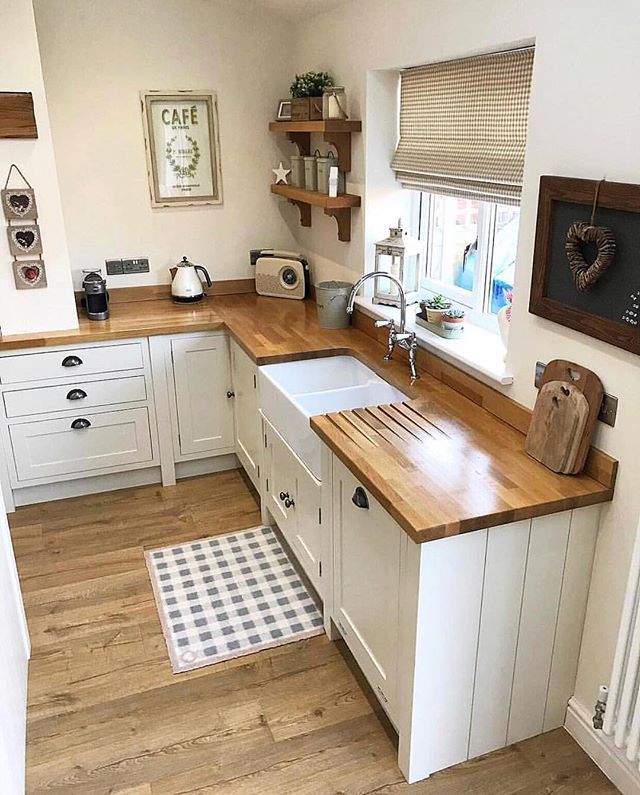 Consider this curved cabinet. It is a great option if you want to elevate the style of the kitchen design. It looks more custom and purposeful than the standard angled corner cabinet.
View in gallery
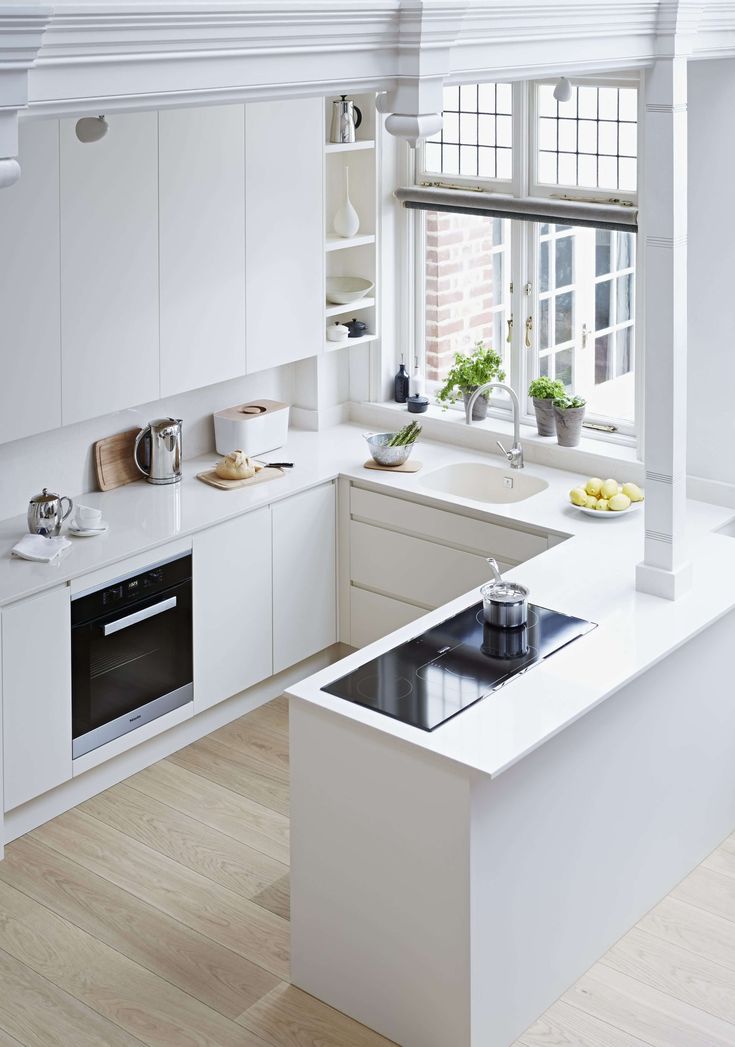
This kitchen design makes use of the space in the corner by placing a stove and vent hood there. In fact, a design like this works because it utilizes the principle of the work triangle. This gives this galley-style kitchen a leg-up on larger kitchens inefficiency.
Stacked corner appliancesView in gallery
This kitchen from Hendel Homes utilizes an angled cabinet that juts out beyond the standard depth to create a custom cabinet look. Also, they have designed this cabinet with an oven/microwave with upper closed cabinets above to use the whole corner.
Pull out corner cabinet shelvesView in galleryCabinet InnovationsOne of the best blind corner cabinet ideas is to pull out shelves in order to access all the available space in the back of the cabinet.
 This way, you can store items all the way in the back corner which are as available to you as those in the front. One of the best options for this design is the Magic Corner Unit.Corner drawers
View in gallery
Corner drawer units are one of the more expensive options for corner base cabinets. However, they allow you to have controlled access to each section of the cabinet offering better organization than other options available.
Lazy Susan insertsOne of the most popular and lasting ideas to utilize corner cabinets are lazy susans. They are available for any budget and size cabinet.
Polymer lazy susanView in gallery
This is a polymer Pie-cut Lazy Susan from Wayfair. It is sturdy, long-lasting, and a cost-effective option.
Sinead lazy susanView in gallery
This wire lazy susan is another inexpensive option. It has an open wire design that works well for small and large items. It is also available from Wayfair.
This is a more delux form of a lazy susan design that curves and slides out for maximum access and usability.
Frequently Asked Questions (FAQ)FAQ
What is good to put in a corner kitchen cabinet?
Most people store items that they don’t need to access all the time like items that they use for occasional parties. However, if you have the right inserts that make the most of the space, you can store items that access every day. Because of the large spaces in corner cabinets, you can store small appliances and large pots and pans in this area too.
What do you do with kitchen cabinets in the corner?
There are some amazing corner kitchen cabinet ideas to optimize all the space in your kitchen, including the corners. Sometimes, you have to think in a creative way about the space in the corner. Some of the best ideas are to incorporate a full pantry into the corner, add open shelving to the top area which is easier to access than a cabinet. On the bottom, use drawers if your budget allows as these make the best use of the space without the extra clutter of folding doors.
Are corner cabinets useful?
Corner cabinets are useful because they are so large. However, in order to make use of all the space, you should utilize some of the solutions that exist. These include sliding shelves and lazy susans to get to the far away corners of the cabinets.
Are corner pantries outdated?
Kitchen designers are sending out mixed messages about corner pantries these days. These were popular in the 1990s and early 2000s as a way to use all the available space in the kitchen. However, these pantries are still being built in kitchens today. Many people see them as an outdated trend. They can take up too much room and inhibit the openness of a room’s design.
Are lazy susans still popular?
Yes, lazy susans are a popular way to store items in a corner cabinet. There are many kinds of lazy susan designs including those that fit inside the cabinet and lazy susans that are attached to the cabinet door.
Corners in kitchens are a fact of life and one that we must learn how to best utilize in our kitchen designs. In fact, kitchen corner cabinet designs have come a long way.
There are amazing new ideas that increase the functionality of your kitchen cabinets. Therefore, if you are designing a new kitchen or just looking at some ways you can remodel for more efficiency, explore ways that you can put your corners to the best use.
In the end, you will need all the space you can get.
10 stylish tips to maximize space |
(Image credit: Jon Day)
Kitchen corner cabinets can be the solution to every designer's nightmare.
Kitchen corners are, of course, in every L-shaped kitchen there is, and can be particularly difficult if the space is in a period property where wonky walls and floors can be abundant.
Kitchen corner cabinets are a way to combat the awkwardness of these spots. Some may need to be bespoke as that can often be the only solution, but it's possible to make fitted kitchen ideas work for you too.
Sleek modern spaces look great with right angled corner cabinets. Another solution is to have kitchen corner cabinets fitted to the countertop, a look that we love.
Kitchen corner cabinets
We’ve sourced a variety of kitchen corner cabinet ideas to help you design your space whether it’s classic or contemporary.
1. Create a countertop drinks cabinet
(Image credit: Hush Kitchens )
We love this idea, but of course, these kitchen cabinet ideas could be used to house your coffee or tea selections too.
Chris Spink, founder of Hush Kitchens, comments: ‘A countertop drinks cabinet makes great use of the corner of this kitchen. The top half features bi-fold doors which can be folded back to reveal bottles and glassware and the practical base is effectively the worktop, so easy to wipe up spills.’
2. Use your corner to house a small appliance
(Image credit: Roundhouse)
When you have an acute right angled corner you can use it to house appliances like a small oven.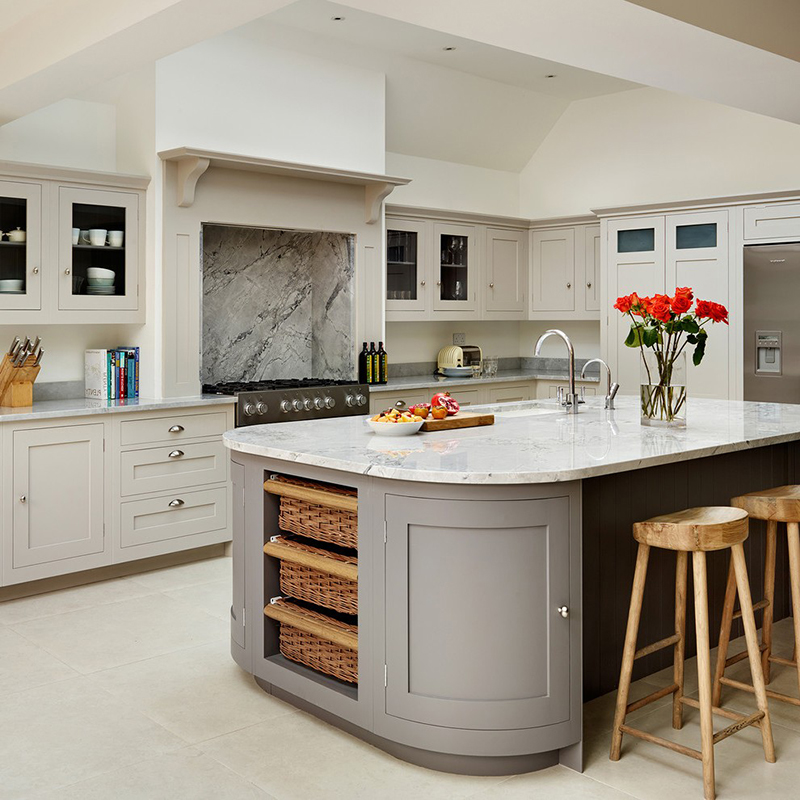 Then add in a wall cabinet above so the rest of the space continues to flow visually.
The handleless doors and vibrant kitchen cabinet colors help to detract the eye. That’s the key with a contemporary fitted kitchen – it should look seamless despite the size and layout.
3. Go bespoke to utilize every corner
(Image credit: Tom Howley)
‘With a bespoke kitchen designer you will be able to design a kitchen that maximizes your space no matter how small,’ explains Tom Howley, design director at Tom Howley .
‘Kitchens can look cluttered because storage hasn’t been adequately considered or planned. Designers can create contemporary and elegant bespoke corner cabinets and drawers that can discreetly house the items you use, leaving you with clean, streamlined surfaces. No space is wasted. If you have awkward corners or quirky spaces this will just add to the creativity of the kitchen.’
4. Make a feature with a contrasting door color
(Image credit: Farrow & Ball)
We’re such big fans of painted kitchen cabinet ideas and how they can transform your space so well.
This is a great example: this kitchen corner cabinet painted in Farrow & Ball’s Treron No.292 matches the tongue and groove panelling in both style and shade, yet the drawers are painted white which makes a feature of them. This ties in with the white shelf, counter top, units and worktops.
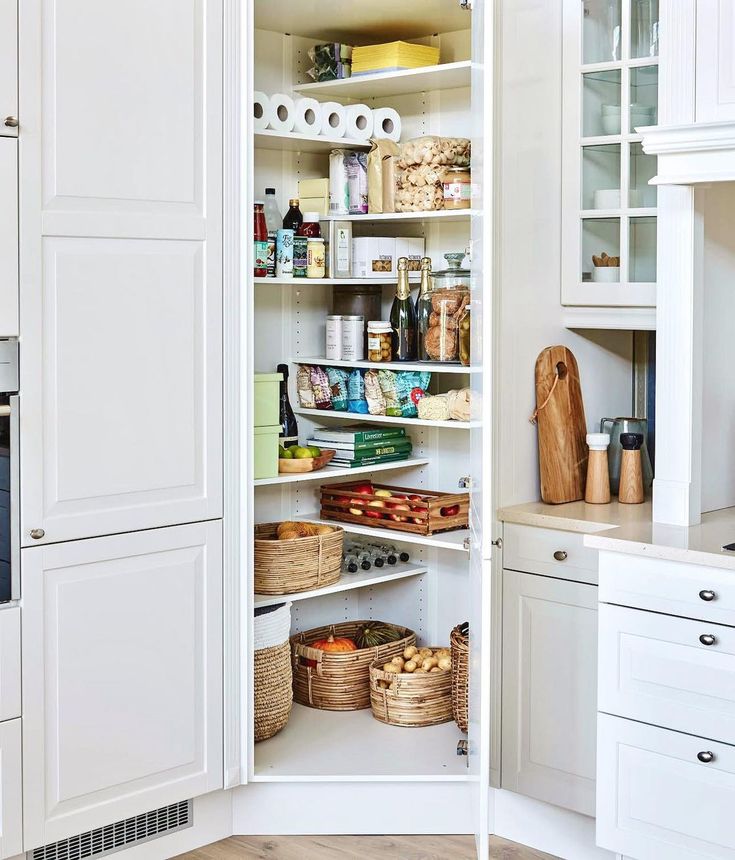
5. Make the most of space with tall cabinets
(Image credit: Mereway Kitchens )
A hand-made kitchen gives you choices for your kitchen storage ideas, and to maximize your space you can choose tall larder corner cabinets.
These floor-to-ceiling cabinets blend it perfectly due to being painted in the same cream shade and you’ll get oodles of space inside for your dry foods like tins, cereal, pasta and rice.
6. Incorporate open shelving
(Image credit: M.Lavender Interiors/Janet Mesic)
This is a great example of how you can make the most out of your corners through clever kitchen shelving ideas.
In this kitchen, there’s a bespoke corner cabinet which has been built to house small appliances and tableware in the open shelving, and on the inner side herbs and spices.
The top drawers match the rest of the cabinetry on the right of the kitchen so it has a cohesive look.
7. Create a corner cabinet over a pantry doorway
(Image credit: Eggersmann)
‘The discreet entrance off to the side of the kitchen leads to the pantry and utility space which is located behind large integrated refrigeration appliances,’ explains Gary Singer, founder and creative director of Eggersmann .
‘We had a bulky structural pillar which was fixed. Its position limited us somewhat on layout options, so our solution was to repeat the corner cabinetry detail to the right of the refrigerators and connect them with a timber structure cladded in plasterboard and decorated to match – therefore creating an illusion of the kitchen joinery and doorway into the pantry area that fit perfectly within the existing structure.’
8. Make the most of your internal corner space
(Image credit: Life Kitchens )
‘If the kitchen turns a corner, a ‘le mans’ or a corner unit is a must.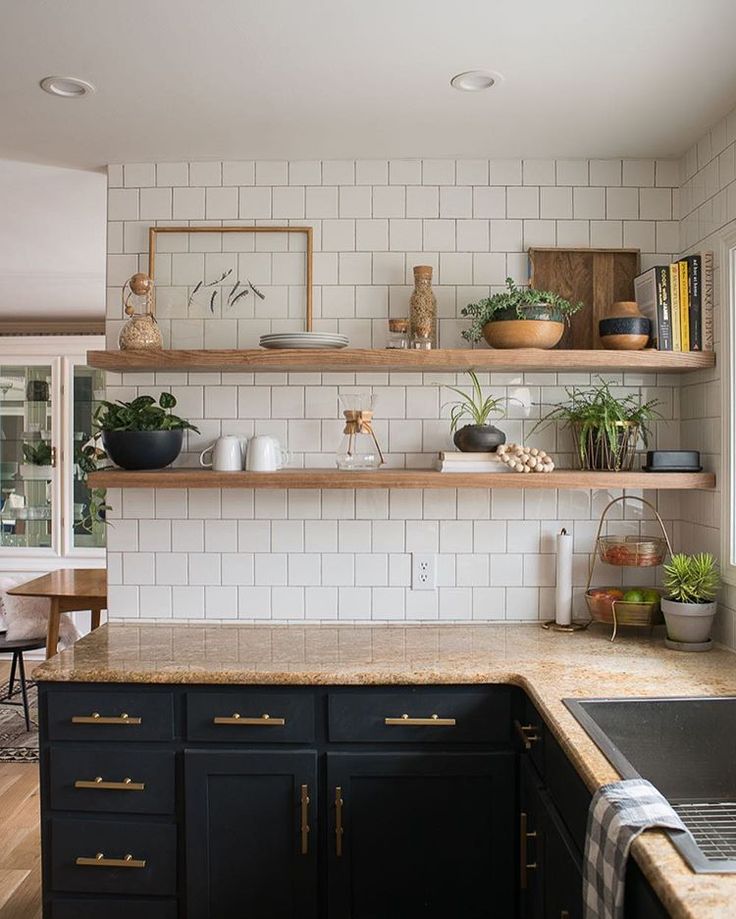 One problem that we all run into especially in a small space is clutter. Utensils, pots and pans and other day-to-day items can take up much needed surface space, therefore, it is vital to have innovative storage ideas for a functional and enjoyable space,’ advises Graeme Smith, head of retail and design at Life Kitchens .
‘Traditional corner units can be notoriously difficult to access and store items in, but for these cupboards there are solutions such as racks that slide along and out of the unit when you open the door. A simple solution that means you are using all of your available space and making your kitchen more user-friendly.’
9. Create a gentle curve instead of a right angle
(Image credit: In Detail Interiors )
Right-angled kitchen cupboard ideas have their place in a sleek modern space, but can look abrupt in a more classic kitchen.
A ‘curve’ like this In Detail Interiors design makes the corner cabinets easier on the eye and less harsh, whilst still utilizing this key storage space.
10. Think about the exterior corners of your island
(Image credit: DesignSpace London)
If your kitchen is all about the kitchen island ideas and less about cabinetry along the walls, you can utilize the corners in there instead, as
‘Corner cabinets are the ideal space saving solution when it comes to kitchen design,' explains Richard Atkins, director of DesignSpace London . 'When incorporated into the island, they allow you to take full advantage of all available storage space. Choosing corner cabinets also means that goods will be easily accessible rather than being awkwardly tucked away around a corner, making it much easier when searching for ingredients etc.
What can you do with a kitchen corner?
The key is to utilize the corner as much as possible, otherwise it will be ‘dead’ space. Use drawers instead of doors – doors take up more space when they open, especially in a small kitchen. And do consider having a bespoke corner cabinet made. It will be worth the investment purely by the space that you’ll gain from doing it.
What can I do with an awkward corner in my kitchen?
Get creative. Open shelving can be a great option and don’t forget you can have a kitchen corner cabinet that sits on your countertop. We particularly like this idea as they can look great, plus concertina style doors can be fitted so you can close it when not in use.
Sophie has been an interior stylist and journalist for over 20 years and has worked for many of the main interior magazines during that time, both in-house and as a freelancer. On the side, as well as being the News Editor for indie magazine, 91, she trained to be a florist in 2019 and launched The Prettiest Posy where she curates beautiful flowers for modern weddings and events. For H&G, she writes features about interior design – and is known for having an eye for a beautiful room.
The junction of the countertop and backsplash: what to choose - plinth, sealant or corner? Designer's Tips
Previously, the junction of the backsplash and the countertop was closed with a flexible plinth from a building supermarket. Now they do this only in projects of the “supereconomy” level. We explain how to arrange the joint of the countertop and the backsplash and what are the advantages of each solution.
PUUSTELLI MOSCOW
1. Tiny skirting board from countertop manufacturer
The easiest option is to order artificial (or natural) stone skirting boards at the time the countertop is made.
Flats Design / Evgenia Matveenko
What is important to consider: before a flexible plinth between the tabletop and the backsplash was bought to cover the mounting gap. The tabletop was not moved close to the apron. A plastic plinth of triangular section with a side of 25–30 mm perfectly concealed the gap between the wall and the set. A modern rectangular plinth (with a section of 10 mm) can only close a very neat assembly seam.
It turns out that the stone plinth assumes a perfectly aligned wall. And a headset mounted close to it.
Interested in kitchen design?
Let's find a contractor according to your criteria
"Design Point"
2. Mid-height skirting board - acts as an apron
The solution for those who are ready for the European trendy version of the "apron without an apron". The bottom - the dirtiest part - is covered from splashes with hardy material. And the rest of the wall up to the ceiling is covered with a dirt-moisture protective coating.
ABOUT THIS…
How to: Find the right size for your backsplash
Ariana Ahmad Interior Design
What is important to note: the worktop, turning into an apron, must be one-color. The option with "variegated" colors will look clumsy.
Marina Kutepova
Photo idea: for interiors in a classic style, a stone apron can be with a figured exit - as in the example in the photo
ASDesign
without plinth. An apron acts as a side, which is made of the same material (artificial or natural stone) as the main countertop. Such material has no seams, so there is no need to additionally seal and protect something from moisture.
In the photo: despite the fact that on the front wall the apron was brought to the upper cabinets, it was not done on the side ones. Therefore, the joining of the worktop to the set was covered with a plank (see item 1)
Gaia Biancucci
4. Epoxy grout
This joint between the worktop and backsplash is recommended for bricked sets and tiled worktops. It is recommended to rub the joint of a tiled or ceramic apron with a countertop made of a different material with a sealant (more on that later).
Important points to consider: the grout should not be ordinary (cement), but epoxy. It is more expensive, not every tiler can work with it, but epoxy grout has zero water absorption.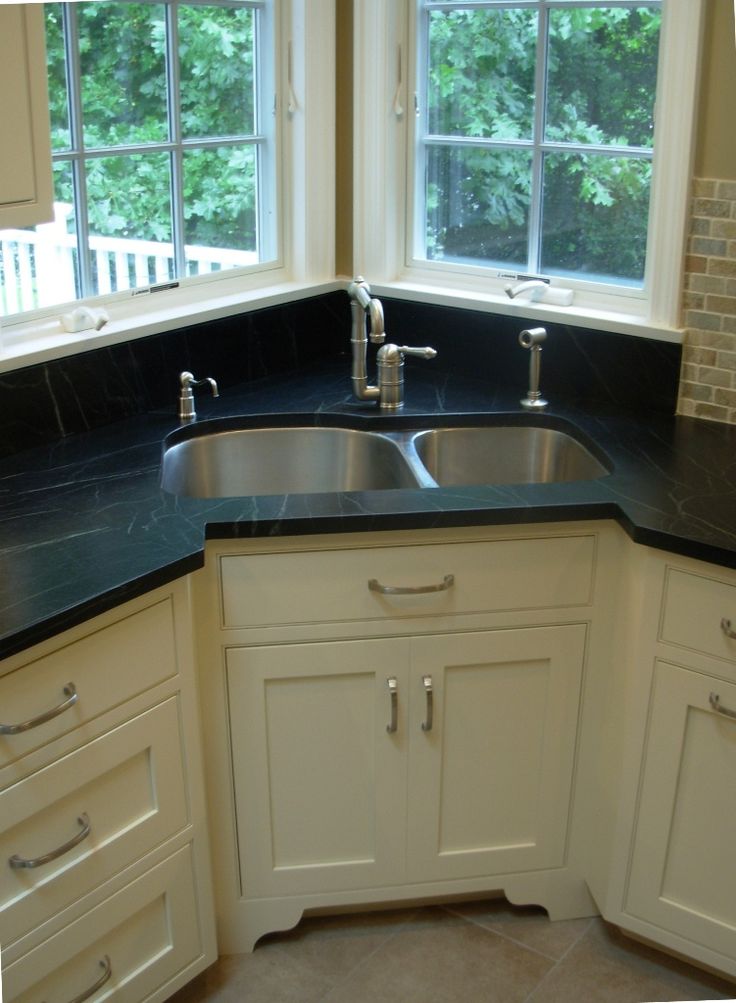 That is, a fungus does not start in it, the seams will definitely not turn black-green and unevenly lose color from constant contact with water.
ABOUT THIS…
Why do you need: Epoxy grout
Aleksey Danilkin
In the photo: an example of a brick kitchen, where it is appropriate to decorate the junction of the countertop and apron with epoxy grout
Mélanie Gonin Architecte d'Intérieur
In the photo: in some collections of tiles there are elements of the outer and inner corners - with their help they also solve joint issues. The tile flows from the apron to the work surface and is also rounded onto the end part of the countertop
on the topic ...
in trend: square tiles laid by a mesh
Kraizearchiteshitects
9000 5. Hermetics for a tabletop
They are used in situations where two fundamentally different materials are joined - porcelain stoneware or tiles on an apron and, for example, a countertop made of laminated chipboard, solid wood.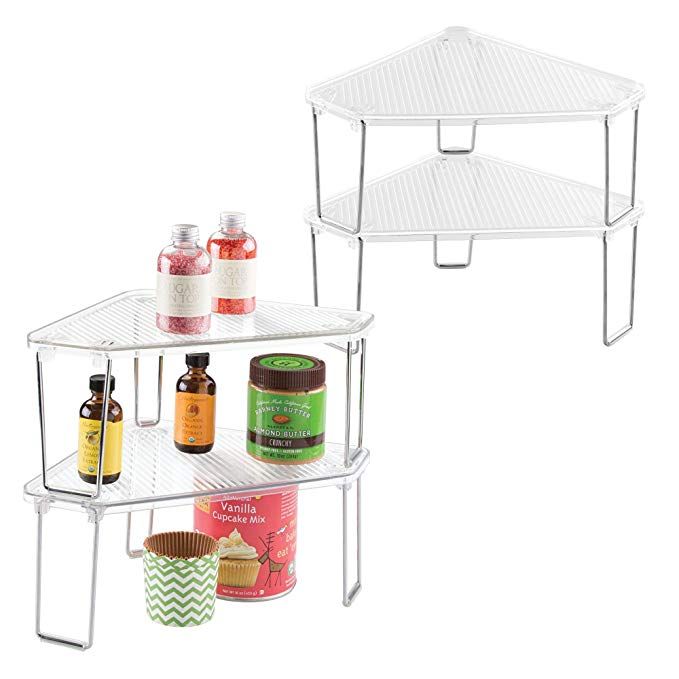
Important note: changes the installation order! First, a kitchen set, countertop is installed. And only then - the apron tile is laid. There is practically no butt joint, and the one that is is treated with a transparent sealant. You can use silicone, sometimes on the forums they advise automotive glass like Sikaflex 555.
►The method seems unusual - not everyone decides to do "dirty work" after installing the kitchen. But this is how designers achieve a neat junction between the backsplash and the countertop.
Maria Pilipenko
Fact: relief tiles on the backsplash are laid only in this way, with support on the pre-mounted table top. The connection through silicone in this case is the only possible connection of the kitchen apron.
RELATED…
Embossed tiles: What is the best thing to know before laying (and buying)
Anna Zueva
6. Metal profile
The photo shows the so-called laying corner for tiles. The profile can be plastic (looks cheap) or metal. Allows you to close the gap between the backsplash and the countertop without resorting to sealant.
Important points to note: the installation sequence is the same as in the case of sealant - first the kitchen is completely installed, then the first row of tile backsplash is mounted through the metal folding corner. Corners are selected in the shade of metal fittings (faucet, roof rails) or sinks - it is quite easy to find both chrome and brass on sale.
Marco Cassottana Architetto
HOW TO REPLACE ECONOMY PLASTIC BOARD
bar. In essence, this backsplash skirting board resembles the option from point 1 (artificial stone) and is an alternative for those who do not like a too thin tile layout profile. The color of the metal is matched to the faucet or sink.
Alexandra Afanasyeva
2. Wooden corner for an apron in the kitchen
Such a corner between the worktop and the apron is sometimes used by designers. The fact is that in pair with a massive countertop it is quite difficult to choose a plinth to match. And if the ready-made version is sold as a "kit" - you have to take it. We do not recommend combining the shades of wood on your own, buying a plinth in one place, and a countertop in another: there is a high probability of missing. It is better to use sealant or tile installation on the countertop through a metal layout profile.
How to fix the corner to the worktop and backsplash? Installation takes place by analogy with a traditional wooden floor plinth: glue is applied to two ends, the corner is pressed against the wall and countertop.
Manders
Tip: even for wood, look for a wooden profile NOT triangular, but rectangular. Bar-shaped options are in fashion. Most often there are analogues of metal and stone (that is, tiny rectangular strips), but you can also order a high flat plinth, as in the photo.
The more minimalist the profile, the easier the maintenance of the skirting board. For a tree, this is an important factor.
Yuliya Khokhlova
And finally, about unsuccessful options - all kinds of plastic skirting boards with a triangular section (as in the photo). Here we have at least two joints instead of one in the area of \u200b\u200badjacent to the wall, plus a void behind the plastic strip: the fungus "overgrows" this surface in just a couple of years - get ready to constantly change the baseboard to a new neat version.
Irina Kireeva
Let's draw conclusions
1. There are fashionable and unfashionable ways to make a joint between a table top and an apron.
2. Triangular skirting boards give way to rectangular ones. Plastic - artificial and natural stone, metal.
3. Many designers do not use skirting boards at all. The neatness of the joint is achieved primarily due to the ideal removal of horizontal lines and the correct sequence of mounting the headset.
Irina Kireeva
4. The junction of the countertop with the backsplash must be ideal, since the edge (unlike plastic) is not flexible - it will not be possible to compensate for the initial irregularities with its help.
5. There is only one way to achieve a perfect connection: first assemble the kitchen, mount the countertop and only lay the backsplash on top of it.
6. If there is no gap between the apron and the set, the skirting board can be omitted altogether. The seam in this case is filled with sealant or epoxy grout. It is possible to lay the tiles through the metal laying profile.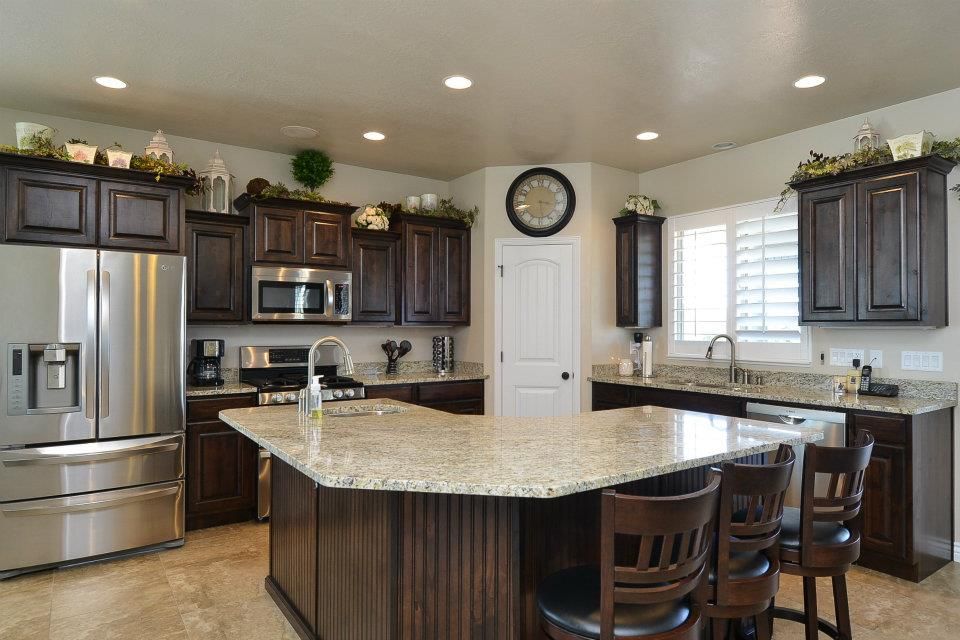
7. For owners of artificial or natural stone countertops, we advise you to order the same edge (height varies). The material is pasted and mounted almost without a seam - very hygienic.
8. It is most reasonable to buy a skirting board for a wooden worktop at the same time as ordering the surface. Give preference to a plinth in the form of a bar, do not consider triangular options.
Sponsored
Bauunternehmen | Düsseldorf
Sponsored
Interior Designer & Raumausstatter | Düsseldorf
How to install a kitchen worktop with your own hands
When arranging a kitchen or replacing furniture, you always have to install a countertop. Its installation can be ordered from the manufacturer where you bought the headset, or you can do it yourself. Consider the cases when it is reasonable to refuse the services of a wizard, and we will give step-by-step instructions for installing it yourself.
In what situations is it possible to self-mount the worktop
If you understand the installation process, you will understand that there is nothing complicated in it. However, we do not recommend immediately abandoning the work of specialists. Weigh all the pros and cons.
Self-assembly of the countertop is justified in two cases:
-
When you change not the entire headset, but only the work surface.
-
When you have the skills to work with chipboard, MDF and wood. You can evenly and accurately cut the slab, process its edge, know how to use sealant, understand the principles of joining and fixing various materials.
Installation should be entrusted to the masters if:
-
You don't have furniture assembly skills.
-
The service is included in the cost of installing the entire headset.
-
You ordered non-standard furniture, for example, the design involves a figured cut of the table.
-
The product is made from expensive raw materials. Recall that artificial and natural stone are heavy, dense, but fragile.
 Without special tools and experience, installing a stone surface will not work. The slightest chips will spoil the whole appearance of the kitchen. Do not risk and use the services of masters.
If you order sawing and installation of countertops from the headset manufacturer, you are given a guarantee for installation work. With self-assembly, the company will not be able to help, even if factory defects are found.
In the article we will talk about installing a countertop using the example of a laminated chipboard (chipboard) or wood-fiber (MDF) board. Today it is the most demanded materials among consumers. The technology for fixing a surface made of wood and metal is no different from that described below.
Worktop installation tools
Before starting work, make sure that you have all the necessary accessories for installation. You will need:
-
Pencil, tape measure, level.
-
Silicone sealant and a gun for it.

-
Wood saw or electric jigsaw. The second option is preferable, because the cut will turn out to be even, there is less risk of deforming the surface.
-
Fasteners to fix the table top on the cabinets.
-
Aluminum slats to give your kitchen a clean, finished look. They are of 3 types. End is used to decorate the raw edges of MDF or fiberboard. To connect the parts of the table at an angle, use corner samples. If the countertop consists of several parts arranged in one row, the joints are masked with connecting strips.
If it is planned to cut the front part of the countertop, the edge must be treated with adhesive tape. It is ordered together with the table from the manufacturer. We will describe the technology of its gluing below; this will require an iron and fine-grained sandpaper.
How to install a countertop in the kitchen: step by step instructions
The table is fastened only after the assembly and screeding of all floor boxes.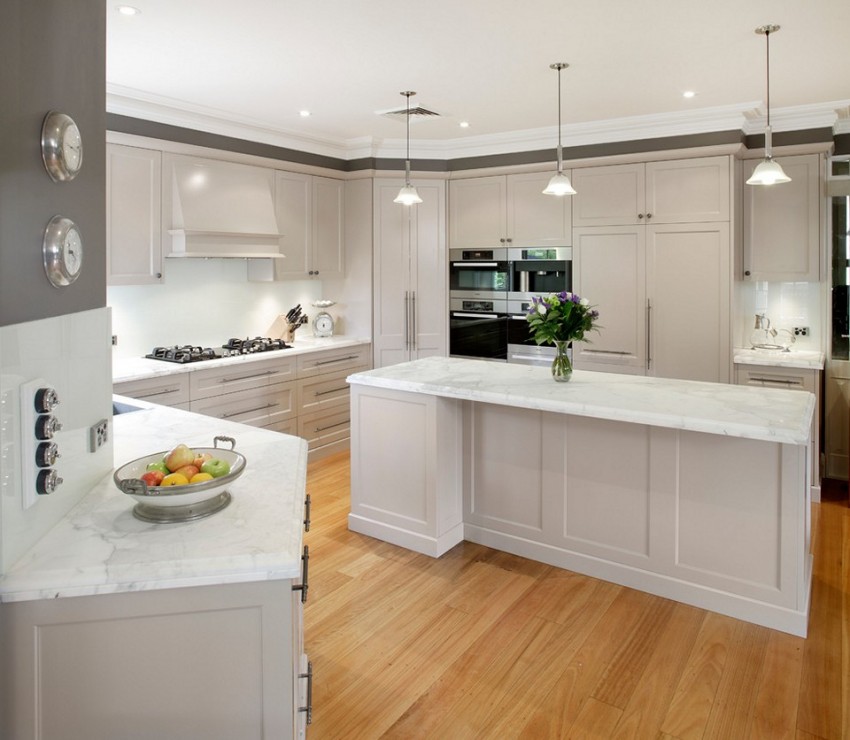 They must be leveled with a level so that the weight of the surface is evenly distributed around the entire perimeter.
Some manufacturers have a worktop attached to each kitchen unit. This is true for small headsets. In this case, cuts are not needed, you immediately proceed to the stage of fixing the surface on the ends of the furniture.
But more often, the design of the room involves several cabinets located in length, and a monolithic countertop on top. If the kitchen is corner, you will be brought one piece of the plate, which will need to be cut to size and joined. How to do it:
Apply masking tape to the cut line. It will protect the laminated coating from chips.
-
Sand all non-plastic-finished ends to remove dust, and lubricate with sealant: it will prevent mold and swelling.
-
When the silicone dries (after about 20-30 minutes), fix the end and, if any, connecting and corner strips with self-tapping screws.

-
Lay the tabletop pieces on the cabinets and drill holes in the special ties of each module. With their help, you will later attach the countertop to the cabinets with self-tapping screws.
While the table is unfixed, you need to prepare a hole for the sink.
-
To cut a hole, use the template that came with the bowl. If it is not there, circle the outline of the sink, which will outline its boundaries. Step back from it 13-15 mm and draw an internal contour along which you want to cut a hole.
-
Treat the resulting edges with sealant.
The technology for preparing a place for a hob is identical.
When the place for the sink is ready, we proceed to fixing all parts of the countertop. To do this, put it on the cabinets and attach with screws. Sometimes during transportation or in case of violation of storage conditions, the MDF board may slightly bend.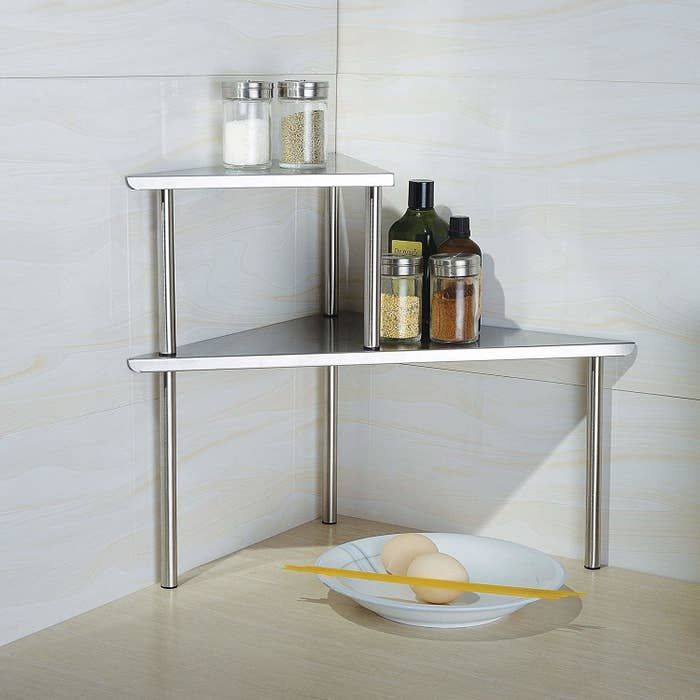 If the bottom cabinets are level and the slab is crooked, press it down.
The surface can be fixed close to the wall or retreated 5 mm. In any case, do not forget to seal the joint and the wall.
How to finish the edge of a worktop with an edge
If the design of the kitchen involves a figured cut of the front part of the table, the edge is sealed with an adhesive edge, which matches the color of the countertop. The sequence of your actions is as follows:
-
Heat up the iron. Check its temperature on a small section of the edge: it should not burn through.
-
Attach the edge tape to the end with the side that has the adhesive applied.
-
Slowly heat the edge with the iron so that the glue melts and sets. Take your time to gradually stick the tape, otherwise creases will appear. They will crack quickly, and the edge will look sloppy. Water will get into the cracks and dirt will accumulate.
 This will shorten the life of the headset.
 -
Wait for the glue to dry completely.
-
Cut off the excess edge with a construction knife.
-
Finish the edges with sandpaper. Your task is to round the end, make it smooth, without corners.
If there is no adhesive layer on the tape, buy Moment wood glue. It will provide the right grip.
Now you have to install the kitchen skirting along the walls. It prevents water, grease, dirt and dust from getting between the wall and the countertop. The side consists of a guide that is attached to the table, planks, plugs and corner connectors. Depending on the model, the guide is glued or fixed with self-tapping screws.
Even if you decide to entrust the installation of countertops to professionals, the material of the article will be useful to you. You will be able to control the work and check whether the masters did everything correctly.