Kitchen additions plans
How to plan a kitchen remodel: planning a kitchen renovation
Being confident about how to plan a kitchen remodel is crucial to a successful renovation. It’s a home project that’s top priority for many in order to create a room that meets all the household’s needs, as well as delivering on style.
Following the stages of planning a kitchen renovation will ensure that elements such as storage, layout, appliances, lighting, materials, style, color, and more are all considered with nothing left out.
Here we guide you through the process of realizing your kitchen ideas into a design that meets all your expectations.
How to plan a kitchen remodel
Before you meet with a designer to discuss your kitchen remodel ideas, spend time considering what you want in terms of the kitchen’s style and its features.
Meet with your designer early, particularly if the remodel involves any construction work. Their advice will prove invaluable when considering positioning of walls, doors and windows – vital elements of planning a kitchen remodel.
Choose cabinetry style
(Image credit: Darren Chung)
You may have been browsing kitchen makeovers for kitchen cabinet ideas – that's usually the starting point for a kitchen renovation. And while, in considering how to plan a kitchen remodel, selecting the cabinetry style might seem as if it’s something you can do later in the process, but it’s worth choosing this early. ‘In particular do you want it to be more contemporary or traditional?’ says Emma Cowburn, kitchen designer at Harvey Jones .
‘Not only are the door styles different but the way you lay out the design will be impacted by your overall style.’
Think appliances
(Image credit: Samsung)
Incorporating all the appliances required in your household is crucial when you’re remodeling.
‘The appliance choice is key to the success of any design,’ says Tom Howley, design director at kitchen company Tom Howley . ‘A mix of cutting-edge appliances will give you more and you don’t need to compromise on the overall design to get this.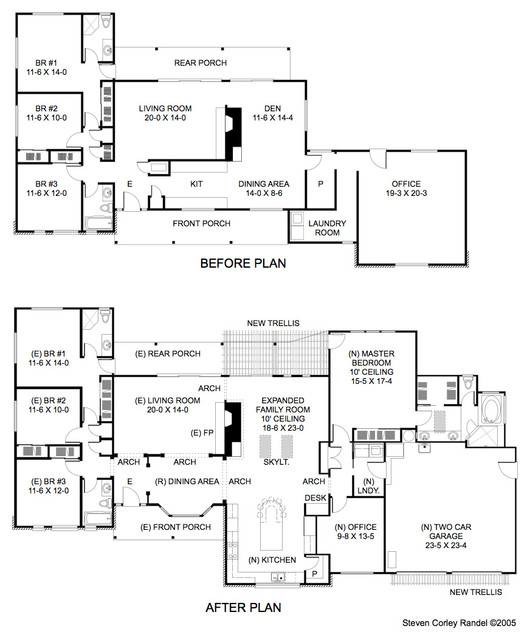 Positioning all the appliances within a workable distance of each other provides the chef complete flexibility. Creating separate zones for preparation, cooking and cleaning creates an easy flow around the kitchen.’
Particularly vital if your kitchen is a smaller one is that opening of oven or refrigerator doors won’t obstruct walkways. Keep a small kitchen open, too. ‘A key tip is to fit built-under appliances,’ says Tom. ‘This will provide lots more work space, leaving views across the kitchen at eye level uninterrupted.’
Consider the layout
(Image credit: The Main Company Photograph: Chris Snook)
Key to success when it comes to planning a kitchen remodel is the layout of the room – especially if you're looking for remodelling ideas for small kitchens.
’It needs to be both functional and somewhere that you love walking into,’ says Alex Main, director, The Main Company . ‘Textiles such as curtains can be changed fairly easily, whereas a kitchen layout cannot. ’
’
Sink, refrigerator, and stove are often arranged in a triangle as seen on a plan – the work triangle of which you’ll hear designers speak. It makes for a practical room reducing the number of steps between them.
The layout should also provide sufficient counter space for the number of people likely to be preparing food at any one time in order to optimize the kitchen’s functionality.
An island is a welcome feature in most households, but beware the fate of many. ‘Consider breaking up the surface of the island with cooking or washing-up components to ensure it’s used to its full potential and to prevent it becoming a dumping ground,’ says Alex.
The layout needs to incorporate sufficient circulation room for movement around the space without compromising the safety of working areas. Choosing the right kitchen island size is one crucial factor as this is where friends and family will congregate.
Be mindful of the aesthetic potential of the room, too. ‘Leave spaces where individual pieces can be introduced, whether on the wall or floor – it furnishes the room and accentuates the “living” feeling we all seem to strive for in modern times,’ says Alex.
Take storage into account
(Image credit: Future)
How many kitchen storage ideas you require is personal. ‘Every household will differ so it’s important to first consider what you will be storing before you start designing your space,’ says Alex Main. ‘If you need space for wine, for example, think about integrating some dedicated shelving or a wine fridge. If you would like to keep your small appliances out of sight, consider space for your toaster, kettle and coffee machine to be neatly tidied away.
‘Think about ergonomic storage, the use of drawers for plate stacks, pull-out shelves instead of scrabbling around in the back of a cupboard only to find an out-of-date packet. Also, consider finding a static home for heavy appliances; this should help to free up extra work surface space.’
Select colors
(Image credit: Martin Moore)
What about how to plan a kitchen remodel in terms of the colors for the room? If your kitchen cabinetry is to be hand painted in situ, you can afford to wait until other elements of your kitchen remodel are decided before selecting a color.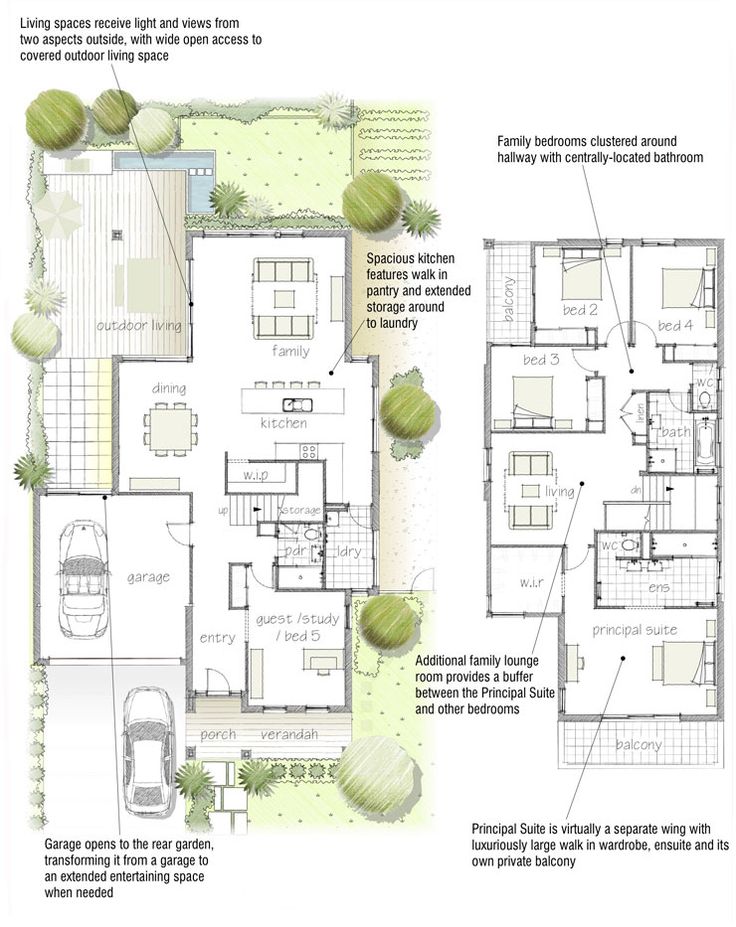 If that’s not the case, you will need to settle on a cabinetry color sooner.
But the color palette for the kitchen includes counters, walls, and floors as well as the cabinetry, and you’ll want to consider kitchen color ideas as a whole. Emma Cowburn suggests an approach based on how easy a color is to change. ‘For example, changing flooring is a lot harder than painting walls,’ she says. ‘Therefore the harder it is to change, the more neutral/timeless you should go. Vice versa, the easier it is to change, well, that’s your opportunity to be bold.’
Consider the light that reaches the room, too. ‘You can’t go wrong with a pale pastel colour to make a room feel bigger and brighter,’ she says. ‘If you want to go bold with darker flooring, cabinets or worktops, I suggest buying a large piece of fabric in a similar color, the bigger the better, tuck it under/behind your furniture, pin in to a wall, cover your existing cabinetry – does it complement the other furniture in the room? How does it look in daytime with natural light, evening time with artificial light? What does it remind you of? Does it make you feel as you expected? Be honest with yourself: does it feel more claustrophobic or even depressing?’
As for the color of counters, she suggests thinking about how much cleaning you want to do. ‘Matte finishes are a lot more forgiving and natural patterns like wood or Carrera marble will help keep things visually calmer.’
You might, of course, want to use two colors for cabinetry with a second hue for an island, for example, and this is an on-trend look. But put this in the context of all the colors in the room – using a mood board can help – rather than thinking of it simply in combination with the other cabinetry color.
Concentrate on counter materials
(Image credit: Future)
It’s not just the colors and finishes of counters that are important, of course. ‘A kitchen counter needs to be both tough and stylish, and the key to this lies in choosing the right materials for the job,’ says Tom Howley. ‘Luckily with advancements in technology the choice of materials is vast for all budgets and styles of kitchen.’
When considering kitchen countertop ideas, opting for a natural stone may require a little more care in terms of protecting it from spills and selecting the cleaning products to use on it, but it has the benefit of being a unique piece of material.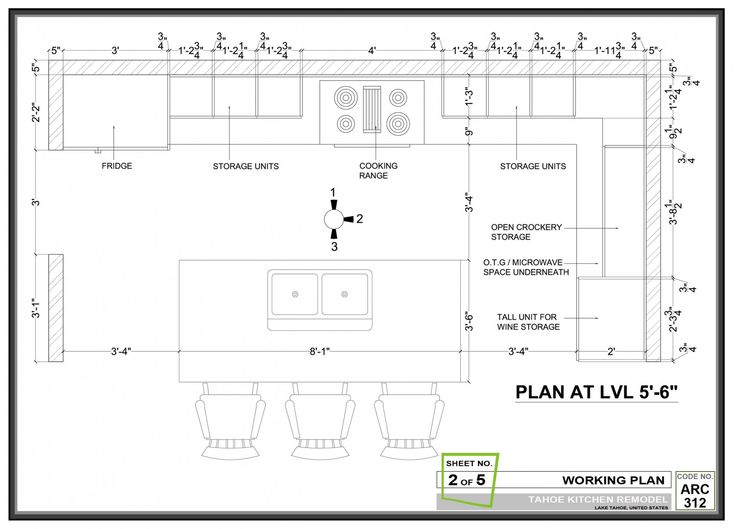 Solid surfaces can’t boast this uniqueness, but they offer a huge range of looks and colors, and are hygienic and easy to look after.
Focus on flooring
(Image credit: Kersaint-Cobb)
Kitchen flooring needs to be hard wearing as well as easy to keep clean as the room is a high traffic work space in which the family will gather. Wood flooring is an enduringly popular choice for kitchens, but you might want to consider a wood-effect porcelain tile as an alternative. ‘The prints and tones available certainly do mimic the look of real wood,’ says Isabel Fernandez, director at Quorn Stone . ‘A porcelain tile is non-porous and will therefore provide a stainproof option which can be preferable with young children,’ she says.
Stone tile is a further possibility. ‘Natural stone flooring can be one of the most forgiving floor coverings if the right stone and finish are chosen,’ she says. Do bear in mind that natural stone should be sealed, however, to protect it from stains.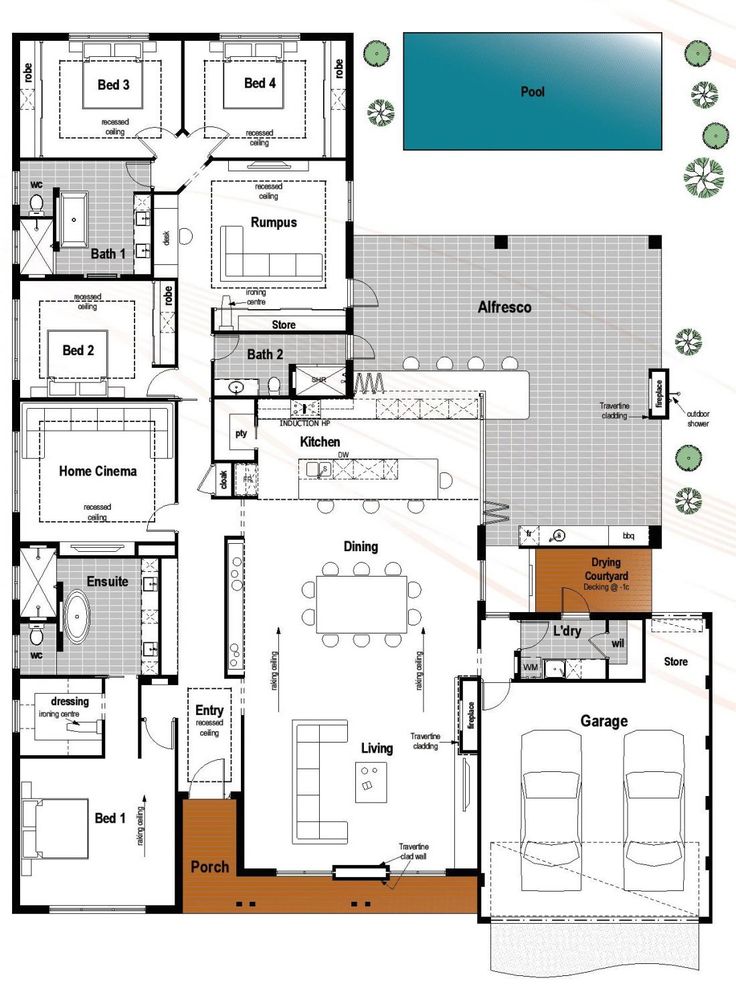
Plan kitchen lighting
(Image credit: Tom Howley )
Also on the list of factors involved in planning a kitchen remodel is kitchen lighting ideas. ‘For electric lights the go-to is spots and pendants,’ says Emma Cowburn. ‘I recommend an even and continuous grid pattern for spots as strange patterns are distracting.
‘I also recommend warm white lights. Warm white is the most inviting. For pendants, put these over fixed things like kitchen islands. If you put pendants over kitchen tables, I suggest a style of pendant that has an adjustable height. You don’t want to be limited if you come to hold a big party and move the kitchen table.’
How do I start planning a kitchen remodel?
Look for visual inspiration when you start planning a kitchen remodel. ‘It’s important to have a clear idea of what you want the space to look like,’ says Alex Main. ‘Pinterest and Instagram are great resources for saving your ideas into one place using boards or saves.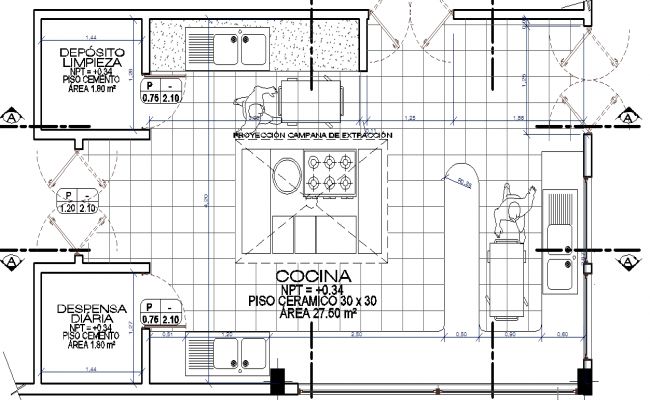
‘This exercise will help you to visualize color choices, worktop materials and other key elements which help to bring the space to life. Alternatively, visit showrooms and get to grips with the raw materials in person.’
From there, you can work out how much a kitchen remodel will cost you and adjust your wish list accordingly.
What is the most expensive part of a kitchen remodel?
The most expensive part of a kitchen remodel is generally the cabinets. They are the foundation of the room, of course, and also have to be durable in daily use. ‘For us, the cabinetry is really the star of the show, so we would suggest investing in bespoke, made-to-measure options,’ says Tom Howley.
Bear in mind that high quality custom cabinets should have a long lifespan, and also that painted cabinets can be refinished over time so the look can be changed easily.
As for the overall cost of a kitchen remodel, a number of different factors will influence it. ‘Budgets are project-specific and partially dictated by the size of the space and client requirements,’ says Tom Howley.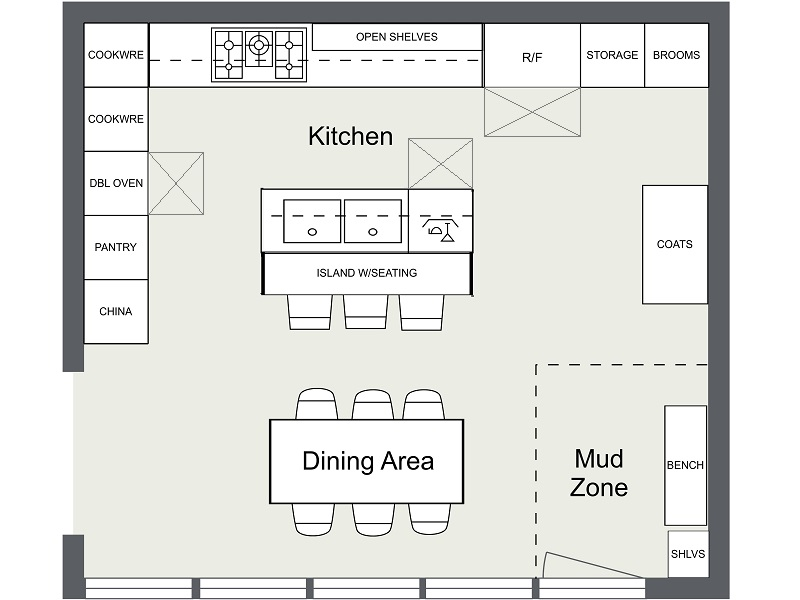 ‘If you are hiring trades, you’ll need to factor in a budget for construction, painting, tiling, flooring, plumbing, electrics and any extra fixtures on your wish list.’
The Ultimate Kitchen Remodeling Guide
Kitchens remain the most popular room in the house to renovate. It's a big job, both in terms of cost and project scale. So before you hire a contractor and start bashing down walls, there are some important things to consider and prepare: namely, setting a budget, determining what you want, and planning how it will all fit.
Set Your Budget Before You Remodel a Kitchen
As you go about planning the new kitchen, be realistic about the cost. Large renovation projects often end up taking more time and money than you plan for, so it's a good idea to aim for a conservative budget beneath your max budget to ensure there are extra funds if your project goes over. A good rule of thumb is to add another 10 to 20 percent for unplanned expenses. The more financial cushion you have, the better. You don't want to be scrambling for an additional loan mid-project, or worse, end up with a half-finished kitchen because you ran out of cash.
Do Some Research
Visit kitchen showrooms and home stores to figure out the cost of items, and then figure out what you need and what you can afford. Attending a neighborhood home tour is a great way to connect with other homeowners and observe their kitchen layouts and renovations.
Consider "Hidden" Costs
Remember to factor in the cost of labor and materials as well as taxes and any shipping or delivery costs that might come up. These can add up very quickly, so it's important to take them into account when you're setting the budget. Also, consider if there are any steps along the way that you would like to perform yourself. Even taking on just a few tasks can save you a significant amount of money.
Aim for Quality
Always buy the best quality materials you can afford. When it comes to kitchen renovations, you want to have high-quality, functional items, both for your own use and for potential resale value. High-quality cabinets, countertops, and appliances will also last much longer so hopefully you will never have to repeat the renovation process again while you are living in the home.
Consider exploring used materials—often you'll be able to afford higher-quality items than your budget would allow if purchasing retail. For example, try repurposing or painting older cabinets bought from a business that sells reused building material. You can also find high-end items for sale from individual sellers online.
Evaluate Your Needs vs. Wants
Be practical and don't buy unnecessary items. It can be tempting to buy all sorts of gadgets and fancy appliances, but it's better to go with the reliable basics that you know you'll use. Remember, with every new appliance comes a slightly higher utility bill. They also add to your upkeep responsibilities and require time and money to maintain.
Planning a Kitchen Layout
More than any room in the house, the kitchen needs to be practical and functional.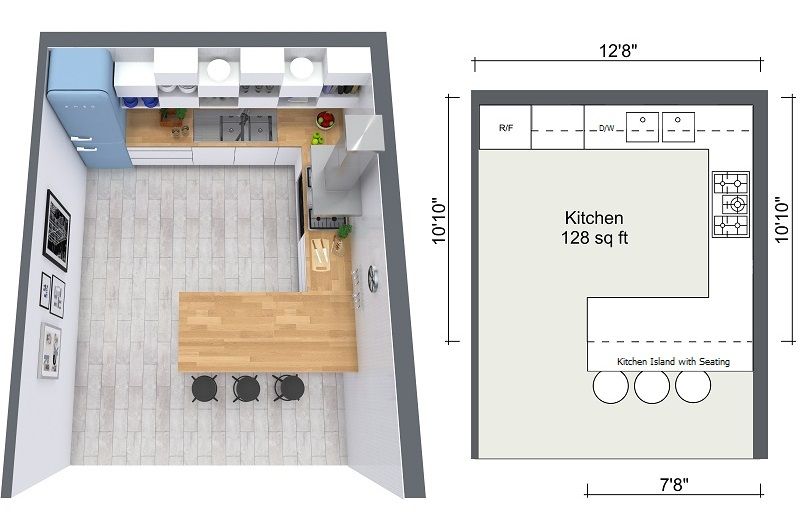 Think about how you use your current kitchen to identify your priorities for the remodeled space. What works and what doesn't? Give considerable thought to the layout of the room and assess what will work best for your household.
Whenever possible, make use of the classic work triangle. Arrange the sink, refrigerator, and stove (the three features used the most) in a triangular pattern. This is generally considered to be the most convenient setup because it saves unnecessary steps.
Also, think about how many people usually work in the kitchen at the same time. If it's more than one, you might want to incorporate more than one workstation. Or, if there's enough space, consider adding an island or purchase a wheeled cart that can be moved around the room and put away when not in use.
Kitchen Space Planning
A good remodeling contractor can help you make sure things are laid out to ensure proper safety, but it's up to you to plan for convenience. Here are a few things to remember when mapping out your space:
- Counters: Plan to have at least 36 inches of counter space for food preparation, with at least 24 inches on one side of the sink and 18 inches on the other.
 If you can fit more, do so.
 - Appliances: Leave adequate floor space in front of appliances so the doors can be opened and you can still walk in front of them. You'll need at least 30 to 48 inches. Also, take note of the direction and depth of swinging appliance doors—especially when it comes to the refrigerator. If you plan to have your fridge next to a wall, make sure the door swings in the opposite direction, otherwise the wall may prohibit the door from opening all the way.
- Walkways: Leave enough room for traffic flow. There should be at least 42 inches between the counters and the island so that people can easily walk through without disrupting anyone working at the counters.
Final Considerations Before Renovation
Invite your contractor and/or your designer into your home to discuss all of your hopes and requirements for your kitchen renovation. This will help confirm your space is planned in a way that will ensure convenience and ease of movement for you and your family.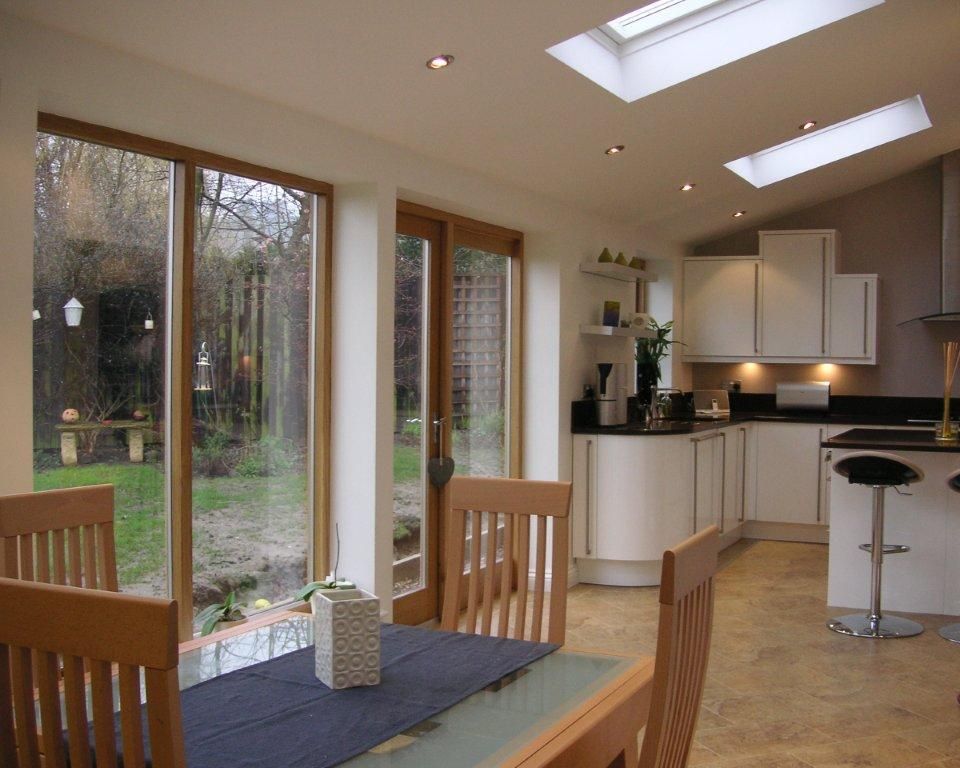 Remember to stick to your plan, and don't get caught up in the excitement or let yourself get talked into things you don't want or need.
Kitchen extension to the house from a pro with 13 years of experience. Click!
Kitchen extension to the house.
What would your kitchen look like?
Of course, attached to the house?
Like this
And like this
And like this.
Various.
It can be summer or winter.
May be on the 1st floor or 2.
May be adjacent to the house. may be somewhat distant from it.
There are many options, but you have exactly 1 chance to make the extension successful.
These are not shoes / for women - boots that you buy once a season. This is an extension for 20-30, or even 50 years.
The choice is serious, so you need to think it over well, consult, draw in full growth and size. See what happens and then fix it if you don't like it.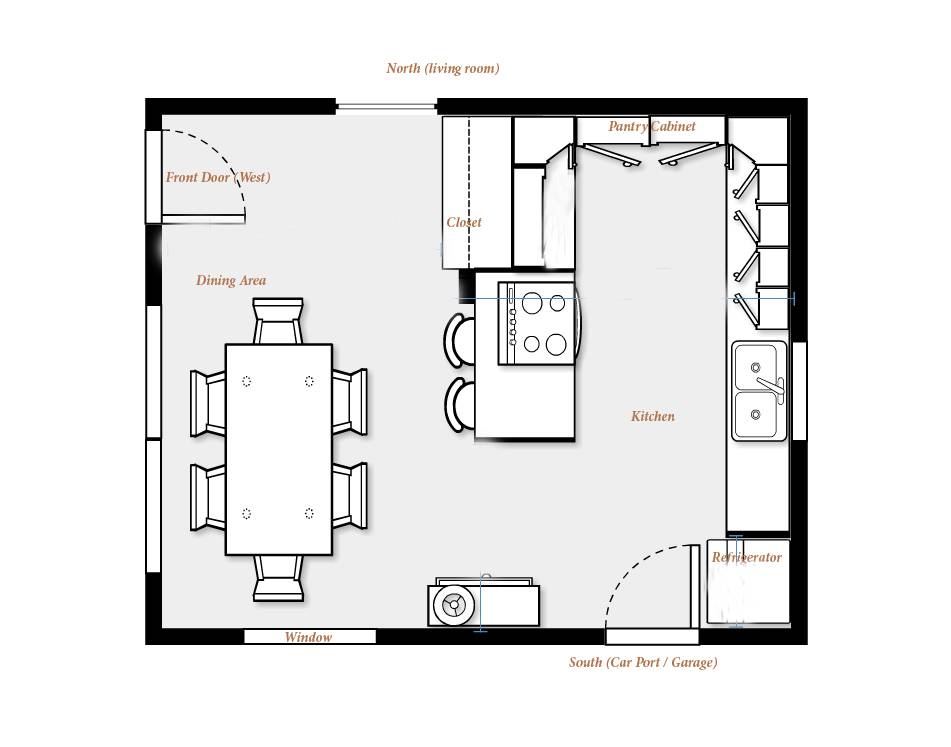
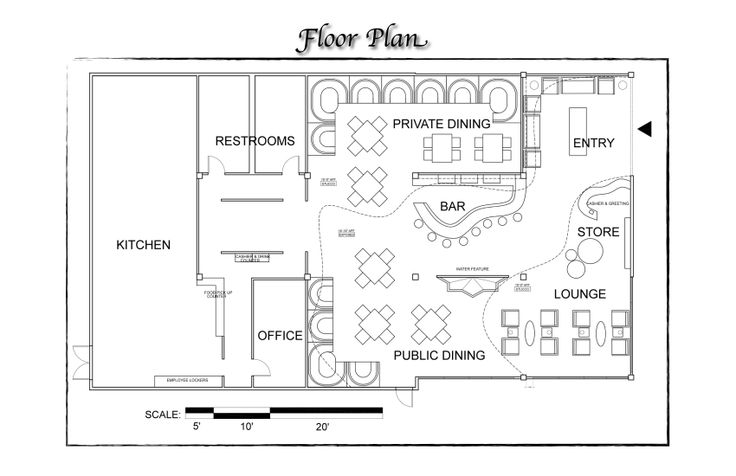
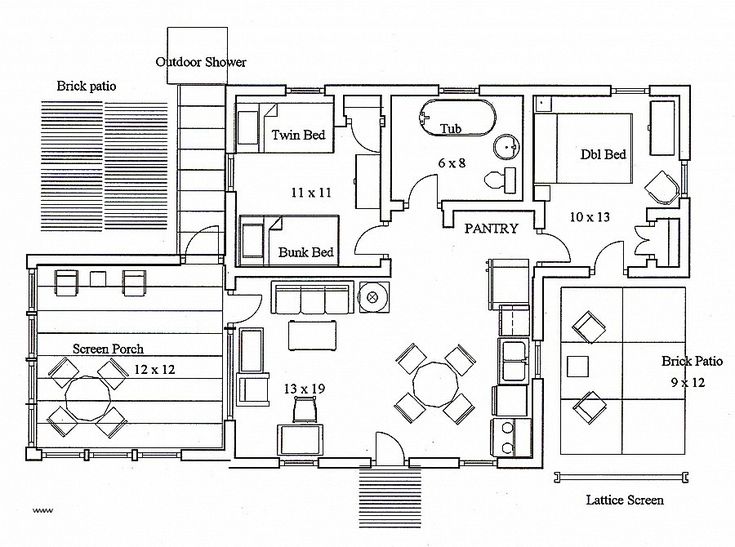
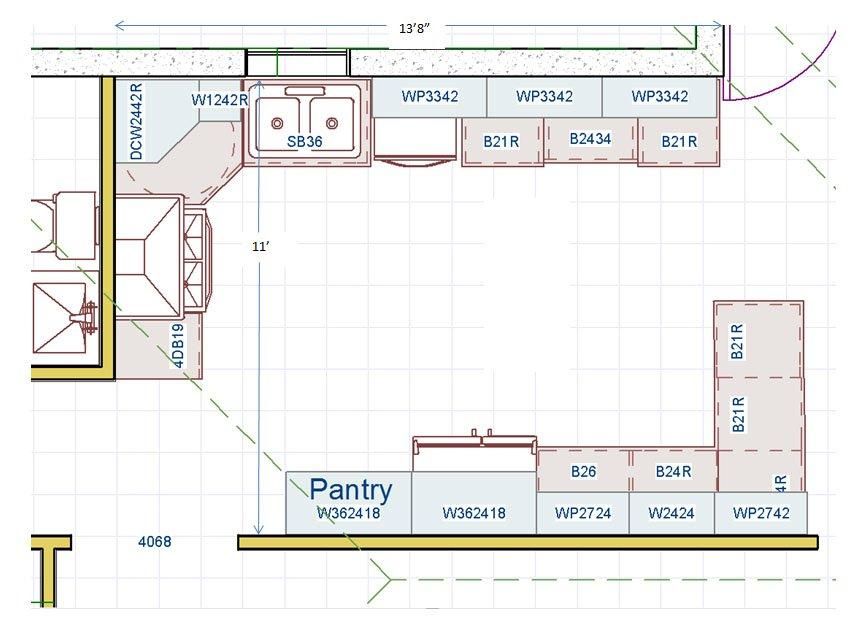
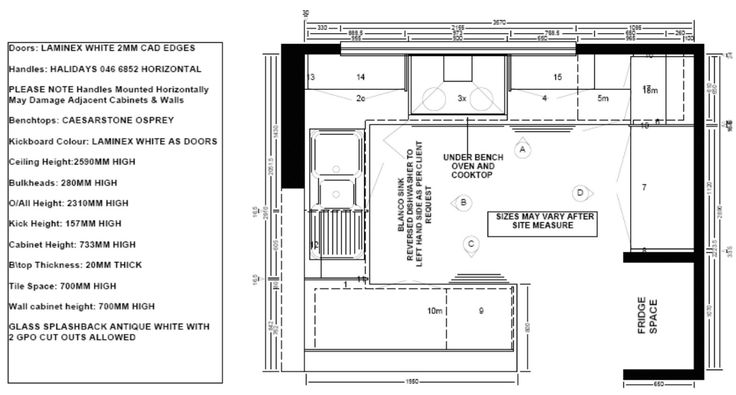
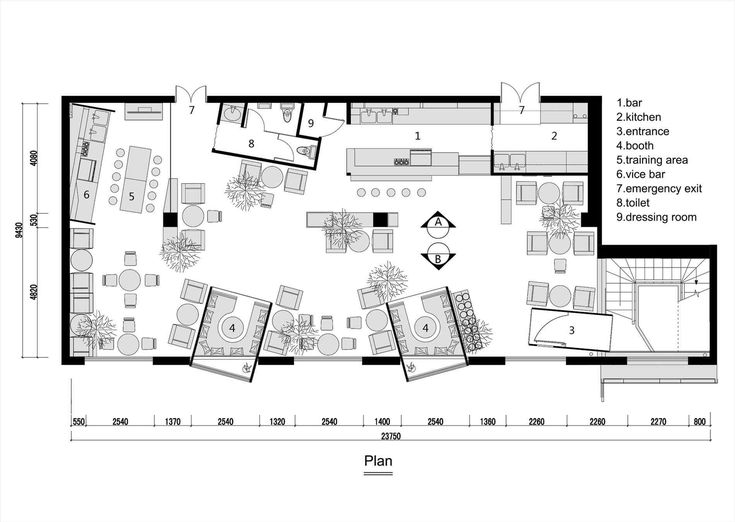
You can even start with such a plan.
Yes, a process that lasts a month, or even several years. Many have an idea for years and then implement it. Or not.
To avoid mistakes, it is better to contact a specialist who knows a lot about extensions. It is in them. Building a house is easier. Renovating an apartment is generally easy. But the extension of the kitchen to the house is a completely different story.
Let's start it!
Tatyana Fedorovna lived and she wanted a spacious kitchen-living room in her house. Let it be an ordinary house 7x8 meters in 1.5 or 2 floors. Internet searches have borne fruit. She found several firms and teams. I called and made an appointment with some of them.
Someone has arrived, someone has not. And someone said that he would come only to conclude a contract for the project. What's the point of just dating. Here the next character of our story appears - Anton (yes, it's me).
Tatyana Fedorovna thought a little, looked at the work on the site and decided on the project.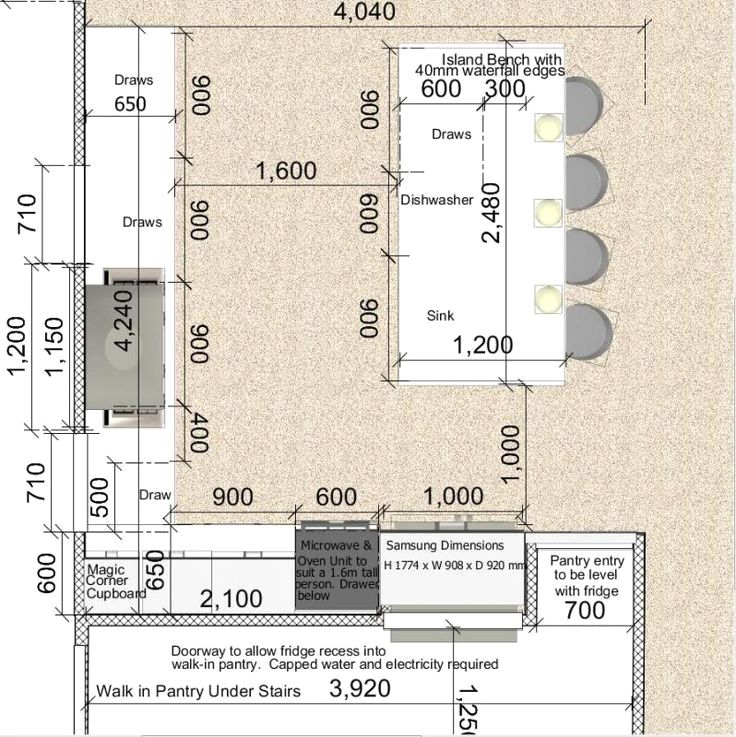 Do it anyway. Moreover, if the price does not suit you, then you can send it to other companies for miscalculations and find out the price there.
Yes, that's a good idea.
The meeting took about 2.5 hours. At this time, Anton took all the measurements, filled out a questionnaire of more than 50 questions, took photos and videos at home.
Plans and facades are also sketched.
Liked it. The impression is positive. After a quick 20-30 minute meeting with other people, this person made an impression. If not a professional, then at least a person who understands something. It is a fact.
Then we made a project,
By the way, visualization.
Exactly what we wanted!
Also made a few edits along the way: changed the stairs, the entrance to the existing house and much more. 2 weeks flew by unnoticed, and then there was the main work, which no one canceled.
Adding a kitchen to the house - is not a quick process and the project must be drawn up correctly: all heights, all plans and stairs must be thoroughly thought out.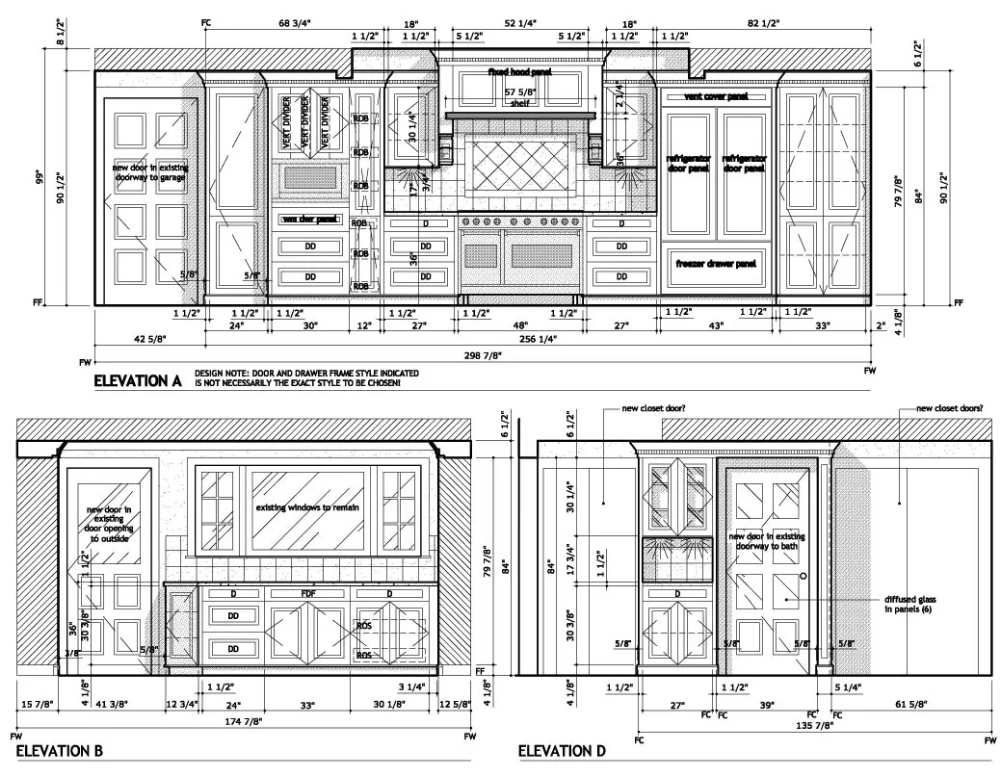
It's one thing to draw.
And another thing is to build what has been drawn and bring it to life.
And here, a common problem for designers and architects who are out of touch with construction is that the idea is unrealizable in practice.
That is, they drew it, but it is not possible to do this. Or due to the lack of data materials. Or because of unaccounted for loads, or maybe there are simply no professionals to implement these works.
Therefore, the advice - this is already from Anton - do the project in an embrace with the builder. Because many people first look for an architect, thinking that he knows better how and what. He's also an architect. And they remember the builders after, when everything is ready. And it turns out that the overlaps do not correspond to the load. The roof slope should be more than 13 degrees for metal tiles, window openings are too large for such a roof area - they cannot be strengthened in accordance with SNiP, and so on and so forth.
The picture is beautiful, but the execution is impossible.
And it turns out that the project needs to be redone. A rare architect will do it for free. The answer will be simple: you wanted, I drew. Alterations cost some money and will be right in their own way. He won't build it. Its task is a beautiful picture that you like.
That's the point of such a waste of time and money when you can immediately apply to a company that already has its own architects. Who sit in 1 office (on the edge in the neighboring ones) with technical supervision, foreman or chief engineer. Whatever you call this position, this is a person who will be responsible specifically for the process of building your kitchen extensions to house .
I hope I explained clearly.
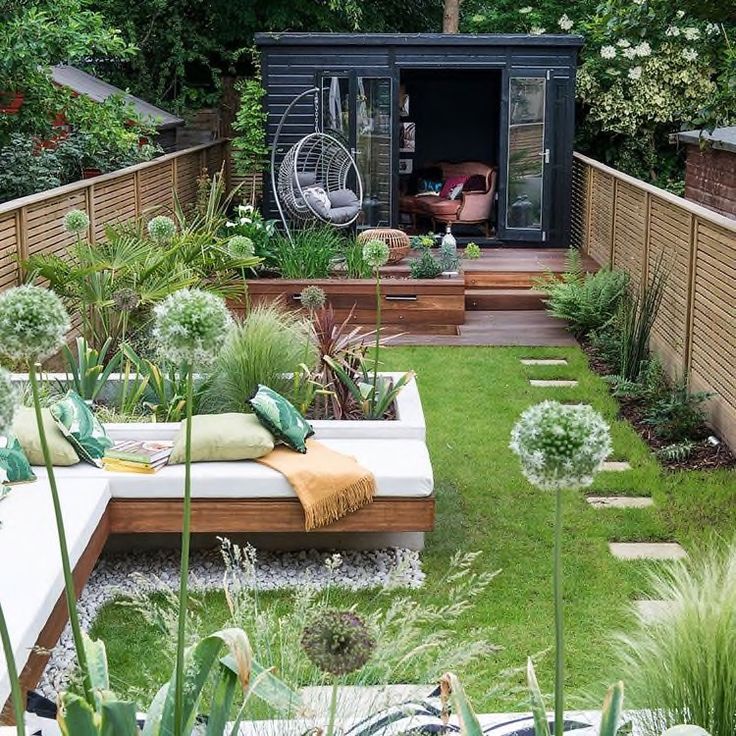
And now some beautiful pictures, how you can make it beautiful.
And it really can be built.
I wish you the same!
Do not forget that the extension can be either 1 floor or 2 floors.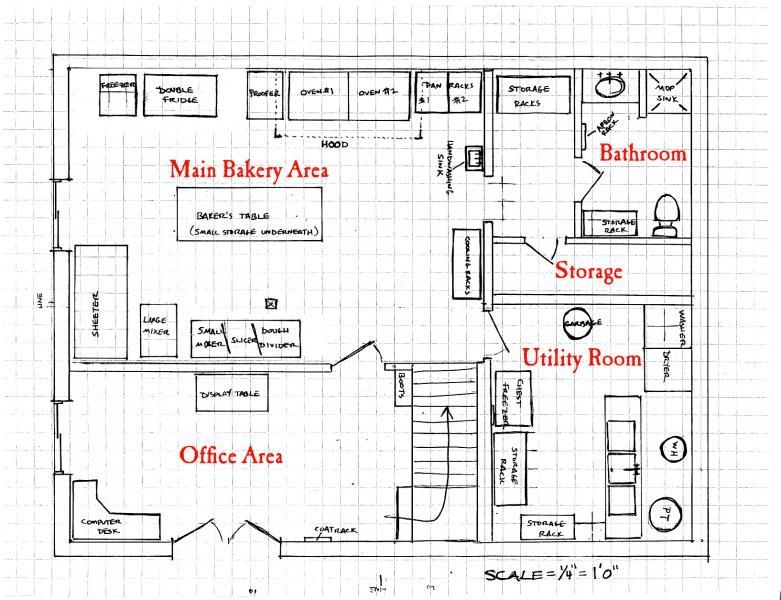 And you can also bury the cellar))
That's all, contact the professionals and may the force be with you))
You can start with the engineer's visit to the facility and the project.
Anton Shchelkov, Construction+.
Adding a kitchen to a frame house
Adding a kitchen to a frame house
Some time after entering the house, the owners of country houses want to have as much free space as possible and plan to increase the area of their own housing.
The smartest and fastest way to implement such a plan would be to build a kitchen attached to the house. The frame is built in construction and the difficulties generally do not appear, but do not yet require special building skills.
If the project is not the most complex, then it can be built in a fairly short time period. The main thing is that you apply a step-by-step plan, which will describe the construction features of the house and how to create a frame extension. How exactly to choose the type of frame extension to the house, what building materials to use, and what other technology options and what recommendations are for each construction stage.
Contents:
When you start building an extension to the house, the step-by-step instructions provide for more than just the work of drawing up an estimate and project coordination of the future building. There are many nuances that are important to consider. Before agreeing on the project and building the frame extension, it is important to choose what kind of goal you are pursuing with new construction work. From the appointment of an extension in a country house, expense items may change - perhaps you need vapor insulation, installation of window frames, plumbing, and also qualified craftsmen.
Frame-type veranda
The simplest frame extension in terms of implementation and spending is a summer-type veranda or a terrace for relaxing in the summer season. Due to seasonal operation, the premises do not need huge investments. The alignment is carried out minus high quality insulation and membranes for moisture insulation.
Summer kitchen
If the veranda is used as a summer kitchen, construction will begin with the fact that you will lay engineering communications at the initial stage. It should be noted moisture resistant OSB and high quality tiles in order to fully avoid getting wet when installing a summer kitchen.
Living area
A frame extension for a house can be used as an additional living area in an existing housing, for example, with one or even a couple of living rooms. In this case, the structure will need additional insulation in order to reduce the cost of heating the room, choosing the most solid type of foundation and performing work for moisture insulation.
Outbuilding
An extension for an old house of additional utility rooms, which will require a competent and timely laying of engineering communications at the construction stage.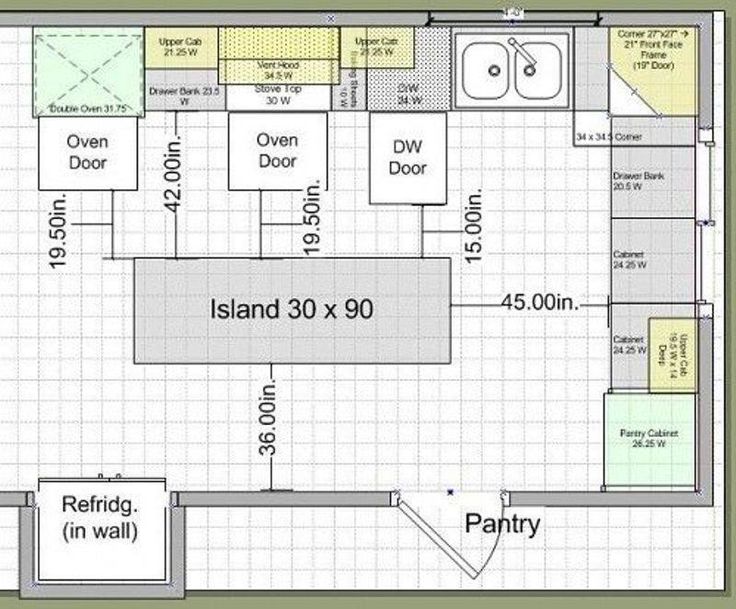 In this case, on the draft floors, you can not cover the boards. Sheathe the extension only on the outside on poles and racks.
Please note that the choice of the type of frame extension for the house is extremely important in order to ensure perfect docking with the already built walls, base and roof for the old country house.
If we do not attach importance to the similarity of the structures of the two buildings, shrinkage or even distortion of the house, cracks and future structural failure may occur. First of all, you should start by choosing a base and knowing how to use the bottom trim. Logs in the extension must be connected competently and thoroughly with the foundation of a capital private house.
Details
Selection of base
The type of foundation you will build will also depend on the further use of the frame structure. In the future, ideally, the base of the main house should correspond to the extension. The choice of the type of foundation for the frame extension with your own hand will largely depend not only on the characteristics of the already built house made of wood, but also on the natural conditions and the quality of the soil at the place where you will be building. The basic list of materials used in order to attach a kitchen to a wooden house:
- Metal rods.
- Wooden piles and beams.
- Stone.
- Bricks.
- Concrete.
Please note that when choosing the type of foundation, it is important to take into account the depth of the main structures. When building a massive or multi-storey extension, the recesses must be made more than 0.7 meters.
The main types of bases that are chosen when building a frame extension with their own hands are:
- Pile-grillage.
- Columnar, made of blocks.
- Pile.
- Slab.
- Tape.
If you plan to build a two-story building (or to be massive), it is important to opt for a strip foundation. When using it in the construction of a frame extension with your own hands, we suggest that you follow the following step-by-step instructions:
- It is important to mark the territory using high-precision drawings.
 Doing this by means of pegs and a stretched rope between them. The marking form indicates the location of the trench for the future strip base.
 - Digging the soil to the depth of an already installed foundation for the house, or to the depth that is raised for building, depending on the size. The bottom of the trench needs to be covered with gravel, which, for perfect laying, should be tamped as best as possible.
- From the boards (wood) prepare the formwork in order to pour the concrete solution. Its height should be equal to the highest point for the future base. An extremely important point will be that you need to do waterproofing work along the general perimeter of the pouring of the future base, and also lay metal reinforcement to give strength.
- The installed formwork (or rather, 1/3) is poured with concrete mortar, which was previously prepared until completely solidified. In the future, the remaining cement will be poured with the removal of air bubbles using a special vibrator or by tapping the formwork walls with a hammer.

Please note that the upper casting part must not only be leveled at the same level, but also covered with a film for more thorough drying. To prevent the appearance of cracks, we recommend light wetting of the treated surface.
Installing the flooring
We learned exactly how to attach a frame extension with a high quality base to the house, and now we will figure out how to install the floor. There are a couple of methods for installing the floor. Concrete floors will be the best option for attaching a strip base - which provides maximum structural stability. The soil inside the already placed base must be dug to a depth of 0.35 meters. The bottom of the resulting trench, as well as the foundation trench, should be covered with gravel and sand, or a layer of expanded clay of 0.2 meters should be covered in order for the insulation to be of the highest quality. If the extension for the house is framed, then beacons are installed by means of a level for the future pouring of a cement floor screed, on which tiles, wooden flooring, or flooring are laid, which corresponds to the purpose of the room.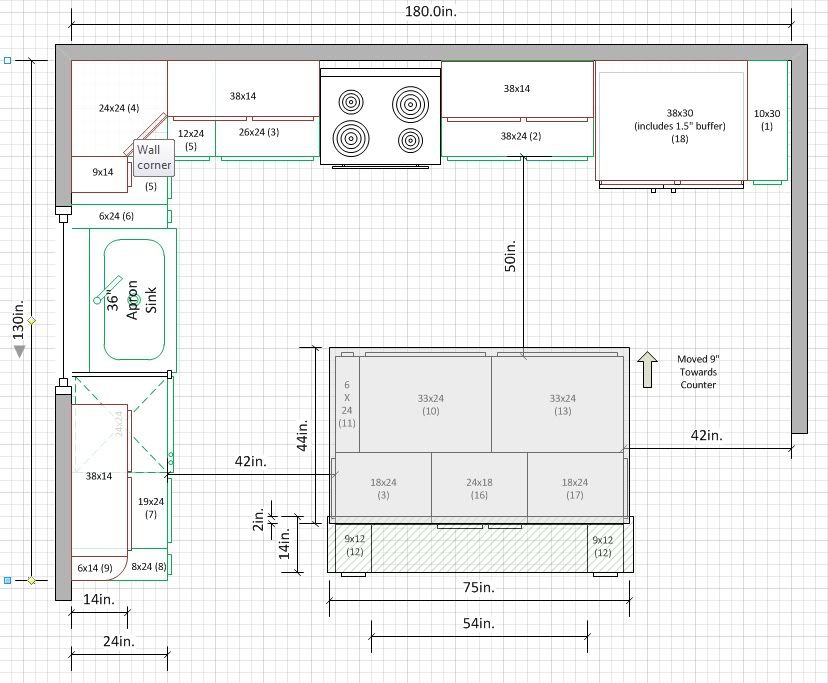 It will be easier to lay a floor heating system in a cement screed, if you are planning one.
It is more environmentally friendly and economical to install a wood floor. It is used to lay floors from beams installed on top of a waterproofing membrane. The timber beams will be fixed to the base by means of special anchor bolts. Corner floor beam connections mounted along the common perimeter of the base of the frame extension to the house are produced according to the type of lock fastenings. After that, the transverse beams of the floor are installed, and layers of insulating material and the finishing floor covering for the extension are also laid.
Installation of an extension
More precisely, we will tell you further how to install a kitchen extension to the house using video and photos (these are reports from real objects). In short, then the frame extension to the house made of wood with one's own hand and its most important part will be the basis, is installed in this way:
 7-1 meter.
 And now for the attachment.
Fixing to a wooden building
One of the main points in building a frame type extension to a house made of wood is to connect it to the built house. Install racks at a distance of 0.59meters for further insulation with mineral wool, the dimensions of which are 0.6 meters, which makes it possible to fully insulate the extension. The thickness of the insulation material is always determined by how the building will be applied.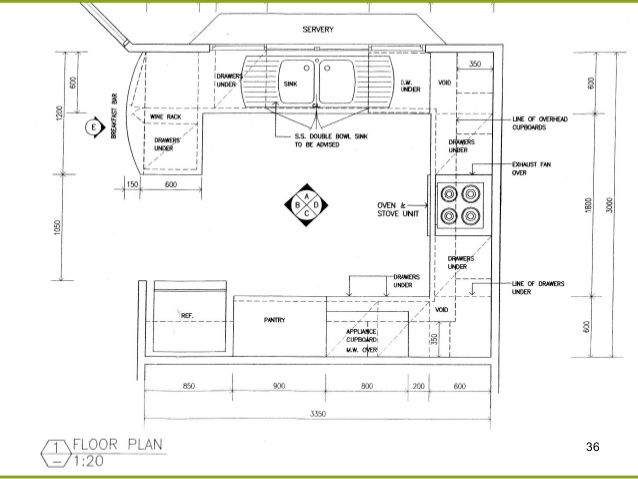 If the selected materials do not match, then the depth of the base or other technical characteristics, then it is important to build an expansion joint at the junction of the bases of the old private house and the new extension.
Work can be done in two ways:
- Laying roofing material between the parts of the base, if their parts are vertical and even.
- Laying of foamed polyethylene and expanded polystyrene at the joints with filling the upper part with sealant and a special closing strip.
Now about the roof.
Roof
If you choose the most simple type of roof - single-pitched, then the installation of floors will be very fast:
- The rafters are installed at an angle - from the roof slope of a house made of wood to vertical beams with a protrusion of at least 0.3 meters.
- Lay OSB sheets, plywood or frequent rows of battens for the last installation of the roof covering, which extends 0.
 3 meters on the sides.
 - But the final touch will be the installation of the selected type of roof - iron sheets, slate, metal tiles, which are attached to special screws.
- Inside, the roof is insulated with mineral wool sheets, which are laid between the rafters, where the distance will be slightly less than the insulation.
- Insulation is masked by sheathing with OSB sheets and at the end with decorative elements.
Insulation
One of the last stages of construction is the process of insulating the house extension, and it also depends on the purpose for the future extension. If it is not intended for permanent residence, then it is important to choose the most economical type of insulation material, or work to preserve heat in the room is not carried out at all - when choosing summer-type construction. In other cases, insulating layers are laid not only when installing the roof and floor, but also when rack-mounted sheathing the OSB frame with sheets. Wallboard cake made from:
- Covers on the inside.
- Vapor barrier films.
- Insulation layer.
- Wind insulation material.
- Exterior trim.
Insulation of a frame-type extension for a house can be done with mineral wool from the middle price category, or expensive ecowool, but treated and environmentally friendly against fires and rodents inside a frame house.
Cladding
Attaching a kitchen to a frame house is a great idea, but the finishing work in the frame extension will be the final construction stage. They depend not only on the purpose of the premises, but also on the expenses that the owner of the house may bear. But when choosing an installation, it is also important to take into account the type of foundation laid, and the reliability of the supporting beams - the coatings are heavy and greatly reduce their service life of the frame panel house.
You can make a choice with your own hands, studying in detail the expanses of the Internet.