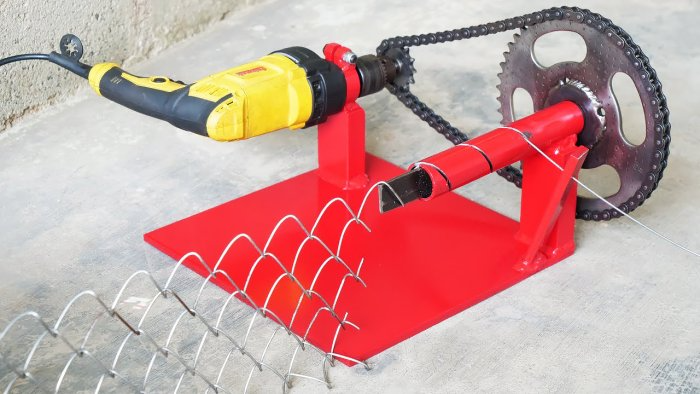
How to build a chainlink fence
How to Install a Chain Link Fence
By
Lee Wallender
Lee Wallender
Lee has over two decades of hands-on experience remodeling, fixing, and improving homes, and has been providing home improvement advice for over 13 years.
Learn more about The Spruce's Editorial Process
Updated on 12/06/21
Reviewed by
Deane Biermeier
Reviewed by Deane Biermeier
Deane Biermeier is an expert contractor with nearly 30 years of experience in all types of home repair, maintenance, and remodeling. He is a certified lead carpenter and also holds a certification from the EPA. Deane is a member of The Spruce's Home Improvement Review Board.
Learn more about The Spruce's Review Board
Lars-Åke Svärdsten / Getty Images
Project Overview
Chain link fences are an economical way to fence in your property and keep everyone safe. Chain link is also one of few fence materials that creates a secure barrier without impeding your sightline. And chain link fencing is tough, with very little maintenance required over the years.
Chain link fences can be a bit tricky to install because nearly every component is unique to this type of fence. But after you've constructed one post-to-post stretch of chain link fence, all other sections are easier to build.
Working With Chain Link Fence
A full chain link fence consists of many parts, especially when you add gates or build corners. But there are a few major components common to all chain link fences:
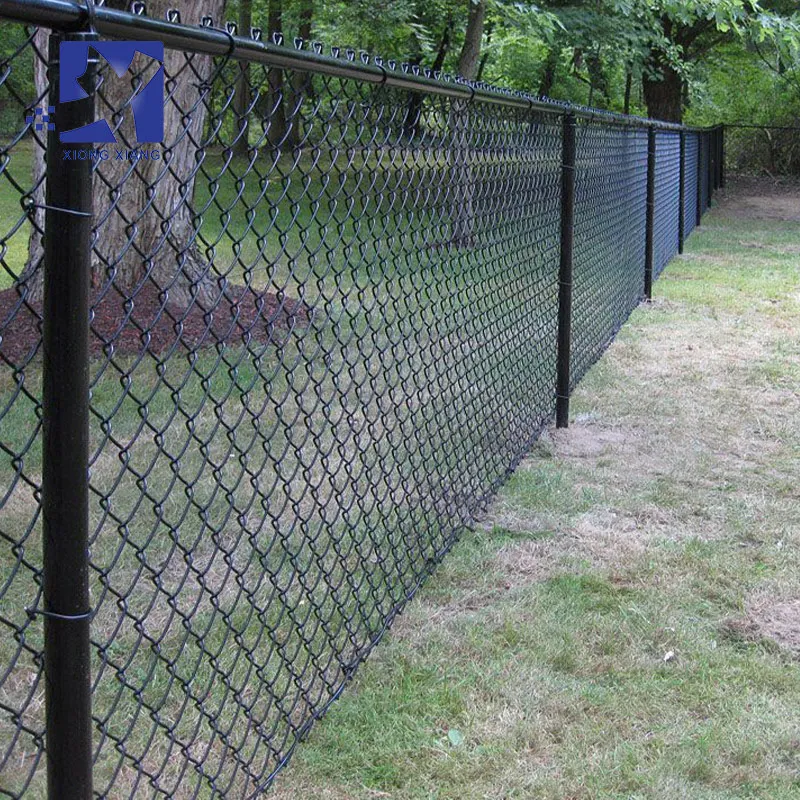
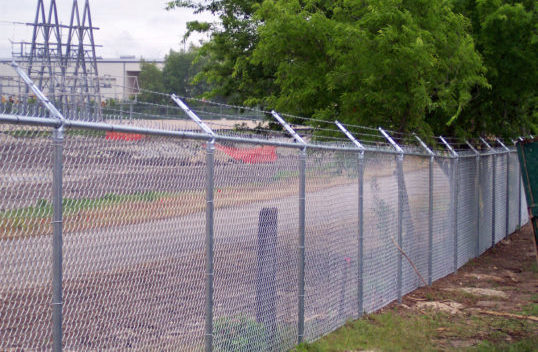
- Chain Link: Available in rolls 50 feet long, chain link mesh or fabric is usually galvanized for long-term durability and to prevent rust. Vinyl coated chain link in green or black blend with many landscapes and usually cost about 25 to 30 percent more than galvanized steel chain link fence mesh.
- Terminal Posts: At each end of a section of fencing is a thick, sturdy terminal post that provides most of the strength.
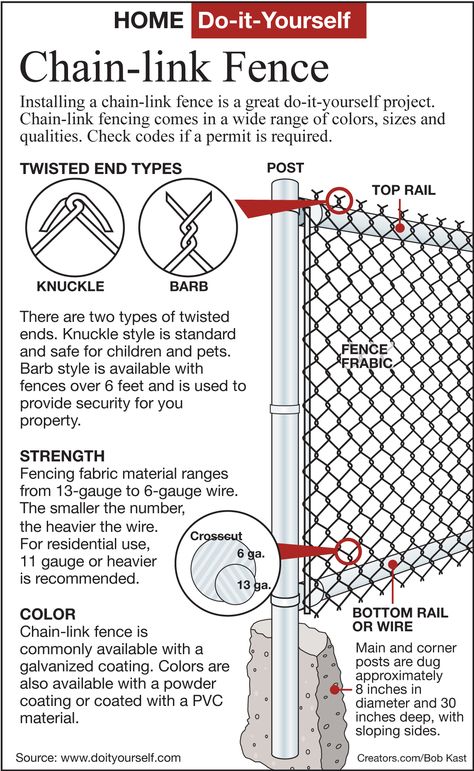 Terminal posts are mounted in concrete in the ground. For a 4-foot-high chain link fence, you'll need 6-foot long terminal posts.
 - Line Posts: Line posts go between terminal posts every 8 to 10 feet, divided evenly between terminal posts.
- Top Rail: The top rail is a 10-foot, 6-inch metal pipe that runs across the tops of the terminal and line posts. The top of the chain link attaches to the top rail.
- Tension Bars: Tension bars are flat vertical strips of metal that weave into the chainlink material. Running parallel to and near the terminal posts, tension bars help you tighten the chain link material against the terminal posts.
- Tension Bands: Tension bands are open-ended bands that fit over the terminal posts and attach to the tension bars. Tension bands are placed about every 12 inches.
- Tie Wires: Tie wires or fence ties are 6 1/2-inch-long aluminum wires that let you attach the chain link to various points on the posts and top rail.
- Terminal Post Caps: Dome-shaped post caps fit over the tops of the terminal posts to improve the appearance and to prevent debris from settling in the open-ended posts.
- Line Post Eye Tops: Eye tops fit on top of the line posts. The top rail fits through the circular top (or, the eye) of this piece. The eye top helps hold the top rail in place.
- Rail End: A rail end is a metal cap that fits over both ends of a top rail, helping to hold the top rail to the terminal posts.
Best Fence Companies
Codes and Regulations
Codes and permitting vary per location. In many areas, a fence permit is required only if the fence rises above a certain height, such as 4, 6, or 8 feet. The fence must also comply with municipal setback and location restrictions.
Houses in developments with private Covenants, Conditions, and Restrictions (CC&Rs) and an HOA (homeowners association) may not be controlled by municipal codes and restrictions, so check with the HOA before installing the chain link fence. Many HOA communities control the types of fencing materials and will not allow chain link fencing.
Tip
You may be required to speak to your neighbor about the fence and obtain written permission to build it. Whether or not it's required, it's always good etiquette to first speak to your neighbor about the fence.
When to Install Chain Link Fence
Because chain link fence materials are waterproof and impervious to rot and freezing, they can be installed at any time of year. If your area requires the terminal and line posts to be sunk below the frost line, it will be difficult to dig fence post holes by hand if the ground is frozen. Also, special considerations are required when curing concrete during cold weather.
Safety Considerations
Always wear safety glasses and heavy gloves when working with chain link material. Be careful when tightening the chain link material from one post to the next post, as the come-along tool creates high tension. If the tool or materials break, you may become injured.
Chain Link Fence Pros and Cons
Pros
Inexpensive compared to other types of fencing
Impervious to rot and rust
Allows a sightline for observation of children or pets
Requires almost no maintenance
Cons
No privacy unless additional covering added
Less desirable appearance
Not allowed in some communities
Adds little resale value to most properties (unless farmland or industrial)
Equipment / Tools
- Come-along tool with stretcher bar
- Ratchet wrench set
- Pliers
- Post hole digger
- Garden hose and water supply
- Trenching shovel
- Bubble post level
Materials
- 1 roll chain link fabric
- 2 terminal posts, each 6-foot
- 1 line post, 6-foot
- 1 top rail, 10-foot, 6 inches
- 2 tension bars
- 6 tension bands
- 1 bag tie wires, 30 count
- 2 terminal post caps
- 1 line post eye top
- 2 rail ends
- Tension wire
- 2 brace bands
- 4 bags quick-set concrete
- Wood stakes and twine
- Landscape gravel
-
Mark Utilities
Call 811 at least two weeks in advance to give your local utility marking service enough time to show up your house to mark vital underground lines with temporary paint.
-
Lay Fence Line
Drive wood stakes into the ground and run twine between the sticks to indicate the line of the fence. Drive a stake at each of the terminal post locations.
Tip
If you are laying out a corner, use the 3-4-5 method of squaring up corners. Measure 3 feet along one side, 4 feet along the other side, then measure the diagonal between the two to make a triangle. If the diagonal line is 5 feet, you have a square corner.
-
Dig Terminal Post Holes
Use the post hole digger and narrow shovel to dig post holes for the terminal post. Depending on your area, the depth of the holes should be 30 inches and the width 8 inches.
-
Set Terminal Posts
Fill the bottom of the terminal post with landscape gravel to about 6 inches. Attach the post level to the top of one of the terminal posts. Set the terminal post into the hole. Measure its height off of the ground. It should be 48 inches high.
 Fill the hole with dry concrete. Add water to the concrete until it reaches the top of the concrete. Set the other terminal post 10 feet away.
 -
Set Line Posts
Run a taut line across the tops of the two terminal posts. Dig the hole for the line post. Add 6 inches of gravel, then place the line post into the hole. The line post should be 2 inches below the string. Add the post level to the line post and plumb it. Fill the hole with concrete, add water, then let the concrete cure.
-
Install Hardware on Terminal Posts
Starting at the bottom and working upward, add:
- One brace band at the very bottom
- Three tension bands, spaced every foot
- Brace band at top with rail cup facing inward
- One post cap
Tighten all of the hardware with the ratchet wrench set. Repeat for the other terminal post.
-
Add Top Rail
Place the eye cap on the line post with the open circle facing toward the terminal post.
 Slide the top rail through the eye cap. Fit one end of the top rail into the open cup section of the rail cap of one of the terminal posts. For the other terminal post, cut off the top rail with a hacksaw so that it will fit in the rail cap. With the ratchet set, tighten the rail caps on both terminal posts.
 Tip
Note that the top rail needs to be long enough to fit inside the second terminal post rail cap. So, add 1 1/2 inches or the appropriate length so that the rail will fit all of the way into the open cup section of the rail cup.
-
Add Bottom Tension Wire
Attach the tension wire to the brace band at the bottom of one of the terminal posts. Run the wire across to the other terminal post's brace band, add tension to it, then twist it into place. Cut off the excess wire.
-
Lay out Chain Link Material
Unroll the chain link fence material next to the post. Slide a tension bar through the last row of diamonds at one end of the chain link.
-
Attach One End of Chain Link Material
Lift up one end of the chain link material so that it is vertical and pressing against one of the terminal posts. With the ratchet wrench set, attach the end tension bar to the tension bands on the terminal post.
-
Temporarily Attach Chain Link Material
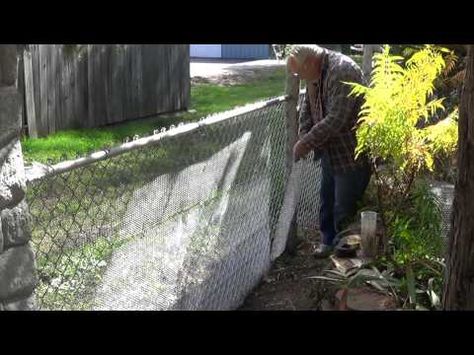
Lift the rest of the chain link material up so that it is vertical all the way across from post to post. Loosely fix wire ties across the top to hold the chain link material on the top rail. Do not tighten the ties. The goal is to have ties that are loose enough to allow the chain link material to slide when you tighten it in later steps.
-
Prepare to Tighten Chain Link Material
At the other end of the chain link, slide a tension bar vertically through the diamonds about 3 feet from the end. Add an extra tension band to the terminal post. This band will later be removed. Hook a stretcher bar to the tension bar.
 Hook up the come-along tool from the tension bar to the extra tension band on the terminal post.
 -
Tighten Chain Link Material
Slowly pump the lever of the come-along tool to draw the end of the chain link material toward the terminal post. When it is tight enough, cut off the excess chain link material and remove the come-along tool, the temporary tension band, the temporary tension bar, and the stretcher bar.
-
Add Last Tension Bar
Weave a tension bar through the last set of diamonds on the chain link material. With the ratchet wrench set, tighten the tension bar onto the post's tension bands.
-
Attach Wire Ties
Twist wire ties from the chain link to the posts at every 12 inches. Along the top rail, twist wire ties about every 2 feet along the entire run. Attach at the lower tension wire about every 2 feet, as well.
When to Call Professionals
Because building a chain link fence requires you to learn how to work with unusual tools and materials, it's sometimes best to call a professional fence company to install your fence.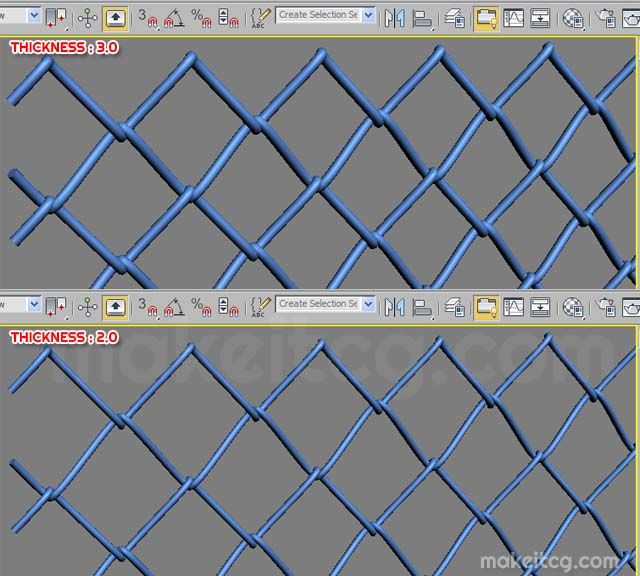
Article Sources
The Spruce uses only high-quality sources, including peer-reviewed studies, to support the facts within our articles. Read our editorial process to learn more about how we fact-check and keep our content accurate, reliable, and trustworthy.
Rights and obligations of owners. California Legislative Information.
7 Tips on How to Install a Chain Link Fence Yourself
It might sound intimidating. But with the right equipment, experience and help, you can install a chain link fence in a few days.
Installing a chain link fence on your property can provide security and safety for your kids, pets and equipment. But just like any DIY project, it will require careful planning and a fair amount of muscle to do correctly.
Chain Link Fence vs. Wooden or Vinyl Fences
The cost of a chain link fence, today, is similar to a wood or vinyl one. However, it’s considerably easier to install, so you’ll end up saving on labor whether you do it yourself or hire pros to handle it for you.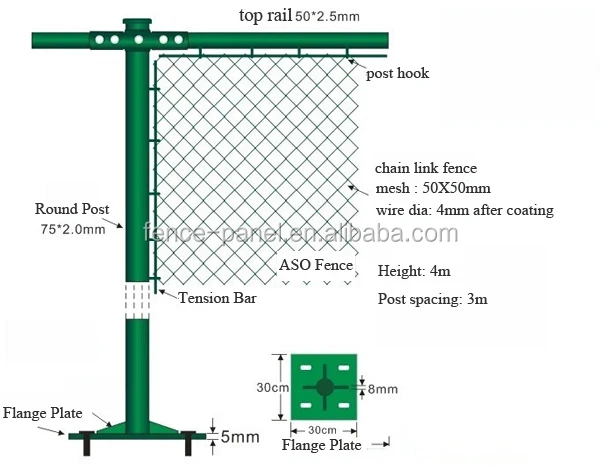 Repairing a chain link fence is relatively easy too, compared to other materials.
There are a few things to consider related to the cost of a chain link fence. While they’re more durable than wood and require less maintenance, they’re not great for the resale value of your home. Chain link fences aren’t going to give you much in the way of privacy either, and they’re not particularly effective for home security.
But if you’re trying to fence off a large plot of land or need something to keep critters out of your garden, a chain link fence is a solid option.
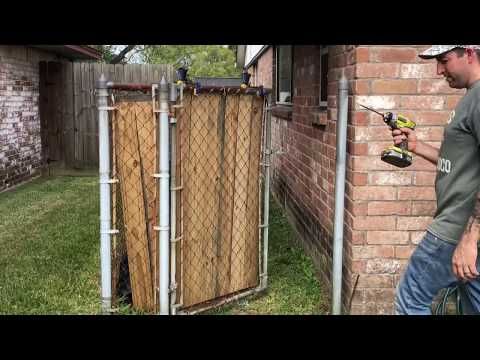
We’ve had some experience repairing and installing chain link fences. But we also called upon Vince Christofora, owner of Woodstock Hardware, to walk us through the process.
1 / 7
Ziga Plahutar/Getty Images
Check Local Building Codes and Property Lines
Building codes vary among municipalities and towns, so check to see what’s required before you start your project.
Since you’ll be digging post holes, Christofora recommends calling 811 in your state so someone can come out and mark utility lines on your property. Make sure you’re absolutely sure about where your property lines start and end so you don’t accidentally dig in your neighbor’s yard.
2 / 7
Family Handyman
Design and Layout Your Fence
To identify potential conflicts with landscaping or building structures, mark your fence line and the locations of the posts. This lets you know how much fencing you’ll need to purchase. Christofora recommends using spray paint to better visualize your future fence. The paint disappears the next time you mow your grass.
Determine the location and size of the gates. “On larger projects/longer fences you may want more gates to avoid long walks,” Christofora says. Also, remember large equipment like riding mowers or lawn tractors may need a double gate.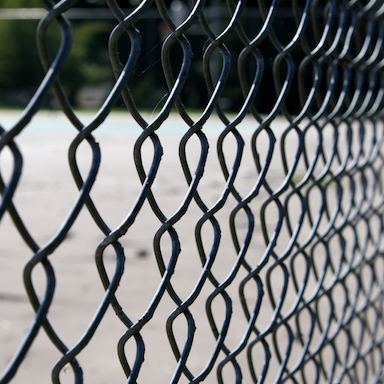 Vehicle-wide gates can provide access to septic pump trucks.
3 / 7
Family Handyman
Dig and Install Fence PostsIn addition to your fencing materials, you may need some digging tools beyond your trusty shovel. Post-hole diggers and picks are essentials, and if you have rocky or hard soil, it may require rock bars or small jackhammers. You’ll need concrete mixing items like a wheelbarrow, mortar pans and mixing hoes, and installation tools like a level, a come-along, wire cutting pliers and locking pliers.
Once you have your materials and tools, the next step is to install the posts that anchor your fence. Once you’ve dug the holes and set them in the ground, secure the posts with concrete. In our experience, dig three times wider than the diameter of the post itself, and place one-third of the post underground. Posts need to be spaced evenly for aesthetic purposes, 4-10 feet apart.
4 / 7
Supersmario/Getty Images
Install Rails, Post Caps and Tension Bands
Once you’ve set the posts, add the tension bands that hold the fence to the end, corner and gate posts. Place a cap on the gates, corner and end posts, driving them in place with a mallet. Then install the top rails through the caps.
Follow the manufacturer’s instructions carefully, ensuring they’re oriented correctly. Then you won’t waste valuable time fixing them later on.
5 / 7
Miljan Živković/getty images
Attach Fence Material and Tighten It
Lay down your fence rolls — these are heavier than you might think — and unroll them along the length of the fence. While weaving it through the end of the fencing, slide the vertical tension bar through the tension bands. This will secure the fence to the end post and let you stretch the fence into place.
Pro tip: Wear a sturdy pair of work gloves to protect your fingers.
Chain-link fencing needs to be stretched taught or it’ll droop or sag. Using a come-along, pull the fence tight to eliminate any extra slack. Attach it to the end post with a tension bar. Christofora says this step requires a decent amount of muscle, so you’ll need a helper or two.
6 / 7
James Andrews/Getty Images
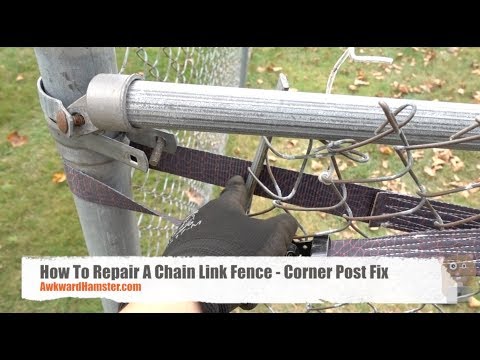
Remove Excess Fencing
Any extra fence left over past the tension bar can be easily removed by unlooping the top and bottom weave and pulling the strand. Then tighten the bolts on the tension bands and release the come-along.
7 / 7
titaniumdoughnut/Getty Images
Tie Fencing to Rails
Separate aluminum wires called “tie wires” attach the fencing to the top rail of the fence. Slide the tie wire through a loop in the top of the fence link, around the rail and back around to the fence, tying it tightly in place. Place tie wires every 24 inches along the top rail.
Originally Published: March 15, 2023
Alex Rennie
Alex Rennie is a freelance writer who specializes in the home improvement, DIY, and appliance space. Having spent more than five years as a residential and commercial carpenter in NYC–specializing in custom furniture construction and installation–Alex uses his hands-on experience and expert insight to craft product reviews, buying guides, and how-to articles. He has previously written for CNN Underscored, Business Insider, and Popular Mechanics, in addition to Family Handyman. He currently lives in Los Angeles, CA, where he spends his free time hiking and relaxing on the beach with his wife and their two dogs, Louie and Iggy.
Do-it-yourself chain-link fence - how to install a chain-link fence yourself
More about chain-link fences. How to install a mesh fence yourself.
The simplest and most budgetary option for fencing a summer house, garden plot or private house is a do-it-yourself chain-link fence. To install such a fence, you do not need special tools. You can do all the work yourself, without involving assistants.
About chain-link fences
Chain-link is a mesh woven from pieces of wire in a spiral shape. Dimensions, shape and materials used comply with GOST 5336-80. Mesh fabric is made with rhombic and square cells. A rhombic cell has an acute angle of a rhombus equal to 60 degrees, while a square cell has all angles of 90 degrees. The size of the cell side of the mesh fabric is from 5.0 to 100.0 mm.
Steel wire with a diameter of 1.2 to 5.0 mm is used as a semi-finished product for the mesh. It can be uncoated or galvanized carbon steel. Another type of woven mesh is a chain-link with a protective and decorative polymer coating. The mesh is sold in rolls, the length of the material in a roll is 10 m.
Purpose of mesh depending on the type of coating
- Uncoated mesh is usually used for the installation of temporary fences on construction sites.
 After installation, the grid almost immediately becomes covered with rust. The service life of such a fence is 10-12 years.
 - Cloth with galvanization is used for fencing garden plots from summer cottages, building walking aviaries for poultry. The zinc layer reliably protects the metal from corrosion and moisture. In this case, the protective coating is not decorative. The service life of fences of this type is 50-60 years.
- Mesh with polymer coating has an aesthetic appearance, so it is most often used for fences of country houses. The protective and decorative coating has high mechanical strength, moisture resistance, resistance to seasonal temperature changes, retains its original color under direct sunlight. Service life - up to 70 years.
Mesh fence pros and cons
Mesh fence, like any other type of fence, has advantages and disadvantages.
Pros:
- Affordable price. A chain-link fence will cost much less than a profiled sheet or metal fence.
 A light translucent structure with zero windage does not need a massive foundation, which means you can save on materials.
 - Protection. The grid is clearly visible, but at the same time it is an impenetrable obstacle for humans and animals.
- Environmentally friendly. The wire cloth freely transmits sunlight, does not interfere with natural air circulation. This is very important for flowers and plants planted around the perimeter of the site.
- Strength. The chain-link, made of structural steel, wins a lot in comparison with translucent fences made of wooden picket fence.
- Functionality. In addition to fencing, the mesh can act as a support for weaving ornamental plants, flowers, grapes.
- Durability. Materials for the construction of the fence have high strength, resistance to mechanical deformation. With proper installation, such a fence will last at least 50 years.
The advantages of this type of fencing include simple and quick installation. A mesh fence without welding can be delivered in 1-2 days. The time required to install the posts and install the grid depends on the total length of the fence, its height, and the type of foundation.
Cons:
- Transparency. The mesh fence does not hide the private area from prying eyes.
- Unaesthetic appearance. Netting fences are not considered "prestigious".
Despite this, the mesh fence looks neat and performs its functions 100% - it protects the site from penetration from the outside, creates conditions favorable for the normal growth of plants.
How to close a chain-link fence from neighbors
- Hedge. Evergreen weaving plants can be planted parallel to the fence line. It is better to choose perennials - honeysuckle, clematis, spindle tree, ivy.
- Camouflage and covering materials. Shading and camouflage nets, reed or bamboo mats are pulled onto the chain-link. The fence with an artificial "hedge" looks very beautiful.
 Plus, you have to wait for it to grow.
 - Polycarbonate. The fence section facing the front side can be covered with opaque or translucent polycarbonate.
Types of mesh fences
There are several types of chain-link fence designs. The most common are rolled, sectional, on a metal frame.
Roll-up
Roll-up fencing has a simple structure. It consists of supports with hooks and a mesh fabric stretched between them. Temporary fences are installed using the “pull-in” method. Without additional support, the metal mesh eventually loses its shape, sags under its own weight.
To prevent the mesh from sagging, a broach is made - a reinforcing bar is passed through the mesh cells horizontally, and its ends are welded to the supports on both sides of the span. Reinforcement, located along the upper edge of the grid, strengthens and reinforces the structure. To make the fence even more rigid and durable, the broach is done in two rows. To do this, use 2 reinforcement for each span. One is installed on the top of the grid, the second - 25-30 cm from the bottom edge of the canvas.
Sectional
This fence has a more reliable and durable design. The pillars form the basis of the fence. The space between them is filled with finished sections.
Mounting strips are welded onto the poles - one from above, the other from below. Frames for sections are welded from a professional pipe or a steel corner. The mesh is cut into segments according to the size of the frames, the edges of the wire are bent along the top and bottom. Along the perimeter of the segments, wire rod or metal rods are threaded through the cells and welded at the junction points in the corners of the web. On the reverse side of the frames around the perimeter, hooks are welded in increments of 20-30 cm. The sections are filled with the prepared mesh - they are stretched and the broaches are fixed on the hooks. Sections are welded to the posts on mounting strips. Frames and poles with mounting strips are coated with primer enamel and painted.
Sectional chain-link fences are placed on metal supports with concrete, on a strip foundation with brick pillars, as well as on pillars lined with decorative or natural stone.
Chain-link fence on poles
Fences of this type have a simpler design than sectional fences. The design consists of a supporting frame and mesh. It can be installed without welding.
The supporting frame is made from a profile pipe. The connection of the supports and the log is carried out using X-brackets, which are attached to the poles with screws. The rolled mesh is fixed to the supports and lags with fixing metal clamps.
Since welding is not used to mount this fence, you can take a galvanized or polymer-coated corrugated pipe and the same brackets to mount the frame. Such a fence will not need to be painted every year. A layer of zinc and powder paint protects the metal from corrosion.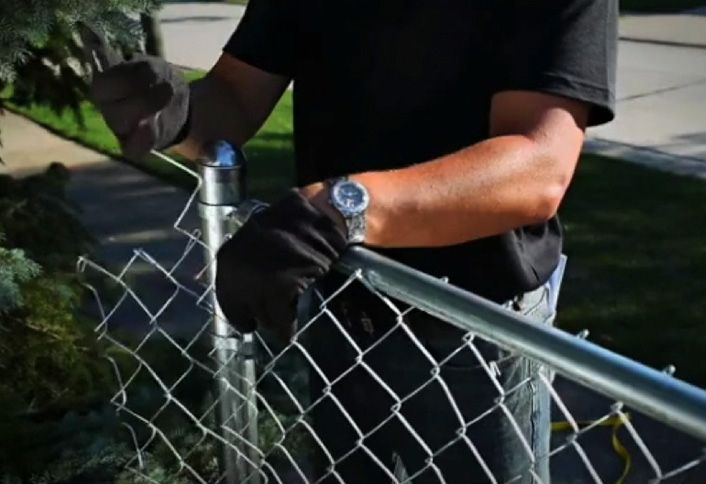 The coating does not change its properties during the entire service life.
Installing a chain-link fence
Materials for mounting the fence:
- A corrugated pipe is used for the frame - for posts 60x60x3 mm, for horizontal logs 40x20x2 mm. If possible, it is best to take galvanized or polymer-coated pipes.
- To fill the spans, you need a mesh in rolls, galvanized or PVC. The standard mesh width is from 1.0 to 3.0 m in 0.5 m increments. The best option is a mesh 1.5 or 2.0 m wide with a cell of 40x40 or 50x50 mm.
- X-brackets are required to mount rails to poles - 2 for each pole. For mounting the grid and assembling the frame, you will need metal clamps, screws or metal screws.
- To fill the foundation you need sand, cement, small gravel.
To install a fence without welding, we need to draw a schematic drawing of the structure. So it will be much easier to calculate how many pillars, logs, fasteners and grids will be needed.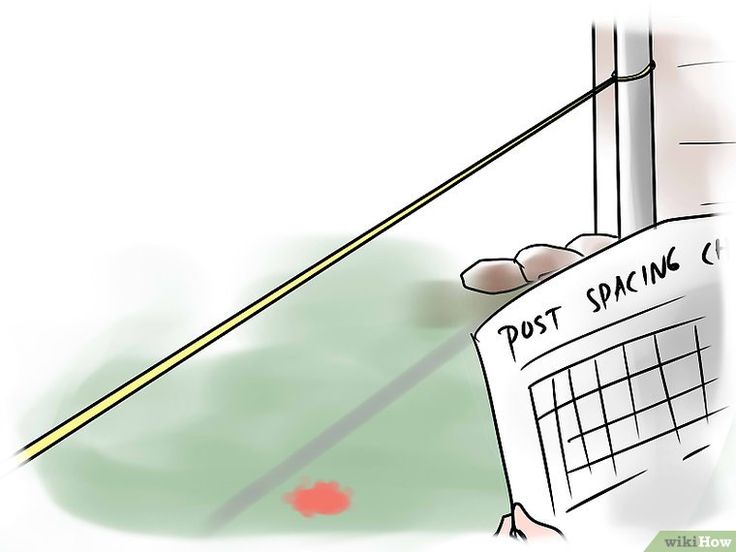
- Pillars are installed in 2 m increments. For example, if we have a plot of 6 acres with sides of 20x30 m, then its perimeter will be 100 m, which means 50 poles will be required. If a plot of the same area has sides of 17x35 m, then its perimeter will be 104 meters, respectively, the number of pillars is increased by 2 pcs.
- With a mesh width of 1.5 m, the height of the fence will be 1.6 m, with a width of 2 m - 2.1 m. This is due to the fact that the mesh is fixed at a distance of 10 cm from the soil.
- The length of the support consists of the above and below ground parts. For a mesh fence with low windage, the depth of immersion of the support into the ground is 1/3 of the total height. So for a fence with a height of 1.6 m, supports with a length of 2.4 m are needed.
- The mesh comes in rolls of 10 m, which means that to enclose a site with sides of 20x30 m and a perimeter of 100 m, 10 rolls will be required.
- The number of hardware for brackets depends on their design and the number of attachment points, but not less than 4 pcs.
- Clamps are placed at a distance of 25-30 mm from each other along the logs and supports. In total, it turns out 200 meters of running logs and 75 meters of supports, or rather their ground part. To install the mesh without welding, 916 clamps are required. As clamps, you can use a knitting wire. Installation of fasteners is carried out using special devices - clamps.
The sequence of works for installing a chain-link fence:
- Preparation. Along the perimeter of the site, everything that can interfere with work is removed - construction debris, tall grass, shrubs.
- Marking. Pegs are driven in along the border of the site, a construction cord is pulled between them.
- Installation of supports. According to the marking, every 2 m they dig holes with a pit drill. A layer of sand and gravel 10 cm thick is poured at the bottom of each pit. A support is installed exactly in the middle of the pit, leveled with a plumb line or level, fixed with spacers and the pit is poured with concrete.
- Mounting log. After the concrete has set, brackets are screwed onto the supports, and logs are attached to them, in turn.
- Mesh installation. The canvas is stretched between the supports, sequentially screwed to the crossbars and supports with wire clamps, so as to avoid sagging.
Articles about fences
27.03.2023
How to install fence posts
The value of a fence post is a bearing (supporting) function. Transverse logs are attached to it, to which the fence canvas is then sewn. By correctly installing the support post, you can be sure that the fence will not warp, warp or tear the soil with heaving.
03/27/2023
How to make a gate with your own hands?
Prestigious gates are expensive. Therefore, many prefer not to buy ready-made models, not to hire installation teams, but to make and install gates with their own hands.
11/29/2022
At what distance can a fence be built?
The distances that must be taken into account during the construction of fences are defined in SP 53. 13330.2011. The set of rules lists the basic requirements at what distance from the fence you can build houses and other structures in the country, how to arrange cottages. How to place fences between the adjoining territories of neighboring houses.
11/11/2022
How to install sliding gates
The sliding gate system is the simplest, most durable and convenient self-supporting gate opening design. It works by shifting the door leaf on rotating rollers along the length of the fence. You can open and close the gate manually or with the help of automation, using an electric drive. It is difficult to understand how to install sliding gates with your own hands without preparation, but it is possible if you follow a certain technology.
01/05/2021
Do-it-yourself fences from corrugated board
The technology for making a fence from corrugated board is relatively simple and does not require any professional skills from the builder.
31.01.2020
Do-it-yourself chain-link fence
Chain-link mesh, in comparison with other fence materials, is distinguished by a rather low cost and a long service life.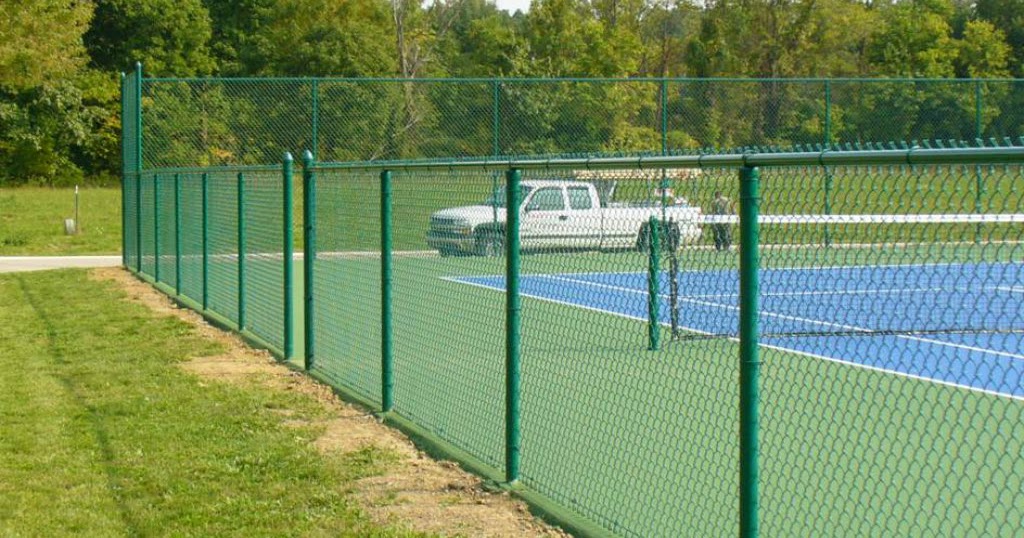
07/30/2019
Rating of fences for summer cottages
When choosing a fence for a suburban area, first of all, you need to decide on the material from which it will be made. Here you need to think not only about saving... Wood is good by nature, but in capable hands it can...
How many people, so many opinions about how a fence should be for an administrative or office building, a country house or...
erected a fence - it would seem, what else is needed for happiness? Quite a bit - a garden shed to create...
06/30/2015
Secrets of painting fences
Fences subject to painting with special compounds cannot be attributed to a separate category of protective structures. In fact, you can color ...
06/24/2015
The choice of a carport
A polycarbonate canopy is the most advantageous of modern solutions for arranging the house adjoining space in a suburban area. Such a design can be...
15.06.2015
Metal fences are always in fashion
They are used to protect cottages and private houses, administrative and commercial buildings - the demand for them is constantly growing. What is the reason for the total popularity of fences made of ...
06/07/2015
Automatic sliding gates
These designs are designed to provide high-quality, convenient and safe entry to any protected area. Automatic sliding gates are quite simple...
05/30/2015
Everything you wanted to know about corrugated sheet fencing
Structural rigidity and increased strength are the main characteristics of corrugated board, which is considered one of the most popular building materials of our time. It is these characteristics...
05/22/2015
Interesting facts about fences
Nowadays, fences and gates have turned from standard protective structures into a separate, and sometimes key design element. Properly designed, reliably manufactured and...
14.05.2015
Note to drivers: carports
Protective canopy designed to protect cars from rain, snow, hail, falling icicles, dust, fallen leaves, sun and wind, today may
05/08/2015
ZavodFences - the best fences for every taste!
A fence should soon appear on your site - a temporary “lightweight” option or a solid fence for many years.