How to vacuum a ac system
How To Pull Vacuum On Car Ac – The DIY Process – Rx Mechanic
Have you got in your car and switched on your AC system only to receive warm air from the vents? It is unnerving and frustrating, right? Trapped air or moisture causes such malfunction in the system. Therefore it is important to evacuate trapped air in the air conditioning system. So, to protect your air conditioning system from breakdown, you need to vacuum the AC system.
Trapped air in the system affects not only the efficiency of the cooling system but also causes premature breakdown. For this reason, this article will discuss reasons for pulling a vacuum and how to pull a vacuum on a car AC system.
What Is The Purpose Of Pulling A Vacuum
Here are the reasons you should vacuum your AC systems;
Eliminate unwanted contaminants
Do you have to pull a vacuum on a car AC? It is essential to pull a vacuum on the air conditioning system, especially after replacing a faulty AC compressor or condenser. The purpose of vacuuming an air conditioning system is to remove unwanted contaminants from the system.
Keep the system in a clean environment
Pulling vacuum from the air conditioning system involves evacuating moisture and air from air conditioning and refrigeration systems. Pulling a vacuum from an AC system is done to eliminate harsh substances from the system. And to ensure the system runs in a clean environment.
To prevent system premature breakdown
If you ignore to vacuum your AC system, it may lead to a mechanical breakdown on the compressor and expansion valves. Other issues it’ll project include refrigerant line restrictions, lower efficiency, premature corrosion, and ultimate system failure.
To save your air conditioning system from the outlined issues above, you need to vacuum the system regularly. Most especially during system refrigerant recharge after installing a new AC component.
Step By Step Guide On How To Pull Vacuum On Car AC System
Let’s look at simplified steps on how to pull a vacuum on a car AC system before determining how long to vacuum a car AC system.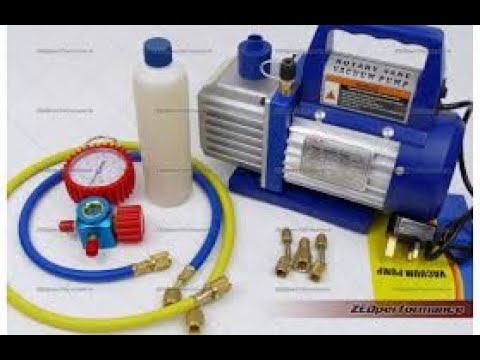
As alluded above, if you fail to pull a vacuum from an air conditioning system, it’ll reduce the performance. I recommend pulling a vacuum on your AC system periodically.
Do not wait until problems creep in. Let’s unveil all the DIY procedures you need to pull vacuum from the AC system.
Getting started and locating low and high service ports
Park your vehicle on a flat floor in your garage or driveway. If you want to vacuum the AC on the driveway, check your local law to avoid violations. Do not start the car yet or turn on the AC.
Put on your protective glasses and your working gloves. Locate the low and high service lines.
The high service port has an H inscription on it and the low service port has an L inscription. Locate the refrigerant lines. They are attached to the compressor and track the service ports on them. Don’t worry about displacing them. They are not interchangeable. Proceed to the next step.
Hook up the manifold gauge
After locating the service ports, the next step is to hold up a gauge set. You need a manifold gauge to connect both low and high service ports to the system. You’ll also use it to vacuum and recharge the system.
Ensure the connections are ‘air tight’ and there are no leaks on the hose and fittings. You need to ensure the valves on the gauge are in closed positions.
The blue hose represents the low-pressure side while the red hose represents the high-pressure side.
The middle yellow hose should connect to the car AC vacuum pump and it’s where you’re going to recharge the system later on. Close the gauge valves before connecting them to the air conditioning system.
Connect the gauges to the systems
The next step is to determine how much vacuum to pull on auto AC system. Connect the blue gauge to the low-pressure service port. To fix it, push down the knob and snap the hose on the service port and let go. Wiggle the hose and see if it snapped incorrectly.
Get the red hose from the manifold gauge and snap it on the high-pressure service port.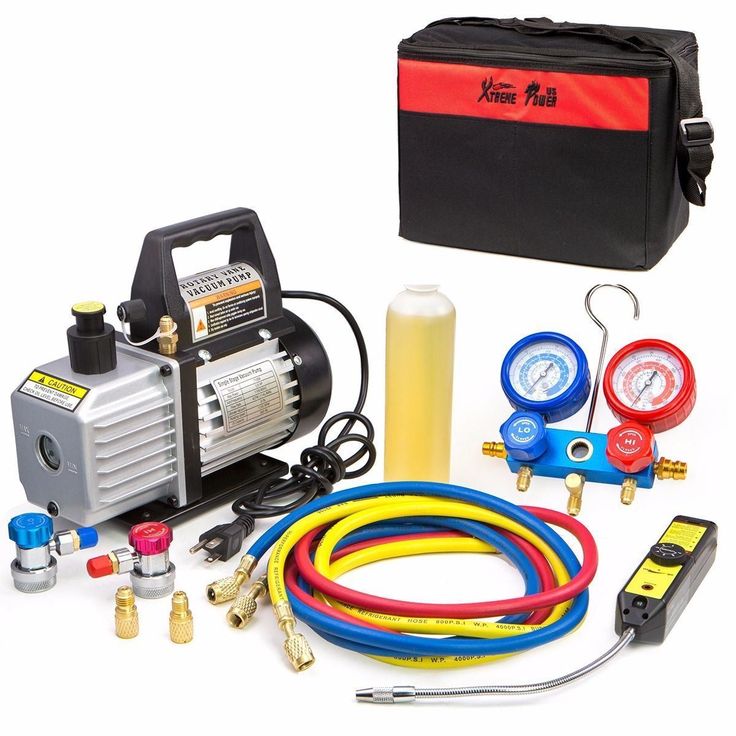 Follow the same step on the low-pressure line to do it correctly.
Unlock the gauge manifold hose on both the low-pressure and high-pressure hose. Inspect the gauge on the manifold gauge. It should be on ‘0’, meaning there’s no air in the system. Next, take the yellow line and connect it to the car AC vacuum pump.
You don’t have to tighten the hose more than hand tight. You need nothing like a plier to do the job for you. There’s a seal there that’ll do the job. Hand-tighten other hose connections.
If there’s any refrigerant in your AC system, make sure you go to a nearby garage and recycle it. You don’t have to violate your local laws by discharging Freon into the atmosphere. These refrigerants cause harsh effects on the atmosphere. So, you should be environmentally responsible.
Cross-check the blue, red, and yellow lines and ensure they are properly connected and opened up. If you’re concerned about how to vacuum an AC system without pumps, it’s possible, but you’ll get a poor result. Let’s proceed to the next step.
The Vacuuming Action
Turn on the vacuum pump. Check the gauge on the manifold gauge. It should be in the ‘0’ position. Open the valves on the blue and red sides of the gauge. The gauge needle should come down below the zero position. The blue gauge should creep down to 30 inches, which is where you want it to be.
After letting the pump run for about 30 minutes, close the red and blue valves on the manifold gauges and let them sit for about an hour. This step is to determine if there’s a leak in the system.
If the gauge needle in the blue stays at 30 after the waiting period, it shows there’s no leak in the system. Once you determine there’s no leak, continue the vacuuming for 45 minutes. Switch on the vacuum pump and open up the gauge valves.
This is going to vacuum all the air and moisture in the system until it’s nice and dry inside. You can get busy with something else and let the pump do its job.
After 45 minutes and everything looks pretty good, turn off the valves on the gauge and switch off the vacuum pump.
You’re done with the vacuuming process. The next step is to recharge the air conditioning with the recommended refrigerant.
FAQs:
Q: How long should you pull a vacuum on a car AC system?
Now that we know how to pull a vacuum on car AC, how long does it take to pull a vacuum from a car AC system? It takes an average of 45minutes to 1hour to pull a vacuum from an AC if there’s no leak in the system. This is enough time to expel moisture and air out of the system.
When vacuuming deep moisture, consider replacing the AC receiver or accumulator. This will help to keep moisture under check.
Q: How do you get the air out of a car AC without a vacuum pump?
While the most general way of vacuuming the air out of an AC system is using vacuum pumps, you can still pull vacuum without a vacuum pump. Refrigeration and air conditioning systems function with refrigerant and oil circulating in them.
Any other substance is unwanted and should be expelled out of the system. Whether it’s oxides, moisture, debris, or air, you need to pull it out.
While using vacuum pumps is the best method for evacuating air from the air conditioning systems, there are other alternatives. The best alternative requires installing access valves on both low and high-pressure valves. Here are the steps to follow;
- Install access valves on the refrigerant lines
- Depress the high-pressure line access valve on the AC and observe the low-pressure line. Once the high-pressure access valve gets to the lowest point, close it and switch off the car.
- Recharge the low-pressure side to about 10 PSI and ensure the pressure on both lines equalizes.
- Repeat the first step.
- Repeat steps 2 and 3.
- Recharge the AC system.
Q: Can you pull a vacuum on just the low side?
Of course, you can pull vacuum from only the low-pressure line. The air conditioning system runs continuously. It has a component called the orifice tube, which restricts refrigerant flow but doesn’t stop it. Expelling vacuum from only the low side will still work.
Q: Does pulling a vacuum remove refrigerant?
Pulling vacuum from your cooling system removes refrigerants. However, only pull vacuum after recycling the refrigerant.
Using the vacuum pump to pull refrigerants will only damage the pump. They’re only designed to evacuate moisture. If you want to pull refrigerant with a vacuum pump, don’t do it. Instead, get a refrigerant recovery machine.
Q: Does vacuuming AC remove oil?
Vacuum pumps reduce the refrigerant pressure and cause it to change from liquid to gas state and expel out of the system. They are not designed to remove oil. In short, they can’t lift oil uphill or from the compressor.
Q: How much vacuum should an AC system hold?
An AC system needs a vacuum of about 500 microns or 29.92 hg gauge pressure to successfully remove any air, moisture, debris, or oxides that made their way into the system. An air conditioning system can hold 29.92 hg for a minute or more.
Final words
We’ve provided sufficient information on how to pull vacuum on a car AC and why you need to vacuum the AC system. With the above instructions, you can do this on your own.
After successfully vacuuming your AC system, pat yourself on the back. Wait! Do not forget to give us some credits. This has saved you an expensive service fee that you would have given to an HVAC technician.
How to Vacuum Down and Recharge an Automotive Air Conditioner
Description
There are two types of air condition system recharge procedures. The first includes
adding a small amount of refrigerant (simple
recharge) to bring the system back to a full state of charge and a more in depth
service which includes vacuuming down and recharging the system from scratch. This
service is usually performed once a repair has been completed (system opened). The
air conditioning system in your car is not that complicated, if you need a refresher
course please visit this guide. Learn more:
How a car air conditioners work
Types of refrigerant
SPONSORED LINKS
- R-12: This is typically in older vehicles built before 1994
- R-134a: Adding additional molecules to the R-12 formula has created a more environment friendly refrigerant which is now being phased out
- 1234yf: The latest and even more environment friendly refrigerant is flammable (the earlier predecessors r-12 and r-134a or not) this will be a much more expensive substance. Due to this flammability most German cars have opted to stay with R-134a sighting potential fires in front end collisions. In 2014 this refrigerant has begun to be phased in. Most system will have a label or ticker identifying the refrigerant used.
What goes wrong?
The correct pressure is the most important aspect of any air conditioning system
when pressure get to low or high the system will not work properly. These pressures
are subject to outside temperatures as well, the higher the temperature the higher
the relative pressure inside the system. Another aspect to the system is moisture
and lubricating oil which can cause the compressor or other components to fail prematurely.
If the system is not vacuumed it will not be as cold due to air trapped inside.
Many manufactures recommend the system be vacuumed down each time a service is performed
to remove residual moisture which helps the compressor last longer.
What's the cost?
Of course there is an initial layout cash to get the recharge equipment but once that is purchased the cost of refrigerant is relatively inexpensive (except 1234yf). Getting the supplies needed to complete this service from Amazon is about $119.00 bucks. If a shop or dealer does the job the one time cost will be about $160.00
Let's Begin
The following process removes damage causing moisture once the system has been
opened up and repairs performed.
Step 1: Locating High and Low Side Service Ports
Park the vehicle on a level surface with the engine off. Apply the emergency brake with the transmission in park and wear protective eyewear and gloves. After replacing a failed component the system is "flat" you are now ready to vacuum the system down and recharge it. The high side port should be on the line between the condenser and the expansion valve or orifice tube while the low side port will be on the return line between the evaporator (firewall) and compressor.
The high side port is larger in size than the low side. If you are servicing the system or doing repairs that require the removal for the refrigerant continue down to Step 9 of the guide to the refrigerant removal section.
SPONSORED LINKS
Step 2: Prepare the Gauge Set
A gauge set is needed to connect to the system on both high and low side pressure
ports and it will also be used to vacuum down and recharge the system. Inspect the
connections to make sure they are tight to avoid leakage. These units must be "air
tight" and not have any leaks at hose fittings or valves. The red colored gauge
and connector valve represents the high pressure side of the system while the blue
color represents the low pressure side.
The center hose (yellow) is connected to the vacuum pump and then the new refrigerant supply bottle or can. Both gauge valves should be closed before attaching them to the system.
Step 3: Connect the Gauges to the System
After repairs have been made, locate the low side service port on the return hose to the compressor and then connect your gauges to the port by lifting up the connector ring and pushing downward. Then turn the valve screw (blue part) inward (clockwise) this will open the service valve below.
SPONSORED LINKS
Repeat this process for both high and low side ports. The high and low side fittings
will only work on their respective ports due to size constraints to avoid confusion.
Once secured tighten the valve which activates the internal plunger that opens the
service port valve to the refrigerant lines.
Step 4: Gauge Readings
Now observe both high and low side gauges with the valves closed there should be little to no pressure in the system.
Step 5: Connect the Vacuum Pump
Connect the center hose from the gauge set (yellow) to the vacuum pump and turn
the unit on. This step is used to remove any moisture and static air from inside
the system. These systems have a mixture of refrigerant and oil to keep the air
conditioning compressor lubricated during operation. Measuring the amount of (peg)
oil in the system is difficult because it's spread throughout the system, in other
words if there is a major leak and oil is dripping out the system will need a small
amount of oil. Unlike a very small leak which releases little to no oil you must
be the judge of this and add appropriately.
SPONSORED LINKS
Step 6: Vacuum the System
Slowly open the low side gauge valve the pump will now start pulling vacuum throughout the system as the gauge needle slowly moves into vacuum. The pump will change in tone once the valve has been opened and it starts to pull air out of the system.
Once the vacuum pump has been on for 30 minutes close the low side valve and turn the pump off. The system should hold at 28-29 inches. If the system never reaches 28-29 inches there is a large leak. If the system loses vacuum after the valve is closed there is a small leak and the system must be rechecked. System leaks can include a faulty O ring seal or a loose hose on the valve set. If the system holds vacuum for 15 minutes proceed to the next step.
Step 7: Charge the Air Conditioner System
Disconnect the yellow hose from the vacuum pump and attach it to a new r134a
refrigerant source which could be a keg (shown) or individual cans which are both
available on Amazon or at the local auto parts store.
Watch the Video!
Please watch this video of the job being done, then continue down the guide to glean additional helpful information.
SPONSORED LINKS
Open the valve on the keg and turn it over to allow the liquid refrigerant to be present at the valve which will charge the system more rapidly. If you are using individual cans connect them to the hose and turn the can over as well.
While the gauge valves are still closed and once the refrigerant source has been
opened the gauges will respond with an equal readings on both high and low side
letting you know that refrigerant is present and ready to be installed. This is
static pressure which will vary depending on the outside temperature. The warmer
the weather the higher the reading will be. This is normal.
Each system has a specific amount of refrigerant that it needs to operate correctly. This amount is located in the owner's manual or on the system sticker label. If you are using a keg and digital bathroom scale will help tell you how much has been installed. Using the cans make this easier because they say how many ounces are in each can. This guide will successfully recharge the system even if this information is not available.
Reference the image below to see how the refrigerant will flow (arrows) once the low side gauge is opened. Never open the high side valve. The high side connection is for monitoring purposes only.
SPONSORED LINKS
Start the engine and turn the system to the highest settings of coldness and
fan speed. This will work the system to its fullest capacity which will help you
charge the system completely.
Once the engine is running and the system is switched on slowly open the low side (blue) valve (never open the valve completely) until the refrigerant starts to flow into the system. This will turn the compressor on via the system pressure sensor. When this happens low the gauge pressure will start to drop and the compressor will cycle on and off as the system low side pressure rises and then lowers, continue to add refrigerant. The high side pressure will steadily start to rise. It helps to have a helper raise the engine idle slightly and to use a garden hose to spray water over the condenser at the front of the vehicle to help cool it down.
Continue adding r134a until the gauges start to look like this and the compressor
stops cycling. If both gauges are too high the system is overcharged or the cooling
fan is not working. If high side pressure runs way up quickly (300+) and the low
side goes into a vacuum the system has blockage such as a plugged expansion valve
or orifice tube. If the compressor engages and neither gauge pressures move (stay
the same) the compressor
has failed and needs replacement.
Outside Temperature - Low Pressure - High Pressure
SPONSORED LINKS
75° F 30 - 40 psi 150 - 170 psi
85° F 45 - 55 psi 220 - 250 psi
95° F 50 - 55 psi 275 - 300 psi
As pressures rise monitor the temperature of outgoing line of the evaporator and air vents in the passenger compartment. Both should be cold to the touch signaling the system is full. Do not install more refrigerant thinking it will make the system even colder in fact it will do the opposite and make the system warmer as it's unable to achieve the pressure drop needed inside the evaporator.
Once the system is performing properly and producing cold air the gauge set is ready to be removed. If the system is not working troubleshooting is needed.
SPONSORED LINKS
Step 8: Disconnecting the Gauge Set
After you have completed the charge turn the ignition switch off and the system
will shut down along with the engine.
With the engine off turn the high side connector counterclockwise to close the internal valve and release the plunger effectively closing the service port, repeat this procedure for both high and low side valves.
SPONSORED LINKS
Firmly grasp the valve retainer and pull up this will release the connector from the service port. You will get a slight pressure release sound when this is done, which is normal, repeat this procedure for both valves.
Once both valves have been removed reinstall the dust caps for each service port. Once the job is complete close the refrigerant supply valve and store the gauge set properly for the next repair. Enjoy the cold air!
Step 9: Refrigerant Recovery
A fully charged system contains refrigerant under pressure (70 to 90 psi static
- system not running). If you are performing this service without repairs then the
system must be discharged which, is done with a recovery machine. Allowing the refrigerant
r134a to leak into the atmosphere is illegal though not harmful compared to it's
predecessor r12 which was slowly bled out of the system by loosening a hose fitting
at the gauge set. This liquid/gas can be recovered if you have a recovery machine
which most do not, this machine is mostly found in repair shops. Locate a garage
to have the refrigerant recovered before work begins. The recycling machine gathers
refrigerant along with a small amount of compressor oil which is then is separated
into individual tanks.
SPONSORED LINKS
Watch the video!
Air conditioner vacuum down and recharge
Questions?
Our certified technicians are ready to answer car repair questions for free. We hope you saved money and learned from this
guide. We are creating a full set of car repair guides.
Please subscribe to our 2CarPros
YouTube channel and check back often for new videos which are uploaded regularly.
Article published 2022-03-13
How to clean the car air conditioner? Spray aerosol, foam, manual analysis - what to choose? | SUPROTEC
How to clean the air conditioner yourself, if the machine, after turning it on, has an unpleasant: putrid, fetid smell.
Causes of an unpleasant odor
How to clean the air conditioner yourself if the machine, after turning it on, has an unpleasant: putrid, fetid odor. First of all, you need to understand the reasons that affect this event. AT 9In 5% of cases, the smell from the air conditioning system is the formation of mold and bacteria that have accumulated inside the system, in the nozzles or on the sprayer, and a hotbed may also appear on the cabin filter. Dirt particles that are not trapped by the filter enter the cooling system. Condensation also forms there if the air conditioner is immediately turned off after the movement stops. A stream of hot air enters the cooling units, thereby creating droplets of moisture. This process is gradual. Fungal colonies can grow on the inside walls of an air conditioning system for years.
Three cleaning options for every taste and budget
How to clean the car air conditioner and save the family budget at the same time? Self cleaning only.
There are at least three options tested by motorists. And two of them are chemical processing, the third is mechanical cleaning. It is used if the first ones did not have the proper effect, since it requires considerable training, skills, and abilities.
The first two use aerosol and foam cleaners. It is worth noting that aerosols mainly have disinfectant properties, and if thorough cleaning is needed, then a foam composition is suitable here.
Do-It-Yourself Chemical Treatment Options
Cleaning your car air conditioner is easier than you think. To do this, purchase aerosol or foam products from a specialized center, with a supply tube of the required length.
Then follow the simple sequence:
- start the car engine;
- turn on the air conditioner and circulate in the passenger compartment;
- adjust the feed rate to maximum rotation;
- place the spray bottle on the front passenger's or driver's mat where the intake pipes are located;
- press the key to start spraying;
- close the windows, doors and leave the car running for the period indicated in the operating rules. The car must be left;
- keep the specified time, ventilate the interior.
Did not find a suitable composition, here is an instruction on how to clean the air conditioner in the car with chlorhexidine. It can be bought at any pharmacy.
We prepare the composition by diluting chlorhexidine in a ratio of 1 to 1 with alcohol. After that, pour the resulting composition into any bottle with a sprayer. Pre-prepare the car by opening the windows, opening the doors.
Remove the air filter. Turn on the air conditioner and fan. Spray the entire solution into the nozzle where the air filter was installed. Let the car run for 10 minutes after leaving the salon. After turning off the air conditioner, ventilate the car for another 10-15 minutes.
There are a lot of options on the market for cleaning products, differing in price, effectiveness and duration of action.
How to clean the car's air conditioner Suprotec
The ideal combination of these parameters is the cleaner of the ventilation and air conditioning system Plus (Antiflu) from Suprotec.
The advantages of the composition are undeniable:
- destruction of the most common influenza and SARS viruses;
- eliminates the source of the spread of mold and fungus colonies;
- fights bacterial pathogens;
- cleans the inner surface of the nozzles from deposits of dirt and dust;
- creates a unique aroma in the salon, thanks to the grapefruit and larch essential oils included in the composition.
This additionally gives an antiviral effect;
- has a long validity period of up to 45 days.
Independent study shows that spraying Suprotec into sealed chambers reduces viral activity by 95-97%.
How to clean the air conditioner in the car with a checker or aerosol:
Do-it-yourself cleaning - mechanical method
If none of the above options has eliminated the problem, then only mechanical manual cleaning remains. Almost every motorist knows how to clean the radiator of a car air conditioner from the outside, but only a few will be able to disassemble the control panel. Here it is necessary to sequentially remove the dashboard, clean the pipes and air ducts, the outlets from the stove, and the sprayer. In addition, it is necessary to clean the engine compartment. After that, it is necessary to assemble the nodes and elements in the reverse order. The procedure is complex and time-consuming, so contact authorized service centers to avoid problems with the further efficient functioning of the air conditioning system.
The final stage - how to avoid the reappearance of an unpleasant odor
We have figured out how to clean the air conditioner in the car yourself, it remains to highlight the question - how to avoid the reappearance of an unpleasant odor!
Follow two simple rules:
- change the cabin filter and air filter within the specified time. For most models, they are in a reasonable price range, so you can install new components more often, especially before the summer heat or winter cold;
- Dry the system naturally. Turn off the air conditioner 3-5 minutes before the end of the route. Leave the fan on. The pipes will remain dry. There is no place for pathogenic microflora to multiply.
Instructions We clean the radiator of a car's air conditioner - it turns out that everything is not as difficult as it seems at first glance!
The easiest and cheapest way to clean the air conditioner in your car - Lifehack
- Lifehack
- Operation
Photo dtgarage33. ru
The air conditioning system after the winter is a source of various mold, a breeding ground for microbes and a huge dust collector. Allergics and asthmatics can be called an ambulance immediately, and a healthy person may be able to get to the hospital on their own. How to clean up the pipes hidden under the dashboard and clean the evaporator, the AvtoVzglyad portal will tell.
Eduard Raskin
The first launch of such a coveted coolness in a stuffy and hot traffic jam can end badly. After winter, when the system was in a state of constant accumulation of condensate, and the air conditioner was not turned on for many months, unpleasant odors will appear. Bacteria and mold spores, which are in huge numbers in evaporators and tubes, in addition to the stench, cause many diseases and ailments. Especially such "air" is dangerous for children. In a word, there is a big cleaning of the air conditioning system, without which the operation of the car becomes unhealthy.
Of course, you can leave the operation at the mercy of professionals. But you will have to pay for the procedures, and their cost can be an unpleasant surprise. There is only one way out: put on rubber gloves and do everything yourself. Oddly enough, expensive cleaning of the air conditioner, as a rule, is subject to every car owner who already knows which side to approach the screwdriver from.
Photo a.d-cd.net
The first step is to remove the cabin filter and inspect its condition: replacing this consumable at the end of the heating season is never superfluous, and washing and cleaning it will not bring the desired effect. Rather, on the contrary: not dried to the end, it will only exacerbate the problem. So feel free to buy a new cabin filter, fortunately, it is inexpensive, and proceed directly to the cleaning process.
First, some theory. The main source of unpleasant odors and mold spores is not pipes or blowers, but an evaporator hidden deep under the dashboard, which eventually fills with condensate and becomes an ideal refuge for all fungi, bacilli and other pathogens known to man. deadly diseases. It is humid and warm there, so you won’t have to wait long for the appearance of bacilli - after 2-3 years of car operation in Russian conditions, it is time to clean the air conditioner.
If the car is still very young, there are numerous sprays that allow you to quickly and easily do the cleaning yourself: close the windows, start the engine, turn on the air conditioning in foxtrot mode and activate air recirculation. A cylinder with chemistry must be installed in front of the driver's seat and irrigation should be started. The operating time is written in the instructions, and after the completion of the procedure, the "vnutryanka" must be properly ventilated and a new cabin filter installed. Nothing difficult or labor intensive. With proper skill and desire, you can meet 45 minutes.
408251
Photo meditsina-online.ru
142029
But a similar cleaning method takes place only with a “warranty” car. If the "iron horse" is already more than three years old, then more effective means are needed. They are made in the form of a bottle of foam: with the help of a plastic tube that comes with the detergent, we fill the air ducts and ventilation pipes and leave it to “sour” for the time prescribed in the instructions. Then we “drive” the condo in different modes and properly ventilate the car.
All of the above methods have one significant drawback: cleaning products in bright jars cost money, and sometimes a lot. Therefore, along with the awareness of the need to “clean the air conditioner”, folk methods and folk remedies appeared - various cheap drugs used to disinfect rooms and medical devices. The simplest and most effective is chlorhexidine.
Its solution can be purchased at any pharmacy, and by diluting the purchased composition with alcohol, we will get an effective chemistry for cleaning even the most neglected air conditioner. With the doors open, turn on the air conditioner to the maximum mode and spray the resulting product into the hole under the air filter.
Learn more
- Square modern house

- How to fix a peeling faux leather couch

- Best cleaner for leather couch

- Top ten mixers

- Casual interior design style

- Modern carpeting styles

- Colors to paint paneling

- Jon bon jovi mansion

- Decorating lake cabins
- Decorating the living room wall

- W hotel penthouse