How to tile walls in bathroom
How to tile a wall: for professional-style results |
When you purchase through links on our site, we may earn an affiliate commission. Here’s how it works.
(Image credit: Fired Earth)
Find out how to tile a wall and you can transform the room with color, pattern, or a fabulous layout. They’re a super practical surface, too, protecting walls from splashes and humidity and ensuring keeping the space hygienic is easy.
Tiling a wall is a job you can take on yourself as an alternative to calling in a pro if that’s your preference, and once you also know how to grout tiles correctly, you can achieve a stylish finish.
These steps will lead you through the process so you can make the most of your bathroom wall tile ideas and kitchen wall tile ideas, and we’ve also asked the experts to contribute their advice for getting professional results.
How to tile a wall
Before tiling you need to ensure that your walls are smooth, waterproof and strong enough to support your chosen tiles.
‘If your surface is uneven you can overboard it with a tile backer board which will provide an even surface to make fitting much easier,’ explains Amanda Telford of CTD Tiles . ‘Whatever surface you are tiling on to needs to be load bearing and able to hold the weight of the tiles, adhesive and grout combined.'
You will need:
- Metal ruler
- Tile scourer
- Tile nipper
- Fine sandpaper
- Grout float
- Grout finishing tool
- Bucket
- Drill with a mixing paddle attachment
- Tile adhesive spreader
- Pencil
- Tape measure
- 5mm floor tile spacer
- Long carpenter‘s level
- Sponge
- Timber batten
- Fixings
1. Prepare a wall for tiling
You may need to remove wall tiles first if your project is a room refresh, but once that’s done, it’s very important to have the right surface for tiling. ‘Any existing painted wallboard (sheetrock) needs to be removed as a painted surface is not suitable for tile installation,’ explains Carol Butsko, a vice president at Artistic Tile .
‘Wood-based panels, which includes particleboard, waferboard, or an oriented strand board (OSB) are not suitable either.
‘There are multiple types of backer boards available: choose the type best suited to the application and tile product. The backer board will be applied to the studs (wood or metal) according to the manufacturer’s guidelines. TCNA (Tile Council of North America) Handbook for Ceramic, Glass, and Stone Tile Installation offers selection guides for various types of tile and installation materials.’
2. Mix up the tiles to avoid color discrepancies
Plan how you want tiles to look. Lay them out of the floor, to test out any patterns. Avoid any stark color discrepancies by mixing tiles from several boxes, this will help achieve a blend of color, texture and pattern.
3. Work out your starting point
It’s important to work out the starting point, just as you do when tiling in a shower or tiling a floor. Make a tile gauge using a wooden batten.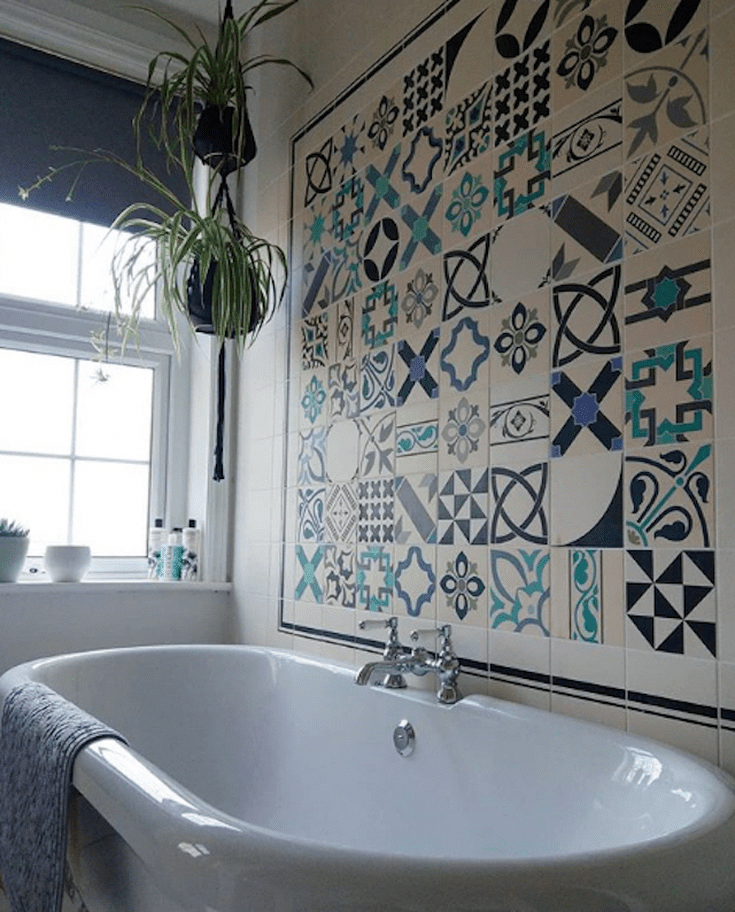 Place it on the floor next to a row of tiles, with spacers in between and mark each tile on the wooden batten.
Measuring the wall horizontally find the midpoint and align the first line on the tile gauge with it. Move the gauge to the left mark by mark, until the wooden batten is close to the corner of the wall. Mark on the wall where the last tile would end, and using a carpenter’s level, draw a line to the ceiling.
Repeat the entire process again vertically, before screwing wooden battens into place over the lines – your starting point is the corner where the battens meet.
4. Lay the full tiles
From your starting point, use a notched spreader to cover part of the wall in adhesive. Apply the tile firmly with a slight twisting action. Repeat with the rest of the tiles, inserting spacers between each one.
Use the wooden batten and capenter’s level to ensure the tiles are straight and level. When the adhesive has completely dried remove the wooden battens.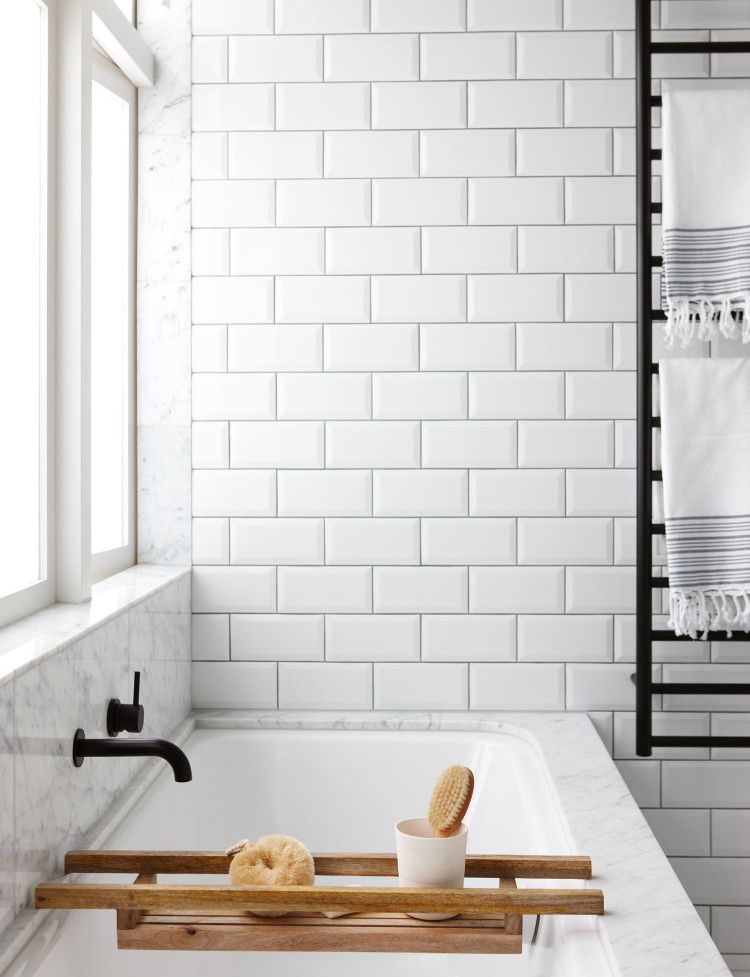
5. Cut and lay the remaining tiles
Measure the gap between the last full tile and the wall. Accounting for the spacer, mark the measurement on a tile and scour a line, before snapping the tile. Repeat for the rest of the tiles.
Starting from the bottom of the main design, lay the cut tiles in the same ways as the full tiles.
6. Grout the tiles
Our complete guide on grouting has the details, but bear in mind that once the adhesive has completely dried, you need to mix up the grout and use a grout float to work it into the joins between the tiles. For a neat finish, use a grout finishing tool to go over the joins.
(Image credit: Fired Earth)
How do I plan a wall tile layout?
When it comes to planning a wall tile layout, it's important to do your research.
Wall tiles are available in a whole host of shapes, sizes, colors and finishes, which can be arranged in a number of different ways, so take time to think about the look you’d like to achieve.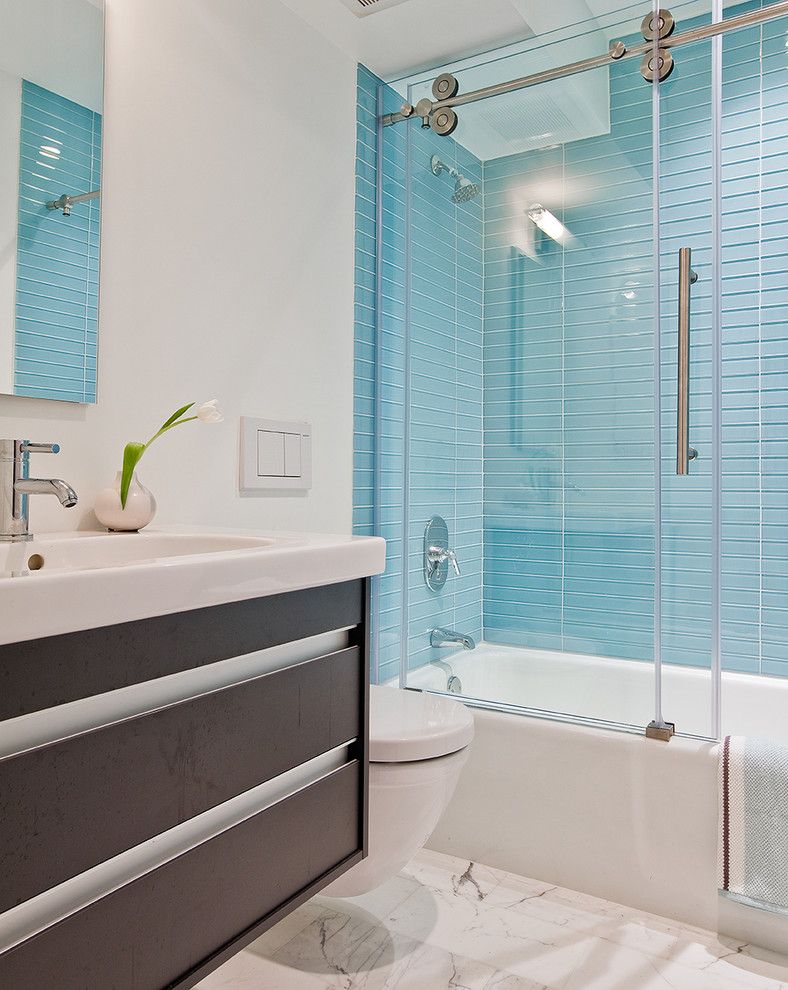
There are a huge range of tile layout patterns. ‘A standard format rectangular field tile offers the ability to create a distinct look depending on the layout,’ says Carol Butsko. ‘Pattern options include straight joint, brick, and herringbone. Each is easily achievable and is more dependent on aesthetic than ability to install.’
Take the size of your room into account, too. Yousef Mansuri, head of design at CP Hart , explains, ‘If it’s a compact space and it's small bathroom tile ideas you need, we recommend large format tiles. This is because fewer grout lines give the walls more continuity, creating the illusion of a larger space.’
What's the best material for wall tiles?
Porcelain is one of the best materials for bathroom and kitchen walls and is used often for shower tile ideas too. It's a practical tile as it's nearly waterproof, and is suited to the humidity and condensation of a the space.
‘Typically, porcelain tiles are popular for bathroom walls in both small and larger formats.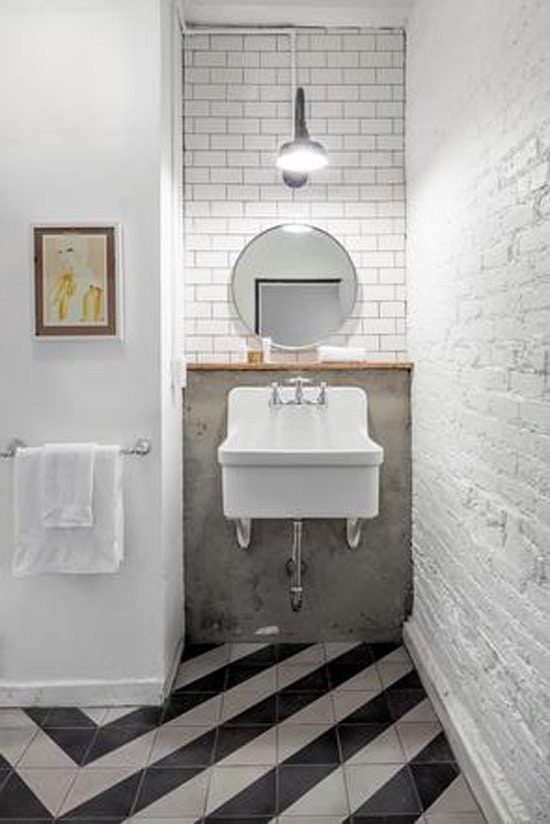 Stylish and in-keeping with so many current bathroom trends, they are also easy to wipe clean and maintain in years to come,’ explains Harriet Goodacre, tile consultant at Topps Tiles .
‘The technology accessible to porcelain allows designs and patterns not achievable with other materials,’ adds Carol Butsko.
Other materials you might consider? ‘Natural stone offers a fascinating range of color, veining, and opacity,’ says Carol. ‘With glazed double-fired ceramic, a vibrant range of color is available. Similarly glass offers a variety of colors with a rich translucency.’
Where do you start when tiling a wall?
Before tiling a wall, you need to work out your start point as shown above in the step-by-step. The reason for this is to ensure that as many full tiles as possible are used.
When working out the starting point, if the space in the corner is less than half a tile, move the tile gauge half a tile’s width to the right of the center point. This is to allow space for a larger cut tile to be fitted, creating a cleaner finished look.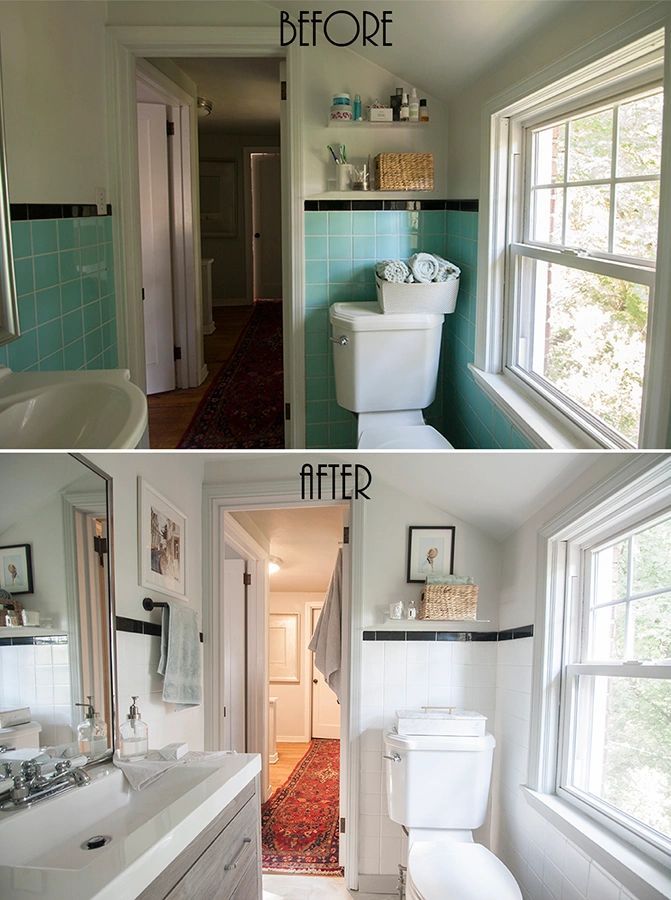 ‘Starting point impacts the end point, so it is important to take this into consideration to achieve the best result,’ notes Carol Butsko. ‘Placement may also require some adjustment for vanities, tubs or other fixtures in the space.’
‘Walls generally lend themselves to being centered, especially the back wall of a shower,’ advises bathroom remodeling contractor in the Seattle area James Upton, of DIYTileGuy .
‘Otherwise, there is some subjectivity,’ he continues. ‘You may want full tiles to start from the ceiling. You may want to start with a full tile at the bottom. Additionally, some may choose to balance the cuts at the top and bottom. This is a personal choice and depends on the tile size, the area being tiled, and the focal point of the wall.’
How far up the wall should I tile?
It can be difficult to know how far up the wall to tile, but you should ideally tile any areas where water is to avoid splashes. Aside from that practical detail, how far up the wall you tile is a personal preference, though kitchen backsplash ideas tend to be around 24in deep.
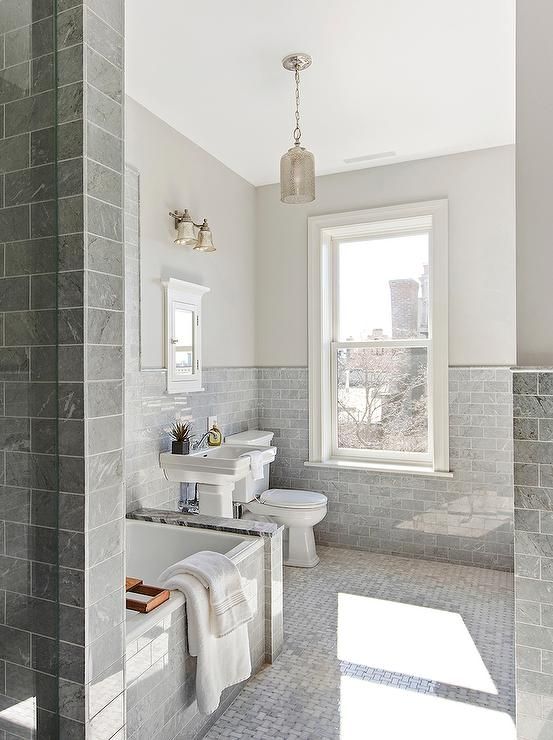
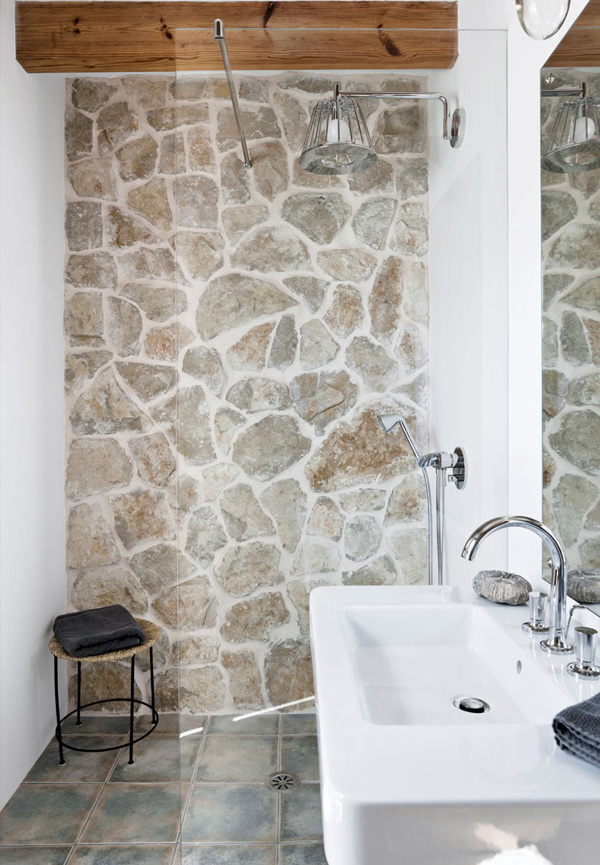
‘In walk-in showers, wet rooms or shower rooms, we recommend tiling to the top of the wall,’ suggests Hannah Guilbert of Original Style . ‘For the rest of the space, tiling at half height is both pleasing on the eye and a good way to ensure your walls are protected from sink, bath and shower splashes.’
Rebecca is the News Editor on Homes and Gardens. She has been working as a homes and interiors journalist for over four years. She first discovered her love of interiors while interning at Harper's Bazaar and Town & Country during my Masters in Magazine Journalism at City, University of London. After graduating she started out as a feature writer for Women's Weekly magazines, before shifting over to online journalism and joining the Ideal Home digital team covering news and features. She is passionate about shopping for well-crafted home decor and sourcing second-hand antique furniture where possible.
With contributions from
- Sarah WarwickContributing Editor
How to Tile a Bathroom Wall - Granada Tile Cement Tile Blog
Tiling the walls of your bathroom, whether a guest room or the master, can boost the style of the space and add an extra protective layer to combat moisture damage and mold growth, and to enable easier clean up. Cement tiles are great materials for bathrooms to add a pop of color, pattern and durability.
Cement tiles are also fairly straightforward to install and can be done in a weekend. If you’re wanting to add some incredible style and durability to your bathroom renovation, follow our DIY guide for installing bathroom cement wall tiles.
Tools and Materials:
- Cement wall tiles
- Thin set adhesive
- Grout (preferably light colored; dark colored grout may stain tiles)
- Grout release
- Cement Penetrating Sealer (one of the best is STAIN-PROOF from DryTreat)
- Trowel
- Paintbrush
- Grout float
- Sponge
- Carpenter’s pencil
- Level
- Gloves
- Wet tile saw
- Power drill
- Backer board
- Tape measure
- Galvanized screws
Start by measuring your bathroom wall to determine the amount of tiles you need.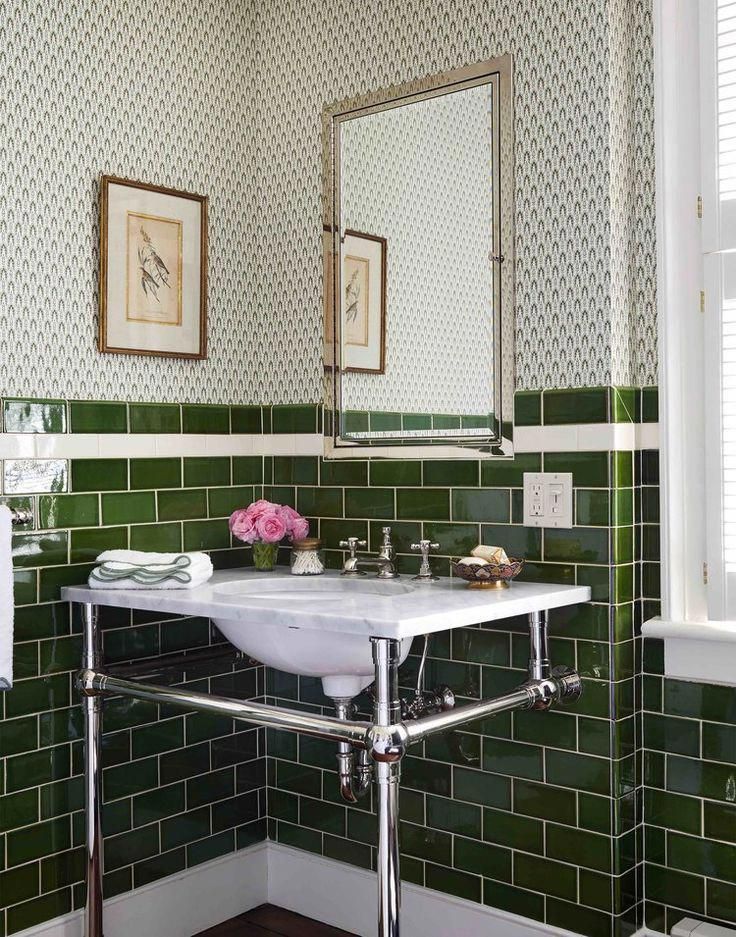 Multiply the wall space by the number of tiles per square foot for the particular type of tile you’re planning to use. For example, let’s say your bathroom wall is 5’ x 10’, so you have 50 square feet to tile. The tile you decide to use is a 6” x 6”, so there are 4 tiles per square foot. When you are ordering your tiles, you want to order 50 square feet x 4 tiles/square foot = 200 tiles. Be sure to order 10-15% extra to have replacements in case any tile gets damaged or there was a slight mistake in the measuring.
Cement wall tiles can be applied on dry wall, plaster, cement block or cement backer board. You want the surface to be smooth, clean and dry, and for any chipping paint or holes to be sanded and patched. If you need to create a new surface for the walls, begin by measuring the area to be tiled and cut the backer board to this size. Cover the area with adhesive and attach the backer board to the wall.
Step 3: Determine the Tile Layout and Make a Layout ToolWhen figuring out the layout, the rule of thumb is to figure out the placement of tiles and the center point that will result in the largest size of cut tiles, avoiding any slivers. If you’ll be incorporating an accent tile or edge tile, figure out where this will go on the wall.
Create a layout tool to figure out the placement of the tiles. Cut a piece of wood just longer than half of the length of the wall, and place tiles along the wood, including spacers, and mark them. Using this tool, you’ll be able to see the placement of tiles by moving it horizontally along the wall. If the ends result in small pieces, then adjust the center point on the wall. Mark on the wall, from the edge, where the first full sized tile will start. Using the level, draw a line from this point up the wall.
Now, do the same process for the vertical side of the wall. Mark the start of the bottom row and mark this line along the horizontal wall.
Step 4: Install the DatumNow that you’ve determined the layout for the wall tiles and you’ve checked for pipes using a pipe detector, you’ll screw in the long, skinny wooden datum boards (which will act as your reference lines) along the horizontal and verticals lines you drew, to guide you on where exactly the tiles will go to create an even, symmetrical installation.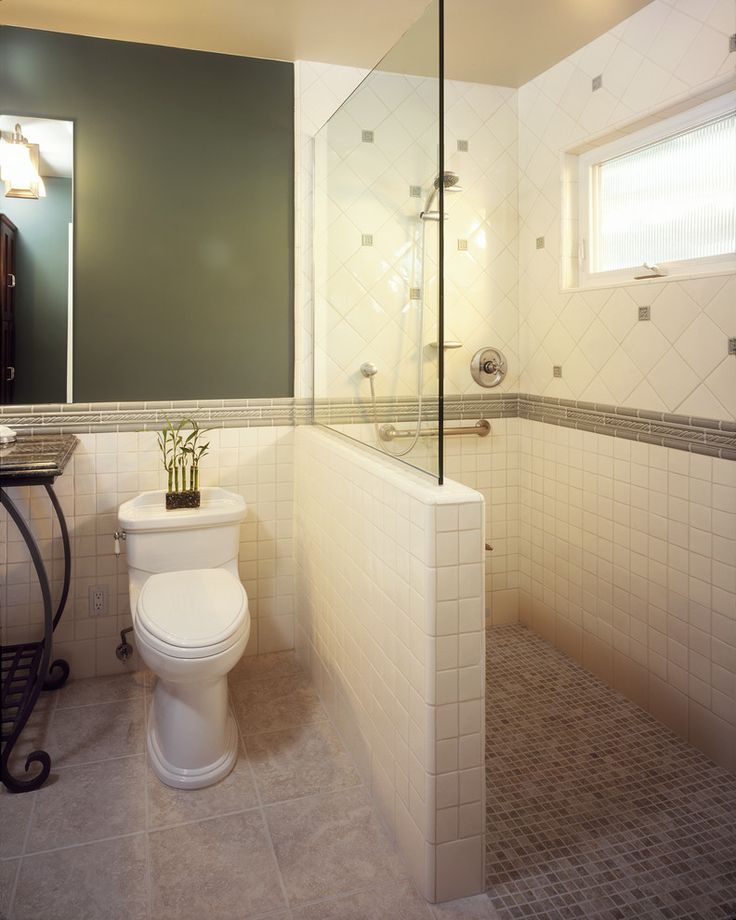
The type of tile adhesive or mortar you use will depend on the type of wall you’ll be tiling on, either dry wall, plaster, cement block or cement backer board. Follow the manufacturer’s instructions. Mix the adhesive with water to create a smooth paste.
Step 6: Install the Wall TilesSpread the tile mortar using the notched trowel working in small sections, and apply a thin layer of the mortar on the back of each tile before pressing it into the wall. Use the notched side of the trowel to create ridges that will help the tiles to stick better. Be sure to wipe off any excess adhesive or mortar on the tile surfaces as you go, and place spacers in between each tile to ensure the right space for the grout. Complete the first bottom row of tiles and check if they are even with the level. Remove the wood datum planks when you’re ready to install the outer edge tiles.
Step 7: Apply the Grout ReleaseOnce the adhesive or mortar has dried according to the manufacturer’s instructions, it’s time to apply the grout release or penetrating sealer.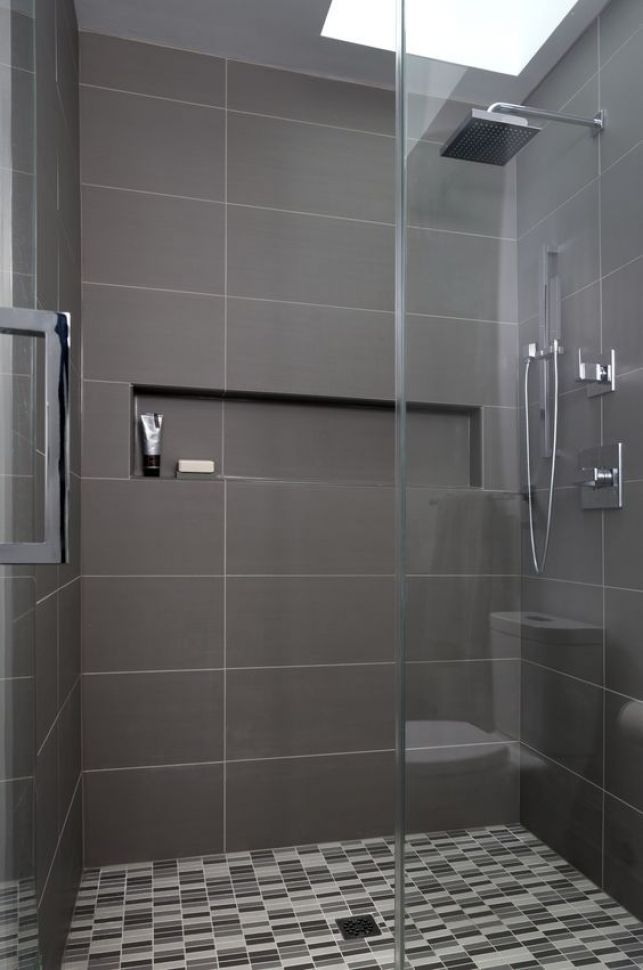 Cement tiles are porous, like natural stone. You’ll need a grout release or penetrating sealer to prevent the grout from staining the tile.
Apply the grout over the tiles using a grout float. Do not allow the grout to dry on the tile surface because it can absorb into the tile and stain. Remove excess grout with a damp sponge. Let the grout dry according to manufacturer’s instructions.
Step 9: Seal the TilesOnce the grout is dry, you’ll want to seal the tiles to protect them.
And that’s how you tile your bathroom walls using cement tiles! For more information or advice for installing your tile project, or for help choosing your cement tiles, contact the team at Granada Tile.
How to lay tiles in the bathroom: step by step instructions - INMYROOM
Tips
A professional decorator, artist and blogger explains how tile joints, knots and seams should look in modern bathrooms and bathrooms
If you want to get the bathroom of your dreams, you will have to find the best tile installer in the world. And so that you can speak the same language with him and know exactly what you want, you must know the secrets of perfect joints and seams the way decorator Oksana Panteleeva knows them.
Oksana Panteleeva
Decorator
A historian by profession, Oksana Panteleeva became a decorator and stylist after graduating from the "Details" school. In his apartment, he remodels and repaints something every day and shares his experience in the blog “On the Wave of Decor”
Where to start?
When you begin to draw your tiling story on the layout of the wall, then:
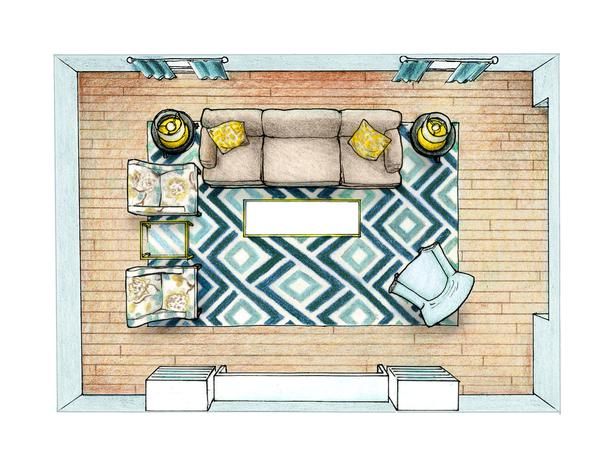
1. First, draw a plan with the arrangement of all furniture and plumbing fixtures.
2. Decide on the location of decors (tiles with decor), depending on where you will have the most beautiful wall, and where you will just have a wall ... beautiful, but not so important.
3. Find the center of your layout. I advise you to walk from the center in most cases, if you are not a pro and do not do this every day.
4. Calculate how the decors will go along the wall: symmetrically to each other, or just a strip in the center (not centered), or the entire wall along the bath - one big decor.
5. Think carefully about the beginning of the tile laying: where you will start the step and where you will end it.
6. Decide how the joints will look: with a plinth, with a cornice, with a floor without a plinth, with a ceiling without a cornice.
7. think over all the corners, both internal and external: do you need special ceramic corners (many collections have them), or the master will cut the tiles at 45 degrees.
8. Consider the layout of the floor together with the layout of the walls in order to understand how the seams will join, how the carpet (for example, metlakh) will be located in relation to the furniture. Wouldn't it turn out that we draw a beautiful carpet, and then it will not be visible from under the bath?
A few unspoken rules
1. We start laying out the tiles from the edge of the bath, that is, there must be a whole tile above the bath.
2. The whole tile is usually left at the wall-ceiling joint.
3. Cut tiles go to the wall-floor joint.
Trimming tiles
If there are a lot of trimmings, I suggest first looking for a variant of a different format. Maybe you will find the perfect tile with the perfect size, and you will have a minimum of cut joints.
You can beautifully leave with cut tiles in the corners if half or a little more than half of the tile remains.
Or the pieces of the tile are full extensions of each other, which can often be seen when laying out subway tiles.
The most common mistake is to leave small pieces of tiles in the corners.
But when there is very little space left, and trimming the tile will turn it into a "stub" - this is not very beautiful. Here you can search for a suitable decor by size or mosaic ... or change the tiles.
At one site, I ordered a “factory” trimming of the central tile with edge processing, and put it in the center so that I get whole tiles along the edges, and in the center it’s so narrow, but ONE, and not two stubs along the edges.
Knots and joints
What is a knot in the understanding of a professional when it comes to laying tiles? Knots are places of junction, contact. All corners, internal or external, all undercuts, all transitions from decors to decors, we will call knots.
Let's agree - we forget about plastic corners once and for all. For a beautiful bathroom, this is terrible! And no matter how much the builders tell you that other options are impossible, it's expensive, it's impractical ... don't be persuaded. So they don't know how to do it, that's all.
Tip: you should know that there are collections in which there are external and internal corners for folding tiles, corners with decor.
Maybe you won't injure the craftsman, but find such a collection right away (as a rule, from elite manufacturers).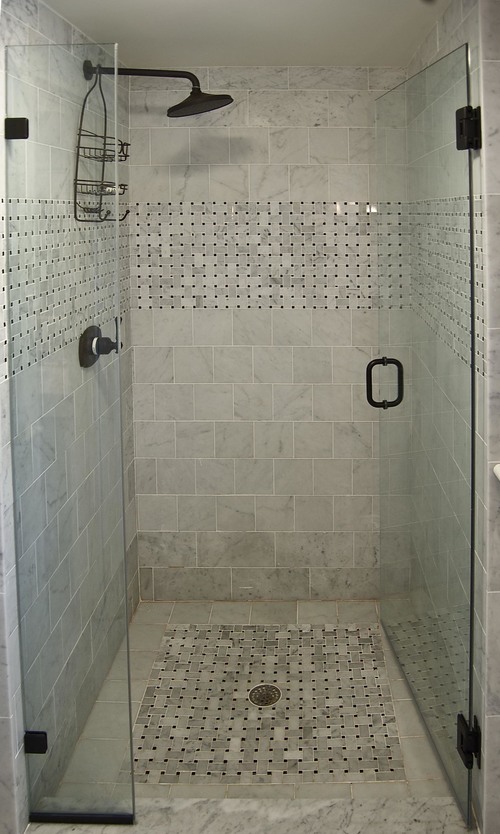
Advice #2: tiles are convex, voluminous, with decor are really very bad for cutting, joining and so on. The master must be a super pro!
And a few more important rules from the pros
Vitaly Likhov
expert
Founder of SM-HOME and VITSET
to frosting. The disc will not cling to it, it will not break off in pieces. If this option is unacceptable, see the next paragraph.
2. Hedgehog method (they cried but pricked). The tile is cut on a machine with a large margin to the required point, and then it is manually sharpened with any grinding tools.
3. It is necessary to have a skill of the corresponding level from the master. Everything is clear here.
4. Availability of a good tool, machine tool. No matter how magical the master may be, but if the circle “beats”, then the result for chips will be appropriate.
5. Availability of time. This is manual labor, requiring significant labor costs. If the task is to do well, it is necessary to allocate time for this.
6. Increased supply of tiles. Cutting under 45 significantly increases the risk of splitting tiles, regardless of skill.
Cover photo: project by Natalya Kupreychuk
How to lay tiles in the bathroom beautifully: layout options
Of course, no one will forbid you to live beautifully; taken bathroom. And we will start by telling you how to lay beautifully ceramic tiles in the bathroom. What’s more, there are plenty of ways to do it. Finishing the bathroom with ceramic tiles is the best option of all. An extensive selection of sizes and shapes, a variety of tile colors, makes it possible to express individuality in the interior of the bathroom.
You can, of course, lay tiles of the same color, and this has its advantages, but if you combine tiles of two or more colors, you can, in addition to the aesthetic side, solve a number of other problems. For example, to correct some of the shortcomings of the room, or to highlight the functional areas of the room.
How to decide on the choice of design
Before laying tiles in the bathroom, you need to study all the possible options for laying tiles applicable to your room and only then stop at the right one. The design should be designed before the repair work, because the choice of material, with what pattern and what size the tile should be, will depend on the decision you make on the interior. To combine wall and floor tiles, as well as the harmony of the cladding with the interior in the room, you need to take into account the following points:
- Geometric parameters of the room. Using a certain size of the tile, its color scheme and the optimal laying scheme, we can achieve a visual change in the direction we need of the volume of the room.
- Availability and location of plumbing and furniture. Interior items should match the tiling and be combined with the tile pattern.
- Illumination in the room. When planning, it is necessary to exclude the possibility of dark zones and unwanted reflections on the surface.
Possible tile layouts
If you know how to combine different tile laying options, you can get not only a beautiful room, but also an original design of the room.
A wide variety of tiling options are available.
- Standard pattern or straight lay. Tiles with this method are laid out seam in seam without shifting in rows. As a rule, square-shaped tiles are used, but rectangular tiles also look good.
- Offset tiling. In this case, the lining is carried out like brickwork. Often used for flooring. Allows you to hide minor defects.
- Diagonal installation. The tile is located at an angle of 45 degrees to obtain diagonal rows. The option is one of the most difficult to implement, firstly because of the large amount of cutting, and secondly, in the obligatory precise marking of the axes. The advantages of this method of cladding include the ability to level out surface irregularities, and the area of \u200b\u200bthe room at the same time visually increases.
In shortcomings, we write down an excessive amount of waste due to the need to cut tiles adjacent to the walls.
- Herringbone. It is mainly used for flooring, tiles are glued in the form of parquet. There are two types.
- Traditional parquet method.
- Attachment method, small inserts of other colors or patterns are inserted into the general background.
Having decided on the laying scheme, let's consider the existing options for laying tiles in the bathroom.
Wall panel
Tile wall panels are an excellent option for the bathroom
Without exaggeration, the most common option for laying tiles in the bathroom. The lower part of the wall along the entire perimeter is tiled with darker tiles, the rest of the area is laid with light tiles. You can also separate the lower and upper parts of the wall with a decorative frieze or border. At the same time, the floors can both match in color, and enter into contrast with the wall.
Horizontal stripes
Horizontal strip encircling the tub to expand the space
Can be narrow, made of decors, or wide, up to several tiles in height. They are located in any plane of the wall and can be of two or more colors. The method allows you to visually increase the width of the room.
Vertical stripes
As in the above version, the stripes are both narrow and wide, but their length and location are different:
Vertical stripes add volume and give the atmosphere a feeling of lightness
- From floor to ceiling.
- From the ceiling, not reaching the floor.
- From floor to ceiling.
- Stripes starting and ending at different sections of the wall.
Floor with curb
One or two lower rows of the wall are made of floor tiles. The method allows you to visually expand the room somewhat, but at the same time underestimate it a little.
A border in small baths is used as a last resort
Accent pieces
The main principle of the method is the use of contrasting tiles or tiles of other colors to highlight functional areas against the general background of the layout. To date, the option is very popular, while the undesirability of its use for small rooms should be taken into account.
Equalization of colors
Today, many people use checkerboard patterns of ceramic tiles
The basis of the method is that different walls, or sections of walls, can be tiled in different colors, highlighting separate functional areas, for example, a bathroom or locker room, washbasin or shower. In this case, the colors should not mix with each other. Applying the method of equality of colors, floors can be laid in two ways:
- Checkerboard.
- Color combination in the middle of the room.
Patchwork or kaleidoscope
The origin of the word "patchwork" comes from the English "patcwork" and means a patchwork quilt. Actually, in fact, we observe a patchwork blanket when using this option. The decoration in the room is bright and cheerful, like pictures in a kaleidoscope. Tiles with different patterns and colors are randomly laid on the surface.
Patchwork is one of the latest trends in tile fashion
Splashes
The entire area of the walls of the room is laid out with a single-colored tile, and only in some places and randomly are inserts made of several tiles of a different color, which in some way resembles drops of water or splashes. This option should be used only in fairly spacious rooms.
Bathroom interior Splashes of summer
Photo print
An option worthy of attention for lovers of individuality, because any picture that you want to see on your wall can be ordered as a photo print on a tile. True, it will cost quite decently. It will be much cheaper to buy an already completed composition and put it on the wall.
Original bathroom interior — Photoprint
Combined laying
The essence of the method is to use two or more laying methods described above within one room. Moreover, you can combine not only in the volume of one room, but also in the plane of one surface.