How to scrape a ceiling
11 Tips on How to Remove Popcorn Ceiling Faster and Easier
Popcorn ceilings were all the rage back in the '60s and '70s. Applying the texture to drywall and plaster ceilings was a quick and easy way to hide imperfections and didn't require any painting afterward. But the rough texture catches lots of dust and cobwebs and it can be difficult to know how to remove popcorn ceiling. It can be a real pain to match if you have cracks or holes in need of patching. Figuring out how to remove a popcorn ceiling texture from a ceiling is a messy chore but worth the effort if the substrate underneath is in good shape. Here are some tips to take some of the pain out of popcorn ceiling removal.
Every editorial product is independently selected, though we may be compensated or receive an affiliate commission if you buy something through our links. Ratings and prices are accurate and items are in stock as of time of publication.
1 / 12
Family Handyman
Do a Scrape Test
Before you go to all the trouble of prepping the room, try scraping a small area while learning how to remove popcorn ceiling. Try it dry first, then dampen the texture with water and try again. Some texture comes off easily without water, but in most cases wetting is best. If the water doesn’t soak in and soften the texture, the ceiling has probably been painted or paint was added to the texture mix. In that case, wetting the ceiling may not help, and you’ll have to decide whether you want to tackle a really tough scraping job or choose another way to hide your popcorn ceiling.
2 / 12
Family Handyman
Test for Asbestos
Any popcorn ceiling installed before 1980 might contain asbestos—a known cause of lung cancer. Before trying to figure out how to remove any popcorn ceiling texture, contact your local health department and ask about getting a sample tested. So you’re wondering how to remove a popcorn ceiling with asbestos? If the test comes back positive, cover the popcorn with new drywall or tongue-and-groove planks, or hire an asbestos abatement contractor to help in removing popcorn ceiling.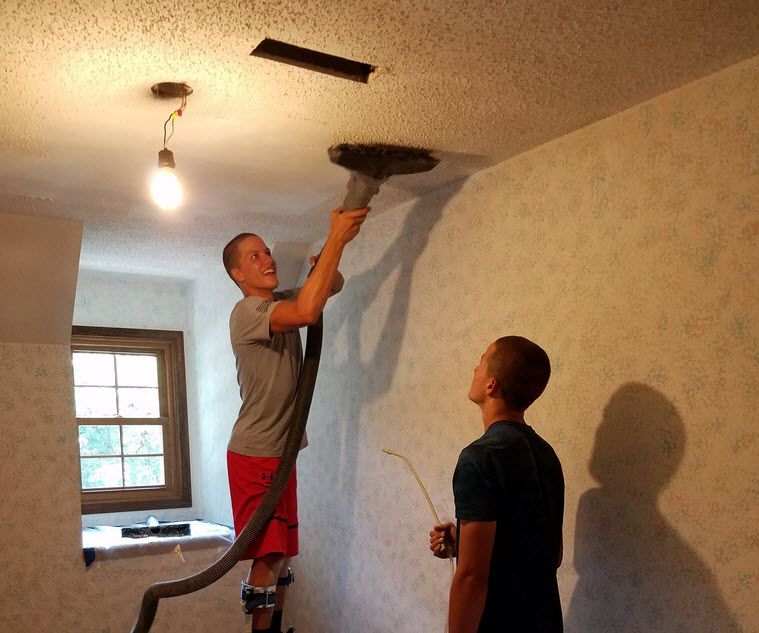
3 / 12
Family Handyman
Prep for a Big Mess
Cover floors and walls with plastic drop cloths as you begin your how to remove popcorn ceiling project. Don’t use canvas drop cloths because water can soak through. Cleanup is easier with plastic too, because you can just ball it all up when you’re done working and throw it in the trash. Leave the plastic in place after popcorn ceiling removal to catch the mess you’ll make repairing and sanding the ceiling later.
4 / 12
Family Handyman
Get the Furniture Out
If possible, remove all furniture from the room you’ll be working in. When learning how to remove popcorn ceiling, it is messy work, and you won’t want furniture in your way every time you move the ladder around. If moving everything out of the room isn’t possible, cluster it and cover it with drop cloths.
5 / 12
Family Handyman
Remove Ceiling Fixtures and Fans
You might think it’s easier to leave light fixtures and ceiling fans in place as you figure out how to remove popcorn ceiling, but they’ll just be in your way and get covered with wet popcorn. Plus, you don’t want to accidentally spray water into an electrical fixture.
6 / 12
Family Handyman
Protect Can Lights From Water Spray
If you have recessed “can” lights, stuff newspaper or rosin paper inside them to keep them dry when completing a how to remove popcorn ceilings project. Also, make sure the power to those fixtures is turned off at the circuit breaker panel or fuse box.
7 / 12
Family Handyman
Wet it With a Pump Sprayer
For easier scraping and practically no dust during popcorn ceiling removal, use a garden pump sprayer to mist the ceiling and let it soak in for about 15 minutes before scraping. Only give it a light misting—too much water could damage the drywall or loosen the joint tape. If the texture hasn’t softened after 15 minutes or so, spray it again and wait another 10 to 15 minutes.
If the texture still hasn’t softened, it might be painted, or paint might have been mixed into the texture before application.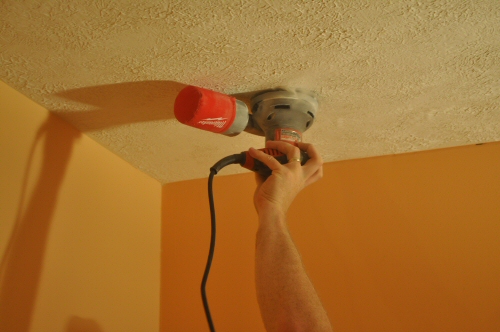 In either case, water won’t easily penetrate. If the texture is painted, you might be able to dry-scrape it first to expose some of the unpainted texture and follow up with wet scraping. If the texture has paint mixed in, you might have to dry-scrape the whole ceiling or cover it up with drywall or T&G boards.
8 / 12
Family Handyman
Cover Electrical Boxes
Shut off the power to any electrical junction boxes in the ceiling and cover them with painter’s tape to keep the wiring dry when spraying water on the popcorn as you complete a how to remove popcorn ceilings project. Overlap the sides of the junction box with the tape, and then trim around the perimeter with a utility knife, being careful not to nick the wires.
9 / 12
Family Handyman
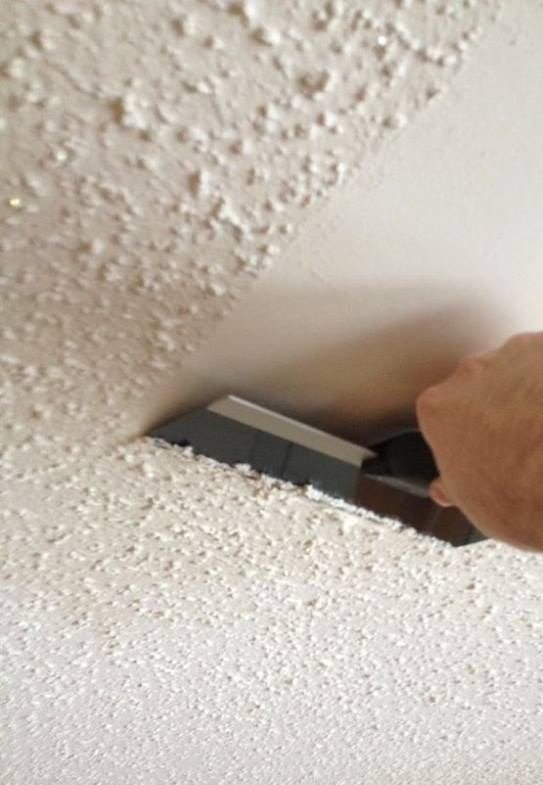
Work in Small Sections
Only spray and scrape a small area at a time—about 4 x 4 ft. If you work too large of an area at once, the popcorn might dry before you have time to scrape it off. If that happens, respray the area and wait another 10 to 15 minutes before scraping.
10 / 12
Family Handyman
Tame the Mess With a Mud Pan
Use a mud pan—the kind for holding joint compound—to catch the wet popcorn before it hits the floor. That way, you’re not tracking it all over the place when you walk and move the ladder around. Also, use the edge of the pan to clean off your scraper when it gets loaded up with wet popcorn.
11 / 12
Family Handyman
Prevent Gouging
Round off the corners of your popcorn scraper—whether it’s a wide putty knife or drywall taping knife—so it won’t gouge the ceiling and leave you with dozens of ceiling wounds to repair. Use a file, a sander or an electric grinder to do this.
12 / 12
Family Handyman
Smooth After Scraping
Scraping alone won’t leave you with a paint-ready ceiling. You’ll probably have small dings and gouges to fix. At a minimum, you’ll have to sand the ceiling to get it perfectly smooth before painting.
Originally Published: October 17, 2019
How to Remove Popcorn Ceilings in 5 Easy Steps
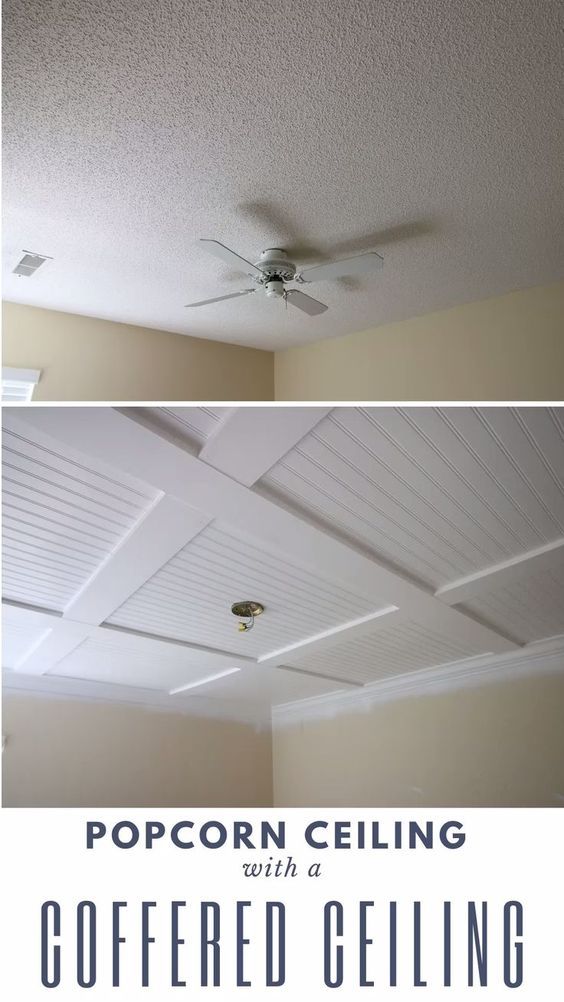
Is there anything more universally loathed than a popcorn ceiling? If you find yourself staring upward, wondering how to remove popcorn ceilings, you are not alone. Let’s face it: They’re eyesores. They’re also known as acoustic ceilings, stucco ceilings, or, worst of all, cottage cheese ceilings. They were big in the mid- to late 20th century. Builders installed the textured treatment to help absorb sound from above or cover up imperfections in the ceiling. (It also helped skip some steps and save money, since it eliminates the need to paint the finished surface.) But like many trends from the 1970s, the popcorn ceiling has fallen out of favor and many homeowners are removing or covering up the unsightly surface.
If you’re tired of looking up at lumps and bumps and are ready for a makeover, there’s good news. Removing a popcorn ceiling is a fairly easy and affordable DIY project that just requires some time and muscle. Should your ceiling need more TLC than just scraping and painting, there are also options for covering up popcorn ceilings, such as wood paneling, pressed tin tiles, or new drywall. Ready to tackle the home improvement job yourself and learn how to get rid of a popcorn ceiling? We asked contractor Justin Krzyston, president of Stonehurst, how to remove popcorn ceilings safely and easily.
1. Test for Asbestos Before You Begin Popcorn Ceiling RemovalBefore you start, it’s important to make sure that your textured ceilings don’t have asbestos. “Prior to the early 1980s, asbestos was an ingredient that many used in textured popcorn ceilings,” Krzyston says. “The popcorn texture was used to help home builders deal with sound travel, and it was a great fire retardant.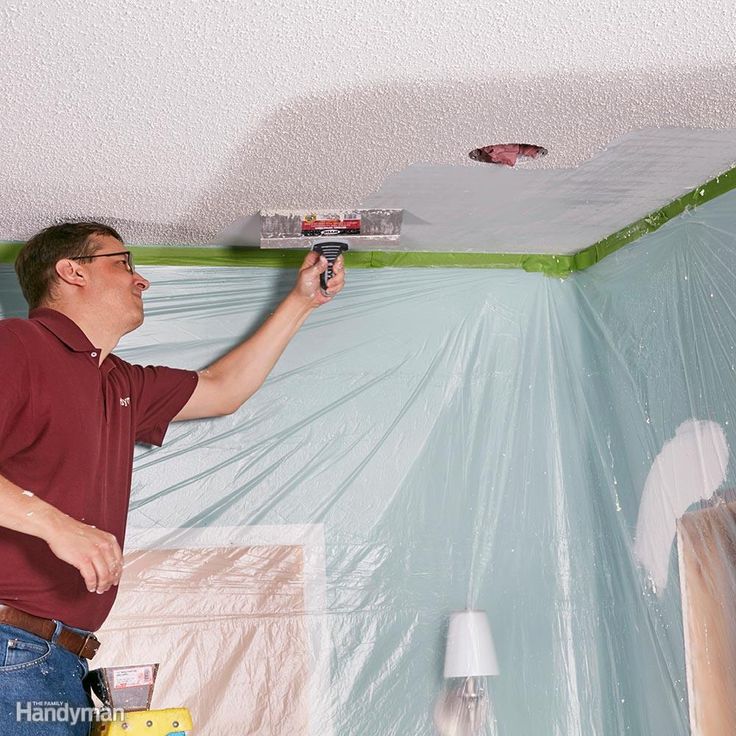 ” He recommends having the surface tested by a professional, or at the very least purchasing a do-it-yourself test kit from the hardware store and sending the samples to a lab. If you go the DIY test route, make sure to use the appropriate safety gear, such as gloves, a ventilator or dusk mask, and eye protection. “Do some research before diving into a weekend project,” he cautions.
If your ceiling tests positive, you should have a professional licensed in asbestos abatement remove the texture or cover the entire ceiling with paneling or drywall. “If you have asbestos, it is best to leave the ceiling intact, as there is no real danger if it is in good condition,” he says.
2. Gather Your ToolsIf your ceiling is asbestos-free, it’s time to get to work. Fortunately, the project doesn’t require any special tools, and you may already have everything you need on hand. The essential popcorn ceiling removal tools include:
- a garden sprayer
- a wide putty knife or drywall taping knife
- drop cloths or plastic sheeting
- painter’s tape
- ladder
- safety goggles
- dust mask
 Protect Walls, Floors, and Yourself
Cover floors and walls with plastic sheeting.
Photo: Spencer Weiner/Los Angeles Times via Getty Images
“Scraping the ceilings is very messy—so have plenty of drop cloths and tarps on hand,” Krzyston says. Remove furniture from the room, and cover floors and walls with plastic sheeting. Attach sheeting to walls with painter’s tape. Taking down ceiling fans or hanging light fixtures will also make the job easier—just be sure to cover electrical boxes with painter’s tape to protect the wires from damage and water. “Turn off your HVAC system and close and cover all vents and electrical outlets with plastic,“ he says. Since this is a job involving water, make sure to turn off the electricity to the room you’re working in.
Repair of a cut on a stretch ceiling, what should I do? — Nevado
Such a product, after installation, is able to withstand significant mechanical stress. But due to the space that is formed between the floor slab and the canvas, the stretched film, which, in fact, is the stretch ceiling, is vulnerable to damage by a sharp object.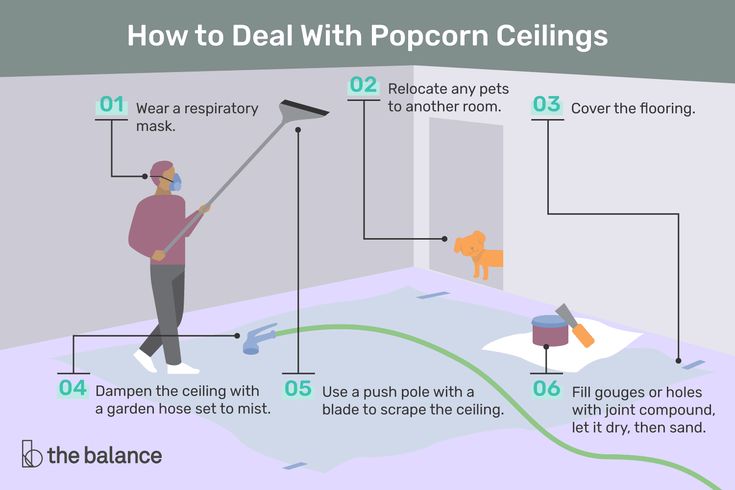 With a point impact, a highly stretched canvas can tear, a cut appears. In this situation, the stretch ceiling requires immediate measures to restore integrity.
The most common causes of stretch ceiling damage
The most common causes of stretch ceiling cuts or other damage are: a stretch ceiling cut is made with ski poles, arrows from a toy crossbow, darts or other sharp objects,
What if one of the described cases happened and you found damage?
Small cut in stretch ceiling
How to seal stretch ceilings in the place of the cut? Initially, the canvas should be given "first aid". Otherwise, there is a high risk that the cut of the stretch ceiling will increase. And this will make it impossible to repair. How to fix a small cut on a stretch ceiling? First, do not panic, do not rush and do not make sudden movements towards the damaged canvas.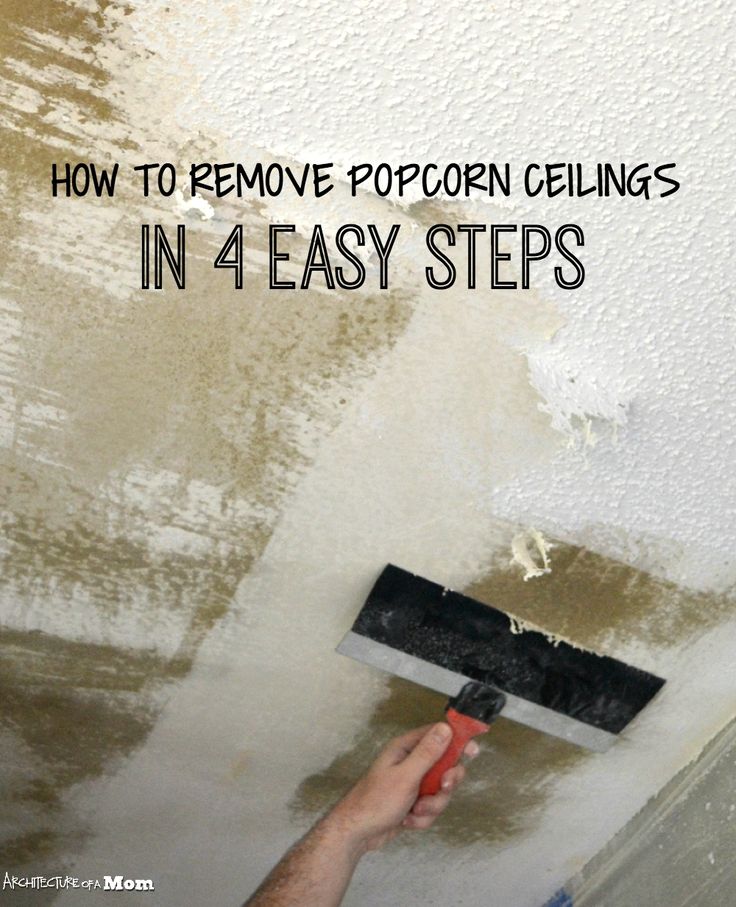 Secondly, carefully try to fix the cut by tightening its edges with construction tape. If the tape is not at hand, you can replace it with glue. Take a disposable plastic cup and cut two strips about a centimeter wide out of it. Apply superglue to the resulting "fixers", and glue them to the edges of the stretch ceiling cut.
The above methods will not "cure" the damaged film, but will not allow it to "spread" more. After carrying out resuscitation measures, installers should be called in who will professionally repair the stretch ceiling cut.
Expert tip: Proceed with care, without force and pressure, as excessive pressure will increase the size of the stretch ceiling cut.
How to repair a stretch ceiling if the cut or tear exceeds 2-3 cm?
Repair of stretch ceilings after a cut, if the gap exceeds 1-2 cm, definitely requires the intervention of professionals. Specialists in the arsenal have several options to restore the integrity of the PVC film:
- The first method of repairing a stretch ceiling in case of a cut involves installing a patch.
 A piece of film is glued on the inside of the canvas, and the outer edges are gently pulled together. The “seam” is practically invisible if the work was done professionally, and the ceiling itself is colored or patterned. For a white glossy finish, to mask the cut of the stretch ceiling, use the applique decoration method.
 - If the stretch ceiling is cut in a corner or at the edge, the repair is even easier. The damaged part of the canvas is removed, the film is heated again and stretched to the desired size. This method allows you to leave no traces of cuts and repairs to the stretch ceiling.
Expert advice: If the stretch ceiling is significantly damaged or cut, do-it-yourself repairs are strongly not recommended. Any intervention by a non-professional will lead to an aggravation of the situation.
How to fix a cut on a stretch ceiling if its duration is up to 10 centimeters?
When this happened, it is impossible to repair stretch ceilings after a cut with your own hands.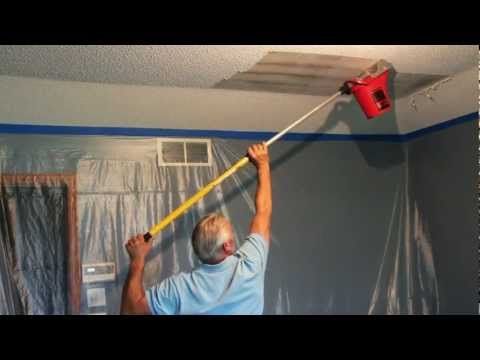 Experts can provide effective assistance, for example, using the holes in which an auxiliary lamp or a false ventilation grill is installed. A functional or decorative element will help hide the stretch ceiling cut, but only professionals can install it, as amateur manipulations with the canvas will damage it even more.
How to eliminate a cut on a stretch ceiling if its size exceeds 10 centimeters?
If it is not possible to repair the stretch ceiling after a cut due to the extent of the damage, the sheet must be replaced. For the repair of stretch ceilings after a cut, the price will be less than the installation of a new design, since specialists change only the damaged film, replacement of fasteners is not required.
Stretch ceiling cut: who to contact?
As a rule, repair of stretch ceilings after a cut or tear is carried out by companies specializing in the manufacture and installation of these products. In St. Petersburg, the Nevado company provides a professional repair service for PVC ceilings.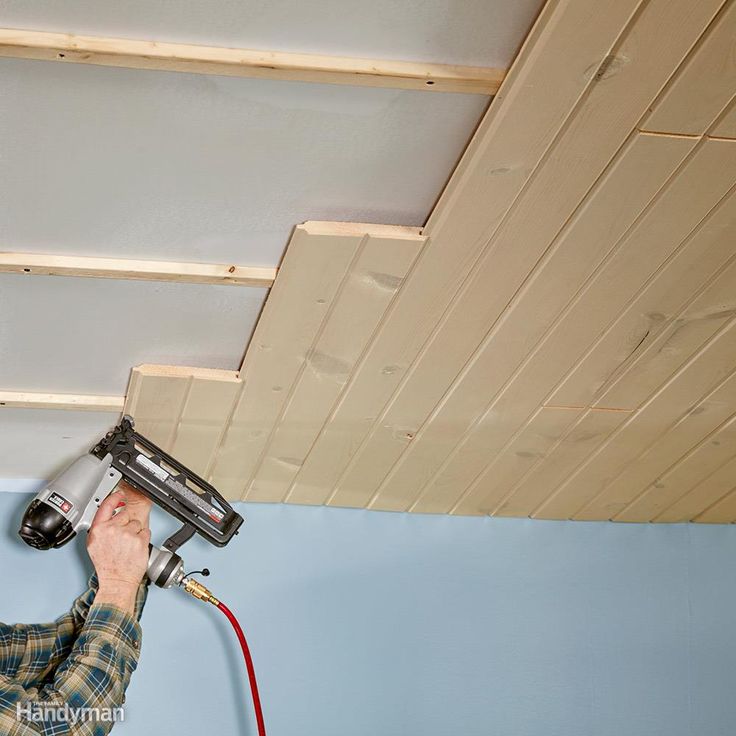 A team of specialists is ready to go to your address after filling out an application by phone or on the website. The price for repairing a stretch ceiling depends on the degree of damage to the canvas and the method of its restoration, which is optimal for a particular situation.
Our masters do not recommend self-restoration of the integrity of the film, if you do not have the necessary skills. The only thing that the owner of the premises can do when a stretch ceiling is cut is to fix the edges of the gap with adhesive tape and call professionals for help. In this case, material losses will be minimal.
Excellent! You have scrolled to the end :)
Excellent! You have scrolled to the end :)
Certificate
9 is now available to you0002 for 3,000 rublesHow to wash the ceiling| Stretch and painted ceilings
How to wash the ceiling?
The ceiling needs the same careful and regular care as the floor, furniture or plumbing. Consider the methods of washing various ceiling coverings.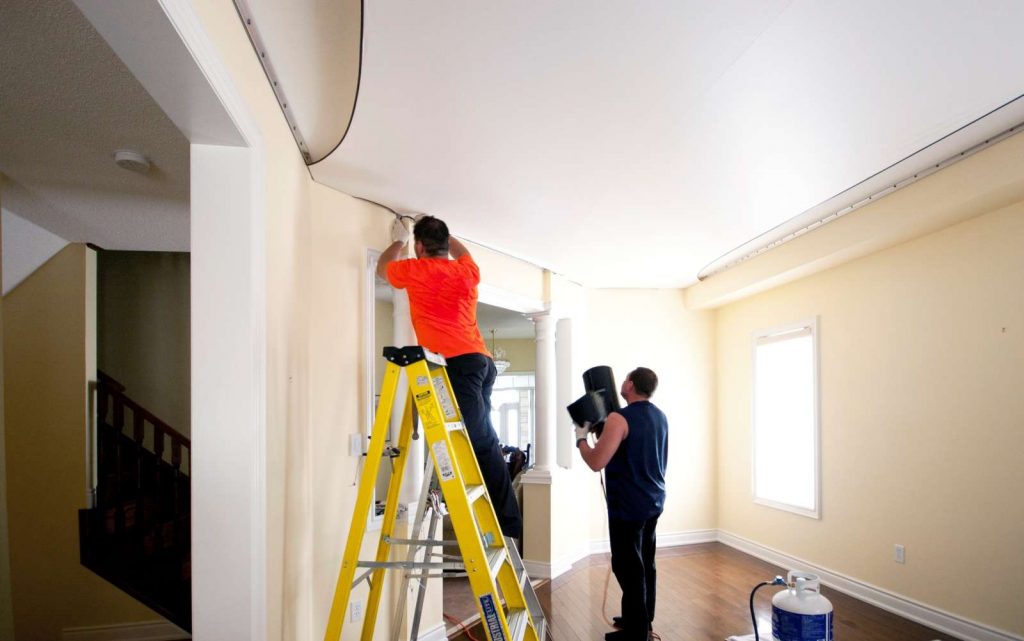
Cleaning the ceiling is not as easy as it might seem at first glance. As a rule, this is an open surface of a light tone - any bumps, stains, stains of dirt that cannot be covered with a sofa or a picture are visible on it. Washing the ceiling requires some skill: dirt and excess detergents flow down to the floor and furniture.
When washing stretch ceilings, refrain from using hard brushes and abrasive cleaners, as they can scratch the surface
How to clean painted, suspended and other types of ceilings?
Whatever type of ceiling you are cleaning, find a cleaner and test it on an inconspicuous area.
Today, whitewash is used extremely rarely: it is replaced with ordinary white oil paint. This type of coating is less environmentally friendly, but paint and enamel (unlike chalk) are not afraid of wet cleaning. Arm yourself with a rag, sponge or ordinary floor mop - and boldly wash the painted ceilings with water, adding liquid cleaners.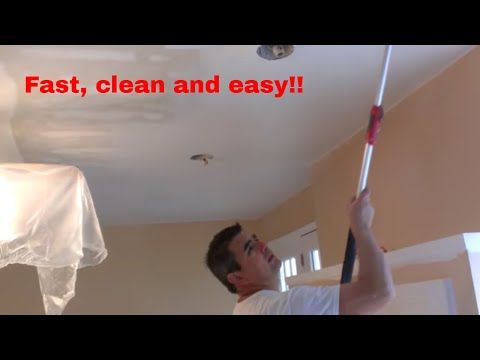 Then wipe the surface and leave to dry.
Mini-survey
What distinguishing feature do you understand that the surface in the kitchen or bathroom is thoroughly disinfected?
On a pleasant smell from the surface of
0%
, shine on the surface of
0%
in a characteristic sound during friction with a finger on a surface of
0%
by the absence of spots on the surface
0%
0 Voice (-s)
An alternative to oil paints - water-based compositions based on polyvinyl acetate. Such coatings cannot be washed: water dilutes the composition of the coating, and streaks and stains form. Surfaces that are covered with water-based paint are recommended to be cleaned with a vacuum cleaner or use special wet wipes.
The ceiling is also lined with polystyrene tiles. Such a surface can be washed, provided that the tile has a protective film.
How to organize the washing of stretch ceilings? They can be cleaned much less often: they accumulate less dust and dirt than other types of coatings.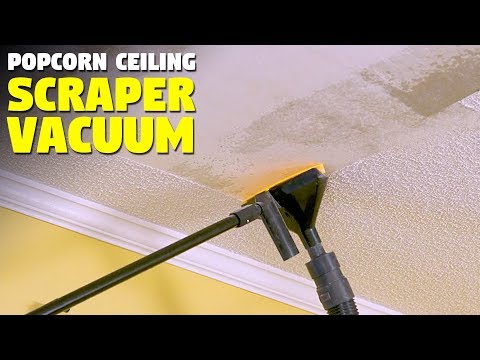 But even they need to be washed at least once a year.
How to clean stretch ceilings
Use all-purpose or special ceiling cleaners, diluted in warm water. The water temperature should not exceed 30-40°C!
-
Apply the solution with a sprayer or saturate a piece of flannel with it. You can also use special microfiber cloths or polishes for stretch ceilings.
-
Wash the surface with light strokes in the direction of the fabric seam. After cleaning, wipe the stretch ceiling with a dry soft cloth.
-
Do not use mops, hard brushes or abrasive cleaners as they may damage the surface.
To wash glossy stretch ceilings, it is better to use cleaning products that contain alcohol: they will not leave streaks on the surface.
-
Oil paint is not the most environmentally friendly type of coating, but such ceilings are unpretentious in maintenance. They can be washed with water and detergent, armed with a rag, sponge or mop
-
Water-based paint ceilings do not tolerate wet cleaning.