How to refinish wood kitchen cabinets
How to Refinish Cabinets and Give Your Kitchen a New Look — Bob Vila
Photo: istockphoto.com
Refinishing cabinets is one of the best ways to give your old, ho-hum kitchen a fresh new look, and it can make a big difference in the way you feel about a space. After all, having expensive cabinets hanging on your kitchen walls doesn’t mean much if you don’t like the color. That’s why many homeowners think about refinishing cabinets with a stain color of their own choosing. It is a big job, but there’s an even bigger payoff.
Before you begin refinishing your cabinets, however, it’s best to do a little detective work. You need to know what materials you’re working with to see if the job is even possible. But, with that research and a lesson on how to refinish cabinets, it’s possible to give a kitchen a serious upgrade.
Safety Considerations for Refinishing Kitchen Cabinets
Before we go too far, it’s important to consider the safety and environmental concerns involved with kitchen cabinet refinishing. You’ll probably need to employ harsh chemicals and create a lot of airborne particulates, so safety does matter.
First, make sure to refinish the cabinets in a well-ventilated area. If the cabinets aren’t mobile, open windows and use a box fan to keep air moving. Next, be sure to wear a respirator when working with chemicals or sanding to avoid inhaling harmful substances. Finally, avoid damaged or stained skin by donning a pair of chemical resistant gloves.
Finally, remember that some chemicals used in kitchen cabinet refinishing (particularly during stripping or staining) are flammable, so be sure to play it safe around any heaters, open flames, or anything of the sort. Oily rags can also combust if left in a pile, so hang them to dry before throwing them out.
Advertisement
RELATED: The Best Under Cabinet Lighting of 2021
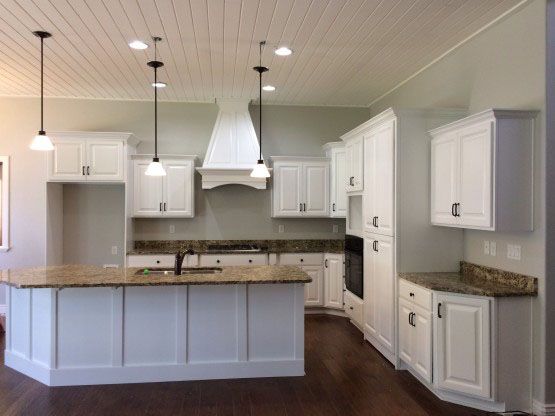
Method 1: Refinishing Cabinets to Make Them Lighter
Photo: istockphoto.com
Refinishing darker cabinets to make them lighter is probably the most involved method of refinishing, and it takes some specific knowledge, tools, and materials. With the following list and steps in mind, you should be able to remove the finish, paint, and stain from wood-based cabinets to bring them to a lighter finish.
– Sandpaper
– Paint stripper
– Chlorine bleach (if necessary)
– Wood filler
– Wood sealer
– Denatured alcohol
– Stain
– Varnish
– Respirator
– Rubber gloves
– Sanding block
– Scraper
– Putty knife
– Orbital sander
– Rags
– Paintbrush
– Steel wool
– Tack cloth
STEP 1 : Remove the cabinet doors.
Before embarking, remove one of the doors and sand off a small area of the finish on the back. Do the same to an area at the back of a rail or stile (horizontal or vertical framing member).
If the doors and drawer fronts are made of hardwood, remove them and take off all the hardware.
Note: If the doors and drawer fronts are fiberboard, forget about refinishing them with stain. The only way you’re going to get the cherry, oak, or birch tones you love so much is by applying a veneer or buying all new doors and drawer fronts.
STEP 2 : Strip the old finish from the cabinets.
In a well-ventilated room (or outdoors), use a paint stripper to remove the existing finish. Removing a clear coat finish should be a lot easier than removing paint, but you may have to use an aggressive stripper or chlorine bleach to remove the old stain. The job is messy and potentially unhealthy, but if you’re careful, it’s better than blowing thousands of dollars on new cabinets.
Note: Removing paint from cabinets, or any wood furniture, requires patience. Not all of the paint lifts off after the first application of remover, and maybe not after the second or third, either. It’s imperative to work in a ventilated space, to wear a respirator, to wear protective gloves and a long-sleeve work shirt.
Advertisement
Use a sharp scraper to remove as much finish as possible and use whatever you have on hand (old spoons, dental tools, etc.) to scrape contours and crevices.
STEP 3 : Fill damaged wood with wood filler, then proceed with sanding the cabinets.
Fill dents and deep scratches with wood filler, then sand thoroughly until all finish is removed and the wood is super smooth with no scratches.
Make your first pass with an orbital sander using 100-grit paper, your second with 180-grit paper, and your last pass with 220-grit.
STEP 4 : Apply a sealer.
Before applying it, thin out the sealer to a 50-50 concentration with denatured alcohol.
Apply the sealer (this is sometimes called a wood conditioner). A sealer does just what it says: It seals the surface with a light, thin coating so that when you apply stain, the color goes on evenly. Zinsser’s Bull’s Eye Seal Coat, an alcohol-based sealer that’s easy to apply and dries fast, is a good option.
When the sealer dries, lightly rub with 000 steel wool, then clean the surface thoroughly with a tack cloth.
STEP 5 : Apply the stain.
Apply stain using a soft cotton rag, a brush, or a brush in combination with a rag. Experiment until you find a combination that allows you to apply a consistent tone.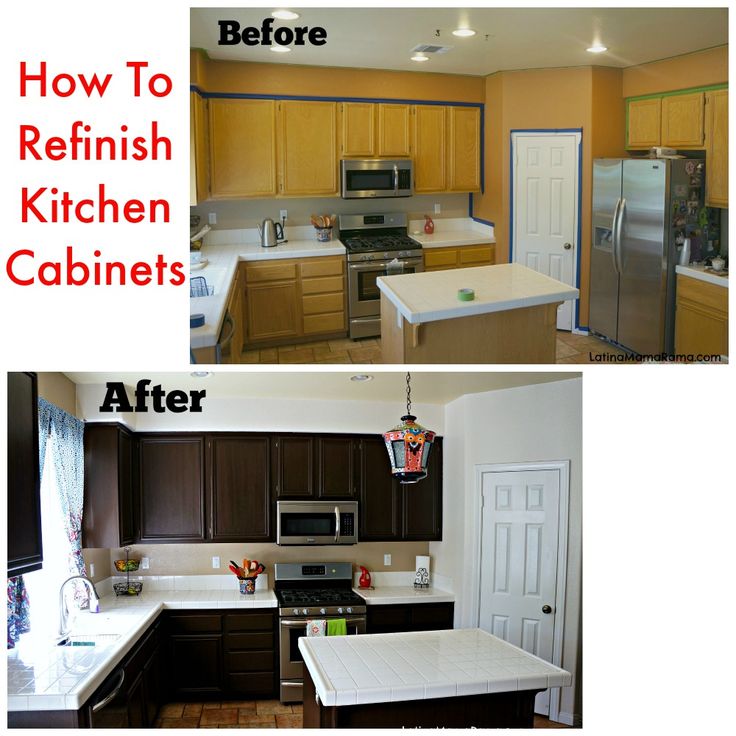
If the stain is going on too dark, rub some it off. Too light? Don’t worry. You can apply another coat after the first one dries.
Once the stain dries, follow up with another very light rubbing with 000 or 0000 steel wool before cleaning with tack cloth.
Note: It’s always wise to experiment on the backside of a single door before committing to the project, just to be sure you’re going to be pleased with the results.
Advertisement
STEP 6 : Add a protective varnish to the cabinets.
Now you can apply a protective coat of clear polyurethane varnish. Applying any clear coat must be done in a dust-free environment.
Read the directions on the can and follow them, but when it comes to thinning, you may need to deviate from the product literature. Most makers say you won’t have to, and maybe that is the case under perfect conditions, but I find that it’s usually necessary to pour in a little mineral spirits to keep the polyurethane flowing smoothly and drying without brush marks.
RELATED: These Cabinet Customizations Are Totally Worth It, According to Pro Organizers
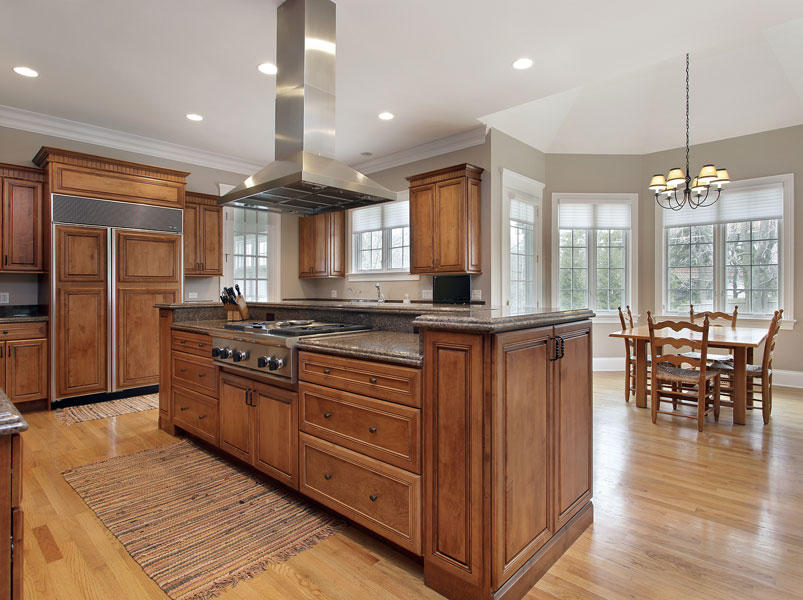
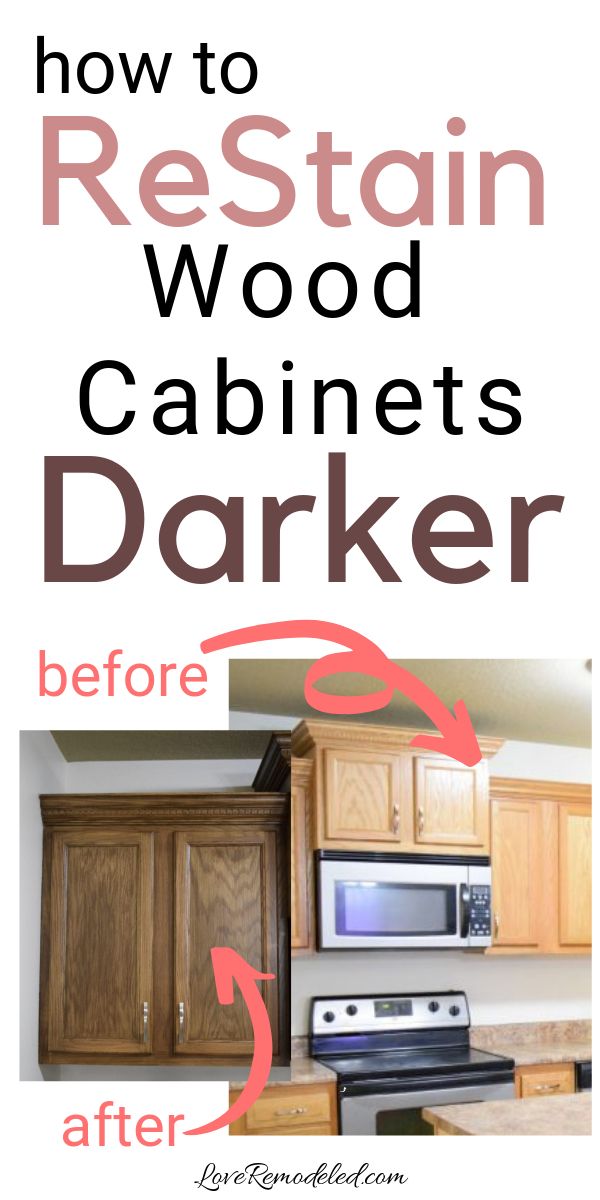
Method 2: Refinishing Kitchen Cabinets to Make Them Darker
Photo: istockphoto.com
If you want darker-toned cabinets than what you currently have, you may be able to simply tint the existing finish. This method of refinishing kitchen cabinets, or cabinetry in any space, is much easier to accomplish than others that require stripping and sanding, but there are still a few ins and outs that you need to know.
SUPPLIES– Respirator
– Rubber gloves
– Trisodium Phosphate (TSP)
– Water
– Sandpaper
– Tack cloth
– Tinted polyurethane varnish
– Paintbrush
– Polyurethane finish
STEP 1 : Remove and wash doors and drawer fronts.
After removing the doors, drawers and hardware; begin by thoroughly washing grease and wax off the cabinets with TSP and water.
STEP 2 : Sand and dust the cabinets.
Lightly sand and wipe off the dust with a tack cloth.
STEP 3 : Apply a tinted polyurethane.
Experiment with a tinted polyurethane varnish (such as Polyshades by Minwax) to see if you can achieve the tone desired. Tinted polyurethanes combine stain and varnish in a single product.
Note: It’s always wise to experiment on the back side of a single door before committing to the project, just to be sure you’re going to be pleased with the results.
Advertisement
RELATED: How to Stain Cabinets
Method 3: Repainting Kitchen Cabinets
Photo: istockphoto.com
While it might make the biggest impact, repainting kitchen cabinets is actually quite a bit easier than restaining them. And, since you’re applying a whole new coat, the color possibilities are endless.
SUPPLIES– Respirator
– 220-Grit sandpaper
– Foam sanding block
– Tack cloth
– Degreaser
– Primer
– Paintbrush
– Paint roller and tray
– Enamel cabinet and trim paint
STEP 1: Remove the cabinet doors and hardware.

Start by removing the doors, door knobs, drawer fronts, drawer pulls, and other hardware from the cabinets. For very large kitchens, it’s a good idea to number the cabinet doors and drawer fronts to ensure you know where to put them back.
STEP 2: Lightly scuff the cabinets’ surfaces.
Cabinets are typically smooth and covered with a bit of polyurethane. While primer can adhere to this surface, it’s better to scuff it up a bit first. Put on a respirator and use the 220-grit sandpaper and foam sanding block to lightly scuff the surface of the boxes, face frames, drawer fronts, and doors. The foam sanding block should be able to get into intricate door profiles.
Keep in mind that your goal isn’t to sand down to bare wood. Instead, you simply want to roughen the surface of the existing finish to give the primer something to hold on to.
RELATED: The Best Primers for Kitchen Cabinet Transformations
STEP 3: Clean the cabinet surfaces.
After scuffing, remove the dust from the cabinets with a tack cloth. Take your time with this step as any dust that stays behind is going to create a rough texture on the cabinet.
While you’re sanding, you’re inadvertently transferring oils from your fingers to the cabinets. Also, cabinets see a lot of cooking oil, as well, and neither substance is conducive to a great paint job. The answer to this conundrum is to use the degreaser to clean the entire surface of the boxes and doors. Once clean, the surface is ready for primer.
Advertisement
RELATED: The Best Paint for Kitchen Cabinets
STEP 4: Prime the cabinets.
After pouring primer into the paint tray, use the paintbrush and roller to coat the boxes, face frames, doors, and drawer fronts with primer. Be sure to brush the primer into any cracks or corners, especially along the door profiles. This finish might look a bit streaky, but you should only need one coat of primer before moving to paint. Pour the excess primer back into the can and clean the brush and paint tray while allowing the primer to dry.
STEP 5: Paint the cabinets.
Once the primer dries, it’s time to paint the cabinets. Put a new roller cover on your paint roller and pour some paint into the paint tray. Use the brush and roller to coat the doors, face frames, drawer fronts, and boxes with an enamel paint made specifically for cabinets and trim for the best results. After allowing the first coat to dry, apply a second coat of paint. Once dry, put all the doors, drawer fronts, and hardware back on and enjoy the fresh, new, updated look in your kitchen.
RELATED: The 14 Freshest Kitchen Cabinet Colors
Final ThoughtsPhoto: istockphoto.com
With this primer on how to refurbish kitchen cabinets, you have the knowledge necessary to give those boring or ugly wood boxes and doors a facelift. Whether sanding down to bare wood and restaining kitchen cabinets, using a tinted varnish to darken the color, or painting your cabinets, be sure to wear the proper safety gear while you tackle this big-impact project.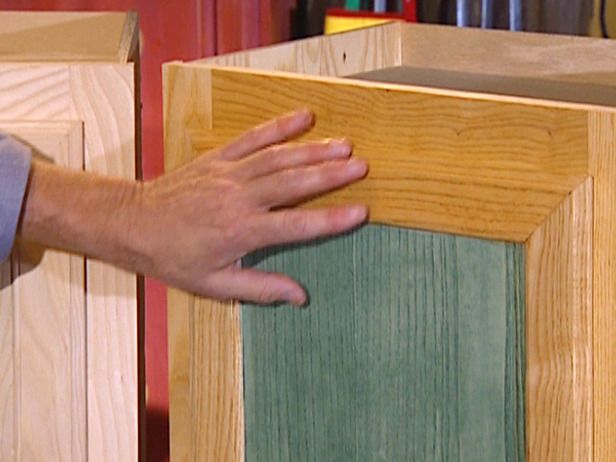
That might feel like a lot of information about the refinishing kitchen cabinets, and it’s hard to cover everything in one coat. If you still have questions about restaining cabinets or simply refurbishing old kitchen cabinets, this section is for you.
Advertisement
Q: What is the average cost to refinish cabinets?Generally speaking, the cost of refinishing kitchen cabinets (with labor) will run between about $1,800 and $4,000, depending on the size of the kitchen. You can save up to 75 percent of that cost if you tackle the project yourself.
Q: Is it worth it to refinish kitchen cabinets?It is absolutely worth refinishing kitchen cabinets. If your boxes and doors are still in good shape, a fresh coat of stain or paint can breathe new life into an old space and save you up to $20,000.
Q: Is it cheaper to reface or refinish cabinets?Generally speaking, refinishing cabinets is less expensive than refacing kitchen cabinets. Cabinet refacing costs, on average, $7,132.
Usually, discoloration is caused by old stain that’s deeply embedded in the wood. Liquid strippers and sanding might not even be an option, so it’s best to go with a darker stain or paint that will hide the blotchiness.
Refinishing your cabinets?
Get free, no-commitment project estimates from pros near you.
Find Pros Now
+for a fresh new look |
(Image credit: Alamy)
Refinishing existing cabinets is the perfect solution when you want a new kitchen but don’t have the energy, time or money to invest in ripping the old one out and starting again.
‘Rather than replacing with new, refinishing your kitchen cabinets not only saves money but it’s also a more eco-friendly and sustainable solution,’ says Lucy Searle, Global Editor in Chief for Homes & Gardens. ‘Painting kitchen cabinets is a great option for wooden or painted kitchen furniture, for example, and it can easily be done over a weekend.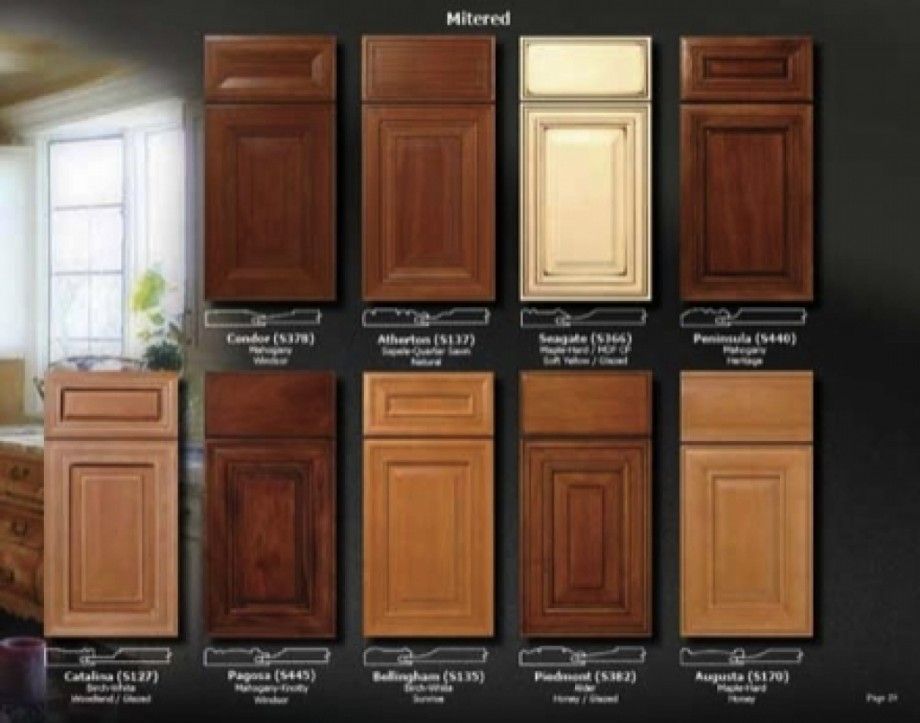 All in all, refinishing is a great way to update kitchen cabinets without replacing them.'
‘Before you even begin this process, the cabinets need to be super clean,’ advises Looeeze Grossman, founder of The Used Kitchen Company . ‘Wipe them down with a good multi-purpose cleaner or dish soap and water, which also works really well. Follow with a sugar soap formation to remove any residue. Once this is done you need to lightly sand the cupboards down. Use a low-grade sandpaper and go gently over the surface. Fill in any chips with wood filler.’
Below, we take you through the process of refinishing kitchen cabinets, step-by-step.
How to refinish kitchen cabinets
As well as painting or staining kitchen cabinets, there is the option to varnish them to refinish the surfaces. It will give the room a makeover without the need to remove kitchen cabinets that are tired or damaged and install kitchen cabinets you’ve selected to replace them.
‘After sanding, I’d always choose a non-toxic finish to varnish the cabinets,’ adds Looeeze. ‘It’s more sustainable and less harmful to your household members and pets. I use an extra-wide paint brush to stain the facia of the cabinet, using a waterproof finish.'
Here's how to refinish kitchen cabinets, whatever the existing finish, with advice from experts.
1. Protect the area
Before you start, make sure the kitchen is well protected. This means laying down plastic sheeting, building paper (which is more eco-friendly) or canvas cloths on the floor as well as over the countertops, appliances, table and chairs and any other items within the space. This will protect them from dust and sanding during your refinishing process.
Next, you want to remove the doors and drawers from your cabinets. Remember to label or number them so you know which door or drawer goes where once you’re finished. Now you need to plastic and tape off the insides of the cabinets to protect from dust and don’t forget to cover up backsplashes too.
2. Prepare the surfaces
Preparation is key, and the results will depend on how much care and attention you give during the preparation process. ‘To refinish wooden kitchen cabinets, first remove the doors, handles and hinges,’ says Ryan McDonough, interior design expert at My Job Quote . ‘Clean all surfaces with sugar soap to remove stubborn grease and dirt. Lightly sand with a fine grit paper and work with the grain rather than against. Hand sanding is best for working around detail such as bevelling on cupboard doors and decorative trim.’
Cleaning the doors and drawers takes a lot of hard work. You can scrub and wash them down with synthetic steel wool and soap and water and for tough greasy stains, use TSP (available at Amazon) and water. Leave everything to dry once you’re done.
3. Clean hardware
As well as the cabinet doors and drawers, it’s a good idea to clean handles and hinges too. Place in a large bowl of soapy hot water for around 30 minutes and scrub gently to remove any grease and residue. Rinse with clean water and dry. If needed, you can always give them a polish.
3. Strip the cabinets
Make sure you open all windows and doors to ventilate the room. Even better if you can take the cabinet doors and drawers outside. Next, you need to check what finish is already on the timber as this will determine which stripper agent is needed. In most cases, a varnish remover will do the job. After you’ve stripped the finish, you can repair any holes or scratches in the wood.
If yours is a painted kitchen, it may not be made from timber. If this is the case, skip this step and move on to sanding.
4. Sand kitchen cabinets
Next, either hand sand with sandpaper or use a sanding sponge to scuff the existing finish and provide an adhesive surface. Ideally you should use a low-grade 100 or 15-grit sandpaper.
A hand-held vacuum dust buster is ideal for clearing up the dust afterwards, though it is also worth wiping down the sanded surfaces with a slightly damp microfiber cloth to remove all traces of dust. Allow to dry before moving on.
5. Refinish in your chosen varnish, wax or paint
Finally, you can apply your chosen finish. For wood kitchen cabinets, you might use a product that brings out the natural beauty of the wood, such as Restor-A-Finish or Feed-N-Wax (both at Amazon). You can find tips for painting kitchen cabinets in our separate guide, including the best paint finishes to choose.
Once you’re done and it’s all dry, replace the handles – or install kitchen cabinet handles in a different material or style – and fix the doors and drawers back into place.
How can I refinish cabinets without sanding?
To refinish cabinets without sanding, simply use some mineral spirits and a rough sponge to clean and gently scuff up the area.
What is the difference between refinishing and refacing?
Refinishing kitchen cabinets involves changing the finish or color of the existing material whereas refacing kitchen cabinets means placing a new material on top.
Hayley is an interiors journalist, content provider and copywriter with 26 years experience who has contributed to a wide range of consumer magazines, trade titles, newspapers, blogs and online content. Specialising in kitchens and bathrooms, she has twice won the CEDIA Award for Best Technology feature. Hayley writes for H&G about kitchens, bathrooms, cleaning, DIY and organizing.
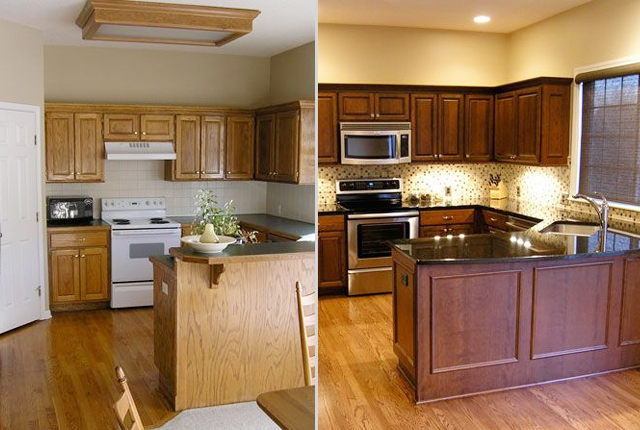
what you need to know, "before" and "after" photos
Due to its refined and noble appearance, compatibility with all colors and interior styles, wood has always been and will be the best material for furniture, and its only drawback is its relatively high price. Restoration of kitchen facades made of solid wood is what sooner or later awaits every owner of this eco-friendly and stylish material.
In this article, you will learn how to avoid the need to restore a headset you just purchased, what to do if it is inevitable, and also see a selection of photos on the topic “Before” and “After”.
The service life of every material, even the highest quality and professionally processed, depends on the optimal conditions of its use. In the case of wooden furniture, important factors are:
- temperature conditions - the best range will be from +15 to +25 degrees; nine0012
- Required humidity level - 70 to 75%
- regular ventilation of the premises;
- exposure to direct sunlight - wood coatings can lose their brightness from ultraviolet radiation, so all surfaces exposed to such a threat must be covered with a special varnish with a UV filter;
- proper care - it is not recommended to use large amounts of water, it is better to wipe the surfaces with a damp, soapy solution (or better - in a special wood cleaner) soft and well-wrung cloth or sponge, and then wipe them dry; Aggressive detergents or abrasive, hard brushes or napkins that scratch the coating can also pose a danger.
 nine0012
Compliance with these conditions will help your headset to keep its original appearance for as long as possible.
But what if your kitchen furniture needs to be restored? Scratches, indelible stains, the consequences of mechanical damage - no one is immune from this.
In this case, you can:
- replace the facades;
- seek help from specialists;
- take on the restoration yourself.
Unlike facades made of plastic or other modern artificial materials, repairing kitchen furniture made of natural wood is possible and quite simple, and as a result, your set will look even better than new. It all depends on the type and extent of damage, as well as the protective coating and shape of your facades.
Restoration of straight facades
Let's start with furniture of the simplest form. First of all, remove all facades in order to work on horizontal surfaces. Do not forget to mark the location of each element (for example, on the inside of the facade) - this will simplify their installation later. Handles and hinges from the facades must be removed, if desired, also noted. nine0003
Whatever damage you encounter, trust me, in most cases you can fix it yourself.
Restoration of raw, i.e. Unpainted or enameled kitchen fronts made of solid wood in case of stains or shallow cracks, it consists in varnishing, painting or covering with self-adhesive vinyl film. But before that, all removed facades must be washed and dried well.
For varnishing you need:
- in case of cracks - first putty the surfaces with a special compound for wood, and then proceed to sanding and all subsequent points; nine0012
- to eliminate stains, it is necessary to grind the surfaces with coarse or medium-grained, and then with fine-grained sandpaper;
- degrease the surfaces and apply a transparent primer or stain to them to protect the wood, let it dry;
- we varnish the facade in 2-3 layers, with each layer reducing the amount of the tinting component and leaving the last layer transparent;
- after the varnish has dried, enjoy your work and put everything in its place.
 nine0021
 - you should not buy the most budget version of the film - it may not last long; nine0012
- take a little more material than you think you will need, because re-sticking of the film is impossible, and if you are not a professional adhesive, you may need to get your hands on.
- Materials needed
- Preparatory work
- Stain impregnation
- Since the kitchen is a place of high humidity, before painting, you will also need an impregnation for wood - an antiseptic.
- You will also need wood putty to repair cracks and patch holes. nine0012
- A small flat paint brush is needed to apply the paint.
- To prepare the surface for painting, you will need abrasive materials: a bar with fine sandpaper and felt.
You can drastically change the look of your kitchen by painting the fronts in a bright or any other color. The course of action during painting is similar: degreasing → grinding → re-degreasing → staining → painting. In this case, you can use stencils and apply a pattern to some or all of the planes.
If the wood on the facade is swollen, it must first be leveled, i.e. jointing - manually or on a machine. If the cabinets have become wider from excess moisture and do not close, you can trim them by cutting off the excess. In the case when the tree, on the contrary, has dried up and a gap has appeared, you can glue the overlay or plank, first leveling the surface. nine0003
If stained or enamelled wood requires restoration, this coating must be removed first, either chemically (thinner) or mechanically (sandpaper). After that, you can resort to the above options or update your headset with a self-adhesive film. The variety of textures and colors makes this material quite popular in the restoration of kitchen facades.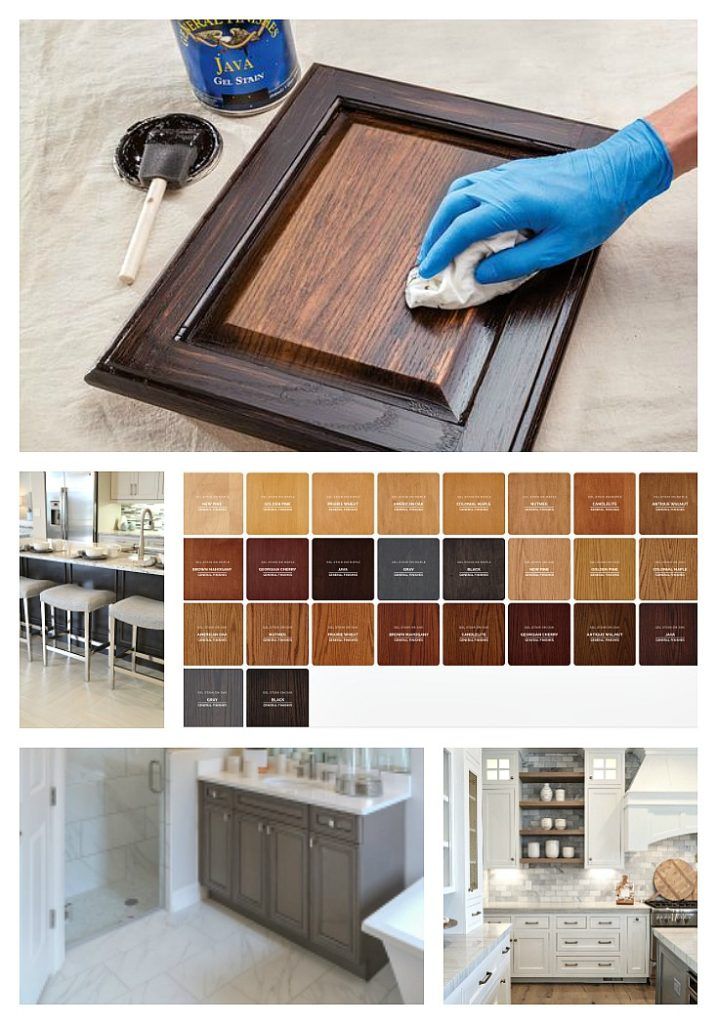
But we must warn you about the following:
Restoration of paneled facades
This type of facade consists of a framing - a frame or a groove, a panel - a convex middle part and lintels that are located between them. Cracks and stains on paneled facades are eliminated in the same way as on straight ones. But there are also some features. nine0003
Due to the decrease in humidity in the apartment, the panel can shrink in width, breaking the varnish layer, which is why light streaks become visible between it and the trim. This is especially noticeable on dark-colored furniture. The way out of the situation can be varnishing or painting using a thin brush.
Important: the panel tends to dry out in winter, when we all turn on the heating, and get back into place in the summer, with more suitable humidity. If everything happens this way for you, then perhaps you should not rush with the restoration, but is it better to purchase an air humidifier? nine0003
From excess moisture, the panel swells and can tear the strapping - then it can be trimmed to the required size (joint or cleaned), dismantling the entire structure.
There is another option - replacing the infill. Instead, you can insert glass, stained glass, rattan mesh, bamboo canvas - yes, anything, thereby bringing novelty or exoticism to your interior. Since one different detail can lead to dissonance in the interior, consider symmetrical arrangement of several new panels. nine0003
We hope that everything we have written will benefit you and we wish you to discover the talented restorer in yourself!
DIY kitchen set restoration
If you have old wooden furniture, don't rush to throw it away! After all, it can be restored, and the furniture will look like new! It is not for nothing that wood is considered the best material for cabinet furniture, it is not MDF or chipboard, which consists of sawdust. In this material, we will make furniture repairs with our own hands using the example of kitchen restoration. nine0003
Contents
Materials needed
Preparatory work
Our experiments started with the lower cabinets of the kitchen unit. The whole process of work took several days.
In the photo you can see that we removed the uncomfortable handles from the doors beforehand, otherwise they would get in the way. In addition, their functionality is minimal, because the door can be easily opened by the ledge. nine0045
We sealed the holes from the fittings with a special wood filler, waited until it dries, and applied another layer on top. It is better to process large holes several times so that later cracks do not appear.
If a tinted impregnation is used, it is better to choose the color of the putty for it. If it is light, furniture should be painted in two layers (at least in places of putty). We used glossy impregnation, a liter jar was enough for the entire set.
It is important to thoroughly wash the surface before work: grease accumulates on it, which will reduce adhesion. Before applying the impregnation, the glossy surface is slightly sanded with a bar with fine sandpaper. nine0003
All unnecessary parts are removed: drawers are pulled out, doors are unscrewed from the hinges. All places are cleaned of dust, dirt and treated with sandpaper.
Impregnation with stain
First, apply the first layer of impregnation. It practically does not darken the tree, but covers it with a shiny crust. After the first layer dries (drying time is written in the instructions on the bank), you can apply the next one. Some stains darken after drying.
Do-it-yourself furniture painting is quite simple, but drips and smudges should be avoided. To do this, you can use the following method: after application, walk with a brush along the entire length, without separation. nine0045
Important! In photo number 1, after the first application, the paint lays down in a thick layer. At first, the color seems saturated dark, but then it flows down, leaving stains. It must be applied as thinly as possible.
First you need to walk along the grain of the wood over the entire area. Then, to remove brush marks, do it again with long strokes.
We recommend watching the process of painting wood on the video:
Next, we look at the color obtained after drying, if necessary, repeat these steps until we achieve the desired shade.