How to restain kitchen cabinet
How to Refinish Cabinets and Give Your Kitchen a New Look — Bob Vila
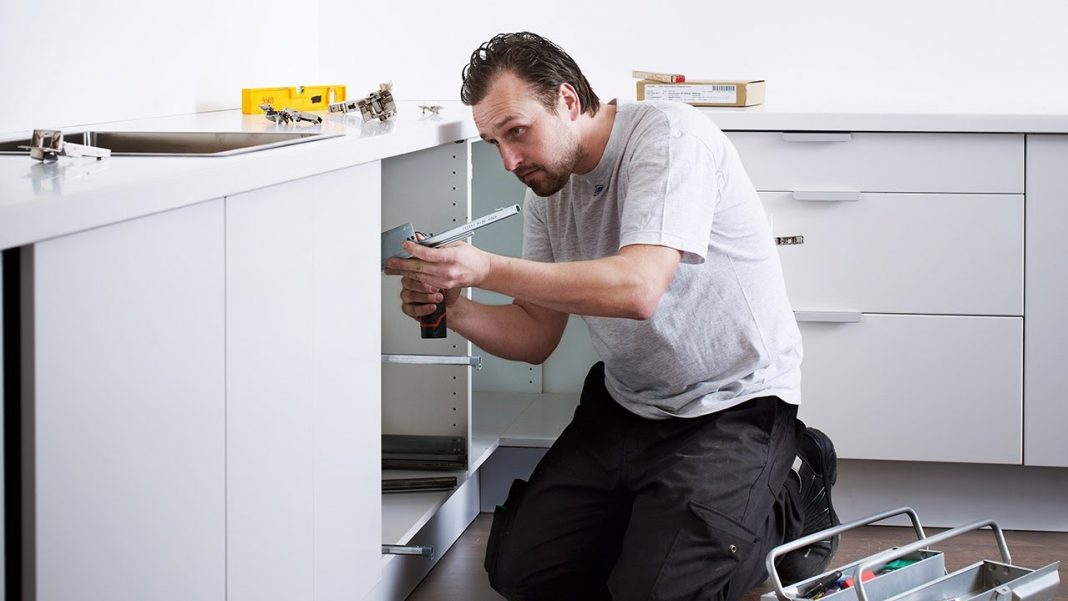
Photo: istockphoto.com
Refinishing cabinets is one of the best ways to give your old, ho-hum kitchen a fresh new look, and it can make a big difference in the way you feel about a space. After all, having expensive cabinets hanging on your kitchen walls doesn’t mean much if you don’t like the color. That’s why many homeowners think about refinishing cabinets with a stain color of their own choosing. It is a big job, but there’s an even bigger payoff.
Before you begin refinishing your cabinets, however, it’s best to do a little detective work. You need to know what materials you’re working with to see if the job is even possible. But, with that research and a lesson on how to refinish cabinets, it’s possible to give a kitchen a serious upgrade.
Safety Considerations for Refinishing Kitchen Cabinets
Before we go too far, it’s important to consider the safety and environmental concerns involved with kitchen cabinet refinishing. You’ll probably need to employ harsh chemicals and create a lot of airborne particulates, so safety does matter.
First, make sure to refinish the cabinets in a well-ventilated area. If the cabinets aren’t mobile, open windows and use a box fan to keep air moving. Next, be sure to wear a respirator when working with chemicals or sanding to avoid inhaling harmful substances. Finally, avoid damaged or stained skin by donning a pair of chemical resistant gloves.
Finally, remember that some chemicals used in kitchen cabinet refinishing (particularly during stripping or staining) are flammable, so be sure to play it safe around any heaters, open flames, or anything of the sort. Oily rags can also combust if left in a pile, so hang them to dry before throwing them out.
Advertisement
RELATED: The Best Under Cabinet Lighting of 2021
Method 1: Refinishing Cabinets to Make Them Lighter
Photo: istockphoto.com
Refinishing darker cabinets to make them lighter is probably the most involved method of refinishing, and it takes some specific knowledge, tools, and materials. With the following list and steps in mind, you should be able to remove the finish, paint, and stain from wood-based cabinets to bring them to a lighter finish.
– Sandpaper
– Paint stripper
– Chlorine bleach (if necessary)
– Wood filler
– Wood sealer
– Denatured alcohol
– Stain
– Varnish
– Respirator
– Rubber gloves
– Sanding block
– Scraper
– Putty knife
– Orbital sander
– Rags
– Paintbrush
– Steel wool
– Tack cloth
STEP 1 : Remove the cabinet doors.
Before embarking, remove one of the doors and sand off a small area of the finish on the back. Do the same to an area at the back of a rail or stile (horizontal or vertical framing member).
If the doors and drawer fronts are made of hardwood, remove them and take off all the hardware.
Note: If the doors and drawer fronts are fiberboard, forget about refinishing them with stain. The only way you’re going to get the cherry, oak, or birch tones you love so much is by applying a veneer or buying all new doors and drawer fronts.
STEP 2 : Strip the old finish from the cabinets.
In a well-ventilated room (or outdoors), use a paint stripper to remove the existing finish. Removing a clear coat finish should be a lot easier than removing paint, but you may have to use an aggressive stripper or chlorine bleach to remove the old stain. The job is messy and potentially unhealthy, but if you’re careful, it’s better than blowing thousands of dollars on new cabinets.
Note: Removing paint from cabinets, or any wood furniture, requires patience. Not all of the paint lifts off after the first application of remover, and maybe not after the second or third, either. It’s imperative to work in a ventilated space, to wear a respirator, to wear protective gloves and a long-sleeve work shirt.
Advertisement
Use a sharp scraper to remove as much finish as possible and use whatever you have on hand (old spoons, dental tools, etc.) to scrape contours and crevices.
STEP 3 : Fill damaged wood with wood filler, then proceed with sanding the cabinets.

Fill dents and deep scratches with wood filler, then sand thoroughly until all finish is removed and the wood is super smooth with no scratches.
Make your first pass with an orbital sander using 100-grit paper, your second with 180-grit paper, and your last pass with 220-grit.
STEP 4 : Apply a sealer.
Before applying it, thin out the sealer to a 50-50 concentration with denatured alcohol.
Apply the sealer (this is sometimes called a wood conditioner). A sealer does just what it says: It seals the surface with a light, thin coating so that when you apply stain, the color goes on evenly. Zinsser’s Bull’s Eye Seal Coat, an alcohol-based sealer that’s easy to apply and dries fast, is a good option.
When the sealer dries, lightly rub with 000 steel wool, then clean the surface thoroughly with a tack cloth.
STEP 5 : Apply the stain.
Apply stain using a soft cotton rag, a brush, or a brush in combination with a rag. Experiment until you find a combination that allows you to apply a consistent tone.
If the stain is going on too dark, rub some it off. Too light? Don’t worry. You can apply another coat after the first one dries.
Once the stain dries, follow up with another very light rubbing with 000 or 0000 steel wool before cleaning with tack cloth.
Note: It’s always wise to experiment on the backside of a single door before committing to the project, just to be sure you’re going to be pleased with the results.
Advertisement
STEP 6 : Add a protective varnish to the cabinets.
Now you can apply a protective coat of clear polyurethane varnish. Applying any clear coat must be done in a dust-free environment.
Read the directions on the can and follow them, but when it comes to thinning, you may need to deviate from the product literature. Most makers say you won’t have to, and maybe that is the case under perfect conditions, but I find that it’s usually necessary to pour in a little mineral spirits to keep the polyurethane flowing smoothly and drying without brush marks.
RELATED: These Cabinet Customizations Are Totally Worth It, According to Pro Organizers
Method 2: Refinishing Kitchen Cabinets to Make Them Darker
Photo: istockphoto.com
If you want darker-toned cabinets than what you currently have, you may be able to simply tint the existing finish. This method of refinishing kitchen cabinets, or cabinetry in any space, is much easier to accomplish than others that require stripping and sanding, but there are still a few ins and outs that you need to know.
SUPPLIES– Respirator
– Rubber gloves
– Trisodium Phosphate (TSP)
– Water
– Sandpaper
– Tack cloth
– Tinted polyurethane varnish
– Paintbrush
– Polyurethane finish
STEP 1 : Remove and wash doors and drawer fronts.
After removing the doors, drawers and hardware; begin by thoroughly washing grease and wax off the cabinets with TSP and water.
STEP 2 : Sand and dust the cabinets.

Lightly sand and wipe off the dust with a tack cloth.
STEP 3 : Apply a tinted polyurethane.
Experiment with a tinted polyurethane varnish (such as Polyshades by Minwax) to see if you can achieve the tone desired. Tinted polyurethanes combine stain and varnish in a single product.
Note: It’s always wise to experiment on the back side of a single door before committing to the project, just to be sure you’re going to be pleased with the results.
Advertisement
RELATED: How to Stain Cabinets
Method 3: Repainting Kitchen Cabinets
Photo: istockphoto.com
While it might make the biggest impact, repainting kitchen cabinets is actually quite a bit easier than restaining them. And, since you’re applying a whole new coat, the color possibilities are endless.
SUPPLIES– Respirator
– 220-Grit sandpaper
– Foam sanding block
– Tack cloth
– Degreaser
– Primer
– Paintbrush
– Paint roller and tray
– Enamel cabinet and trim paint
STEP 1: Remove the cabinet doors and hardware.

Start by removing the doors, door knobs, drawer fronts, drawer pulls, and other hardware from the cabinets. For very large kitchens, it’s a good idea to number the cabinet doors and drawer fronts to ensure you know where to put them back.
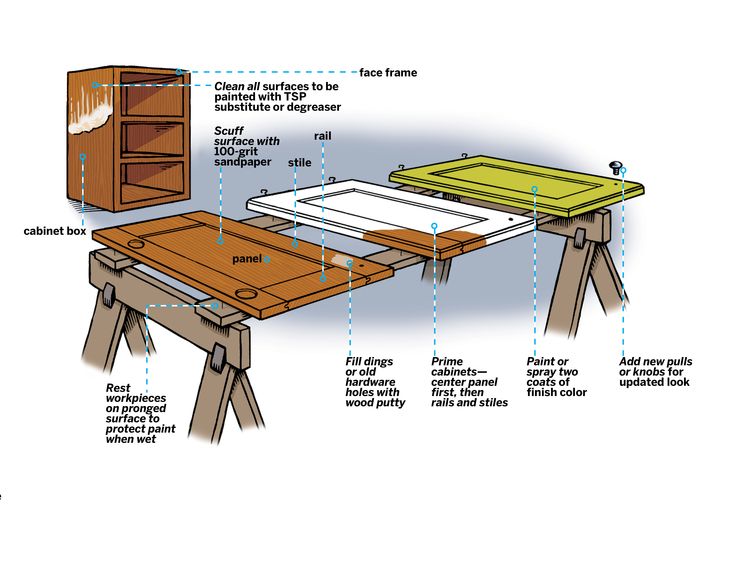
STEP 2: Lightly scuff the cabinets’ surfaces.
Cabinets are typically smooth and covered with a bit of polyurethane. While primer can adhere to this surface, it’s better to scuff it up a bit first. Put on a respirator and use the 220-grit sandpaper and foam sanding block to lightly scuff the surface of the boxes, face frames, drawer fronts, and doors. The foam sanding block should be able to get into intricate door profiles.
Keep in mind that your goal isn’t to sand down to bare wood. Instead, you simply want to roughen the surface of the existing finish to give the primer something to hold on to.
RELATED: The Best Primers for Kitchen Cabinet Transformations
STEP 3: Clean the cabinet surfaces.

After scuffing, remove the dust from the cabinets with a tack cloth. Take your time with this step as any dust that stays behind is going to create a rough texture on the cabinet.
While you’re sanding, you’re inadvertently transferring oils from your fingers to the cabinets. Also, cabinets see a lot of cooking oil, as well, and neither substance is conducive to a great paint job. The answer to this conundrum is to use the degreaser to clean the entire surface of the boxes and doors. Once clean, the surface is ready for primer.
Advertisement
RELATED: The Best Paint for Kitchen Cabinets
STEP 4: Prime the cabinets.
After pouring primer into the paint tray, use the paintbrush and roller to coat the boxes, face frames, doors, and drawer fronts with primer. Be sure to brush the primer into any cracks or corners, especially along the door profiles. This finish might look a bit streaky, but you should only need one coat of primer before moving to paint.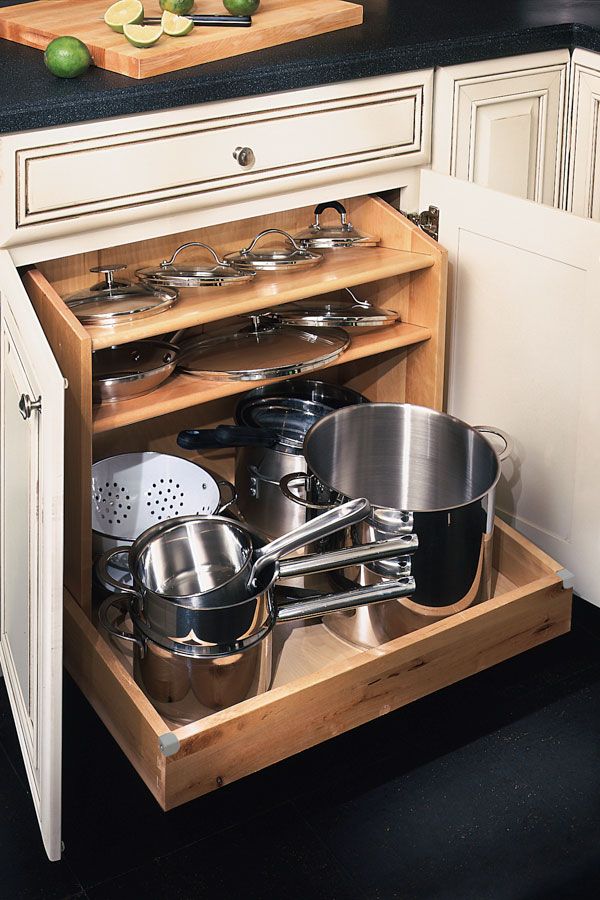 Pour the excess primer back into the can and clean the brush and paint tray while allowing the primer to dry.
STEP 5: Paint the cabinets.
Once the primer dries, it’s time to paint the cabinets. Put a new roller cover on your paint roller and pour some paint into the paint tray. Use the brush and roller to coat the doors, face frames, drawer fronts, and boxes with an enamel paint made specifically for cabinets and trim for the best results. After allowing the first coat to dry, apply a second coat of paint. Once dry, put all the doors, drawer fronts, and hardware back on and enjoy the fresh, new, updated look in your kitchen.
RELATED: The 14 Freshest Kitchen Cabinet Colors
Final ThoughtsPhoto: istockphoto.com
With this primer on how to refurbish kitchen cabinets, you have the knowledge necessary to give those boring or ugly wood boxes and doors a facelift. Whether sanding down to bare wood and restaining kitchen cabinets, using a tinted varnish to darken the color, or painting your cabinets, be sure to wear the proper safety gear while you tackle this big-impact project.
That might feel like a lot of information about the refinishing kitchen cabinets, and it’s hard to cover everything in one coat. If you still have questions about restaining cabinets or simply refurbishing old kitchen cabinets, this section is for you.
Advertisement
Q: What is the average cost to refinish cabinets?Generally speaking, the cost of refinishing kitchen cabinets (with labor) will run between about $1,800 and $4,000, depending on the size of the kitchen. You can save up to 75 percent of that cost if you tackle the project yourself.
Q: Is it worth it to refinish kitchen cabinets?It is absolutely worth refinishing kitchen cabinets. If your boxes and doors are still in good shape, a fresh coat of stain or paint can breathe new life into an old space and save you up to $20,000.
Q: Is it cheaper to reface or refinish cabinets?Generally speaking, refinishing cabinets is less expensive than refacing kitchen cabinets. Cabinet refacing costs, on average, $7,132.
Usually, discoloration is caused by old stain that’s deeply embedded in the wood. Liquid strippers and sanding might not even be an option, so it’s best to go with a darker stain or paint that will hide the blotchiness.
Refinishing your cabinets?
Get free, no-commitment project estimates from pros near you.
Find Pros Now
+How to Refinish Old Stained Kitchen Cabinets | Home Guides
By Mary Cockrill Updated December 10, 2018
Give your kitchen cabinets a refreshing update for only a few dollars. You can refinish old stained cabinets to hide surface imperfections, restore color and provide a protective finish. Cabinetry that's in good condition -- sturdy and free from major damage -- can be easily refreshed with new stain or paint.
Cleaning
Old kitchen cabinets can accumulate layers of dirt, grease and grime.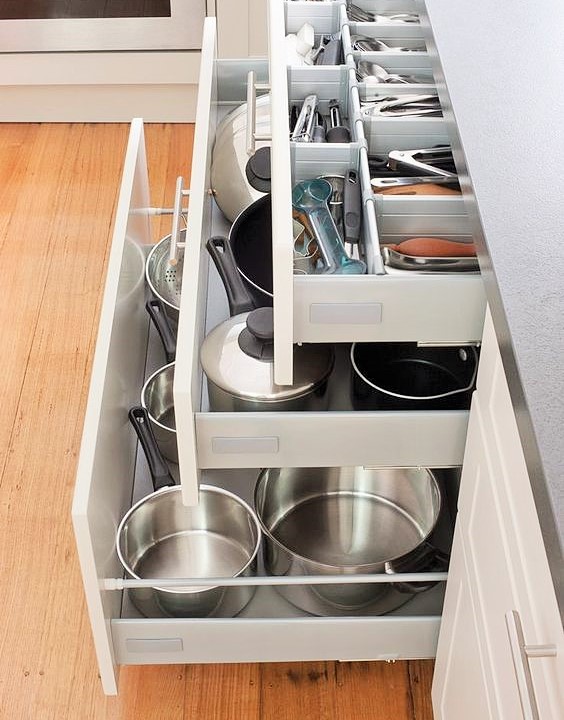 New paint or stain won't adhere properly to dirty, greasy surfaces, so a thorough cleaning of your cabinets is a vital step in refinishing them. Prior to cleaning, use a screwdriver to remove the doors and drawers from the cabinets, as well as additional hardware, such as knobs and handles. Also, remove the shelves from the interior spaces of your cabinets. Wipe down the exterior cabinet surfaces with a cloth dampened with mineral spirits. You can also opt for a natural cleaner made from distilled vinegar and hot water.
Preparation
Preparing your cabinetry prior to refinishing can provide a durable, aesthetically-pleasing finish. Fill small cracks, holes and dings with wood filler. Sand your cabinets with 200-grit fine sandpaper to remove any peeling varnish and to roughen up the stained surfaces. This provides a better bonding surface for the new stain or paint to adhere to. Wipe off the sanding dust with a clean cloth. Apply a paint primer to the cabinets if you're going to paint them. Sand the primed surfaces once more with a fine sandpaper and wipe off the dust. There's no need to apply paint primer if you're going to cover your cabinetry with stain. Use a furniture touch-up marker to fill in cabinet areas where the color has worn off.
Paint and Stain
Select a paint color that enhances your kitchen decor. White paint provides a cottage appearance when finished in a weathered look. Apply black paint with a distressed finish for a Tuscan look. Glossy, white or black paint in a uniform finish tends to complement contemporary decor. Sage green paint is an ideal color for farmhouse style. Apply two coats of paint, followed by a protective polyurethane finish. Bring out the natural wood grain of your cabinetry and add a protective coating by applying an all-in-one stain and polyurethane finish. Choose a stain color that complements your existing decor and other wooden features, such as a hardwood floor. Brush on the stain with smooth, even strokes.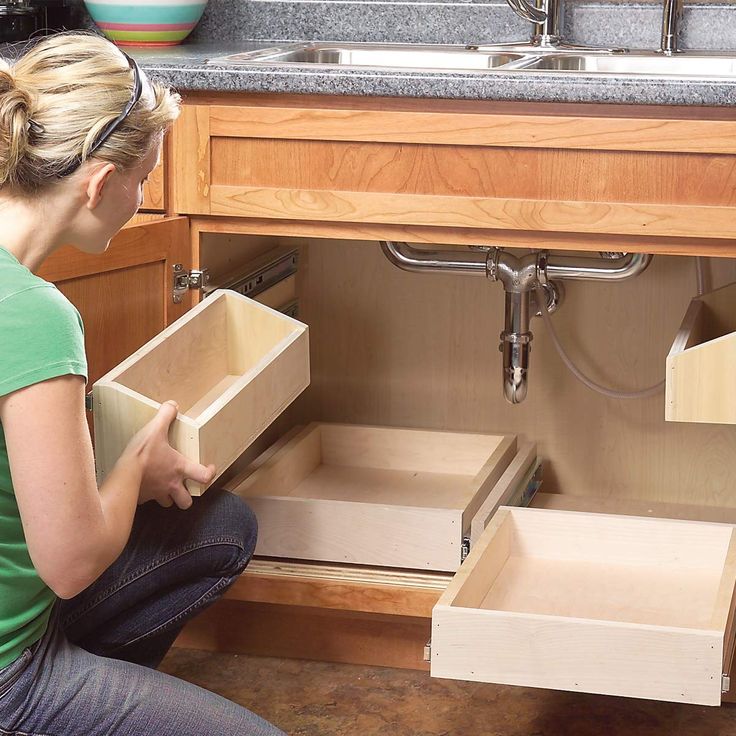 Avoid saturating the cabinets with too much stain that may drip and pool. Apply a second coat for a more intense color.
Hardware
New hardware can provide the finishing touch for your refurbished kitchen cabinets. Install shiny chrome hardware to enhance a modern, contemporary feel. Add black, hammered metal handles and knobs to provide a rustic Old World look. White ceramic hardware is ideal for cottage design, while antique glass knobs and pulls provide a country farmhouse ambiance. Add bold-colored hardware to white cabinetry for a bright, whimsical look. Try contrasting-colored knobs and handles to provide a wow factor, such as white hardware against black cabinets.
References
- Sunset: Kitchen Cabinet Facelift
- Ron Hazelton: How to Refinish Kitchen Cabinets Without Strippin
Writer Bio
Mary Cockrill's education and certifications in interior design and home staging have allowed her to author numerous home-related articles. Cockrill has been a top design consultant for a renowned home store and is the owner of Starwood Home & Gifts, LLC, an interior design, decorating and home staging business. She holds a Bachelor of Science in secondary education with a comprehensive major in office administration.
12 ideas how to organize storage in the kitchen
12 ideas how to organize storage in the kitchen
Headings: All about furniture 2 , Kitchens 88 , Living rooms 2 , Bedrooms 3 , Hallways 2
-
If you have limited space to organize your kitchen utensils, it is very difficult to use every centimeter. Endless utensils, jars and pots may soon fill the space of kitchen cabinets, so it is necessary to think about the organization of storage in the kitchen. nine0003
Clever storage solutions with a bespoke kitchen set will make life in the kitchen much easier, whether you use the space for cooking, work or play.

For most families, the kitchen is the center of the home. To avoid cluttering your countertops, check out these practical storage ideas. They will keep the room functional and beautiful.
Make the most of your corner cabinets
Rotating corner storage helps you keep your kitchen organized and provides easy access to kitchen utensils. nine0003
The corner table can accommodate bulky items - pots, pans, etc. Thanks to the different door styles and colors, you can match the corner cabinet to any kitchen.
Watch the video review of the magic corner in the corner table straight
If you have limited space for a corner cabinet, corner drawers will be the way out.
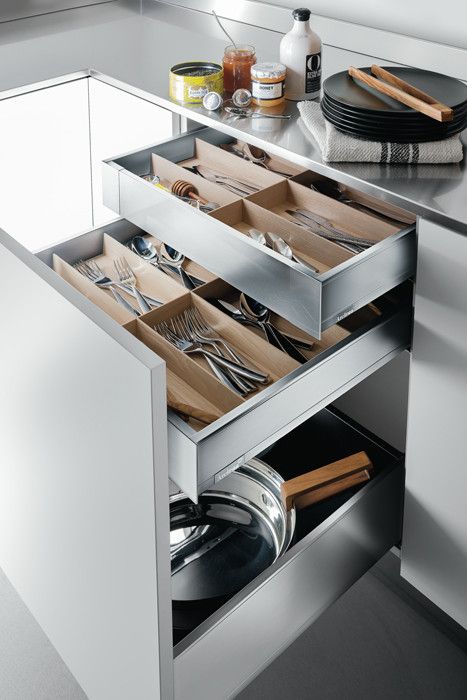
Cutlery storage boxes
Storage boxes make life in the kitchen much easier.
 You can store serving and silver cutlery in them.
 Perfect for a busy modern kitchen filled with gadgets and gizmos. Scissors, a pizza cutter will find a place in the drawer, it also has a compartment for cutlery.
Drawers with which draw-out mechanism are the most convenient? Which to choose? nine0043 Watch our video review:
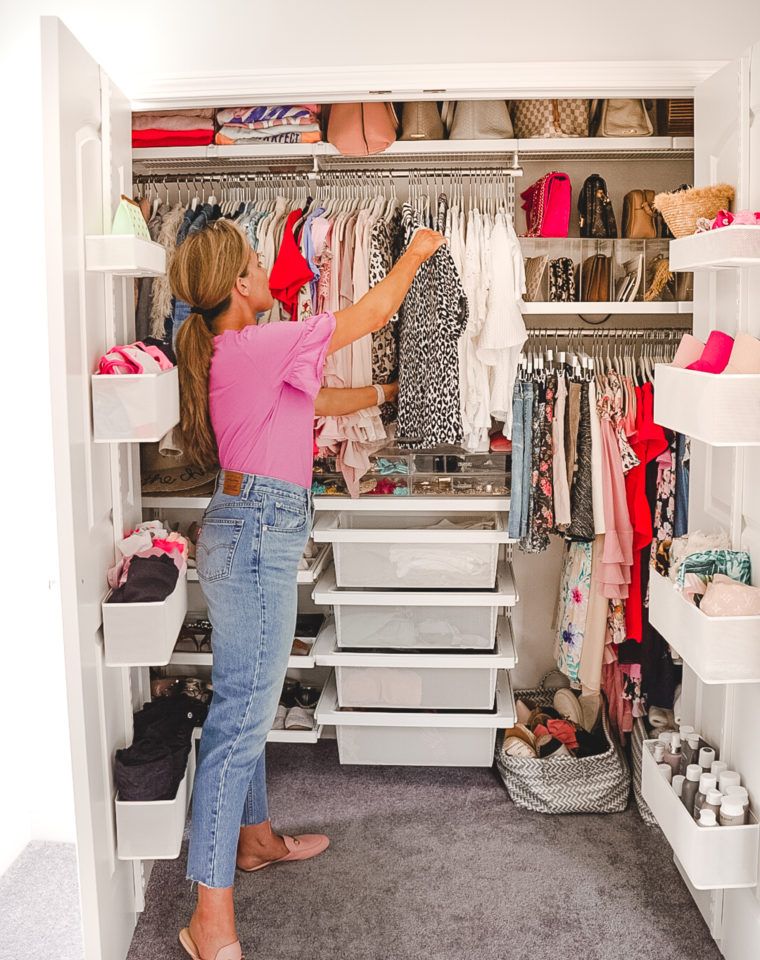
Pencil cabinet
Pencil cabinet is a popular storage option for modern kitchens. Being inside the kitchen, it is a practical storage solution while maintaining the style of the room. The advantages of the pencil case are obvious: compact, roomy, functional.
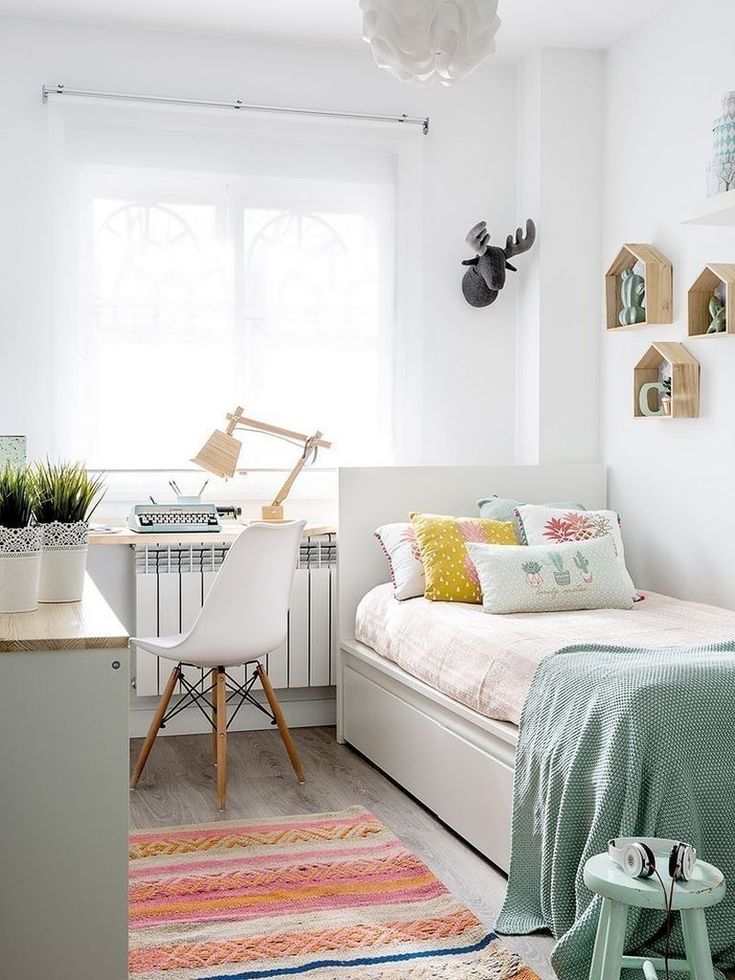
Use wall storage
Store essential kitchen utensils in close proximity. If you have few cabinets and drawers, but enough dishes and accessories, wall storage is a good solution.
 Use the space to store everyday items such as decorative mugs, coffee, tea and sugar. nine0003
With the railing you can not only decorate the kitchen, but also increase its functionality, since the railing can accommodate a considerable number of items and at the same time save space, so valuable for a small kitchen. On the railing, you can (if desired) place hooks, mesh shelves, holders for bottles, glasses, towels, knives, lids, hanging drying and even a holder for cookbooks. The choice of accessories is very wide, which will make the kitchen not only comfortable, but also cozy. nine0003
How to make the kitchen more functional with a railing system, see our detailed video review.
Add a pull-out organizer: Bottle Desk
If you don't have pantry space, a pull-out organizer paired with a door can offer you a neat and alternative storage solution.
Maximizing closet space, the pull-out organizer keeps everything within easy reach, which is practical for everyday use. nine0003
Make use of the space under the sink
Install the draw-out U-shaped basket in the sink table. What does a roll-out basket under the sink give?
- full extension with closer;
- is installed in a sink table with a width of 900 mm;
- is easy to use - everything is at hand;
- is an excellent place to store household chemicals and cleaning supplies. nine0020
The wastebasket is most often placed in the table under the sink, it is convenient to do this:
Use the space under the bar counter
Acting as a dining area, very often the bar counter is also part of the desktop and storage space.
If space is available, a breakfast bar kitchen set can offer additional storage space.
 Chests of drawers and cabinets can easily be hidden under a long tabletop. nine0003
 Use the plate drawer
Sturdy and deep plate drawers keep bowls, plates and cutlery within reach.
Where is the best place to store dishes? Types of dishwashers Watch in our video review!
If space is available, use the extra space to store pans and oven trays.
Open shelves
A popular trend for both modern and traditional kitchens, shelves allow decorative kitchen utensils to be beautifully arranged.
Available in a variety of colors and designs, but be careful not to make the kitchen look cluttered and untidy.
Pull-out shelves are a practical alternative. They provide easy access to kitchen utensils.
 You won't have to reach out to reach the pots deep in the corner. nine0003
 Use the combination of fronts - open shelves with the SlideLine system:
Use the space behind the plinth
To effectively use every centimeter of the kitchen behind the plinth under the oven, place tables under the built-in oven with the Orga Box plinth system, manufactured by Hettich company.
Add narrow shelves
Narrow shelves are ideal for storing spices and oil bottles. To prevent items on the shelves from creating visual noise and clutter, use the same vessels, one of the best options is glass jars and bottles of the same size. Also, with the help of these shelves, you can add zest to the kitchen by placing decor items.

Open shelves for plates
You can store dishes not only in the tables and cupboards of the kitchen set, but also in open shelves. nine0003
Add containers
The functionality of kitchen furniture is determined not only by the equipment of various types of mechanisms, but by the organization of the internal space of drawers and modules with hinged facades.
The container systems presented above have a rather high cost, the most budgetary way is to use ordinary baskets that can be purchased at a hardware store.
-
Read also ↴
-
Interior: how to make the kitchen safe for children
The article will help young parents to design the interior of the kitchen in such a way as to protect the baby as much as possible.
Read more...
-
Installing a washing machine in the kitchen
In a small apartment, there are inconveniences due to the placement of household appliances. That is why the design of kitchen sets includes a variety of objects that are not used for cooking. In particular, the undercounter washing machine is increasingly appearing in our homes. nine0003
Read more...
-
We place the TV in the kitchen. Tips
Even the smallest TV in the kitchen can save the hostess from depression caused by many hours of daily cooking and other household chores. Therefore, you should immediately install it so that it performs three main tasks: entertain, do not interfere and fit into the interior as much as possible.
Read more...
nine0037 -
Where to place a microwave in the kitchen
A rare family considers a microwave oven an unnecessary purchase.
 After all, such a multifunctional technique is capable of defrosting, heating, boiling, frying and even baking. Moreover, in a microwave oven, these procedures take much less time than usual. But in some kitchens, it is simply impossible to find a place for an extra household appliance, unless you are smart. The placement method depends on the type of microwave. nine0003
 Read more...
Kitchen storage: 15 life hacks
The kitchen is a place where many things are stored, from food to dishes and household items. Therefore, the order and functionality of this space play an important role, regardless of its size. We tell you how to make the kitchen cozy and comfortable
Photo: Shutterstock
You open the kitchen cabinet, and a colander and baking bags fall out from there, looking for spices for frying - you find vanillin, and again there is nowhere to put a ladle and pot lids. Familiar? To minimize stress during the cooking process, the kitchen space must be organized so that it is pleasant and comfortable to be in it.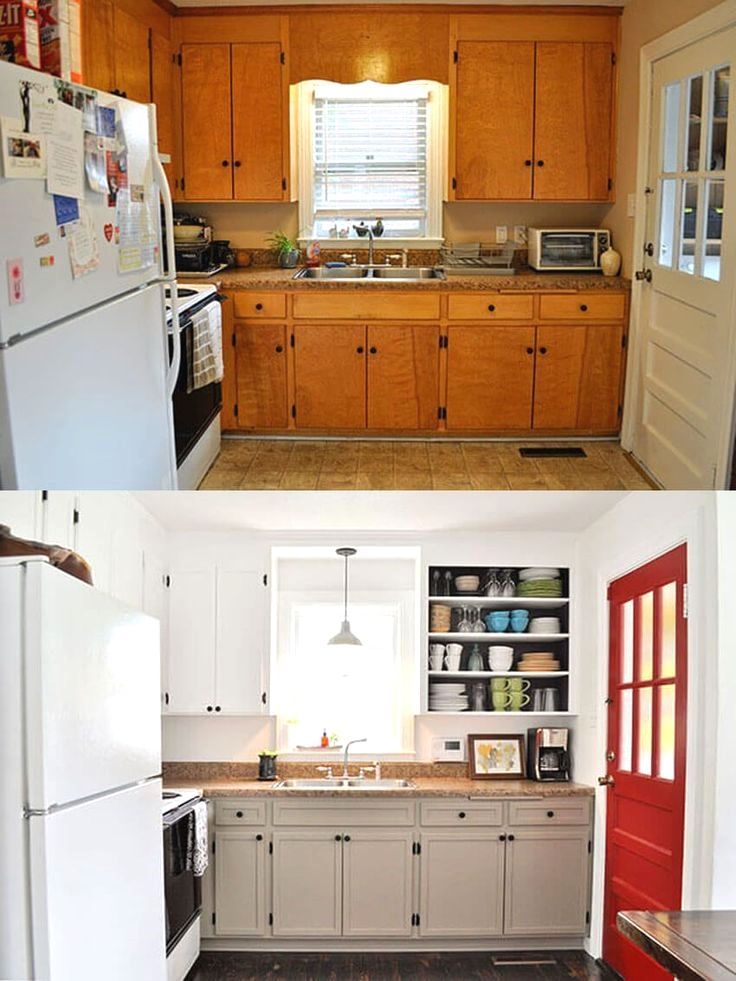 nine0003
- 15 kitchen storage tips
- Spice storage
- Vegetable storage
- Storing pans and pots
First of all, you need to identify areas that require revision: overflowing spice racks, cluttered drawers and cabinets, a clogged refrigerator, etc.
adv.rbc.ru
Photo: Pexels
Then it is worth identifying the areas that require the most prompt intervention - usually these are places to store essentials (pots and pans, a dish dryer, bulk products, etc.). Thanks to small steps and a clear understanding of what you want to see in the end, you can save time and effort. After each new decision, it is worth stopping and evaluating - perhaps the bar for kitchen comfort has already been reached and you can just enjoy the cozy and comfortable space or add finishing touches. nine0003
7 tips for organizing a small kitchen
Storage, cooking and social gatherings are often not enough. Alas, not every apartment has the opportunity to re-equip the kitchen, expand the space or organize a separate pantry for food. But even with these inputs, there are ways to deal with kitchen chaos.
15 kitchen storage tips
1. Organize your work area
All items that are used daily for cooking and table setting should be placed in close proximity so as not to waste time looking for them. Then it is worth evaluating the workplace, ideally it should be between the stove and the sink, so it is more convenient to quickly remove dirty dishes from the working area and quickly add ingredients to dishes cooked on the stove. nine0003
Photo: Pixabay
The optimal length of the countertop is 80-90 cm. It is also better to place the refrigerator nearby so that you do not have to move around the kitchen while cooking and waste time.
2. Use the space under the ceiling
If the space between the ceiling and the kitchen cabinet is empty, it can be used for storage. It is better to place rarely used or decorative items there.
Photo: Pixabay
These can be, for example, serving plates that only reach the table on holidays, bottles of alcohol that do not require refrigeration, a supply of oven mitts or other cooking utensils. If you want visual uniformity, you can buy wicker storage baskets that are the right size. nine0003
3. Install rails
Rails can be used to save space. This accessory is great for storing a variety of items - from spices in special jars to ladles, potholders, mugs, pans.
Photo: Pixabay
4. Place shelves with hooks
When choosing new furniture for the kitchen, you should pay attention to its functionality. For example, on a horizontal surface of a shelf with hooks, you can put frequently used dishes so that they are always at hand. You can also use this surface for decorative purposes: to place bright dishes, vases, etc. The hooks under it are suitable for cutting boards, potholders, ladles, kitchen scissors.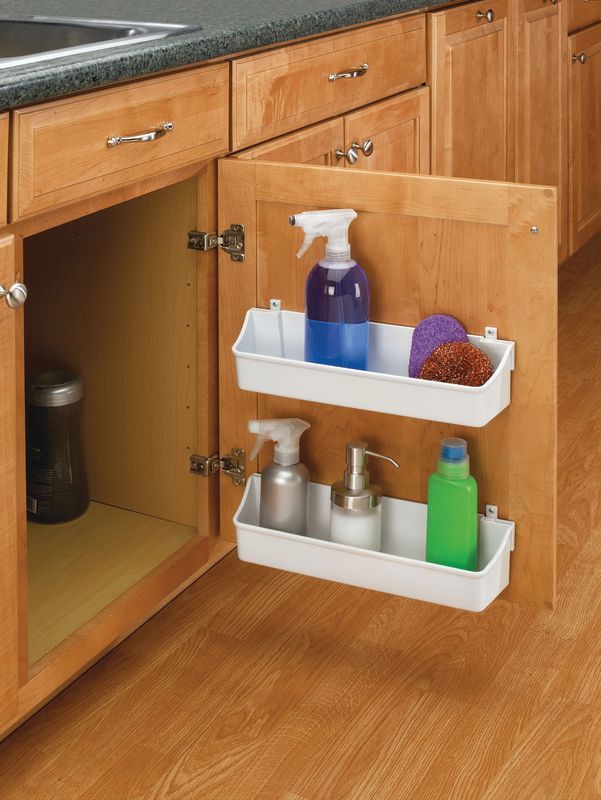 nine0003
Photo: Shutterstock
5. Hang Magnetic Knife Holder
Countertop space is an important part of a comfortable cooking experience and should be as free as possible. One way to tidy up is to hang a magnetic holder for knives, kitchen scissors, and other cutlery above your countertop.
Photo: Shutterstock
6. Buy containers
Plastic containers are a great way to store both food and kitchen utensils. They can be placed in the refrigerator and signed to know exactly where everything is, as well as placed in kitchen drawers and cabinets and store spices, rarely used utensils, bulk products, and household items there. nine0003
Photo: Unsplash
7. Use the space under the sink
The space under the sink can be used for more than just a trash can. There is a small bookcase for storing household items: sponges, gloves, garbage bags. You can even hang hooks for towels and oven mitts or small hanging shelves for detergents on the cabinet door. Another option is vertical drawers.
Photo: Shutterstock
8. Use organizer
Organizers are a convenient solution for storing things that are always needed at hand. Transparent drawers, with which it is easy to organize space in the refrigerator, will save space, and rubber holders can be hung on the sink, placing a dish sponge and detergent in them.
9. Store bulk food in containers
Grains, pasta, breakfast cereals and other bulk products are best stored in containers of the same type with labels on the contents. Such jars / boxes can be used not only as a place of storage, but also as an element of decor. nine0003
Photo: Pexels
10. Hang a shelf above the table
This way you can solve the problem with items that clutter up the table, but are needed only at meals - napkins, spices, a sugar bowl. Cups can be hung on hooks under the shelf so that they can be reached without getting up from the table.
Photo: Unsplash
11. Use the side walls of hanging furniture
On the sides of kitchen cabinets, it makes sense to place small shelves for spices, sauces and dressings that do not require storage in the refrigerator. On such shelves you can store textiles, potholders and other kitchen utensils. nine0003
12. Use drawers
Instead of a decorative panel, a drawer can be built into the bottom of kitchen cabinets. This is a convenient way to store pans, baking sheets, cutting boards, or other items that fit.
Photo: Shutterstock
13. Install Insert Shelves
Kitchen cabinets can be fitted with custom built-in shelves to help you make the most of space, organize items by type, and save time looking for what you need. nine0003
14. Don't Forget the Top of the Refrigerator
If the ceiling and height of the refrigerator allow, the top surface can be used to store refills, rarely used crockery, kitchen utensils, canned food and other non-perishable foods.
Photo: Pexels
15. Buy a cutting board basket
A low-sided, moisture-resistant basket is perfect for cutting boards. So they will be in one place, they will not interfere during cooking and fall into the sink. nine0003
10 unusual gadgets for the kitchen
Storage of spices
Spices are best stored in a cool, dry place: they lose their properties from humidity and high temperature. It is worth considering a place to store them away from the stove and heating, but not next to the sink.
Photo: Shutterstock
If the spices are stored in retail packaging, all of them can be placed in a container and placed in a kitchen cabinet. It is convenient to rank them according to the frequency of use and put those that are not needed all the time on the top shelves. nine0003
Jars of spices can be placed on hanging shelves on cupboard doors, hung on rails or placed in drawers.