How to make your front porch more inviting
9 Ideas for Creating an Inviting Front Porch
There’s nothing quite like a cozy and inviting front porch to crank up your home’s curb appeal and entice visitors to want to stay for a while. But if your front porch is currently bare-bones and lacking in charm and color, it can be tricky to know where to start. Check out these nine front porch ideas to transform your space.
Table of Contents
- 1. Add or Change Out Your Light Fixtures
- 2. Paint Your Door
- 3. Get a Doormat
- 4. Install a Porch Swing
- 5. Get New House Numbers
- 6. Plants and Flowers
- 7. Decorate for the Seasons
- 8. Outdoor Living Room
- 9. Accessorize Your Porch
1. Add or Change Out Your Light Fixtures
A well-lit porch functions as both an important safety precaution (to prevent tripping and stumbling in the dark, as well as deterring possible break-ins) and also as a decorative welcome to your home.
Exterior Lighting
Whether you want an antique hanging lantern or a pair of bronzed industrial sconces on either side of your front door, you can set the tone for your décor inside while keeping the area brightly lit.
Porch Step Lighting
If you have stairs leading up to your door or porch, consider adding lights on each step for optimal illumination. You’ll thank yourself every time you arrive home after dark.
2. Paint Your Door
A freshly painted door is hands down one of the best and easiest front porch ideas for the dramatic transformation it can give your space. Your front door likely takes a beating thanks to its daily use and exposure to the elements—and a faded, peeling front door doesn’t exactly say pride of ownership. But a fresh coat of paint on the door will give your entire house a facelift. Try a bright color, which plays well off of a neutral exterior while energizing your front porch. If you coordinate the door color into the upholstery and accessories on the porch, you’ll be amazed at how easily it all comes together.
Front Door Color Ideas
From timeless to trendy, here are the color choices you will want to consider for your front door.
Take Me There
3.
 Get a Doormat
While a doormat serves the specific purpose of keeping dirt and debris from being tracked into your home, it also brings the front porch together and introduces texture. Since it sits at the threshold of your home’s cozy interior and the outside world, it’s a first impression worth the effort. Right now, you will likely spot layered doormats out and about in your neighborhood. Get a larger, softer doormat with a striking pattern, and then put a smaller doormat made of a tougher material in the center of it to get this look.
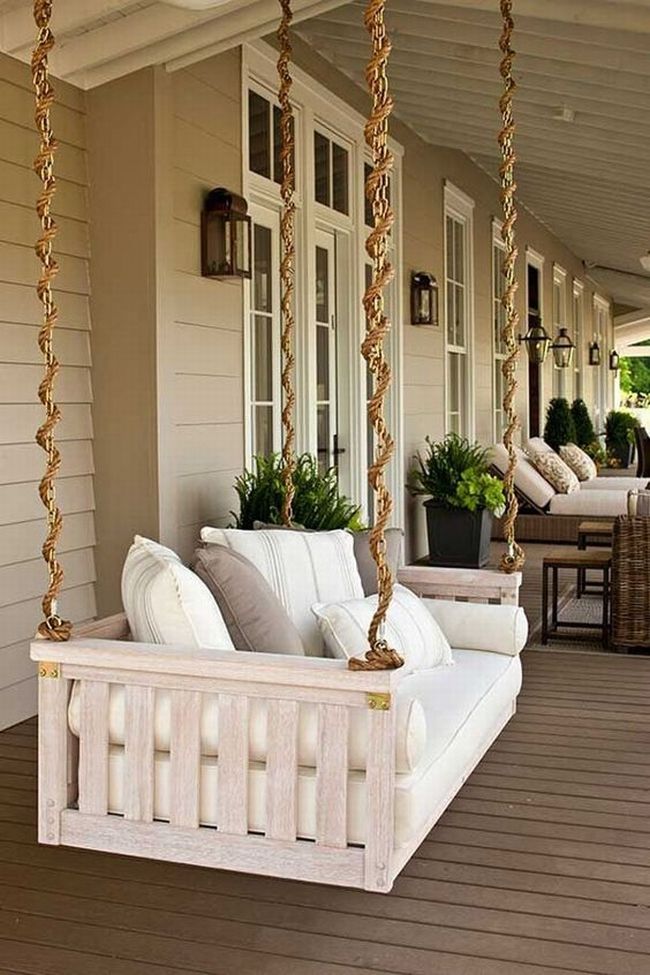
4. Install a Porch Swing
You can’t go wrong with the quintessential front porch swing. There’s no better spot for reading the paper on a Sunday morning or enjoying a glass of wine on a summer evening. Who knows, it might even provide the perfect opportunity to start talking to your neighbors! Finish things off with a cozy throw and a couple of pillows made up in durable outdoor fabric for a seating spot that’s sure to become everyone’s favorite.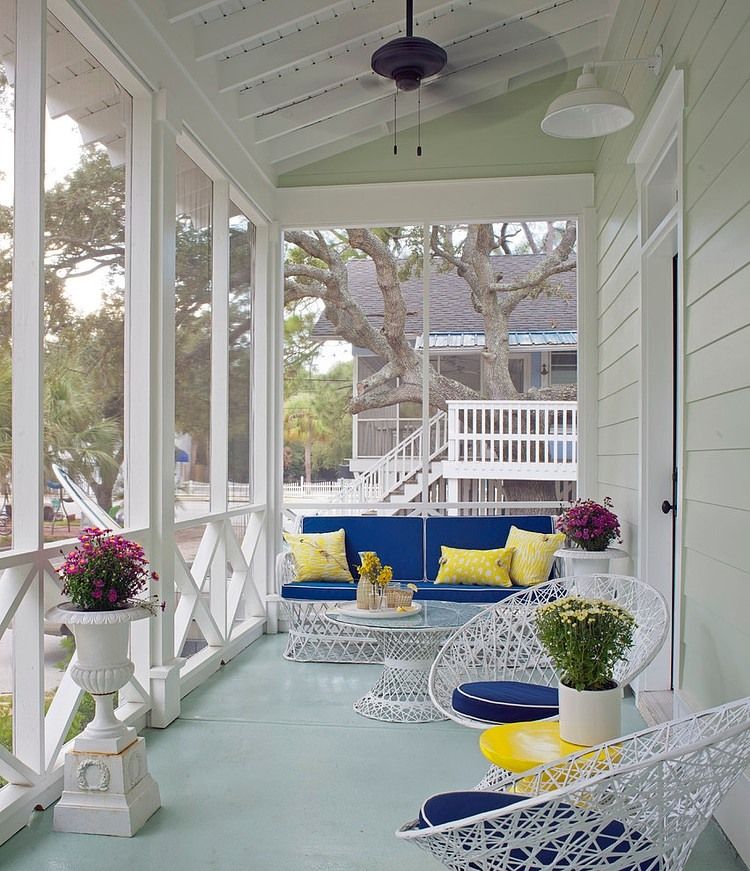
If swings aren’t your thing, consider a cushy couch or a pair of Adirondack chairs. A charming bistro set will work well on particularly small or narrow front porches.
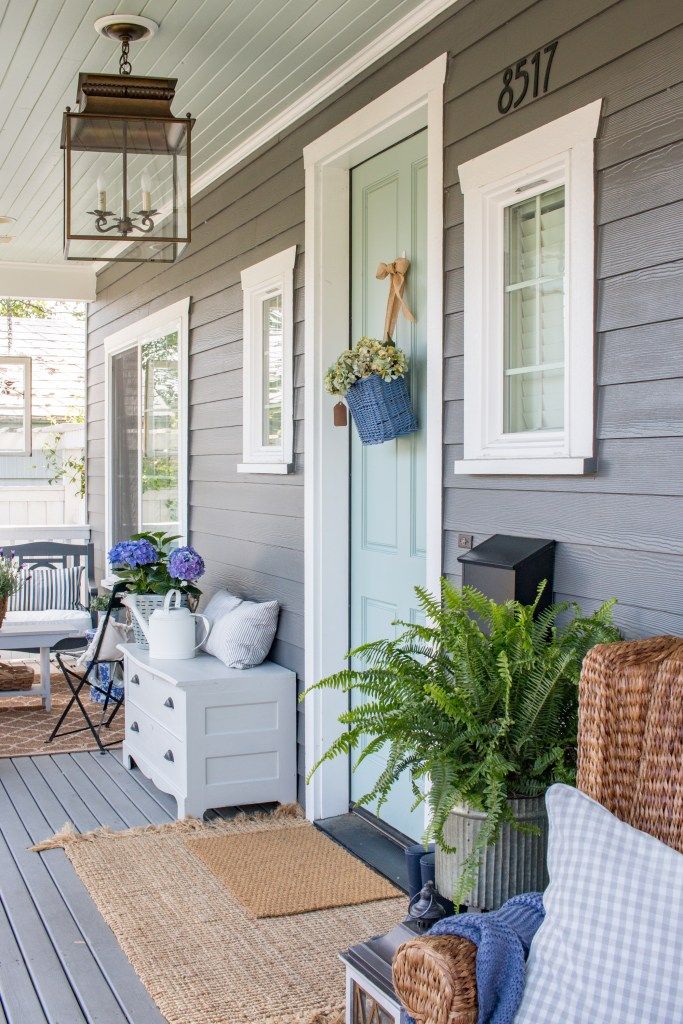
5. Get New House Numbers
Much like lighting, house numbers are both a design choice and a safety issue. In the event that you need to call emergency services, you’ll want them to be able to find your home as quickly as possible. Though you may not typically associate your home address with curb appeal or front porch ideas, house numbers that stand out can change the look of your space while keeping you safe.
Oversized numbers in a contrasting color will be easily readable from the street, ensuring that everyone can find your home quickly. And don’t think your house numbers can only be hung on a porch post: hanging them directly on the front door or adding a yard post to your front lawn are also good options for making sure your house numbers are visible.
6. Plants and Flowers
Potted plants, topiaries, or flowers instantly infuse your front porch with a wash of eye-catching color and texture.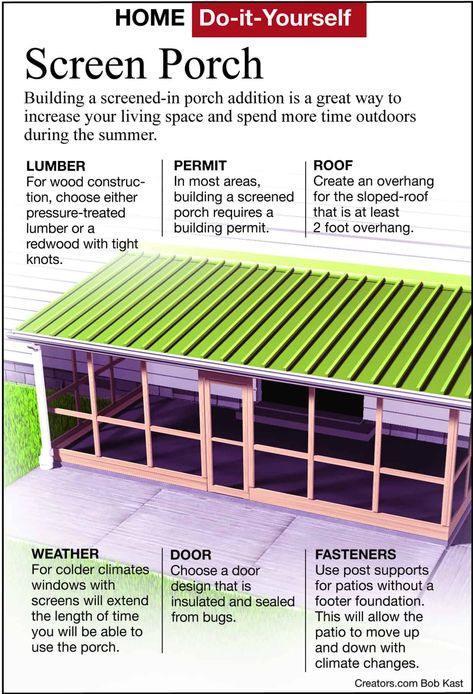
- The best choice of plants are ones that thrive in the shade and are large enough to make an impact from the view of the street—like ferns and hostas.
- Choose planters that complement your home’s style and the scale of your porch.
- Large pots have the added bonus of creating clever hiding spots for deliveries while you’re away from home.
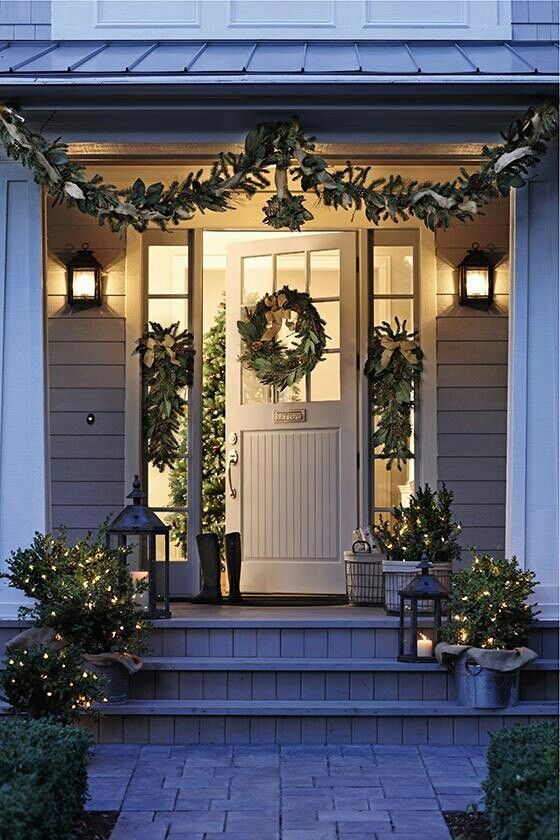
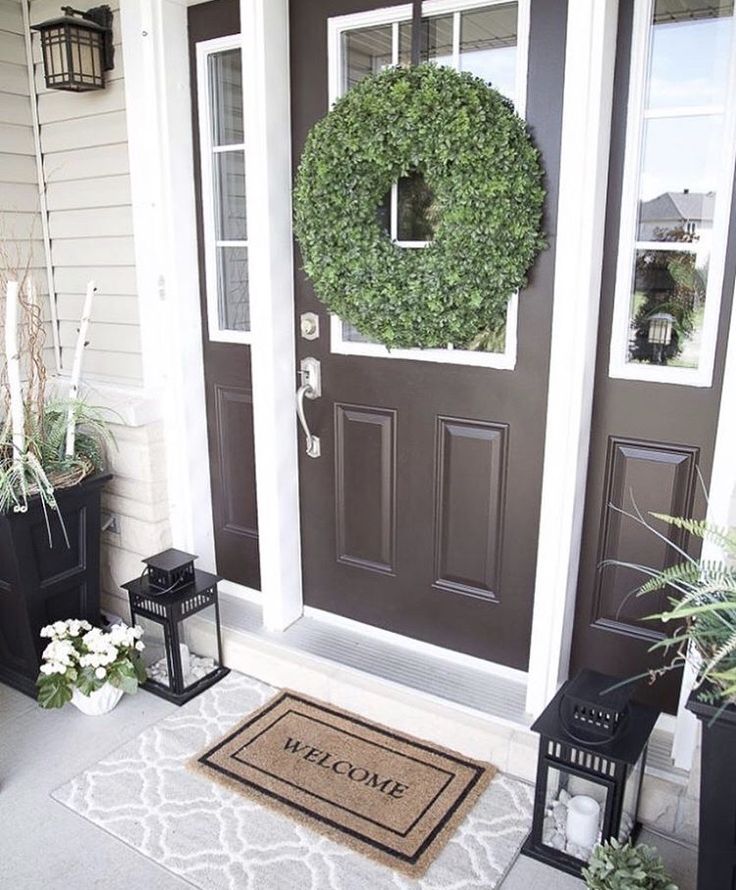
- Hanging a festive wreath on the front door is another way to give your porch a shot of greenery.
7. Decorate for the Seasons
This is one of the best front porch ideas for keeping things updated year-round. Seasonal decorating is an easy way to keep your front porch décor feeling fresh and festive. Add piles of pumpkins and gourds in the fall or hang an evergreen wreath for the winter. This is a smart way to create seasonal looks that last not just through the holiday, but the season itself.
8. Outdoor Living Room
A roomy front porch is just begging to be used as an outdoor living room.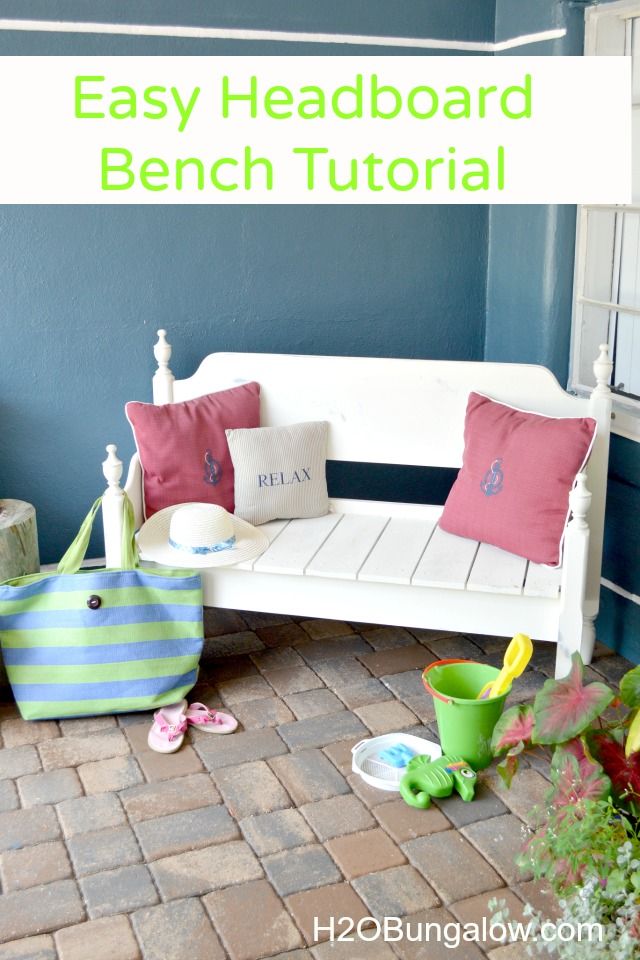 Apply the same rules for decorating as you would use inside.
- Use materials and finishes that can take exposure to the elements.
- Adding a patterned rug will provide extra warmth to your porch in the winter.
- Hanging curtains will help define the space, keep the porch shaded from the hot afternoon sun, and provide an extra bit of privacy from neighbors.
9. Accessorize Your Porch
You don’t want your front porch to look crowded, but adding a few thoughtfully chosen décor items can definitely make your front porch look more interesting. Antique shops and thrift stores are great places to look for interesting porch decor items, like a wooden shutter, wagon wheel, or vintage cooler. The choices for personalizing your front porch are endless!
25 Porch Decorating Ideas for an Inviting Entryway
Porch decorating is a long-standing tradition. In the days before air conditioning, a home’s front porch was a go-to gathering spot, a place to stay cool and get some fresh air.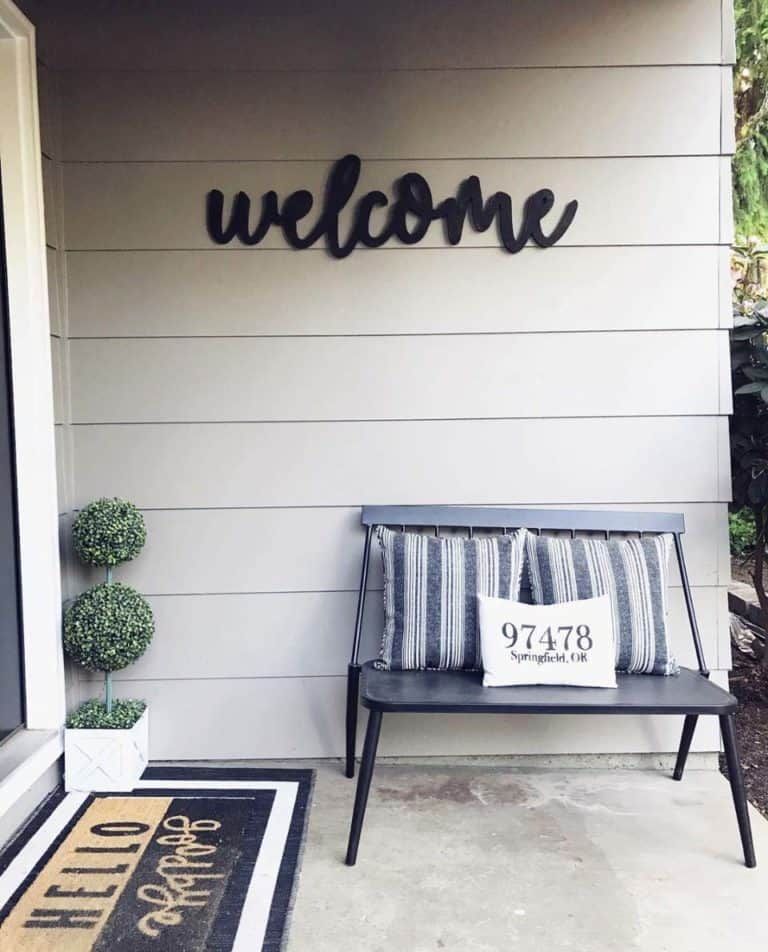 We believe front porches should function as an extension of the home and are worth looking at as another “room” to decorate. Whether you frequent your home’s front porch often or not, it’s still how you welcome guests into your home. Think of it as your home’s first impression. We’ve curated this list of front porch decorating ideas to help you make your entry more inviting.
Is your home in need of more than front porch decorating ideas? At brick&batten, we’ll help your house reach its full curb appeal potential. We work with our clients to create a custom virtual exterior designs based on their needs and desires. You’ll get a photo rendering and resource list to put your design in action. Learn more about our virtual exterior design services.
#1 // Think Style AND Comfort for Front Porch Seating
It can be hard to find porch chairs that are both attractive and relaxing to sit in. Luckily, you can transform pretty much any chair into a lounge chair with the addition of outdoor throw pillows.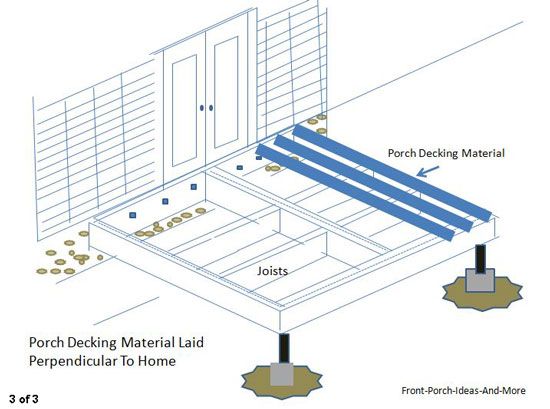 Spend a lot of time on your porch? Go for something weatherproof and truly comfortable, like these teak chairs from Rejuvenation, a brick&batten designer favorite, pictured in the first example above. If you want to skip the pillows but are still looking for comfort, we often suggest furniture made out of woven materials for our clients, since they are softer than wood or metal. Case in point: the rockers in the second example above. Plus, there’s always something to be said for a classic wooden porch swing.
#2 // Decorate the Steps or Walkway with Potted Plants
One way to make a small porch seem larger and more inviting is to utilize the steps and walkway as an extension of the porch. Place potted plants along each one. Not only will they stand out, but they will also add some depth and dimension thanks to the tiered effect.
#3 // Use Front or Back Porch Accessories to Create Symmetry
There’s a reason film director Wes Anderson’s symmetrical set designs and framing methods have made him an industry icon.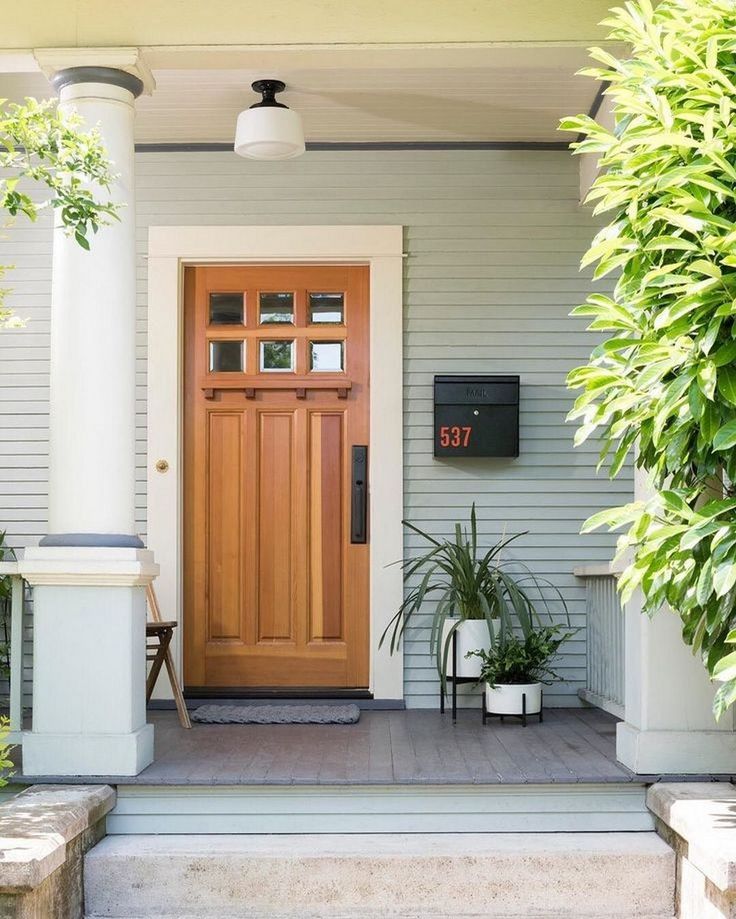 Simply put, people love symmetry. When combined with soothing colors, it can set a relaxed mood. We especially love this look on large porches that expand the entire length of the home. Keep in mind that you don’t need to create perfect symmetry. It is okay to have a coffee table on one end and an extra chair on the other. Just try to achieve visual balance.
#4 // Create an Urban Retreat with Outdoor Curtains
We love outdoor curtains for front porches and back porches alike. With this accessory, you can create a serene place fit for conversations between close friends. Look for curtains that dry quickly and are resistant to mold and mildew, such as these from Ballard Designs.
#5 // Go Minimal on the Porch Decor and All-Out on Landscaping
While we do love tall privacy plants, there is such a thing as too tall. If your plants or decor are starting to look like they are taking over your porch, it’s time to try a different approach. Consider using horizontal space as opposed to vertical space to plant large flower beds with layered landscaping that draws the eye directly to the door.
#6 // Choose Warm Recessed Lighting
We’ll never stop loving stringed lights on porches and beautiful lanterns; however, a dimmable recessed light can put off the same wonderful glow. Recessed lighting is a great alternative to wall lights or can be used in addition to wall lights. Get specific lighting ideas here and pro tips here.
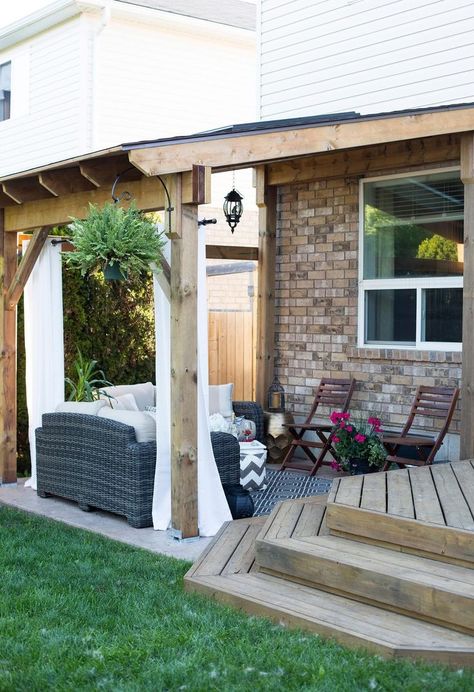
#7 // Create a Larger Seating Area with a Pergola
Pergolas certainly aren’t just for backyards. If your front porch doesn’t have any room for visiting, create some with the addition of a front porch seating area. If you commit to a front yard pergola, we love the look of cement tiles, flagstone, or brick under the seating area.
#8 // Make a Statement with an Oversized Porch Light
When it comes to front porch decorating ideas, there’s one easy change that we often recommend: Swapping out small, understated porch lights for dramatic, large fixtures makes a noticeable difference all the way from the street.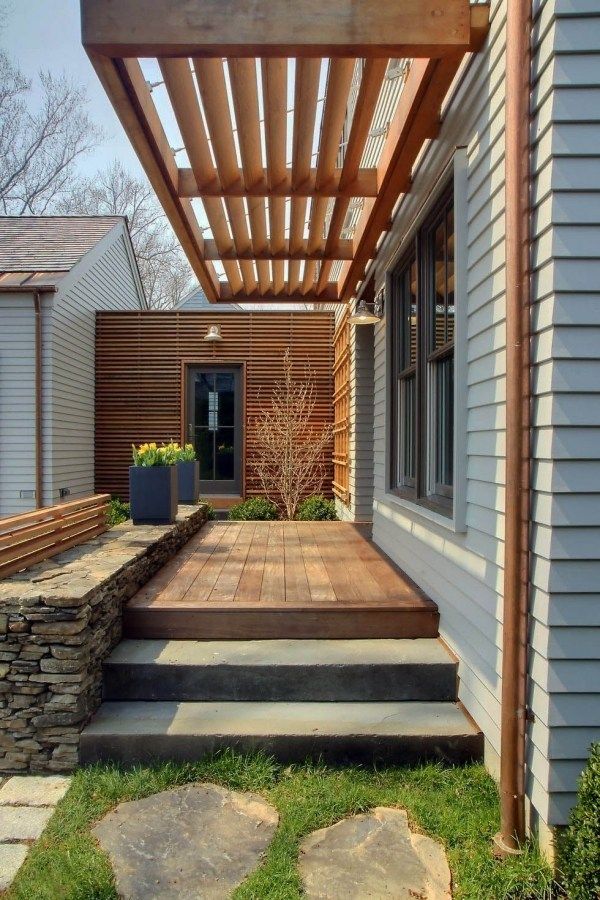 Keep in mind, your lighting doesn’t need to all match. Choose lights that serve the purpose for their location on your home’s exterior.
#9 // Use Tea Lights or Lanterns on Special Occasions
If you’re hosting a party, go all out and light the way for your guests with tea lights. If you’re concerned about a fire hazard, battery-operated options are just as appealing. We especially love using faux tea lights on occasions like Halloween.
#10 // Paint Your Front Door
Such an easy fix! Painting your front door is an excellent way to to update your home’s curb appeal, as well as add interest to your front porch. Learn more about the front door colors we are loving.
#11 // Switch Up Your Address Numbers
Any graphic designer knows that fonts make a big difference. New address numbers are affordable and super easy to install. If you have a short street name, adding it under the address numbers can further make your home stand out.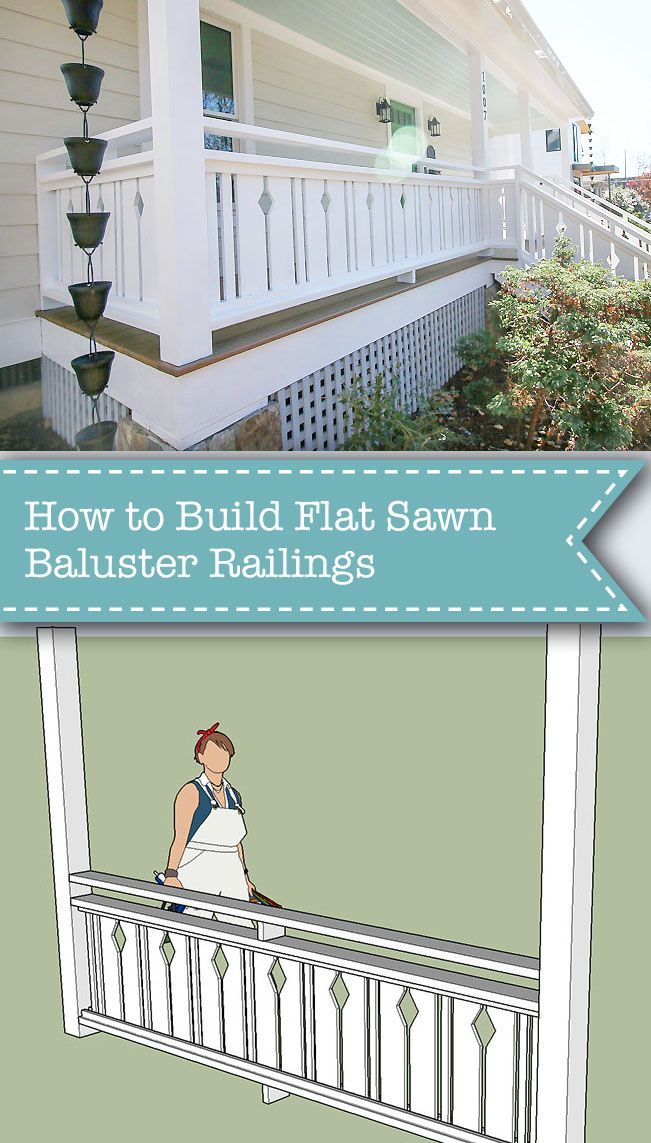 Just make sure to choose numbers that are easy to see from the street. Choosing the best address numbers for your home’s architecture and your personal style is a great way to some flair to your outdoor space.
#12 // Upgrade Your Front Porch Railing
Porch railings are one of the often-overlooked front porch decorating ideas. Outdated railings can age a home, but replacing them with clean, modern railings can quickly modernize the whole façade. To create a sense of visual cohesion, you can repeat the porch railing as a front fence.
#13 // Source New Planters
One piece of porch decor that we encourage our clients to have fun with is flower pots. We are loving terra cotta and durable materials like glazed stones that aren’t subject to weathering quite as quickly. Express your personal taste by choosing artistic designs or opting for more modern planters with simple lines. Find out more about how to master container gardening and make your porch come to life!
#14 // Update Your Walkway
Your walkway is the first thing people see as they’re arriving at your doorstep.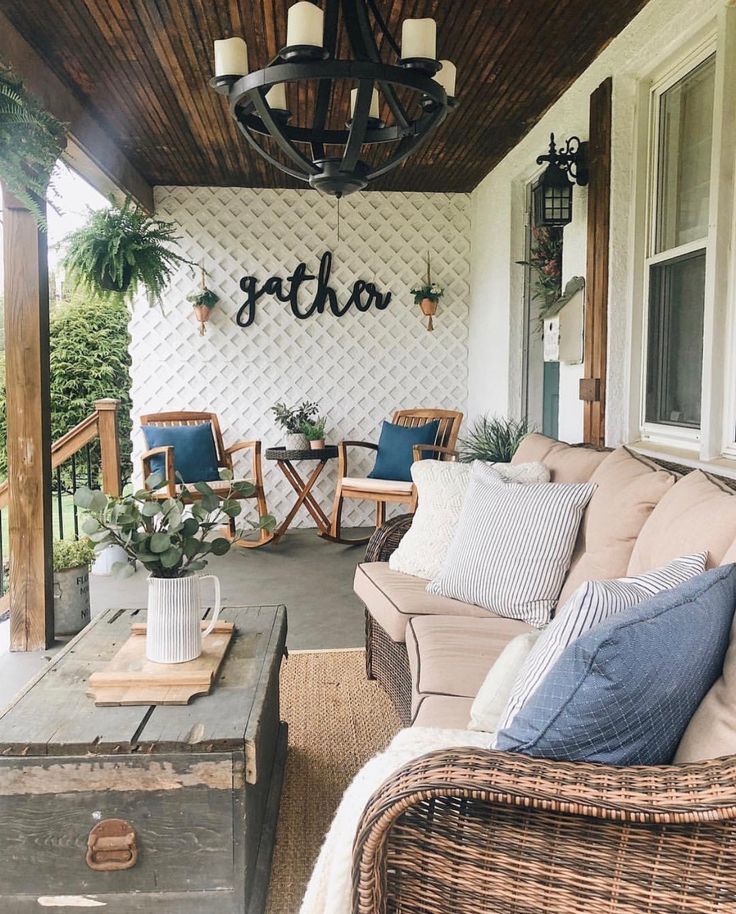 Pulling out the old builder concrete steps and walk and adding flagstone or brick is an excellent way to increase your home’s value and take your curb appeal to the next level.
#15 // Add an Outdoor Rug to Your Porch
An outdoor rug can instantly bring life to your front porch, making it feel as cozy as an indoor room. A high-quality outdoor rug is durable and can withstand environmental elements. It’s a nice alternative to a welcome mat or porch floor.
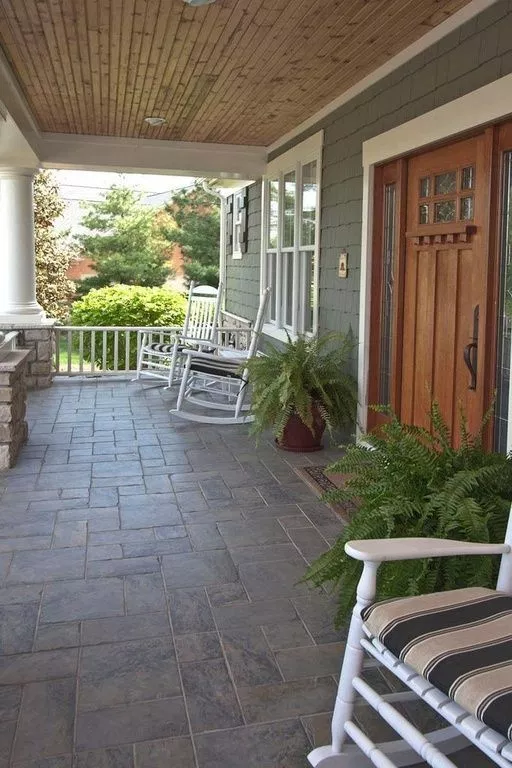
#16 // Incorporate Wood Accents
Wood accents are a beautiful way to add warmth to your home’s exterior. Wood blends beautifully with darker paint colors such as Kendall Charcoal or lighter colors such as Seapearl, both by Benjamin Moore. (The latter is our 2021 exterior paint color of the year!) Use wood accents in gables, above windows, around door frames, and on columns. Wooden front doors can give off a casual but elegant vibe. Wood works well on a myriad of home styles, from farmhouse to mid-century modern, and the front porch is a great way to incorporate this natural element into your home’s exterior.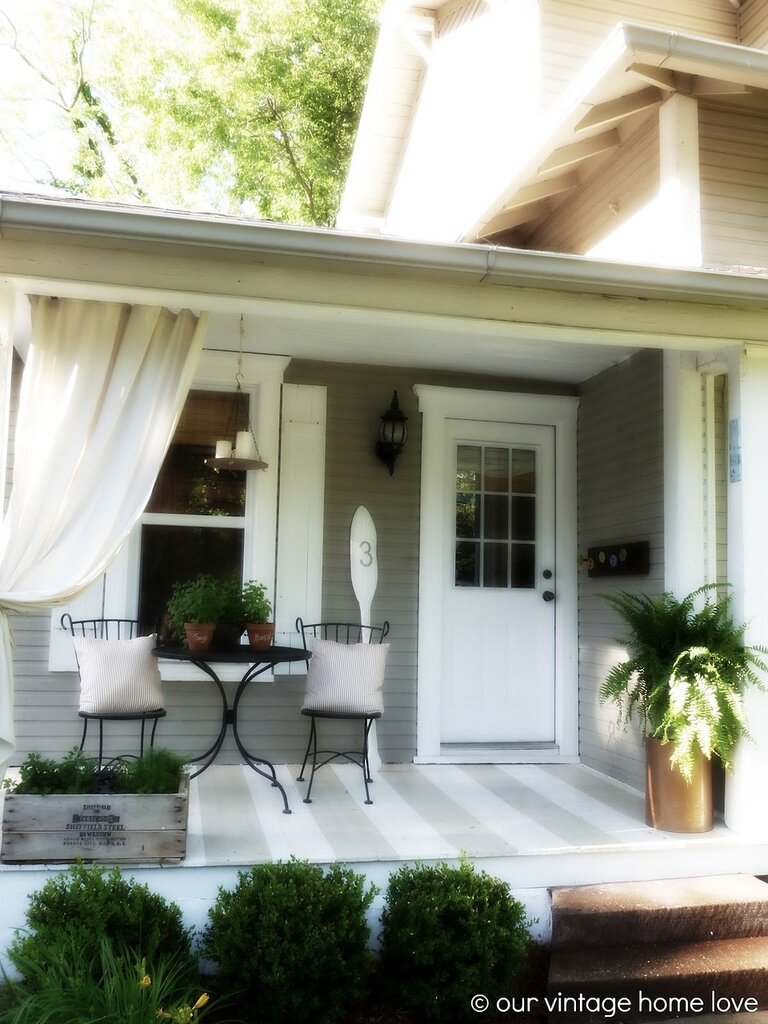
#17 // Choose a Statement Door Knocker
Although most guests will reach for a doorbell before they use a knocker, there’s something special about keeping up the tradition and adding one to your door. However, traditional doesn’t need to mean antique-looking. Many companies offer modern, whimsical, and quirky door knockers. A door knocker will be one of the last front porch accessories visitors see before they enter your home, so why not make it reflect your taste?
#18 // Find a Statement Piece
Sometimes making a dramatic change to your front porch doesn’t need to involve paint, cement, or a big dumpster in the driveway. The right porch accessory can do wonders. We love playing with trends when it comes to porch furniture, and hanging swings are definitely on-trend. Think Bohemian, and go for it!
#19 // Add a Fire or Water Feature
Many of our clients ask us to add a fire pit or water feature to their outdoor living space.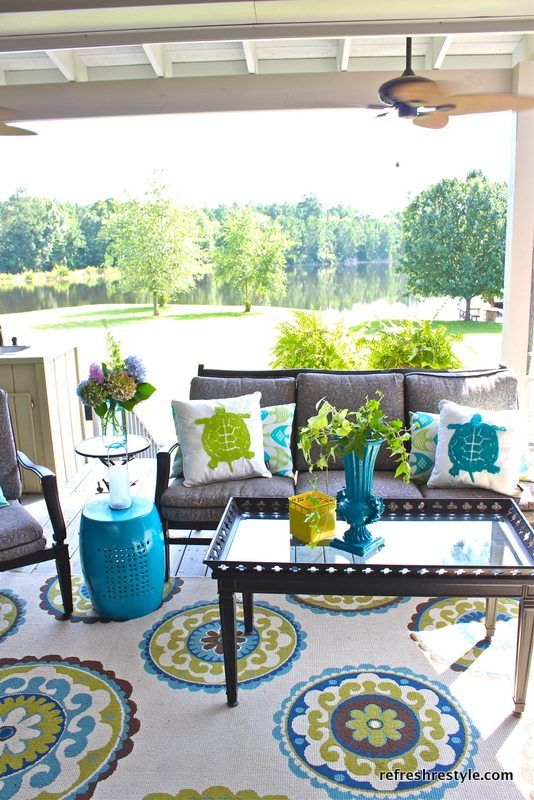 They both create a central space around which to gather. Fire pits or fireplaces provide coziness and warmth, extending the longevity of your outdoor space into the cooler months (or times of day). Water features offer soothing white noise and bring a serene vibe to your home.
#20 // Choose a Neutral Color Scheme
Ivory, gray, and black make a great neutral color scheme. We especially love using concrete architectural decor pieces to give off a minimalist, yet classic European look. When in doubt, keep it simple.
#21 // Mix Decorating Styles and Materials
Sometimes choosing a theme for your decor can limit you. We’re all about mixing styles. Just because you own a farmhouse, it doesn’t mean you can’t add modern and rustic accessories.
#22 // Add a Gable or Awning Over Your Door
Adding a gable over your door adds dimension and interest to the front of your house. It also gives coverage from the rain and sun beating down on your door.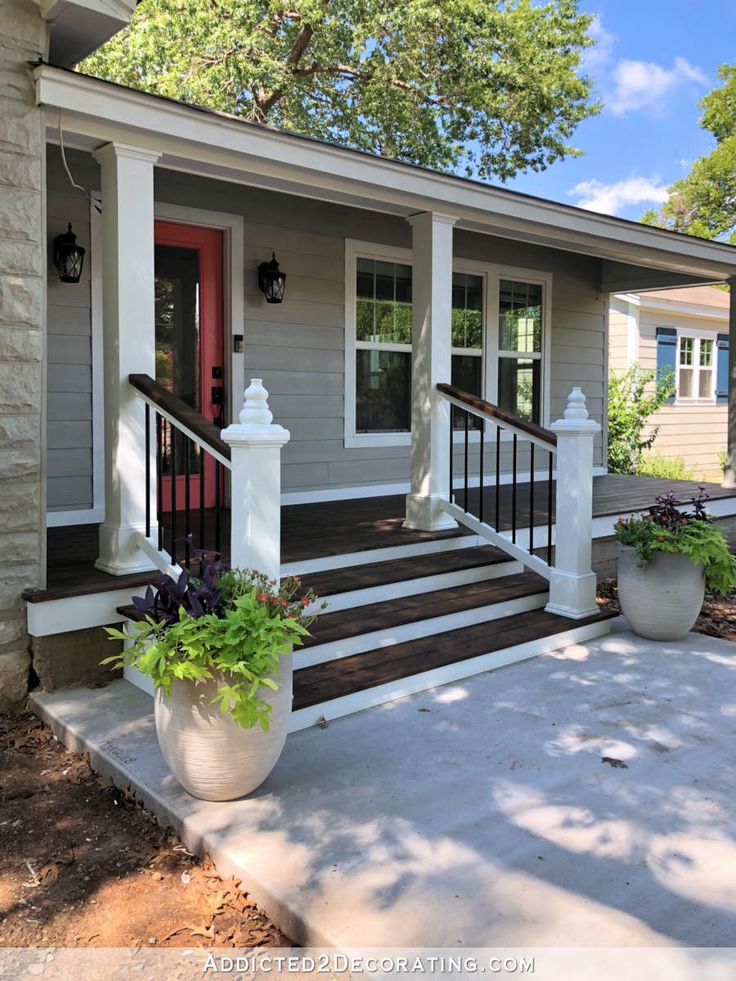 A gable roof can be metal or wood. If you keep it simple, gables and awnings are inexpensive and easy to install by local contractors.
#23 // Think of Every Element as Art
When putting all your front porch decorating ideas together, keep in mind that no detail is too small. Container plants, lighting, front doors, sidelights and transoms, walkways, and even the rises on the steps up to the front door all come together to make this home’s curb appeal so eye-catching.
#24 // Make a Dramatic Material Change
Sometimes painting or changing the material of your porch floor or ceiling is just what you need to create the feeling of a new space. While we don’t often suggest painting a wood front porch floor, you can find stains that come in nontraditional colors like black. Be sure to prime the surface before painting. Another idea is to extend your front walkway to create a beautiful flagstone porch.
#25 // Try a Cathedral Railing
Cathedral railing doesn’t need to be reserved for a church.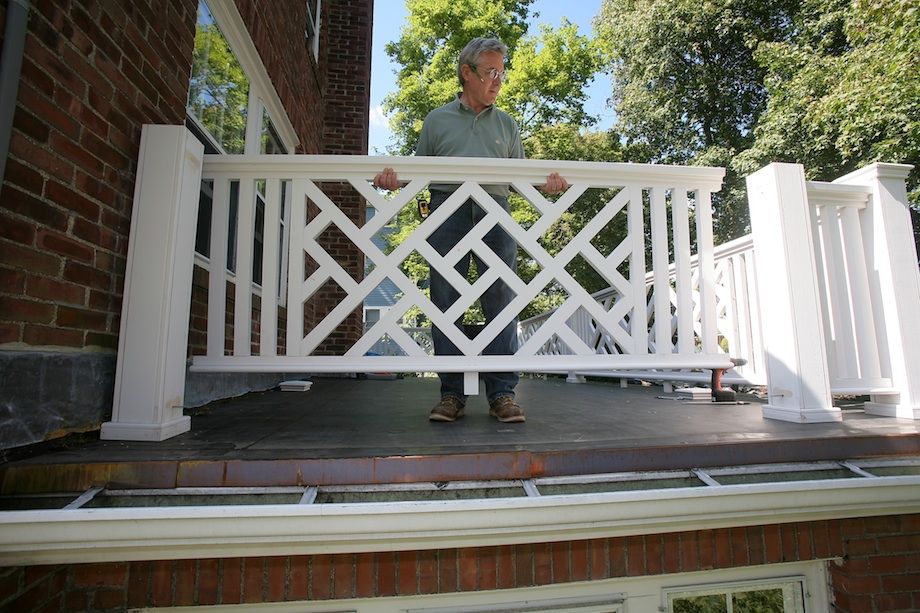 With its beautiful arched shapes, it can add class to any style of home, much like traditional columns. Since it is so versatile, it ranks as one of the most popular porch railing ideas that designers reach to when they want to add an interest piece to a front porch. Some cathedral railings can also have a simplified modern design. Take a look at how we used modern cathedral railing to replace the standard vertical railing in the photo above.
Front Porch Decorating: From Ideas to Reality
Now that you’re inspired, it’s time to make some changes to begin enjoying your house and outdoor living space. If you don’t know where to start or just need confirmation you’re making smart choices, that’s what our team is here for.
When you engage us in our virtual design services, our expert exterior designers will take your ideas — or lack thereof — and use their knowledge of trends, style, and architecture to create before-and-after renderings like those above. You also receive a list of materials, furniture, and fixtures they recommend using.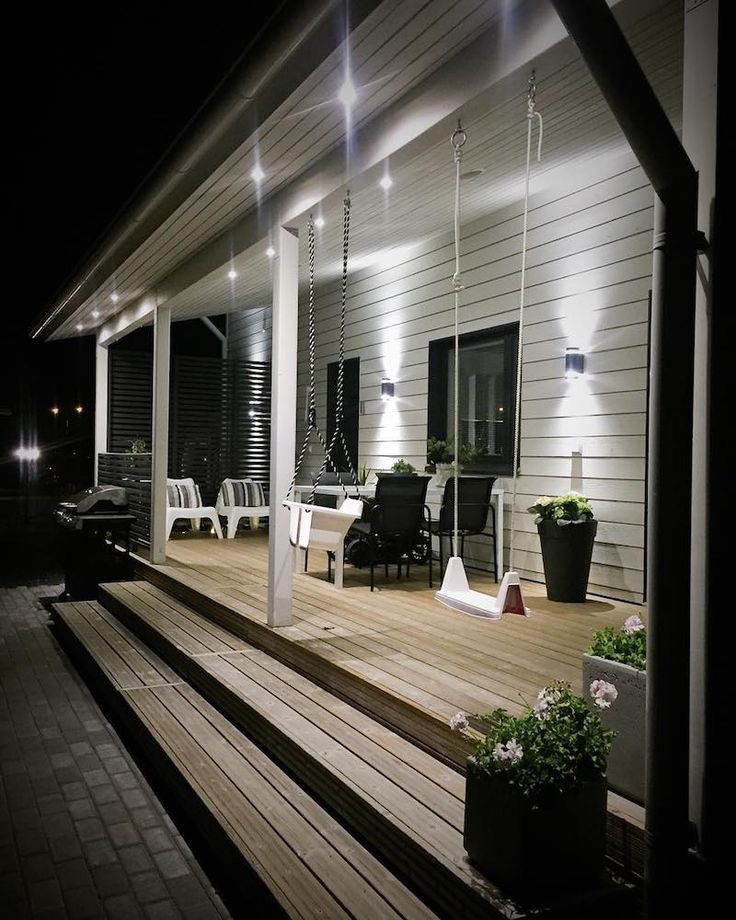 Do the work yourself, hire a local contractor, or do a bit of both. We want to get you on the path to making your home exterior design dreams a reality. Get started today!
Don’t just take our word for it. Here’s what one of our past clients has to say about their brick&batten experience (as posted to Houzz):
We used brick&batten to get a virtual exterior design of our home and we couldn’t be happier! They took all of our desires for our home, such as making our entry feel more welcoming, and created a cohesive and beautiful plan. We personally enjoy working on our home and updating things ourselves, so this allows us to have a visual guide/master plan, without using a builder or contractor. So now, when we need to replace windows, shingles, doors, paint, etc, we know exactly what to do! We definitely recommend brick&batten!
We’ve rounded up more client reviews here. Our fantastic clients are the reason we’re the leading virtual exterior design company!
How to attach a veranda to the house with your own hands (+photo)
A spacious and comfortable veranda or, as it is fashionable to say today - a terrace, is a great place for a secluded vacation, and for fun, stormy parties with friends in the warm season.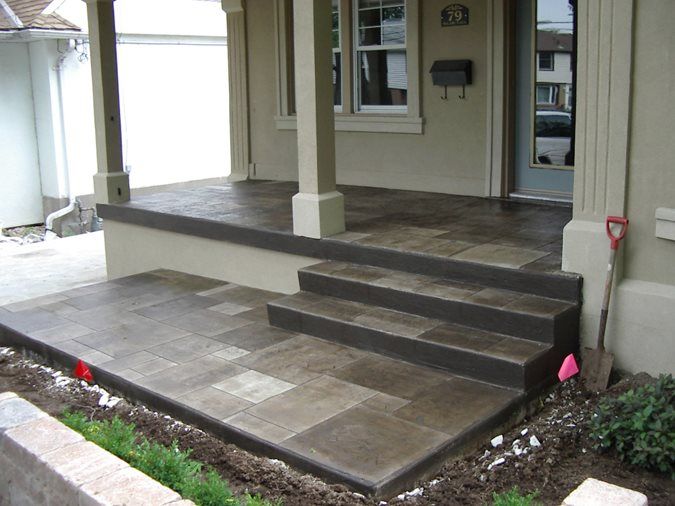 A well-designed veranda with an original design can immediately become a real decoration of the facade of any private house. Of course, it is best to lay the construction of a veranda in the main project for building a house. But do not be upset if you prudently did not do this, because this type of room can be attached at any time.
In this article we will tell you how to attach a veranda to the house with your own hands, we will consider options for a polycarbonate veranda, as well as an open veranda, we will give photo and video instructions.
Content
- Location
- Foundation
- Carcass
- Roof
- floors and walls
- from polycarbonate
- Advantages
- Options 0010
- Features of the devices of the sexes
- Features of finishing
- video
- photo
Location
The veranda of the country house
usually place the veranda in front of the main facade, but it is not forbidden to place it in front of the side facade, if in this if in this there is a need.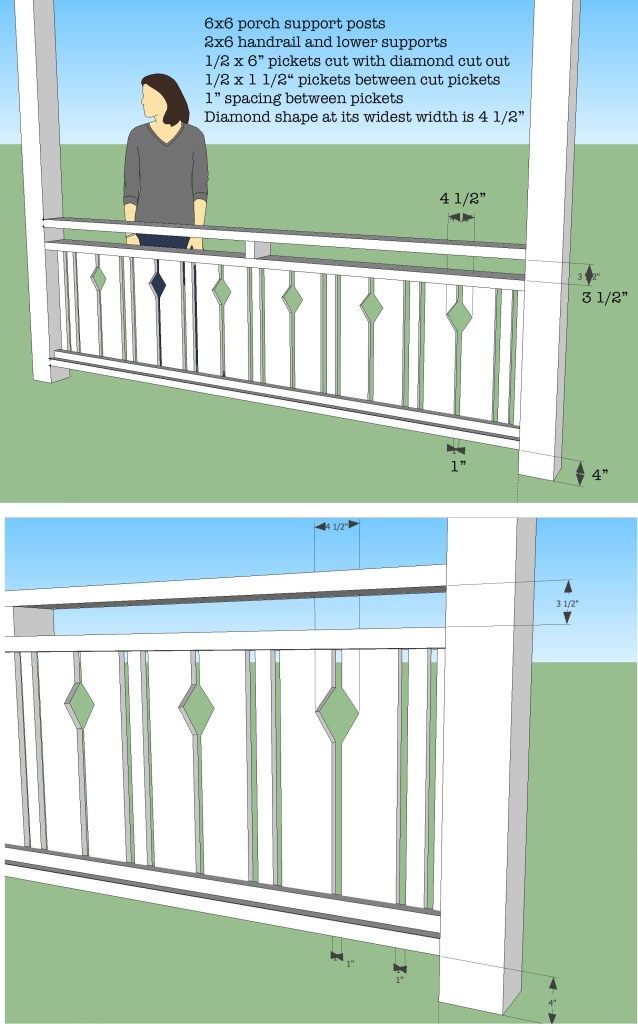 It is important that the veranda is clearly visible from the gate (the main entrance to the courtyard) and has a passage to the rooms of the house.
The decisive role in calculating the length of the veranda is played by the length of the facade of the house along which it will be completed. With a width, everything is much simpler, usually it is about two and a half meters.
Before you start building, do not forget to prepare the workplace, i.e. clear the area, dismantle the porch and the canopy over the entrance.
Foundation
Pillar foundation for veranda
Pillar foundation is well suited for a frame or wooden veranda, i.e. foundation with the installation of brickwork pillars under the corner posts.
It is recommended to dig holes for posts to a depth of more than a meter - this will be more reliable.
For a light veranda of small size, posts placed in the corners will suffice, and for a larger extension, intermediate posts with additional posts should be installed (in 50cm increments).
Foundation work sequence:
- First, holes are dug at least one meter deep.
- The bottom of each of the pits is covered in layers: first, 20 cm of sand are poured, and then 10 cm of gravel.
- A concrete base (approx. 15 cm) is poured and the concrete is allowed some time to set.
- Brick pillars are laid out. Their above-ground part is brought to the height of the main foundation or slightly lower. The height of the foundation brick pillars is usually made 30 cm below the finished floor level.
- Each finished pillar should be smeared with hot bitumen.
- Pole cavities are filled with brick fragments or fine gravel.
- The gaps between the posts and the ground are covered with sand.
Frame
Wooden frame
The frame of the veranda is usually made of wooden beams, the section size of which is 120x80 or 100x200. Logs (with a diameter of ≤ 12 cm) are sometimes used for the same purposes.
Starting to build a wooden frame, usually from the bottom trim (preferably double). The connections of the bars should be carried out with a direct lock. At the level of the second log, logs and vertical posts with spikes (50x50) are cut into the harness. The entire structure is fastened with nails, and for greater reliability, staples are used.
The most correct distance between the bearing racks is 50 cm, but, as practice shows, this value is greater.
Roof truss system and top rail mounted on studs. Racks can serve as solid wooden beams, or connected two boards (section 120x40) with a gasket between them. For fastening the rafters, a horizontal beam is used, passing under the slope of the roof of the house. The beam and posts should be fastened with anchor bolts. During the installation of the veranda frame, make sure that the roof of the veranda being erected fits well with the roof of the house.
Roofing
Construction process
Undoubtedly, the roof of the veranda should be a continuation of the roof of the house.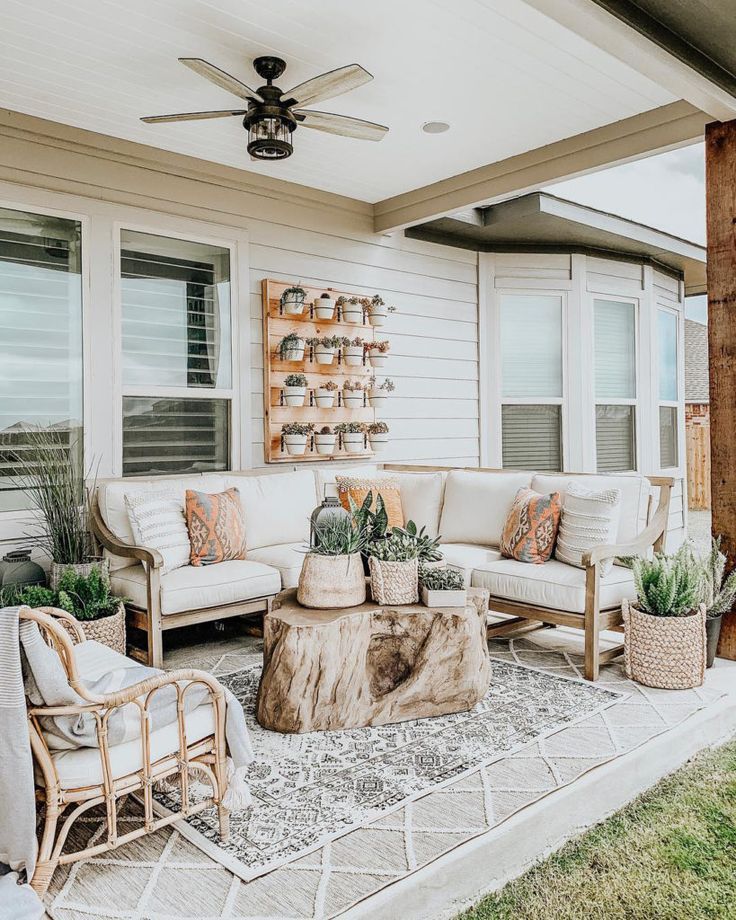 It is recommended to perform it from the same roofing material, but other types are also allowed. Roofing material is attached to a wooden crate. The crate is mounted either at intervals or close (depending on the type of roof).
- The boards are fastened closely when using roll material. When attaching the flooring to the rafters, nail heads should be sunk into the wooden surface (they should never protrude). The rolled material is fastened along the edges with nails, and for additional fixation, slats are nailed to the coating. The protruding edges of the roll should be folded inward and fastened with nails.
- If steel roofing material is used for the roof, it is fastened to the crate with nails and joined with a “seam” seam.
- Asbestos cement sheets are installed with an overlap. At the same time, the upper sheets overlap the lower ones by at least 14 cm. They are fixed in pre-drilled holes with nails or screws.
Floors and walls
Construction of the plinth
Usually the floor is made of wood, taking wooden boards as a material, coated in advance with an antiseptic.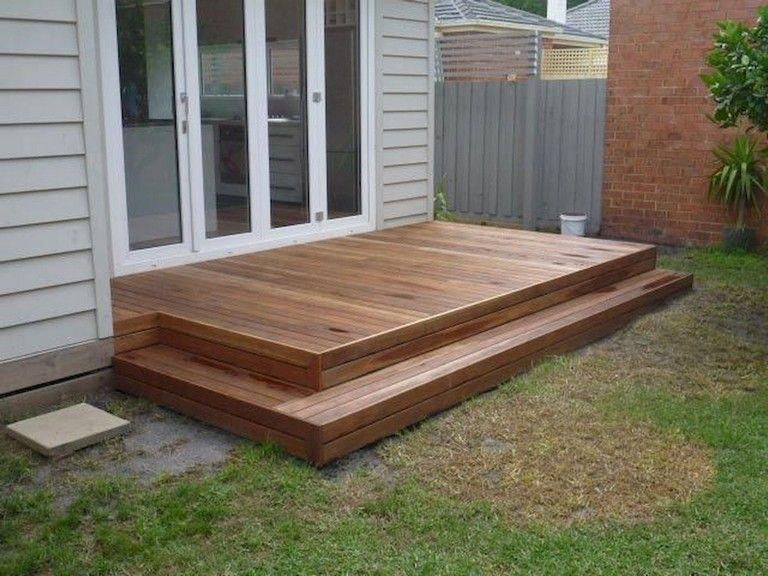
The veranda can be left open, or walls can be erected from wooden panels or clapboard. In the second option, do not forget to take care of the windows.
Do not over-insulate the walls of the veranda, because it is considered a summer place to relax.
From polycarbonate
After the floor, frame and roof of the veranda have been made, you can proceed to the sheathing of the structure with polycarbonate. So, you will get a bright and light veranda, where you can have fun in the warm season.
Polycarbonate is a translucent material made from carbonic acid polyesters. It is produced in the form of honeycomb or monolithic panels. In cellular polycarbonate, there are cavities between stiffeners that connect two sheets together. They often replace glass when arranging verandas. This is due to a number of positive properties of the material.
Benefits
Although polycarbonate has appeared on the construction market not so long ago, it is very popular among consumers.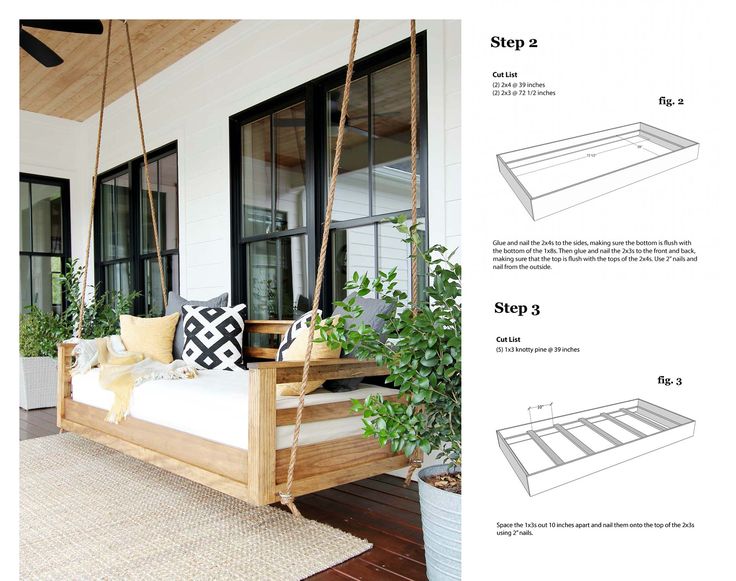 Why? The reason for this is the unique properties of the material, which has no analogues on the market today:
- High strength. These figures for polycarbonate are 20 times higher than for glass. If polycarbonate is damaged, then it will not crumble into small fragments, like glass, but will break into fragments that do not have sharp corners. Thus, the injury risk of polycarbonate is minimal.
- High light transmission - up to 86%. Due to the fact that part of the light is scattered, polycarbonate creates protection from direct sunlight. Partially absorbs ultraviolet light.
- Polymer panels are flexible, making it possible to design curved shapes. Polycarbonate can be bent without special equipment, right at the installation site.
- Temperature range is from -40 to +120ºС. And this implies that polycarbonate is not afraid of either the scorching sun or severe frosts.
Mounting Features
If you don't have much building experience, don't worry.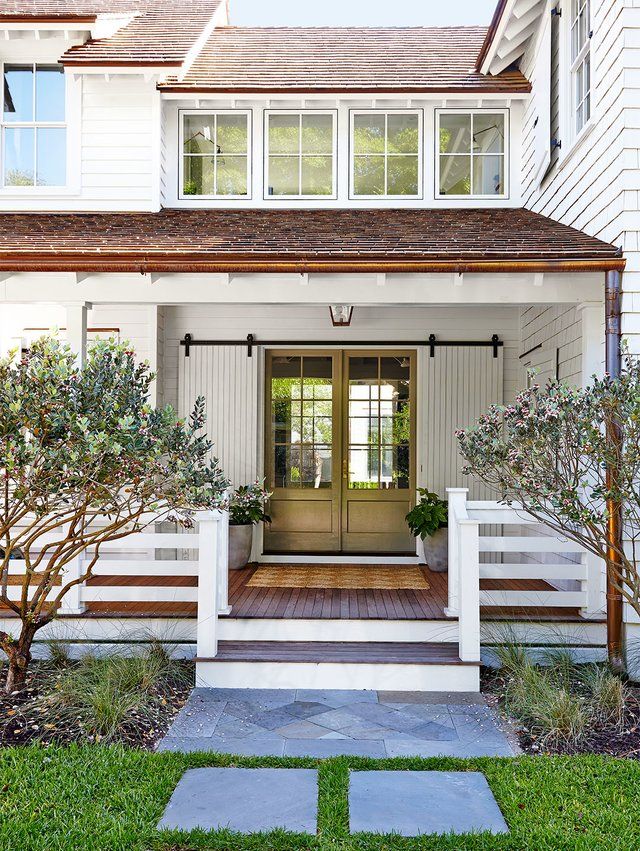 This technology is up to you to master and implement. Initially, you should make a foundation, fix the elements of the frame in it. After the concrete has completely hardened, you can begin to manufacture the frame. How to make a foundation and a frame made of wood has already been described in the article.
For the manufacture of a metal frame in this case, a thin-walled galvanized sigma profile will be used. Features of the installation of the frame:
- No welding is required, since all connections will be made with bolts. For this you will need a wrench.
- The main fastening of the beams - anchors, laid in the base of the foundation. If they have not been installed, then you will have to drill holes in the foundation and screw the check bolts into them, and then fix the beams.
- Sigma profiles are fastened with standard fittings.
If you made a frame from rolled steel, then it must be treated with a primer and then painted with metal paint.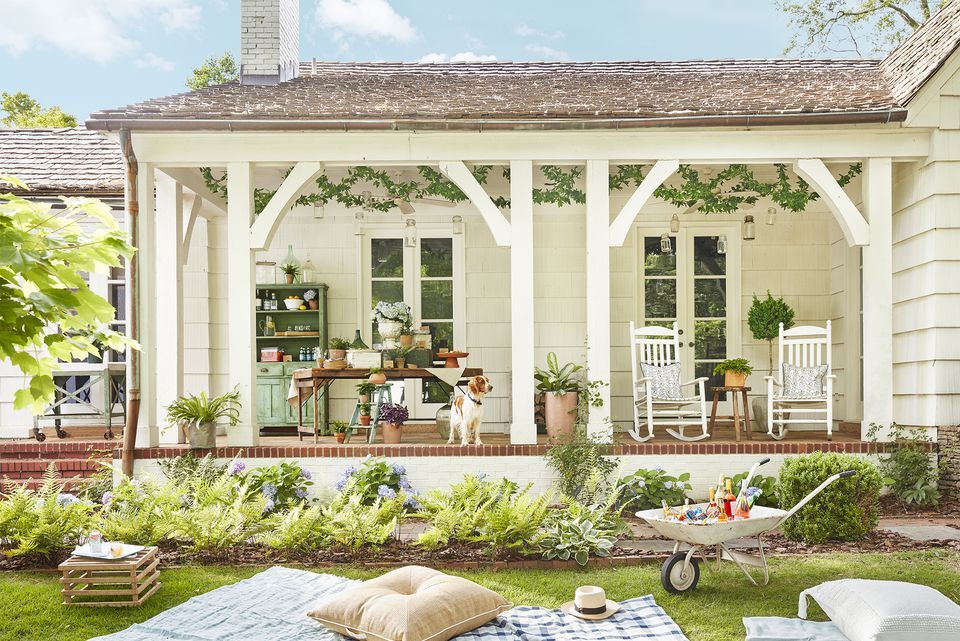 Thus, you protect the frame from corrosion.
Polycarbonate fixing
Now you need to cut the polycarbonate to fit it to the required size. This can be done with an electric jigsaw. It is important to take into account that the sheets must be tightly pressed to the surface.
If you cut polycarbonate too fast with a jigsaw, it will melt, and if this work is done too slowly, the material will burst.
To create a thermal gap during the assembly of polycarbonate sheets, it is necessary to ensure that the screws are not clamped to the stop. In addition, when installing polycarbonate under the washers, gaskets must be laid without fail. This will protect the material from damage and leakage. Holes in polycarbonate should be slightly larger than the diameter of the legs of the self-tapping screws. So, with temperature changes, polycarbonate will narrow and expand without deforming.
Wooden porch with polycarbonate roof
The roof is mounted according to the scheme already described in this article.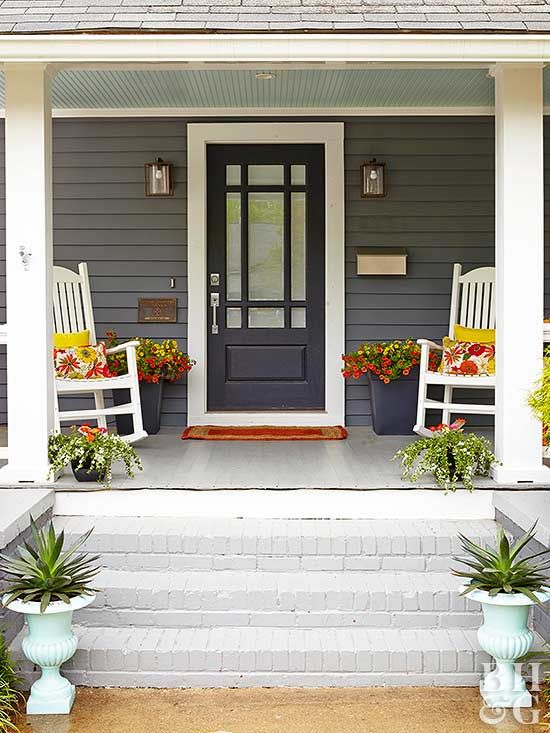 If desired, you can also make it from polycarbonate. In this case, your building will be very light. Polycarbonate is laid on the roof according to the same principle as on the walls.
Open
The open veranda is a frame structure without walls and the roof is supported by beams. This design has a number of advantages and disadvantages.
Pros and cons
Of the indisputable advantages of an open veranda, the following are worth noting:
- Easy to install. Its construction takes a minimum of materials and time. It's easy to bring her up.
- Easy maintenance. Such a veranda is more of a part of the street than a house. Therefore, to keep it clean, it is enough to sweep the floor regularly.
- An open veranda will allow you to enjoy the opening landscape and breathe clean air when you are on it.
Outdoor terrace
Like all man-made works, an open-type building also has disadvantages:
- Unsuitable for use in the cold season.
- It is impossible to install upholstered furniture on the open veranda, as it will be impossible to take care of it, which means that staying here will be deprived of a certain comfort of home.
- Difficulties may arise with the choice of finishing materials, as they will be exposed to the negative effects of the environment.
An open veranda is not glazed and no walls are built on it. It is often used as a gazebo. Build it in a frame way.
Tools and materials
For construction you will need:
- Concrete pillars for the foundation.
- Beam for frame with section 150×150 mm.
- Cement and sand.
- Beam for strengthening the frame with a section of 120×120 mm.
- Bracket for beam connection.
- Sheathing for the lower part of the veranda. It can be OSB, forging or slats in the form of plates or balusters.
- Wood screws 100 mm and 25 mm for fastening OSB or wooden lining.
- Wooden lining.
- Beams for roof mounting 150×150 mm.
- Anchors 150–200 mm.
- Krokva 60×120 mm.
- Roofing material, such as metal tiles or ondulin.
- Planks for making roof battens.
- Beams 100×100 mm.
- Windboard.
- Floor board 30-40 mm.
- Paints and varnishes for woodworking.
- Foundation waterproofing roll.
- Drill and saw.
- Level.
You have already familiarized yourself with the method of making the foundation, so we will miss this point in our description of the construction of an open type building. And now let's move on to the features of the device floors.
Features for flooring
To carry out high-quality installation of the floor, you must first prepare the base. To do this, the earth is first leveled and rammed. Adjustable supports can serve as supports for the logs. Moreover, their number will directly depend on the planned loads on the floor. This idea is great for open verandas.
Then place the joists on the adjustable feet and fasten them. Thanks to these supports, you can adjust the slope of the floor and level it. Installation of boards begins from the edge of the veranda parallel to the logs. Boards must be level and dry. They should be placed closely. Fastening boards to the logs is carried out with nails or wood screws.
Wooden floors are short-lived because they cannot withstand long-term exposure to aggressive environments. If you want to make a more durable floor on the veranda, then you can replace the boards with decking or, as it is also called, a terrace board.
The structure of the frame and roof does not differ from the technology described in this article.
Finishing features
In order for the wooden elements of the open veranda to last longer, they should be impregnated with special antiseptics and covered with paints and varnishes.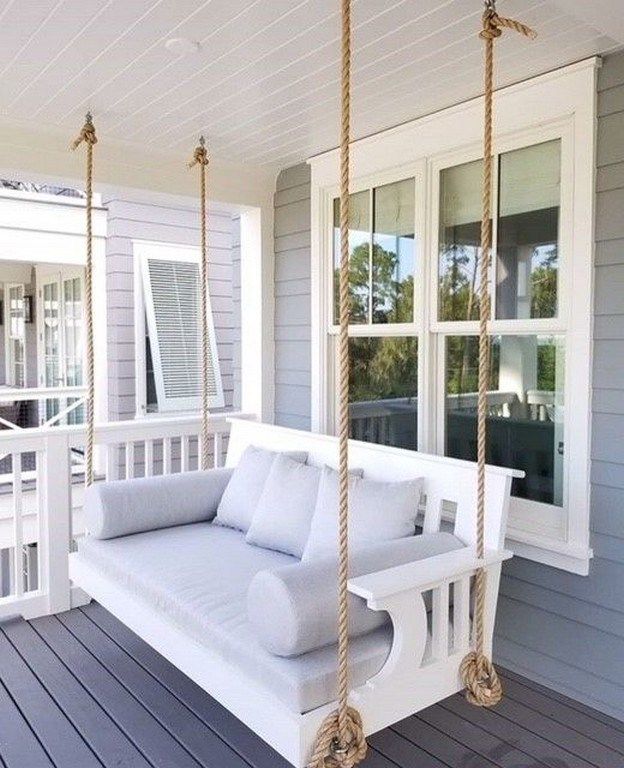 Among other things, these actions will highlight the structure of the tree and help make the extension more attractive.
The lower part of the veranda also needs finishing. To do this, you can use slats that are fixed at an angle of 45º, forged elements or balusters. If you use a wooden or plastic lining for this, then under it you will need to make a frame of bars.
The same material must be used for ceiling and gable finishes. It can be wooden lining or OSB boards. At this stage, it is important to run electrical cables for lighting the veranda and make appropriate holes in the ceiling sheathing.
Tips from the editor:
- how to build a brazier out of bricks with your own hands;
- how to build a winter greenhouse with your own hands;
- how to build a gazebo with your own hands from wood.
Video
How to build a veranda-wing, watch in the following video material:
photo
Winter-stained veranda 9000 9000 9000
9000 Verande0002
The winter veranda extension
Did the article help you?
Do-it-yourself veranda - how to build a veranda
The construction of a special extension to a country house, made in the form of a veranda of one design or another, without any doubt can give your home a more attractive look.
Do-it-yourself wooden frame veranda, as a rule, is used only as a summer room - that's why it does not need to be insulated. At the same time, it is also desirable that its design be extremely simple, which would allow you to surely build it in the country or in the garden on your own.
A veranda attached to the house can be placed along the front or end wall of the house in such a way that the door to the dwelling is located inside the extension and is additionally protected by this.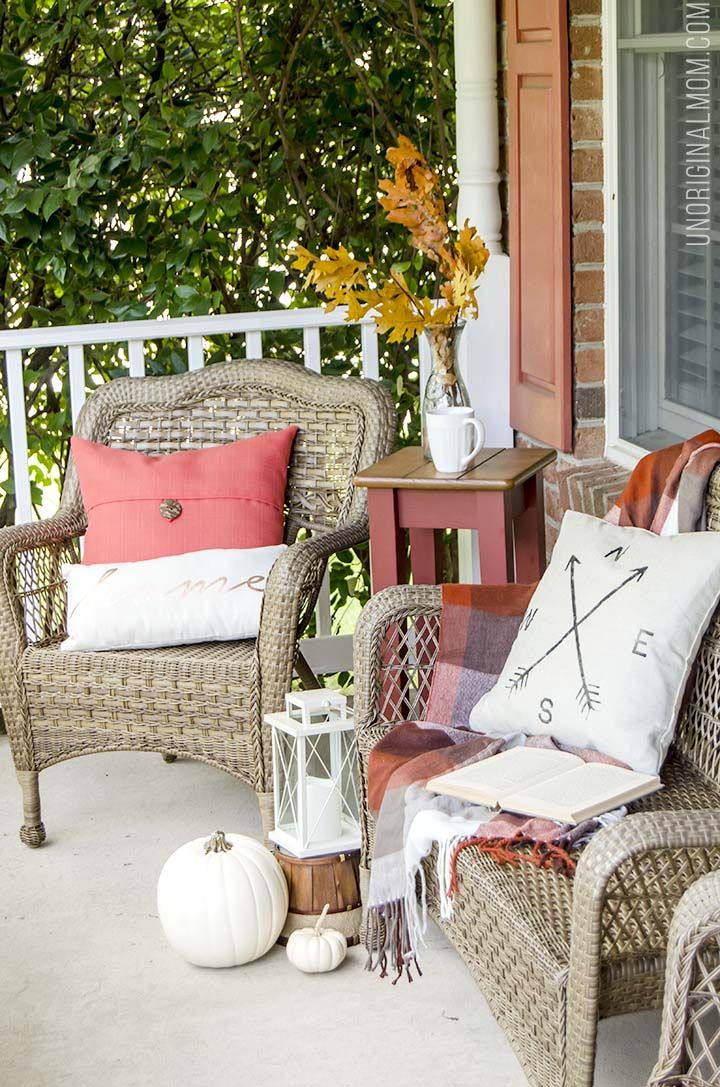 Most of the most common veranda projects set for them a length of about 4-6 meters and a width of about 2.5 meters.
Pillar foundation
Porch foundation for a veranda is best made of bricks, with foundation pillars placed under each of its corner posts. In the case of large extensions, it will be necessary to lay poles under one or two intermediate racks of the frame.
Works on the installation of foundation pillars are usually carried out in the following sequence:
- Holes are dug in the places where the pillars are placed, about 1 m deep.
- At the bottom of each of the pits, a sand cushion 20 cm thick is made (in the case of sandy soil, the bottom must be covered with a layer of crushed stone or gravel, which is usually filled with hot bitumen).
- Then a concrete base is made, which has a strictly horizontal surface.
- After that, on the frozen foundation, a brick foundation pillar is laid out to the desired mark.
We note right away that the height of the foundation pillars should be such that the flooring of the veranda floor is 25-30 cm below the floor level of your home. In this case, the upper ceiling of the veranda (its roof) will "fit" just under the overhang of the roof of the building, and the height of the building will be equal to the height of the rooms in your house.
Upon completion of the basic procedures, the installed foundation pillars are coated with bitumen, after which they are backfilled. The voids formed in brick pillars are usually filled with gravel, broken bricks or any other filler.
Frame
Veranda frame
Standard beams with a section of 100x100, 120x80 mm, and sometimes logs with a diameter of 100-120 mm are used to equip the frame of the veranda. When mounting the frame, first of all, the lower trim is laid on the concrete base of the pillars.
Corner joints of the lower trim are usually mounted in a "half-tree" method using a direct lock, and experts advise making it double.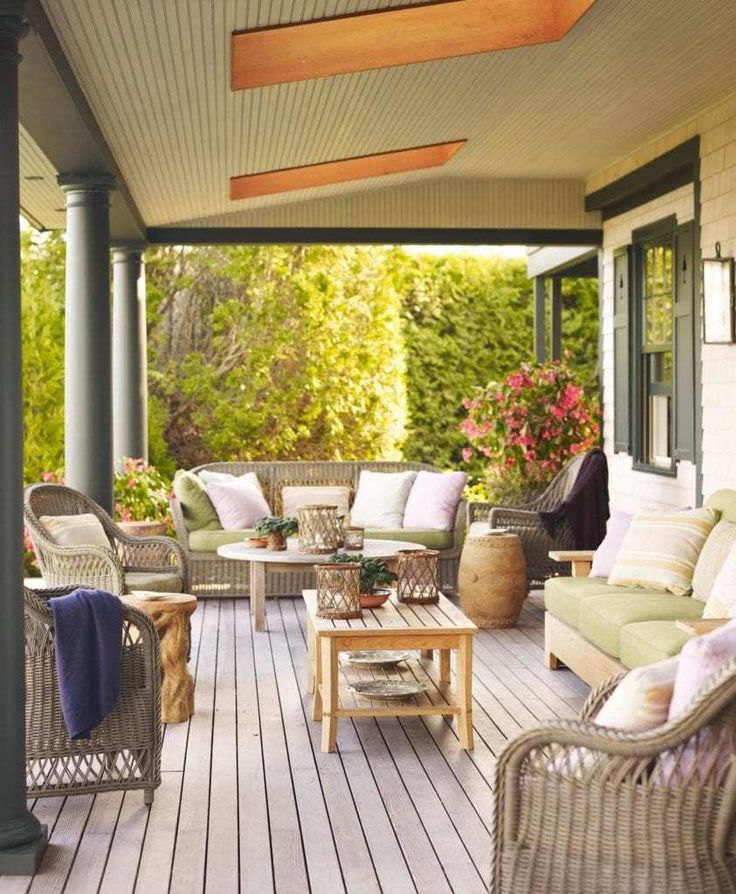 Then logs are cut into such a double strapping, on which the floor will later be laid.
After that, grooves of 50×50×50 mm (the so-called "spikes") are prepared for the posts, which are fastened with nailing during installation and then additionally fastened with special brackets.
On top of the fixed racks, the upper trim and rafters are mounted from the beams, which are fastened with the same spikes and nails (or staples). The ends of the rafters are fixed on a special horizontal beam (girder), placed under the very slope of the roof and fastened to the posts of the veranda. The run itself and the racks adjacent to the wall of the building are attached to the wall using anchor bolts of the required size. Particular attention when deciding how to build a veranda on your own should be paid to the installation of beams that are supports for the rafters. They must be carefully fixed on the wall of the building and placed under the roof overhang so that the roof of the building is joined to the roof of the house as tightly as possible.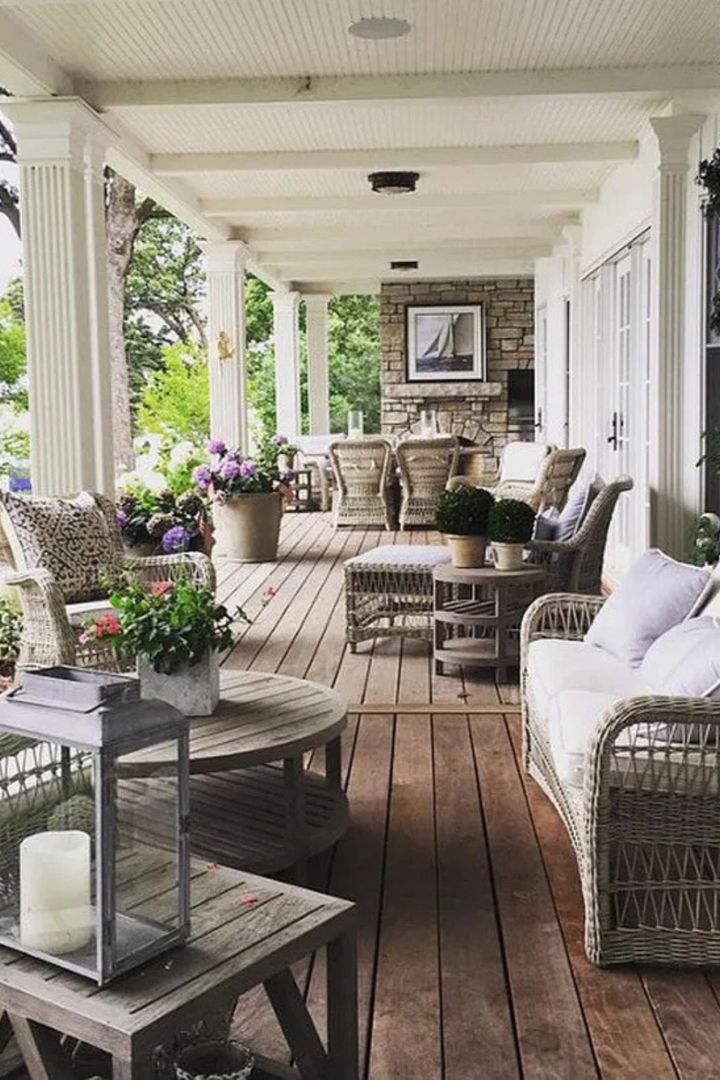
Roof and floor
The roof of our veranda can be made sloping and slightly flatter than the roof of the house itself. To cover the veranda, the same material that was used in the arrangement of the roof of the house is quite suitable. Of course, if you wish, you can always choose any of the modern roofing - rolled, asbestos-cement or steel. Before laying the roof, a crate is mounted, which is usually made of unedged boards, securely fastened to the rafters.
Roofing made of roofing material and other rolled materials is recommended to be laid on solid wooden flooring, made up of edged boards tightly fitted to each other. At the same time, the coating material is carefully spread on the flooring, its surface is leveled, and the edges are grabbed with small nails.
After that, special slats are punched, with the help of which the laid strips of material are fixed on the plane of the slope. Strips of roll coating are superimposed on the slats and fixed on them with roofing nails.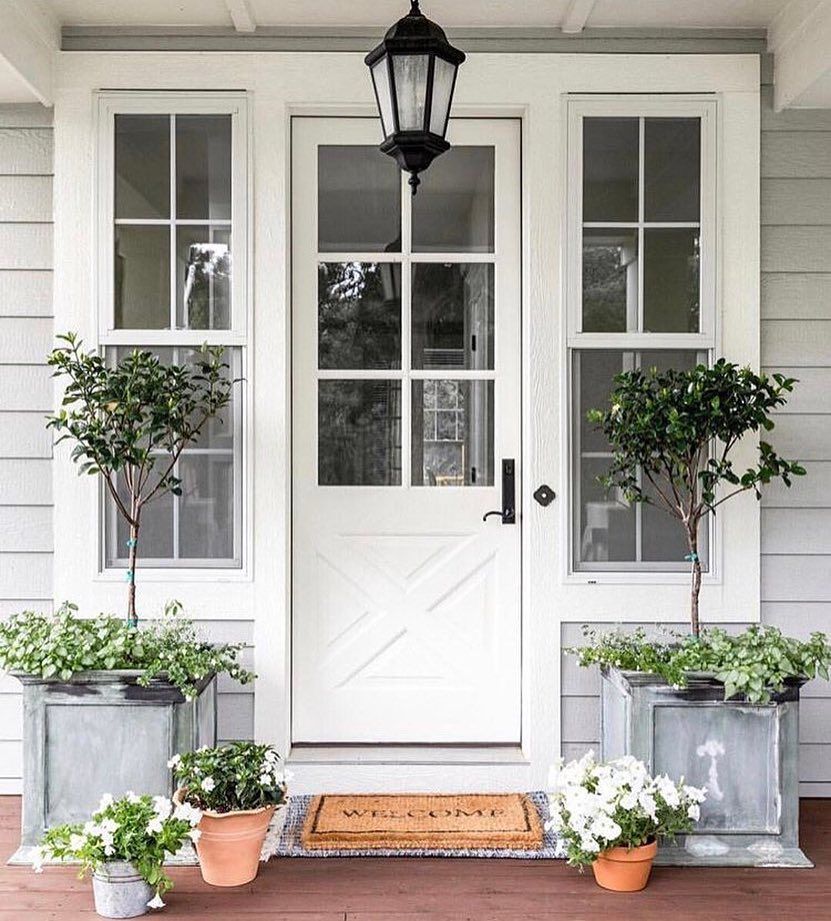 At the edges of the roof, the rolled material is folded under the crate and fastened with the same roofing nails.
Solid purlins can also be used under steel sheet roofing. When laying, sheets of roofing steel are usually joined by forming special folded seams and attached to the body of the crate with nails.
A typical asbestos-cement coating (in the form of sheets) is laid on a crate with an overlap of one wave, while each overlying sheet must overlap the underlying one by at least 12 cm. Such sheets are fastened with special nails or screws, for which small holes.
The floor for the veranda can be made single, while the boards are mounted on logs cut between the first and second crowns. Logs and floorboards are recommended to be treated with an antiseptic and painted with any suitable paint used for outdoor work.
Windows, walls and door
When arranging wall partitions and windows on the veranda, it is necessary to take into account that their relative dimensions (width of windows and piers and height of window openings) largely determine the appearance of the entire building as a whole.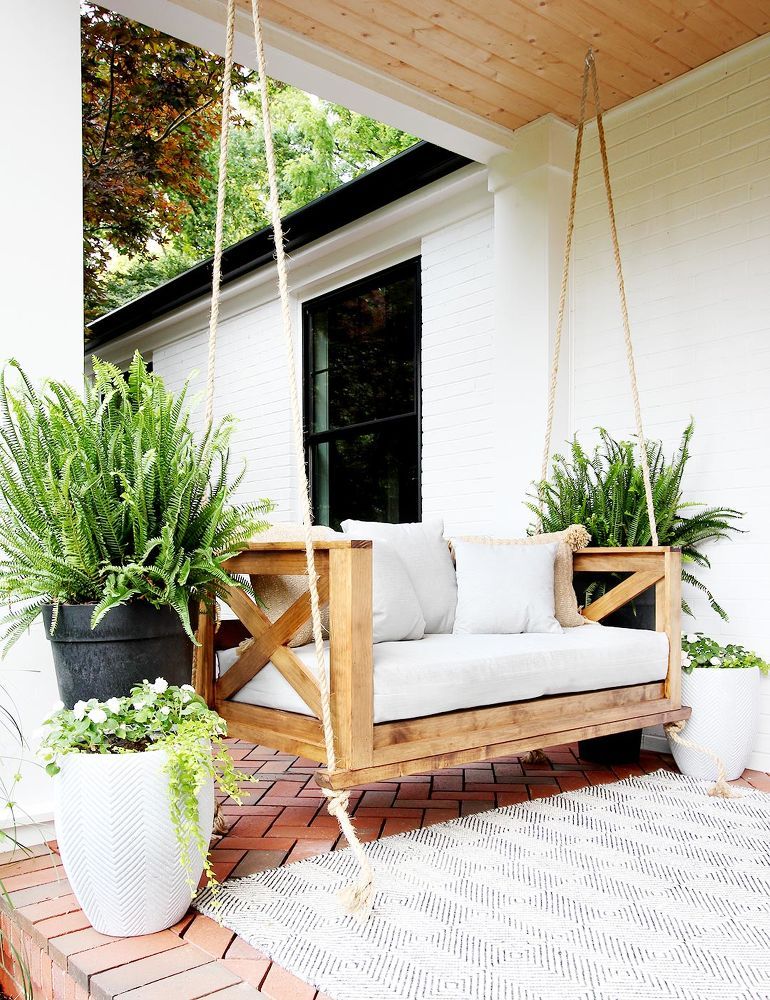 Since the veranda belongs to the category of unheated summer rooms, single window frames can be installed on it.
Installation of windows begins with the installation of a window sill, which is usually fixed at a height of 50-60 cm from the floor covering and fastened to the frame posts. The level of the windows on the veranda, therefore, will be somewhat lower than in the house. The gap between the bottom trim and the window sill can be sewn up with ordinary construction clapboard (sometimes standard wooden shields are used for this).
Sheathing of piers is usually carried out only from the front side, since there is usually no need for their insulation. Then, window blocks are installed in the opening formed between the upper trim and the window sill.
The installation begins with the fact that the window block is carefully inserted into the wall opening and its frame is fixed at the corners of the opening with special wooden wedges. After that, using nails of a suitable size, this box is attached to the window sill and sheathing in several places at once.