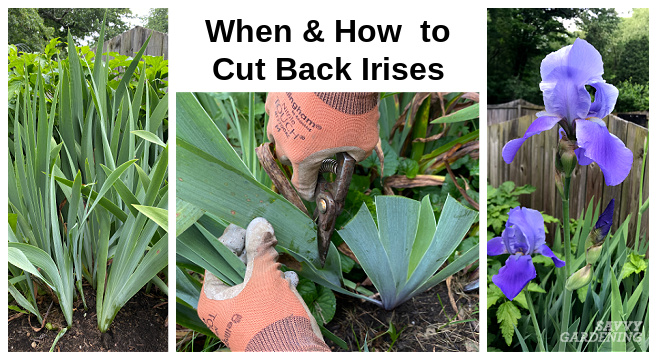
When to cut iris back
When to Cut Back Irises for Healthier, More Attractive Plants
Bearded irises (Iris germanica) are a star of the late spring garden. Their big floppy blooms come in a huge range of colors, capable of creating a rainbow of hues in the landscape. They are deer- and rabbit-resistant, and many varieties have a lovely but subtle fragrance. Though they are fairly easy to grow, it’s important to know when to cut back irises to maximize both the plant’s health and the appearance of your garden.
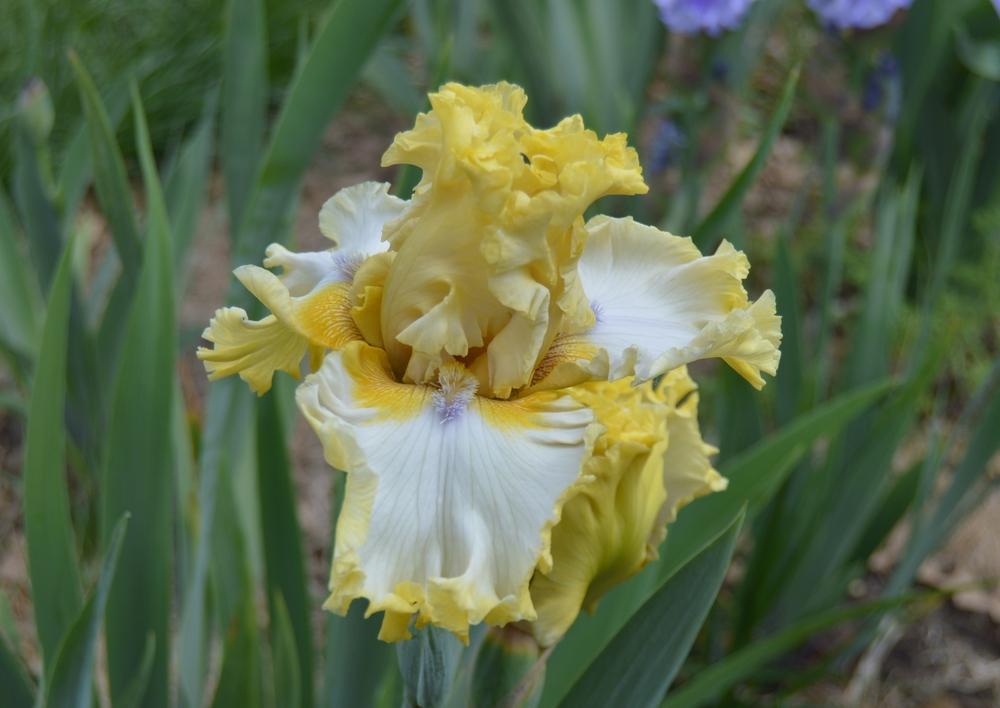
Bearded irises come in a broad range of colors. Here are just a few of the ones in my home garden.Why is knowing when to cut back irises important?
There are three primary reasons to trim back irises:
- While bearded irises put on quite the show for two to three weeks every spring, once their blooms fade, the plants look a lot less attractive. You’ll want to trim off the spent flowers to keep the garden looking its best.
- In addition to removing the spent flower stalks, disease prevention is another factor that plays into when to cut back irises.
There are several common iris diseases that can be reduced or eliminated by proper iris care, including iris pruning.
- Lastly, knowing when to cut back irises is critical for preventing a dreaded pest known as the iris borer.
Let’s talk about each of these three reasons in turn and discuss how and when to trim irises to help them achieve peak performance.
When they’re healthy, bearded iris plants are lovely. Unfortunately, they are prone to many foliage diseases which causes brown and/or yellow foliage.When to cut back iris flower stalks
Deadheading is a daily or weekly task for most gardeners. Removing the spent flowers from some types of plants encourages the development of subsequent blooms. However, this is not the case with bearded irises. The majority of varieties bloom only once in the late spring, and that’s it for the season. Like peonies, even if you deadhead irises, they won’t flower again until the next year. There are a handful of bearded iris cultivars that bloom again in the autumn, but they are not the norm.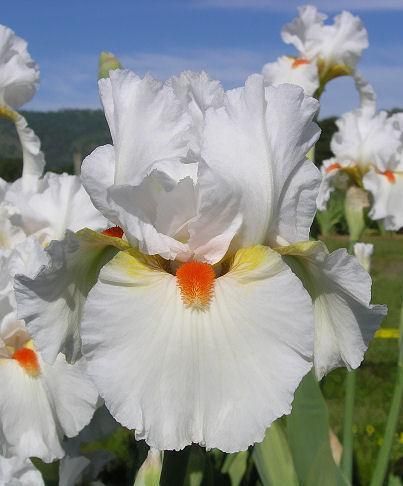 That being said, you should still trim off spent iris flower stalks to keep the plants looking tidy and prevent botrytis and other diseases. The right time to remove the flower stalks is a few days after all the blooms have faded.
How to deadhead irises
There is no need to remove individual dead flowers as they fade. Instead, trim off the entire flower stalk at the end of bloom. To remove spent flower stalks from bearded iris plants, follow the stem all the way down to the base of the plant where it meets the rhizome (the thick fleshy root-like structure), and trim it off using a sharp pair of pruning shears. Cut the stem at an angle if possible. If you cut it flat, rain and irrigation water collect on the cut surface, which can lead to crown rot. Angled cuts encourage water to run off the side.
To deadhead irises, follow the flower stalk all the way down to the base of the plant and use a sharp pair of shears to trim it off.
When to cut back irises to manage diseases
Unfortunately, bearded irises are prone to several different diseases. Bacterial leaf blight, botrytis, ink spot, soft rot, and leaf spot are among the most common. These diseases leave iris foliage marred with brown spots or streaks. Some cause the rhizomes to turn mushy. And they make the plants look downright ugly. What’s a gardener to do?
Unfortunately, bearded irises are prone to many diseases that turn the foliage brown or yellow. Trim it off regularly to keep the disease from spreading.Since all of these diseases are encouraged by wet weather or damp, humid conditions, encouraging good air circulation is key to preventing these diseases or, at the very least, lessening their damage. Do not water irises in the evening and use drip irrigation or a soaker hose instead of an overhead sprinkler if possible. The drier the foliage stays, the better. But, since you can’t control Mother Nature, it’s inevitable that the foliage will get wet from time to time.
Immediately remove any iris leaves that show signs of disease (spots, streaks, or blotches) and throw them into the garbage. Cut them off as close to the rhizome as possible. Continue to remove discolored foliage as soon as it appears. I do this two or three times through June and July to keep the plants looking good.
Trim diseased or damaged leaves off at the base of the plant. Dispose of them in the garbage or by burying them to limit further disease transmission.How to limit iris disease by pruning the plants
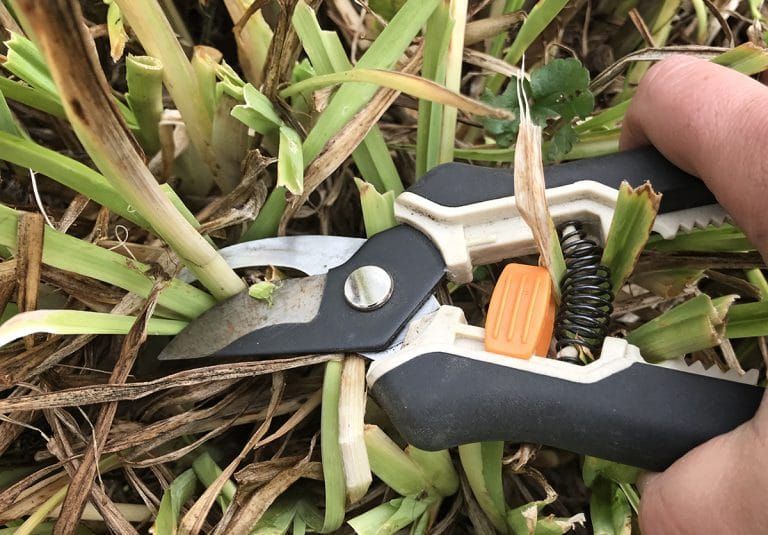
In late summer, if the plants are flopping over and looking really disheveled, prune the entire plant back. Use a pair of garden scissors to trim each “fan” of leaves down to half of its height. This improves air circulation around the rhizomes and discourages rhizome rot. Prune each leaf blade at an angle to create a rounded fan shape and prevent rainwater from sitting on the cut surface and causing rot.
In mid summer, when the plants begin to look ratty, cut all the foliage down by half to create “fans” of leaves. Always cut at an angle.
At the end of the growing season, after the leaves have been killed by a few fall frosts, completely remove all foliage. Most of iris diseases overwinter on the leaf debris. Getting rid of the foliage limits the presence of overwintering fungal spores.
Iris fans look much more attractive than brown, half-dead foliage in late summer. Then, when frost strikes, cut all the leaves off completely to keep fungal spores from overwintering.When to cut back irises to prevent iris borer
Iris borers (Macronoctua onusta) are a species of moth larva that feed on the rhizomes of bearded iris. Their feeding causes iris foliage to turn slimy and yellow. Often there is a putrid smell around the plant (think rotten potato). The female moths lay eggs on iris foliage in late summer. These eggs sit on the foliage all winter long, and then they hatch in spring. The tiny caterpillars burrow into newly emerging leaves and begin to feed inside of them, working their way down to the base of the leaf and into the rhizome. By mid-summer, a single borer can carve out the insides of an entire rhizome, leaving only a stinky, smelly mess behind.
Iris borer larvae are chubby and pinkish white. If you divide your iris in the late summer, you’ll often find a few borers in the process. Come August, the borers burrow into the soil to pupate. A few weeks later, the adult moths emerge to breed and lay more eggs.
While you can use beneficial nematodes to control this iris pest, knowing when to cut back irises is a really easy way to prevent more borers. Since the eggs overwinter on the foliage, it’s critical that you cut back irises in the fall. Trim off the leaves all the way back to the rhizomes, and toss them in the trash or bury them. If you come across a soft, rotten rhizome, dig it out and throw it away.
Borers leave behind excrement called frass, along with mushy stems and hollowed-out rhizomes.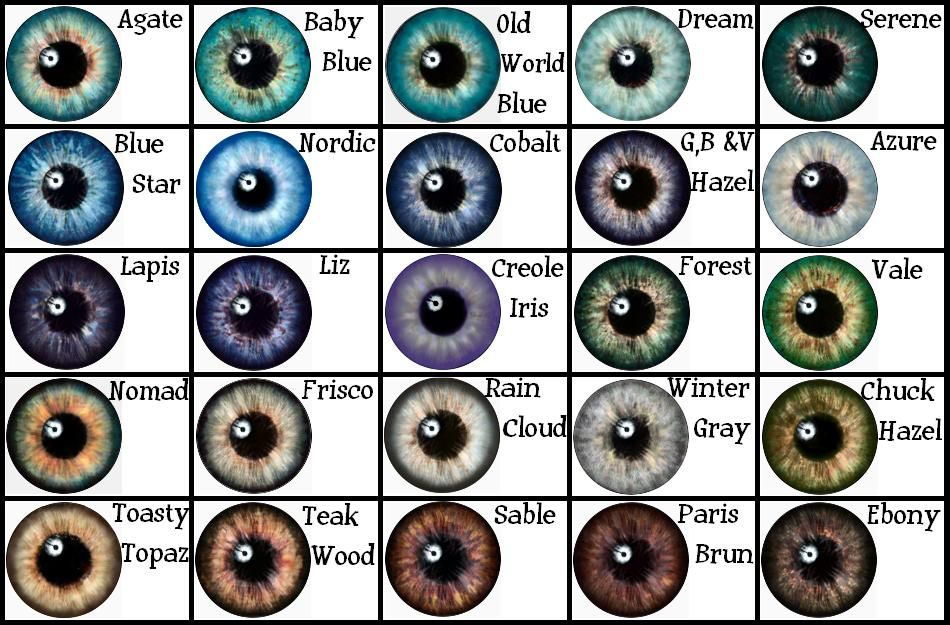
One final way to up your iris game
As you can see, there are many reasons why learning when to cut back irises and how to do it properly can improve the health of your plants and the beauty of your garden. Another task to keep your iris plants in good shape is to divide them every few years. This important practice further serves to prevent disease and encourage better blooms. Here’s an article on how to divide iris.
While in bloom, irises are real show-stoppers. Care for the plants properly and you’ll have many seasons of gorgeous blooms.Learn more about when to prune your irises in this video:
For more on growing beautiful flowering plants, please read the following articles:
- 8 Types of garden lilies
- Perennials for small gardens
- Purple-flowering perennials
- Shasta daisies
- How to grow daylilies
Pin it!
When do you cut back irises? Expert tips for the best blooms |
(Image credit: Alamy)
With over 250 species of iris around the world, these tall, colorful plants, are desirable pops of color in many gardens. Luckily, despite their numerous varieties, many share the same appearance and gardening needs. As the cooler months approach, learn when to cut back irises to protect their beautiful blooms the following year.
Irises make wonderful additions to any garden ideas, and their delicate blooms and soft colors stand out beautifully in cottage garden ideas. Once you have taken the time to learn how to grow irises, cutting back irises should be done annually to ensure your plant remains healthy through the winter in preparation for the following spring.
Here, gardening expert Rachel Crow, garden editor for Homes & Gardens, has shared her tips on when to cut back irises, as well as why it is crucial to prolonging your plants.
Senior Garden EditorRachel has written for lifestyle magazines for many years, with a particular focus on gardening.
Now focusing on gardening content on Homes and Gardens and its sister brands, she finds every day is a journey of discovery, whether it is learning about new plants or gardening techniques, or sharing the advice of passionate horticultural experts and garden designers.
When do you cut back irises?
(Image credit: Alamy)
'Irises typically die away as the temperatures get cooler, so it is a good idea to start pruning and cutting back your iris plants in fall,' explains Rachel. 'You should begin cutting irises back after flowering and the blooms have all begun to fade. The remainder of the plant's foliage should be left until the first signs of frost, however.' Deadheading irises throughout the blooming season in spring and summer should be avoided, unlike deadheading pansies, as these plants only bloom once. 'Cutting back iris flowers helps keep the plant looking tidy, rather than help restore energy for new flowers,' Rachel continues.
It is worth noting that if you intend to split irises, it should be done after the plants have flowered, but before cutting back for winter.
'Allowing the leaves to die back naturally in fall before winter frosts allows the plant to gather and restore its energy in preparation for the following spring,' she adds. 'Cut away any remaining leaves and stem to just above the soil line in mid-fall. Cutting the leaves and stems back before this may risk weaker or non-flowering plants the next year.'
Why should you cut back irises?
(Image credit: Alamy)
As with many other plants, there are a few reasons why you should cut back your irises such as protecting the roots and allowing the plant to regain its energy. The most important reason, however, is to prevent overwinter diseases.
'Irises, particularly bearded irises, are prone to several diseases such as blight, leaf spot, and soft rot,' explains Rachel. 'These diseases can quickly kill a plant so cutting back infected parts as soon as possible can help maintain the rest of the plant. Pruning at the end of each season can also help to prevent diseases from setting in over damp winters.'
How to cut back irises
(Image credit: Alamy)
To cut back irises, start by removing the dead flower heads once they have faded and begun to shrivel.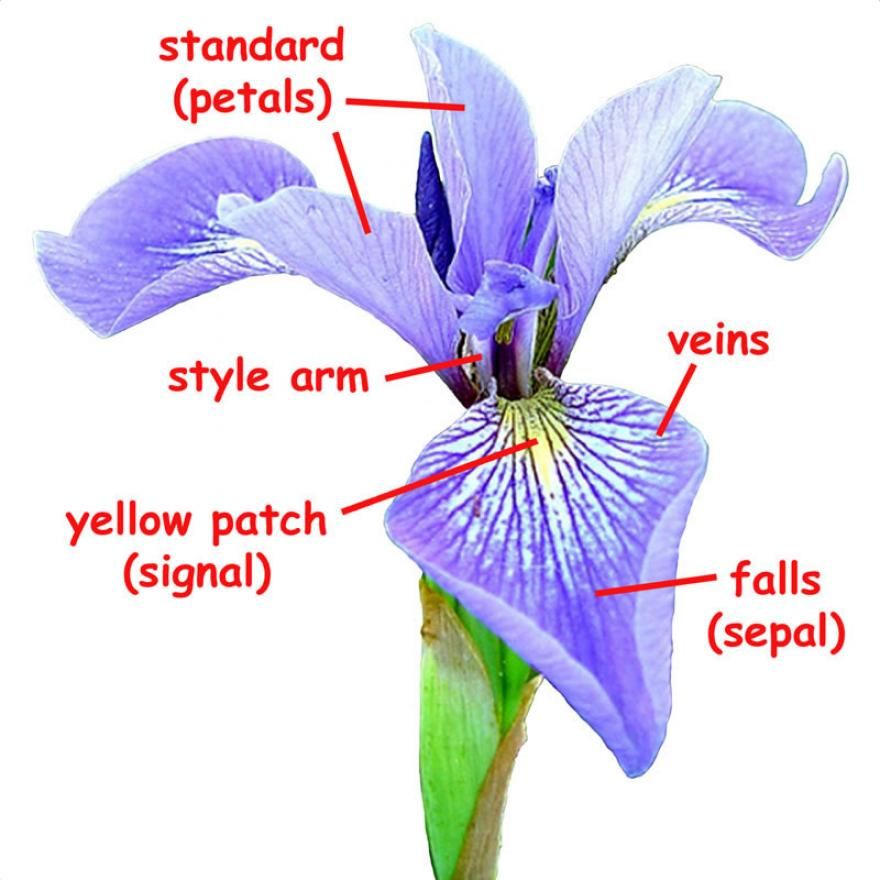 This can be done as soon as they start to die off around late spring and early summer.
'When cutting back the iris plant, use sharp, clean pruning shears and trim the stem so that only three inches remain out of the soil,' recommends Rachel. 'Try to make crisp cuts with no tears to ensure healthy plants next year.' Make sure to dispose of any leaves in your compost, removing any diseased leaves to your regular waste bin if needed.
'When cutting back your irises, take the time to check for any pests and disease in the plant and surrounding soil,' Rachel suggests.
Can you cut back iris leaves after they bloom?
While you can cut back iris leaves and stems after they have bloomed, it is recommended to leave the foliage on the plant until mid-fall to allow the plant to regain its energy to survive the winter and rebloom the following year.
What do you do with iris seed pods?
Iris seed pods can be used to grow more iris plants as long as they are stored correctly after harvesting. Learning how to collect and store seeds from your garden plants is an excellent way to populate your garden with your favorite bright blooms affordably.
Snip Iris seed pods off of the plant in late summer, being careful to not lose any of the seeds as you do so. Store the pods in a cool, dark place until you are ready to use them.
If you do not want to replant your iris seeds, these pods can be disposed of in your compost or waste bins.
Chiana is a junior writer for Homes & Gardens having joined Future plc as a new graduate in 2022 after achieving a 1st class degree in Literature at university. She first became interested in design as a child after spending her summers helping her parents redecorate her childhood home. As a long-time reader of Future’s homes titles, Chiana is constantly finding new inspiration at work as she focuses on emerging trends, how-to’s, and news pieces.
Rotate, crop, and modify images in Adobe Camera Raw
User's Guide Cancel
Search
Last update Jan 24, 2022 03:51:59 AM GMT | Also applies to Adobe Camera Raw, Adobe Creative Cloud, Creative Suite
- Photoshop User Guide
- Introduction to Photoshop
- Dream about it.
 Do it.
 - What's New in Photoshop
- Editing the first photo
- Create documents
- Photoshop | Frequently Asked Questions
- Photoshop system requirements
- Transferring presets, operations and settings
- Introduction to Photoshop
- Dream about it.
- Photoshop and other Adobe products and services
- Working with Illustrator artwork in Photoshop
- Working with Photoshop files in InDesign
- Substance 3D Materials for Photoshop
- Photoshop and Adobe Stock
- Working with the built-in Capture extension in Photoshop
- Creative Cloud Libraries
- Creative Cloud Libraries in Photoshop
- Working in Photoshop using the Touch Bar
- Net and guides
- Create transactions
- Cancellation and transaction history
- Photoshop on iPad
- Photoshop on iPad | General questions
- Introduction to the working environment
- System requirements | Photoshop on iPad
- Creating, opening and exporting documents
- Adding photos
- Working with layers
- Drawing and painting with brushes
- Selecting areas and adding masks
- Retouch compositions
- Working with Adjustment Layers
- Adjusting the key of a composition using the Curves layer
- Applying transform operations
- Trim and rotate compositions
- Rotate, pan, zoom and restore canvas
- Working with text layers
- Working with Photoshop and Lightroom
- Getting missing fonts in Photoshop on iPad
- Japanese text in Photoshop on iPad
- Application parameter management
- Touch shortcuts and gestures
- Key combinations
- Image resizing
- Live stream your creative process in Photoshop on iPad
- Repair imperfections with the Healing Brush
- Creating brushes in Capture and using them in Photoshop
- Working with Camera Raw files
- Creating and using smart objects
- Adjusting the exposure of images with the Dodge and Burn tools
- Photoshop Web Application Beta
- Frequently Asked Questions | Photoshop Web App Beta
- Working environment overview
- System requirements | Photoshop Web Application Beta
- Keyboard shortcuts | Photoshop Web Application Beta
- Supported file formats | Photoshop Web Application Beta
- Opening and working with cloud documents
- Collaboration with stakeholders
- Limited editing options for cloud documents
- Cloud Documents
- Photoshop Cloud Documents | FAQ
- Photoshop Cloud Documents | Workflow Questions
- Work with and manage cloud documents in Photoshop
- Cloud storage update for Photoshop
- Unable to create or save cloud document
- Troubleshooting Photoshop cloud documents
- Collection of cloud document synchronization logs
- Sharing and editing cloud documents
- File Sharing and Commenting in Application
- Working environment
- Working environment basics
- Learn faster with the What's New panel in Photoshop
- Create documents
- Working in Photoshop using the Touch Bar
- Tool gallery
- Performance settings
- Using tools
- Touch gestures
- Touch gestures and customizable workspaces
- Overview versions of technology
- Metadata and comments
- Default key combinations
- Touch gestures and customizable workspaces
- Putting Photoshop images into other applications
- Installations
- Default key combinations
- Rulers
- Show or hide non-printing auxiliaries
- Specifying columns for the image
- Cancellation and transaction history
- Panels and menus
- File storage
- Positioning of elements with referencing
- Positioning with the ruler tool
- Setting sets
- Customizing keyboard shortcuts
- Net and guides
- Web, screen and application content development
- Photoshop for design
- Artboards
- View on device
- Copy CSS from layers
- Dividing web pages into fragments
- HTML options for snippets
- Changing the arrangement of fragments
- Working with web graphics
- Create web photo galleries
- Understanding images and working with color
- Resizing images
- Working with raster and vector images
- Image size and resolution
- Import images from cameras and scanners
- Creating, opening and importing images
- Image viewer
- "Invalid JPEG marker" error | Opening images
- Viewing multiple images
- Customize color palettes and color swatches
- HDR images
- Image color matching
- Converting between color modes
- Color modes
- Erase sub-images
- Blend Modes
- Color selection
- Making changes to indexed color tables
- Image information
- Distortion filters not available
- Color details
- Color and monochrome corrections with channels
- Selecting colors in the Color and Swatches panels
- Sample
- Color mode (or picture mode)
- Shade
- Add color mode change to operation
- Add swatches from CSS and SVG files HTML
- Bit depth and settings
- Layers
- Understanding Layers
- Reversible editing
- Create and manage layers and groups
- Selecting, grouping and linking layers
- Putting images into frames
- Opacity and layering
- Layer masks
- Application of smart filters
- Layer compositions
- Move, arrange and lock layers
- Masking layers with vector masks
- Manage layers and groups
- Effects and Layer Styles
- Editing layer masks
- Extract resources
- Display layers with clipping masks
- Generation of graphic resources from layers
- Working with Smart Objects
- Blend Modes
- Combining several fragments into one image
- Combining images with Auto Layer
- Alignment and distribution of layers
- Copy CSS from layers
- Load selections based on layer boundaries or layer masks
- See-through to show the contents of other layers
- Layer
- Mixing
- Composite images
- Background
- Selections
- Select and Mask workspace
- Quick area selection
- Getting Started with Selections
- Selecting with the Marquee toolbox
- Selection with the Lasso tools
- Selecting a color range in the image
- Pixel highlight setting
- Convert between contours and selection boundaries
- Channel Basics
- Moving, copying and deleting selected pixels
- Create temporary quick mask
- Save selections and alpha channel masks
- Selecting focus areas in an image
- Duplication, splitting and merging of channels
- Channel calculation
- Extraction
- Bounding box
- Image corrections
- Perspective distortion
- Blur reduction due to camera movement
- Healing Brush Tool Examples
- Export color lookup tables
- Image sharpening and blurring
- Understanding color grading
- Applying the Brightness/Contrast setting
- Shadow and Highlight Detail Correction
- "Levels" correction
- Hue and saturation correction
- Juiciness correction
- Adjusting the color saturation in image areas
- Quick tone correction
- Applying special color effects to images
- Image enhancement with color balance correction
- HDR images
- View histograms and pixel values
- Image color matching
- Crop and straighten photographs
- Converting a color image to black and white
- Adjustment and fill layers
- Curves correction
- Blend Modes
- Press 9 Target Imaging0010
- Color and tone correction with Levels and Curves eyedroppers
- HDR Exposure and Toning Compensation
- Filter
- Blur
- Lighten or darken image areas
- Selective color correction
- Changing object colors
- Adobe Camera Raw
- Camera Raw system requirements
- What's New in Camera Raw
- Introduction to Camera Raw
- Creating panoramas
- Supported lenses
- Camera Raw Vignetting, Grain, and Haze Removal
- Default key combinations
- Automatic perspective correction in Camera Raw
- Reversible editing in Camera Raw
- Camera Raw Radial Filter Tool
- Manage Camera Raw Settings
- Processing, saving and opening images in Camera Raw
- Image enhancements with Camera Raw 9's improved Spot Remover0010
- Rotating, cropping and modifying images
- Camera Raw color correction
- Function overview | Adobe Camera Raw | Issues for 2018
- Overview of new features
- Processing versions in Camera Raw
- Making local adjustments in Camera Raw
- Fixing and restoring images
- Removing objects from photos using Content-Aware Fill
- Patch and move content-aware
- Retouching and fixing photos
- Image Distortion and Noise Correction
- Basic troubleshooting steps to solve most problems
- Image transformation
- Object transformation
- Crop, rotate and canvas adjustment
- Crop and straighten photographs
- Creating and editing panoramic images
- Deforming images, shapes and contours
- Perspective
- Using the Plastic filter
- Content-aware scale
- Transforming images, shapes and paths
- Deformation
- Transformation
- Panorama
- Drawing and painting
- Drawing symmetrical ornaments
- Options for drawing a rectangle and changing the stroke
- Drawing details
- Drawing and editing shapes
- Paint tools
- Creating and modifying brushes
- Blend Modes
- Adding color to contours
- Edit contours
- Painting with mix brush
- Brush Presets
- Gradients
- Gradient interpolation
- Fill and stroke selections, layers, and paths
- Draw with the Pen tool group
- Making patterns
- Creating a pattern with the Pattern Builder filter
- Circuit control
- Managing pattern libraries and presets
- Drawing with pen tablet
- Creating textured brushes
- Adding dynamic elements to brushes
- Gradient
- Draw stylized strokes with the Artistic Archive Brush
- Drawing with pattern
- Synchronizing presets across multiple devices
- Text
- Adding and editing text
- Universal text editor
- Working with OpenType SVG Fonts
- Character formatting
- Paragraph formatting
- Creating text effects
- Text editing
- Leading and letter spacing
- Font for Arabic and Hebrew
- Fonts
- Troubleshooting fonts
- Asian text
- Create text
- Text Engine error when using the Type tool in Photoshop | Windows 8
- Adding and editing text
- Video and animation
- Video editing in Photoshop
- Editing video and animation layers
- Introduction to video and animation
- Video and animation preview
- Draw frames in video layers
- Import video files and image sequences
- Create frame animations
- Creative Cloud 3D Animation (Preview)
- Create timeline animations
- Creating images for videos
- Filters and effects
- Using the Liquify filter
- Using Blur Gallery group effects
- Filter basics
- Filter effects reference
- Adding lighting effects
- Using the Adaptive Wide Angle filter
- Oil Paint Filter
- Effects and Layer Styles
- Application of specific filters
- Image area feathering
- Saving and exporting
- Saving files in Photoshop
- Export files to Photoshop
- Supported file formats
- Saving files in other graphic formats
- Moving projects between Photoshop and Illustrator
- Saving and exporting video and animation
- Saving PDF files
- Digimarc copyright protection
- Saving files in Photoshop
- Printing
- Printing 3D objects
- Printing with Photoshop
- Printing and color management
- Checklists and PDF presentations
- Print photos in a new image layout
- Spot color printing
- Duplexes
- Printing images on a printing press
- Photoshop Color Enhancement
- Printing troubleshooting | Photoshop
- Automation
- Create activities
- Creation of data-driven images
- Scenarios
- File batch processing
- Operation playback and management
- Adding conditional operations
- About Actions and the Actions Panel
- Recording tools in operations
- Add color mode change to operation
- Photoshop UI Development Kit for plug-ins and scripts
- Color Management
- Understanding Color Management
- Accurate color assurance
- Color settings
- Working with color profiles
- Color management of documents for viewing on the web
- Color management for printing documents
- Color management of imported images
- Perform proofing
- Content Authenticity
- Learn more about content credentials
- Identity and origin of NFT tokens
- Connecting accounts for creative attribution
- 3D objects and technical images
- 3D in Photoshop | Common questions about deprecated 3D features
- Creative Cloud 3D Animation (Preview)
- Printing 3D objects
- 3D drawing
- 3D Panel Enhancement | Photoshop
- 3D Concepts and Tools
- Rendering and saving 3D objects
- Creating 3D objects and animations
- Image stacks
- 3D graphics workflow
- Measurements
- DICOM files
- Photoshop and MATLAB
- Image object count
- Combining and transforming 3D objects
- Editing 3D textures
- HDR Exposure and Toning Compensation
- 3D panel settings
- Click the Rotate Image 90° Clockwise button (or press the L key).
- Click the Rotate Image 90° Clockwise button (or press the R key).
Using commands on the Edit menu, you can also rotate images in Adobe Bridge without opening the Camera Raw dialog box.
-
Select the Straighten tool in the Camera Raw dialog box. Or press the key A .
-
Drag the Straighten tool in the preview image to define the horizontal and vertical position of the object.
The Crop tool becomes active immediately after using the Straighten tool.
You can automatically straighten an image in one of the following three ways:
- In the Control Panel, double-click the Straighten Tool .
- Using the Straighten tool, double-click anywhere on the image on the preview page.
- Select the Crop tool and press Command (macOS) or Ctrl (Windows) to temporarily switch to the Straighten tool. Then double click anywhere on the preview image.
-
In the Camera Raw dialog box, select the Crop tool (or press the C key).
To limit the initial crop area to a specific aspect ratio, hold down the mouse button and select the Crop tool and then one of the options from the menu. To apply a constraint to a previously applied crop, Ctrl-click it (macOS) or right-click it (Windows).
-
Drag the Crop tool on the preview image to set the crop area.
-
To move, scale, or rotate the crop area, drag the area or its handles.
To cancel a crop operation, press the Esc key while the Crop tool is active, or press and hold the Crop tool button and select Clear Crop from the menu. To cancel the crop and close the Camera Raw dialog box without processing the raw image (Raw) file, click the Cancel button or deselect the Crop tool and press the Esc key.
-
When you get the desired result, press Enter (Windows) or Return (macOS).
The cropped image will resize to fill the preview area, and the Workflow Options link below it will show the new image file size and dimensions.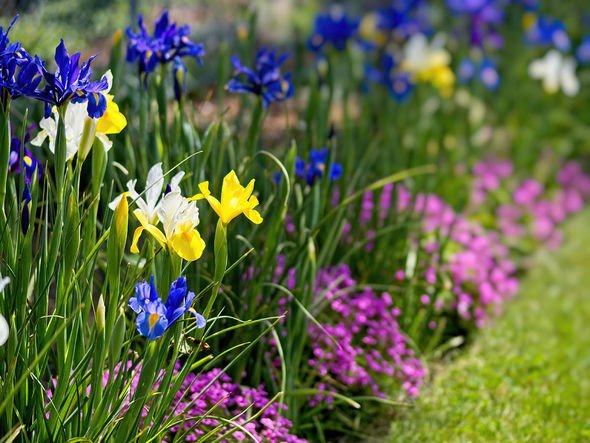
-
Magnify the image to at least 100%.
-
From the toolbar, select the Red-Eye Removal Tool ().
-
In the right panel, choose Red Eyes or Animal Eyes from the Type pop-up menu.
-
Select the area around the eye in the photo.
Camera Raw will size the area according to the size of the pupil. You can resize the selected area by dragging it with the mouse.
-
In the tool options area below the histogram, move the Pupil Size slider to the right to increase the size of the area to be adjusted.
-
(Only for red-eye reduction in animal photos) If necessary, select Add lens flare. Flare adds a special glow to the eye area.
-
(Only for red-eye removal in photos of people) Drag the Darken slider to the right to darken the selection in the pupil and the area of the iris outside the selection.
-
Deselect the Show Overlay option to deselect the area and check the corrections made.

Switch between multiple red-eye areas by clicking on the selected area.
The Retouch tool is used to correct a selected area of an image using a sample from another area.
-
Select the Area Removal tool from the toolbar.
-
From the Type menu, select one of the following options.
Recovery
Sets the texture, lighting and shading of the selected area according to the pattern.
Clone
The area of the sample image is applied to the selection.
-
(Optional) In the tool options area below the histogram, move the Radius slider to set the size of the retouch area.
-
Point the Retouch tool over a photo and click on a part of the image. A red and white shaded circle appears above the selected area. The green and white shaded circle indicates the area of the photo that is being cloned or restored.

-
Do one of the following.
- To define the sample area, drag inside the green/white circle to move it to a different part of the image.
- To specify the area to clone or restore, drag inside the red and white circle.
- To resize the circles, hover over the edge of each circle until it changes to a double-sided arrow, then drag the pointer to resize the circles.
- Press Backspace (Windows) or Delete (macOS) to cancel the operation.
Repeat this procedure for each area of the image to which you want to apply retouching. To remove all areas of the sample and retouch, click the Clear All button on the toolbar.
Related Topics
- Adobe Free Online Image Cropping Tool
Account login
To come in
Account Management
A computer will distinguish the iris of a living person from a dead one
Polish programmers have developed an algorithm that distinguishes the iris of a dead person from that of a living person with an accuracy of up to 99 percent, according to a preprint on the ArXiv. org website. According to the developers, in the future this will help to avoid hacker attacks on systems that identify a user by their eyes.
The iris, like a fingerprint, is unique to each person, so some systems use it for biometric identification and identity verification. Today, this approach is considered one of the most effective in the world. However, the system is potentially bypassable: for example, U.S. law enforcement officials are already reportedly using the fingerprints of dead people to unlock their iPhones. A similar scenario can be used by attackers for the iris.
Mateusz Trokielewicz of the Warsaw University of Technology and his colleagues have developed an algorithm that distinguishes whether an eye belongs to a living person or a dead one. They took as a basis the architecture of the VGG-16 convolutional neural network, which is traditionally used for image recognition. The researchers used two databases to train and test the algorithm. The first one contained 574 images of irises of 17 people taken in the near infrared range at different times after their death - from 5 hours to 34 days.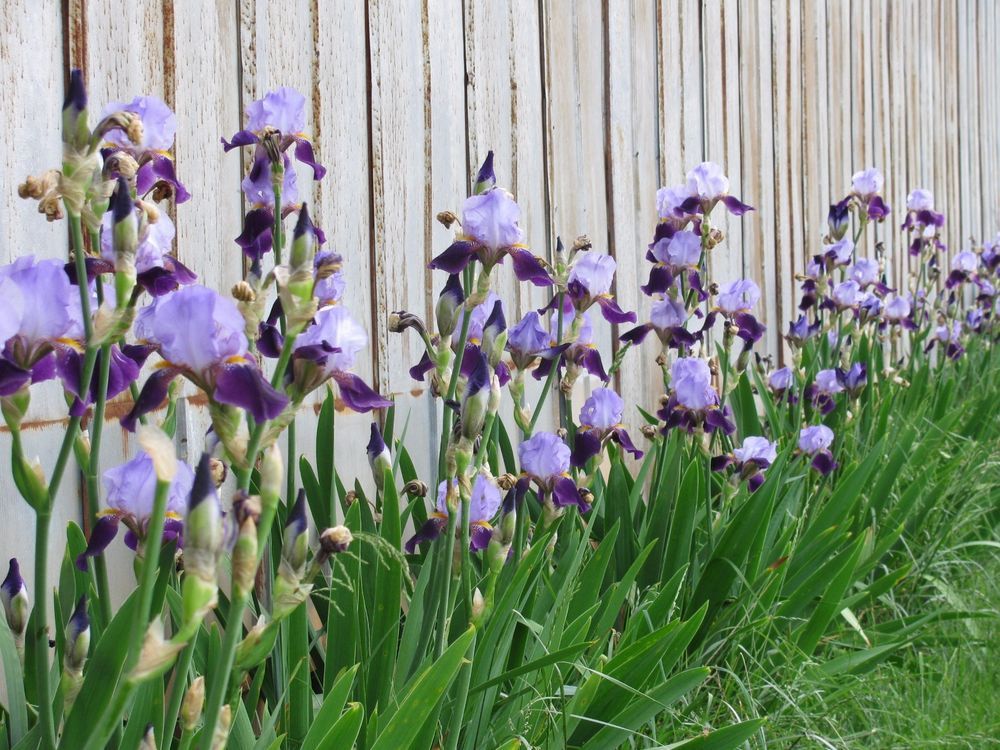 In the second database, 256 images of irises of living people were collected, obtained by the same camera.
Different people take pictures differently, which can affect the characteristics of the image, so the researchers performed additional validation of the dataset to avoid algorithm bias. However, they did not find significant differences between the pictures of different operators. The computer's most visible clue was the metal fasteners used to hold the eyes open, so Trokelevich's team cropped the images of the eyes so that only the iris was visible.
Testing of the algorithm has shown that it accurately determines the irises of dead people and rarely misclassifies living people. The average accuracy of the program was 98.94 percent. The probability of getting an incorrect result was highest for the eyes of people who died less than 5 hours ago. Post-mortem changes in this period of time do not yet have time to manifest themselves sufficiently.
In the future, the program can be used to improve biometric identification and to detect unauthorized access attempts, including those using the eyes of a deceased person.