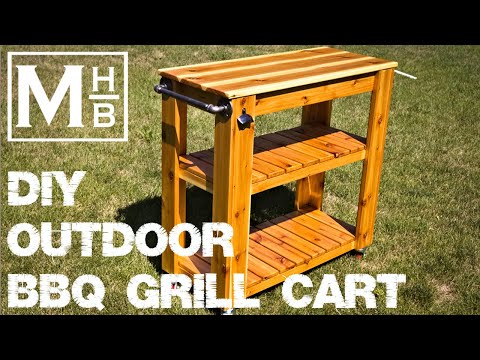
How to make an outdoor grill
Build Your Own Outdoor Kitchen
Project details
Skill
3 out of 5 Moderate Building the frame is basic, but mortaring and fitting the stones takes a lot of time.
Cost
$800, not including countertop, sink, grill, or other fixtures
Estimated Time
Two weekends
Kitchens are the undisputed heart of the home, where everyone gathers, mingles, and lingers during parties. But to achieve that kind of appeal outside means expanding your outdoor living space. To draw a crowd—and keep them entertained—requires a bit more than plopping down a table and a few plastic chairs.
With an outdoor kitchen you can prepare meals and be around your guests with minimal time spent running back inside for plates, beverages, or tongs. Although you could spend tens of thousands of dollars for a custom outdoor kitchen, a basic island is an efficient design that leaves out the complexity of curves and angles. Not only that, with an island guests can relax on one side while you're cooking on the other, so you feel as though you're part of the gathering.
Related
Plan the Perfect Outdoor Kitchen
Since durability is such a critical issue for an outdoor kitchen, stone veneer is a low-maintenance option that won't need painting or sealing. Real stone is heavy, expensive, and requires the experience of a mason. Cementitious cultured stone, such as the type used in this project from Landmark Stone, is easier to work with because it's lighter, cuts faster, and lasts just as long as the real thing—all while looking as natural as real stone.
How to Build a Better Barbecue Area
Building this open-air kitchen takes some time, but with the right planning, you can do it in two weekends.
As long as you get to the point of coating the frame and lath in a layer of mortar, you can essentially tarp over the top of it and take your time applying the finish decoration. Once you get the counters on it, you can go ahead and use it, working on the stone veneering over time.
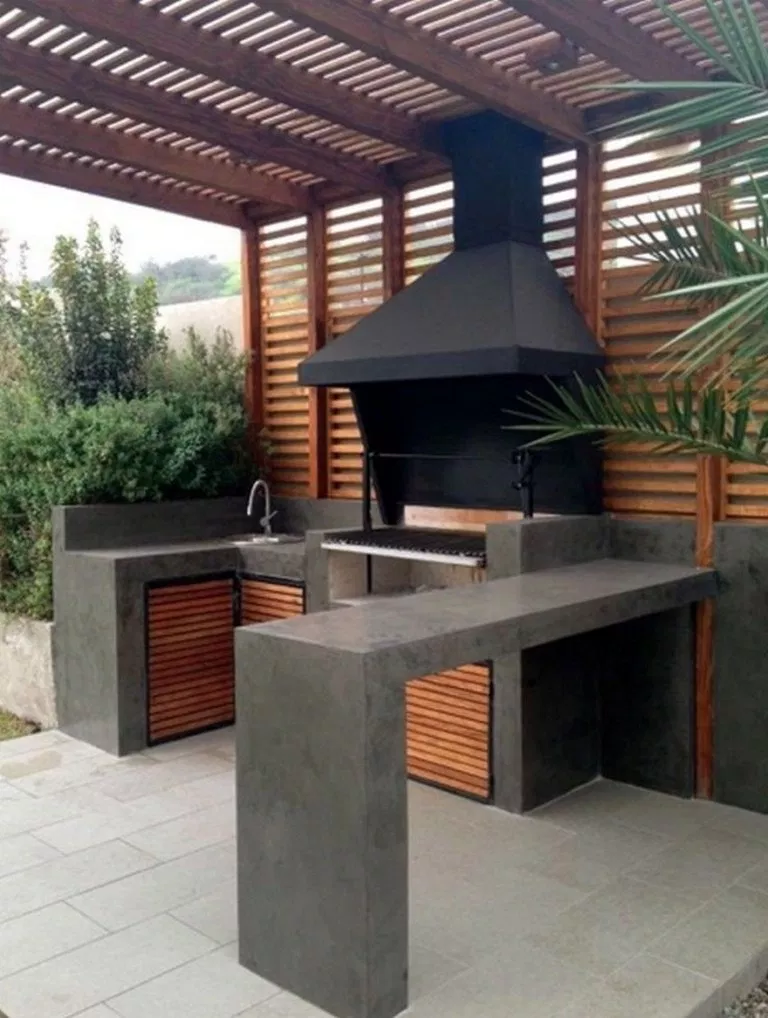
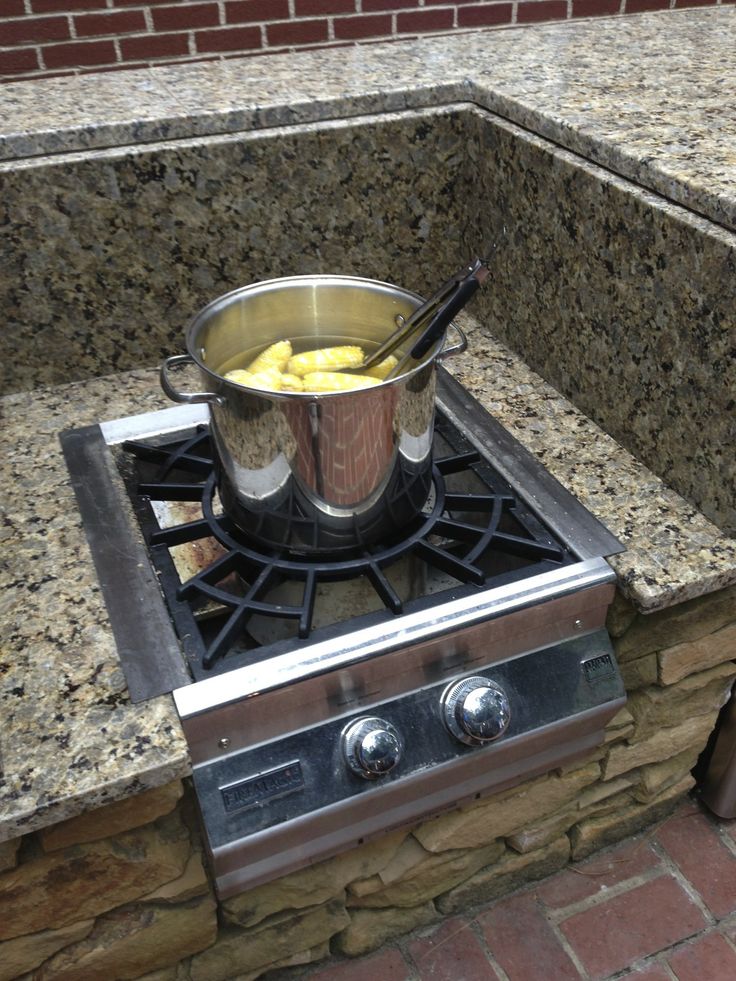
The kitchen consists of a stainless-steel grill set into a 3-foot-long stone-veneered plywood base and flanked by two more 4-foot bases with cabinets below and 48 linear inches of countertop on each side—one with a working sink. The countertop - here it's concrete, but it can be any kind of stone—sits 38 inches from the ground, which is a comfortable height for both food prep and elbow propping. It rests on a gently sloped concrete slab to help prevent water from pooling around the bottom, but any structurally sound existing patio would work as a base.
The island's frame is made out of pressure-treated 2x4s and 3/4-inch plywood - an inexpensive and durable construction that's easier to work with than concrete block. The frame consists of three small, manageable boxes that are built separately and then screwed together to make one long island: one 24-inch-high, 37-inch-wide box in the center to support the grill and the shelf it sits on, plus one 36-inch-high, 48-inch-wide box on either side, with cabinets set into each.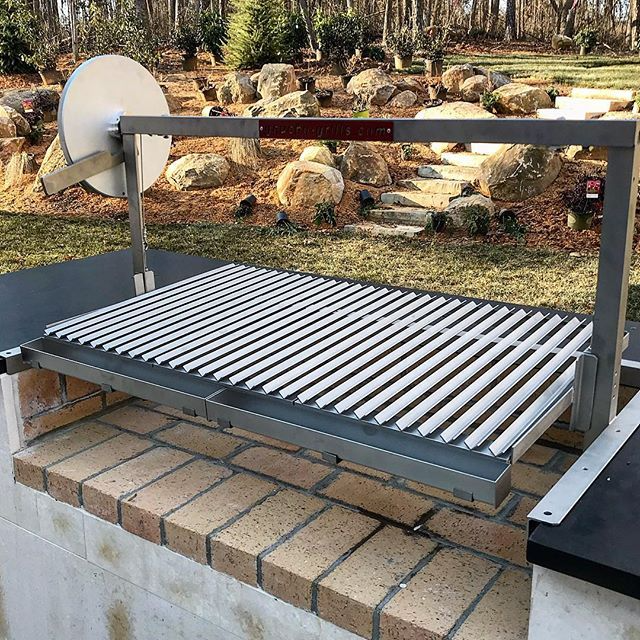 This layout allows you to scale the island's length to fit your patio or adjust it to incorporate a built-in bar with a 90-degree turn. Because the boxes are empty, they can accept steel doors, drawers, or other storage compartments or conceal a propane tank for a gas grill.
The outside of the island is veneered with cultured stone, which is lightweight and easy to put on with mortar. Use stones that complement your home's architecture or existing stonework - round fieldstones evoke a classic New England farm wall, while thin, horizontal stones have a more modern look. Arranging the stone in an aesthetically pleasing way is like doing a big jigsaw puzzle. Speed up the hunt for the perfectly sized stone by first unpacking and organizing all the pieces into piles of corners, shorts, longs, and rectangulars. This ensures you'll have on hand a random range of colors, mimicking real stone, and keeps you from rummaging through boxes and chipping the pieces.
How to Build an Outdoor Kitchen
Follow along as This Old House senior technical editor Mark Powers shows you how to build an outdoor grill island by starting with a simple frame, covering it in faux stone, and then nestling a gas grill in the center to get the party started.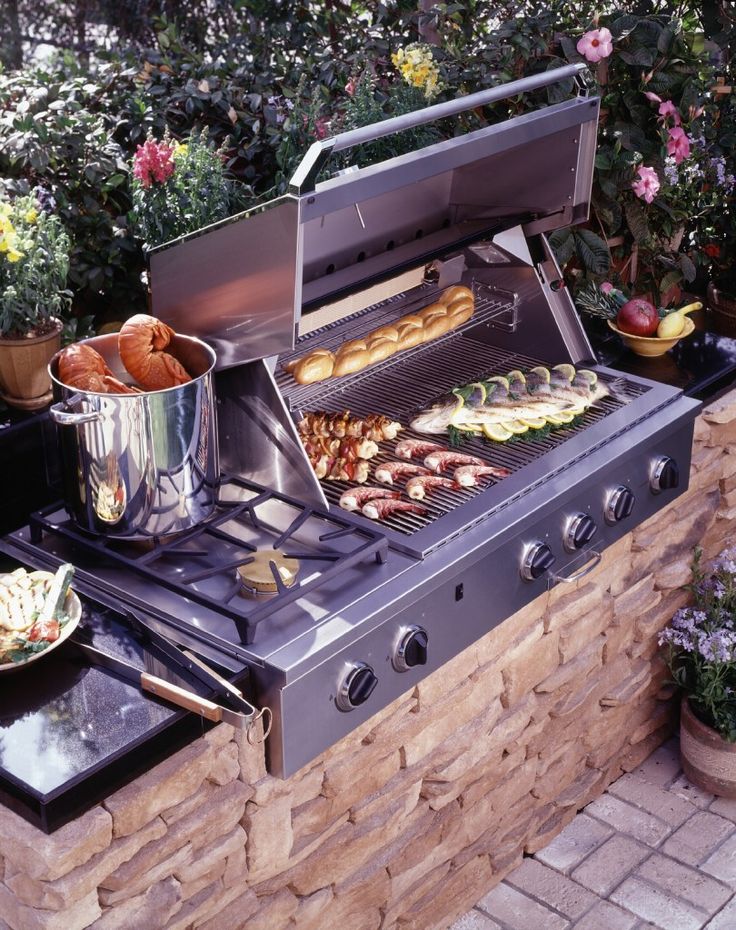
Step 1: Build the frame
- Make corner posts for each box: Using a circular saw, cut eight lengths of 2x4 to the height you want the finished counter to be, minus the thickness of the countertops and the height of the metal post standoffs.
- Using a drill/driver, screw the 2x4s together in pairs with 2½-inch deck screws.
- Using a circular saw, cut a 1½-inch-deep-by-3½-inch-high notch at the top and bottom of each post.
- Separate the posts with stretchers: Cut four 2x4s to the depth of the box. Line up the four posts and screw the 2x4s to the top and bottom of the posts to tie the sides together.
- Cut four 2x4s to the width of the box, minus 3 inches. Run these between the posts at the top and bottom of both the front and the back of the box.
- Wherever you will have cabinets, put a 2x4 for support in the middle of the bottom framing.
Step 2: Sheathe the Frame
- Screw the three boxes together side by side.
- Flip the frame over and screw a metal post standoff to the bottom of each post to act as feet.
- Using a circular saw, cut plywood panels to fit the dimensions of the frame. Run a bead of construction adhesive along the posts and stretchers.
- Lay the plywood over the adhesive and screw it to the 2x4s with 2-inch deck screws.
- Leave openings in the sheathing to match any cabinet openings.
- For the cabinets, create boxes out of plywood to fit within the depth of the framing. Hold them together with construction adhesive and 1¼-inch deck screws.
- Build in a 1-inch-wide, 1¼-inch-deep flange around the front of each box.
- Set the boxes aside.
Step 3: Attach the Lath
- Cover all the plywood with builder's felt and staple it in place using a staple gun. Work from the bottom up and overlap the sheets of felt by a couple of inches to make sure water can't get behind them.

- Examine a sheet of wire lath and note which way the honeycombs are protruding outward. Run your hand over the wires—in one direction the sheet will feel like a cheese grater. Make sure the wires face up as you lay each sheet over the builder's felt (to catch or cup the mortar).
- Nail the lath to the plywood using stainless-steel roofing nails every 6 inches vertically and every 12 to 15 inches horizontally, making sure you hit the framing as much as you can.
- Overlap the pieces of lath at seams by a couple of inches.
Tip: Wear gloves when working with the sharp lath.
Step 4: Trim the Lath
- Using tin snips, trim the top of the lath so that it's flush with the top of the frame.
Step 5: Trowel on a Scratch Coat
- Using a masonry hoe and a mixing trough, mix up a bag of mortar with water until it is the consistency of peanut butter and it clings to a trowel turned upside down.
- Lay a ring of 1x scrap boards against the bottom edge of the island.
 Using a finishing trowel, spread a ½-inch-thick layer of mortar over the lath and down to the 1x scrap.
 - Push the mortar into the crevices in a downward motion. If at any point the lath moves, stop and nail it tight to the sheathing.
- When you are finished, you should not be able to see any mesh.
- Let the scratch coat cure for about an hour.
Step 6: Score the Mortar
- When the scratch coat is firm to the touch, score the surface horizontally using a ½-inch notched trowel.
- Start at one of the island's short ends and position the trowel vertically and on edge.
- Tilting the trowel 45 degrees, score all the way across the short side and continue around to the front.
- Make one pass all the way around the island; keep the lines as straight and parallel to the ground as you can, so you can use them later as guides for setting the stone.
- Continue scoring the scratch coat in single passes that wrap all the way around until all the mortar is grooved.
- Let the mortar cure for at least 24 hours.
- Set the cabinet boxes into the openings, pushing each back until the flange butts against the mortared face of the island.
- Secure the box through the bottom and into the base framing with 2-inch deck screws.
Step 7: Back-Butter the Stone
- Separate the stones into piles of corner, short, long, and rectangular pieces to organize them and to help create a random color pattern.
- Start with a corner piece. Using a pointing trowel, butter the back of one of the L-shaped stones with a 1-inch layer of mortar.
- Scrape excess mortar from the edges of the stone, then use the trowel point to create V-shaped air pockets in the wet mortar.
Step 8: Set the First Course
- Starting at the base of a corner, set the L-shaped stone by pressing it firmly onto the grooved scratch coat.
- Let it rest on the 1x scrap board.
- Scrape any excess mortar that oozes out, pushing it into the seam to make a tight seal.
- If at any point you knock a stone loose, remove it and reset it to recreate this seal.
Step 9: Shape the Stones
- Continue laying stones out in both directions from the corner. Dry-fit stones before mortaring them in place to check the look.
- Overlap the stones, then mark where they intersect.
- Using a grinder fitted with a diamond blade, shape the stone at the mark so it will sit tightly against its neighbor.
Step 10: Trim Large Stones
- If a stone is uneven along a top or bottom edge so that it gets in the way of keeping the rows straight, cut away the protruding parts using a miter box fitted with a diamond blade. Set the stone cut side up.
- Camouflage the cut face by setting other stones around it that protrude out farther and cast a shadow over it.
Tip: Clamp smaller stones to the box before cutting them to keep your hands away from the blade.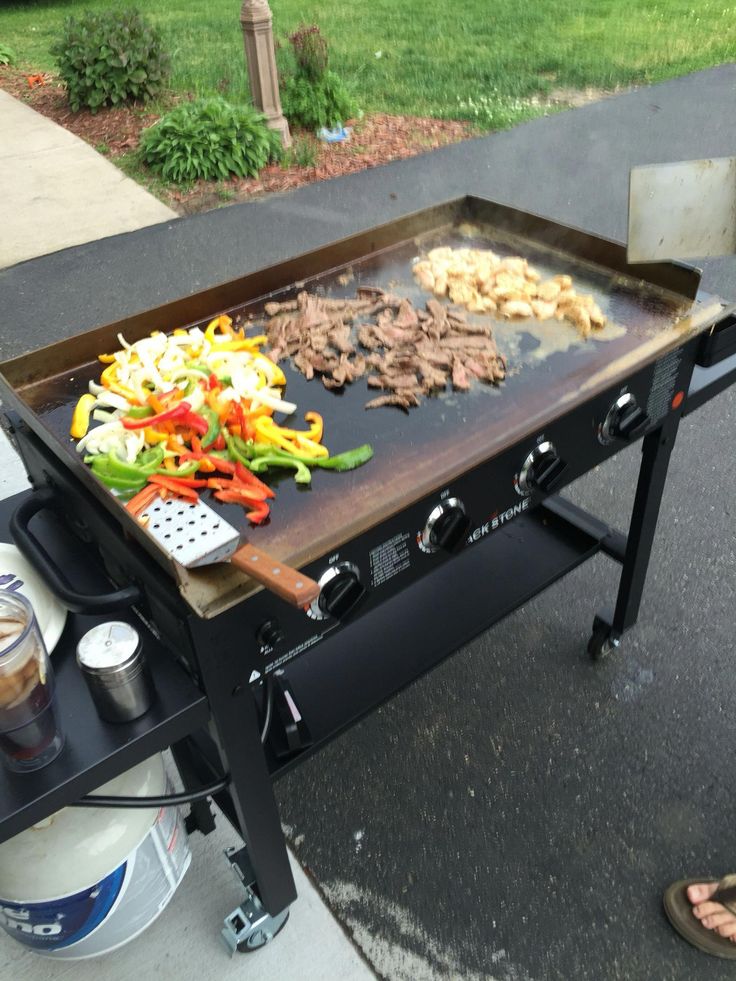
Step 11: Veneer the Rest of the Frame
- After setting the first course around all four sides, start the second from the same corner, alternating the orientation of the L-shaped corner piece.
- Continue setting subsequent courses, incorporating stones of varying sizes for a natural look. Minimize cuts by dry-fitting several stones at a time and piecing them together like a puzzle.
- Do not lay any stones over the flanges of the cabinet boxes.
- Position straight-cut stones along the top edge so they sit flat against the underside of the counter.
Step 12: Install Fixtures
Wendell T. Webber- Allow stones to set for 24 hours; install cabinet doors by attaching them over the flanges of the cabinet boxes.
- Install the countertops and the grill.
Tools
Tools & Materials
-
Circular saw
-
Drill/driver
-
tin snips
-
Hammer
-
Staple gun
-
Mortar tub
-
Masonry hoe
-
Notched Trowel - 1/2-Inch
-
Pointing trowel
-
Finishing trowel
-
Miter saw
-
Power grinder
-
Drywall hawk
-
Bar clamps
12 DIY Grill and BBQ Island Plans
By
Stacy Fisher
Stacy Fisher
Stacy is an expert writer for The Spruce covering home DIY projects and crafts.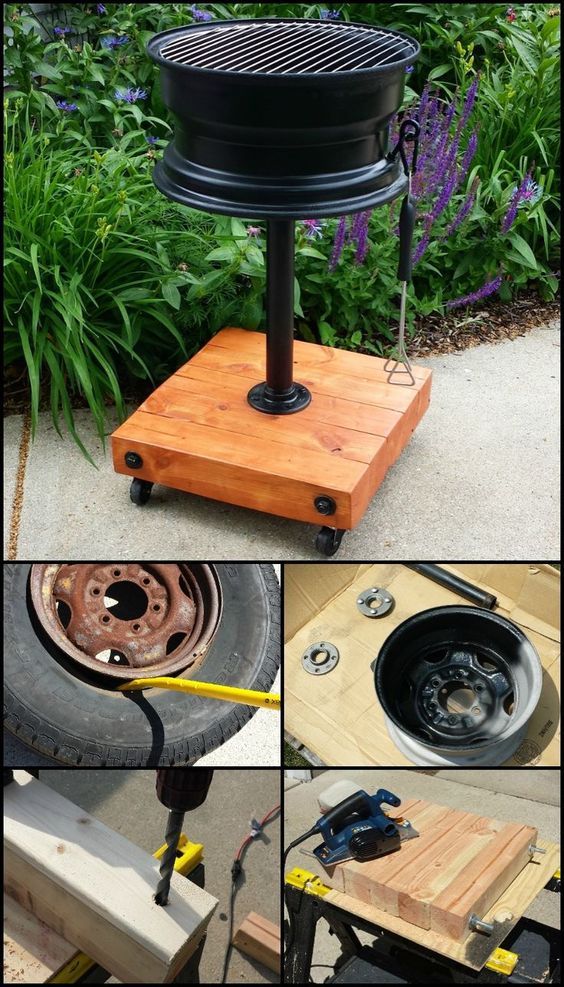 She has over 18 years of journalistic experience, appearing as a DIY expert on the Dr. Oz Show and several radio shows. She has published hundreds of articles and co-authored a book.
Learn more about The Spruce's Editorial Process
Updated on 06/28/22
Michal Kin / EyeEm / Getty Images
Use one of these DIY BBQ island plans to make cooking outside with your grill easier than ever before. You'll have more prep space for food, serving areas for guests, and extra storage so you're not running into the kitchen all the time for all those necessities.
All of these outdoor grill islands work a little bit differently. Some of them are actually built around a gas grill, some are built for a grill to be set inside, and others are just for giving you more space when you're grilling. No matter what kind of grill you have or outdoor space available, you'll find one that works for you.
-
01 of 12
Pneumatic Addict
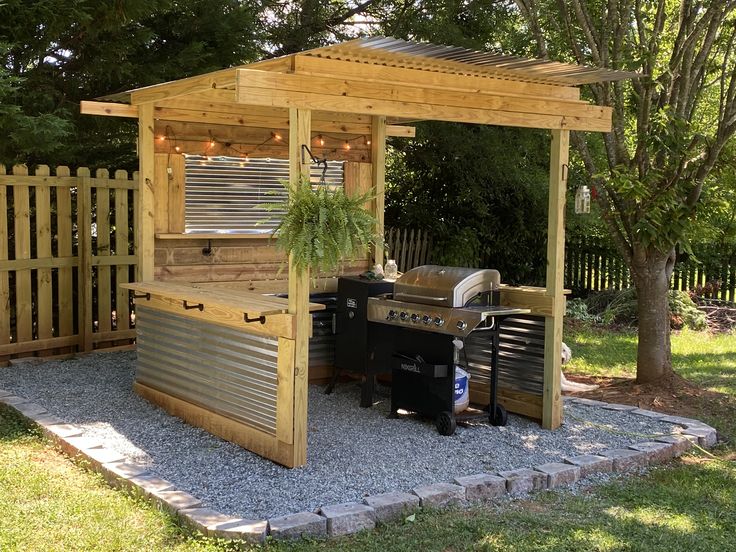
Steel, cement board, and wood make up this DIY outdoor grill island that has the look of modern stucco without the cost.
 Besides being a nice place for your grill, there are hooks for grill tools and open shelving that allows easy access to a propane tank.
 Rolling Outdoor Island from Pneumatic Addict
-
02 of 12
Unexpected Elegance
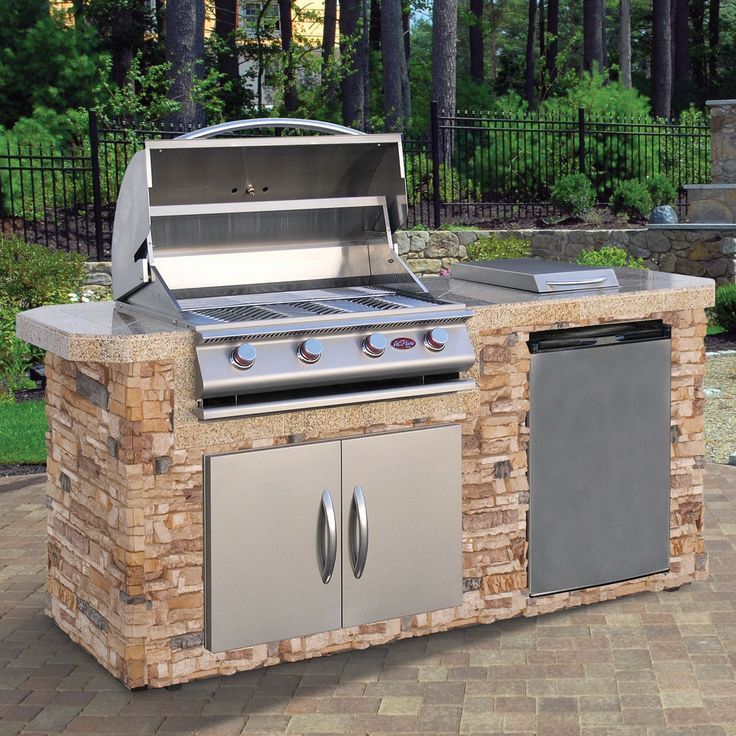
For around $150 you can build this stone grill station that looks like it belongs in a fancy outdoor kitchen. The plan includes building a frame to go under the grill sides and then attaching a stone veneer to give it an elegant touch.
Stone Grill Station from Unexpected Elegance
-
03 of 12
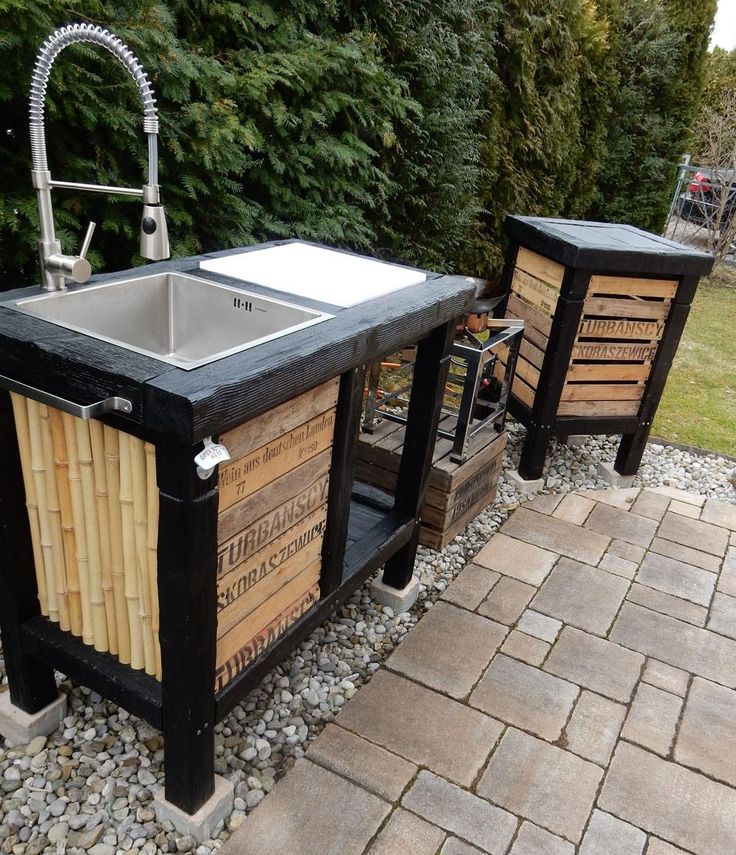
Charleston Crated
If you're looking for something more mobile, this outdoor grill cart is perfect. It can be moved right beside your grill and gives you much needed counter space, a towel rack, hooks for tools, and an extra open area for storage at the bottom.
Outdoor Grill Cart from Charleston Crafted
-
04 of 12
Grandma's House DIY
This small but mighty grill station is built from wood and topped with a piece of granite.
 Small grills—even tabletop grills—can sit on top while an added bar holds your towels and grilling tools.
 Grill Station Tutorial from Grandma's House DIY
-
05 of 12
The Lowcountry Lady
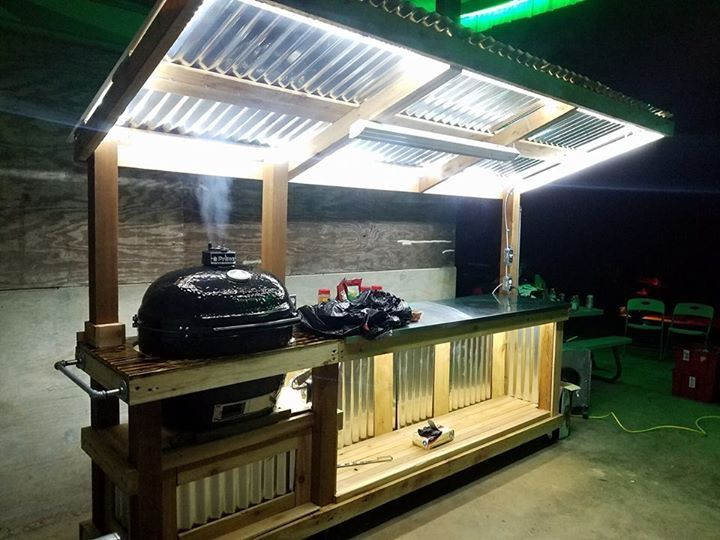
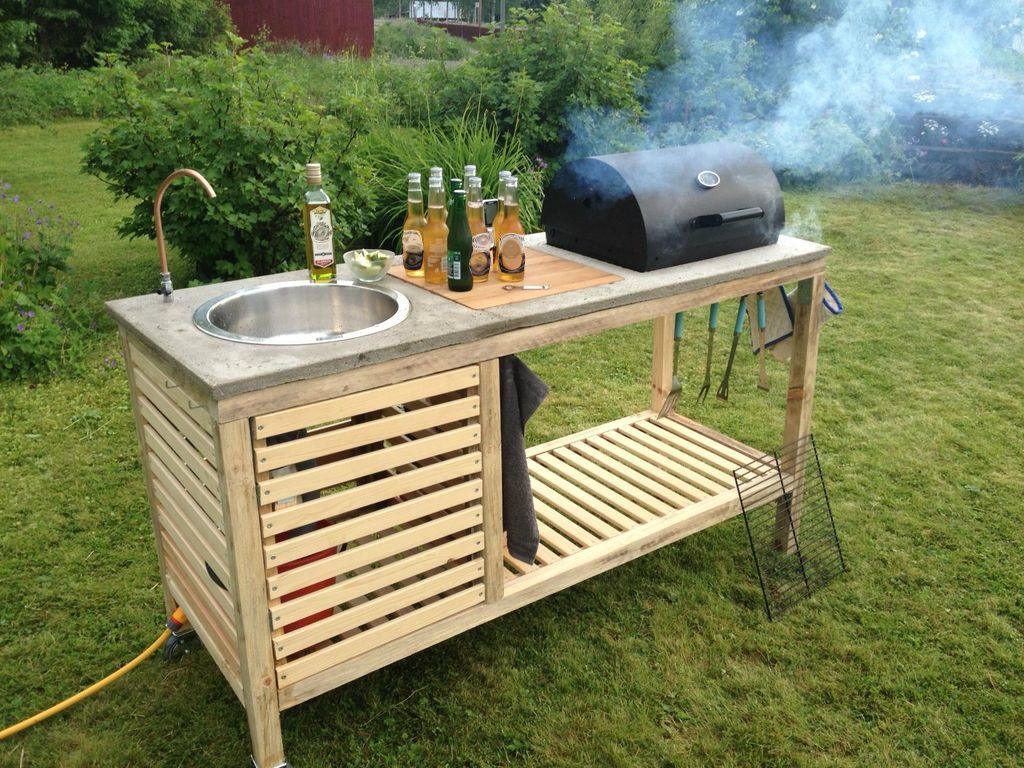
If you have a Big Green Egg, you won't want to pass up this free plan for a BBQ island that has a custom spot to sit your egg. The top is a concrete counter and it gives you lots of extra space for food prep. There's also a sliding barn door underneath, so you have both open and closed shelving for storage. This free plan fits the large size of Big Green Egg, so you may have to change some measurements if you have a different size.
Big Green Egg Table Plan from The Lowcountry Lady
-
06 of 12
Our Fifth House
If you're looking for a permanent grill station that you can easily build around your grill, you'll want to check out this free plan. This simple DIY grill station only takes an hour to put together.
 Made of cinder blocks and patio stones, this grill station looks great and will last for many years to come. The best part is that it's a flexible grill surround, so it works for any size of grill.
 DIY Grill Station from Our Fifth House
-
07 of 12
Ohoh Deco
Build a custom grill cart for any portable grill with this free DIY plan. A concrete countertop with open shelving below will make grilling so much easier. It's also on wheels so you can take it wherever you'd like to grill.
How to Build a Grill Cart from Ohoh Deco
-
08 of 12
Lady Goats
If you love your charcoal grill, this DIY BBQ table is a must-have. This will give you counter space and shelving. There's even a tilt-out bin for trash that you won't know how you lived without. Make a few small changes and you can also use this as a potting bench.
Weber Grill BBQ Station from Lady Goats
-
09 of 12
C.
 R.A.F.T.
 This rolling grill cart will have you ready to prepare your next barbecue with all the sides. This is a mobile DIY grill cart that you could really use anywhere you need some extra counter space. Just roll it over to the new area and then back again to keep it out of sight. The area at the bottom is perfect for holding a cooler, which makes for an awesome beverage center that all your guests will love.
DIY Grill Cart from C.R.A.F.T.
-
10 of 12
Darbin Orvar
Here's a free plan for a DIY Weber grill cart and BBQ station that would look great in anyone's backyard or on their deck. There's a great video that goes along with this plan that gives step-by-step instructions on how to build it. This whole project will only set you back a $100 or so, leaving you more cash for new grilling tools.
Weber Grill Cart BBQ Station from Darbin Orvar
-
11 of 12
Katrina Blair
This BBQ grill cart adds so much extra prep space with its beautiful wooden countertop and it looks great while doing it.
 Hooks and a towel bar, as well as open shelving, give you even more options for serving and storage.
 BBQ Grill Cart from Katrina Blair
-
12 of 12
Girl, Just DIY
If you have a gas grill you don't want anymore, you can use the frame to create a patio cart. Everything you need for this makeover project is here, including pictures, directions, tips, and tricks.
Patio Cart from an Old BBQ from Girl, Just DIY
The Best Grills to Upgrade Your Outdoor Kitchen
extremely efficient and capacious contact grill
The De’Longhi CGh2012D contact grill differs primarily in its design: its heating elements are not under the braziers, but are built into them. Thanks to their location, as well as 2000 W of power and the ability to adjust the temperature from 60 to 230 ° C, the grill is ideal for roasting beef steaks and cooking many other dishes.
The appliance can be used in three modes: classic contact grill, roaster with fully open panels and grill oven for non-contact frying of thick foods.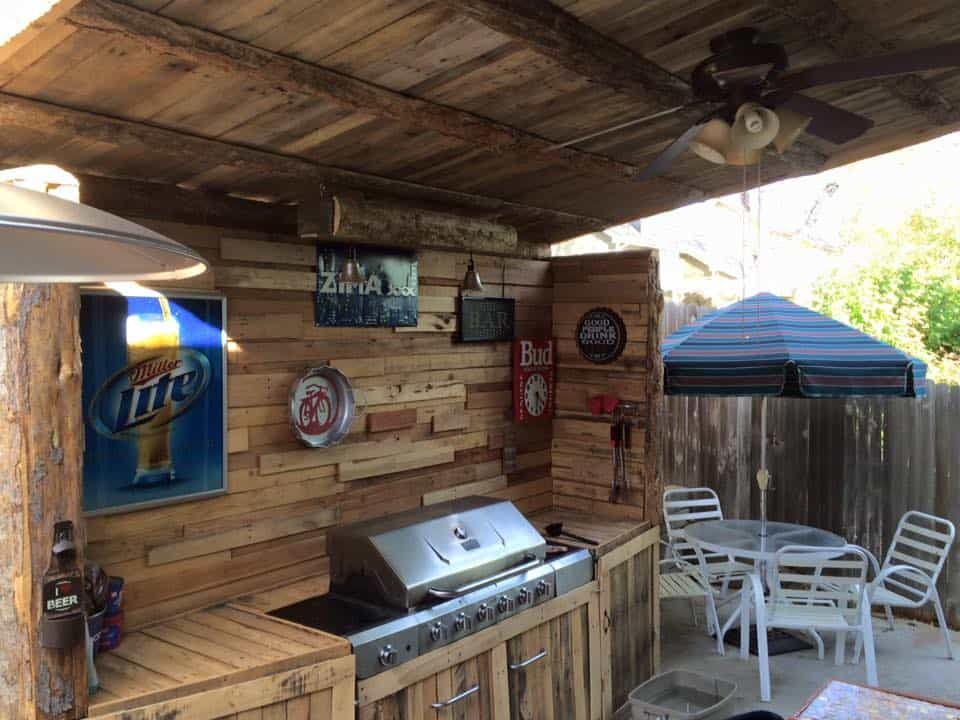 Removable interchangeable panels, a timer, adjustable heating temperature for each of the panels - it looks like the De'Longhi CGh2012D grill will give us many great moments during testing. We are especially pleased to be able to wash the braziers in the dishwasher. Well, in the course of practical experiments, we will find out whether the device is as good as it seems after reading its description. nine0003
Features
| Manufacturer | De'Longhi |
|---|---|
| Model | CGh2012D |
| Type | contact grill |
| Country of origin | China |
| Warranty | 2 years |
| Life expectancy | 2 years |
| Declared power | 2000 W |
| Housing material | plastic, metal |
| Removable panel material | non-stick coated metal |
| Grip area material | plastic |
| Body color | black metallic |
| Panels included | with flat and ribbed surface.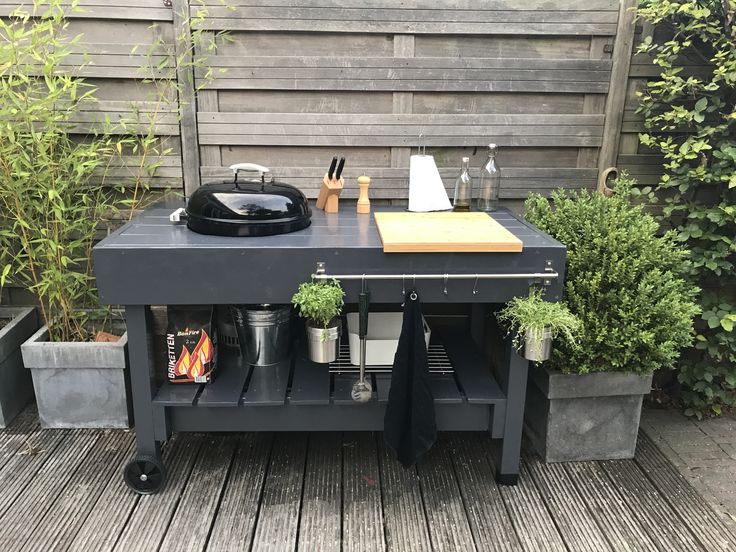 It is possible to purchase 9 waffle panels0014 It is possible to purchase 9 waffle panels0014 |
| Control | electronic |
| Display | LED display |
| Indicators | heating, readiness for operation, as well as sound signals |
| Temperature control | yes, 60 to 230 °C |
| Timer | Yes, 10 seconds to 90 minutes in 10 second increments |
| Features | removable and interchangeable panels, 3 operating modes: contact grill, open grill, grill oven; temperature control for each panel, Sear mode, automatic shutdown |
| Accessories | grease and liquid collection container, cleaning paddle |
| Panel dimensions (L×W) | 37×23 cm |
| Cord length | 88 cm |
| Appliance weight | 7.22 kg |
| Instrument dimensions (W×H×D) | 46×19×34 cm |
| Shipping weight | 8.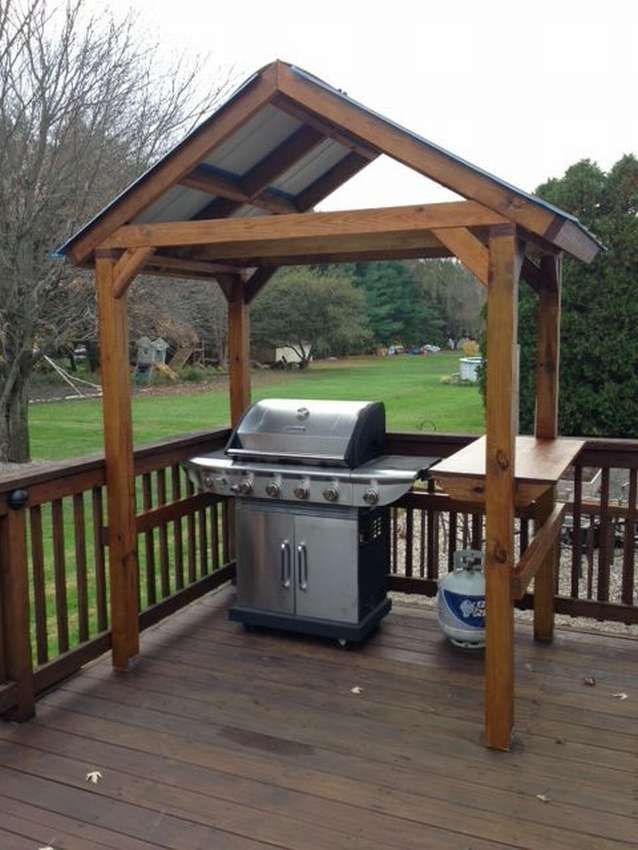 6 kg 6 kg |
| Package dimensions (W×H×D) | 49.5×38.5×23 cm |
| Retail offers | ask price |
What's in the box
Carton of a very substantial weight of 8.6 kg is not equipped with any kind of carrying device. There is a lot of information on the packaging: this is a photograph of the grill, and a list of its properties and advantages, and a description of the control features and operating modes. All information is presented in several languages, unfortunately, Russian is not among them. nine0003
Grill stays in place during transport thanks to two foam inserts that hold the grill securely inside the box. A sheet of soft packaging material is placed between the closed panels, protecting their surface from scratches and damage. Having opened the box, inside we found the grill body with installed panels and a number of paper materials: an instruction manual, a service book, a warranty card and a leaflet with recommendations for preparing to work in the expanded position of the panels.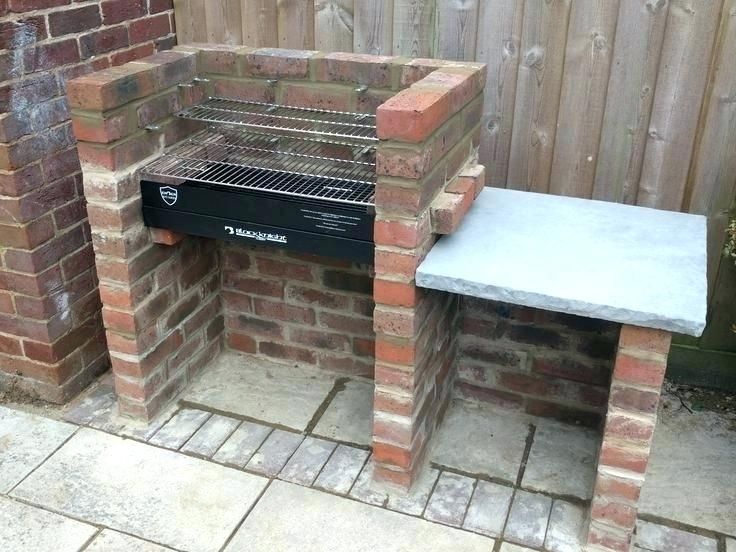 nine0003
At first glance
The dimensions of the De’Longhi CGh2012D contact grill cannot be called compact: the device is large. The appearance is neat, with a certain elegance and no pretensions to design frills. The combination of black plastic and shiny metal surfaces looks like a win-win and will look appropriate in any circumstances.
The control panel is located in the usual place: on the front side of the case. The massive handle, on which the grill lid is fixed, is made of metal, the gripping area is made of plastic. On the right outer side of the handle are: a platen lock/unlock lever (keeps the plates closed) and a hinge release lever that allows the grill to be brought to the fully open position. nine0003
The hinge connecting the lid and the base of the appliance has a handle for adjusting the height of the top panel. The cover can be fixed in four positions - from almost closed to a very significant distance between the panels. Levers and other devices are signed or provided with obvious icons in perception, therefore, in order to understand the purpose of individual parts, it is not at all necessary to study the instructions.
The lid with the top frying plate is hinged to the grill handle. Thanks to this, the part automatically adjusts to the height of the products and is held in a horizontal position, which will avoid deformation or squeezing of the raw material during frying in contact mode. nine0003
When open, the grill lid rests on the handle to form a single broiler with two panels on the same level.
The panel release buttons are located on the right side of the case and cover.
The drip tray is mounted in the center of the back of the cabinet. The volume of the container seems to be sufficient for frying even more than one serving of wet or fatty foods.
The power cord is connected to the appliance at the left protruding part of the leg. The length of the cord is not long, but it seems to be sufficient when using the grill in normal household conditions. nine0003
On the bottom side, we see two stickers with information about the device, several rows of ventilation holes and low legs, equipped with rubber pads.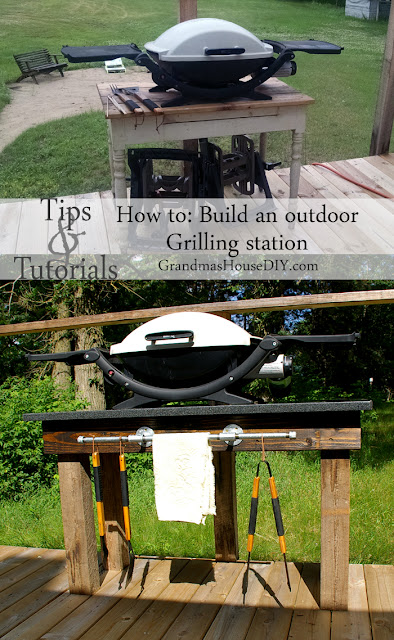 Thanks to the pads and its own weight, the grill sits firmly on the tabletop or glass ceramic hob, does not move or slip when manipulating the panels, the lid, or when setting the appliance to work in alternative modes.
In the open position of the grill, there is no need to hold the folding part - the base of the appliance is very stable. Removable panels made of metal are fixed inside the grill. On the working side, the panels are treated with a non-stick coating, on the reverse side they are covered with a protective material. The quality of the non-stick coating is rated by us as quite good - applied evenly and smoothly. The panels have a different surface: one is smooth, the second is corrugated, but the same shape and dimensions allow any of them to be made both upper and lower. nine0003
The reverse side of the panels is extremely interesting. Here is a built-in protected heating element, treated with the same coating as the rest of the surface. In the upper right corner there are contacts of the heating element.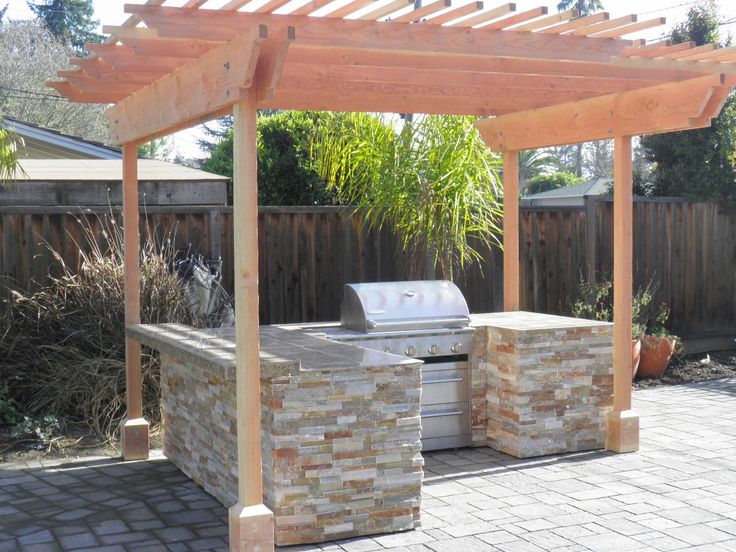 The place of their attachment to the panel is protected by a rubber gasket.
If you remove the frying panels, then in the lid and on the base we will see the same picture: a metal surface, a row of contacts in the corner, a panel presence sensor and a latch.
A visual acquaintance with the contact grill De'Longhi CGh2012D made the most favorable impression: a typical design, ease of preparation for work, a clear control panel, a large working surface of the panels and excellent workmanship and assembly of the device as a whole. One feature looks very promising - the heating elements are built directly into the frying panels. nine0003
Manual
The instruction manual is a thick 332 page A5 booklet. Information in Russian is presented on pages 149-168.
The content is standard: safety measures, description of the device, its individual parts and design, a list of actions before starting operation, operating rules, a description of the features of various modes.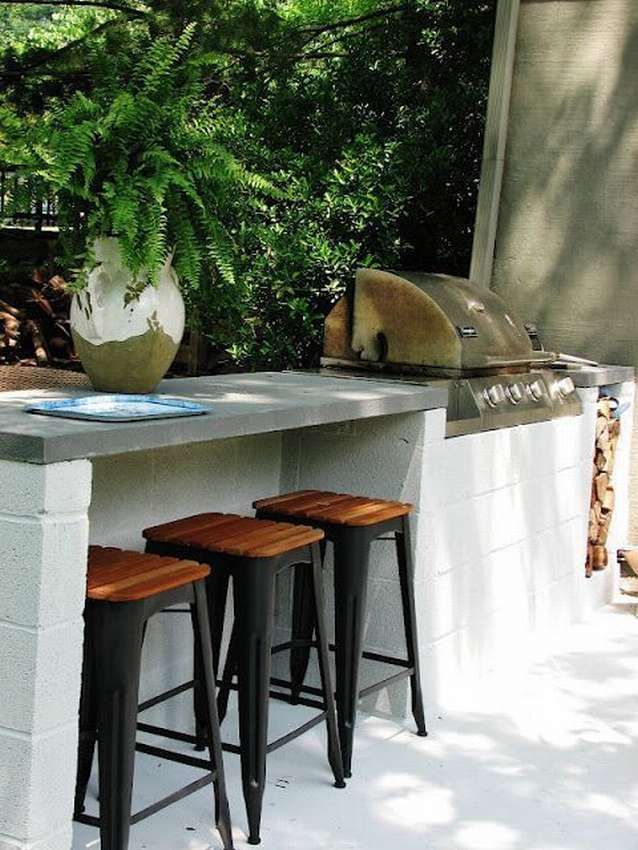 Useful section with recommendations on the preparation of various types of raw materials: the temperature and cooking time, the panels used and the modes depending on the thickness and amount of the product. It may also be necessary to have a table describing possible error messages, the problems that caused them, and, accordingly, their elimination. nine0003
It is a pity that the document is difficult to study due to its length - it contains a large amount of necessary and useful information. The block of information in Russian ends with recipes. Among them there are dishes of different categories: appetizers, salads, main courses and desserts. The recipes are very interesting and unusual.
De’Longhi MultiGrill app
The app is more of an informational and supportive role, rather than controlling the appliance. That is why we decided to mention its features in the "Instructions" section, and not "Controls", as we usually do. nine0003
For the Android operating system, the application is downloaded from Google Play. With installation there are no difficulties. For the application to work adequately, you just need to remember the model number of your grill and select it from those offered.
Navigation is very simple and intuitive. In the main menu on the home page, it is proposed to select a product, then indicate in what form the user is going to cook it.
The next page asks you to choose the thickness of the product, the quantity and the degree of doneness you want; after which the program gives recommendations on preparation, panel configuration, temperature, and also calculates the time required for cooking according to the given conditions. nine0003
The user only has to start the timer after the raw product is placed on the panel and follow the prompts that will appear on the screen of the phone or other mobile device.
The chef's hat tab takes us to the "Recipes" section. In the "All recipes" item, in fact, the recipes are presented in alphabetical order. The bottom three items offer lists that are filtered by certain criteria. Recipes in the app are filtered by ingredients (cheese, eggs, fruits, pastries, poultry, etc.), dishes (buffets, main dishes, side dishes, desserts). The Special Dishes category includes gluten-free, quick, vegetarian, egg-free and dairy-free dishes. nine0003
The recipes themselves are very clear and easy to understand. All information is logically divided into the tabs "Ingredients", "Method", i.e. cooking progress, and "Tips".
The third tab of the main menu directs us to the tips or help section. You can also download the manual in PDF format from here. The information provided duplicates the "Problem Solving" section of the paper instructions. The rightmost menu item, marked with an asterisk, perhaps, does not require explanation - this is "Favorites", where the user can place the recipes that are most beloved or of interest to him. nine0003
Despite the initial skepticism, we liked the application. When we started cooking directly on the De’Longhi CGh2012D grill, the tips turned out to be appropriate and really helped at each stage of cooking - determining the time and choosing the operating mode depending on the type of product, the method of its preparation and the thickness of the piece. The list of recipes is quite extensive and curious. If the product needs to be turned over during frying, then the cooking timer may also be in demand. nine0003
Control
In general, the control of the De’Longhi CGh2012D contact grill is quite simple. The control panel is represented by an on / off button, an electronic display, timer buttons and two controls - heating the top and bottom panels, which are equipped with Sear buttons that launch the same-name mode.
After turning on the network, a beep sounds and the display lights up. The user needs to set the heating temperature of each of the panels by turning the knobs. Possible temperature range: 60-230 °C in 10 °C increments. The scoreboard displays the actions and indicators. After setting the temperature, you need to start heating by pressing the Start/Stop button. When the panels reach operating parameters, three beeps sound and the Ready message appears on the display. By placing the food on the grill, you can adjust the cooking timer. The time is set in 10 second increments. At the end of cooking, the grill will emit five loud beeps and stop heating. nine0003
During cooking, the user has the opportunity at any time to correct each of the parameters - temperature or operating time.
What is the "chip" of the Sear mode (roasting), we found out during practical tests. The instructions indicate that when this mode is turned on, the panels heat up to an elevated temperature in a few minutes. However, the panel heating temperature is set by the user. In addition, even without turning on this mode, the panels warm up in the same few minutes. The peculiarity, it turns out, is that regardless of the set temperature, the panels warm up to the maximum, and then slowly cool down, reaching the preset temperature and maintaining it. Therefore, we would not recommend cooking delicate foods in the Sear mode. But for frying meat and dishes from it, this mode is perfect as well as possible
Operation
Before operation, it is recommended to clean the base, handle, cover, controls of the control panel with a damp cloth. The removable panels, drip tray and scraper must be thoroughly washed by hand or in the dishwasher
The grill may emit an odor when first used. As the instructions clarify, this is a normal phenomenon inherent in all devices with a non-stick coating. The specific smell disappeared literally within a couple of minutes when the grill was heated to maximum temperature. nine0003
The operation of the De'Longhi CGh2012D grill is simple and quite standard. Like all appliances of this type, the grill should be placed on a stable, level surface away from flammable objects and materials. Next, we mention a few significant or seemed to us interesting points.
The De'Longhi CGh2012D grill can work not only as a contact grill when both panels touch the food. Two more modes are available to the user:
- grill oven - cooking mode with the lid ajar. It is used for non-contact frying of dishes or semi-finished products of great thickness, as well as soft sandwiches and products that do not require pressure; nine0254
- unfolded position (brazier) - the top and bottom panels are in the same plane, forming a large surface for frying.
 In this mode, the appliance can be used as a barbeque grill or smooth stove.
Particularly when used as a fryer or oven, the ability to separately adjust the heating temperature of the top and bottom panel becomes of great importance. Firstly, you can generally turn off the heating of the free surface, as we did when frying pancakes. Secondly, you can set different temperatures on smooth and grooved surfaces, which will allow you to cook different foods at the same time, such as delicate seafood and meat, or toast and steaks. nine0003
In the grill position, the lid can be installed in four positions: approx. 2 to 6 cm from the bottom plate. It is also important that the lid can be fixed in a horizontal position on any of the four available adjustments.
Inserting the panels into the grill is very easy: just insert the notches into the grooves and press the panel until it clicks. To remove, use the release buttons. Panels can be swapped if necessary.
Thermal insulation of the handle is beyond criticism - the part remains cold even during long work. Although the outer surfaces of the grill are hot, it is unlikely that you will be able to burn yourself on them, but taking certain precautions will not hurt.
The volume of the pallet is very large - during the tests we never had a need to drain its contents during operation.
When frying several portions, it is necessary to clean the panels from the remnants of finished products and lay out a new portion after the appliance has heated up to the set temperature. nine0003
Roasting releases a lot of moisture, so the outer surfaces of the grill may be damp. In general, during frying, the case gets dirty quite a lot, so you have to carefully wipe it with a sponge and detergent to remove greasy deposits.
The power of the grill allows you to brown even food with a high moisture content, such as zucchini or shrimp. When evaluating the results of frying, we would never assume that the heating of the panels is uneven - the products seemed to be cooked the same way.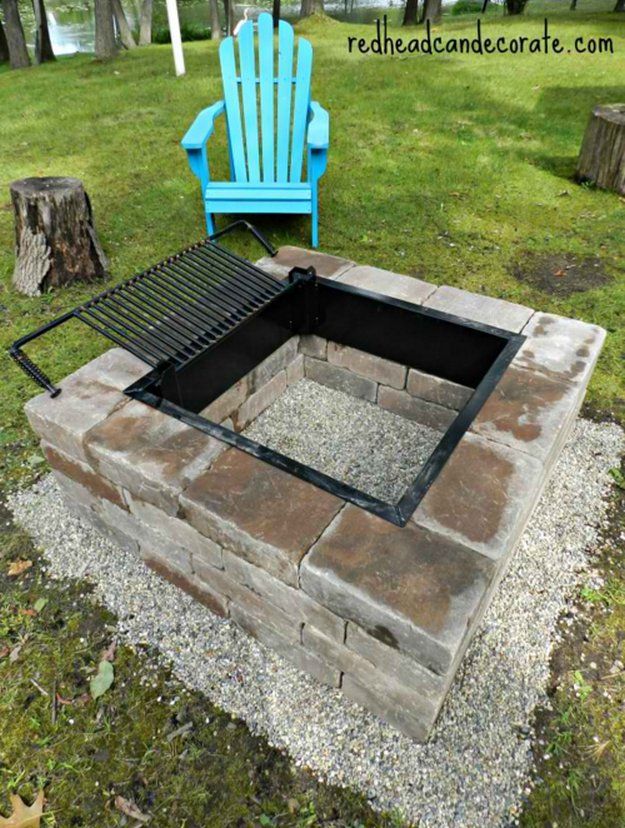 nine0003
In general, we appreciate the quality of work of De'Longhi CGh2012D. In particular, two pieces of steak reach the medium rare stage in 4 minutes. The temperature of the panels is so high and maintained at the same level that the surface of the product has time to “seal”, thanks to which meat, fish, vegetables, and minced meat products remain juicy inside. However, the test results will be described below.
Maintenance
Maintenance of the De’Longhi CGh2012D grill is easy. The main thing is to fulfill a number of requirements:
- Allow the appliance to cool down for at least 30 minutes before cleaning,
- do not use metal tools that can damage the non-stick coating of the panels,
- do not leave plastic tools on hot panels, including the complete scraper,
- before a new laying, it is necessary to remove food residues through the grease drain hole and wipe the panels with paper towels.
We recommend cleaning the outer surfaces of the housing and the lid of the instrument with a sponge and mild detergent. All accessories including panels, scraper and drip tray are dishwasher safe. However, there is a note in the instructions that frequent washing of the panels in the dishwasher may adversely affect the quality of the non-stick coating. nine0003
Any non-stick coating based on polytetrafluoroethylene (colloquially "Teflon") is harmful to the dishwasher, and sooner or later it will "finish it". Another thing is that in the case of a high-quality coating, this process can take quite a long time. Long-term experiments of our experts with frying pans have revealed that even with regular washing exclusively in the dishwasher, a good frying pan definitely “lives” for two years. And sometimes three.
In the car, we only washed the panels after frying a lot of greasy or very wet food. In some cases (after frying scrambled eggs, toast, hot sandwiches, shawarma, vegetables), it was enough to wipe the panels with paper towels. nine0003
Cleaning tool included with grill. It is recommended to use the scraper either after the grill has completely cooled down, or for a few seconds during cooking, in order to remove any adhering food residues from the surface of the panel. Judging by user reviews, if you work with a scraper on a hot plate, it can be deformed. A couple of times during the tests, we removed the adhering soot using the complete tool. We did not notice any changes in the appearance of the scraper. But we worked quickly, and the plastic was in contact with the hot surface really within a few seconds. nine0003
Our measurements
When both panels are heated, the grill power reaches 1950-2010 watts. In the heating mode of only one panel - about 975-1003 watts.
The grill reaches a maximum temperature of 230°C in 4 minutes and 20 seconds when both panels are heated. During heating and operation for five minutes at maximum temperature, the grill consumes 0.201 kWh.
We are also interested in the actual temperature of the panels.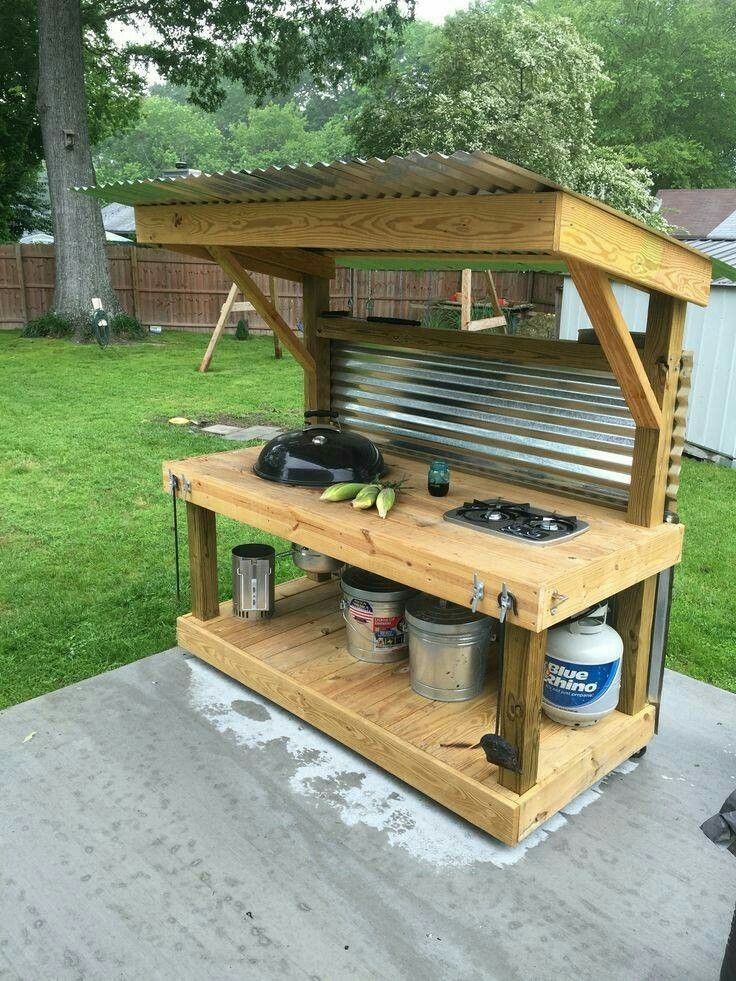 During this test, we set the temperature, heated the grill until it beeped, and measured the temperature of the top and bottom panels at several points. When analyzing the test results, it is worth remembering the error associated with the cooling of the panels during the time the measurements are taken. nine0003
| Set temperature | Heating time, min:sec | Bottom panel actual temperature | Top panel actual temperature | ||
|---|---|---|---|---|---|
| center | corners | center | corners | ||
| 100°C | 01:11 | 103-117°C | 50-78 °C | 123-145°C | 78-107°C | nine0015
| 150°C | 02:08 | 148-157 °C | 104-142 °C | 180-220°C | 120-170°C |
| 200°C | 03:34 | 208-223 °C | 154-201 °C | 230-254 °C | 160-210°C |
| 230°C | 04:20 | 244-260°C | 186-216°C | 260-271 °C | 184-232°C |
As you can see, the temperature of the top panel is higher than the bottom one. There is a big difference between the temperature in the center and at the edges: on average it is 40 °C. Let's see if such unevenness will affect the quality of frying products.
To understand whether the big difference in the heating of the top and bottom panels is due to the shape of the surface, we swapped the panels (smooth was installed at the bottom, and corrugated at the top) and repeated the experiment in a somewhat truncated form.
| Set temperature | Bottom panel actual temperature | Top panel actual temperature | ||
|---|---|---|---|---|
| center | corners | center | corners | |
| 100°C | 90-115°C | 50-79°C | 115-135°C | 76-98°C |
| 150°C | 136-154 °C | nine0013 90-130°C176-205°C | 118-146°C | |
| 200°C | 190-216°C | 135-175°C | 224-258 °C | 163-196°C |
The results of the experiment show that more intense heating of the top panel does not depend on the shape of the surface.
It took us a long time to understand the peculiarities of the Sear mode. The test was carried out in two stages. The first was set to 150 °C and turned on the heat with Sear. At the second stage, we measured a number of indicators during conventional heating to the same 150 °C. nine0003
| Mode | Heating time, min:sec | Temperature in the center of the panel immediately after the end of heating signal | Temperature at the center of the panel 5 minutes after the end of the heating signal | Power consumption during warm-up and 5 minutes of operation | ||
|---|---|---|---|---|---|---|
| bottom panel | top panel | bottom panel | top panel | |||
| Sear | 04:50 | 265-270°C | 265-274 °C | 190-200°C | 200-206°C | 0.193 kWh |
| regular | 02:08 | 154-158 °C | 185-225°C | 138-148 °C | 154-170°C | 0.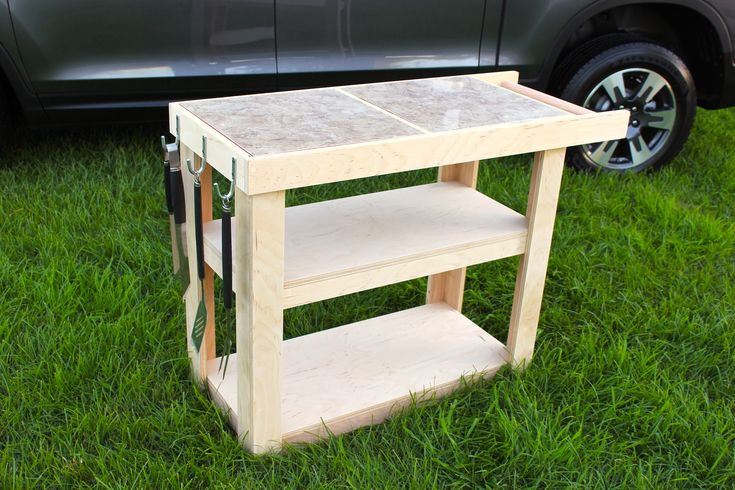 107 kWh 107 kWh |
So, in the toasting mode, the device heats up the panels to the maximum, after which the temperature drops to the values set by the user. In the first experiment, after the end of the heating, the grill did not consume electricity until the very end of the experiment. In normal mode, the grill heated the panels to 150 °C and then maintained this temperature, periodically turning on the heating of the heaters. nine0003
To make sure we understood everything correctly, we used the Sear mode, setting 100 °C. The grill beeped ready for use after 4 minutes 48 seconds. The temperature of the panels again reached an average of 270 °C.
Practical tests
Already after the first test, we realized that a very worthy device fell into our hands, so during the testing period a lot of different dishes were cooked. We fried vegetables, fish, seafood, meat, and poultry in various versions. When writing the article, we encountered certain difficulties in choosing the dishes that will be presented.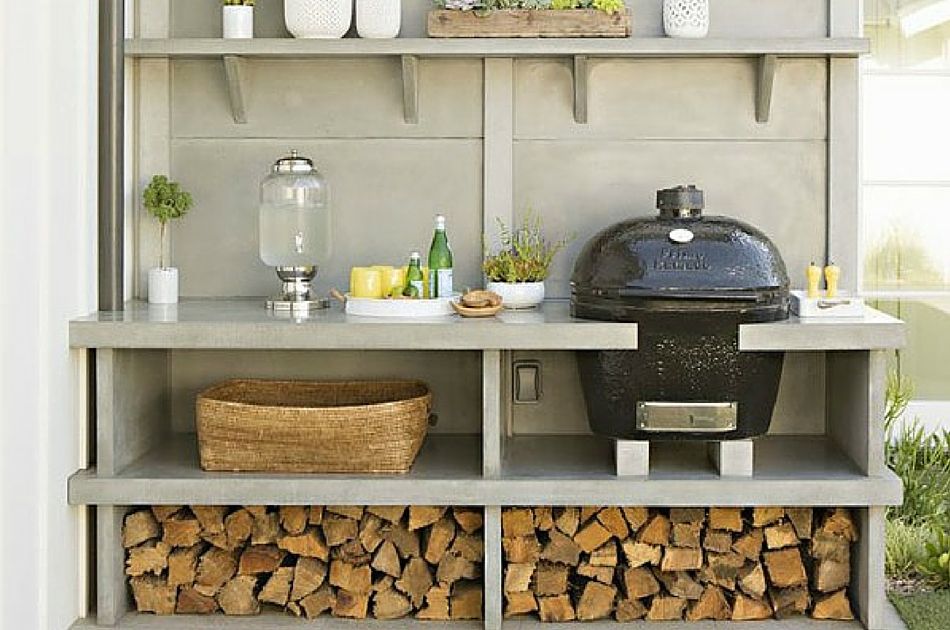 Nevertheless, a choice must be made, so we will describe several tests that seem to us the most illustrative. nine0003
By the way, during the tests it became clear: the power of the grill is so great, and the design is so successful that the uneven heating within one panel does not play a big role and does not have a visible effect on the result.
Shrimp fry
Shrimps cleaned and marinated in a sauce of vegetable oil, lemon juice, soy sauce and a couple of crushed garlic cloves. After about half an hour they were strung on skewers.
Grilled on the contact grill position at 200°C as advised by the app. We only adjusted the cooking time - six minutes seemed excessive to us. nine0003
But even in three minutes, the shrimp managed to fry and lose a lot of moisture. We think that one and a half to two minutes would be enough to heat up and lightly fry shrimp skewers.
The first acquaintance with the operation of the grill was successful: there is more than enough space on the panels to place skewers, it heats up quickly, fries seafood more or less evenly in minutes.
Result: excellent.
Chicken Heart Skewers
Chicken hearts were placed in a mixture of vegetable oil, soy sauce, chopped fresh ginger and garlic for a couple of hours. While the grill is heating up, string the hearts onto wooden skewers.
Six skewers loosely placed on one side of the grill. We started the process at 230 °C. All the moisture released from the products evaporated in a timely manner or drained into the pan.
Five minutes later, one of the skewers was removed and the heart was cut open. Outside, the skewers were already fried, but inside they were damp. The temperature was reduced to 200 °C. Roasted for 3 more minutes. The next batch was cooked at 200°C for 7 minutes and got the perfect result: browned on the outside, juicy and cooked inside the pieces. nine0003
Result: excellent.
Shawarma
In one of the previous experiments, we found out that for shawarma it is better to take not ascetic breast, but chicken thigh fillets.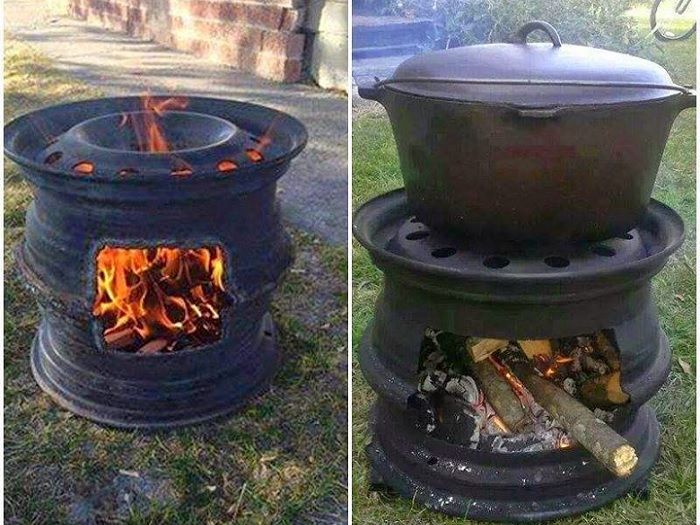 So this time we decided to follow the once paved path. We salted, peppered, smeared the fillet with vegetable oil and went to prepare the grill.
Brought the device to the fully open state. The heating was adjusted to 230 °C. We waited for the signal to warm up and laid out the pieces of chicken on the brazier. nine0003
Grilled for about 8 minutes on each side. The contact grill mode in this experiment seems to us more suitable, but in the case of a large amount of meat, you can use the grill as a roaster. The device copes with the task well, although it creates a very hot atmosphere around itself.
Perfectly fried chicken: the flesh is white and juicy.
While the chicken was cooling, we wiped the panels with paper towels and prepared the vegetables and pita bread, and mixed the sauce of sour cream, salt, taco seasoning and garlic. nine0003
We heated up the grill to the usual 230 °C – we don’t need to cook, but just slightly warm the contents and brown the pita bread.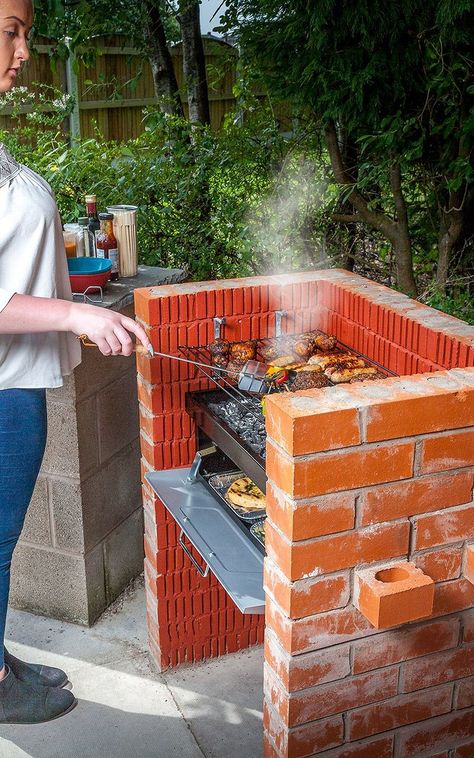 In three minutes, the grill coped with the task.
Perfect, fast and satisfying in every way: a crispy shell and a warm filling with fresh vegetables and a well-structured sauce.
Result: excellent.
Eggplant rolls
The contact grill is an excellent device for roasting eggplant slices. The process is fast, and the vegetables do not absorb excess oil. nine0003
Eggplant cut into slices about 1 cm thick. The app recommends frying this thickness with the grill open for 10 minutes at 230°C, 5 minutes per side. We still took the risk of using the contact position at the same 230 °C. The first portion was fried for five minutes.
Looking at the uneven frying due to loose contact with the top panel, we concluded that the application was right about the unfolded position of the panels. We just turned the pieces over and fried them for another minute. nine0003
The aubergines were overcooked for our taste, so the temperature was lowered to 220°C, the duration was set to about 6 minutes.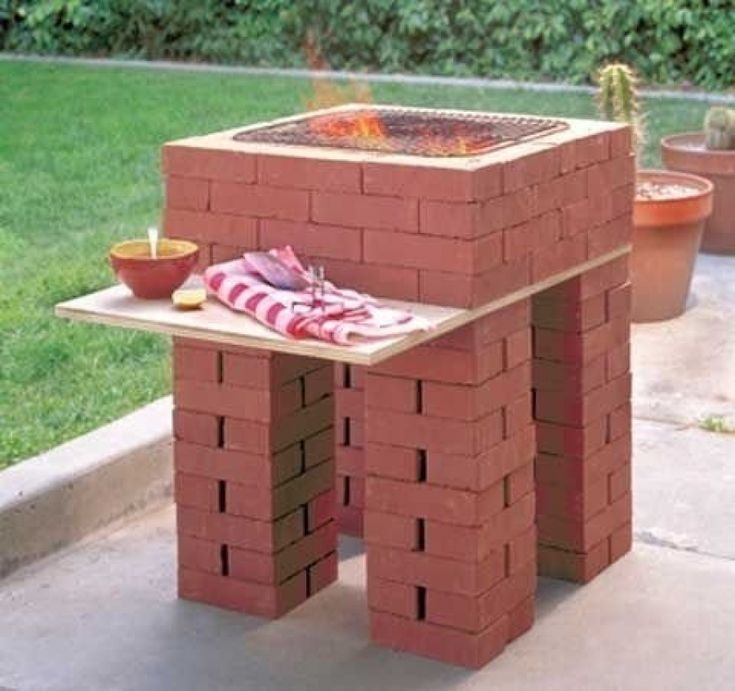 With these parameters, we got the same result that we wanted.
The still warm slices were stuffed with grated cheese with garlic and mayonnaise and rolled into rolls.
It took us about 20 minutes to heat up the grill and fry four eggplants. During this time, the device consumed 0.5 kWh.
Result: excellent. nine0535
Roast chicken thighs
The day before the experiment, we prepared the chicken. Two hams and wings were salted, smeared with sweet chili, vacuum-sealed and cooked in sous vide at 72°C.
Then preheat the grill on Sear mode to 230°C. Roasted for 4 minutes.
We got a fried crust and heated tender meat. Fast and very tasty. This style of cooking is especially useful if you want to cook a certain amount of food ahead of time. A chicken cooked in a bag can lie quietly in the refrigerator for a couple of days, after which you can cook a fresh and hot dish in just minutes. nine0003
Result: excellent.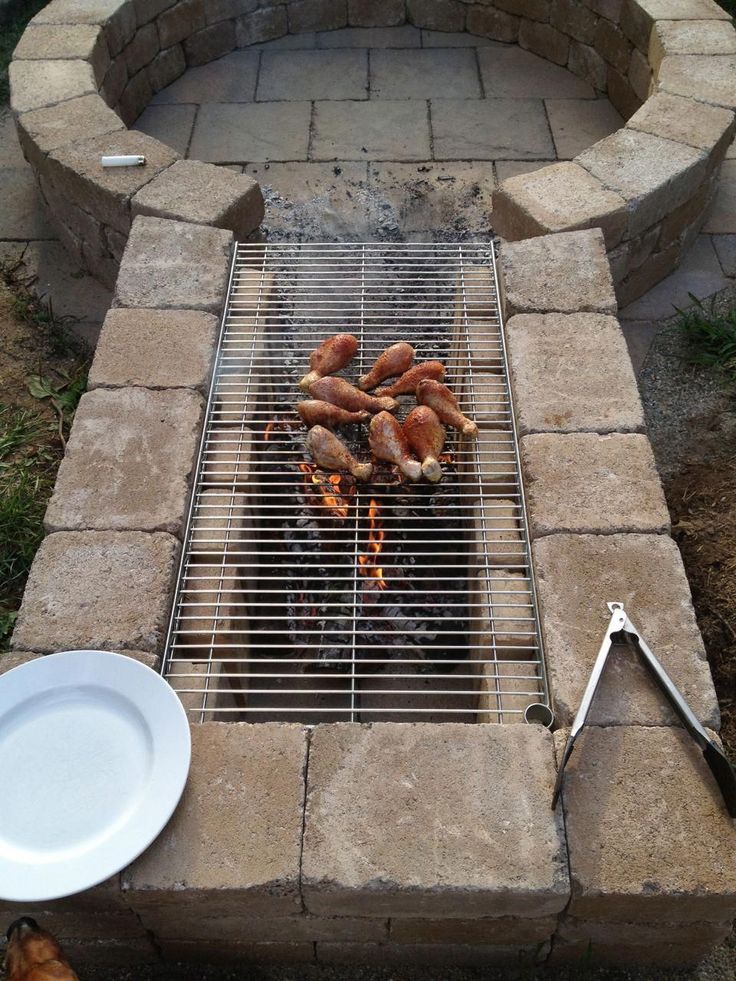
Banana pancakes
1 banana, 2 eggs (1 whole + 1 egg white), 150 ml milk, 100 g flour, 70 g butter, 1 tbsp. l. sugar, salt, 16 g baking yeast
Recipe taken from instructions. However, we were so confused by the amount of dry yeast that we could not help but adjust it. We took about 8 g of fresh yeast, dissolved it in warm milk, added all the flour and left it in a warm place for about an hour. nine0003
Mash a banana with a fork and make a puree. Beat the egg with sugar, add melted butter, come up dough and banana puree. All mixed well and left for half an hour. Then, one whipped protein was carefully introduced into the dough.
Install the appliance in the open position, fixing the flat panel in the base. We turned on only the heating of the bottom at 200 °C. When the grill was hot, greased the surface with oil, then laid out about 1.5-2 tablespoons of dough and leveled it, forming a circle. nine0003
When bubbles appeared on the entire surface of the dough, and the dough “frozen” slightly, the pancakes were turned over. In total, it took about half an hour (28 minutes) to fry pancakes from the indicated amount of ingredients. The grill consumed 0.273 kWh.
Despite the large, as it seemed to us during measurements, temperature difference in the corners and in the center of the panels, the surface of the pancakes was fried fairly evenly. All pancakes of the same filling were removed from the grill at the same time, none fried significantly longer than others. nine0003
Result: excellent.
Roast Pork
Three pieces of pork neck about 2 cm thick salted, sprinkled with freshly ground black pepper and lightly brushed with vegetable oil.
Roasted in Sear mode at 230°C. Pork cooked for 5 minutes. The temperature inside the piece reached 87°C and continued to rise after the piece was removed from the hot plate. In total, the device worked for 9 minutes 3 seconds and consumed 0.273 kWh.
Meat cooked superbly. Due to the fast and powerful roasting, the pork retained incredible juiciness and managed to be completely fried in just five minutes! nine0003
Result: excellent.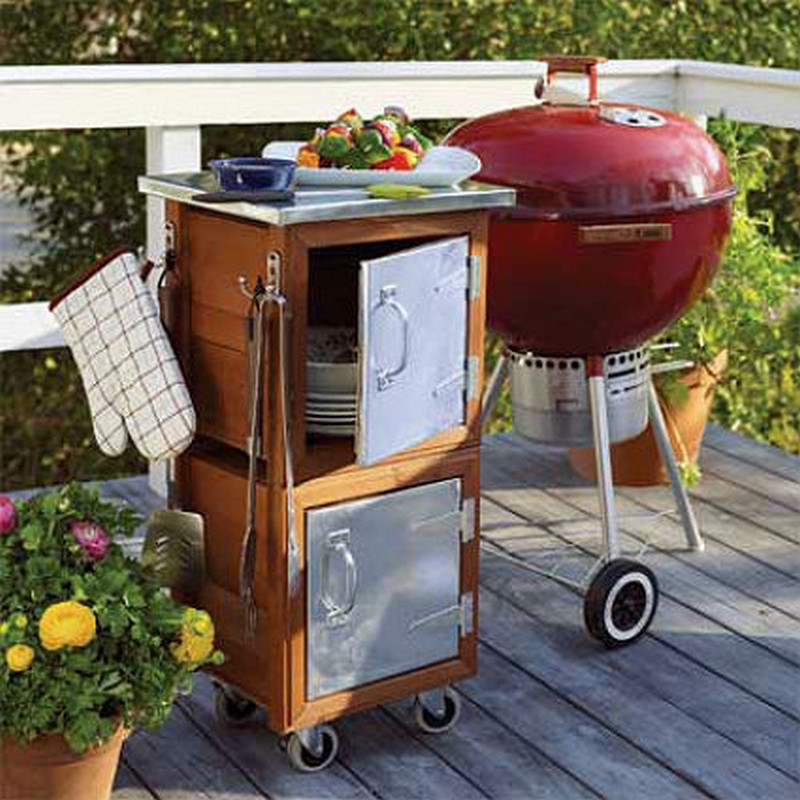
Beef steak
Finally, when it became clear that the De’Longhi CGh2012D grill was powerful enough to quickly roast meat, we armed ourselves with a thermometer and started the test.
Steak, unfortunately, we got not the best, but not the worst either. If it were not for the thick veins in the middle and along the edges, then the pieces could be reference.
Grease the meat with a little vegetable oil and start the grill on Sear, setting the operating temperature to 230°C. When the ready-to-work signal sounded, two steaks were laid out on the panel. nine0003
Exactly 4 minutes later the piece reached Medium Rare.
However, it was necessary to remove the steak from the panel a little earlier. As a result, already on the plate, the temperature inside the piece rose to 58 °C. However, it didn't spoil the steak too much. At the edges, the degree of readiness was slightly higher, but in the middle, the Medium Rare we wanted remained.
After removing the meat, put eggplant pieces on the hot plates and turn off the grill.
In five minutes, while the device was cooling down, perfectly fried pieces of vegetable were obtained. nine0003
Result: excellent.
The grill isn't just great for grilling meat, it does it perfectly.
Conclusions
The author has already tested more than a dozen grills. In the iXBT.com test lab, there were both cheap appliances with fixed panels and expensive smart devices, but the De’Longhi CGh2012D contact grill made an indelible impression on us. The appliance is equipped with features and features of the most advanced grills: high-quality non-stick coating, removable interchangeable panels that can be washed in a dishwasher, high power, simple electronic control and three operating modes. In addition, the grill is characterized by a number of original features: independent adjustment of the heating of the panels, sound indication, Sear mode and a heating element built into the panel itself. nine0003
The performance of the device can be assessed as excellent. The grill cooks both vegetables and meat in minutes, which is especially valuable when frying steaks. Heating can be considered very uniform. Note the large working area of the panels and the ability to separately purchase panels for making thick waffles. The "companion" app contains recipes and cooking tips for many types of food, and we found it really useful and interesting.
During testing, we were unable to find any significant disadvantages. We only note that you should not abuse the washing of removable panels in the dishwasher. However, the manufacturer provides an opportunity to purchase a new set of panels if the existing ones are damaged. Another point is related to the volume of the soundtrack. If someone is sleeping in the next room, then the device that works and informs about all the processes taking place in it has every chance to wake up a family member not so much with the smell of cooked dishes as with sound signals. nine0003
Pros
- ease of use and maintenance
- enough power for fast frying
- large work surface
- removable, interchangeable dishwasher-safe panels
- heating off timer
- independent panel heating controls
- three operating modes: contact grill, open grill, grill oven
Cons
- washing the panels in the dishwasher still affects them negatively
- loud beeps
Two gadgets from De'Longhi with which you will cook like a real chef
March 22, 2021
These gifts will make life comfortable and turn every day into a holiday.
Together with De'Longhi we have chosen a cool technique for everyone who appreciates the taste of life.
Compact electric grill
- Why: to cook steaks as good as in your favorite restaurant.
One device for different dishes
Grill pan, waffle iron, toaster and pancake maker - De'Longhi Grill CGh2030D can easily replace all this and help save space in the kitchen. There is a possibility that for some time the owner of such a device will, in principle, forget about the existence of the stove. If you need it, then only to cook soup or pasta, and the rest will be easier and faster to cook on the grill.
De'Longhi Grill CGh2030D supports three operating modes. In the contact grill mode, the product is sandwiched between two plates and simultaneously fried on both sides. The open grill increases the surface for frying - you can cook on both plates at once. The grill oven is an option if the bottom of the dish needs to be thoroughly fried, and the top only needs to be warmed up. For example, this mode is suitable for warming up burger buns. nine0003
With the grill, you can roast vegetables and various types of meat, whether it be chicken or burger patties. You can also make pancakes for breakfast (on large plates it is convenient to bake several at a time), cook Viennese waffles or heat up sausages for homemade hot dogs. The De’Longhi Grill CGh2030D comes with three sets of interchangeable plates: for waffles, smooth ones for pancakes and scrambled eggs, and corrugated ones to make appetizing stripes on sandwiches or steak.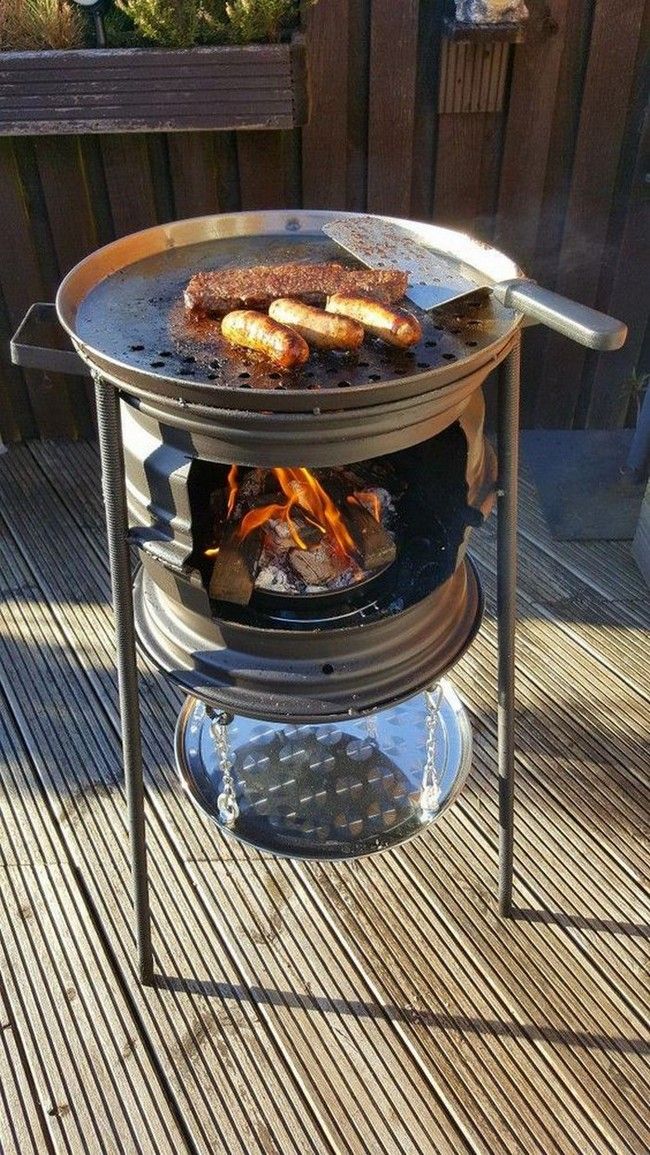
By the way, about steaks: with such a grill, the meat will turn out tender even for a novice cook. Thanks to the Sear mode, the plates heat up to the maximum temperature and seal the juice inside the piece. nine0003
Personal chef on your smartphone
Calculating the perfect roast time is a task with an asterisk. It’s worth taking a break for a few minutes, and instead of medium, it’s already well done. You have to go to the tricks and first fry the steaks over high heat, and then bring them to readiness in the oven. But with a grill, it's easier. The De’Longhi MultiGrill mobile application will tell you which mode and temperature to choose for meat or other products, depending on the number of servings and the desired degree of roasting. If there is no inspiration to come up with what will be for dinner today, the application will also help out with interesting recipes. nine0003
Easy to cook and wash
Setting the table for a family dinner or a party with friends is no problem.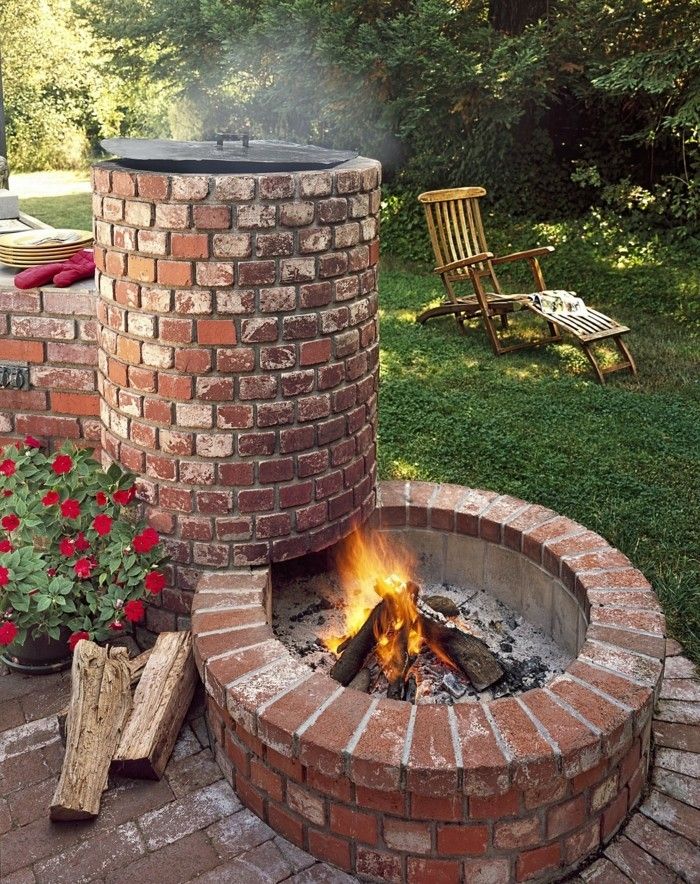 With De'Longhi Grill CGh2030D it is convenient to cook food even for a large company. For example, in the open grill mode, you can fry 12 chicken thighs at the same time or cook an impressive portion of seafood with vegetables. A separate heating element is inserted into each plate. It distributes heat over the entire surface so that the dishes are fried equally in the center and along the edges. Thanks to autonomous heating of the plates, it is convenient to choose the right temperature for different products. nine0003
The grill is equipped with rubberized feet, so it will not slip on the table, and the handle remains cold even after prolonged use. Finally, after large-scale cooking, you don’t have to wash the entire kitchen: the fat flows into a special tray, and the plates with non-stick coating are easy to clean by hand or in the dishwasher. Comes with a spatula for cleaning the plates.
You can buy such a grill on Ozon - using the promo code LIFEHACKER from February 20 to March 31, a 10% discount applies to it. nine0003
Buy electric grill
Automatic coffee machine
- Why: so as not to waste time going to the coffee shop.
Drinks created especially for you
A coffee machine is a great gift for a person who cannot imagine a morning without a portion of cappuccino and knows by heart the menu of all coffee houses in the area. Sorry, coffee houses, but now you can brew a fragrant drink at home. De'Longhi Primadonna Soul ECAM 610.75 is a personal barista who knows exactly what kind of coffee you will like. All you need to do is select your coffee beans and specify the type and roast level, and the Bean Adapt system will select the required number of beans, determine the appropriate grinding degree and water temperature, which will allow you to extract the maximum taste. nine0003
Every minute counts in the morning and the last thing you want to do is wait until your coffee is ready. With De’Longhi Primadonna Soul ECAM 610. 75, you don’t have to waste time in vain: the coffee machine can simultaneously prepare two portions of espresso at once. And there will be no need to fiddle with the settings: the machine supports up to 5 user profiles and remembers the preferences of each family member.
Easy to operate and maintain
With the De’Longhi Coffee Link app, you can command your coffee machine from your smartphone. This opportunity is especially valuable in the morning: while still in bed, select the appropriate drink options in the application, and when you get to the kitchen, a cup of hot coffee will already be waiting for you there. nine0003
When it's time to empty the grounds container, change the water filter or descale, a reminder will appear on the device's display and in the app. The milk and grounds containers, the drip tray, the ground coffee funnel and the nozzles of the beverage outlets can be washed by hand or placed in the dishwasher. And with the Clean function, after preparing a latte or cappuccino, it is easy to clean all the parts that have come into contact with milk: the device will process them with hot water and steam.