How to grow fava beans at home
As Food & Cover Crops! ~ Homestead and Chill
Fava Beans are such a rad crop! Also known as “broad beans”, these hardy annual plants are multi-use, beneficial, and easy-to-grow – totally worthy of a spot in your garden. Commonly grown as a cover crop, fava beans are nitrogen-fixers – meaning they improve soil quality by adding nitrogen to it, rather than taking away from it. The nutrient-rich edible beans and greens are delicious, and bees love the flowers! Winning, all the way around.
After hearing all of that, are you interested in growing fava beans too?
Hey look, we grew a Fava-Bee!Read along to learn all about growing fava beans, which is pretty dang simple! We’ll go over the benefits of growing fava beans, their preferred growing conditions, varieties, and how to plant and care for them. Additionally, I’ll hit you with some tips for harvesting, eating, and even preserving fava beans. Finally, let’s talk about maximizing the benefits of growing fava beans – by leaving their roots in the soil, and mulching with the greens!
3 REASONS TO GROW FAVA BEANS
1) Nitrogen-fixing
Fava Beans are a member of the legume family. As with most legumes, fava beans have the ability to “fix nitrogen”. But what does that mean exactly? Well, all plants have the ability to uptake nitrogen from the soil. That process is a normal and essential part of the plant life cycle! However, legumes do something a little extra special.
In addition to taking in nitrogen from the soil, they also have the ability to absorb and fix nitrogen from the air! They accomplish this through a beautiful symbiotic relationship with specialized bacteria called Rhizobia. The Rhizobia bacteria colonize the roots of legumes, form nodules, and draw in nitrogen – usually in excess than what the plant can use for energy. Therefore, a surplus is leftover and stored in the plant material. Additional nitrogen-fixing cover crops include peas, clover, vetch, lentil, flax, alfalfa, ryegrass, and other legumes like soybeans.
Image courtesy of Master Gardeners of Napa CountyRhizobio in action! Check out these badass nitrogen nodules on our fava bean roots.

So why does this matter? Nitrogen is one of the key nutrients that all plants need to photosynthesize and healthily grow! However, nitrogen is also easily depleted in garden soil where crops are repeatedly grown, and thus needs to be replenished. Traditional agriculture systems simply add chemical fertilizers to accomplish this, which is harmful to the environment in a number of ways. Using natural, organic practices like cover crops and compost to feed our soil instead of synthetic fertilizers is a wonderful thing!
But that isn’t the only wonderful thing about favas….
2) The entire fava bean plant is edible!
Yep, you read that right! The beans, pods, leaves, you name it… All edible. Sure, some parts may be less desirable to eat, such as the tougher stems or older fuzzy pods, but the other parts are incredibly yummy and versatile! Fava bean leaves taste very similar to the bean: sweet, buttery, and earthy. They are rich in vitamins and minerals like folate, manganese, copper and phosphorus. The beans themselves are an excellent source of protein and soluble fiber as well. We routinely enjoy both the beans and greens with many meals!
3) Low-fuss & Low-pressure
Fava beans are very easy to grow, as long they’re planted in the right season. They prefer mild to cool weather conditions, which we’ll discuss more below. Fava beans also attract very few pests or diseases, and require minimal maintenance!
Even if you have a short growing window between hot and freezing weather (or vice versa) I still recommend planting fava beans somewhere in your garden. Let’s say unfavorable fava weather comes before the plants are mature enough to produce a fat batch of beans… Oh well! For us, we view the beans themselves as bonus – like the cherry on top of all of the other benefits of growing fava beans.
Worse case scenario? When freezing or frying weather is on the horizon, harvest some of the tender fava greens to enjoy, and allow the rest of the plant to fade in place to nourish the soil. Best case scenario? You’ll be snacking on some delectable fava beans… perhaps while sipping a glass of chianti. Both are worthy options.
Like I said, low pressure!
HOW TO GROW FAVA BEANS
Fava Bean Preferred Growing Conditions
Temperature
Fava beans favor weather that is not much warmer than 75°F during the day. Their ideal temperature range is 60 to 65°F, though they will tolerate colder temperatures down to 40°F as well. This makes them perfect for fall or spring planting in most locations!
Sun & Location
Fava beans grow best in full sun, but will not flower well in hot, dry conditions. Thankfully, they grow decently well in partial shade too. Meaning, if you’re worried about temperatures occasionally climbing over 75°F (especially for spring-planted favas with summer on the way), choose a planting location that receives afternoon shade or filtered sunlight throughout the day.
Fava beans can absolutely be grown in containers! Again, they’re not fussy about much. As long as you can follow the other general guidelines provided in this article, they’ll do great in a container too. We routinely grow them in half wine barrels, but have also grown them successfully in smaller fabric grow bags.
Time
From planting seeds to harvest, fava beans require an average of 3 months of growing to mature. Different varieties will vary slightly in their days to maturity; some say 75 days and some up to 100. Therefore, choose varieties that suit your optimal growing window – especially if you are hoping for a good bean harvest. Note that smaller, less mature fava beans are the most tender to eat though! So even if they don’t have time to get huge, that is totally okay.
Soil & Water
Fava beans are not picky! They don’t mind cool, clay, or deficient soil – things that other plants typically do not love.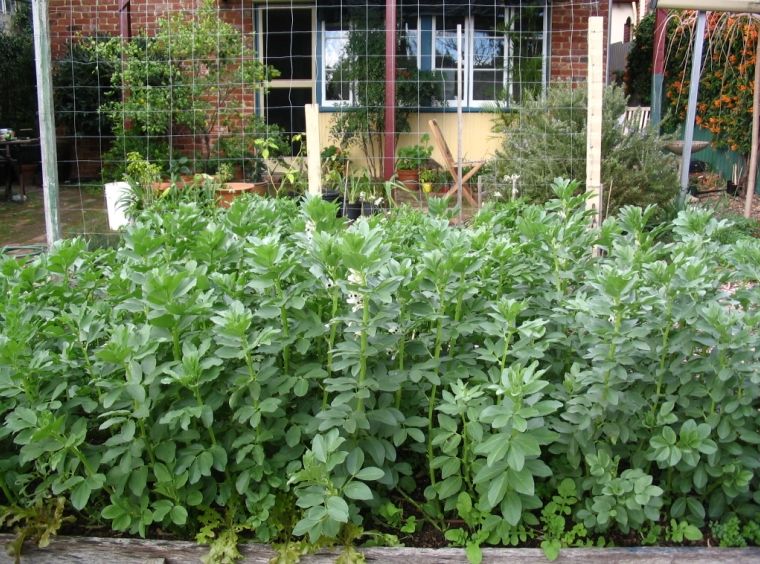 Therefore, you don’t need to worry much about the soil quality (let alone fuss with amending it) before planting fava beans. However, favas won’t be happy with water-logged roots, so do choose a growing location and soil that can provide decent drainage. Provide regular water in order to maintain the soil moist but not soggy.
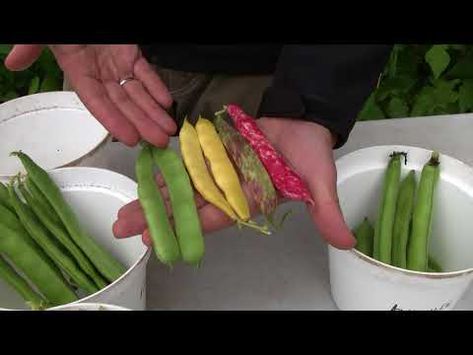
Fava Bean Varieties
The most common and popular variety of fava beans is Broad Windsor, and for a good reason! The plants are reliable and productive, and mature quickly to produce large delicious bean pods. We have experimented with a handful of different fava varieties over the years, but always come back to the tried-and-true Broad Windsor. That’s primarily all we grow these days.
Yet there are many other fun and unique types of fava beans out there. For example, we grew these “Extra Precoce A Grano Violetto” that develop purple beans inside their green pods! They do quickly change back to green when cooked though. Others are known to be exceptionally cold-hardy, such as Aguadulce.
Soaking Seeds & Planting Instructions
Once you have your fava bean seeds on hand, lets get planting! Like most beans, favas prefer to be directly sown outside. However, they aren’t as sensitive or prone to transplant shock as some beans, so if you need to start them indoors for whatever reason, that works too. Just ensure they’re transplanted out before they become too large or root bound.
To help aid in speedy and successful germination, soak the seeds in un-chlorinated water for 12 to 24 hours prior to planting. This is a great tip for all tough, large seeds!
Sow fava bean seeds 1 to 2 inches deep in the soil, about 6 inches a part. Lightly cover, water, and keep the soil moist to assist in germination. They can be a bit slow to sprout, so be patient! Some may pop up within a few days, some may take a few weeks.
Ongoing Care & Support
After fava beans have sprouted, they need very little care. Simply water on occasion and they’ll be happy. But did you know that fava bean plants can reach 4 feet tall?! So keep that in mind when you’re choosing their planting location – since they can shade out other nearby plants! Once fava bean plants begin to get tall, and especially as they become heavy with developing beans, you’ll want to provide support for them. In climates with strong wind or rain, you may even want to provide support earlier since they’ll be prone to flopping over in those conditions.
To support our fava beans, we simply put a few stakes around their planting area and run twine between them, creating a makeshift cage. Fava beans do not have tendrils that grab onto trellises like peas, nor do they wind themselves around their support structures like pole beans. You basically have to find a way to prop them up, more like tomatoes.
Harvesting Fava Beans & Greens
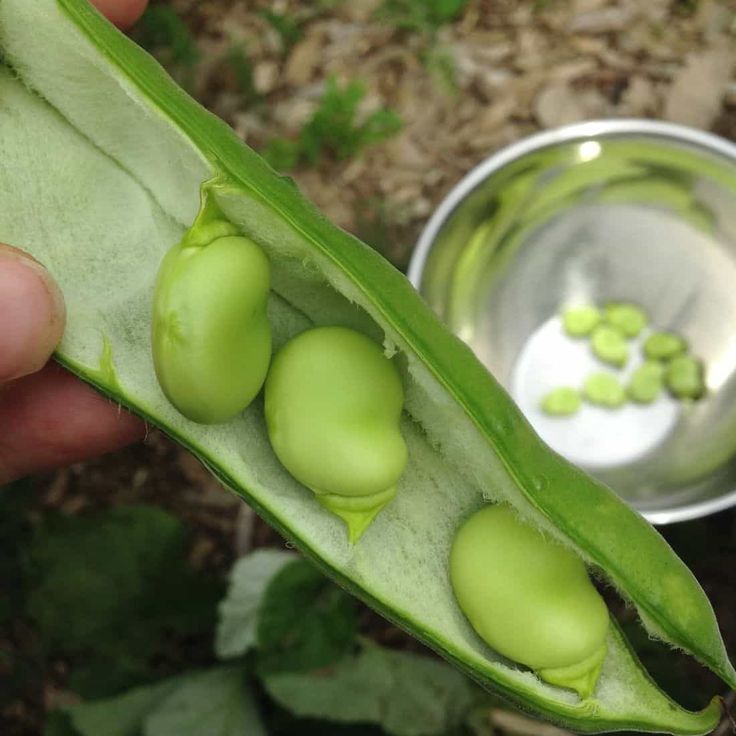
It is hard to go wrong when it comes to harvesting fava beans! Some folks enjoy the smaller, less mature bean pods. They even eat the whole thing, outer pod and all – like a snap pea! At this stage, the inner beans are exceptionally tender.
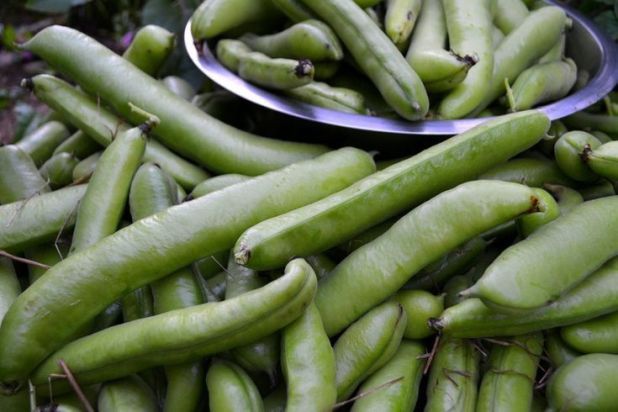
We generally allow the bean pods to get a bit larger before harvesting. Mature fava bean pods can reach over 6 inches long! You can tell when the inner beans are well-developed by feeling or observing the pod. As the beans grow to fill out the pod, it becomes bulbous and firm. However, the larger the fava beans, the tougher their outer skin can get. To remove the beans, pull up or twist on the bean to see if it easily disconnects from the plant. If not, use pruning snips or scissors.
The best fava greens to eat are the freshest tender growth on the tips of the plants. We typically harvest upper portions of stem and leaves about 6 to 12 inches long. As you continue to pluck beans, more will grow. As you trim the stems and foliage, it will encourage branching and fuller plants.
After Harvest or the Growing Season
This may be one of the most important points of this article: When it comes time to say goodbye to your fava bean plants, leave the roots in place! This way, the roots can decompose in the soil and feed it the nitrogen that the Rhizobia has worked so hard to store. Even more, take advantage of the nutrient-dense aboveground leaves and stems!
When fava season comes to an end, you could do a few different things. One is to simply allow the plants to die back and fade in place. This is an especially great option for fall-planted fava beans where winter is on the horizon, and you don’t intend to plant anything else there until next spring.
Another option is to cut the plants down (into pieces if you wish), and leave them on top of the soil to break down. This practice is known as “chop and drop” mulching. Or, instead of leaving them in the same bed they grew, you could also add the fava foliage to your compost pile or mulch another area. For example, we often top our large cannabis grow bags with fava plant mulch.
A batch of fava beans growing around our fruit trees. After harvesting all the beans, we cut the plants down, chopped them up a bit, and left them as mulch to enrich the soil.To Shuck or Not to Shuck?
To answer this question, you’ll have to experiment for yourself! Each gardener and fava bean officinando has their preferred way to process and eat fava beans. Again, some eat the whole outer pod! Personally, I find it too fuzzy and fibrous. Therefore, we shell our pods to reveal the inner beans. Be sure to compost or mulch with those spent outer pods.
Additionally, each individual fava bean inside the pod is wrapped with a thin skin.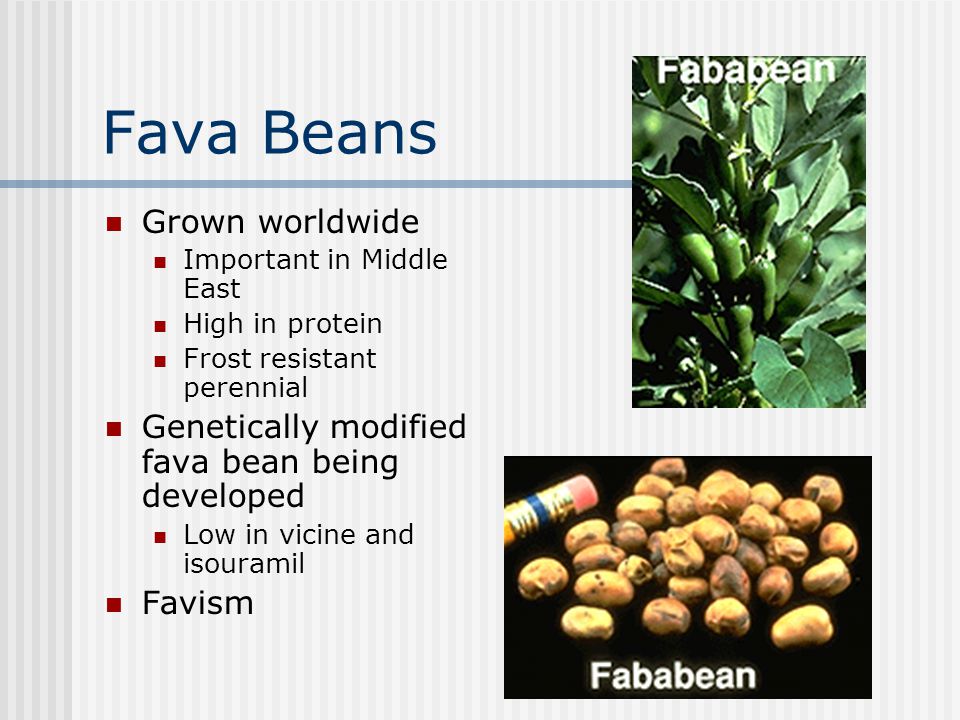 Some folks are hellbent on removing that skin, shucking or peeling every little bean. In my opinion, this is usually unnecessary, too time-consuming, and a waste of good protein, fiber, and flavor – particularly for the smaller and more tender ones! Do not peel the little guys. Yet the skin around the older largest beans can definitely get tough. We sometimes peel those, but not always.
EATING & PRESERVING FAVA BEANS
Eating fresh
Fava beans are versatile little vegetables. You can enjoy them sautéed, roasted, pan-fried, and more! Most often, we add them to our favorite cast iron wok to sauté with various veggies and seasonings, and serve it all over brown rice, quinoa, lentils, or with eggs. We also routinely add them to soup. Pan-fried or roasted fava beans go particularly well with olive oil, garlic, salt, pepper, and even a little squeeze of lemon juice at the end!
For fava greens, we treat them much like kale or any other leafy green in our garden. Add handfuls of leaves to any sauté, stir fry, soup, frittata, quiche, salad, or more! Fava bean greens also make for an insanely delicious, nutritious, nutty pesto – which can also be frozen to preserve. Check out our fava green pesto recipe here.
The ingredients for our fava greens pesto. Yum!Preservation ideas
There are SO many options for preserving fava beans too! Last season, we froze a lot of them to use in future soups or sautes. A quick tip for freezing fava beans (or any food, really): Lay them out on a baking sheet, not touching, and freeze this way first for 6 to 12 hours. Then package them together into a container for long-term storage in the freezer. Freezing them individually first prevents them from sticking and clumping together later, which makes it much easier to fish out just a handful of beans when you want them!
In addition to freezing, fava beans can be pickled, fermented, or dehydrated! We will definitely be doing a little of each this season, and I will report back with recipes.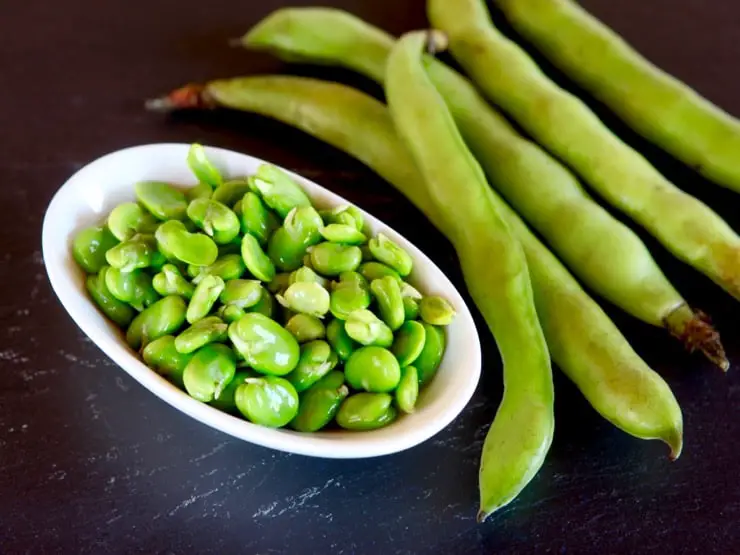 In the meantime, if you need a good pickling brine recipe, check out our easy refrigerator pickled peppers. Simply swap out the peppers for fava beans instead, or any other delicious veg! Similarly, use this simple ferment recipe and replace the radishes for favas. For pickling or fermenting, I suggest to use smaller tender beans, or remove the outer skin of the tougher large beans as needed.
And that, my friends, is how you grow and use fava beans – from seed to table.
I hope this article was interesting – and inspired you to try growing fava beans at home! Please let me know if you have any questions, and feel free to spread the fava love by sharing this article. If you’re interested in learning about other ways to organically amend your soil, you may enjoy this article about how we amend our garden beds between seasons. Thanks for tuning in, and for your interest in organic gardening!
How to Grow Fava Beans (Broad Beans)
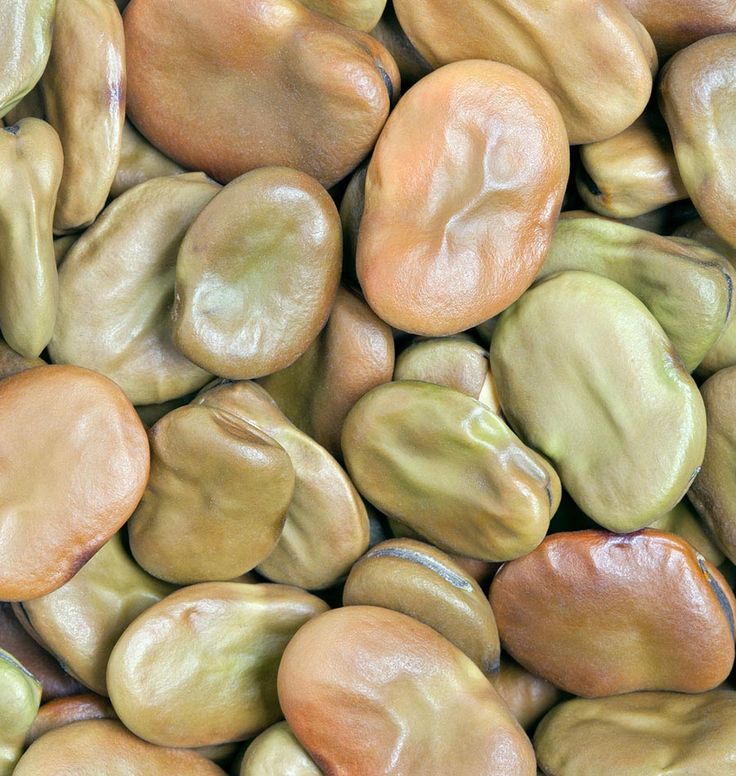
Fava beans (Vicia faba), also known as broad beans, are a fast-growing, cool-weather annual vegetable that can be planted in either the early spring or fall. They are grown for their large, flat, edible seeds found inside the fruiting structures, or pods, although all portions of the plants are edible. There is a good deal of variety within the different types of fava beans, in both the size of their seeds and their color (e.g., white, beige, brown, purple, and black).
The plants are large and leafy with square, hollow stems that are fairly sturdy but might flop under the weight of the pods. Fava beans are not twining climbers like many other bean species. The leaves are rounded and look more like pea leaves than bean foliage. The flowers grow in spiked clusters and are mostly white with dark markings, although they can also be crimson. They mature into thick, waxy pods that can stretch to almost a foot long and contain up to six seeds. Note that both the fruits, flowers, and even pollen can be toxic to certain people who experience favism.
| Common Name | Fava bean, faba bean, broad bean |
| Botanical Name | Vicia faba |
| Family | Fabaceae |
| Plant Type | Annual, vegetable |
| Size | 2–6 ft. tall, 0.75–1 ft. wide tall, 0.75–1 ft. wide |
| Sun Exposure | Full to part sun |
| Soil Type | Loamy, moist, well-drained |
| Soil pH | Acidic, neutral (6.2 to 6.8) |
| Bloom Time | Spring, summer |
| Hardiness Zones | 2–10 (USDA) |
| Native Area | Asia, Mediterranean |
| Toxicity | Toxic to people with favism |
How to Plant Fava Beans
When to Plant
Fava beans can be planted at different times depending on the climate. In most areas, they are planted in early spring as soon as the soil is workable. In cooler climates, they also can be planted in late fall to overwinter. And in mild climates, it's possible to grow them year-round. Not only are they edible, the plants are often used as a cover crop to add nitrogen to the soil.
Selecting a Planting Site
Fava beans need a sunny spot with well-draining soil.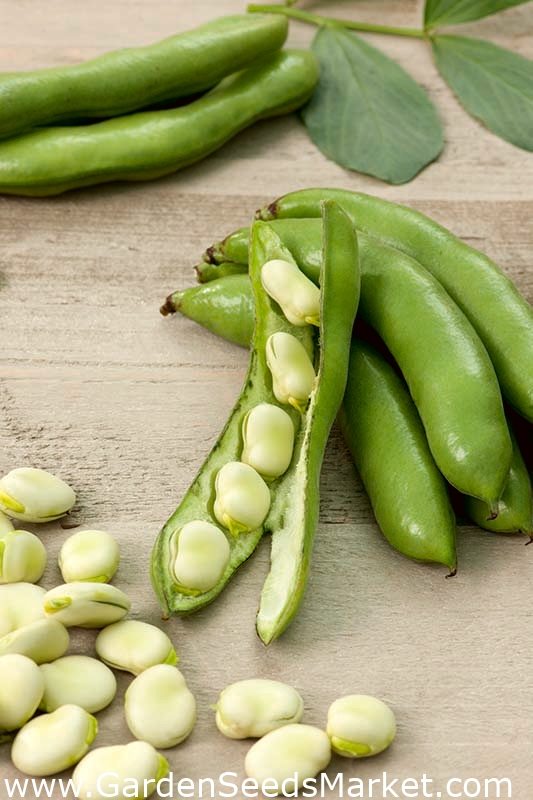 Make sure no nearby plants will create too much shade for them as they leaf out in the spring. It's also possible to grow them in raised beds, but because they grow quite large, only dwarf cultivars, like 'Bell Bean', perform well in containers.
Spacing, Depth, and Support
Plant seeds about 1 to 2 inches deep and at least 6 inches apart. Rows should be roughly 2 to 3 feet apart. Stake plants while they're still young to avoid disturbing the roots once they mature.
Fava Bean Plant Care
Light
Fava beans prefer to grow in full to part-sun, meaning at least six hours of direct sunlight on most days.
Soil
Fava beans can tolerate a range of soil types, as long as there is good drainage. A loose, loamy soil with a slightly acidic to neutral soil pH is ideal.
Water
The plants have average water needs and some drought tolerance. About an inch of water per week is fine. However, during flower and fruit production, keep the soil evenly moist but never soggy.
Temperature and Humidity
Temperatures between 65 and 75 degrees Fahrenheit are best. The plants will struggle in hot temperatures and be more prone to diseases. They can tolerate temperatures down to 40 degrees Fahrenheit well — and even cooler temperatures down to 21 degrees Fahrenheit for short periods. Humidity typically isn’t an issue as long as there is adequate soil moisture and good air flow around the plants. Long, cool growing seasons are best.
Fertilizer
Fava beans, like other legumes, fix their own nitrogen into the soil and therefore don't usually require additional feeding. However, working compost into the soil can help with growth, especially if the soil is nutrient-poor.
Pollination
The plants are self-pollinating and will attract bees and other pollinators to the garden.
The Spruce / Heidi Kolsky
The Spruce / Heidi Kolsky
The Spruce / Heidi Kolsky
Types of Fava Beans
There are several types of fava beans, including:
- 'Aquadulce Claudia' is a large Spanish variety with good disease resistance.
 It takes about 90 days to mature when planted in the spring or 240 days when planted in the fall.
 - 'The Sutton' is a dwarf variety, reaching 14 inches tall, that's great for limited space, containers, and windy areas. It matures in 80 days.
- 'Sweet Lorane' is a smaller bean bred to have fewer tannins. It matures in 100 days.
- 'Windsor' produces large, flavorful beans. It takes about 90 days to mature when planted in the spring or 240 days when planted in the fall.
Fava Beans vs. Lima Beans
Fava beans and lima beans are similar in appearance. However, fava bean pods are typically bumpy while lima bean pods are smooth. Plus, fava beans tend to be firmer when cooked and have a nutty, sweet flavor. Lima beans get softer and have a slightly starchier flavor.
Harvesting Fava Beans
Fava beans take between 80 and 100 days on average to reach their harvest, though that can change with variety and climate. Pick individual pods when they’re plump and glossy by twisting them off the plant or using scissors. Don’t wait too long, or the beans will end up tasting dry.
In addition to removing the pods, fava beans have a thick skin that needs to be removed before cooking. You can usually just pop them out of their skins, but know that it can be time-consuming if you're doing a lot. Shelled beans can be used immediately, stored in the refrigerator for a couple of days, or frozen for later use.
How to Grow Fava Beans in Pots
Growing fava beans in containers is a good option if you don’t have the garden space. Choose a small variety to make container growth manageable. A container that is at least 5 gallons with ample drainage holes is ideal, though note the space requirements for your specific variety. An unglazed clay container is best, as it will allow excess soil moisture to escape through its walls. Add a stake or other support structure to the container to support the plant as it grows.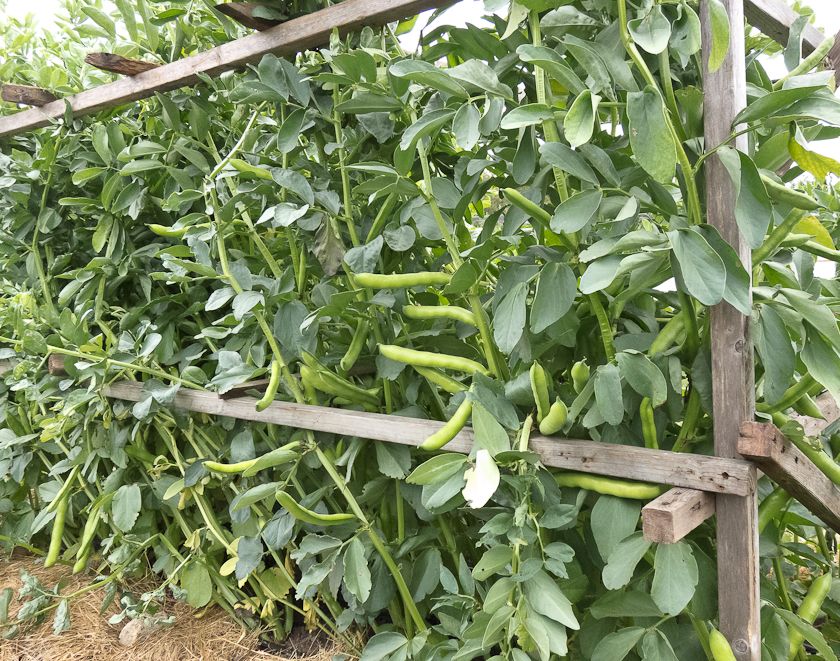
Pruning
Once the plant starts flowering, pinch off the top couple inches of growth to encourage a bushier habit. Prune plants to a few inches from the ground after you’ve harvested the ripe pods. If your temperatures are still suitable to growing fava beans, the plants might regrow and provide a second harvest.
Propagating Fava Beans
Most gardeners grow fava beans from seed. And you can save seeds from a mature plant to grow during the next season. This is an easy and inexpensive way to get new plants, and it will allow you to duplicate plants whose vigor or flavor was particularly good. Here’s how:
- Allow pods to dry out on the plant. Then, cut them off.
- Arrange the pods in a single layer, and dry them for at least two weeks indoors in a cool, dry spot with good air flow.
- Remove the seeds from the pods, and put them in an airtight container. Place the container in a freezer for a week. Then, store it in a cool, dark spot.

How to Grow Fava Beans From Seed
Fava beans are planted much like other types of beans. You can speed up germination by soaking the seeds in water for 12 to 24 hours before sowing. Direct sow the seeds 1 to 2 inches deep and 6 inches apart. Keep the soil moist but not soggy, and germination should occur in a week or two. Thin the seedlings to 4 to 6 inches because crowding can encourage diseases.
Potting and Repotting Fava Beans
A quality all-purpose potting mix with good drainage should suffice for fava beans. When growing them in containers, it's best to choose a large enough container for the mature plant right away to avoid having to disturb the roots in repotting.
Overwintering
Fava beans are annuals, meaning they complete their life cycle in one growing season. Therefore, overwintering is not necessary. Leaving the plant roots in place after harvesting will continue to fix nitrogen in the soil. However, in warm climates, many gardeners plant fava beans in the fall, overwintering them in the moderate climate, for a spring harvest.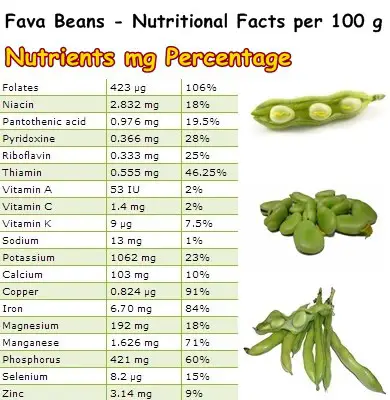
Common Pests and Plant Diseases
Fava beans are largely trouble-free in cooler weather, but warm temperatures can bring a variety of insect pests, including aphids and black flies. Pea and bean weevils might feed on the leaves and can damage young seedlings. And broad bean seed beetles can eat holes in the seeds, though this usually does not hinder germination. Fungal diseases and rust also can be a problem in wet conditions. Watch for powdery mildew, fusarium root rot, mosaic virus, and broad bean chocolate spot. Make sure you provide plenty of room between the plants to improve air circulation.
Article Sources
The Spruce uses only high-quality sources, including peer-reviewed studies, to support the facts within our articles. Read our editorial process to learn more about how we fact-check and keep our content accurate, reliable, and trustworthy.
Vicia Faba (Bell Bean, Broad Bean, English Bean, Fava Bean, Field Bean, Horse Bean, Pidgeon Bean, Tick Bean, Windsor Bean) | North Carolina Extension Gardener Plant Toolbox.
 https://plants.ces.ncsu.edu/plants/vicia-faba/.
basic rules for sprouting and caring for beans
Mon, 11/01/2016 - 19:19 | Comments: 0 | Author: OLCHUKS
Proper germination of beans is the basis for obtaining fast, friendly shoots and a good harvest. The basic rules need to be known to both gardeners who plan to grow beans in their summer cottage in the open field, and those who want to use germinated sprouts for food as a living source of vitamins. Knowing how to sprout beans quickly can produce strong sprouts in a few days, which will grow into strong, hardy plants over time. nine0003
Contents:
- Bean seed preparation
- Basic sprouting methods
- How to germinate beans for human consumption
- Bean Care Rules
Preparation of bean seeds
Preparation of bean seeds for germination is quite simple. First of all, you need to carefully sort the seed, removing all shriveled, dried or moldy grains, as well as removing various debris. After that, you can use one of the germination methods and get strong sprouts in a few days. nine0003
Be aware that not all beans are suitable for eating raw, unprocessed. Fans of a raw food diet and a healthy diet prefer to sprout Mash beans, as well as Mung beans.
Young sprouts are a real storehouse of vitamins that improve digestion and strengthen the immune system.
However, red beans should not be eaten raw. It contains toxic lectin proteins, which can lead to severe poisoning. During heat treatment, they are destroyed, so it becomes completely safe. nine0003
Basic sprouting methods
Bean sprouting methods are varied, but they all follow the same general principle: the beans must be provided with enough moisture and light to soak the hard shell and create conditions for swelling and germination.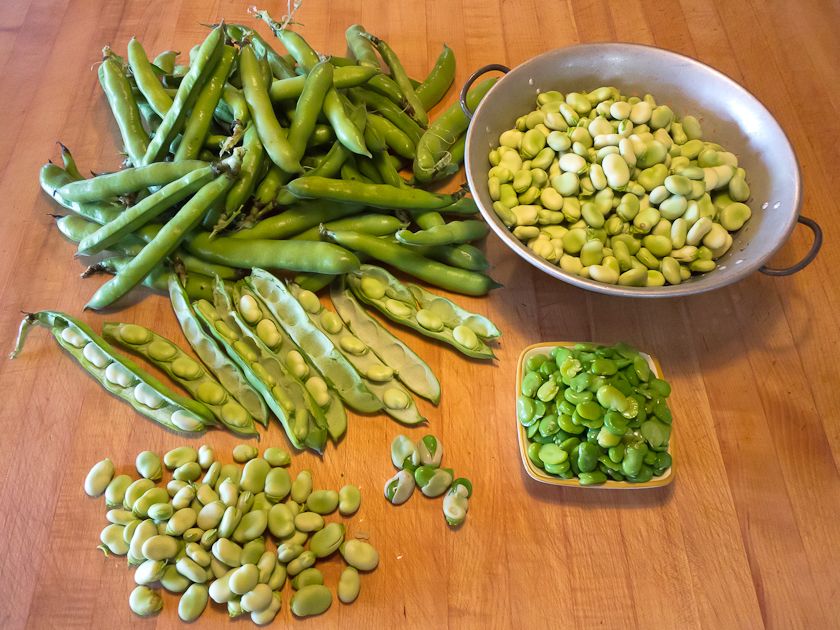
There are several common methods of germination:
- Bean seeds are placed on a damp cloth or gauze and covered with a second layer of the same cloth. It must remain constantly moist, but water must not protrude above the surface of the fabric, otherwise the seeds may begin to rot and not sprout. To prevent plaque from forming on them, the fabric is periodically washed. To speed up the growth, you can add growth stimulants to the water, which contribute to the faster formation of sprouts. The first sprouts may appear the very next day after planting, after which the seedlings can be planted in the ground. nine0010
- Another easy way to germinate beans at home is to place the beans in a flat glass container, cover with a damp cloth and place in a warm place. In this case, there is less risk of allowing excess moisture, and the seeds will not start to mold due to a violation of air exchange. Sprouts appear on the second or third day, and it will be possible to observe the process of germination through the glass.
 When the size of the sprouts is 2-3 cm, they can be transplanted into the soil.
 - Growing bean sprouts on cotton balls is a good way to watch the grains germinate and seedlings begin to develop. To do this, you need to place healthy bean seeds on cotton balls, place them in a transparent glass container, moisten with a little water and put in a bright, warm place. Within a few hours, the growth process is activated, and the next day the first shoots will appear. Watching the development of a young plant is interesting for both an adult and a child. nine0010
The appearance of a young sprout is always a small miracle that every gardener looks forward to. Observing the germination of beans, you can trace all the main patterns in the development of the plant. If you want to experiment, for the first try, you can buy green mung beans, which are sold in any supermarket today and are highly regarded by fans of healthy eating.
How to germinate beans for eating
Beans are germinated in a special way if you are not going to plant them in the garden, but are going to use them as a useful vitamin supplement to the family table. In this case, it is necessary to obtain strong healthy sprouts, which will become a source of life-giving force. nine0003
How to germinate beans for eating? The technology is divided into several main stages:
- For germination, a wide and shallow plastic container with a flat bottom is required. For example, you can take a container for ice cream or other products. In the bottom it is necessary to make several holes through which water will drain.
- The container is placed in a deep cup: the bottom of the sprouting container must not touch the bottom of the cup so that the water can drain freely. nine0010
- A thin cloth or gauze in several layers is placed on the bottom of the container, dry bean grains are poured on it. It must first be sorted out so that there is no debris left, and all the grains are healthy.
- The fabric is spilled with water, after which the container is covered with gauze, and it must be placed in a warm, bright place, for example, on a windowsill on the sunny side.

- The grains are poured with warm, but not hot water several times a day, after which the excess water is drained from the cup. nine0010
Seedlings appear the next day after the first watering, but you need to continue to grow them for a few more days. Usually they are ready for use on the 4-5th day, when the first green leaves appeared.
The grains are skinned and can be eaten raw.
During germination, stored nutrients are processed by grains into useful compounds that become a source of vitality. They are very useful for humans and are a cure for many diseases. nine0003
How to care for beans
Beans are a common garden plant, and many gardeners have mastered the technology of growing successfully and getting a good harvest. If you are going to germinate grains for subsequent planting, you need to familiarize yourself with the basic patterns:
- Beans are a heat-loving plant that is very afraid of frost, so it is planted in open ground in the country house not earlier than the beginning of May.
 She needs to pick up a bright open place where the plants will receive enough sunlight. nine0010
 - Light soil is ideal for beans and should be thoroughly loosened before planting. Although beans love moisture, water should not stagnate in the ground, you need to take care of the drainage system.
- Seeds are planted to a depth of 5 cm in grooves or holes, a small amount of compost should be placed at the bottom. This will provide young sprouts with the necessary supply of nutrients. The soil before planting the seeds is thoroughly shed with warm water.
- Most of the varieties are climbing plants, so it is necessary to install supports for them. For this, wooden slats are suitable: they are installed at an angle to each other and connected by a transverse crossbar. As soon as the plant reaches two meters in length, the lashes are pinched so that there is enough strength left for the ripening of large beans. nine0010
- A month after planting in the ground, the beans need to be fed, complex mineral fertilizer is suitable for this.
 Its amount is about 40 g per square meter of beds, fertilizers are mixed with the soil in the process of loosening the soil. If the weather was dry, the plants may suffer from a lack of nitrogen. For feeding in this case, use a small amount of bird droppings.
 - One of the main conditions for obtaining a good harvest is proper watering. All legumes love water, especially when ripening pods appear. Watering in the beds should be carried out along the aisles: water should not fall on the leaves, otherwise fungal diseases may appear. It is best to use rainwater for irrigation, and it is advisable to water the plants in the morning. Watering should be infrequent, but plentiful: with an average amount of rain, the plants are watered once a week. nine0010
Growing beans in the country allows you to get a good harvest if you provide the plants with the right care.
In general, this is one of the undemanding crops, and it needs minimal care. A large amount of moisture and sunlight is a guarantee of rapid maturation of the pods and a large number of grains.
More information can be found in the video.
Category: Growing | Beans
How to grow beans at home - variety selection, soil preparation, planting and care features
How to grow beans at home is a topical issue for many gardeners. Beans are known to every inhabitant of our vast country, but not everyone knows about its varieties and cultivation rules. It is not difficult to grow such a culture at home.
Beans are rich in various vitamins and microelements. With all this, in terms of care, it is an unpretentious plant. So, how to grow beans at home, and what care features are there?
Contents:
- 1 Description of beans
- 2 How to choose the right type of beans for your home?
- 3 Preparation of planting material and soil
- 4 How to grow beans at home? Planting steps
- 5 Care and watering
- 6 Harvesting the first harvest
- 7 How to grow healthy beans at home - possible diseases and protection against them
Description of beans
The plant belongs to the legume family, which includes about 97 species.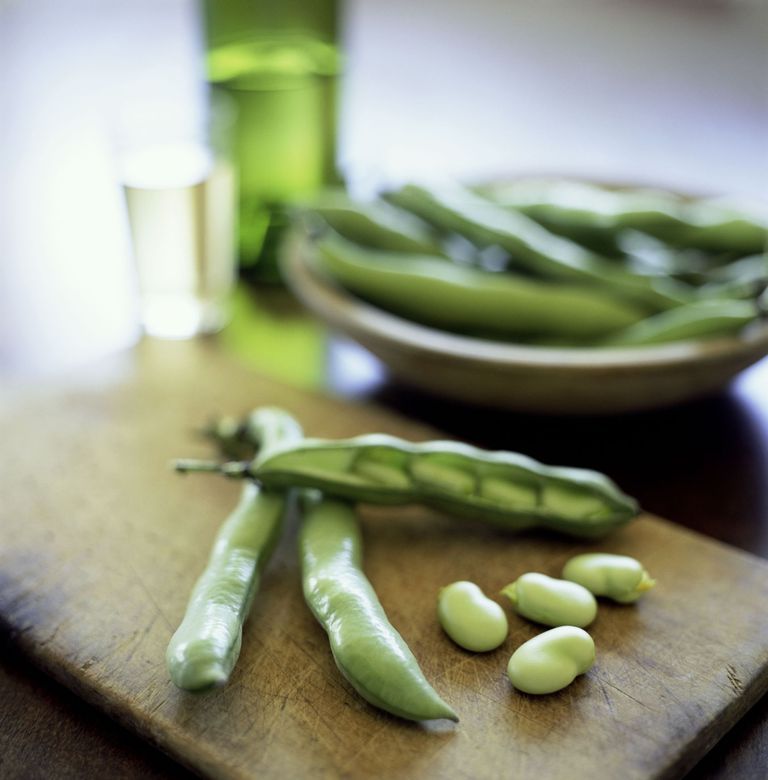 His homeland is considered
Lat. Phaséolus
Latin America and India. Beans are widely distributed in England, France, Brazil, Germany, etc. It appeared in Russia in the 16th century.
An interesting fact is that initially this plant was grown only for decorative purposes, and after several centuries, it began to be cultivated as a vegetable crop.
This is a truly unique plant, because its fruits contain a huge amount of useful elements that are so necessary for the human body. nine0003
There are a lot of species of this plant: the common bean was mostly common in our country. Beans may be:
- curly;
- semi-curly;
- bush.
In the first case, the length of the plant can reach five meters or more, in the second - up to 1.5 m, and in the third, the height can vary from 20 - 70 cm. In Russia, bush varieties are more preferred.
During the flowering period, the plant can become an ornament to a vegetable garden, a garden plot or a house adjoining area.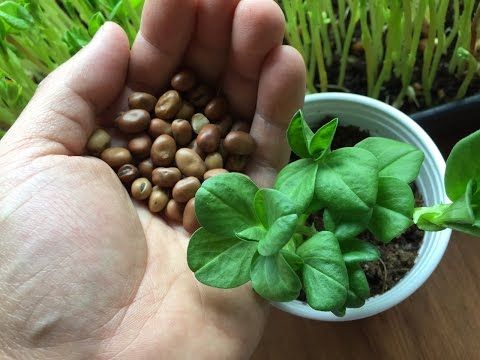 It has rather large leaves, and the flowers are irregular, moth-like, collected in inflorescences of 2-6 in a brush. nine0003
The length of the pod depends on the variety, it can vary from 5 - 25 cm. Their color can be different:
- White;
- Red;
- Violet;
- Black.
In addition, beans are subdivided according to the structure of the shells:
- Sugar or asparagus;
- Semi-sugar;
- Peeling grades.
An interesting fact: the plant is thermophilic, because its seeds germinate only at a soil temperature of about 10 degrees, in connection with this, the crop is sown at the same time as cucumbers. nine0003
How to choose the right type of beans for your home?
Is there a difference between a greenhouse and a glazed loggia? Answer: no. We choose a place for location along the walls so that our plant does not obscure others.
Above we figured out that there are several types of this plant: climbing, semi-climbing and bush.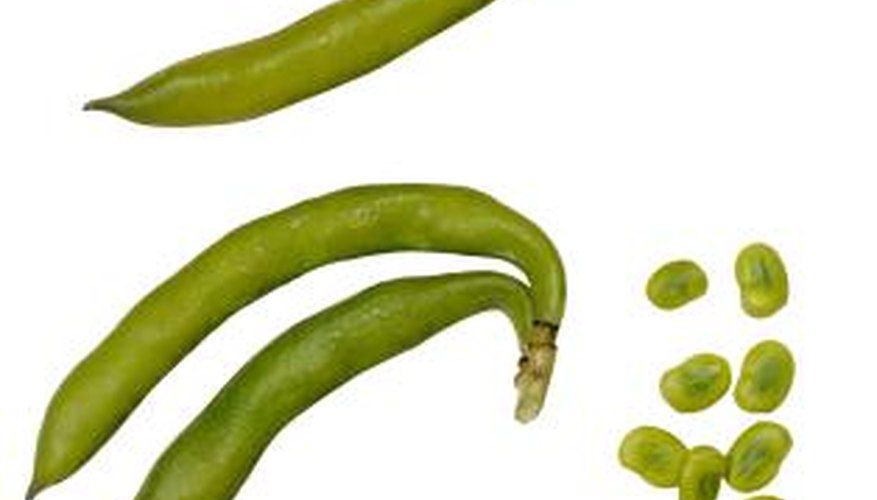 The last species is the most precocious, which is important for some regions of our country.
Bean pods
Climbing plants will have to be tied to a trellis (a lattice that serves as a support for plants), and bush plants can be tied to sticks up to 60 cm high and this will be quite enough. nine0003
It is best to discard shelling bean varieties immediately, they are not suitable for growing indoors.
Sugar or asparagus beans are ideal for the loggia. The most popular of them are the following varieties:
- "Caramel";
- Oil King;
- Saks 615.
First grade: in 2 months the bush can produce pods with a pleasant sugar taste. It is worth noting that this variety is resistant to all diseases. nine0003
The second crop can be harvested in less than 2 months. The pods are tubular in shape and can reach a length of 25 cm. They taste tender. They can be used both fresh and harvested for future use.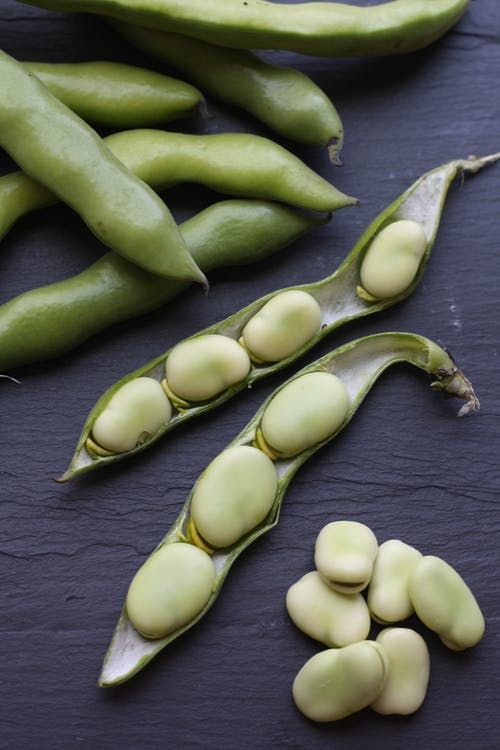
The last variety has a length of no more than 40 cm. As well as in the second case, it has tube-shaped pods up to 12 cm. They contain a huge amount of useful substances and sugar.
Preparing planting stock and soil
Bean fruits have a hard shell and grow rather poorly from dry seeds. nine0003
Bean seedlings on the windowsill
It is not recommended to soak them immediately before sowing, because they will simply rot in the cold soil.
Professionals proceed as follows: the seeds are placed in a small container and filled with a weak solution of potassium permanganate.
The temperature of the solution must be at least 70 degrees. After this procedure, the seeds should be sown immediately. Pour the rest of the hot solution into the ground.
Or you can do it differently: dilute a weak pink solution of potassium permanganate in water, its temperature should be approximately 60 degrees. Pour the soil with this solution and immediately sow the beans.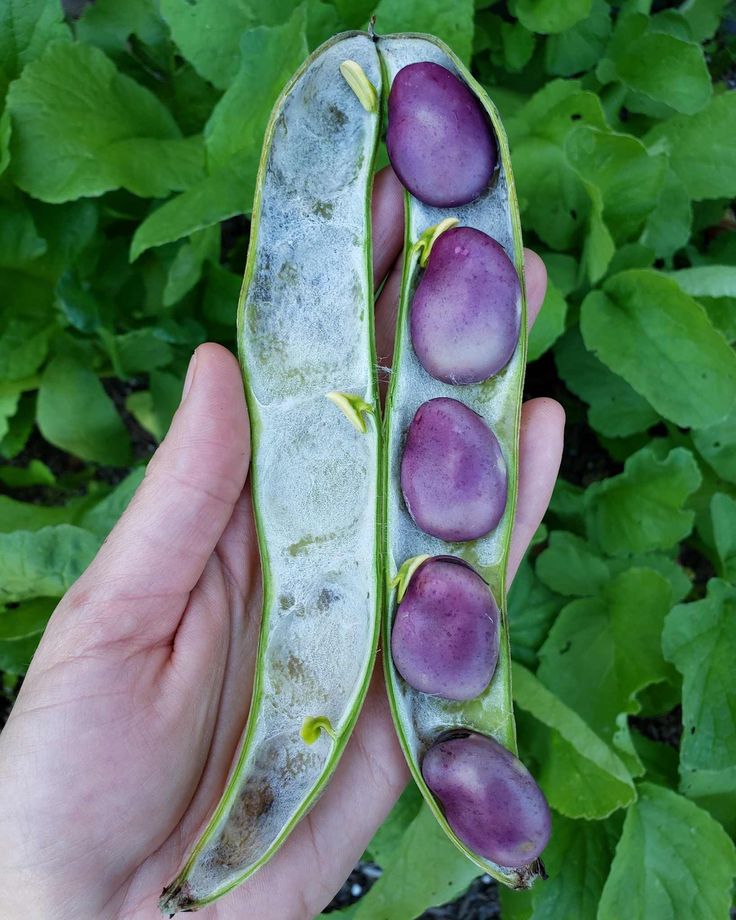 nine0003
If you are going to grow beans at home, it is important that the balcony or loggia is glazed.
As a rule, it starts to be sown in late spring. If you don’t have a balcony, but you still want to enjoy delicious fruits, don’t despair. Containers or seed boxes can also be placed on the windowsill in the room, but in this case, seeds are sown in mid-March.
The soil for this plant should be loose, fertile and rich in various microelements. nine0003
It does not tolerate acidic soil, it should be slightly alkaline, so a softener must be added before seeding. To do this, you can use chalk, dolomite or ash.
How to grow beans at home? Planting Steps
Remember that the planting site must be well lit, otherwise the plant will not grow in the shade. And this means only one thing: if you are going to grow beans in a room, then it will need additional lighting. nine0003
Stage #1
First shoots
Seeds can be planted immediately (as described above) or pre-sprouted. If you prefer the second method, then the scheme is very simple:
- We take the required number of seeds and wrap them in gauze;
- Fill a small container with some warm water and dip the seeds into it;
- As it evaporates, add water to the container.
It is important to know that all specimens must be carefully inspected for defects before planting. nine0003
Damaged seeds are sifted out immediately. This is the only way you will protect your plant from pests, and they can ruin the crop even on the loggia or in the apartment.
Stage #2
Particular attention should be paid to the choice of box or container for planting. For bush varieties, we choose a container with a volume of at least 2 liters, and for climbing varieties - at least 35 liters.
Once you've got the right crate, you need to work on the soil. For selected varieties, we use the following composition: 2 parts of soil and one part of humus. nine0003
Stage 3 Planting
How to plant beans? There is no difficulty in this. It is enough just to follow some rules and recommendations:
Before planting the seeds, even if you have soaked them in advance, you should dip them in hot water or water the soil with it.
Seeds are planted at a distance of 10 cm from each other, while two seeds can be placed in one hole at once.
Best planting time is late spring. Already after 5 - 7 days, the beans will give the first sprouts, after 6 weeks - the plant will bloom, and in a few more weeks it will give the first crop. nine0003
Care and watering
Sprouting beans
In order for our plant to give a good harvest, proper watering is necessary.
Absolutely the whole family of legumes loves water, especially the plant needs it when the pods appear. Watering should be carried out as it dries, it should be moderate.
Water must not get on the leaves, otherwise the plant may get sick with a fungal disease.
Watering is best done in the morning. It is stopped after the appearance of the second pair of leaves, and resumed from the beginning of the flowering of the plant. nine0003
On cloudy and cold days, beans need additional lighting. After the first sprouts have appeared in the container, you need to stick a stick, to which they should be tied in the future.
The plant does not need special fertilizers, but they will not be superfluous either. For this, mixtures with a content of potassium and phosphorus should be chosen. Fertilizer should be applied no more than once every 2 weeks.
Important! Even at home, the plant can be affected by a spider mite or caryopsis. nine0003
The latter can get into the ground when planting, and then settle inside the fruit. If this still happened to your plant, then it is important to treat it with special biological products.
First harvest
The pods are removed and used as soon as they are ripe. At the same time, a few pieces can be left for the next landing, but they must fully mature.
Growing this crop at home cannot be called large-scale, but, for example, 8 planted bushes will be quite enough to harvest after 2 months. nine0003
Cool weather can slightly delay fruiting. If you decide on climbing varieties, then it will be enough to plant about 5 bushes on the loggia.
Expert opinion
Yuliya Yuryevna
I have a large garden and vegetable garden, several greenhouses. I love modern methods of plant cultivation and soil mulching, and I share my experience.
Ask a question
How to grow healthy beans at home - possible diseases and protection against them
Gray mold infection can infect home-planted beans from contaminated soil or planting material. Indoors, it is easier to protect plants from such problems, because it is possible to carry out a complete disinfection of the soil. nine0003
The development of the disease occurs during the flowering period of the legume. Usually, this phenomenon is accompanied by falling leaves, on which fungal spores develop. For this reason, cleanliness must be observed near the bushes.
The described rot appears as brownish fast growing spots on the crown. Later, the leaves and shoots are covered with a grayish fluffy coating, curl, fall off.
This infection also threatens the fetus directly. In addition to the presence of spores in the soil, waterlogging, musty air, and dense plantings contribute to the intensive development of the disease. nine0003
Anthracnose for beans cultivated on a balcony or window is almost harmless if the soil is properly cultivated, not taken from the area where the affected specimens grew.
The disease described is carried by wind or rain. Symptoms are sunken dark spots on all parts of the beans. Suitable conditions are the same as for rot. Almost all fungal diseases are activated in conditions of high humidity, heat.
White rot is also caused by untreated soil or seeds. Symptoms - white mycelium, rotting of the stem on all above-ground parts of the bush. Causes significant damage to the crop. nine0003
Root rot is common in households. They are bacterial and fungal. Beans are most susceptible to such problems at the germination stage, when the bushes are not at all strong. Therefore, good drainage and timely, but moderate watering are very important.
Signs of rhizome rot may be the formation of a light bloom or mucus on the stems.
Curing bean bushes is not easy, especially if the disease has already spread. That is why prevention is important. You need to start with seed treatment. They can be held before planting in a solution of manganese or Fitosporin. nine0003
It is worth adding the required number of looseners to the prepared soil, for example, deoxidized peat or old sawdust. You can disinfect the earth by watering it with boiling water or a solution of a fungicidal preparation. You can also use boron or manganese.
Do not use acidic soil. It will not only interfere with the normal growth of beans, but can enhance the development of the fungus. Therefore, we recommend adding ash or dolomite flour to the substrate.
Also, we recommend not to bury the seeds too much, and respect the intervals between plants. Also, balanced fertilization is important. The composition of dressings should contain potassium and phosphorus, as well as nitrogen, but in much smaller quantities. Such funds will increase the culture's immunity and resistance to infections. nine0003
While watching the video, you will learn about growing beans.
Beans are certainly healthy, because they are rich in vitamins and microelements, and also contain vegetable protein, which is similar in composition to meat.
It is unpretentious in care, the main thing is to strictly follow all the rules and recommendations and you will achieve a rich harvest.