How to grow corn at home
The Beginner's Guide to Growing Corn
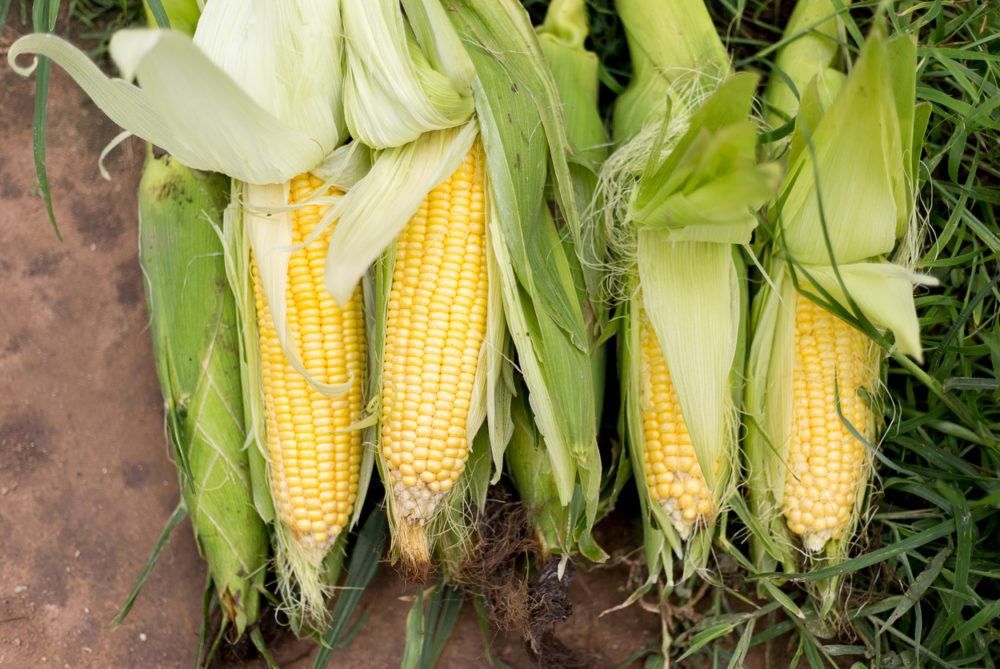
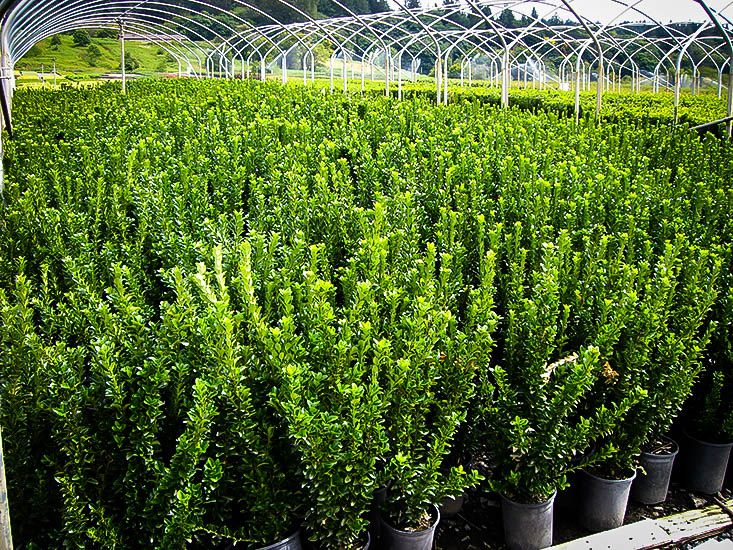
Corn is more American than apple pie and it’s been cultivated in North American gardens for over 4,000 years. Even though it takes up a large share of garden space, many gardeners make room because of the unbeatable sweet taste of fresh-picked ears.
The sugar in the kernels of ears of open-pollinated sweet corn varieties starts changing to starch almost as soon as you pick the ears. However, plant breeders have developed dozens of new and ever-sweeter cultivars that retain their sugar content for days. If sweetness is your prime goal, choose varieties listed as supersweet (abbreviated as sh3 in seed catalogs), but keep in mind that these may not be as vigorous as other types of sweet corn. If you prefer good old-fashioned corny flavor, pick standard (su) varieties. For a compromise between sweetness and vigor, choose sugary-enhanced varieties (se). If you like to experiment with the latest innovations, try planting a synergistic variety. These varieties produce ears with a combination of sugary-enhanced kernels and supersweet kernels on each ear. Whichever type you decide to grow, it’s a good idea to check with other local growers or your Cooperative Extension service to see what varieties have a good track record in your area.
If you have lots of garden space, you may also want to try growing some popcorn or ornamental corn, which have similar planting and care needs as sweet corn.
Planting
Corn is very susceptible to frosts. Look out for signs of frost to know if a cold snap will kill your crop. Corn doesn’t transplant well, either, so if you garden in a short-season area and want to start corn indoors, use biodegradable pots to avoid disturbing the roots at transplanting time. It’s better to wait until all danger of frost is past and the soil warms up to the 60 degrees needed for seed germination. If the weather stays cool, spread black plastic on the planting area to warm the soil more quickly.
If you want corn only for fresh eating, plant a minimum of 10 to 15 plants per person. To extend your harvest, sow an early-maturing type every 2 weeks for 6 weeks, or plant early, mid-season, and late types at the same time. To avoid cross-pollination, keep different corn cultivars (especially supersweets) 400 or more yards apart, or plant them so they tassel 2 weeks apart.
Site your corn patch in a sunny, wind-protected area. Corn is an extremely heavy feeder, especially on nitrogen, so it thrives in a place where soil-enriching crops like beans, hairy vetch, or clover grew the previous season, or add 20 to 30 pounds from the compost pile per 100 square feet to the soil as you prepare it for planting.
The best way to promote complete pollination is to plant corn in blocks rather than long individual rows — a block should be at least three rows wide. If you plant only one or two rows, hand pollinate to improve kernel formation.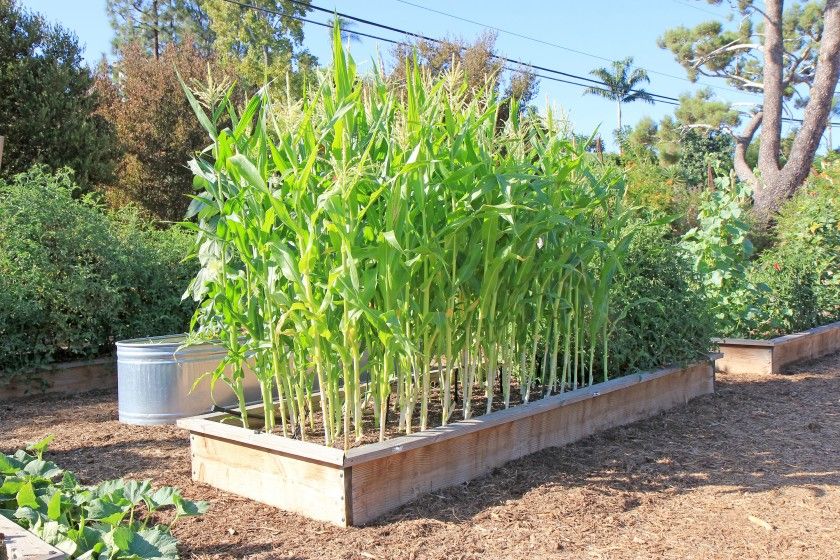
For early plantings, sow seeds only 1 inch deep; in the hot weather of midsummer, plant them up to 2 inches deep. The average germination rate for sweet corn is about 75 percent, so plant three seeds together every 7 to 15 inches. They should germinate in 7 to 10 days. Thin to one plant every 15 inches. To avoid disturbing remaining plants, remove unwanted seedlings by cutting them off at soil level.
Growing Guidelines
Corn can’t compete with weeds, so be sure to kill weeds thoroughly around the stalks for the first month of growth. After that, corn’s shallow roots will spread out as much as 1 foot from the stalk; be careful not to disturb these roots, because it’s easy to damage them. Instead, apply mulch to prevent weeds from sprouting.
Corn needs about 1 inch of water a week, particularly when the stalks begin to tassel. Water stress during pollination will result in ears with lots of missing kernels, so don’t skip watering your corn patch. Apply water at the soil surface by using a soaker hose or drip irrigation. Avoid spraying plants from above, which could wash pollen off the flowering tops.
When the stalks are 6 inches tall, side-dress them with blood meal or diluted fish-based fertilizer and repeat the feeding when they are about knee-high. Don’t remove any side shoots or suckers that appear; they won’t harm production, and cutting them might damage roots.
Problems
Cutworms sometimes attack corn seedlings and flea beetles may chew holes in the leaves of young plants.
Corn earworms are one of the best-known corn pests. They also attack tomatoes and are most prevalent in the southern and central states. Earworm moths lay eggs on corn silks and the larvae crawl inside the husks to feed at the tips of the developing ears. The yellow-headed worms grow up to about 2 inches long and have yellow, green, or brown stripes on their bodies.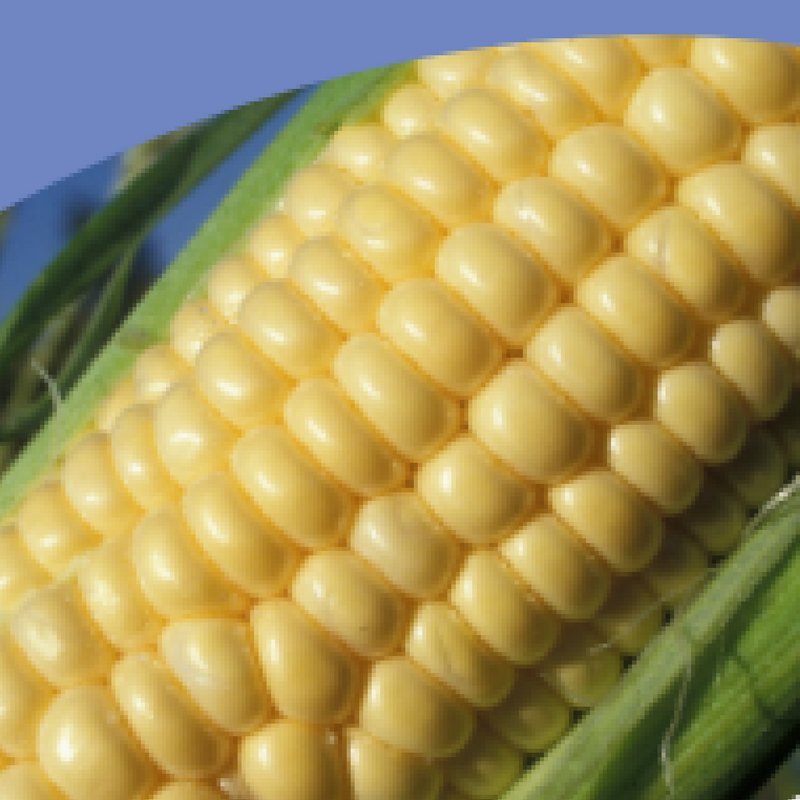 To prevent earworm problems, use an eyedropper or spray bottle to apply a mixture of vegetable oil, Bt (Bacillus thuringiensis), water, and a few drops of dishwashing liquid to the tip of each ear several days after the silks emerge. Or you can try pinning a clothespin to the tip of each ear once the silks start to turn brown to prevent the worms from crawling through to the ear.
European corn borers are 1 inch long, flesh-colored worms marked with tiny black dots that feed on foliage, especially near the top of the stalk where the leaves emerge. They also bore into the developing ears. Bt and spinosad are effective controls if applied early, before the borers tunnel into the stalks. Corn borers overwinter as full-grown larvae in weed stems and old cornstalks. Pull up and destroy such winter refuges to break their life cycle.
Cucumber beetle larvae, also known as corn rootworms, feed on corn roots, causing plants to weaken and collapse. Adults are yellow beetles with black stripes or spots. To kill the rootworms, apply Heterorhabditis nematodes to the soil.
Seed-corn maggots attack kernels planted too deeply in cool soil. These yellowish white maggots are ¼ inch long, with pointed heads. If they attack, wait until warmer weather to plant another crop at a shallower level.
Animal pests can seriously reduce your corn yields. Birds may be a problem at both seeding and harvesting time, while raccoons are fond of the ripening ears.
Clean garden practices, crop rotation, and planting resistant hybrids are the best defenses against most diseases, including Stewart’s wilt, a bacterial disease that causes wilting and pale streaks on leaves.
Corn smut makes pale, shining, swollen galls that burst and release powdery black spores. Cut off and dispose of galls before they open. If necessary, destroy affected plants to keep smut from spreading. It can remain viable in the soil for 5 to 7 years.
Hand Pollinating Corn
In order to produce kernels, wind must deposit pollen from the tassels (plant tops) onto each of the silks on the ears. Every unpollinated silk results in an undeveloped kernel. If you’re planting only a single or double row of corn plants, you can improve pollination by transferring pollen from tassels to silks yourself. Collect pollen as soon as the silks emerge from the ears and the tassels have a loose, open appearance. Wait for a morning when there’s no breeze, and shake the tassels over a dry bucket or other container to release the pollen. Collect pollen from several plants. Immediately transfer the pollen into a small paper bag and sprinkle the powdery material onto the silks of each ear in your corn patch. Repeat once or twice on subsequent days for best results.
Harvesting
Three weeks after corn silks appear, start checking ears for peak ripeness. Pull back part of the husk and pierce a kernel with your thumbnail. If a milky liquid spurts out, the ears are at prime ripeness — rush those ears to the table, refrigerator, or freezer. Ears on the same stalk usually ripen a few days apart. A completely dry silk or a yellow or faded-green sheath means the ear is past its prime.
Leave ornamental corn and popcorn on the stalks to dry until the first hard frost. If the weather is cloudy and wet, cut and stack stalks in a cool, dry place until the corn dries.
How to Grow Sweet Corn at Home
Zea mays var. saccharata or Z. mays var. rugosaThe first year I moved to Alaska, I threw some sweet corn seeds down in my flower bed halfway through the summer, gave them some water, and blew them a kiss goodbye.
Okay, not really (the kiss part). The seeds germinated and the seedlings grew a few inches – and then died. Of course.
Because chilly September came when they were still young, and then October hustled in with its first snowfall.
I wised up after that waste of seeds and garden space. Since then, my maize-growing knowledge has expanded and every year I grow tall, fluttery-green stalks in my garden.
We link to vendors to help you find relevant products. If you buy from one of our links, we may earn a commission.
Honestly, the idea of growing sweet corn can be daunting. How tall does it grow? Will it create shade over your entire garden? How is it pollinated? When do you harvest it?
If you’ve never grown sweet corn (Zea mays var. saccharata or Z. mays var. rugosa, or sometimes Zea mays convar. saccharata var. rugosa) before, or if you need help with the maize you’re growing in your garden, I’ve got you covered.
Ready to grow your own crisp, tasty sweet corn?
What You’ll Learn
- Cultivation and History
- Propagation
- How to Grow
- Growing Tips
- Cultivars to Select
- Managing Pests and Disease
- Harvesting and Preserving
- Recipes and Cooking Ideas
- Quick Reference Growing Guide
Before we get growing, I’ll share some surprising secrets about the history and nature of this widely consumed grain.
The sweet variety is mostly eaten as a vegetable, which is fitting; maize is rich in fiber, folate, phosphorus, vitamin C, thiamin, and magnesium.
Cultivation and History
If it weren’t for humans, corn as we know it today would not exist.
While it’s a whole grain from the grass family, Poaceae, Z. mays isn’t found anywhere in the wild. Nine thousand years ago, Mesoamericans created corn out of almost nothing.
And by “nothing” I mean this unassuming little grass, teosinte (Z. mexicana).
Photo by Mbhufford, Wikimedia Commons, via CC BY-SA.With just a few edible kernels in each tiny ear, teosinte isn’t a food crop.
But early Mesoamerican cultivators caught on to a genetic mutation that removed teosinte’s hard outer casing, which made the grain inedible.
They carefully saved and planted the special kernels in order to create the maize we know today.
That was at least 5,000 to 7,000 years ago, as evidenced by the 5,000-year-old cob of maize found in the Guilá Naquitz Cave in Oaxaca, Mexico in the 1950s, and carbon-dated in the early 2000s.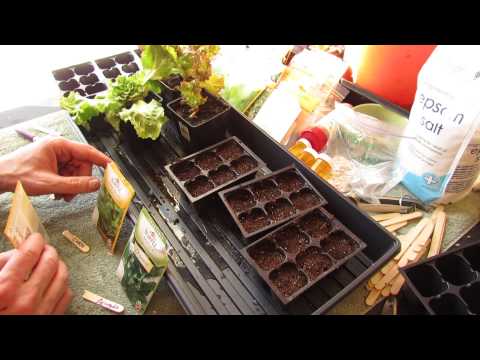
For millennia, indigenous peoples throughout the Americas grew maize.
The exact origins of sweet corn are unclear, but it’s generally understood by scientists that the sweet variety may have been discovered by accident, when a recessive mutation of genes occurred in maize and altered the sugar and starch levels in the plant.
People of the Iroquois Nation cultivated this type of corn into a cultivar they named ‘Papoon.’
During the American Revolutionary War, Lieutenant Richard Bagnal of the Poor’s Brigade stole the cultivar from the Haudenosaunee.
Over the years, settlers and scientists cultivated ‘Papoon’ into what’s widely considered the “original” sweet corn, or sugary-1 (SU).
We can thank John Laughnan, a botany professor and corn geneticist at the University of Illinois, for developing supersweet corn in the 1950s.
Laughnan found that the Sh3 gene in sweet corn produced kernels with up to four times more sugar and less starch than other types of corn, and developed supersweet corn from there.
In the 1980s, another University of Illinois professor, Dusty Rhodes, discovered the more tender but less sweet sugary enhanced (SE) corn.
There are four main types of sweet corn grown and consumed today: SU, SE, Sh3, and SYN.
Here’s a quick breakdown of the differences between the four:
Standard (SU)
The standard sugary corn, or SU, is well known for its sweet, creamy texture. It should be eaten within a week after harvest for the best taste.
The SU type contains more sugar and less starch than field corn, which is primarily used for grain and harvested when the kernels are dry.
The high levels of sugars in SU and other sweet varieties are the result of a natural genetic mutation that controls the conversion of sugar to starch in the plant, making it sweet during the milk stage prior to the kernel’s full maturation.
Sugary Enhanced (SE)
SE is an enhanced version of SU, with a higher sugar content than standard sweet corn but less sugar than supersweet (Sh3).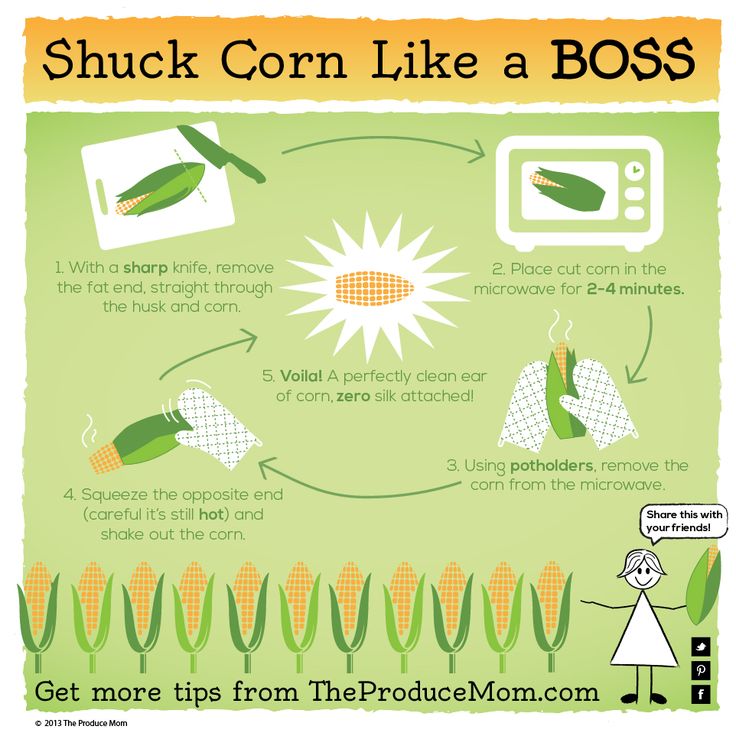
A gene in the SE type causes an increased amount of sugar in the kernels, which also leads to kernels that are more tender.
SE is popular because it retains its taste and texture much longer than standard SU types after harvest.
Supersweet (Sh3)
Sh3 is – that’s right, you guessed it – super sweet.
In fact, it has four to 10 times the sugar content of varieties of the SU type. Sh3 has a very low starch content when the kernels have fully matured.
Synergistic (SYN)
This fascinating type of sweet corn, abbreviated SYN, is a hybrid of 25 percent Sh3 and 75 percent SE, which makes for crunchy yet tender kernels that hold their flavor well in storage.
Propagation
There are two ways to propagate sweet maize: from seed, or from transplants, which you can find in some local nurseries.
From Seed
Before you plant maize, it’s important to know the right time and place for planting. Seedlings actually transplant pretty well, so you can start seeds indoors or outdoors and grow them in USDA Hardiness Zones 3-11
Outdoor Sowing
First, the weather is an important consideration. Z. mays is not tolerant of cold, so wait until two to three weeks after the last frost date in your area to plant your seeds.
Make sure your average temperatures in early spring aren’t continuously below 60°F if you choose this method, since you’ll find it challenging to successfully establish seeds in cold soil. The soil temperature should be no lower than 50°F for optimal germination.
To help improve the germination rate of your seeds and to speed germination along, soak them overnight in tepid water before planting.
Pick a planting location that gets at least six to eight hours of sunlight per day. The soil should be rich, so amend your soil with well-rotted manure or compost before planting.
Sowing is easy. To sow seeds, dig a hole about one inch deep and place two to three seeds inside. Cover them lightly with dirt and water thoroughly.
You’ll want to space the holes about seven to 12 inches apart. Arrange your seeds in a block pattern – a four-foot-by-eight-foot square or something similar, depending on the size of your total planting area – instead of in rows.
Each individual cob should be seven to 12 inches apart from the others within the square.
This is because Z. mays is wind-pollinated. Planting your crop in a block makes it more likely that pollen from the tassels will drop on surrounding silks instead of on bare earth (or your carrots, peas, or whatever else you planted next door).
Next year, I plan to plant four rows of sweet maize together instead of two, to help with wind pollination. Photo by Laura Melchor.This cereal crop is a heavy feeder and each plant will need some elbow room. When planting a block of rows, space each block about one to two feet apart.
Small gardens can successfully yield 15-20 plants in a four-by-six-foot bed with proper spacing.
Keep the soil moist, but not waterlogged, until germination, which can take anywhere from 10 days to three weeks
Once each plant has two sets of leaves, pinch off the smaller one or two seedlings every 7-12 inches to allow the strongest one to thrive.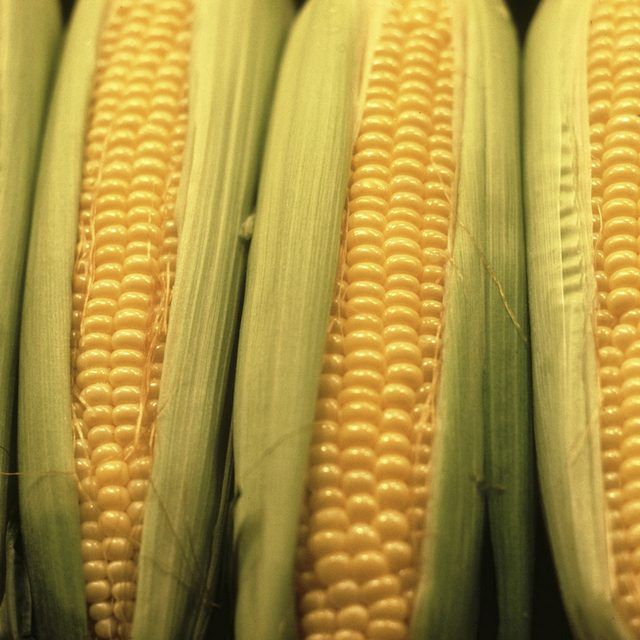
Indoor Sowing
To start seeds indoors, do so about two weeks before your average last frost date.
Fill a seed tray with potting soil and make a one-inch-deep hole in each cell. Drop two to three seeds inside, cover lightly with soil, and keep evenly moist.
I learned early on that if a grow light is too far away, a plant will get leggy. So keep it close to your growing sweet corn — as close as this grow light is to my young broccoli plants. Photo by Laura Melchor.Once germination occurs, set the tray in a sunny windowsill that receives at least six to eight hours of light a day or more.
If you don’t have much sun, position a grow light an inch away from the seedlings, adjusting it as the plants grow.
Once each plant has two sets of true leaves, pinch off all but one seedling per cell.
From a Transplant
Sometimes, you’ll find seedlings at a local nursery. Or maybe you’ve successfully sown seeds indoors and want to transplant them to the outdoor garden.
Here’s how to do it:
Make sure the area you’re transplanting to receives at least six to eight hours of full sunlight a day. The soil should be organically rich, so amend with well-rotted manure or compost.
Dig holes about seven to 12 inches apart. I wanted to fit more plants in my garden, so mine are more like seven to eight inches apart.
The holes should be the same size as the root ball you’ll be transplanting.
Set the root ball inside the hole and backfill with soil, taking care not to cover the stem. Water thoroughly, add a layer of mulch to keep moisture in and weeds out, and watch your sweet corn thrive!
How to Grow
Sweet maize prefers organically rich, loose, well-draining soil with a pH of 5.5-7.0.
If you want to plant several varieties of sweet corn, maximize the space you have in your yard.
Unless they are the same variety or you’ve staggered out your plantings, each plot should be spaced at least 100 yards apart to avoid any unwanted cross-pollination.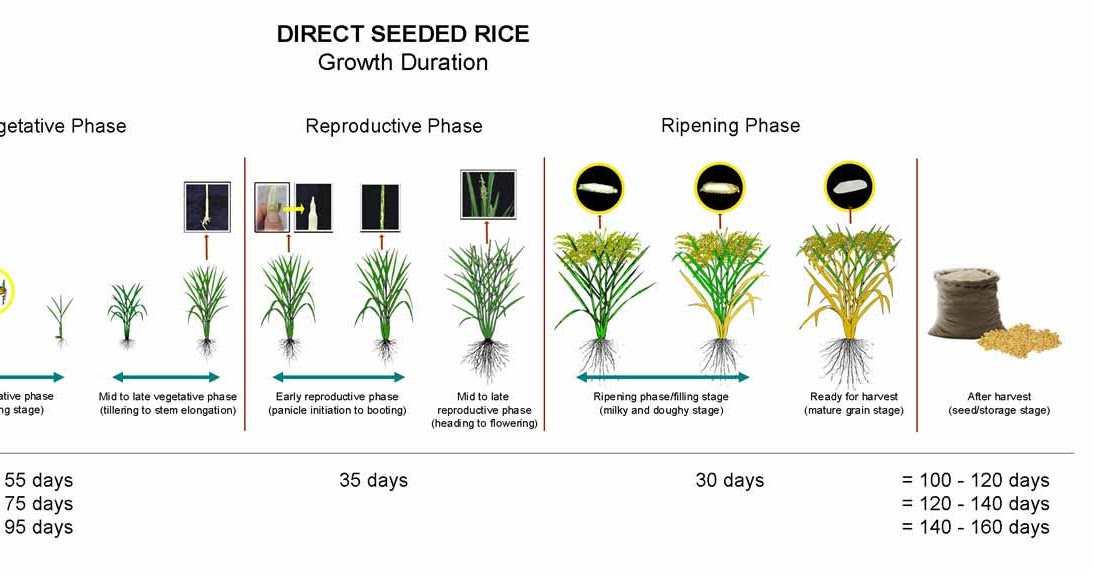
Corn is wind-pollinated; the tassels are the male flowers of the plant, and the silks and ears are female. Wind blows pollen off the tassels and onto the silks.
Each strand of a silk is connected to an individual floret on the ear. Pollen from the tassel travels down the strand and pollinates each floret, giving it the reproductive cells to become a tasty kernel.
If you plant multiple varieties together, various genetic traits of each variety will mix.
This sometimes produces unfavorable results. Sh3 kernels, for example, must not be grown near other sweet varieties because the cross-pollination would result in a suppression of the gene that makes it supersweet, essentially turning it into field corn.
Even worse is to plant sweet corn near something like popcorn. I learned this lesson the hard way by literally planting my sweet maize and popcorn side by side.
When I realized that the popcorn tassels would pollinate the sweet corn silks, which would result in starchy, chewy kernels (yes, I’d planted them at the same time – I know, I know!) I had to transplant the popcorn out of the garden.
I caught my mistake when the plants were still young, which made transplanting easy.
I simply used a trowel, carefully dug up the popcorn, and replanted it in a large, deep, square container.
Since I was taking the corn away from the enclosed garden, I sprayed it with Plantskydd to protect it from moose.
The stalks are tall, green, and happy in their container that’s located on the opposite end of my property from the raised bed garden.
Photo by Laura Melchor.Of course, the much easier solution to avoid cross-pollinating is to plant different varieties far from each other to begin with, or to stick with one variety.
As far as fertilizing goes, make sure your sweet corn gets regular doses of nitrogen, phosphorus, and potassium with a balanced NPK fertilizer, such as 10-10-10.
Apply it according to package instructions, every two to three weeks.
You could also add blood meal and bone meal, according to the instructions on the packages, for a combination of nitrogen and phosphorus.
If your plants start to turn a light yellow instead of a rich, dark green, then they are telling you something: Feed me! Yellowing of leaves is a sure sign that the plant needs more nitrogen.
And if you don’t give them enough phosphorus, the leaves may start to turn purple at the edges.
This happened to both varieties I’m growing.
I added bone meal to the soil, which is high in phosphorus, by sprinkling it on top and working it in a couple inches deep.
Within a week, new green leaves were emerging.
As for moisture, you’ll want to give each plant about one inch of water every week. Drip irrigation works well. Or, water at the base of each plant.
Photo by Laura Melchor.The final thing to keep in mind is that you may need to “hill” the corn to support the tall stalks.
To do this, simply mound soil about two to three inches high around the base to help keep each stalk straight.
You might want to bring in some rich gardening soil from your local gardening store to give the plants a nice nutrient boost as well.
Repeat this process as necessary, usually every two to three weeks.
As you approach harvest time, your plants will be heavy and susceptible to heavy winds.
Drive a simple wooden stake down into the earth in between two plants, and use twine or stretch tie to secure two stalks to each stake.
This will help them stand tall, and prevent them from toppling over under the weight of the developing ears.
Growing Tips
- Space different varieties at least 100 yards apart to avoid cross-pollination
- Fertilize with a balanced product, such as 10-10-10 NPK, every two to three weeks
- Provide plants with one inch of water per week
- Hill every two to three weeks to provide support
- Consider hand pollinating for low density stands
Cultivars to Select
In this section, I’ll share my favorite SU, Sh3, SE, and SYN varieties.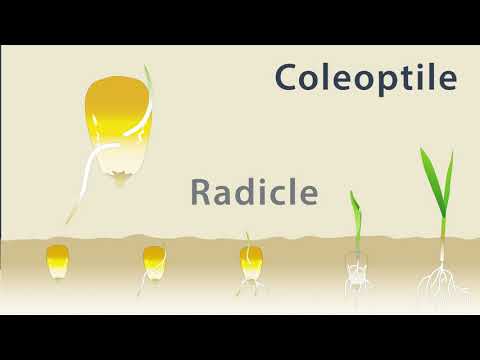 For even more options, check out our roundup of the 11 best varieties to plant in your garden.
Bodacious, a Full-Bodied SE
While it takes up to 90 days to mature, ‘Bodacious’ is worth the wait. This SE variety grows eight-inch cobs with 18 rows of sweet, milky kernels.
‘Bodacious’
Their delicious flavor lasts for 10 days post harvest, so if you plant a new block of seeds every two weeks, you’ll have enough corn for all of your late-summer and early fall cookouts.
Get your ‘Bodacious’ seeds in a variety of packet sizes at Eden Brothers.
Early Sunglow Hybrid, A Cool-Weather SU
Suitable for Zones 3-11, ‘Early Sunglow Hybrid’ is an excellent choice for cold-weather gardeners. Plus, it matures in as little as 62 days. That’s fast for maize!
‘Early Sunglow’
With a golden color and a petite, four-foot stature at maturity, this SU cultivar produces six to seven-inch ears for your enjoyment.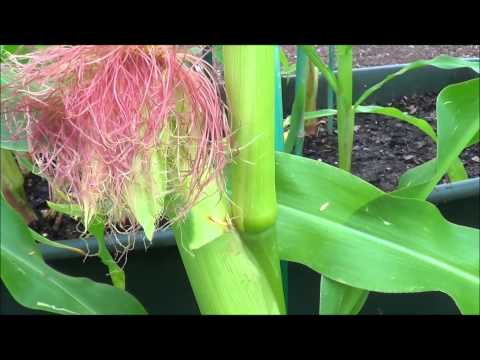
Eat within two days after harvest for the sweetest flavor.
Find seeds in a variety of packet sizes available at True Leaf Market.
Honey Select Hybrid, A Delightful SYN
This delicious mix of tender and crunchy delivers eight- to nine-inch cobs about 80 days after germination.
‘Honey Select’
Stalks grow to five or six feet, so while they’re tall, they’re not enormous compared to other varieties.
With indoor sowing, ‘Honey Select Hybrid’ grows well in Zones 4-11.
Find seeds in a variety of packet sizes available at True Leaf Market.
Illini Xtra Sweet Hybrid, A Supersweet Sh3
This hybrid delivers on sugar content, and cobs stay sweet for days, giving you plenty of time to enjoy them after harvest.
‘Illini Xtra Sweet’
‘Illini Xtra Sweet Hybrid’ grows six feet tall at maturity, and delivers eight-inch ears in 85 days. This cultivar grows best in Zones 4-11.
Find packets of 200 or 800 seeds at Burpee.
Managing Pests and Disease
Sweet corn is susceptible to several pests and diseases. By checking on your crop each day, however, you can prevent many problems.
Here are a few prevalent pests and diseases to watch out for.
Insects
Three of the most bothersome bugs for sweet corn are aphids, cutworms, and the European corn borer.
Aphids
Blue-green corn leaf aphids (Rhopalosiphum maidis) and greenish-yellow green peach aphids (Myzus persicae) will stunt plant growth when they suck sap from leaves, and leave a sticky substance called honeydew in their wake, which can then develop sooty mold.
Since aphids also love weeds, keeping your garden well-weeded is important.
To get rid of aphids, use a strong blast of water from the hose to knock them off and then spray neem oil on each plant to discourage re-infestations.![]()
Check out this guide to learn more about managing aphids in your garden.
Cutworms
These gray-brown worms are essentially seedling decapitators, cutting seedlings away from their lifeblood: the root systems of your young plants.
Not only that, but cutworms – most commonly the Agrotis ipsilon, Peridroma saucia, and Feltia ducens species – often proudly curl up next to their fallen prey, like the rascal next to the sad, dead lettuce plant pictured above.
To keep these pests away, make a tinfoil necklace for each plant and place it around the stem.
Check the collar every day to make sure there isn’t any sign of cutworms, as well as to make sure the stem isn’t rotting.
Remove the collar before watering and replace after an hour or so to give the plant time to breathe.
Once the seedlings grow into strong young plants with thick stalks, remove the collars.
Monterey Bacillus thuringiensis (Bt) Spray
Spray existing worms with Bacillus thuringiensis (Bt) spray, like this one from Arbico Organics.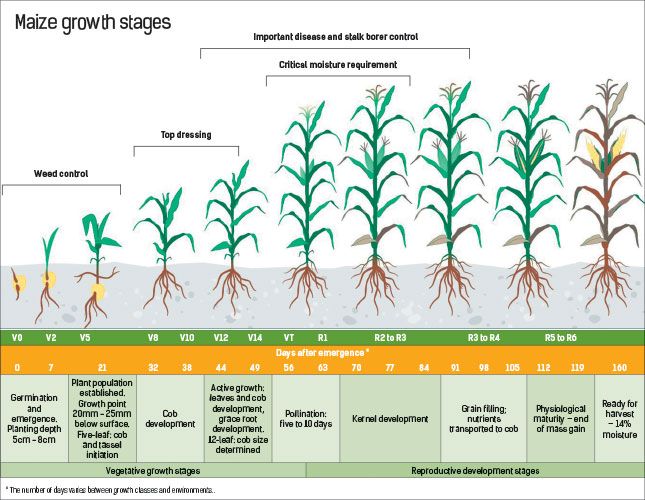
You can learn more about Bacillus thuringiensis in this guide or read more about controlling cutworms here.
European Corn Borer
These nasty whitish caterpillars (Ostrinia nubilalis) attack tassels, often snapping them off the stalks.
Photo by Keith Weller, Wikimedia Commons, via CC BY-SA.They also hollow out sweet corn stalks by eating through stems and munching through the cob shafts, causing them to fall off the mother stalk. And they like to nibble on developing kernels as well.
In short, they’re bad news for your garden. They often leave a pile of frass, aka poop, behind when they drill into a stalk, so keep your eye out for any strange masses under the leaves. The frass looks a bit like sawdust.
Bonide Thuricide
To control infestations, treat with thuricide according to package instructions.
Try this product from Arbico Organics.
Disease
All sorts of maladies can infect your sweet maize.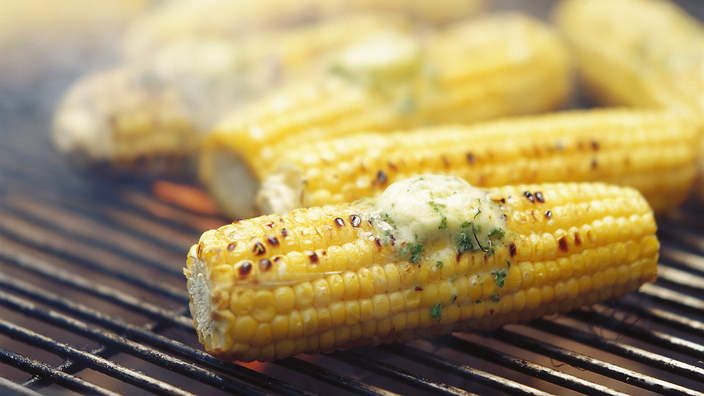 Here are a few top annoyances.
Anthracnose
Caused by the fungus Colletotrichum graminicola, anthracnose presents as tan, brown, or even necrotic lesions on leaves. Left untreated, stalks can eventually rot, killing the entire plant.
This fungus thrives in hot, humid weather, so maintaining adequate airflow between your stalks is important.
Remembering to water at the base of each plant (instead of hosing them down from above) can also help.
Manage an existing anthracnose infection as early as possible in order to enable your plants to keep growing and producing ears.
Bonide Revitalize Biofungicide
To treat, spray plants with Bonide Revitalize Bacillus amyloliquefaciens Biofungicide, available from Arbico Organics.
Common Rust
Easily identified by its, well, rusty spots on the leaves, common rust is caused by the fungus Puccinia sorghi.
While it can affect all types of corn, it especially adores sweet corn and is sometimes called “common rust of maize. ”
”
A copper fungicide spray, like this one from Arbico Organics, can treat the disease.
Gray Leaf Spot
Caused by the fungus Cercospora zeae-maydis, gray leaf spot appears as tan lesions on the leaves about two weeks before the corn produces tassels.
If untreated, the lesions will turn brown, grow larger, and merge, killing entire leaves.
Fruit and Vegetable Spray
This eco-friendly spray from Arbico Organics can help control outbreaks.
Harvesting and Preserving
For tasty-fresh corn, harvest at the milk stage. This occurs 18-20 days after tasseling. The silks will be a dried-out brown, and the ear will feel plump and firm when you wrap your hand around it.
To harvest, gently grasp an ear with your hand and bend or twist downward. Wrap ears in damp paper towels to preserve their flavor in storage in the refrigerator, and wait to husk until you’re ready to use them.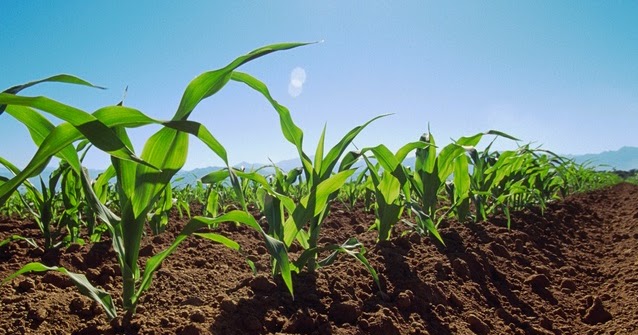
Eat SU corn as soon as possible for the best flavor. SE, Sh3, and SHY types hold up better in storage, giving you more time to eat them fresh or preserve them.
Kernels may also be blanched and then frozen and stored in the freezer for up to 12 months.
That’s the short version.
For a complete guide to harvesting and preserving sweet maize, check out our guide to harvesting corn.
Recipes and Cooking Ideas
There’s an endless array of delicious dishes you can make with your maize.
My favorite thing to do is grill it, slather it with butter, add a sprinkle of salt, and cut it off the cob to eat.
I don’t like getting it stuck in my teeth, so I eat it like a little kid. And it’s good.
Photo by Fanny Slater.My second-favorite way to eat it is in the form of these divine sweet corn fritters from our sister site, Foodal.
I also love this roasted sweet potato, corn, and black bean salad with spicy miso dressing for a perfectly light and zingy summertime dish. You can find the recipe for this dish on Foodal as well.
Whichever recipe you choose to use or dream up yourself, it’s sure to taste a hundred times better when you make it with your own homegrown sweet corn.
Quick Reference Growing Guide
| Plant Type: | Annual cereal grass | Maintenance: | Moderate |
| Native to: | Mesoamerica/North America | Tolerance: | Mild heat |
| Hardiness (USDA Zone): | 3-11 | Soil Type: | Rich and loose |
| Season: | Summer | Soil pH: | 5.5-7.0 |
| Exposure: | Full sun | Soil Drainage: | Well-draining |
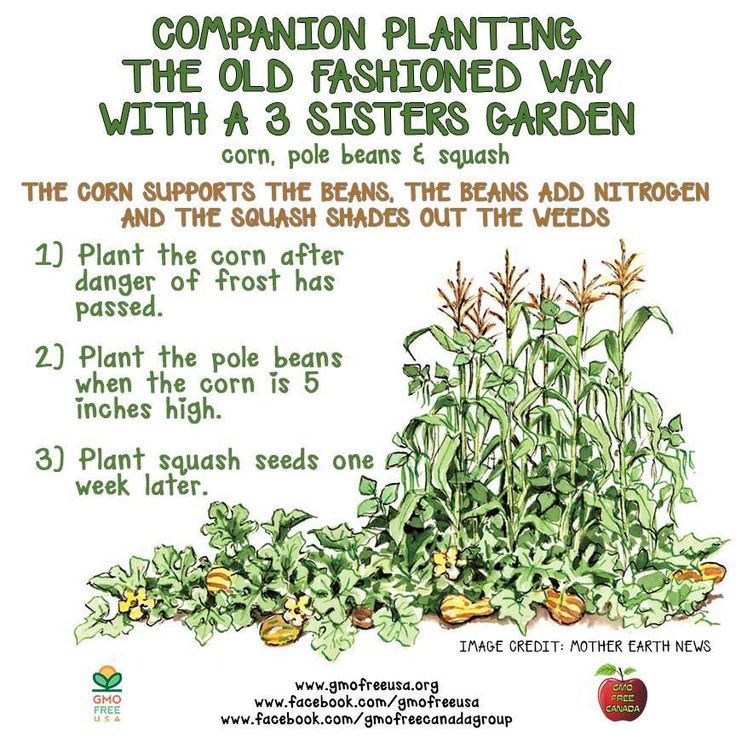
| Time to Maturity: | 60-90 days | Companion Planting: | Beans, pumpkins and other types of winter squash, sunflowers |
| Spacing: | 7-12 inches | Avoid Planting With: | Celery, tomatoes |
| Planting Depth: | 1 inch (seeds) | Family: | Poaceae |
| Height: | 4-7 feet | Genus: | Zea |
| Spread: | 6-8 inches | Species: | mays |
| Water Needs: | Moderate | Varieties: | saccharata or rugosa |
| Common Pests: | Aphids, cutworms, European corn borers | Common Diseases: | Anthracnose, common rust, gray leaf spot |
Everything Corny and Wonderful
It’s truly thrilling to watch your tiny seedlings grow tall and strong.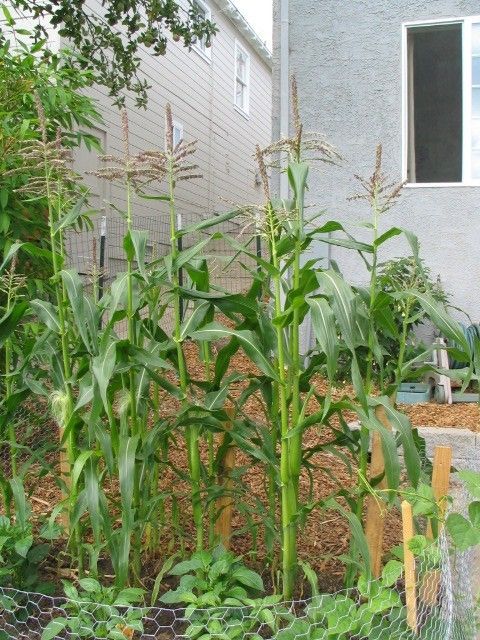 There’s nothing like seeing those tassels and silks form and then watching ears develop, knowing you’re in for a tasty treat.
What do you love most about growing sweet maize? Let us know in the comments below!
And for more information about growing corn in your garden, check out these guides next:
- 9 of the Best Companion Plants to Grow with Corn
- The 7 Best Varieties of Popcorn to Grow Your Own
- What Is Corn Seedling Blight?
- Why Are My Corn Seedlings Dying? 5 Common Reasons
Photos by Fanny Slater, Laura Melchor, and Raquel Smith © Ask the Experts, LLC. ALL RIGHTS RESERVED. See our TOS for more details. Originally published on February 19, 2019. Last updated July 26, 2020. Revised and expanded from an original article by Casea Peterson. Product photos via Arbico Organics, Burpee, Eden Brothers, and True Leaf Market. Uncredited photos: Shutterstock.
Maize cultivation | Rosselhoz.rf
The times when corn was called the queen of the fields have sunk into oblivion. But, if you show a rationalization approach in growing this crop, then you will become the owner of an excellent product with very little effort expended.
Maize is still one of the world's most popular crops for its fodder and productivity. Corn is grown to produce grain and silage, with properly organized work, both will be in abundance on the farm.
Important points
- The choice of predecessors is the key to a successful harvest. Corn will grow well after legumes, legumes and row crops;
- Loams, sandy loams and sandstones are suitable for growing corn, which easily warm up in the first spring sun. Soil pH should not be below 5.6. The soil should be loose, overcompaction is detrimental to corn;
- For landing, you need to choose a sunny, protected from the wind, place.
 Cucumbers, physalis, pumpkin crops are suitable as "neighbors".
Soil
As they say, prepare the sled in the summer and the soil for corn in the fall. Previously, the soil is dug up, removing weeds and the remains of predecessor plants. Secondary digging, after two weeks, is carried out to a depth of at least 30 cm. At the same time, fertilizers are applied: rotted manure or compost, sand and ash.
In the spring, after the soil has dried, break the crust on the surface to a shallow depth (5-6 cm) so that the moisture in the soil is preserved.
Seeds
A very important point is the selection of quality seeds for sowing. Seeds must be carefully sorted, removing small, excessively dry and damaged seeds from the seed. To carry out the treatment of corn seeds before sowing, they are treated in a manganese solution (1%) for 10-15 minutes. After this procedure, the seeds are washed in running clean water.
There are two options for planting corn in a summer cottage:
1. Growing seedlings at home with subsequent planting in open ground.
To do this, at the beginning of May, seeds are planted in cups (paper cups are best). Each glass is filled with soil consisting of humus, peat and river sand (2:1:1). It is advisable to add two glasses of ash to a bucket of such a mixture. One glass - one grain. The embedment depth is 3 cm, the soil is sprinkled on top with a thin layer of sand. The temperature in the room with seedlings is + 180C, watering is rare, but plentiful. Transplantation into the ground is carried out at the end of May. The sprout should not have more than three true leaves. Seedlings are watered abundantly, the soil is sprinkled on top with a thin layer of sand, which will not allow a dense crust to form and retain moisture in the ground.
2. Sowing seeds directly into the ground. Sowing is done in early April. Planting depth - 6-8 cm. Before planting corn, the earth must be loosened and nitrogen fertilizers applied (20 g / 1 sq. m.). Corn is planted in a square-nest method, leaving wide aisles. This culture is very responsive to loosening, as aerial roots form in the lower part of the stem. In the aisles add earth and make top dressing. Crops are sprinkled with sand or damp earth, dry mulching on top. All measures are aimed at maintaining moisture in the soil.
Two or three seeds are placed in each hole, after germination one, the strongest seedling, is left.
Planting care
After the sprouts have six true leaves, the plants are fed with organic matter - compost, humus, rotted manure. Inorganic fertilizers are applied to the aisles - potash, phosphorus, nitrogen.
Corn requires weeding and loosening to grow quickly. Since adventitious roots are formed below, it is necessary to loosen the soil around very carefully so as not to damage them.
As the plants grow, they may form stepchild sprouts. They require nutrition and prevent the formation and maturation of cobs, so stepchildren must be removed.
Hot weather in the first half of summer is not terrible for corn crops, but during the flowering period, irrigation should be given the closest attention.
Harvesting
Grain corn is harvested in the second half of August or early September. Milk cobs are used for food. Cobs that do not leave grain must be removed before the onset of frost.
It should be noted that the most popular are hybrid corn varieties with improved taste characteristics, resistance to drought, and many diseases. Hybrids can produce larger cobs, they are unpretentious to the soils on which they grow. The Hopi hybrid produces cobs filled with purple-black grains with a very delicate taste.
Corn is eaten boiled, used for making cereals, soups, salads, many varieties are excellent for canning.
Similar articles:
World agricultural news → Record corn harvest in the US will lead to lower prices for chicken meat
Russian Agricultural News → Russia will supply corn to Japan world population
Russian Agricultural News → Corn harvest to fall to 2012 levels?
SUGAR CORN - Growing on the balcony and loggia - Garden in apartment
Home - Growing plants - Garden in the apartment
Sugar or vegetable corn is a plant of the bluegrass (cereal) family. Her homeland is America. This is one of the oldest cultures. In recent years, sweet corn has been cultivated in household plots. It is also successfully grown on loggias and balconies.
In terms of nutritional value, sweet corn is superior to many vegetable crops. It is richer in carbohydrates, fats, proteins and sugars, and in the composition of carbohydrates there is much less starch, and more sugars than in grain corn. Sweet corn contains many amino acids and vitamins necessary for the human body, which are preserved during canning. They prepare independent dishes from it, add it to borscht and soups (a few minutes before being ready).
The stalk of sweet corn is the same as that of grain. The leaves are broadly lenticular, slightly pubescent on the upper side. Flowers are dioecious; male, collected in a spreading paniculate inflorescence, are at the top of plants, female - in the axils of the leaves, on the cob. The grains are round, wedge-shaped, elongated or elongated, yellow, white, pink and even red in color.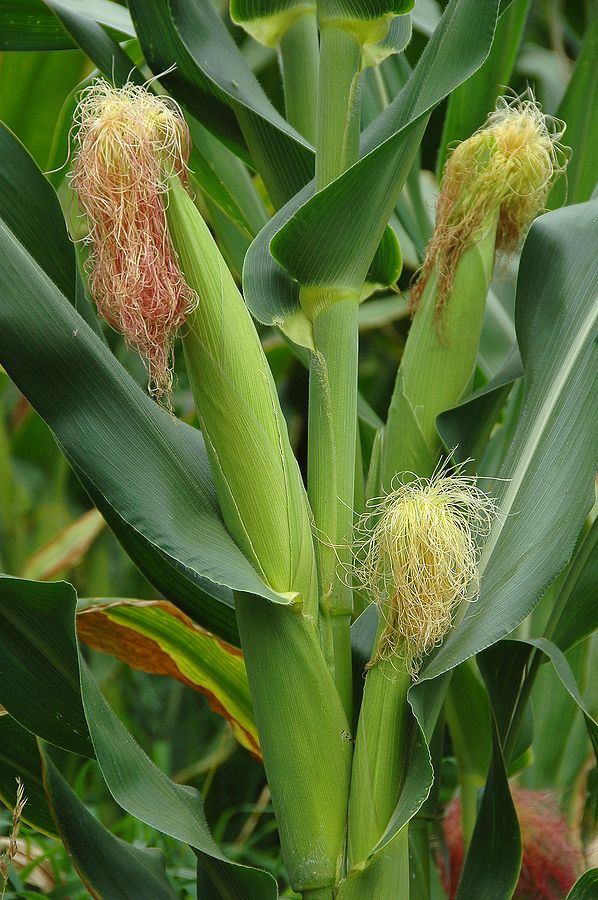 On the cob they are arranged in eight to twelve rows.
Sweet corn is a thermophilic plant. Seeds germinate at a temperature not lower than 10°C. The optimum temperature for growth and development is about 18...24°C. The culture is moisture-loving, but does not tolerate excessive soil and air moisture. The soil is preferably light, fertile, well-permeable to water. For growing at home, one variety and two hybrids of sweet corn are recommended.
Sweet corn varieties for growing on balconies and loggias
Delicacy is an early ripe variety. The plant is medium. The spadix is slightly conical, 16–18 cm long. The number of rows of grains is 12–14. Grains are yellow. The first cob is formed at a height of 44 cm.
F1 hybrid Kulikovsky - early ripening (technical maturity occurs 79-85 days after germination). The plant is medium. The ear is cylindrical. Grains are amber-yellow. The first ear is formed at a height of 35-40 cm.
Hybrid F1 Skvirka - early ripening (technical maturity occurs 76-79 days after germination). The plant is medium. The cob is cylindrical, 17 cm long. The number of rows of grains is 12-40. The grains are yellow-orange. Differs in amicable formation of a crop and high palatability.
Growing and care
On a balcony or loggia, sweet corn is sown in late May - early June. But usually it is propagated by seedlings grown on a window (seeds are sown 30-40 days before planting plants in a permanent place in boxes with loose fertile soil to a depth of 4-5 cm). As the plants grow, they are planted in pots, first in small ones, then in more spacious ones, trying not to damage the roots. Each plant is planted in the center of the pot, soil is poured on the sides and slightly compacted so that voids do not form. Seedlings are fed twice with a solution of mineral fertilizers (g per 1 liter of water): ammonium sulfate 1.5-2, superphosphate 3.5-4, potassium sulfate 1-1.