How to get shade
10 Ideas to Get More Shade in Your Backyard | Home Matters
Need more shade in your backyard throughout the day to enjoy summer afternoon? Check out these ideas to see if any of them can work in your yard.
It’s hard to stay indoors on a summer afternoon, but when there’s no shade in your backyard, it can be dangerous to stay too long outside. Fortunately, it’s easy to add more shade to your backyard, even on a budget. Here are some backyard patio ideas to get more shade in your outdoor space, so you can get out of the sun this summer:
1. Extra-Large Patio Umbrella
As far as backyard ideas on a budget, patio umbrellas are a perennial favorite. Extra-large patio umbrellas add shade right where you need it. Most are pretty mobile, so you can switch up your patio design as needed. Combine multiple umbrellas or create a shady nook on one corner of your deck, patio or backyard.
2. Pergola
Pergolas are a versatile element in many backyard designs, especially in areas that get a lot of sun. Pergolas add more shade, without cutting sunlight completely, and you can hang curtains or screens to block the blinding rays of the setting (or rising) sun. Need more shelter than the open roof can provide? Drape a cotton canvas tarp over the roof, or train wisteria to grow over your pergola in a natural canopy.
3. Outdoor Curtains
If you have a porch or patio cover already, you can add more shade by hanging some outdoor curtains. Use cotton canvas to make cheap, attractive outdoor curtains on a budget.
4. Awnings
Awnings have come a long way since the days of tin monstrosities sold door-to-door. Today’s modern, colorful fabric awnings can add color and class to your patio or deck. Install a retractable model and choose whether you want to bask in the sun or cool off in the shade.
5. Fast-Growing Trees
While planting a fast-growing tree or two might be budget-friendly, it also takes some patience. Of course, it also comes with all the responsibilities of tree care, including keeping roots out of your sewer pipes, leaves out of your gutters and so on. But a shade tree can lower your home energy costs, raise your home’s value, and provide a natural roof for a gorgeous outdoor room.
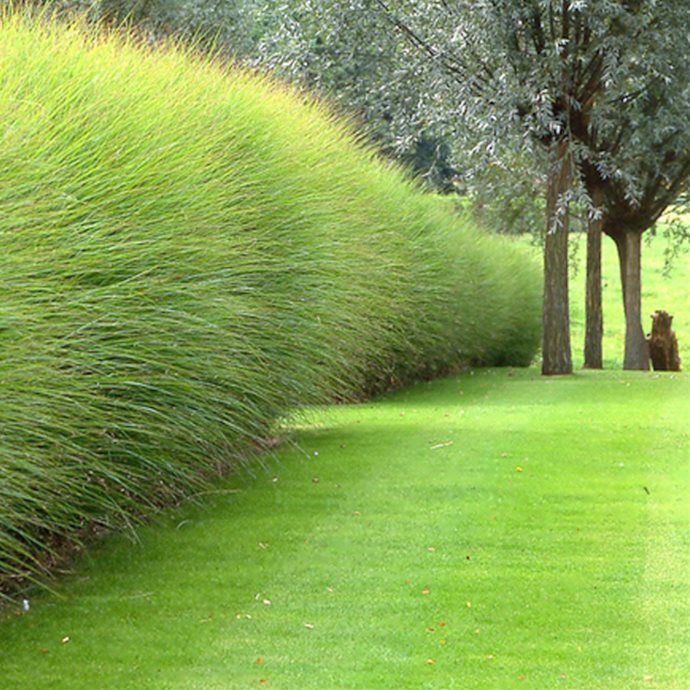
Not ready to commit to a whole tree? Consider planting some tall shrubs, or building a latticework screen or structure and training vines to climb it. Shrubs and vines grow much faster, and require much less maintenance, than trees.
6. Pull-Down Shades
As with curtains, outdoor shades can also provide more, well, shade. Choose self-retracting shades if you want the versatility of choosing when to let the sun in, and when to block it out. Otherwise, install rollup shades that need to be manually rolled up.
7. Fabric Canopy
A fabric canopy can be an attractive and semi-permanent choice for a patio in dire need of shelter from the sun. There are plenty of attractive options available at your local home store, or you could DIY a simple fabric canopy with some copper pipes and fittings. Google “how to build a patio cover” for ideas.
8. Gazebo
A gazebo is another more permanent structure that creates a shady sanctuary in your outdoor space. Gazebos are perfect for drinking your morning coffee, hosting a dinner party, collecting your thoughts or catching up with a friend. Hang flower boxes around the outside or train vines to grow up latticework along the sides for an extra-magical retreat.
9. Pop-Up Canopy
If you need shade sometimes, but not all the time, a pop-up canopy could be the answer. Most pop-up canopies are fairly easy to set up and take down. You can add more shade when you need it for a family gathering, dinner party, wedding celebration or other event. If you think you’ll need to use your pop-up canopy regularly, you can probably buy one for an affordable price. If you need an extra-large canopy for a single event, such as a wedding, you can rent one.
10. Permanent Roof
Installing a permanent roof over your deck or patio might be the most expensive option, but it will also raise your home value and may be cheaper in the long run, because a permanent structure will last longer than most canopies, awnings or umbrellas. Of course, a permanent roof offers the most protection from rain as well as sun, and can raise your home’s value. If you’re not sure about covering your whole patio in a roof, you could cover just a corner of it, or opt for a pergola or arbor instead.
With the right amount of shade, your backyard will be a much more comfortable place. If your backyard is too sunny, you can add more shade with quick, attractive options for just about any budget. Get creative, and create an outdoor space that’s uniquely yours. And don’t just cover your backyard with shade, look into covering your some of your major home system components and appliances with a home warranty from American Home Shield®.
AHS assumes no responsibility, and specifically disclaims all liability, for your use of any and all information contained herein.
NO TWO HOMES ARE THE SAME. THAT'S WHY WE HAVE OPTIONS. FIND A PLAN THAT FITS.
Shop Plans
How to Create Shade in a Backyard
Share
Spending time outdoors is one of the most sought-after benefits of living in Southern California and one of the main reasons so many folks choose to call this area home. While our comfortable climate allows us to enjoy backyard barbecues and alfresco dinner parties throughout the year, there are some steps we have to take to ensure that our family and friends can enjoy the fantastic climate in comfort.
After all, the reason we can spend so much time outdoors here is that most days are warm or hot and the vast majority of days are sunny. This warm, sunny weather also means that we need to make sure our yards have lots of shade to help keep our guests cool and provide protection from the sun for our children and pets.
To make sure your patio, swimming pool area or other entertaining spaces are comfortable and usable throughout the year, here are 21 functional, stylish ways you can add shade to your outdoor living areas.
1. Plant trees.Shade trees are an obvious choice and an eco-friendly, inexpensive way to add shade to outdoor living areas. You will, of course, need to select varieties that grow in a manner that will provide shade, but you can easily find plenty of options at your local nursery or by working with a landscape designer. Many shade trees are deciduous, but folks who live in Southern California can use their outdoor entertaining spaces through fall and winter as well, so you may want to opt for evergreens for year-round shade.
The issue with this option is that it will take many years for a young tree to grow large enough to provide a significant amount of shade. However, the end result is definitely worth the wait. Some homeowners even create full outdoor rooms under the canopy of a single shade tree, which creates a space that is functional, beautiful and integrated with nature.
Also keep in mind that strategically planted shade trees can lower the cost and use of energy when heating and cooling your home.
2. Add a gazebo.Adding even a small gazebo to your backyard or front yard creates a covered seating area where you can read, relax or visit with friends. Installing a gazebo instantly adds an outdoor room that comes with its own shade and protection from the elements, so this is a great option for homeowners who have the space and budget for this home improvement project. As an added bonus, different areas around the gazebo will also be shaded as the sun moves through the sky, which can provide a protected space in which your children or dogs can play or relax outside.
Umbrellas are one of the fastest ways you can add shade to your outdoor living areas, so if you have a social gathering that is just days – or hours — away and you need more shade, umbrellas may be your best option. Of course, to find the perfect umbrella, you may need to order it online or have it made, but you can purchase basic options in a variety of colors at garden centers, patio furniture stores and home improvement stores. You can even find patio umbrellas for sale at grocery stores just before and during the summer entertaining season.
You can opt for simple umbrellas with a pole you insert in the hole found in the middle of most patio tables or standalone options. For standalone options, you can choose conventional options that have a straight pole and provide shade in a circle around that pole, or you can choose off-set umbrellas, which allows you to place the base more out of the way and direct the shade to your outdoor entertaining areas. Off-set umbrellas are often more expensive, but this is not something that you want to go too cheap on; inexpensive umbrellas or bases often do not function as well as their better-made counterparts, and you may end up spending double when you have to replace them.
Because umbrellas shade limited areas at a time, this option is best when you have particular spots that need sun protection, such as a patio dining table.
4. Stash a pop-up canopy.If you only need some extra shade very once in a while, it is likely not worth the expense to install a permanent shade structure. If this is the case, you can simply purchase one or more pop-up canopies to provide temporary shade anywhere you might need it. Benefits of this option include the ability to move your shade as needed and the ability to store your canopy out of sight when not in use. While you can certainly spend more on a higher-quality or more-stylish product, another benefit is that you can pick up these temporary canopies rather inexpensively almost anywhere.
This is another instant option that you can purchase, set up and use within an hour or so, so this is a great option to quickly add shade and sun protection to your yard. Because it is temporary and can be moved, this also might be a good option to use while you are waiting for the above-mentioned shade trees to mature.
5. Install a pavilion.Pavilions are like canopies and are commonly called canopies, but we are using the terms separately here to differentiate between the temporary style of canopy mentioned above and the more permanent option we are talking about here. So, a pavilion usually has a fabric top and corner posts like a pop-up canopy, but there is nothing pop-up about these. Pavilions are more of a semi-permanent shade structure – not quite permanent, since you can usually move or remove them fairly easily, but they do require assembly and can be attached to a deck, patio or the ground for stability and long-term use.
Pavilions are more attractive and, generally, better made than canopies, since they are designed to withstand the elements on a long-term basis. They can be securely attached to the ground, a deck or a patio to provide daily protection from the sun and rain while you enjoy your outdoor living area.
If you want something with more style and sturdiness than a temporary canopy but your budget will not allow the construction of a permanent cover for your patio, a pavilion is kind of the perfect middle ground. The price range for pavilions can range from around $200 into the thousands, but you can get a decent pavilion that you can enjoy for years to come starting at about $600. If you are a bit handy around the house, you may be able to install it yourself. If you are not very handy, it is worth hiring a handyman or contractor to properly install it to get the best value out of this option.
While they will not last as long as a solid roof structure for a covered patio, a pavilion should provide you with an attractive shade structure for many years with proper installation and care.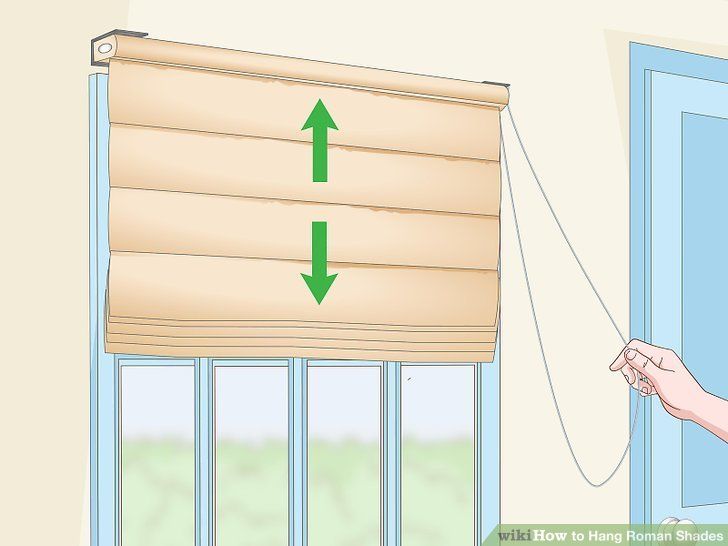
A marquee is yet another type of canopy, but this one is a bit different. Marquees are generally used to provide protection from the elements as guests approach an entryway or as they make their way between structures. For example, if you have a covered porch attached to your home and a covered patio in your backyard, you might use a marquee to provide shade over the walkway connecting the porch to the patio. Keep in mind that a marquee does not have to be made out of canopy fabric. For example, you can create a natural, living marquee by growing vines over an arched trellis.
7. Hang patio curtains.Patio curtains are an easy, quick, inexpensive way to increase the shade and weather protection in an outdoor living area that already has a solid roof, pergola, pavilion or other type of cover. Curtains can be opened and closed as the sun moves to maintain shady areas and air circulation. What this option is going to do for you is extend the amount of time you enjoy shade on your patio, since it will help block the sun from the side while your patio’s cover blocks it from above.
Keep in mind that you do not have to use actual patio curtains to achieve this look and function. You can also use tapestries for more bohemian feel, or even shower curtains or fabric, if that is what you have on hand.
8. Construct a permanent roof.If you have an existing deck or patio that does not have a cover, you can always construct a permanent, solid roof to transform it into a covered patio. This is a more expensive option than those we have mentioned so far, but it is also a permanent solution that comes with the opportunity to significantly enhance the look and function of your patio.
This option will take longer to install, usually requires hiring a contractor and will most likely involve building permits, but if you have the time and the budget, this is your most elegant, attractive option for creating shade.
This option definitely takes longer to install, definitely involves building permits and, unless you are a contractor, it is going to require hiring one. This is also the most expensive option on this list. However, folks who have the time and money for this home improvement project have the opportunity to add shade to their main outdoor living area while also increasing their outdoor living space by adding a balcony or a second-story deck. If you do not have a second-story from which to access your deck, you can also provide access via stairs from the ground.
Having one outdoor living area on top of another provides lots of opportunities for entertaining, may increase the value of your home, and increases your access to functional, outdoor spaces any time of the day or night. For our purpose here, it also is a great way to cover your current outdoor living area to add shade and protection from the elements.
Pergolas are permanent, assembled and installed structures with an open roof system. They are rather versatile when it comes to complementing a variety of architectural styles and can significantly enhance the visual appeal of outdoor living areas. This makes them a popular choice that we are seeing more of all the time. Another reason they are so popular is that options are available for almost any budget, so this is one shade structure that most homeowners can afford. Plus, there are lots of pergola plans online and kits available at home improvement stores, which allows homeowners to take on this home improvement as a do-it-yourself project.
Alone, pergolas offer broken shade, but this can be supplemented and filled in by adding a fabric covering. The two most common options for this are fabric lengths that are permanently placed to cover the top of the pergola and fabric that is installed on a ring or bar system that allows you to cover or uncover the pergola as desired.
The terms arbor and pergola are often used interchangeably, but there is a difference. Whereas pergolas have an open roof structure supported by four or more posts, arbors are more like a combination of a trellis and a pergola. Arbors have an open roof structure that is similar to a pergola, but – unlike a pergola – they have trellis-like structures on either side, which allows vines to easily grow up and over the structure to provide shade. Some arbors are large enough to include bench seating on the sides, which provides a shady spot to read, enjoy your morning coffee or catch up with a friend.
12. Build a fence or wall.Fences and walls do not offer protection from the sun while it is overhead, but they do provide shade earlier and later in the day when properly positioned. This makes them a good addition to a covered patio or canopy to offer a larger expanse of shade throughout the day.
13. Grow vines.
Vines can be planted to enhance the shade offered by pergolas, arbors, fences and walls and can even be grown between a fence and a pergola (or other structure) to provide a living marquee. This can be accomplished by training the vines along a trellis, arbor or twine strung between the two structures.
Growing vines on a fence that does not adequately block light, such as a chain-link fence or split-rail fence, is another easy way to increase shade, as well as privacy.
Evergreen vines that do not die back or need to be cut back in the winter are your best options if you are going for year-round shade.
Vines that can be trained to provide shade include grapes, chayote and other squash, bougainvillea and wisteria.
14. Hang plants.
Hanging plants are not going to provide enough shade on their own to really protect you from the sun; however, they are a great supplement to shade structures, such as patio roofs, pergolas, arbors, cabanas or pavilions. When added to these existing structures, hanging plants increase the amount of shade your outdoor living areas will have when the sun is not directly overhead.
Vining plants are going to be your best bet here, since they will provide more protection as their vines hang below the containers. Examples of vines that grow well in containers include bougainvillea, jasmine and ivy.
15. Hang shade sails.Shade sails are an easy, attractive way to add shade to outdoor living areas. These large pieces of fabric are typically shaped like triangular sails and are stretched between posts or structures to cover patios and other outdoor areas. Depending on the color and style you choose, shade sails can look incredibly modern and sleek or a bit more rustic. This option is typically easy to install and can be purchased at home improvement stores or some garden centers, but you may have to order custom sails to make sure they properly fit your space.
16.
 Install do-it-yourself rolling shades.
Rolling shades can be used as window coverings inside or outside of your home. You can also purchase larger versions that can be easily attached to a patio roof or pergola to provide shade when the sun is not directly overhead. Bamboo rolling shades are the most common type seen in use on patios, but they can also be made of fabric. While you can hire a handyman for convenience, most folks who know how to use a drill can just take this on as a quick, do-it-yourself project.
17. Go upscale with a cabana.Cabanas include a pretty wide range of shade shelters that can be anything from fabric to wood, since pretty much any type of structure that is next to a pool or on the beach and has an opening facing the water is generally considered a cabana. This means that this option could fall into more than one of the above-mentioned categories, but it is worth mentioning separately here, because they are often considered more upscale and they do differ a bit from other options.
For example, in order to call it a cabana rather than a pavilion, most people would say you would need to have patio curtains on at least three sides so that it can be closed off to make a room. Since cabanas are often used as changing rooms for swimming pools and beaches, it would be best to have curtains on all four sides. You could also add curtains to a covered patio with a stick-built roof that is near your pool to turn it into a cabana.
The combination of a solid roof and curtains makes cabanas a particularly good choice for adding shade to outdoor living areas.
18. Opt for awnings.Awnings are simple, have been around forever and are a tried-and-true way to easily add shade to outdoor areas. They can be attached directly to your home and, in most cases, do not require posts. You can, of course, attach awning to posts if you plan on using them as a permanent structure, and some styles do have posts integrated into the design.
There are basically three types of awning from which to choose: solid metal awnings, fabric awnings that are stationary and fabric awnings that are retractable. Solid metal awnings, which are usually made from aluminum, are your sturdiest option and can hold up to rain, wind and sun for years.
Stationary, fabric awnings are second in line as far as sturdiness goes, but they are much more customizable to complement your space, since you can choose among different styles and a huge variety of colors.
Retractable awnings are your most versatile option and allow you to decide when you would like protection from the sun and rain and when you would like to have your outdoor living space uncovered. In the category of retractable awnings, you can choose between less expensive options that you open manually or models that are fully motorized.
Although awnings are not cheap, they do provide a relatively inexpensive option for covering a large area without having to install an entire structure.
19. Plant tall plants and bushes.
They might not grow up to be big, beautiful shade trees, but tall plants and bushes can increase privacy and provide shade throughout the day to make your outdoor living areas more enjoyable. And, if you choose something as attractive as the rose bushes in the photo above, they can also significantly increase the visual appeal of your outdoor living areas.
You can plant tall plants or bushes as a border near your patio or deck or you can plant them in containers that can be arranged on or near your entertaining spaces. If you plant them in containers on wheeled plant stands, it is easy and convenient to move them around to keep the area shaded as the sun moves through the sky throughout the day.
20. Create a tropical paradise with a palapa.
A palapa is similar to a pavilion or other covered patio options, but it is best to list it separately because there is a rather distinct difference. The main difference between a palapa and other shade structures is that a palapa typically has wooden posts and always has a thatched roof. So, if you are going for a tropical look in your backyard, this might the shade structure for you.
If you are not familiar with thatched roofs, they provide great protection from the sun and rain. After all, they are primarily used in areas that receive a lot of both. You can learn how to build your own palapa online, order a kit to assemble, or hire a contractor experienced in building these tropical, open-air huts.
21. Get creative.
You can create shade with just about anything that blocks the sun and can be hung up or strung up in some way. For example, you can create your own DIY canopy with bamboo, fabric and some rope, or you can string up a row of parasols to create a unique marquee over a walkway. Another option is to throw a sheet over a rope tied between two trees or posts to make a tent-like structure where your children can play outside but out of the sun. Alternatively, you can create covered outdoor living areas or play areas by setting up a teepee, yurt or tent.
Additional Resources- How to Expand Your Living Space with a Sunroom
- How to Create a Backyard Spa Getaway
How to make a shadow in Photoshop
January 30LikbezTekhnologii
Three ways to add more volume and dynamics to an object in a photo.
Share
0Shadows are one of the most important components of the composition, which makes the scene more realistic and lively. If you do not take care of this element, adding a new object to the photo, then the object will “hang” in the air and the frame will turn out to be unnatural.
When creating a shadow, it is important to remember that it must appear from the side opposite the light source and fall at the same angle as other similar details already present in the image.
Shadows can be made in many different ways in Photoshop. Consider the most popular of them.
For macOS and Windows, Photoshop provides the same shortcuts, but there are differences in the modifier keys. We will use the notation for macOS. If you have Windows, just change Cmd to Ctrl.
How to make a shadow in Photoshop using styles
One of the easiest and fastest methods, which is suitable for creating a shadow around the entire contour of the silhouette. In public, this does not always look good, but on the text and some individual objects, it’s even nothing.
Open the file with the object on a transparent background and double click on the layer to display the style menu.
Turn on the Shadow style and play with opacity, offset and other settings until you get the desired result, then click OK.
Now add a new layer by pressing Cmd + Shift + N, drag it to the very bottom and fill it with some color. If you plan to move the object with the shadow to another image, then just save the photo with a transparent background.
How to make a shadow in Photoshop using a brush
Yes, you can just draw the desired element! This option is good for cases where the light source is from above, and is also suitable for soft, diffused shadows without a clear transition from dark areas to light areas.
Open the image you want to make a shadow on and add a new layer by pressing Shift + Cmd + N or by clicking on the plus button at the bottom of the window.
Choose from the soft brushes available.
Set the Opacity and Pressure to around 35% and paint the shadow. Experiment, and if the result does not suit you, cancel the actions by pressing Cmd + Z. For greater convenience and accuracy, adjust the scale by combining Cmd and + (plus), Cmd and - (minus).
If necessary, soften the entire drawn shadow by lowering the layer's opacity. Export the finished image.
How to make a shadow in Photoshop using transform
Quite an easy way to create a sharp drop shadow of a person, animal or any other object. The principle is the same as the method with styles, but gives a better result.
Open the image with the object on a transparent background and double click on the layer.
Check the box next to the Shadow style and set the options you want by moving the sliders, and then click OK.
Select the shadow in the layer effects list and right-click and choose Make Layer from the context menu.
Select the new layer with the added path, press Cmd + T. Then right click on the selection and select "Distort".
Grabbing the key points, resize and position the shadow to match the light source and press Enter.
Now add a new layer with Shift + Cmd + N or click on the plus button and fill it with some color. If you are going to transfer the object to another photo, do nothing else and immediately save with a transparent background.
Read also ✂️🖌👩🎨
- How to merge layers in Photoshop: 10 ways0084
- How to set a font in Photoshop
- 75 keyboard shortcuts for productivity in Photoshop
How to create a shadow from an object in Photoshop / Photo manipulation in Photoshop / Photography tutorial
Publication date: 07/31/2017
When adding new objects to a photo, it is important not to forget to add shadows from them. Or you can add shadows to spice up the shot a bit. You need to add a shadow correctly. It should fall at the same angle as the rest of the shadows in the photo. But how do you make a shadow in Photoshop? In this article, we will show with examples how to make a shadow from an object in Photoshop.
Let's start with the case where the shadow can be drawn with a brush. This option is suitable if the shadows are diffused. A diffuse shadow is a shadow that does not have a clear border of transition from a darkened part to a lightened one. It does not have to show the full silhouette of the object.
Before making a shadow from an object, you need to carefully consider the projection of the shadow. Let's open the image in Photoshop.
Judging by the sky in this photo, it was an overcast day. Shadows from pillars and pelicans are almost invisible. Mentally assume that the sun shines on the pelicans frontally. Thanks to the clouds, the shadows will be very scattered. So, you can not try to draw a clear silhouette. And let the shadows be a little elongated.
When we have thought about the position and shape of the shadows, create a new layer Shift+Ctrl+N . We stand on it, call the tool "Brush" / Brush (key B ). The color of the brush is black, the brush is soft, the size is adjusted with the keys [ and ] , they are also Х and Ъ .
And just paint on a new layer of the shadow according to our idea. If you missed somewhere and climbed onto the object itself, you can remove it with an eraser (key E ). For convenience, the picture can be scaled using the keys Ctrl + and Ctrl- . You can also paint over the shady side of the wooden poles.
To make the shadows more realistic, lower the layer's Opacity to 35%. To do this, standing on the layer, move the slider to the left on the parameter "Opacity" / Opacity on the layers palette. If something doesn't work out, press cancel Ctrl+Alt+Z the required number of times.
That's how it happened.
Save the result Shift+Ctrl+S , you can choose the usual file format - JPG.
This method is the easiest, especially for those who are good at drawing.
If we need a sharp shadow, then the problem is solved in a different way. A hard shadow is a shadow that has a clearly visible line of transition from the shadow area to the lightened area.
Learn more about Photoshop on the course at Fotoshkola.net “Photoshop. Layers and masks.
Open the photo in the program. Separating the object from the background. To do this, you can use any of the tools of the group "Quick Selection" / Quick Selection Tool . They are called by pressing the key W . In this case, select the object "Magic Wand" / Magic Wand Tool by clicking on the background (suitable for a uniform background).
The dotted line is visible along the entire perimeter of the image, so you need to invert it to select only the object. Press Shift+Ctrl+I . Now we transfer the object to a new layer: Ctrl + C - copy, Ctrl + V - paste. A new layer with the object will appear automatically. Turn off the bottom layer by clicking on the image of the eye.
We call the tool "Eraser" / Eraser Tool , key E , and remove the chips of the rods. They are not needed for shade. Then right-click on the layer with the object, from the list that appears, select item "Overlay options" / Blending Option .
In the window that opens on the left, select item "Shadow" / Drop Shadow .
Using parameters "Offset" / Distance , "Spread" / Spread and "Size" / Size create a shadow. Move the sliders until we get the desired shadow. Then we decrease Opacity .
Press Ok and return the visibility of the bottom layer (click on the gray square where the eye was before).
If we want to lay the shadow of the object on the floor, we follow the same steps. After we have created the shadow, we transfer it to a separate layer. To do this, under the layer with the object, right-click on item Shadow / Shadow and select Create Layer / Create Layer in the list that appears.
The shadow is transferred to a new layer. Get on the shadow layer and press Ctrl+T . Then, by clicking the right mouse button, we call up the context menu and select item "Distortion" / Warp . A frame with dots will appear. By moving these points, you can change the perspective of the image.
After completing the transformation, press Enter . The opacity of the shadow layer can be reduced up to 50%. For greater realism, you can blur the part of the shadow that goes into perspective. Select the eraser with the key E , on the control panel select the type of stroke with a feathered edge and pass the eraser along the edge of the shadow.