How to fix drain in sink
Kitchen sink not draining? Here are 6 ways to unclog it
There I was, minding my own business, washing the dishes after dinner like I always do. Just moments into scrubbing and rinsing the frying pan, I noticed that the water wasn't draining from the sink. I checked to see if anything was blocking the drain opening - nothing. I switched on the garbage disposal, but that was only a temporary fix. As I continued washing dishes, the drainage was only getting slower. With a clogged sink on my hands, my after-dinner cleanup was about to get more intense.
I'm sure I'm not the only one to experience the inconvenience of clogged drains. Clogged kitchen sinks are among the most common drainage issues to plague homeowners, largely because food debris and soap residue are nightmares for smooth draining. Thankfully, clogged drains are also one of the easiest home repairs to make on your own. However, before you roll up your sleeves and get into the do-it-yourself spirit, make sure you're aware of the plumbing myths that could lead you astray.
When it comes to the kitchen sink, for instance, don't think Drano and other chemical-based drain cleaners are the easy, go-to fix. The chemicals can sometimes cause more damage to your system, even if the clog seems fixed initially. Plus, backsplash from stubborn blockages could seriously harm your skin and eyes. You can avoid these catastrophes with other clog repair methods, some using common household items and others requiring some straightforward plunger or plumber's snake action.
Don't call the plumber yet! There's a good chance you can fix the problem yourself with one of these six methods to unclog a kitchen sink:
1. Attack with boiling water
When hair, grease, soap residue and other debris get stuck in your drain, boiling water may be all your pipes needs to loosen the blockage. It's the simplest fix, which means it should be your first move when trying to unclog a sink.
Easy as 1-2-3, here are the steps to follow:
- Bring half a gallon of water to a boil on your stove or use a kettle to heat the water.

- Pour the boiling water directly into the drain opening.
- Turn on the faucet to see if the water drains in a steady fashion. If it's still draining slowly or standing still in the sink, repeat the process.
Important note: Don't try this method if your drain is attached to PVC pipes, as the boiling water could melt or damage the plastic.
If the boiling water fails to dislodge the clog after the second try, it's time to move on to another method. Unfortunately, you have yourself a sink clog that's too stubborn for the simple boiling water approach.
2. Check the garbage disposal
If your sink has a garbage disposal, it could be the culprit of your drainage issues. If the clog is in the disposal, turning it on will usually break up the blockage. Overheated or dysfunctional disposals may not even turn on, but you can activate the reset switch at the side or bottom of the unit for an easy reboot. After resetting the disposal, try turning it on again to clear the clog.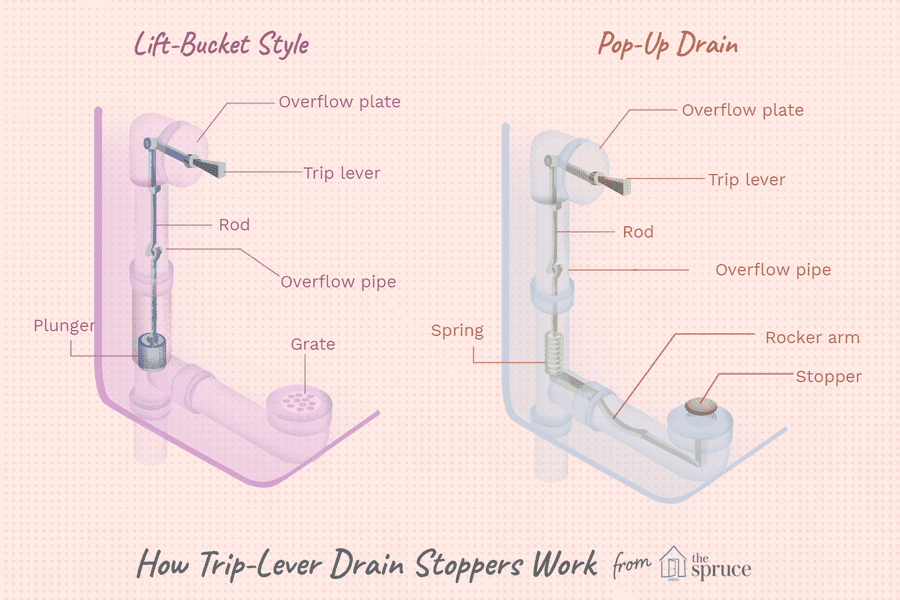
If you turn on the disposal and hear a low humming sound, the unit could be jammed or broken. Before doing anything to fix your disposal, remember to disconnect the power to the unit and never - and we mean never - stick your hand in the disposal. From there, you can try to break up the clog in the disposal by turning the blades manually. You can do that by inserting an Allen wrench into the hole on the bottom of the disposal, and twisting until you feel less resistance, meaning the blockage is beginning to break up. If that doesn't work, follow these tips to unclog your garbage disposal. Once unclogged, turn the power back on and test the disposal. If all looks and sounds good, turn the faucet to see if the sink drainage is back to normal.
Keep in mind that your garbage disposal inspection may not reveal any clogs or issues, in which case you can skip straight to a different unclogging method.
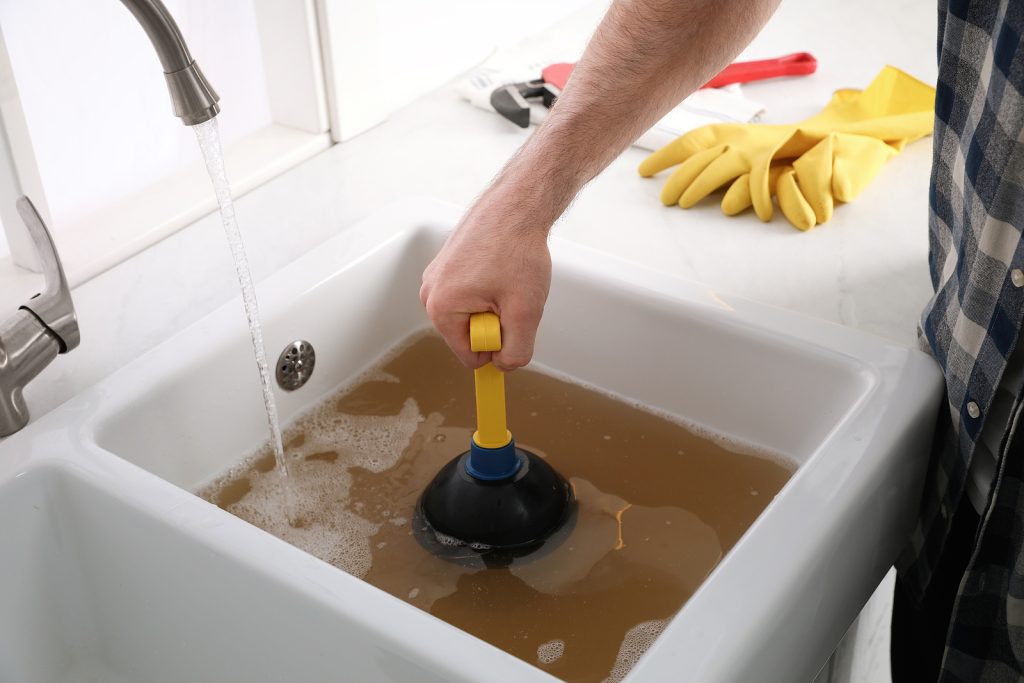
3. Plunge away the blockage
Once you establish that the disposal isn't the problem, it's time to bring out the plunger.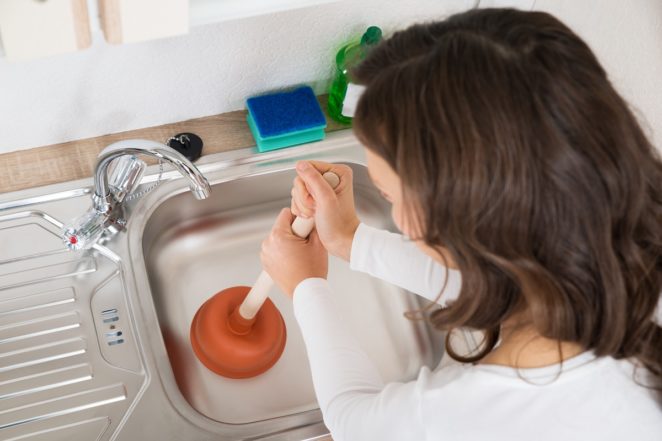 But keep in mind: While you can use the toilet plunger if it's all you have on hand, Dengarden suggested using a flat-bottomed one for the job. With your plunger at the ready, follow these steps:
- Fill the sink with hot water until it's about halfway full and creates a seal around the drain.
- Position the plunger over the drain and begin pumping up and down quickly several times.
- Remove the plunger and wait to see if the water drains.
- Repeat the process until the water drains freely.
If the sink still isn't draining properly after multiple plunging attempts, you know the drill. Time to try a different method.
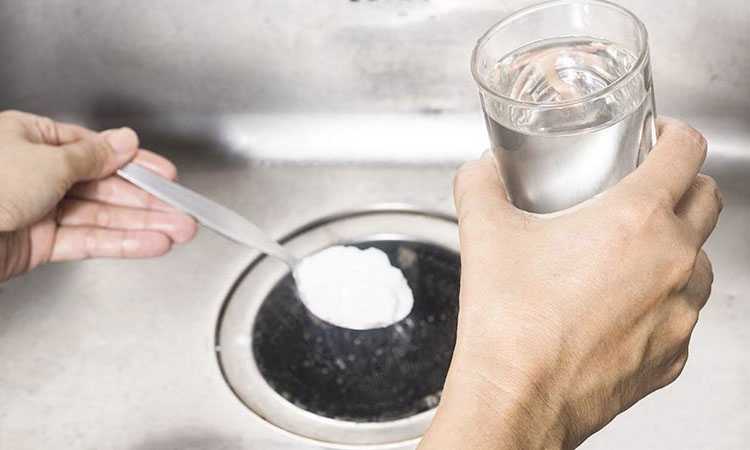
4. Break it down with baking soda and vinegar
This approach is a natural alternative to using chemical drain cleaners on clogged drains. Much to your convenience, baking soda and vinegar are also common household items that you're likely to already have in your kitchen. Follow these steps to let the mixture work its magic:
- Remove standing water from the sink with a cup or bowl.
- Pour one cup of baking soda down the drain, using a spatula or spoon to push the powder down the drain if necessary.
- Pour one cup of white vinegar down the drain opening.
- Place a stopper or cover on the drain to seal the opening.
- Let the mixture sit for 15 minutes.
- Remove the cover and run hot tap water down the drain.
- Use boiling water to break up more intense clogs.
As with any unclogging method, this natural alternative doesn't have a 100% success rate. However, if it seems like you're making progress on the clog after completing the steps, repeat the process to double down on the blockage.
5. Try the plumber's snake
The clogs that put up a fight will require the strength of a plumber's snake to battle the blockage. The tool has a coiled spiral snake that reaches down into the drain. Once the snake hits an obstruction, you can crank the handle to dislodge the debris and pull it out of the drain. Electric snakes pack even more power to tackle clogged drains.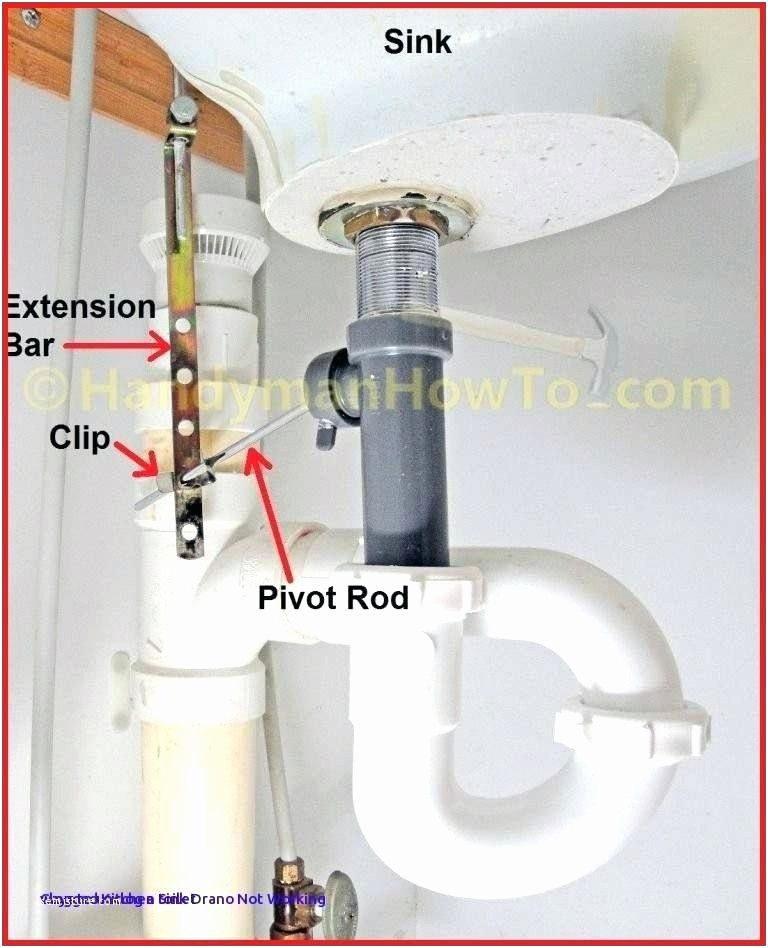
If you don't have a plumber's snake, you can create a makeshift one with a wire coat hanger. Simply use a pair of needle-nose pliers to unwind the hanger into a long piece of wire. Keep the hooked end, as this is what you'll use to grab onto the debris. If necessary, you can use the pliers to adjust the angle of the hook so that it can easily fit through the drain opening.
No matter which tool you're using, simply feed it down the drain a few feet at a time. Try not to push too roughly, as you might accidentally push the clog further down the pipe. When you feel the tip of your tool hit an obstruction, hook it on and pull the debris up through the drain. Keep doing this until you feel confident that the blockage is gone. Run hot water down the drain to see if you're right.
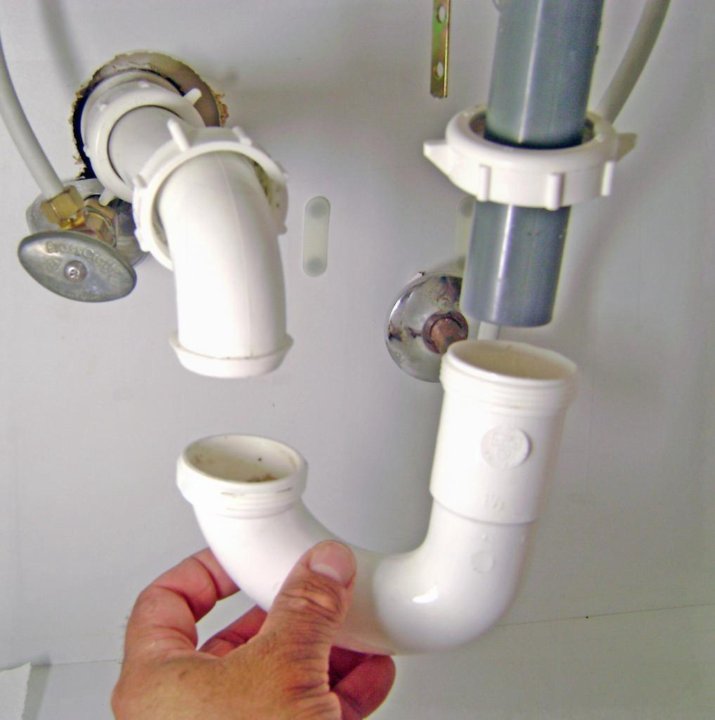
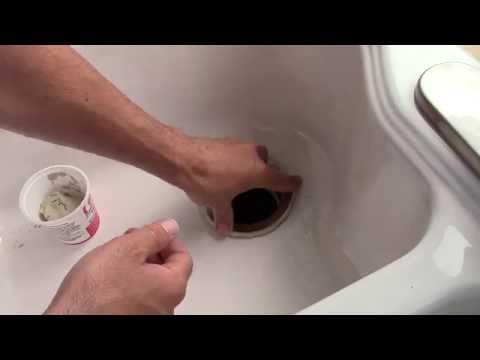
6. Clean the P-trap
If the water is still not draining correctly, there might be a blockage in the P-trap, aka the elbow-shaped pipe under your sink. Food, grease and other debris may be stuck in the pipe, causing your sink to drain slowly or not at all because the water hits a snag on its way down.
The fix is disassembling the pipe to clean out the gunk that's causing the blockage. Warning: This task can get a little messy, so you might want to prepare yourself with gloves, goggles and towels. When you're ready, follow these steps to clean the P-trap:
- Place a bucket underneath the pipe. This will catch any backed up water or debris that may fall out when you open the P-trap.
- Unscrew the connectors on the trap that hold the curved piece to the vertical and horizontal drain pipe. There should be a slip nut on either end of the P-trap.
- Remove the P-trap and clean the pipe of all debris, grime and residue.
- Reconnect the trap.
- Turn on the faucet to run water down the drain.
If the drainage situation is still not up to par, the clog may be farther up the pipe. Back under the sink you go to find the source of the blockage. Here's what to do when you get there:
- Repeat the steps to remove the P-trap.
- Remove the horizontal pipe that connects the system to the wall.
- Feed a plumber's snake, auger or coat hanger into the wall pipe. When you feel an obstruction, use your tool to pull the blockage out from the pipe.
- Repeat the process until you remove all debris.
- Reassemble the pipes and P-trap, tightening the connectors by hand. (Pro tip from Home Depot: Do not over-tighten, as this may cause the connectors to crack.)
- Run hot water to flush the drain.
Before you celebrate your handiwork, check under the sink while the water's running to make sure there isn't any leaking from the pipes. If you do notice leaks, make sure all the connectors are tightened. Once you're free from the drips, dry any water spillage from under the sink or on the floor and you're good to go.
If you've made it to this point and your sink still isn't draining, there could be a larger issue at play. It's time to give in and schedule an appointment with a plumber for a professional fix.
How to prevent future clogs
Now that your kitchen sink is draining properly again, make sure you're taking measures to prevent clogs from coming back.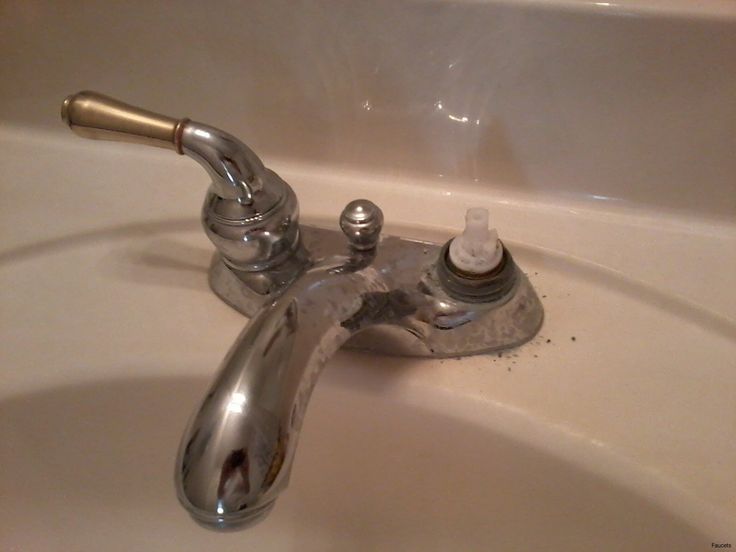 The most important preventative measure is refraining from disposing of harmful items down the drain. That includes:
- Grease, fats and oils.
- Meat.
- Coffee grounds.
- Egg shells.
- Starchy foods, such as pasta, rice or bread.
- Fruit peels, pits and stickers.
- Gum.
- Paint.
- Paper products, such as paper towels or food wrappers.
Instead, pour cooking grease in an old can and dispose of the container once it's full. You can add certain waste, including coffee grounds, to mulch or compost piles.
The Home Depot also advised homeowners not to overload the garbage disposal. Try not to grind more than one cup of food waste at a time, and, of course, avoid sending any of the above items to the disposal. Another pro maintenance tip: Create an equal solution of vinegar and water, and freeze the mixture in an ice cube tray. About once a month, grind a few of the cubes down your disposal to scrape away food-waste buildup and keep the unit fresh. Here are more garbage disposal do's and don'ts to keep your drains clean and clear.
Another good habit for your pipes sake is running hot water down the drain after each sink use to keep everything clear. You might also want to use a drain cover to catch debris before they cause damage in the pipes.
While clogged drains are an easy DIY fix, being prepared for serious plumbing troubles before they arise is always a good strategy. See how plans from HomeServe can help with the costs of covered repairs.
Slow Sink Drain? 6 DIY Fixes for Before You Call a Plumber
Photo: istockphoto.com
Q: My bathroom sink isn’t draining very well, and it’s driving me crazy. While the water does eventually drain out, it takes a long time—and, in the meantime, it’s hard to use a sink full of dirty water. What can be done about the slow sink drain?
A: If by the time you finish brushing your teeth, you’re leaning over a sink full of water dotted with toothpaste foam, you face a very common problem: a partial clog. While frustrating, a slow sink drain is easy enough for most homeowners to remedy on their own. The culprit is generally a slimy mixture of soap scum, hair, sticky styling products, and/or thick shaving foam that has accumulated on the drain walls. While you might be tempted to reach for commercial drain openers right off the bat, know that these harsh and corrosive chemicals can irritate your skin and eyes and even harm old pipes. Since removing the blockage often won’t take any chemicals at all, we suggest playing it safe and following the steps outlined here.
Don't want to do it yourself?
Get free, no-commitment estimates from professional plumbers near you.
Find local plumbers
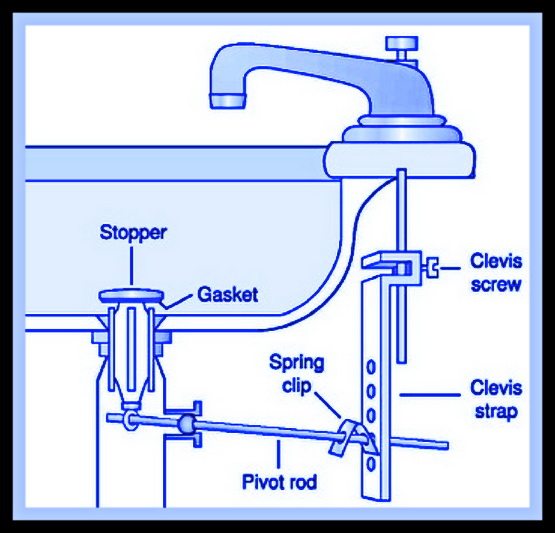
+ Clean the stopper.Because of its position at the mouth of the drain and the metal “tail” that extends a couple inches into the pipe, the sink stopper—the small raised metal device used to plug the sink’s drain on command—tends to catch hair, soap, and other debris. Once this trapped ball of grossness gets too big, wham, you have a slow sink drain.
In many modern sinks, you can remove the stopper simply by unscrewing it. In some older sinks, though, a small tether holds the stopper in place. If your sink is the latter type, follow these instructions to remove the stopper for cleaning:
- Look underneath the sink, right where the basin connects to the pipe, and you’ll typically see a small rod with a nut and clip attached to the pipe.
- Turn the nut to detach it—you might need pliers if it’s tight—squeeze the clip to release the rod, and lift the stopper out of the drain.
- If the stopper is covered in slimy grunge and hair, use a paper towel or rag to thoroughly clean off all of the residues.
A slimy coating along the inside of the sink’s drainpipe will narrow the opening and slow drainage. Here’s an easy way to dislodge built-up residue in the pipe using only common household pantry items.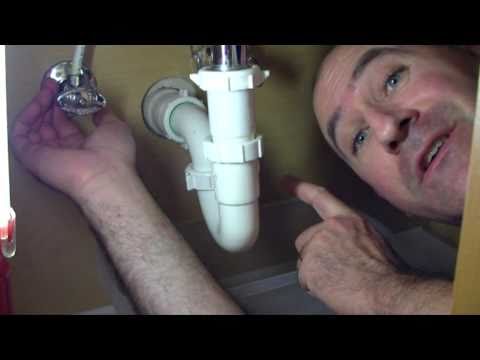
- Pour one-half cup baking soda into the drain followed by one-half cup white vinegar; the fizzing and bubbling reaction helps to break up small clogs.
- Block the drain using a small rag so the chemical reaction doesn’t all bubble up out.
- Wait 15 minutes.
- Now pour a kettle’s worth of boiling water down the drain and run hot water for several minutes to further flush out the melted slime.
Photo: istockphoto.com
Lift out debris.If cleaning the drain walls didn’t fix the problem, fish out any accumulated debris with a small hair clog tool (sometimes called a “drain-cleaning tool”).
Generally made of flexible plastic, this tool features a long stem with a handle at one end and small barbs at the other for grabbing onto hair and other debris inside the clogged sink drain (view example on Amazon).
With the stopper removed, insert the plastic line down the drain, wiggle it around, and lift it out frequently to wipe off whatever you hook. Continue to do this until you can no longer pull up any blockage.
Advertisement
Use a plunger.Sometimes the clog is further down the drain than even a drain-cleaning tool can reach. A sink plunger can help. For the best results:
- Block the sink’s overflow hole with a small rag.
- Place your cup-shaped sink plunger—not a toilet plunger, which has a flange for sealing a toilet’s outlet—over the sink drain.
- Fill the basin with enough water to cover the plunger’s cup.
- Now plunge up and down in short, quick movements to force as much air as possible down into the drain.
- If the clog dislodges, you should see the water in the sink quickly drain away.
If you’ve tried all of the above steps but are still stuck with a slow sink drain, it’s time to get a bit more aggressive. Pick up a drain snake, also called a drain auger, from the home improvement store (or check out our roundup of the best drain snakes available for purposes like this). This metal cable extends anywhere from three to 25 feet long with a spiral catch at the other end so you can dislodge clogs located beyond the reach of a sink-cleaning tool or plunger.
With the stopper removed, insert the tip of the snake into the sink drain. Feed the snake further down the pipe, periodically retracting it to clean away any accumulated grunge. (Keep a trashcan nearby, as you’ll need somewhere to toss whatever comes out of the drain.)
If you feel a block in the pipe, crank the drain snake’s handle to break through and wiggle the tool gently from side to side to catch the clog. Once the snake has a little give again, remove the snake and its contents and flush the drain with hot water.
Advertisement
Photo: istockphoto.com
Check the trap.Look underneath your sink and you’ll see a U-shaped bend in the pipe. This is the P-trap, and while its purpose is to maintain a small standing pool of water to prevent sewer gas from backing up into your home, it’s also a prime spot for loose change, lost rings, debris, even lost toys to accumulate.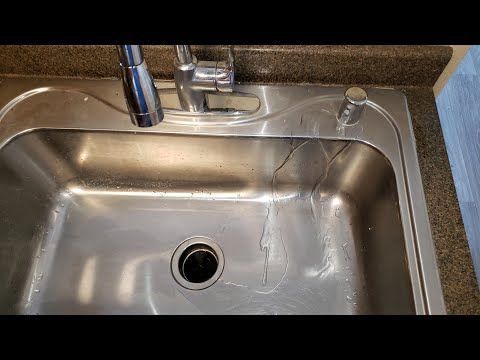
- To clear your P-trap, start by turn off the water supply to the sink. While you’re at, remove any items store under the sink. Leave only a bucket placed directly underneath the P-trap to catch dirty water.
- In most homes, the P-trap is held in place by slip nuts at each end of the curved pipe. These are usually plastic but can be chrome in older houses. Twist the slip nuts counterclockwise with your fingers or a wrench and, once the slip nuts are loosened, lift away the P-trap section of pipe.
- Use your gloved fingers, a stiff brush, or an unbent coat hanger to push out any apparent blockages.
When the job is done, reattach the plumbing, tighten the slip nuts securely, and don’t forget to turn the water back on!
Keep things flowing with a little preventative maintenance.Since a slow-draining sink is a problem that gradually escalates over time, you can minimize the chance of making a day of this by following a few basic precautions.
Photo: istockphoto.com
- When you see loose strands of hair in the sink, toss them into the trash rather than washing them down the drain. The same goes for gobs of toothpaste and soap: Better to wipe up than rinse away.
- If long hair often ends up in the sink, cover the stopper with a plastic or wire mesh hair catcher to collect hair before it goes down the drain during your grooming routine.
- Knock dirt and any other thick, heavy, or sticky materials into the trash before washing up.
- Make cleaning the sink stopper a part of your regular bathroom cleaning routine. Lift it out to wipe away hair, scum, and residue weekly.
- Regularly flush out the drain with very hot water to help melt away soap scum and sludge.
- Once each month or two, remove the stopper and pour a tablespoon of table salt and a quarter-cup of white vinegar into the drain, flushing the mixture away with hot water. This combination should loosen stubborn grunge before it builds into a clog.
Don't want to do it yourself?
Get free, no-commitment estimates from professional plumbers near you.
Find local plumbers
+How to fix a sink drain. Diagnosing a faulty siphon
Contents
- How to fix a sink drain. Diagnosis of a faulty siphon
- Do-it-yourself installation of a siphon on a sink. Siphon for washing in the kitchen: how to assemble and install it yourself
- Siphon device
- Connecting the sink drain to the sewer. Installing the faucet and connecting to the water supply
- Features of mounting the washbasin on the wall
- Washbasin drain with valve. Bottom valve for a sink: installation + Photo: Installing a bottom valve without overflow with your own hands
- Types of bottom valves
- Mechanical bottom valves
- Automatic bottom valves
- Installation of a bottom valve
- Installation of a mixer and a bottom valve
- )
- Installation of an automatic valve to an existing faucet
- Video how to clean the sink
How to fix a sink drain.
 Diagnosis of a faulty siphon
 In order to determine the causes of leakage, the siphon must be inspected and disassembled. This work does not require any tools, since the connection and disassembly are carried out exclusively by hand force. The use of various keys can only aggravate the situation, since plastic can burst under their pressure. This also applies to metal siphons. When assembling them, steel bolts are used, which, over the years of operation, firmly stick to the nuts and the body of the product. nine0043 If you find a leak in the drain system, do the following:
- Pour strong detergent into the drain hole. After a while, rinse the drain system of the sink with boiling water. This technique will remove dirt, plaque, food waste and all fat deposits from the pipes and siphon, which will greatly facilitate further work.
- Prepare a bucket and rags to collect the liquid that will inevitably spill when disassembling the siphon. In order not to breathe sewer gases, you need to buy a plug that is the same size as the drain pipe.
 In modern plastic systems, pipes with a diameter of 50 mm are used. Prepare liquid soap to lubricate the rubber cuff. nine0002
 Prepare a bucket to collect the liquid
- Use a plunger to remove all water from the drain. Wipe the drain dry with a clean, natural cloth. Plug the drain with a cork and draw a few liters of water from the tap into the sink. Put rags under the siphon to collect flowing water.
Draining with a plunger
- Remove the plug from the neck. While draining the water, watch the siphon. Protruding drops or trickles will indicate the place where the malfunction occurred. In order not to get confused during the repair process, you can mark this place with a marker or take a picture on your mobile phone. nine0006
- Shut off the water supply and dismantle the siphon. When working with a plastic product, you should rely solely on the strength of your hands. When dismantling a metal drain, it is better to use electric tools. The bolt heads and nuts are cut off with a grinder, the remaining fragments are drilled out.
 After that, the siphon cover can be easily removed.
Do-it-yourself installation of the siphon on the sink. Siphon for sink in the kitchen: how to assemble and install it yourself
Even a novice can handle the installation of a siphon under the sink in the kitchen without resorting to the help of a specialist. The designs of modern siphons are designed to be assembled by hand, and only in rare cases may a screwdriver be required.
Siphon is a pipe (rarely several pipes) with a bend, which serves to drain dirty water into the sewer. It is thanks to the bend that a small part of the water remains in the pipe, forming a kind of sump. He, in turn, does not allow unpleasant odors and noise from the sewer pipe to enter the room. nine0003
Siphon device
Waste traps are most often made of chrome-plated brass or plastic (propylene, polyethylene, PVC). Brass products oxidize over time and accumulate dirt. It is better to give preference to a plastic siphon. Such a product does not corrode, does not rot, it is wear-resistant and durable.
Types of siphons for the kitchen
Let's consider a siphon device using a plastic product as an example. Siphon standard set includes:
- protective grille. It is installed directly in the drain hole of the sink and prevents large pieces of waste from entering the sewer.
- rubber plug. Designed to block the drain hole of the sink (usually there are no siphons in cheap models).
- rubber gasket 3-5 mm thick. It is located between the sink body and the outlet pipe.
- outlet. Some models of pipes have an additional outlet to which the washer/dishwasher drain or outlet for faucets with a waste valve is connected. nine0006
- Outlet rubber seal
- Outlet plastic nut
- Stainless steel connecting screw Ø 6-8 mm. In cheap models of siphons, these screws are made of simple iron with a thin coating of chromium or nickel. Such a screw is unreliable, quickly begins to rust and collapse.
 To buy a siphon with a quality screw, it is recommended to take a small magnet with you to check the metal (stainless steel is not magnetized).
 - metal nut. It can be brass, copper or stainless steel. Do not take a siphon with an iron nut. It will also quickly rust and will last no more than a year. nine0006
- siphon body in the form of a bottle or elbow.
- plastic tie nut.
- 2 rubber or plastic cones.
- sewer outlet. It is located on the side of the siphon body.
- nut of appropriate diameter for fixing the plastic adapter.
- siphon cover or bowl. This part more often than others has to be unscrewed to clean the siphon.
- large flat rubber gasket. It serves to tightly adjoin the lid (glass) of the siphon to the body. nine0006
- sewer outlet. It can be a flexible hose, a standard plastic pipe, a corrugated pipe, or a plastic spigot. It all depends on the model of the acquired siphon and the diameter of its outlet.
Connecting the sink drain to the sewer. Installation of the faucet and connection to the water supply
When working in the bathroom or in the kitchen, the installation of the faucet can also be carried out on a sink attached to the wall, only this process must be carried out in a certain sequence and before the sink is fully fixed. This is due to the fact that all work on connecting and fixing is done from below. nine0003
The faucet should be mounted in the following order:
- a fixing pin is screwed into it, depending on the type there may be two;
- To supply cold and hot water, hoses are installed, which are tightened with an open-end wrench. It is important to correctly calculate the force so that after installing the mixer on the plumbing fixture, you do not have to tighten it again;
- based on the connection diagram of the sink, it will be necessary to run water supply hoses that will be connected to the holes in the sink; nine0006
- On the reverse side, a rubber seal and a pressure washer are put on the mounting studs.
With the help of such elements, an easy fixation of the fastening nut is carried out;
- Use a wrench to tighten the fastening nuts.
installation of the sink and connection of the drain pipe to the sewer
Great attention must be paid to the correct location of the faucet spout, while the device itself must be installed at an even angle with respect to the wall to which the sink is attached. nine0003
Peculiarities of mounting the sink on the wall
After connecting the sink to the water supply, they proceed to the process of fixing it, while the work will be carried out in the following sequence:
If the sink is to be installed with a stand or pedestal, then you need to start with the installation of the supporting elements. nine0003
How to connect water hoses to the plumbing system?
First you need to install a special gasket between the valve and the packing nut, but the nut does not need to be tightened too much. Due to the use of a rubber gasket, a good seal is provided, while it is possible to tighten the nut after testing with the inclusion of water.
If leakage occurs, then tighten the nut at the connection point more tightly.
Washbasin drain with valve. Bottom valve for the sink: installation + Photo: Do-it-yourself installation of a bottom valve without overflow
Bottom valve for sink. Purpose of the bottom valve. Mechanical and automatic (types). Installation of a mechanical valve. Installation of an automatic valve with and without overflow. Main characteristics. Mounting features. You will learn about all this in our article!
Types of bottom valves
The bottom valve for a sink is an analogue of a rubber stopper. The difference between them is not only in aesthetics and hygiene.
The foot valve is operated by pressing a button. This device is designed to hold water in the sink, which saves water, and therefore money. nine0003
There are the following types of bottom valves:
- Mechanical
- Automatic
- With overflow
- Without overflow
Mechanical bottom valves
Mechanical valves operate by light pressure.
The basis of the mechanism is a spring!
Main features:
- Easy to install
- Long service life
- Fair price
Automatic bottom valves
The downside is that you have to put your hand into the water to drain.
Automatic close and open with a lever (button) The whole mechanism is located under the sink, which preserves the appearance of the faucet. The lever (button) itself is in most cases located behind the crane.
Benefits:
- Maintains the aesthetic appearance of the sink
- Easy installation
- Hygiene
Automatic valves come in two types with and without overflow. without overflow are not equipped with this outlet. nine0003
If the washbasin or sink does not have an overflow hole, then it is logical to install a valve without this function. The valves are available in three versions. Under gold, bronze and chrome-plated metal. Which one to choose is up to you.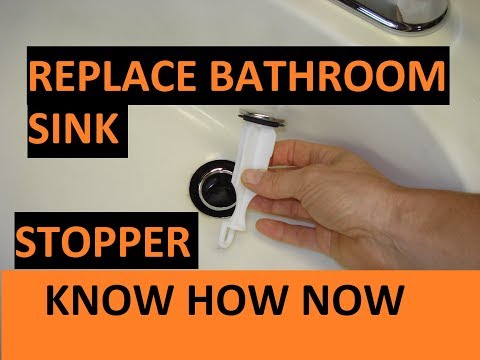
Installing the bottom valve
Installing the mixer and the bottom valve
You can install any valve yourself. Installing a mechanical valve is as simple as possible. The valve itself is inserted into the drain hole, fixed. A spoke is connected to the lever and the eye of the valve, it is responsible for opening and closing the plug. nine0003
After installation, the siphon is connected. The function of the valve and the presence of leaks are checked. If the device works and there are no leaks, the valve is ready for operation.
If there is an overflow hole, be sure to connect the hose to the siphon.
Automatic bottom valve (installation)
There are faucets with automatic valve equipped with overflow and without it. Consider their installation. Before installation, it is worth checking the length of the pipes (they are rigid and must be shortened)
When reducing the length of the pipes, be sure to flush the unit under running water in all directions for 3-5 minutes. This will help to avoid disruptions in operation. It is better to put the mixer on a sealant, which will increase the quality of fit and service life.
The valve is installed in the sink opening. The lever mechanism itself is immersed along with the mixer. After fixing, we connect all the pipes and hoses under the sink.
An airlock (bottle trap or tube trap) is placed in the drain and the valve spokes are folded into an equilateral cross. They are fastened with a self-tapping screw in a plastic cross shape. The ends of the spokes are connected according to the scheme: with a lever on one side and with a valve loop on the other. nine0003
Vertical translational movements will provide a future mechanism for draining water when the lever is pressed. If there is an overflow system, do not forget about it, connect it. We connect the lever of the mechanism to the valve and attach the siphon. We check for leaks.
Tubing and hoses can be bent but kept in a U-shape. The shape of pipes in the form of a zigzag is contraindicated.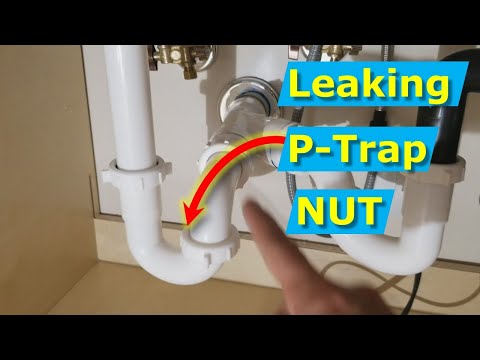 If there is a leak, it is recommended to disassemble the structure and tighten it up first.
In case of no result. We advise you to sort out the system and install again. In rare cases, a manufacturing defect is possible. Mixers equipped with a valve without overflow are installed in the same way. nine0003
Installation of an automatic valve to an existing faucet
There are bottom valves for faucets (these faucets have a hole for the lever). If there is none. The installation task is more difficult, but doable. To do this, you need a hole for a lever or button. If the sink is metal, then you can make a hole yourself. And install the valve in accordance with the instructions.
In the case of a ceramic washbasin there is an option. But it is worth buying a bottom valve with a side button. It can be mounted in the overflow hole. nine0003
Mechanical valve suitable for washbasin. The automatic valve is ideal for the kitchen. Submerging your hands in dirty greasy water is unpleasant.
Pay attention to the tools, it is good if they are without sharp corners. Line the sink before installation with cardboard or other material to avoid damage.
Gaskets take a special place during installation, do not forget about them. Tighten all nuts and bolts tightly.
Video how to clean the sink
Sink drain repair. Assembling the siphon: instructions on how to properly assemble for a sink (sink), for a bathtub
Contents
- Repair of the sink drain. Assembling the siphon: instructions on how to properly assemble for a sink (sink), for a bathtub
- Do-it-yourself installation of a siphon on a sink. Siphon for washing in the kitchen: how to assemble and install it yourself
- Siphon device
- The siphon falls under the sink. How to fix a siphon under a sink
- What are the siphons
- Why is the siphon dripping under the sink
- Troubleshooting
- How to repair the siphon
- Leak prevention measures
- Connecting the sink drain to the sewer.
 Installing the faucet and connecting to the water supply
 - Features of mounting the sink on the wall
- The siphon fell off the sink. #1 "Water soluble trap nut" how to solve p
- How to install a trap for a sink with overflow. Choosing and installing a siphon for a sink in a bathroom with an overflow
- Bottle siphons
- Corrugated and tubular siphons
- Video how to assemble the siphon for the sink
Repair of the sink drain. Assembling the siphon: instructions on how to properly assemble it for a sink (sink), for a bathtub
To ensure the rapid removal of dirty water into the sewer system, a siphon is installed under the sink. Replacing and installing this device can be a difficult task for some. This review will discuss how to assemble a siphon in the kitchen. In order to complete the installation, you need the right approach, and then even a non-professional will do the job. This does not require a specific tool, you only need a screwdriver.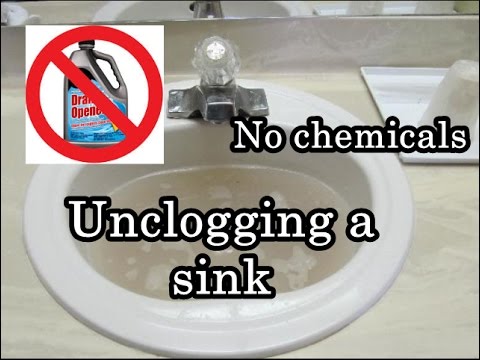 nine0003
Siphon assembly - detailed instructions
Siphon assembly is made to connect any plumbing fixture to the sewer. The design of the siphon contributes to the accumulation of water in it, so that the smell of sewer water does not penetrate into the room.
Bath siphon
These knee-type siphons are installed on cast iron, acrylic bathtubs. as well as shower trays. For this design, an overflow is required.
Illustrative diagram "How to assemble a bathtub siphon"
The principle of construction of different models of bath siphons is the same.
- The plug (1) made of rubber or plastic for the drain hole of the bathroom is attached with a chain to the overflow plate. The cork is needed to draw water into the plumbing fixture.
- Standard diameter 63 mm protective grate (2) is installed with a rubber seal (2c) on the bathtub drain. The task of the grate is to protect against the penetration of various objects into the sewer.
- Next, take the outlet pipe (4) At the top of the pipe there is a platform with a small ledge for gaskets (3) and embossed rings.
 This configuration will prevent the gasket from moving during installation. Place the gasket (3) in the correct position and press the outlet fitting firmly against the bath body. If the gasket is not tightly connected to the bathroom, a leak may occur. With your free hand, insert the connecting screw (5) with a diameter of 6-8 mm into the protective grille and screw it with an ordinary wide screwdriver into the nut (6), pressed into the body of the nozzle at the casting stage. nine0006
 - How to properly assemble the siphon in the next step? Now you need a removable siphon elbow (7) for assembly. This part is most often contaminated and has to be removed and cleaned. From above, a branch pipe and an adapter are inserted into the removable elbow.
To fasten the elbow to the branch pipe, a plastic compression nut (8) is put on the branch pipe, and a cone gasket (9) is placed under the nut. The elbow should be put on the nozzle to the desired height and tighten the nut. Next, the elbow is fastened to the adapter (10) using a coupling nut (8), into which a conical gasket is inserted. With an adapter, you can adjust the height of the siphon. nine0006
 - A flat gasket (11) is placed in the other nut of the adapter to make a strong connection to the sewer outlet, connecting to a cast iron or plastic pipe (50 mm diameter) also using a rubber flat gasket or a special collar if the outlet diameter is different. This completes the assembly of the lower part of the siphon.
- An overflow outlet (13) is located on the side of the nozzle. To it, with the help of a conical or flat gasket (15) and a coupling nut (16), a flexible harmonica hose (25 mm) is attached. nine0006
- The same nut with gasket connects the harmonica hose to the overflow pipe (17).
Do-it-yourself installation of a siphon on a sink. Siphon for washing in the kitchen: how to assemble and install it yourself
Even a novice can handle the installation of a siphon under the sink in the kitchen without resorting to the help of a specialist. The designs of modern siphons are designed to be assembled by hand, and only in rare cases may a screwdriver be required.
Siphon is a pipe (rarely several pipes) with a bend, which serves to drain dirty water into the sewer. It is thanks to the bend that a small part of the water remains in the pipe, forming a kind of sump. He, in turn, does not allow unpleasant odors and noise from the sewer pipe to enter the room. nine0003
Siphon device
Waste traps are most often made of chrome-plated brass or plastic (propylene, polyethylene, PVC). Brass products oxidize over time and accumulate dirt. It is better to give preference to a plastic siphon. Such a product does not corrode, does not rot, it is wear-resistant and durable.
Types of siphons for the kitchen
Let's consider a siphon device using a plastic product as an example. Siphon standard set includes:
- protective grille. It is installed directly in the drain hole of the sink and prevents large pieces of waste from entering the sewer.
- rubber plug. Designed to block the drain hole of the sink (usually there are no siphons in cheap models).
- rubber gasket 3-5 mm thick. It is located between the sink body and the outlet pipe.
- outlet. Some models of pipes have an additional outlet to which the washer/dishwasher drain or outlet for faucets with a waste valve is connected. nine0006
- Outlet rubber seal
- Outlet plastic nut
- Stainless steel connecting screw Ø 6-8 mm. In cheap models of siphons, these screws are made of simple iron with a thin coating of chromium or nickel. Such a screw is unreliable, quickly begins to rust and collapse. To buy a siphon with a quality screw, it is recommended to take a small magnet with you to check the metal (stainless steel is not magnetized).
- metal nut. It can be brass, copper or stainless steel. Do not take a siphon with an iron nut. It will also quickly rust and will last no more than a year. nine0006
- siphon body in the form of a bottle or elbow.
- plastic tie nut.
- 2 rubber or plastic cones.
- sewer outlet.
 It is located on the side of the siphon body.
 - nut of appropriate diameter for fixing the plastic adapter.
- siphon cover or bowl. This part more often than others has to be unscrewed to clean the siphon.
- large flat rubber gasket. It serves to tightly adjoin the lid (glass) of the siphon to the body. nine0006
- sewer outlet. It can be a flexible hose, a standard plastic pipe, a corrugated pipe, or a plastic spigot. It all depends on the model of the acquired siphon and the diameter of its outlet.
The siphon falls under the sink. How to fix a siphon under the sink
Every day you come to the kitchen, enjoy the smell of food, have a good time there, and do not even suspect the existence of one small, inconspicuous item that works every day for your comfort. His name is Siphon! His mission: to create a water plug under the sink so that “enemy” smells from the sewer cannot break through it and spoil your appetite. But, alas, it is remembered only when it fails. nine0003
What kind of siphons are there
Something tells me that in your kitchen it is the first type. Ask how do I know? It's just the most common of all. The lower part (in the picture two arrows go up from it) can be unscrewed, so it is very convenient to clean it, unlike the other two.
Materials can also be different, but the most common is the good old plastic. Unlike steel, it does not rust, but otherwise it does not differ much in its useful properties: it does not retain dirt, and it can also be cleaned even with aggressive chemicals, and at least henna for him. Of course, such a siphon is less durable, but it is not subjected to special loads, so this is not so important. nine0003
Why is the siphon dripping under the sink
There may be several reasons for this:
- Poor installation. It can include loose joints, misaligned threads, loose union nuts, and unsuitable gaskets.
- Blockage.
- Hardening and shrinkage of rubber seals (unfortunately, this is inevitable over time).
- Cracks or chips.
Now let's look at how to distinguish one problem from another.
Fault diagnosis
The very first thing that catches your eye is always a blockage. You turn on the faucet, and the water, instead of going down the drain, comes back. If there is no blockage, just inspect the siphon from all sides (yes, these are poems). So you can see cracks or chips. If nothing of the kind was found, it remains only to disassemble the siphon.
During the disassembly, you will notice all the flaws of the installation, if any. If everything is in order here, the last thing left is to check the gasket. It should fit in size, be soft and bendable, and also not have cracks. nine0003
Have you done all this and are you all right? Put it back together and the leak is still there? Let a professional plumber help you!
How to repair a siphon
If the problem is found, and you yourself have a mustache, and you don’t need any plumbers, then I will take over. More precisely, you will, of course, take it, and I will help with advice and good parting words.
Do you know that with 90% of problems in the computer, the advice helps: "Try turning it off and on again"? Here is the same diagram. Is the siphon leaking? Try taking it apart and putting it back together again. Honestly, it helps almost always! Except when the faucet is so "handicapped" that it ends up being even worse than it was, but you're not him, right? The more carefully and diligently you collect, the better for you. nine0003
In case of blockage, you don’t have to disassemble (unless, of course, you are the owner of a bottle siphon with a submerged tube, in other cases you have to), just unscrew the lower part and clean the sewer with a cable or wire. "Tiret" with "Mole" also help a lot.
The old gasket can be smeared with a thick layer of sealant or silicone gel and put back in place. So it will last a couple more years. But I still recommend replacing it with a new one, it will turn out more reliable and durable.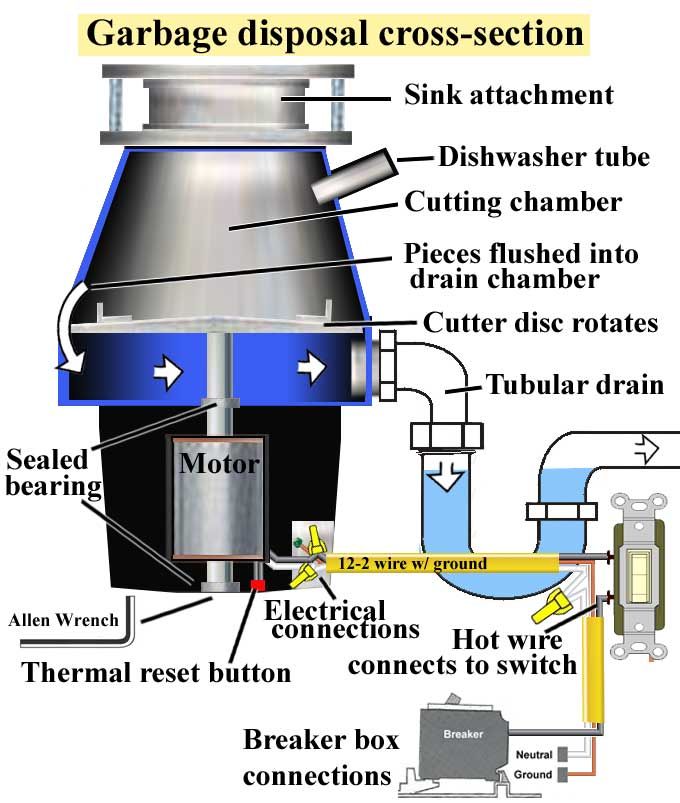 When replacing, you can cover only the joints with sealant, and it is enough to apply petroleum jelly or liquid soap on the gasket itself. nine0003
Same story with cracks and chips. It is better to replace the entire siphon. But the cases are different, and it is not always possible to do it right away, but you want to wash the dishes (How can you not want it? Of course you want to!). Then you can give the siphon first aid, and for this you need epoxy glue and a bandage or fiberglass. The crippled part is dried, processed with sandpaper and solvent. After that, the glue is diluted, applied to the damage and wrapped with a bandage or cloth. Such a siphon will last for some more time while you are looking for a replacement for it. nine0003
Measures to prevent leaks
Let's look at how to avoid each of these problems.
Everything is clear with the assembly: if there are straight arms, then everything will be in order.
As a preventive measure against blockages, the pipes can be periodically flushed with plenty of hot water.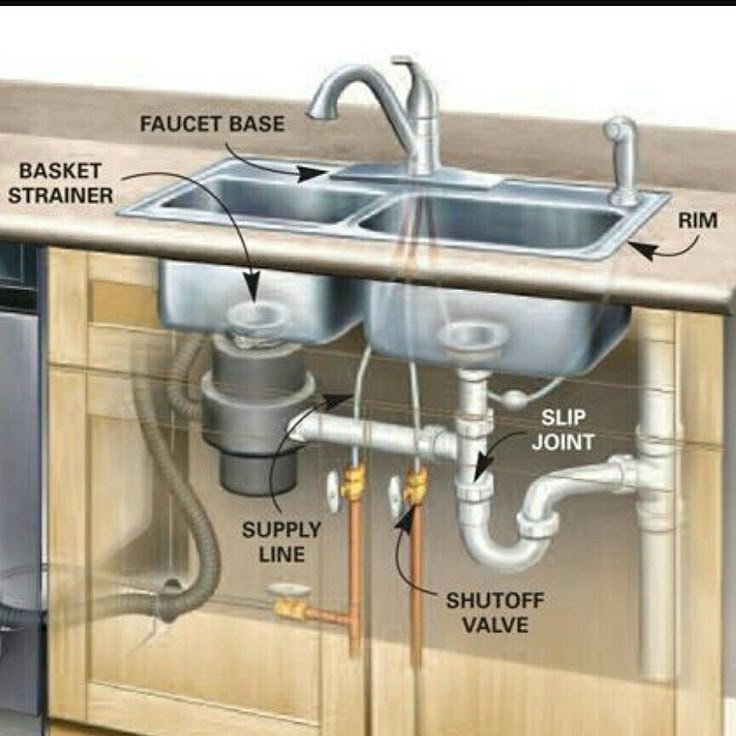 And to be sure, you can pre-fill the hole with soda or pour detergent.
Cracks and chips are formed from external influences. Don't beat your siphon, he doesn't deserve it! And to keep it away from the games of children and animals, an ordinary bedside table will help you. nine0003
But, alas, nothing will help against the wear of the gasket. So sooner or later you will have to face the need to replace it.
Take care of your siphon as it takes care of your noses! Then you don't have to take it apart to fix it.
Connecting the sink drain to the sewer. Installation of the faucet and connection to the water supply
When working in the bathroom or in the kitchen, the installation of the faucet can also be carried out on a sink attached to the wall, only this process must be carried out in a certain sequence and before the sink is fully fixed. This is due to the fact that all work on connecting and fixing is done from below. nine0003
The faucet should be mounted in the following order:
- a fixing pin is screwed into it, depending on the type there may be two;
- To supply cold and hot water, hoses are installed, which are tightened with an open-end wrench.
 It is important to correctly calculate the force so that after installing the mixer on the plumbing fixture, you do not have to tighten it again;
 - based on the connection diagram of the sink, it will be necessary to run water supply hoses that will be connected to the holes in the sink; nine0006
- On the reverse side, a rubber seal and a pressure washer are put on the mounting studs. With the help of such elements, an easy fixation of the fastening nut is carried out;
- Use a wrench to tighten the fastening nuts.
installation of the sink and connection of the drain pipe to the sewer
Great attention must be paid to the correct location of the faucet spout, while the device itself must be installed at an even angle with respect to the wall to which the sink is attached. nine0003
Peculiarities of mounting the sink on the wall
After connecting the sink to the water supply, they proceed to the process of fixing it, while the work will be carried out in the following sequence:
If the sink is to be installed with a stand or pedestal, then you need to start with the installation of the supporting elements. nine0003
How to connect water hoses to the plumbing system?
First you need to install a special gasket between the valve and the packing nut, but the nut does not need to be tightened too much. Due to the use of a rubber gasket, a good seal is provided, while it is possible to tighten the nut after testing with the inclusion of water.
If leakage occurs, then tighten the nut at the connection point more tightly.
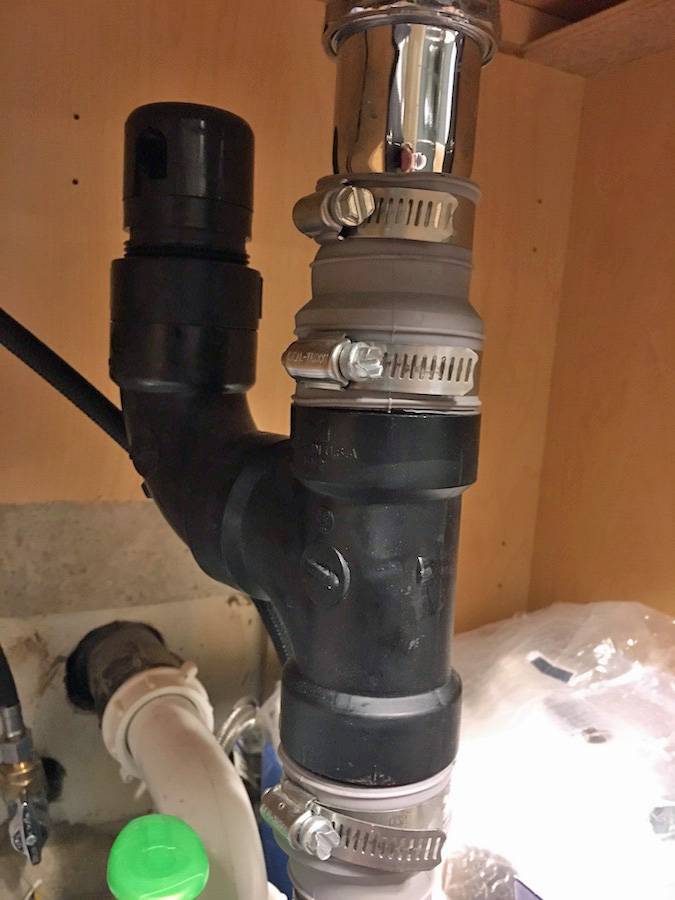
The siphon has fallen off the sink. #1 "Water soluble siphon nut" how to solve p
Good afternoon. I ask for help in solving the problem. 3 years ago, I had to change the cast-iron pipes to plastic ones, and with them, the natural and cast-iron siphons were replaced with plastic ones. Since then, we began to "siphon fall". The siphon in the bathroom was the first to fall, and we never found the nut . .. but the plumber did not believe me that the nut could disappear without a trace. The second, after a couple of weeks, the siphon in the kitchen fell off, and, taught by bitter experience, I left everything as it was, so that the plumber who came was able to personally verify that the nut also disappeared in this siphon almost without a trace, leaving behind only a little brown goo. The nut was replaced, a little over a year has passed and here is a new siphon drop this week. This time, the plumber dug out only a thin ring - all that was left of the nut, which (in the singular keeps the entire structure in working order). There is not a single thread left on this nut! This nut was replaced again, (the screw remained the same) the siphon was fixed, but now I understand that, it turns out, there are time bombs in my kitchen and bathroom, which can work as soon as the next nut rusts to the base, and as soon as it falls off , then the entire contents of the sink or sink will simply pour onto the floor again.
 And this despite the fact that I have never cleaned the pipes with any cleaning products like "Mole". That is, only water + ordinary dishwashing detergent is poured onto the nuts. Please help, tell me what type and where you can buy nuts that are not soluble in water (screws do not fall apart) for siphons, or maybe there are some plastic siphons of a more reliable design that do not suddenly fall off for the apartment owners and their neighbors living on the floor below . Thank you. nine0003
How to install a siphon for a washbasin with overflow. Choosing and installing a siphon for a bathroom sink with overflow
Siphons for bathroom sinks with overflow are an important part of the sewer structure. Outwardly, they represent a system of tubes interacting with each other, which not only allow the discharge of used water into the sewer, but also prevent the entry of an unpleasant odor into the apartment.
The overflow also plays an important role, it prevents the sink from being overfilled with water and creates additional water drainage.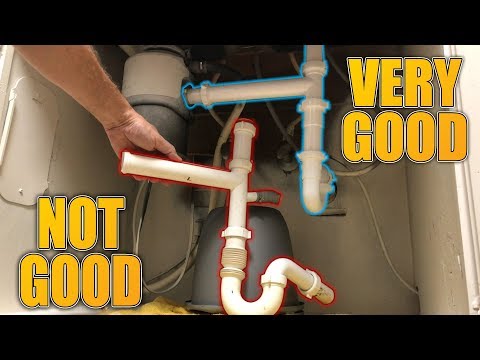 The siphon is placed on all types of plumbing. Over the years, it will need to be cleaned, repaired and replaced. There are several types of siphons that are designed to be installed on the sink. Between themselves, they differ in shape, material of manufacture and type of water seal. nine0003
Bottle siphons
These siphons with overflow for wash basins have a characteristic bottle shape. This is especially true for the septic tank. Two tubes are connected to its middle part. One leads to the sewer, and the second leads to a drain in the plumbing. If it is planned to install a siphon for a washbasin, then, perhaps, there is no better design for it.
- The advantage of this system lies in the ease of mounting and dismounting.
Among the shortcomings of this system, it is necessary to single out a large number of connections. As a result, this can cause a leak.
Corrugated and tubular siphons
This design is not without reason considered the simplest of all types of siphons.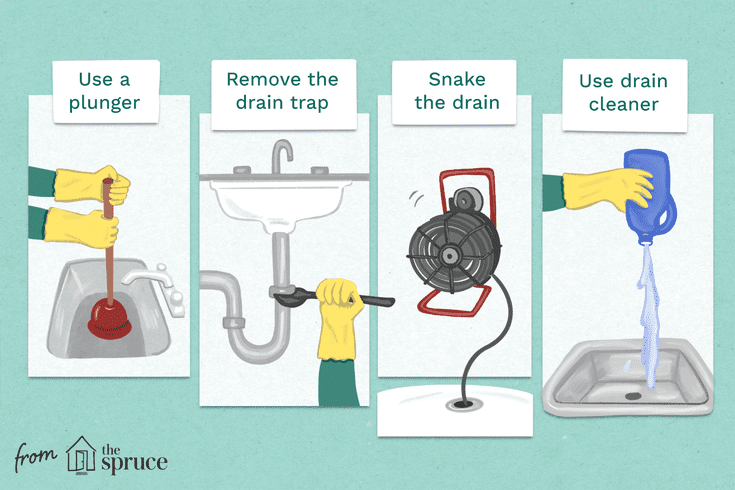 Outwardly, it looks like a curved tube. Its fixation is carried out not with the help of threads, but with clamps. On the one hand, this avoids small leaks, and on the other hand, it complicates installation and dismantling.
To drop a small change into such a structure is definitely to create a headache for yourself to extract it. At the same time, a large number of bends and plasticity of the material make it possible to install it in almost any hard-to-reach place.
- The bottle trap can be placed at a certain height from the sink to the floor. With regard to the corrugated appliance, the position of the sink practically does not matter. Made of corrugated plastic, the siphon bends easily, and its water trap can even be placed away from the sink, thereby saving space. nine0006
- On the other hand, a flexible tube clogs faster. After all, the corrugated surface of the tube is not only outside, but also inside. If such a siphon becomes clogged, then all its elements will have to be dismantled.

Learn more