Shrubs from cuttings
Propagate Your Shrubs From Softwood Cuttings
I have propagated thousands of new shrubs from softwood cuttings. That may sound like a lot, but since I’m a propagator at a nursery, it’s all in a day’s work. To successfully propagate such a large number of shrubs requires specially designed hoop houses and state-of-the-art misting and heating systems. It’s also handy to have helpers to carefully monitor the health and well-being of each cutting.
On a smaller scale, though, it is possible to propagate deciduous shrubs from cuttings taken during the summer without the all the high-tech machinery and costly gadgets I have at the nursery. By creating favorable conditions, using the right tools, which are actually quite simple, and being patient, you can achieve success with softwood cuttings at home, too.
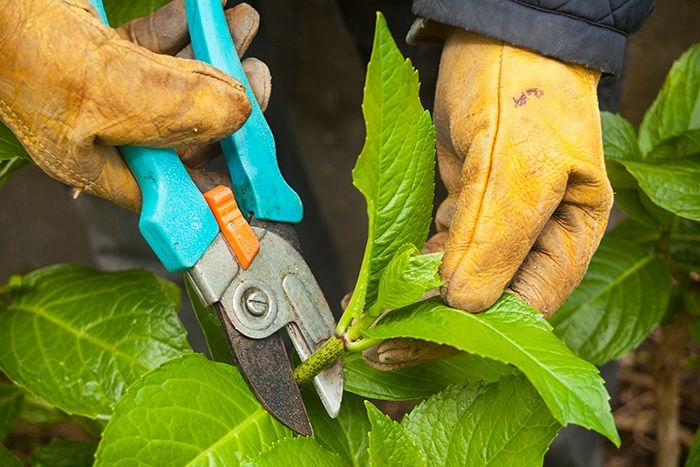
Harvest cuttings from semi-ripe growth
The trickiest part of propagating shrubs from softwood cuttings is knowing when a shrub’s stems are ready to be cut. Softwood, the section of a shrub’s stem that’s neither brand new nor fully mature, is the stage of growth on a deciduous woody plant that is best suited for rooting (for details, see “Softwood is neither green nor woody,” below). The newer, green growth that lies at the end of the stem will rot before roots are produced, and the older, more woody growth at the base of the stem has a harder time putting out roots.
Softwood cuttings can be taken from most deciduous shrubs in June and July and sometimes into early August. I determine a stem’s maturity by taking it in my hand and bending it. If the stem breaks with a characteristic snapping sound, it is in the softwood stage and ready to be harvested as a cutting. If the stem is still too green, it will bend but not break. If the stem is entering the woody stage, it won’t bend at all.
Softwood is the term used to describe the stage of growth on a deciduous woody plant that’s neither the new, green growth at the end of a shoot nor the stiff, woody growth near the base of the stem. The softwood lies between the two. The best way to know if a shoot has reached the softwood stage is to bend it. If the softwood snaps, the shoot is ready to be taken as a cutting.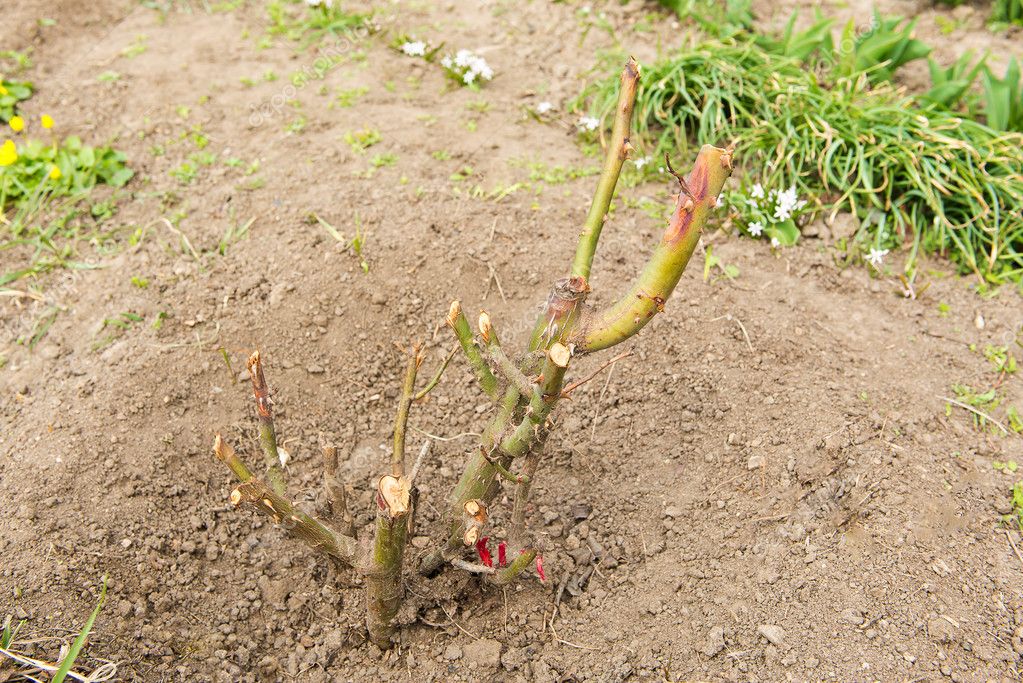 If the shoot is very flexible and doesn’t snap, it’s too green. If the shoot is not flexible at all, it is too far gone.
The best time to take cuttings is early in the day, when shoots are fully hydrated. Lateral shoots, or those that grow from a leader, make the best cuttings. I avoid weak, thin shoots, as well as overly thick, heavy ones. As soon as I take a cutting, I nestle it into a plastic basin that I’ve filled with damp paper towels. The towels will keep my cuttings moist and cool until I’m ready to head back inside and pot them up. They also shade my cuttings from the sun. Exposure to direct sunlight, even for only a few minutes, can cause irreparable damage. I also avoid taking cuttings on hot days, when plants may be wilting.
Keep cutting short to conserve energy
3. Keep your cuttings cool and moist while collecting them. The author uses a plastic basin and moist paper towels to keep her cuttings fresh.4. Remove leaves to create wounds. The wounds allow the rooting hormone to can gain entry into the stem.
A cutting’s size is also something to consider. I like my cuttings to contain at least two sets of leaves. I use pruning shears to cut the stem from the shrub at about one inch below the second leaf node. Since the length between leaf nodes differs from plant to plant, the size of a cutting, using this rule of measurement, will vary. The average cutting should measure between 3 and 5 inches.
To prepare my cuttings for rooting, I remove the lower set of leaves to open up wounds on the shoot. It is at these wounded sites that rooting will occur. I also wound the end of the shoot’s tip by laying the cutting on its side and shaving away a strip or two of bark.
Use rooting hormone and provide good drainage
5. Cover the wounds with hormone to boost the shoot’s root-producing capability and to prevent rot.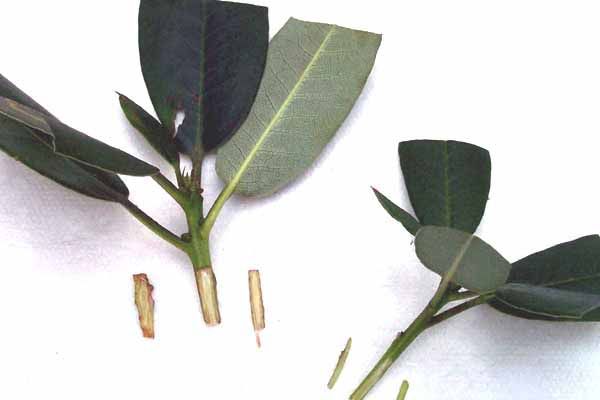 6. Trim each set of leaves to minimize transpiration loss.
After I’ve wounded the cutting, I dip the end of the stem into water and then into rooting hormone powder. Softwood cuttings root more successfully when a rooting hormone is used. The object when dipping cuttings in rooting hormone is to cover the wounds completely. Rooting hormone contains the same auxins already in the stem that initiate root production. Coating the stem with hormone boosts the plants’ natural mechanisms to produce roots.
I’m careful never to dip cuttings directly into a jar of rooting hormone powder for fear that the cutting may contain a contaminant. To be on the safe side, I empty a small amount of the hormone into another container and dip my cuttings into that.
Once a cutting’s wounds are coated with rooting hormone, I gently tap off any excess and insert the stem into a six-pack or seedling tray filled with a moistened mixture of perlite and soilless mix. The potting mixture we use at the nursery is 60 percent perlite and 40 percent soilless mix. This mix provides the good drainage and maximum aeration that new roots need. Cuttings placed into a mix that holds moisture is apt to rot before rooting occurs.
Once the cuttings are inserted into the soil, I trim the remaining leaves in half to cut down on transpiration loss. These leaves are still performing photosynthesis, even though there are no roots to draw moisture out of the soil. At this point, if I were propagating these cuttings for the nursery, I would move them into the propagation house where they would get bottom heat from a mat and moisture from a sophisticated misting system until roots develop.
7. Place stakes at the corners of each tray to support the roof of your mini-greenhouse.8. Water the trays well.9. Place the tray of cuttings into a plastic bag. This mini-greenhouse will keep the cuttings moist until roots develop.To mimic these conditions on a smaller scale, I stick small stakes into the corners of the six pack, then water the cuttings from the bottom. Finally, I tuck the tray into a plastic bag, which will create the humid conditions needed for rooting to take place. I then place the tray in a sheltered part of my garden that gets dappled sunlight and keep the cuttings moist until roots develop.
Check for root development
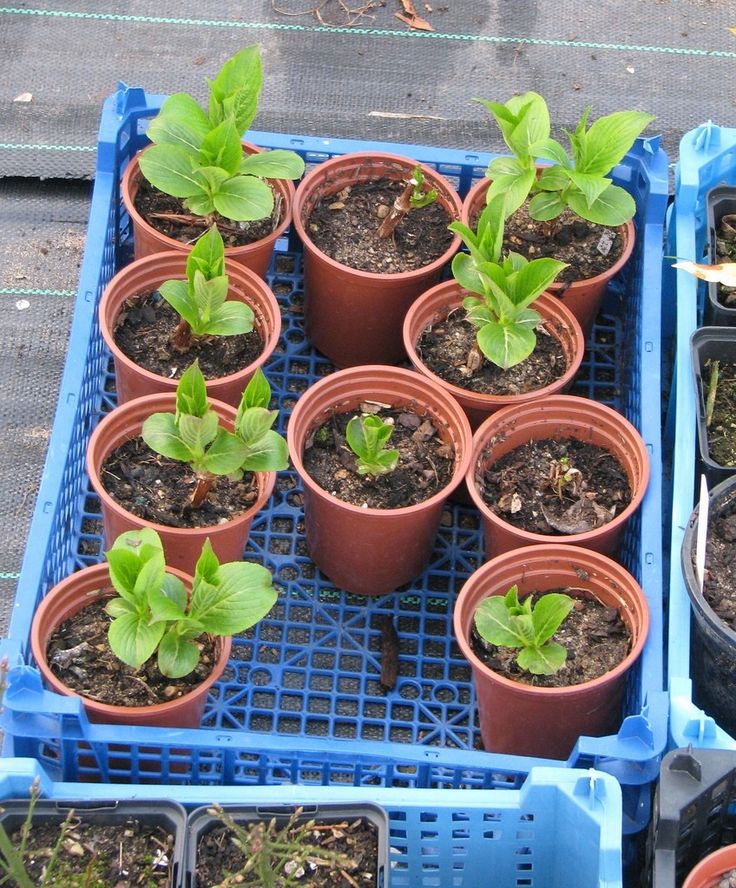
10. Monitor cuttings weekly for root development. These hydrangeas developed roots in three weeks.11. Pot up rooted cuttings into quart-size containers. Water them well, and transfer them to a sunny spot.Some cuttings root faster than others. I’ve found that the best way to check for root development is with my eyes. After four to five weeks, I can check the bottom of each tray for small white roots that may be poking out of the drainage holes. If none are visible, another way to check for root development is by gently pulling on a cutting. If it shows some resistance, then it’s a good bet that roots have developed. If it pulls out of the tray easily, I inspect the stem for very fine root hairs. If no roots are apparent, I place the cutting back into the tray, reseal the bag, and wait a few more weeks before checking again.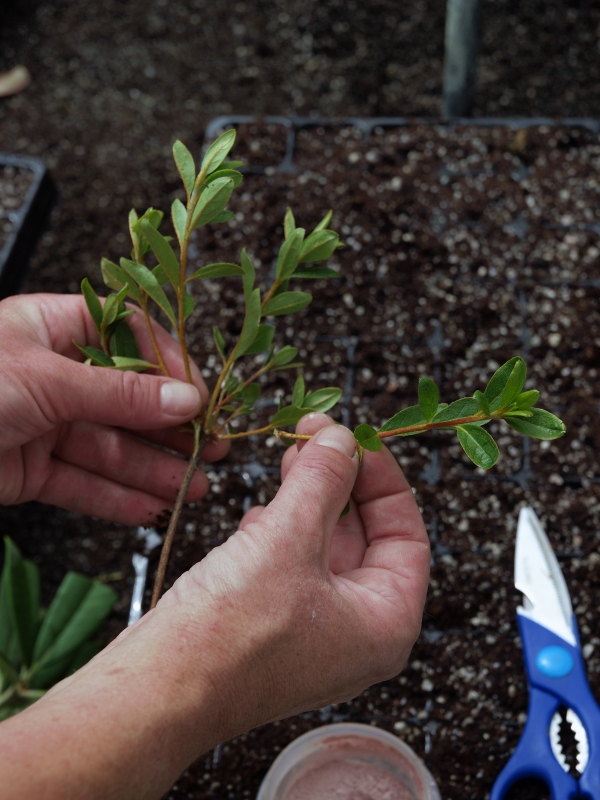
Depending on the species and the growing conditions, a healthy network of primary and secondary roots should develop after six weeks in the bag. My success rate varies from shrub to shrub, but generally I get roots on about 70 percent of my cuttings. Once they’ve rooted, I pot up my tiny new shrubs into one-quart pots that I’ve filled with a mixture of 80 percent soil and 20 percent perlite, water them with a nutrient-rich seaweed- or kelp-based fertilizer and place them in a sunny spot in the garden. In the fall, I unpot them and transfer them to a sheltered nursery bed where they’ll spend the winter. Come spring, I’ll have a good supply of shrubs that I can move to a new, more permanent home.
37 shrubs that are easy to propagate from cuttings
Many deciduous garden shrubs can be propagated by softwood cuttings taken in summer. The ones listed below tend to root quickly and grow into viable shrubs in a short period of time.
Beautyberry (Callicarpa japonica)
Beautybush (Kolkwitzia amabilis)
Blue mist shrub (Caryopteris × clandonensis)
Burning bush (Euonymus alatus)
Butterfly bush (Buddleia davidii)
Chinese stranvaesia (Stranvaesia davidiana)
Crape myrtle (Lagerstroemia indica)
Daphne (Daphne caucasica)
Deciduous azaleas (Rhododendron cvs.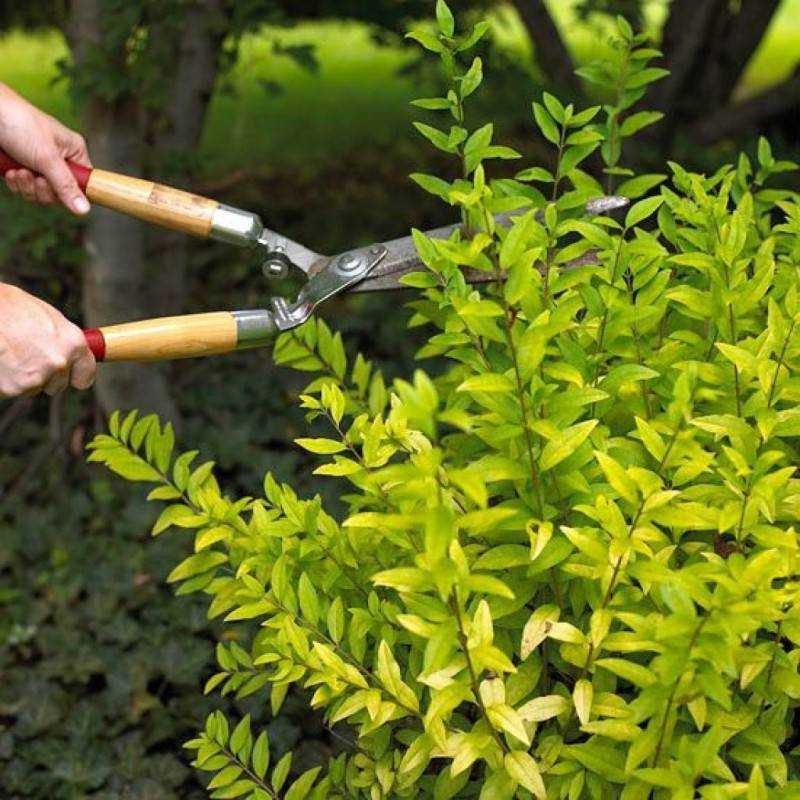 )
)
Elders (Sambucus spp.)
Enkianthus (Enkianthus campanulatus)
Flowering quince (Chaenomeles speciosa)
Forsythias (Forsythia spp.)
Honeysuckles (Lonicera spp.)
Hydrangeas (Hydrangea spp.)
Japanese maples (Acer palmatum cvs.)
Kerria (Kerria japonica)
Large fothergilla (Fothergilla major)
Lilac (Syringa vulgaris)
Magnolias (Magnolia spp.)
Mock orange (Philadelphus coronarius)
Redtwig dogwood (Cornus alba and sericea)
Rugosa rose (Rosa rugosa)
Serviceberries (Amelanchier spp.)
Slender deutzia (Deutzia gracilis)
Smoke tree (Cotinus coggygria)
Spireas (Spiraea spp.)
Stewartia (Stewartia pseudocamellia)
Summersweet (Clethra alnifolia)
Sweetshrub (Calycanthus floridus)
Viburnums (Viburnum × burkwoodii and carlesii)
Virginia sweetspire (Itea virginica)
Weigelas (Weigela spp. )
)
Willows (Salix spp.)
Wintercreeper (Euonymus fortunei)
Winter hazels (Corylopsis spp.)
Witch hazels (Hamamelis spp.)
Rooting Softwood And Hardwood Cuttings
General Tree Care
By: Heather Rhoades
Image by Lex20
Many people say that shrubs, bushes and trees are the backbone of garden design. Many times, these plants provide structure and architecture around which the rest of the garden is created. Unfortunately, shrubs, bushes and trees tend to be the most expensive plants to purchase for your garden.
However, there is one way to save money on these higher ticket items. This is to start your own from cuttings.
There are two types of cuttings to start shrubs, bushes and trees — hardwood cuttings and softwood cuttings. These phrases refer to the state the wood of the plant is in. New growth that is still pliable and has not yet developed a bark exterior is called softwood. Older growth, which has developed a bark exterior, is called hardwood.
How to Root Hardwood Cuttings
Hardwood cuttings are typically taken in early spring or early winter when the plant is not actively growing. But, in a pinch, hardwood cuttings can be taken anytime of the year. The point of taking hardwood cuttings in non-growth periods is more to do with doing as little harm to the parent plant as possible.
Hardwood cuttings are also only taken from deciduous shrubs, bushes and trees that lose their leaves every year. This method will not work with evergreen plants.
- Cut off a hardwood cutting that is 12 to 48 (30-122 cm.) inches long.
- Trim the end of the cutting to be planted just below where a leafbud grows on the branch.
- Cut off the top of the branch so that there are at least two additional leafbuds above the bottom leafbud. Also, make sure that the area left is at least 6 inches (15 cm.) long. Additional buds can be left on the branch if necessary to make sure the branch is 6 inches (15 cm.).
- Strip the bottom-most leafbuds and the topmost layer of bark 2 inches (5 cm.
 ) above this. Do not cut too deeply into the branch. You only need to take off the top layer and you don’t need to be thorough about it.
 - Place the stripped area in rooting hormone, then put the stripped end into a small pot of damp soilless mix.
- Wrap the whole pot and cutting in a plastic bag. Tie off the top but make sure the plastic is not touching the cutting at all.
- Place the pot in a warm spot that gets indirect light. Do not put in full sunlight.
- Check the plant every two weeks or so to see if roots have developed.
- Once roots have developed, remove the plastic covering. The plant will be ready to grow outdoors when the weather is suitable.
How to Root Softwood Cuttings
Softwood cuttings are normally taken when the plant is in active growth, which is normally in the spring. This will be the only time you will be able to find softwood on a shrub, bush or tree. This method can be used with all types of shrubs, bushes and trees.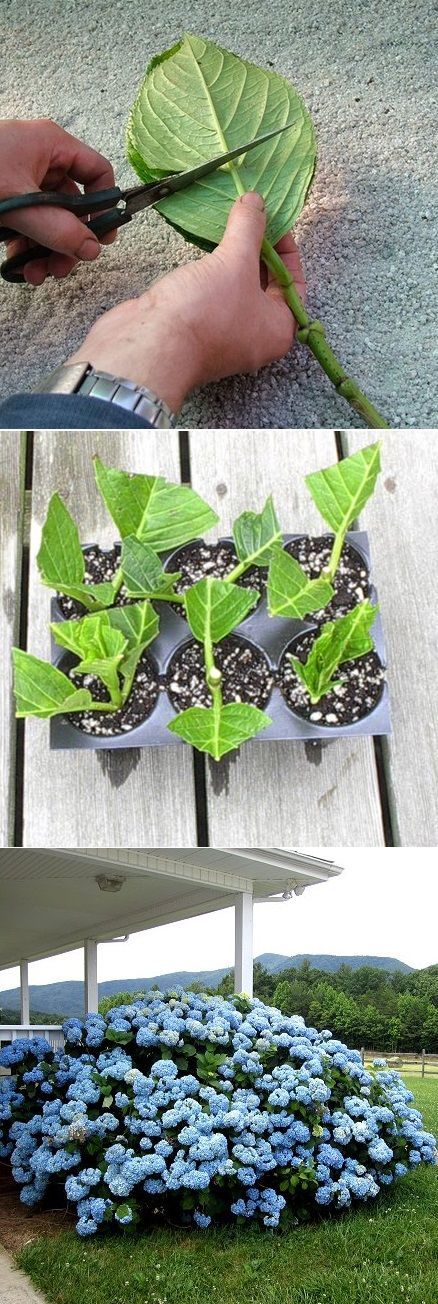
- Cut a piece of softwood off the plant that is at least 6 inches (15 cm.) long, but no longer than 12 inches (30 cm.). Make sure that there is at least three leaves on the cutting.
- Remove any flowers or fruit on the cutting.
- Trim the stem to just below where the bottom most leaf meets the stem.
- On each of the leaves on the stem, cut off half of the leaf.
- Dip the end of the cutting to be rooted in rooting hormone
- Put the end to be rooted into a small pot of damp soiless mix.
- Wrap the whole pot and cutting in a plastic bag. Tie off the top but make sure the plastic is not touching the cutting at all.
- Place the pot in a warm spot that gets indirect light. Do not put in full sunlight.
- Check the plant every two weeks or so to see if roots have developed.
- Once roots have developed, remove the plastic covering. The plant will be ready to grow outdoors when the weather is suitable.
This article was last updated on
Read more about General Tree Care
Next>
Did you find this helpful? Share it with your friends!
Cuttings of ornamental shrubs ⋆ how to properly cut cuttings
Cuttings of ornamental shrubs is the most responsible work to be done in June. Most of them are best cut from late June to early July. At a later date, the roots are formed, but do not have time to "ripen" and winter poorly.
Features of cuttings of shrubs
Rooting cuttings in a glass of water is not suitable for most shrubs. It can be used for a branch of mint or blackcurrant. For example, I grew a huge willow from a twig. Roots grown in water are fragile; when transplanted into the soil, they, as a rule, die off. Therefore, the plant actually has to grow roots twice: in a glass of water and in the soil. It is better to plant cuttings directly into the ground. nine0003
How to prepare soil for cuttings
Soil requirements: as light as possible, well worked, low in nitrogen. It is strictly forbidden to bring fresh manure, slurry or compost to where the cuttings will grow. The optimal substrate is peat mixed with sand. If the entire area is evenly manured or the soil is rich in nitrogen, the substrate (or at least sand) should be poured in a layer of several centimeters, not mixing with the bottom layer of the earth.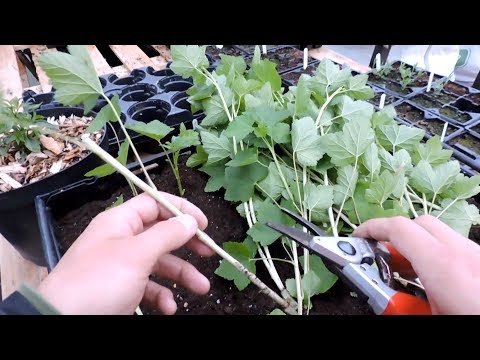
Charcoal added to the substrate helps fight infections. nine0003
Cutting conditions
Cuttings need high humidity at first. It can be created using plastic wrap, a glass jar, or a cut plastic bottle. In addition, diffused light is needed. This can be achieved:
- covering the glass jar on the south side with earth;
- covered with additional light-diffusing materials: lutrasil, gauze, burlap or polymer material, from which bags are now made;
- by placing the cuttings in the shade of a building or tree. nine0022
Cuttings of conifers, derain, vesicle, honeysuckle, mock orange, weigel take root better in the shade. For roses, hydrangeas, Kuril tea, phlox, physostegia, thyme, spirea, a greenhouse in the sun is suitable, but always covered with light-diffusing materials. A noticeable number of species do not care where the rooting takes place.
Cuttings of roses
Cuttings of park roses (especially wrinkled rose hybrids) root very poorly, it is more reliable to use root shoots.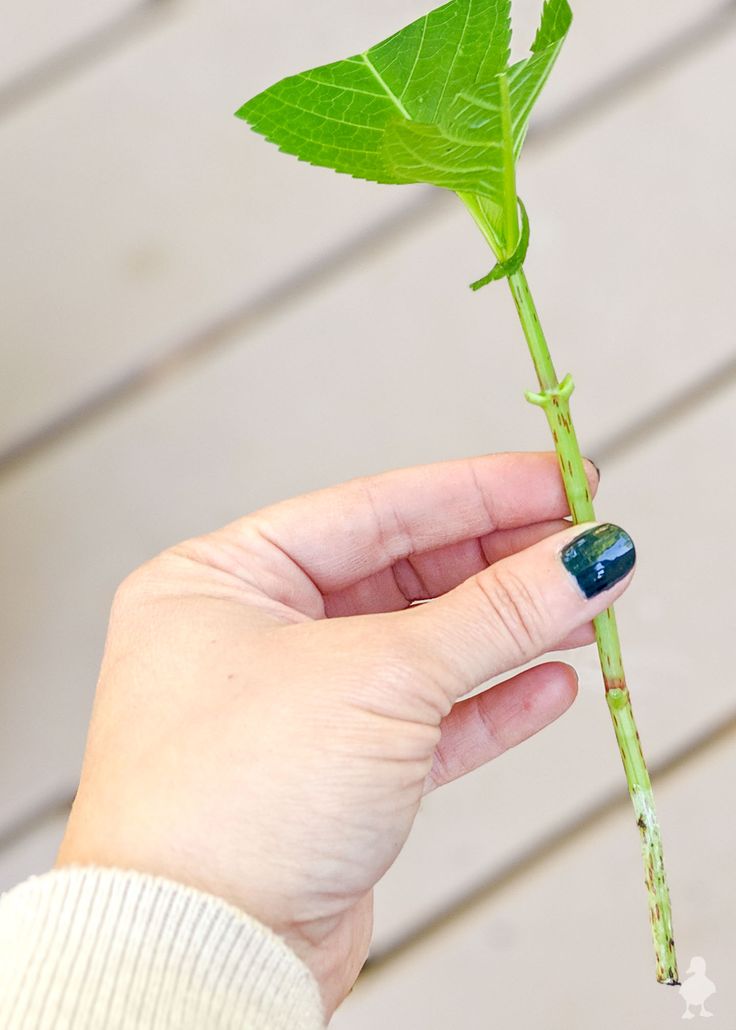 Roses from bouquets can, in principle, be rooted. The thinner the stem of such a rose and the less time it stood in the water, the higher the chances of growing the desired variety. nine0003
Roses take root better in warm summers, at temperatures around +25ºC … +28ºC. If the summer turned out to be cool, it is better to “warm up” the cuttings of roses. Dry leaves or hay are used to generate heat. They make the so-called warm bed.
Warm bed
The fertile layer of soil is taken out, organic materials are laid on the bottom, tamping, with a layer of 30 cm, sprinkled with granulated urea or other nitrogen fertilizers, watered with warm water (boiling water is also possible). The previously extracted soil is returned to its place, and a frame is installed above the bed and covered with a film. After three days, the decomposition of organic matter begins, after a week, rose cuttings can be planted. nine0003
How to make a cutting plant with your own hands
Dig up the soil, level it, layer the cutting substrate on top. Install the arcs, fix a plastic film on them, and on top - a light-scattering material. A cutting greenhouse can be small in size and height: at least 40 x 40 cm in area and 20 cm high, but more is possible.
Shortly before cutting, water the greenhouse and cover to create a humid atmosphere.
Preparing shrubs for cuttings
1 day before cuttings, water the mother bushes abundantly. It is advisable to treat those branches that you have outlined for cuttings with one of three drugs against fungal diseases: Fitosporin, Topaz or Fundazol. Preparations that include copper inhibit the growth of cuttings, so do not use them. For roses, additionally add "Fitoverm" to the solution to prevent the attack of a spider mite. During the day, the branches will be filled with moisture, the preparations will be absorbed and begin to act, increasing the resistance of the cuttings to infection (most of the cuttings die from it). nine0003
How to cut the cuttings
In the evening (closer to sunset) cut the branches with a razor or sharp pruner. Shoots should not be too thick (this reduces the chances of rooting). The optimal diameter is no more than that of a simple pencil, i.e. within 10 mm. In roses and viburnum, the flowering time or immediately after it is considered the optimal cutting time, although shoots with flowers are taken only from roses, Japanese spirea, Kuril tea. In other species, growth shoots are taken. nine0003
In conifers, the ability to root decreases with age, so young specimens are considered the best mother plants.
Further operations are best done immediately. However, the branches can be stored and transported for a short time, wrapped in a wet newspaper or cloth, wrapped in additional polyethylene. It is important that the cuttings are completely tightly packed and do not dry out.
Cut the branches into individual cuttings. The upper part of the branch with non-lignified soft tissues is not used for cuttings. For roses, a stalk with three leaves is considered standard. For hydrangeas and viburnum bulldenezh - with two pairs of leaves, for curly honeysuckle, lilac, weigela, mock orange (garden jasmine), forsythia, cuttings with three knots can be used. Whereas for species with small leaves (Kuril tea, spirea, conifers), the number of nodes is not important. It is better to make oblique cuts at the bottom of the handle and straight cuts at the top. nine0003
Coniferous cuttings, as a rule, are not cut - they are broken off by hand along with the "heel" (a piece of the main shoot). Immerse the lower parts of the cuttings immediately in water.
Preparing the cutting
Remove the leaves from the bottom of the cutting: there should be no leaves on the part that will be under the ground. In species with large leaves, it is customary to reduce the evaporating surface: shorten the top pair of leaves on the hydrangea by half. For roses with large leaves, remove the terminal leaf blade, leaving only the lateral ones. nine0003
Application of auxins
To accelerate rooting, the lower cut can be treated with auxins. Dissolve the drug in water and soak the bottom of the cutting according to the instructions. During processing, the leaves should be covered with a plastic bag to retain moisture. Usually processing time is about 18 hours. "Kornevin" is suitable for quick processing: it is enough to dip the bottom of the cutting soaked in water into the preparation powder and you can plant it.
I can say from my own experience that I used this method to root Actinidia cuttings in mid-July. The yield of seedlings was very high. Almost all cuttings gave roots, overwintered safely in the open field under a dry leaf. After 2-3 years they gave the first fruits. nine0003
Planting cuttings
There must be at least one node in the substrate. When disembarking, raise the edge of the shelter and immediately lower it so that the cuttings do not dry out. Don't forget the date and grade labels. The distance between the cuttings depends on the size of the leaves. You can plant closely, but so that the leaves do not touch each other. For roses, an average of 10 cm between rows and about 5 cm in a row. After planting, the cuttings can be watered with the remnants of the auxin solution and tightly closed with polyethylene and shading material. nine0003
Care of cuttings
The more often (and in small portions) you water the cuttings, the better. You can recommend daily watering in the evening with warm water. Remember, for all types of work, the film cannot be opened for a long time. Once a week (not more often!) Water the cuttings with a solution of auxin (Heteroauxin, Kornevin or another drug). This care should be followed until rooting or even until the cuttings are fully adapted to the open air in September.
Remove all dried and fallen leaves, spray with a fungicide once every 10 days after watering - this will increase the number of rooted cuttings. nine0003
References: "Perennials for landscape gardens", Vladimir Chub.
Propagation of shrubs. Division. Cuttings. Decorative flowering, deciduous. Care, cultivation. Photo - Botanichka
Three considerations may motivate you to grow shrub seedlings yourself. First of all, getting your seedlings gives you reason to be proud of yourself. Secondly, this is the only way to get a plant that you like if there is nowhere to buy it. And finally, growing your own planting material saves a lot of money. nine0003
Not all shrubs can be propagated at home, although there are some that are quite easy to propagate. There are different methods of vegetative propagation. The most effective for each given plant are mentioned in the corresponding description. Try propagating garden shrubs by division, layering or cuttings - you can gain a lot without risking anything.
Ornamental shrub© Matt Lavin
Propagation by division
Some shrubs form small bushes that can be dug up and divided like herbaceous perennials. When planting, the ground around the roots is compacted, the plant is watered abundantly. nine0003
Best time : Late autumn.
Examples of : Periwinkle, Lavender, Dabeokia, Ceratostigma.
In many shrubs, new shoots form at the base of the stems or grow from the roots. As a result, the bush grows strongly, and some part of it can be cut off and planted.
Best time : Deciduous - late autumn. Evergreens - early spring or September.
Examples of : White Derain, Magonia, Kerria, Skumpia, Hazel, Snowberry. nine0003
Propagation by cuttings
Shrubs with flexible stems are easy to propagate by cuttings; for some plants (for example, rhododendron and magnolia), this is a natural way of reproduction. To obtain layering of a shrub or liana, the shoot is pinned to the ground. After six months or a year, the rooted layers are separated.
Best time : Spring or autumn.
Examples of : Barberry, Magnolia, Heather, Rhododendron, Honeysuckle, Lilac, Camellia, Forsythia, Clematis, Chaenomeles. nine0003 Lilac
© Magnus Manske
Propagation from seeds
Propagation from seeds is a common way of growing flowers and vegetables. For propagation at home of woody plants, it is used infrequently. The seeds of such plants sprout with difficulty: some germinate only after a few months, others need a long stay in the cold to germinate. Shrubs grown from seeds will achieve decorativeness only after a few years, moreover, with seed propagation, cultivars degenerate. However, some shrubs are easily propagated from seed. nine0003
Examples of : Gorse, Clerodendron, Cistus, Potentilla, Leucesteria, Sea buckthorn.
It is better to start in the spring. Fill the flower pot with soil. Lightly compact and water the compost. Rarely sow the seeds. If the seeds are large enough, spread them over the surface at some distance from each other. Sprinkle large seeds with soil, leave small ones on the surface. Place a plastic bag over the pot and secure with a rubber band. Place the pot in a shady area. The best temperature for germination is 18-21°C. As soon as the seeds hatch, move the pot to a bright place, but not under direct sunlight. Remove the bag, water, and turn the pot regularly to keep the plants from pulling to one side. When the seedlings are large enough to pick up with your fingers, poke the seedlings into small peat pots. nine0003 Ornamental shrubs
© magnolia1000
Propagation by cuttings
A cutting is the separated part of a shoot or root of a plant. Usually shoot cuttings are used. From a specially prepared and rooted cutting, a plant identical to the parent subsequently grows. There are some general rules for cuttings. The cuttings are planted immediately after cutting, the compost near the cutting is compacted. Do not try to remove the cutting from the soil to see if roots have appeared; The best sign that the stalk has taken root is the hatched buds and the appearance of new shoots. nine0003
Propagation by non-lignified or semi-lignified cuttings
Cuttings with green leaves are taken from spring to mid-summer. In some cases, root shoots are used for these purposes. Some shrubs propagate by cuttings with non-lignified stems, but the main method of propagating woody plants is by semi-lignified cuttings, in which the growth of the current year is lignified at the base, and the top is still soft, green. As a rule, semi-lignified cuttings are selected with a “heel”. Do this from mid-summer to early autumn. nine0003
- Tip cutting : 3-15 cm depending on the size of the mother plant. Trim the leaves from the bottom half of the cutting. Make a straight cut under the internode. Dip the end of the cutting in the phytohormone solution.
- Heeled cutting : Separate the side shoot with the heel. Trim the leaves from the bottom half of the cutting. Dip the end of the cutting (2-3 cm) into the phytohormone solution.
- Fill a 12 cm flower pot with soil. nine0021 For cuttings of large-leaved plants, cut the leaves by half.
- Make an indentation in the soil with a pencil.
- Place the cutting in the hole and compact the soil around it with a pencil.
- Carefully water the cutting.
Rooting in the greenhouse
Place potted cuttings in the greenhouse. Shade the frames, ventilate in the heat. Water as needed. In case of frost, cover the glass with burlap.
Pick off yellowing or rotting leaves. In the spring, plant rooted cuttings in a temporary place. At the end of the season, transplant to a permanent place. nine0003 Ornamental shrub
© MPF
Rooting in greenhouse
Place pots with cuttings in greenhouse. Maintain a temperature of 18-24 ° C in it. In the heat, shade the greenhouse and ventilate.
Transfer pots with rooted cuttings to a frame greenhouse. Cut off yellowing or rotting leaves. In the spring, plant rooted cuttings in a temporary place. At the end of the season, transplant to a permanent place.
Propagation by lignified cuttings
Many woody plants are propagated by such cuttings. Cuttings are taken from well-ripened shoots of the current year in late autumn. nine0003
- In a well-drained area, preferably in partial shade, dig a trench 15-20 cm deep with one vertical wall.
- Fill the bottom with 2-3 cm of sand and peat mixture.
Learn more