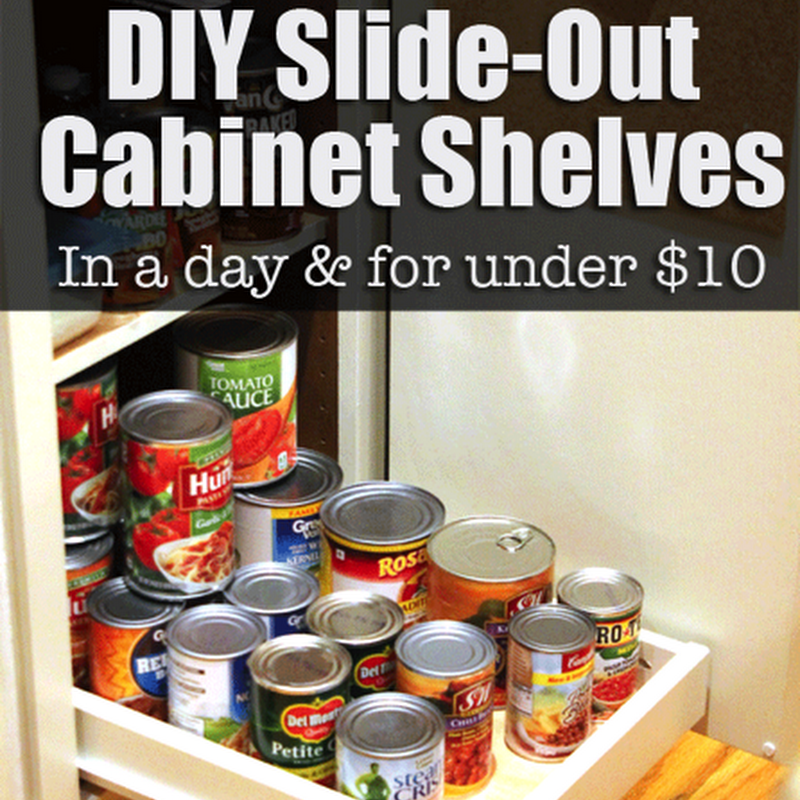
How to build pantry shelf
How to Build Pantry Shelves
By
Kamron Sanders
Kamron Sanders
Kamron Sanders is a home improvement expert and writer with over 15 years of hands-on construction, remodeling, woodworking, home repair, and landscaping experience. He has also written for HGTV. Kamron's expertise ranges from troubleshooting saws and lawnmowers to painting kitchen cabinets.
Learn more about The Spruce's Editorial Process
Published on 12/09/22
Lourdes Balduque / Getty Images
Project Overview
Whether your pantry doesn't currently have shelving or you're simply after a functional, stylish upgrade, DIYing your own pantry shelves is the way to go. With custom wood shelving, you can easily increase the storage and organizational potential of your pantry, while creating a visually pleasing space you'll be dying to show off. You have to look at your pantry every day, so why not make it something worth looking at?
Before You Begin
The key to maximizing the efficiency of your pantry as well as the storage and organizational potential is to design a layout that fits the space and is adaptable. Trying to fit too many shelves or overly customize the layout may seem like a good idea, but it will often come back to bite you, as your use of the space may change over time.
Laying Out Your Pantry
Start by heading to your pantry and measuring a few staple items like cooking oils, cereal boxes, and anything else that comes in taller containers. At least one of your shelves should feature enough vertical space to accommodate these items.
For smaller items, consider shopping for storage containers and round-up baskets and bins before designing your shelf layout. Knowing what pantry storage options are available beforehand will greatly aid in determining shelf depth and height.
Locating Studs
Thoroughly planning your pantry's layout is important, but not as important as locating the wall studs. Without locating and fastening your shelving to the studs, the strength of your shelves will greatly suffer.
Consider Additional Lighting
When you add wood shelving to a small pantry space, things can get hard to see quickly.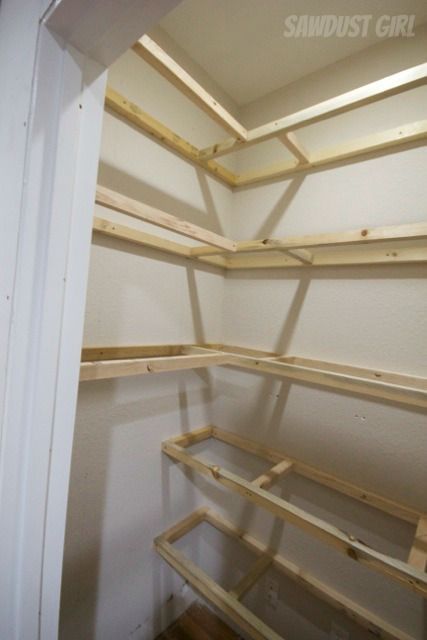 Unlike wire shelving, which allows light to pass through from shelf to shelf, a wood shelf will totally shadow the shelf below it. So, it may be worthwhile to consider alternative light sources such as low-voltage strip lighting beneath the shelf. Furthermore, dark colors, while undeniably beautiful, can make a pantry even more difficult to navigate.
Types of Wood
- Frame: For the shelf frames, 2x2 pine lumber is ideal, as it is inexpensive and strong. And, while pine isn't the prettiest wood, the frame members will be totally hidden once the shelves are complete.
- Shelf: Finish-grade plywood is ideal for the shelves, as it can be cut to a variety of widths while maintaining a low cost per shelf. The unsightly plywood edge can easily be covered with a front trim piece.
- Front trim piece. The front trim piece is the most important visual piece. If you plan to stain, pine will work, but you may consider poplar or even oak for a more elegant look.
 If painting, any wood that is smooth and free of knots will do.
Staining vs. Painting
Whether you stain or paint your pantry shelves is totally up to you, but there are a few things to keep in mind when making the decision:
Staining
Requires more expensive stain-grade wood
Harder to hide imperfections like joints and nail holes
Soft woods and plywood requires pre-stain wood conditioner to prevent blotchiness
Painting
Lighter colors can brighten a small pantry
Easy to hide imperfections like joints and nail holes
Painting raw wood requires a primer coat
Safety Considerations
The steps below outline how to build floating pantry shelves with no visible hardware. However, if your pantry is more than 6 feet wide or you plan to load the shelves up with heavy items like canned goods, adding at least one vertical support column that ties the shelves together aren't a bad idea.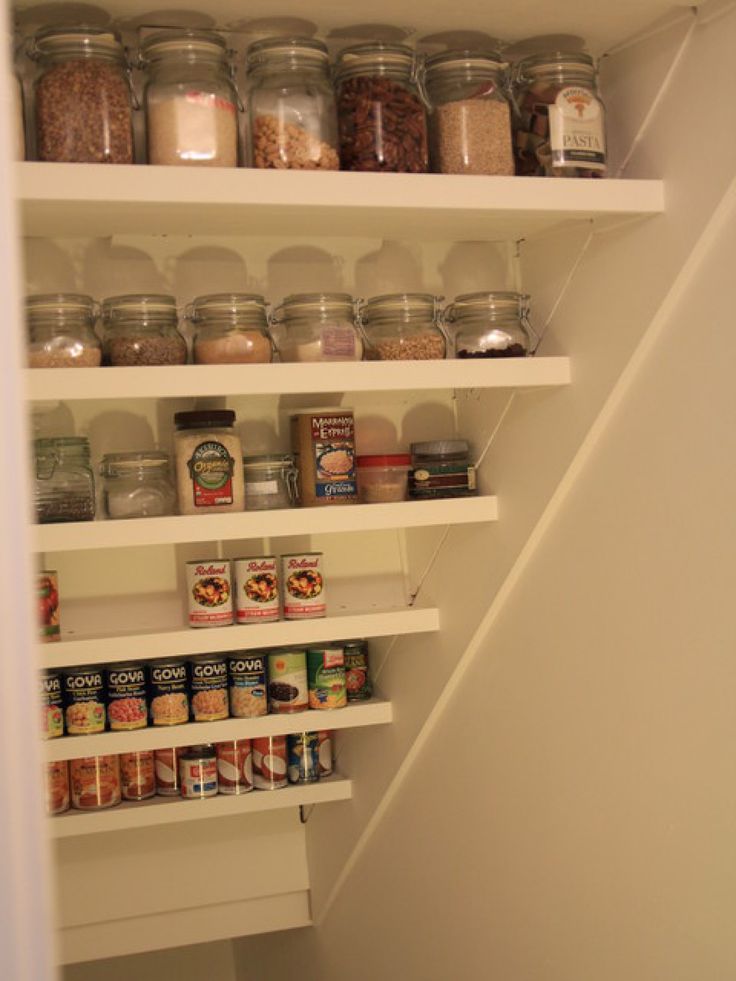
Equipment / Tools
- Measuring tape
- Circular saw or table saw
- Miter saw
- 4' level
- Pencil
- Brad nailer or hammer
- Stud finder
- Chalk box (optional)
- Orbital sander
- Painting supplies (optional)
- Staining supplies (optional)
- Safety glasses
- Dust and fumes mask
Materials
- 2x2 x 8' pine boards
- 1x3 x 8' lumber
- 1/2" x 4' x 8' finish-grade plywood sheet
- 1-1/2" brad nails
- Self-tapping 3-1/2" wood screws
- Heavy-duty drywall anchors (optional)
- Wood glue
- Wood filler
- 220-grit sandpaper
- Stain or paint (optional)
- Primer (optional)
- Pre-stain wood conditioner (optional)
How to Build Pantry Shelves
-
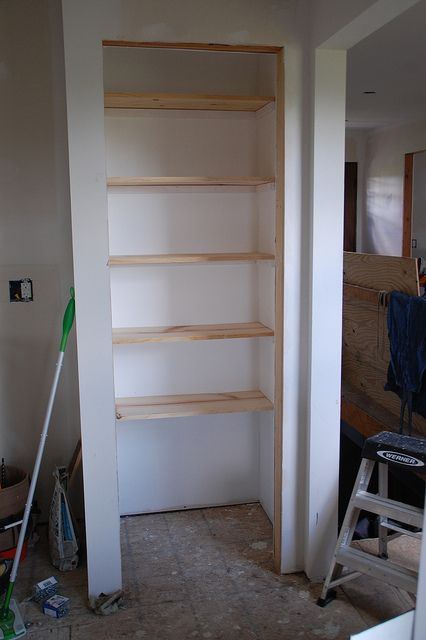
Measure and Mark Vertical Shelf Placement
Using your pantry items as your guide, mark your shelves' vertical placement using a level.
 Mark the back wall as well as the side walls. Remember to account for the shelf and shelf frame thickness, which is 2 inches. So, if you're planning for 10 inches between each shelf, mark the walls at 12 inches.
 -
Locate and Mark Studs
Use a stud finder to locate and mark the studs on each of your horizontal lines. Finding multiple studs on the back wall should be no problem, but there's a chance you may not find more than one on the side wall. In this case, use heavy-duty drywall anchors.
-
Cut Frame Pieces
Each shelf frame will resemble a ladder. A front and back board will span the full width of the wall, while multiple short "rungs" will tie the two pieces together and support the middle. All frame pieces will be cut from 2x2 lumber.
For each shelf, cut a front and backboard to the full width of the wall. Cut the rungs to the full depth of the shelf minus 3 inches. So, if you're building a 12-inch-deep shelf, cut the rungs to 9 inches.
 The number of rungs needed will depend on the width of your shelf, but plan for one every 12-16 inches with one flush on each end.
 -
Partially Assemble Frames
Partially assemble each shelf frame by screwing 3-1/2-inch wood screws through the back boards into the end of each rung, leaving the front piece unattached until later.
Tip
Screwing through soft pine is fairly easy without the need to drill pilot holes. Splitting will rarely occur, especially if you use self-tapping wood screws. However, splitting is more likely at the end of the board, but drilling pilot holes will prevent this.
-
Mount Frames
Place the backboard against the wall. After ensuring the board is aligned with the mark on the wall, screw through the board into each marked stud using 3-1/2-inch wood screws. Adjust each side rung until it sits level and screw it into the marked studs.
-
Attach Front Frame Member
Lift the front frame member into place and fasten it to the mounting portion of the frame by screwing through the front piece into the end of each rung.
 Start with the end rungs to ensure the piece sits level, then attach the rungs throughout the middle.
 -
Cut Shelf Pieces
Cut each shelf piece out of finish-grade plywood. To determine the dimensions for each shelf, use the exact dimensions of the frames. If you don't have a table saw for making precise cuts on plywood sheets, mark perfectly straight lines using a chalk box, then use a circular saw.
To do this, mark the length of your cut on each side of the plywood, stretch the chalk box line across the plywood, and pop the line, linking the two marks with a perfectly straight line. Turn the sheet 90 degrees and mark the depth of the shelf on each side, then repeat the process. Cut along the chalk lines.
-
Mount Shelf Pieces
Apply a bead of wood glue on top of every frame member and set the shelf in place. Use a hammer and brad nails or a pneumatic brad nailer to secure the shelf. Small brad nails are all that's necessary, as the glue will do the majority of the holding once it dries.
-
Cut Trim Piece
To cover the edge grain of the plywood and the front frame piece, cut a 1x3 to the full length of the shelf. If you have access to a table saw, rip the 1x3 to two inches to perfectly match the thickness of the shelf and frame.
-
Attach Trim Piece
Apply a layer of wood glue to both the trim piece and the frame and shelf edge. Align the top of the trim with the top of the shelf, then secure the trim using brad nails.
-
Mount Remaining Shelves
Follow the steps above to mount additional shelves.
-
Fill Nail Holes
Fill each brad nail hole with wood filler, sanding smooth once dry. If you plan to stain the shelves, choose a stainable wood filler. If you plan to paint, any wood filler will do.
-
Sand the Shelves
Sand the shelves and the front trim pieces until smooth. Be sure to sand any excess wood filler. Once finished, remove all dust.
-
Stain the Pantry Shelves (Optional)
If you desire to stain the shelves to maintain the visible wood grain, follow this process:
- Apply a pre-stain wood conditioner. This will prevent the stain from being blotchy.
- Once dry, follow with your stain of choice, following the manufacturer's instructions for drying times.
Warning
Whenever staining or painting in a confined area, always wear a mask rated for fumes and allow the area to thoroughly air out before operating without a mask.
-
Paint the Pantry Shelves (Optional)
If you prefer to paint the pantry shelves, follow this process:
- Prime the raw wood.
- Once dry, sand the primer if specified by the manufacturer's instructions.
- Caulk the gaps around the shelves and the joint between the front trim piece and the shelf and let dry.
- Paint the shelves.
How to Add Corner Shelves
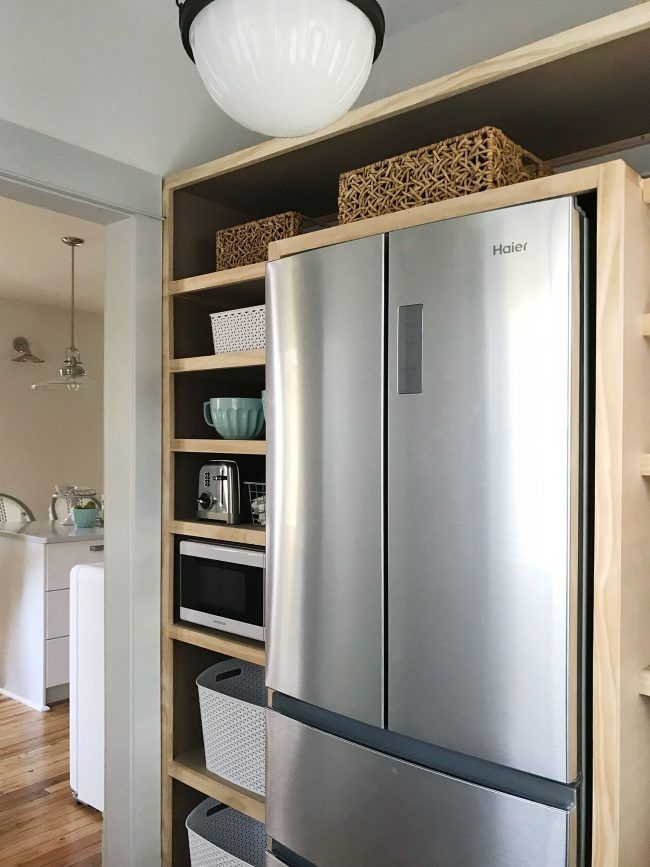
If your pantry features enough side wall space to utilize for storage, you may consider continuing the shelving around the corner. To do so, attach additional 2x2 frames to the existing framework and the next wall. Add at least one 2x2 middle support if the length spans more than 1 foot. Cut a shelf piece to fit the space and attach using the same glue and nail method found above. Finish with a 1x3 trim piece on the front.
How to Build Pantry Shelving
Home » DIY Home
Learn how to build strong and sturdy pantry shelving (or walk-in closet shelving or garage shelves) with this detailed tutorial.
We’ve lived in our home for four months now, and we’re finally nearing the end of The Pantry Project. I’m almost ready to show you the whole, glorious project! But today I’m sharing how we built the pantry shelving. If you are new here, you have got to see what this space used to look like!
One common question I keep getting is about the size of this space. Our pantry measures 3 feet by 4 feet.
I spent a lot of time trying to decide on the spacing of the shelves. I knew the bottom space needed to be big enough to fit a five gallon food storage bucket.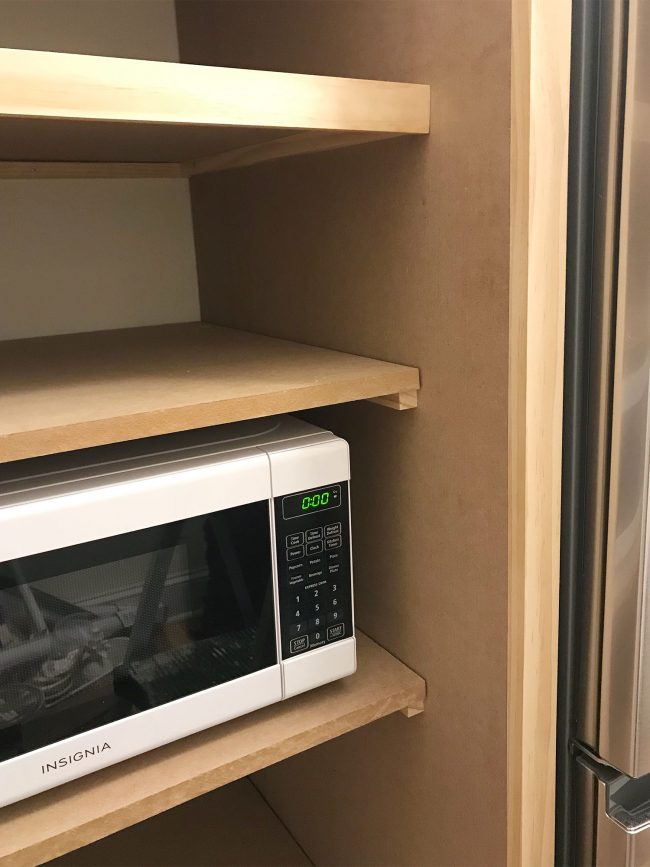 I also wanted a few large shelves for oversized items. But I also wanted to be able to fit as many shelves as possible into this little space. I even measured the height of canned goods, mason jars, cake mixes, cereal boxes and soda bottles, just to help me know what sizes would work. After I came up with an idea of what I wanted, I used blue painters tape to mock up the shelves:
It was so helpful to see what the shelves would look like!
Next, it was time to start building. I turned this part over to the hubsters. He started by screwing 1×2 pieces of wood to the walls, making sure that each piece hit a stud in two places and was perfectly level.
I painted the wood on the walls at this point. I figured it would be a lot easier than trying to do it after the shelves were in.
Next, we cut shelving out of MDF boards. THESE are the boards we purchased at Home Depot. We chose MDF for the price, but it is kind of a pain to cut. The edges crumble if you aren’t careful, so be patient. I painted all of the shelves before installation and it made the process so much easier!
The shelves are mitered where they meet in the corner, and have an angled edge on one corner near the front because they needed to go around the door trim instead of butting up against it. (You can see that part in the very left edge of the photo). To reinforce the back corner where the two shelves meet, we used a 2×2 piece of wood as a vertical pole. The shelves are attached to the 2×2 with metal L-brackets, two on each level.
Here’s a close-up of the brackets. You need two on each level so that one is attached to each of the two boards that meet at the corner. Make sense?
After everything was installed, I did a whole lot of caulking. It made all the difference! See for yourself:
The caulk took away all the screw holes, cracks and imperfections and we were left with clean, crisp shelving!
Isn’t it breathtaking? Okay, okay, that might be strong vocabulary for shelving, but this is my baby we’re talking about here! I’ve watched my crazy idea come to life before my eyes, and it’s given me the remodeling bug so hard!
The spacing we settled on worked out to be:
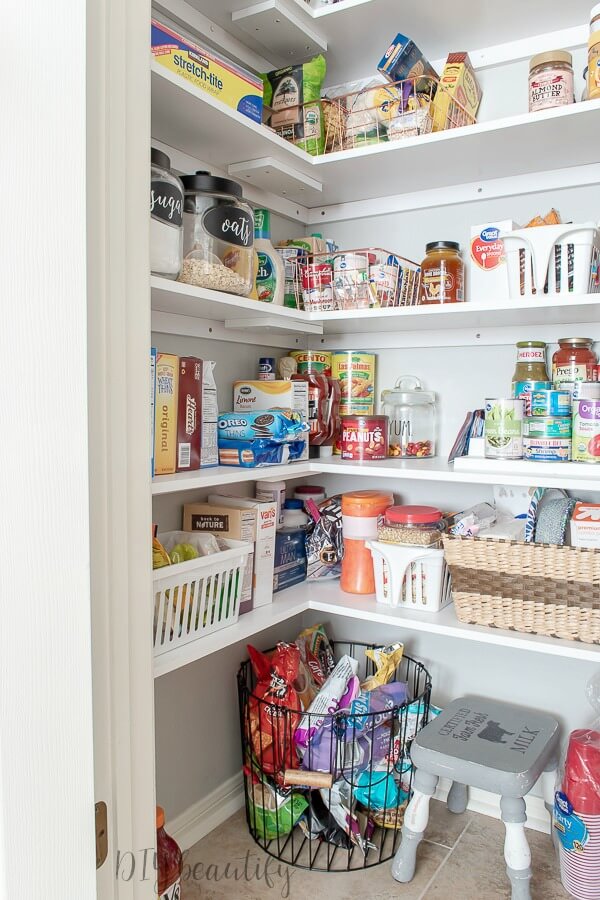
And here’s the pantry fully stocked:
There are still empty shelves in here and I cleaned out all the food from the kitchen cupboards and one shelf from the linen closet that’s next to the pantry in the hallway. Isn’t that amazing! Ahhh… I love my pantry!
We figured out a great solution for the third wall of the pantry that doesn’t have shelving on it… we built a shelf between studs! Read about that HERE!
We are getting close on the outside too. Two out of three walls are textured and primed. We need to put up moulding and baseboards, trim the door, texture the last wall, then paint everything. Can’t wait to show you!
TO SEE THE FULL PANTRY REVEAL, CLICK HERE!
Reader Interactions
The Craft Patch is a participant in the Amazon Services LLC Associates Program, an affiliate advertising program designed to provide a means for sites to earn advertising fees by advertising and linking to amazon.com. “This site uses cookies from Google to deliver its services and analyze traffic. Your IP address and user-agent are shared with Google along with performance and security metrics to ensure quality of service, generate usage statistics, and to detect and address abuse.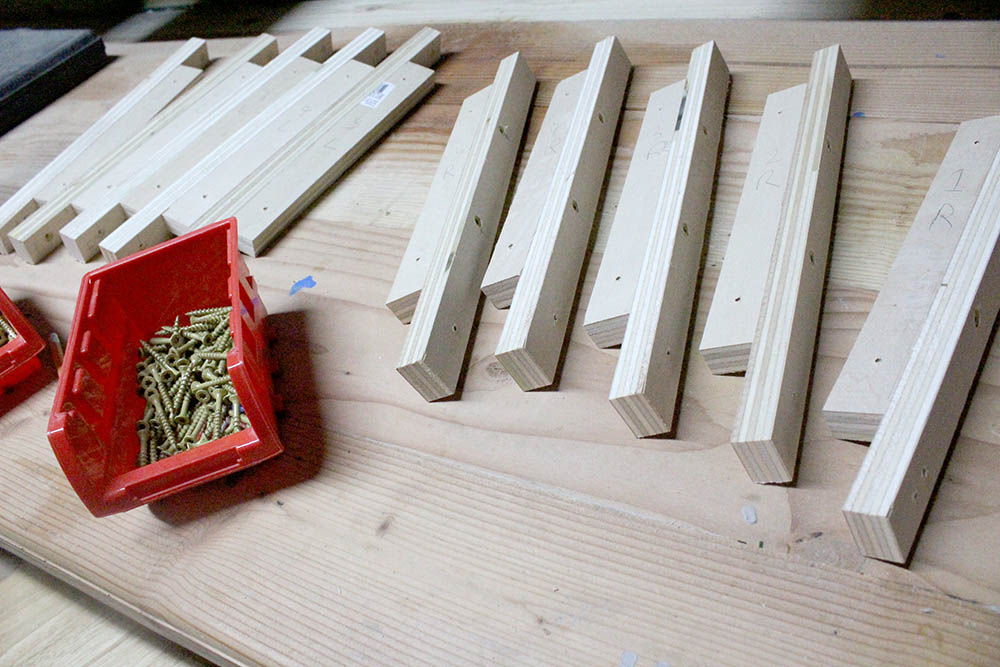 ”
”
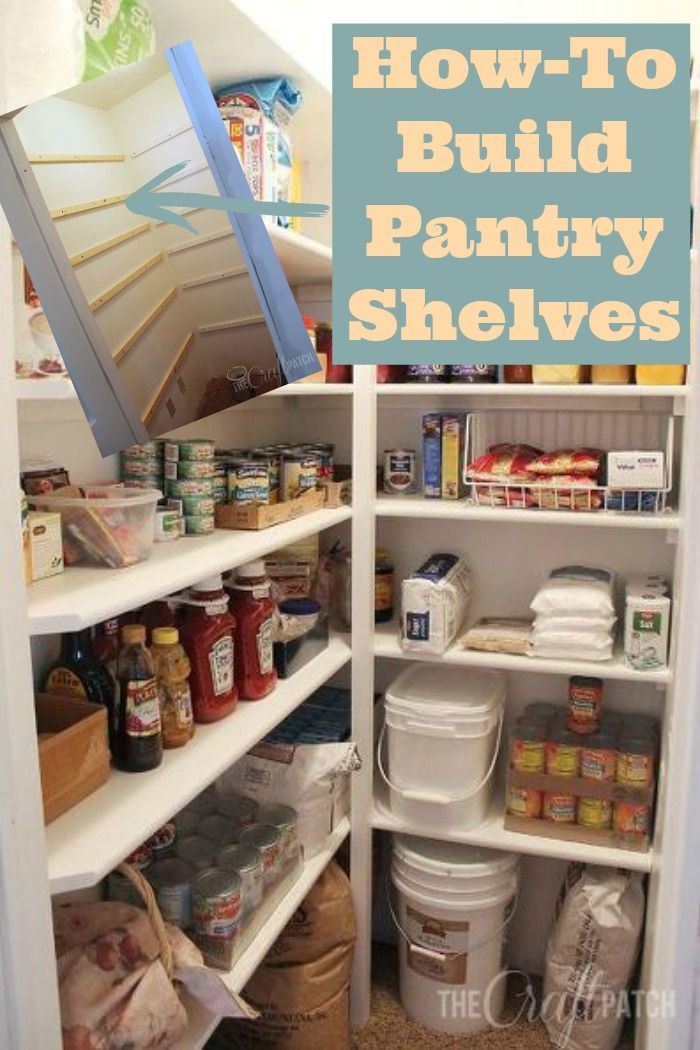
How to make shelves in the pantry with your own hands? 40+ photos and videos
Features of planning storage systems
The most important thing when arranging a pantry in an apartment or private house is to decide what things it will be intended for and correlate the load with the dimensions of the room.
- For a small closet, several rows of shelves placed one above the other are suitable. At the bottom it is better to leave room for boxes and boxes: this way the area will be used optimally.
- The dimensions of the compartments must be made in accordance with the dimensions of the items that will be removed in the pantry.
- If the room has a high ceiling, it is worth providing a place for a stool or stepladder: it will be more convenient to get things from the upper shelves.
- Some pantries have enough free space to make deep shelves. This is not always convenient, and besides, you should leave a distance for the passage and bringing in objects.

Preparation
Before installing storage systems, the pantry needs to be repaired: clean the space, carry out dry and wet cleaning, remove old wallpaper and flooring. If necessary, the walls of the pantry or attic are leveled and also put in order: painted or pasted over.
It is recommended to use a primer containing antifungal impregnations.
Laminate, parquet or linoleum is laid on the floor. It is also worth equipping the pantry with ventilation and lighting, which will greatly facilitate the use of the room.
Which material can be used?
One of the most affordable and durable materials for creating shelves in the pantry is wood. Boards made of natural wood (pine, larch), as well as chipboard, are fixed to metal fasteners. The heavier the items that will be stored in the pantry, the thicker the boards should be. For conservation, large equipment, construction tools and other heavy things, it is worth providing an additional stiffener.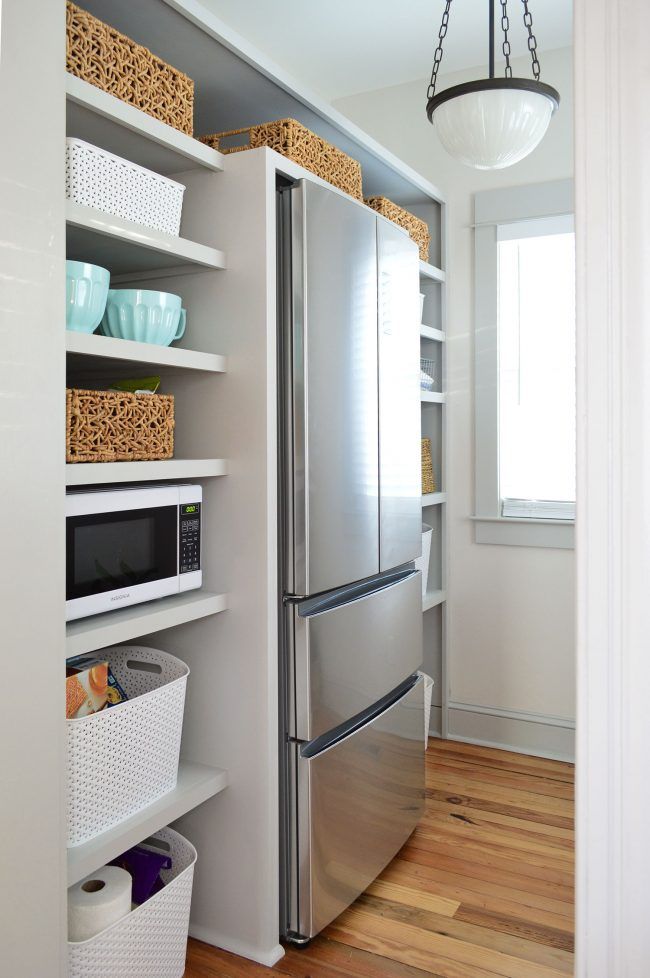
If you make shelves in the pantry with your own hands, you can use what is at hand - wooden pallets, old unnecessary furniture, plastic fruit boxes. Plywood is considered a budget option, but thin sheets are not suitable for heavy items. Lightweight but durable plastic is suitable for storing books, clothes and bulk products. It is easy to care for it, besides, the material is not afraid of moisture.
Metal racks are considered the most durable and do not require additional reinforcement. Modern products have a collapsible design, they are easy to rearrange and transport, in addition, the material easily withstands temperature changes. When buying, you should pay attention to the coating - it must be protected from corrosion with a special composition.
Pictured are shelving, drawers and wall shelves for a spacious pantry.
How best to arrange the shelves in the closet?
The size of the utility room primarily affects the placement of shelves.
- A small closet (about 2 meters) allows you to install shelves in only one row - linearly, along one wall. Sometimes designs are made rounded - this shape allows you to win a few centimeters and use three walls.
- The corner arrangement in the form of the letter "L" is considered much more practical, but the storage area must exceed 2 meters. For maneuvers, you need to leave a small passage, especially if the room is elongated and narrow.
- In a large utility room, it is best to place shelves in the shape of the letter "P". In this case, it is necessary to calculate the depth of the structures so that there is room for movement in the middle.
The photo shows a pantry in which the racks are functionally arranged in the shape of the letter "P".
Deciding on the dimensions
The most popular and practical form of shelves is straight. The length of the shelf is usually equal to the length of the wall. If the distance between opposite walls is 2 meters or less, then the shelf does not need additional support. Otherwise, the structure should be strengthened, especially if it is planned to store rolls and tools.
The thicker the wooden shelf, the more fasteners it requires. Also, its strength is determined by the distance between the support posts: the more massive the structure, the smaller the gaps.
In order to use the shelves comfortably and safely, the heaviest items must be stowed down. The width of the protrusions should decrease from bottom to top. The standard shelf width for cans with preservation is 30 cm. The height depends on the dimensions of things.
Pictured is a pantry with a wide aisle between wooden shelving.
DIY Shelf Options: Step-by-Step Instructions
You can save your family budget with homemade pantry shelves and detailed tutorials below.
How to make a wooden shelving unit for a pantry?
Before starting work, it is necessary to measure the walls of the pantry and create a drawing of the desired structure.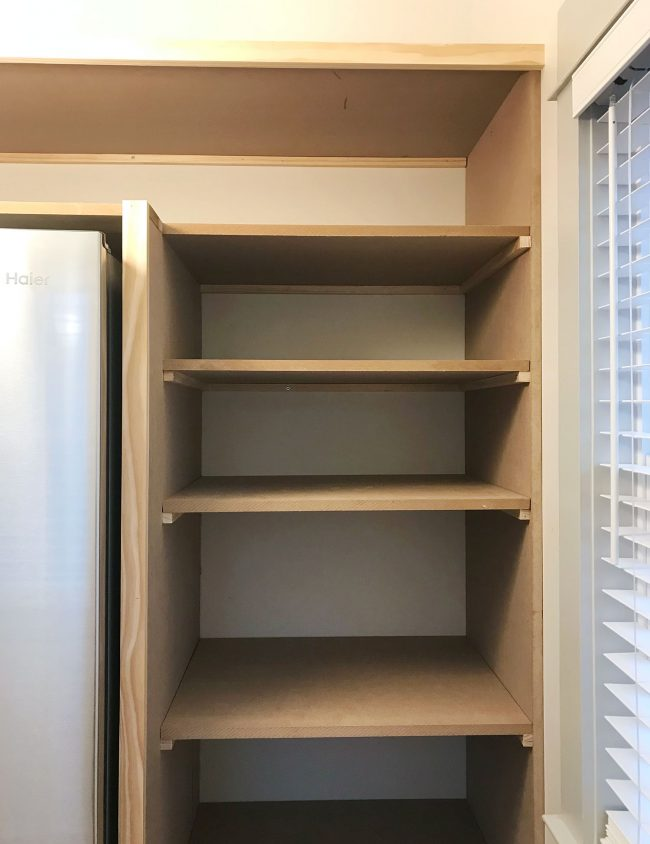 Next, prepare in advance the consumables necessary for the manufacture of functional shelves.
The photo shows a linear self-made shelving made of wood, occupying the entire wall of the closet.
Tools and materials
For work you will need:
- Planed block for a vertical post (8 pcs, about 2 m).
- Beam for horizontal supports (12 pieces, approx. 50 cm, depending on the depth of the rack).
- Boards or lining for shelves (the number depends on the depth of the shelves, the length - on the length of the wall).
- 16 metal corner fasteners (corners).
- 45 screws (3.5x25).
- About 70 thin studs.
- Wood impregnation and brush.
- Building level.
- Roulette.
- Hammer.
- Electric jigsaw.
- Screwdriver.
Step-by-step instructions
- First you need to prepare the material. Using a hacksaw or electric jigsaw, we cut the bars and lining in accordance with the dimensions of the future pantry rack.
- We apply impregnation, carefully processing every detail. You need to dry for as long as indicated in the instructions on the bank.
- We fix the corners with screws at the level where the shelves will be located:
- We fix horizontal bars as follows (4 such structures should be obtained):
- We install the lining horizontally, nail it with thin nails:
- We make the second shelf in the same way: we fasten the corners, fix the horizontal bars, attach the lining.
- We lay the upper horizontal bars, fasten them.
-
The shelves in the pantry are ready. In this way, you can make a rack of any height, depth and shape.
You can learn more about how to make shelves in the pantry from this video:
DIY wall shelves
This is the easiest and most economical way to make hanging shelves for a small closet. The amount of material for the shelves depends on the size of the room and the number of floors.
In the photo there are pantries in small apartments such as Khrushchev or Leningradka, equipped with simple shelves.
Tools and materials
To make shelves in the pantry with your own hands, you will need:
- Planed bars.
- Plywood, chipboard, boards or remnants of old furniture.
- Self-tapping screws for fastening.
- Screwdriver.
- Thin nails.
- Hammer.
- Level.
- Jigsaw or hacksaw.
Step-by-step instructions
- Sawing timber and plywood according to the size of the pantry. If desired, they can be painted or varnished. For the frame of one shelf, you will need 1 long and 2 short bars, for the base - a plywood sheet or boards of the required size and thickness. We make markings on the walls and securely fasten the bars.
- Making markings for the next shelf.
- We mount the shelf in the pantry.
- We fix it with nails.
And this video shows how to install a wall shelf in the pantry in two ways: on the brackets for chipboard and on the standard brackets.
Shelves in the pantry from the profile
Solid U-shaped shelving for a spacious pantry is obtained from metal profiles. Having understood the principle of operation, you can make shelves of any configuration, replace plywood with wood, cover the metal profile with paint and create a loft-style rack.
The photo shows two types of shelves for the pantry, made by hand from metal profiles and wood.
Tools and materials
- Guide profiles 50x40.
- Guide profiles 50x50.
- Plywood or wooden boards.
- Roulette.
- Building level.
- Metal shears.
- Electric jigsaw.
- Screwdriver.
- Dowel-nails.
- Self-tapping screws.
- Ladder.
Step-by-step instructions
- We make a drawing and calculate the amount of materials. We cut the profile into components in accordance with the dimensions.
- Marking out horizontal lines. We fasten guide profiles 50x40 to the walls using dowel-nails.
- We make the frame of the first shelf, put it on temporary supports from the profile.
- We cut a sheet of plywood with an electric jigsaw:
- We fix the finished parts with self-tapping screws.
- We replace temporary racks with rails. Shelves on the walls in the pantry are ready.
This video clearly shows how to make shelves in the pantry from the profile:
Photo gallery
You can see other options for shelves in the pantry in the photo selection below.
How to make your own shelving and shelves for a closet
The current developers, unlike their colleagues of the past generation, do not seek to equip the living area with storage rooms. This increases the living space, but does not allow you to optimize the space and have the storage area that is sometimes necessary.
The presence of a pantry in the apartment becomes a gift for the hostess and sometimes a luxury inaccessible to others.
Unfortunately, the pantry is not always equipped with shelves and racks for placing and storing things, so you have to install the shelves in the pantry yourself.
Do-it-yourself shelving in the closet is a simple task.
Contents
- 1 Design, construction and mounting methods
- 2 Required materials
- 3 Tools for work
- 4 Choosing a place for a shelf
- 5 DIY manufacturing and installation process
- 7 Shelves in pantries - 50 photo ideas:
Design, construction and fastening methods
wall.
There are only two options for how to make a rack, namely to make a free-standing shelf, or simply fix the boards directly to the wall.
First, it's worth drawing the idea on paper. This will allow you to visualize the desired rack, take measurements and most successfully place it, taking into account the wishes and intended storage items.
In order for a closet to be equipped with shelving, there must be enough space in it.
Keep in mind that the shelves should be arranged in width from bottom to top, that is, the bottom shelf will be the widest, and the top one, respectively, the narrowest. This is due to the fact that the most dimensional items that are inconvenient and impractical to lift up will be stored on the lower shelves.
You need to think carefully about the distance between the shelves and correlate it with the items that you plan to store.
Depending on the desire of the owners, the racks can have any shape that will allow the implementation of the place chosen for fastening the structure.
You need to take into account the amount of free space - if the racks take up too much space, then it will be inconvenient for you to walk in the pantry.
U-shaped and L-shaped are more often chosen, this type of shelves is the most practical. For installation, it is better to prefer metal brackets and fasteners, they are the most durable, they can withstand any weight on the shelves.
Choose whichever option suits you.
Required materials
When deciding how to make shelves in the pantry, you need to decide on the material from which the structure will be made. There are several options.
- Budget option allows you to make shelves from the material that is part of the furniture. If there is an old wall-slide or an unnecessary chest of drawers available, then they can be disassembled and you can get a fairly durable and, at the same time, free canvas for making boards.
This will be enough to have good and reliable shelves in the pantry, on which you can store anything.
- The second option involves the purchase of material for shelves in the pantry. The choice should correspond to the list of intended items for storage, their dimensions, weight.
It is advisable to make the rack directly in the pantry, because if it is large, then it will be difficult for you to bring it inside.
If the shelving is expected to be loaded with conservation, then a solid board with a width of about 30 mm is the best choice.
Boards are suitable for any - the main thing is that they have sufficient length and withstand the expected load.
In addition to wooden materials, you can choose others, the main thing is durability and the possibility of self-assembly. In addition to the shelves, you should stock up on fasteners on which the shelves will be installed, consumables necessary for work.
In order to make wooden storage shelving, you will need few materials and serious tools.
Tools for the job
To understand what tool is needed for the job, you need to clarify what exactly needs to be done. If the material for the shelves is not prepared and needs to be cut and sharpened to the desired dimensions, then it is imperative to have a jigsaw or a hacksaw for wood and a planer. They will help to make the shelves the right size. And you will also need sandpaper to process the edges of the cuts and give the shelves a finished look.
Tools needed for the job.
Requires a puncher to create holes in the wall for dowel-nails to attach brackets, a screwdriver to connect parts to each other, if necessary.
This is enough to have good and reliable shelves in the pantry, on which you can store anything.
Without fail you will need:
Choosing a place for a shelf
When thinking about how to make shelves in a pantry, it is important to decide on a place. The place where the shelves will be attached should be chosen taking into account many factors.
The wall to be fastened to must be load-bearing.
This is a guarantee of strength and durability of the structure.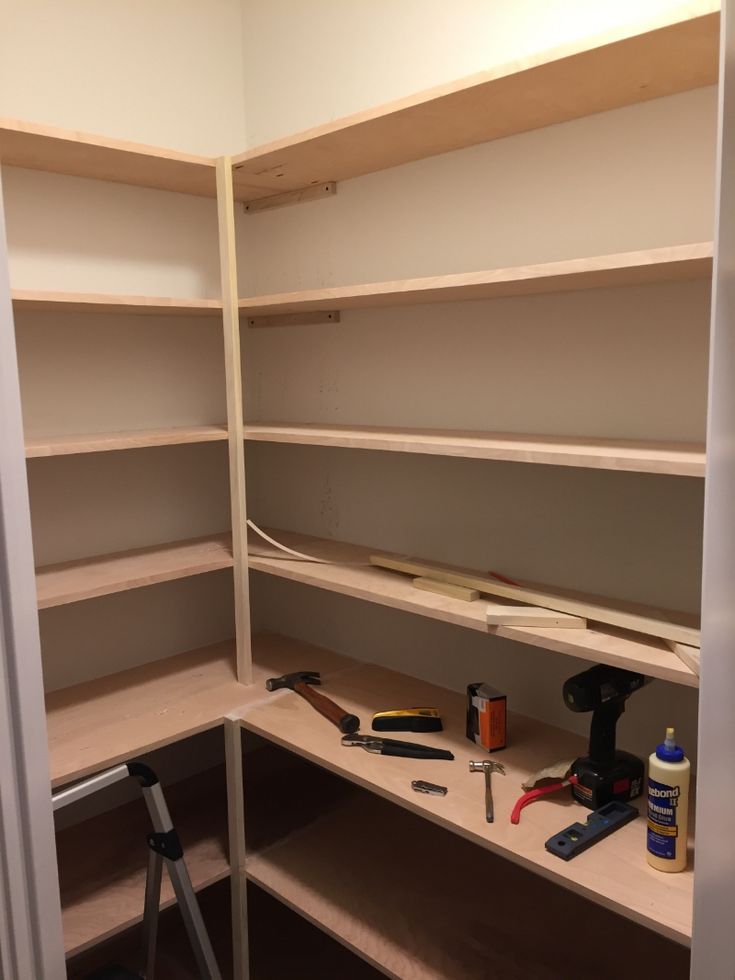 A thin interior partition may not withstand the load and shelves filled with heavy objects will collapse.
In addition to boards, chipboard, plywood and other suitable materials can be used.
If the fastening is not carried out directly to the wall, then you can use your imagination according to the desired form of arrangement.
Consider the dimensions of the items to be stored.
It is important to prepare the storage room itself, align and tidy up the walls in advance so that the shelves stand up straight and there is no need to adjust them to the wall relief.
Lighting needs to be taken care of before shelving is installed.
The process of manufacturing and installation
So, the place for the rack has been chosen, all the tools and materials have been prepared, the layout of the shelves on paper has been made, and all dimensions have been verified and calculated? You can proceed to the main process of manufacturing shelves and assembling the structure.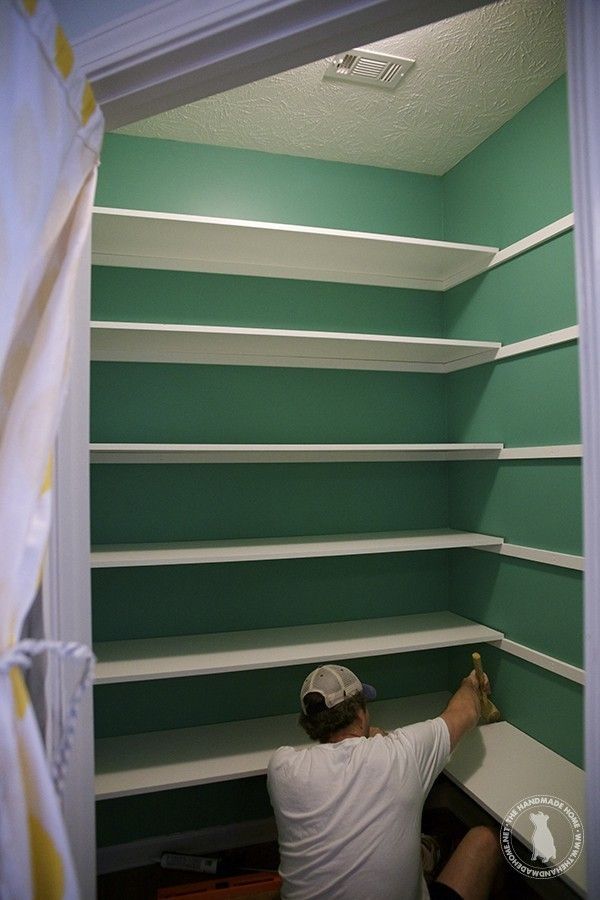
- The first thing to do is to use a tape measure and a building level to mark the wall, which will serve as the basis for fastening.
Use a tape measure to mark the height of the shelves in the center of the room and draw horizontal lines using a laser level.
Use a puncher to make holes in the wall where the brackets will be attached.
Guide profiles are attached to the walls with dowel-nails.
Fasten the bases for the brackets and install them.
Their number depends on the desired number of shelves, and the distance between them determines the height of the shelves.
- The next step is the manufacture of shelves. You need to use a jigsaw or a saw to cut shelves from wood to the required size.
It is better to check the dimensions again and cut out the template from cardboard for greater accuracy.
After checking them with the installed brackets, you can start trimming. After the shelves of the desired size are cut, it is worth processing the cuts with sandpaper to remove the roughness.
Learn more