How long garlic take to grow
How Long Does It Take For Garlic To Grow?
Table of Contents
Garlic is one of the most rewarding things you can grow on your own. Garlic bulbs are tasty, and they last a long time. Since the growing season is coming, and we’re thinking about timings, you may wonder: how long does it take for garlic to grow?
While most varieties take around 9 months to mature when propagated from cloves, there are short-season varieties that take less time. The way you plant garlic has bearing on when it’s ready for harvest too. Some garlic types allow you to easily propagate from last year’s harvest and grow garlic again, while other harvested garlic is better for using right away.
Planting garlic involves deciding whether you’re going to work with spring-planted garlic or fall-planted garlic. The USDA growing zone you’re in is an important consideration. And issues that arise in the process of growing garlic can change your timing as well.
So let’s examine all of these factors to help you decide the type of garlic bulbs and the timing of planting so you can enjoy homegrown garlic for years to come.
Growing from Seed v Growing from Clove
How long does it take for garlic to grow? Let’s discuss that. Source: KjokkenutstyrAside from harvesting garlic scapes, you can grow garlic in different garlic growing stages. After harvesting garlic, growers cure each garlic bulb in good air circulation and use multiple ways of storing their garlic. During the growing process, gardeners can collect garlic seed from flowers to grow again the following year. They also have the option to plant garlic cloves, which each act as a seed on their own.
Which type you choose to plant has bearing on your harvest time. While cloves take roughly 9 months from planting, garlic seeds take a year more than garlic bulbs (sometimes called bulbils). That’s because the seed has to germinate, grow the greenery necessary for photosynthesis, and then go through the process of bulb formation. When you plant cloves, the first half of the process is already complete.
If you’re going to grow garlic plants in the upcoming growing season, consider the variety and its source! This will help you determine when to get that garlic planted.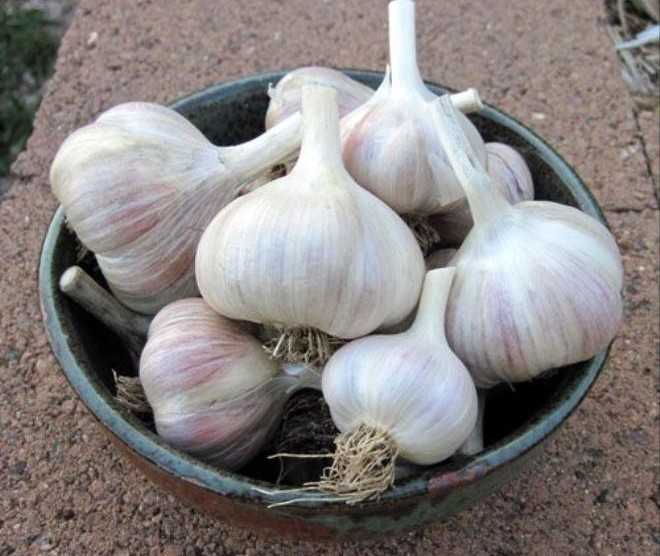 There are some cold-climate garlic varieties that like it best when temperatures are cooler.
When to Plant Garlic
Garlic greens can be lightly harvested while you’re waiting for the bulbs to form. Source: renoir_girlAnother consideration in knowing when you’ll harvest garlic is the planting time. While there is spring-planted garlic and fall-planted garlic overall, there is also climate to consider. Softneck garlic is better when planted in warmer climates and hardneck garlic is best planted in cooler climates. The differences between the two exist in their botany as well. We will discuss those in a later section.
Timings by Zone
Garlic is generally part of fall planting 4 to 6 weeks before the first frost in early summer to early fall. It is also most often fall-planted garlic due to its ability to produce larger bulbs over cold winters. This general list is for fall plantings. Spring planted garlic is possible, and it generally takes place 4 to 6 weeks before the last frost in early spring. Softneck varieties are suited for mild climates in zones 6 and higher, but there are varieties adapted to cold weather, such as Polish softneck.
The timing of planting cloves of either could just depend on the season you’re planning for, and that is largely determined by your USDA growing zone. Here is a rough breakdown of when to plant garlic based on the type and USDA growing zone.
- Zones 0-3: Late August – early September to Late September
- Zones 3-5: Mid – late September to Early – mid-October
- Zones 5-7: Early – mid-October to Late October
- Zones 7-9: Late October to November
- Zones 9-10: Late October to December
If you’re growing garlic companion plants alongside your alliums, use their planting times to determine exactly when to start growing garlic plants. For instance, grow tomatoes next to garlic to prevent spider mites.
Garlic Growth By Type
For garlic to grow well, the timing of your planting is important. Source: anastaz1a
Whether you’re interested in making garlic spray, or you want to make garlic spread or produce garlic just like the kind you buy in the store, the types of garlic you grow have bearing on how to plant them. Softneck versus hardneck determines whether you’re carrying out a fall or spring planting. Fall garlic plantings should be winter-hardy and are ready in the middle of summer. Spring plantings should be ready in the fall (either the current or following based on whether you planted cloves or bulbils). In a place with a long growing season and enough cold, you may find you can harvest garlic multiple times in a year.
So let’s discuss the types of garlic you can grow and how that changes your harvest time.
Hardneck Garlic
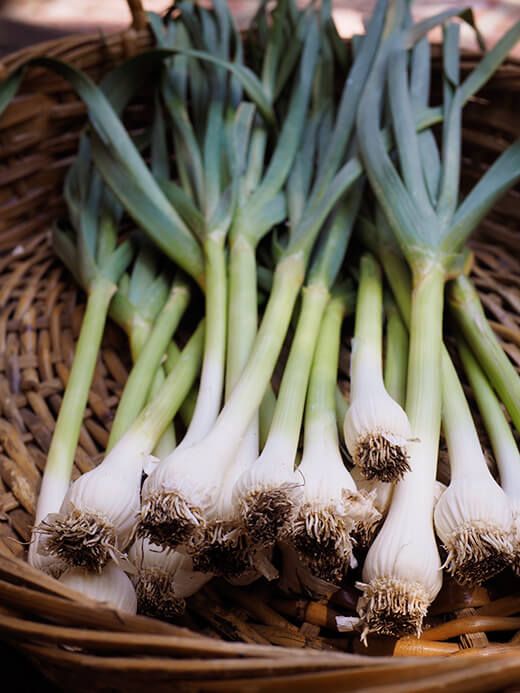
Hardneck garlic is called such because it has a stalk in the center of the garlic head that turns rigid at maturity. It has long flower stalks that produce bulbils after the flower stems bloom. It is often cold-hardy and peels easier because it has thick skin. Each garlic bulb has only a few cloves. In this case, the harder the neck, the larger the clove. If you plant and store garlic of the hardneck variety, you’ll find it doesn’t keep as long as store-bought garlic. And as we mentioned earlier, this garlic grows best in colder climates. A few of the best hardneck varieties are Rocambole, Purple Stripe, and Porcelain.
When it comes to timing hardneck harvests, you’ll know they’re ready when the bottom ⅓ of the leaves have turned yellow. Since this variety is typically planted in the fall, you’ll harvest in early summer to mid-summer. Before that, you have to remove green leaves called garlic scapes to ensure a decent harvest. Doing this promotes the growth of large cloves from the time the bulbs begin to grow at the root system.
Softneck Garlic
Softneck garlic has a softer stalk made of green garlic leaves rather than a hard stalk. Softnecks do not flower – not usually, anyway – and therefore don’t produce bulbils. Mature bulbs have many more individual cloves than hardnecks, and they are much smaller. The garlic skin on softnecks is papery and difficult to peel. This garlic grows best in a warmer climate and is often planted in spring. Softneck cloves must be planted for propagation. This is the type you get when you purchase garlic in grocery stores. Two great softneck varieties are Silverskin and Artichoke garlic.
To time the types of garlic that fall into the softneck category, know that they can be ready as early as the beginning of spring. Wait until the top 5 to 6 leaves are still green, and the bottom leaves have turned brown. Then remove them with a garden fork.
Elephant Garlic
Elephant garlic is technically not true garlic, but it is always included with the other types of garlic we’ve discussed so far. Elephant garlic varieties form bulbs with the largest cloves out there. When it comes to elephant varieties, each head of garlic contains no more than 6 cloves each whereas most garlic has 10 to 12 cloves. Each of the elephant garlic cloves is ready to eat after very little cooking. That’s why it’s great garlic to use for spreads. If you need garlic that’s ready quickly, go for elephant. You’ll have your garden fork out for harvesting within 90 days of planting.
Garlic Greens
If you’re interested in growing garlic purely for the greens, know you can harvest those multiple times in a growing season. However, you must wait for late spring and early summer to do so. That’s because the bulbs need the greens to continue forming up to the harvest. Remember to keep leaves on the plant if you don’t want to harvest bulbs at the same time.
Garlic Troubleshooting
Braided garlic can be stored for later use. Source: Photography-SYou may experience issues that limit the growth of your garlic bulbs and delay your harvest. This section will cover those factors and what you can do to limit them at the time of planting.
Soil Moisture
Because garlic requires lots of water to grow, you’ll need to keep the garden soil moist throughout the growing process. Most often, failed harvests are due to dry soil. Especially if you’re growing in full sun, consistent monitoring of the water content in the soil is important. But you don’t want to go overboard with water. That can cause bulb rot. Here is where the growing medium comes in. Amendment mixtures of garden compost, well-rotted steer manure, and sand will promote moisture, but also assist with drainage. An addition of 2 tablespoons of 5-10-10 fish meal gives the bulbs the nutrition they need. And mulching with pine needles helps the soil retain moisture even in direct sunlight. Keep this in mind when preparing your site.
Pests
Onion maggots don’t do much damage to a harvest at first, but after a few generations, they can cause up to 50% yield loss. They feed on the garlic seedlings at first, and then on expanding bulbs in the 2nd and 3rd generations. Insecticides applied to the growing area before planting will assist in removing the threat of onion maggots. Spinosads applied to seeds will also prevent them. Maggot flies are the same pests as onion maggots but in their adult form. Prevention methods for controlling them are cultural. Rotate your garlic crops to prevent them. This also prevents wearing out the soil in the process of growing delicious garlic bulbs.
Dry bulb mites also feed on garlic and reduce yields, delaying your harvest. They are part of the same class as ticks and mites. They overwinter inside stored cloves and affected plants become stunted. Females lay eggs on garlic leaves that hatch releasing hundreds of larva who flock to bulbs to eat. Crop rotation will keep your garlic producing at a normal rate, and prevent these mites. Hot water treatments of garlic seeds keep them away as well. Neem sprayed on non-flowering plants will keep the mites from laying eggs on your leaves altogether.
Consider these when gardening to ensure you have a timely and plentiful garlic harvest.
Frequently Asked Questions
Q: How do you know when garlic is ready to harvest?
A: It depends on the type you’re growing. See above!
Q: What is the best month to plant garlic?
A: Most garlic does best when planted in late summer to early fall. However, you can plant some varieties in spring as well.
Q: How long does garlic take to sprout?
A: Cloves sprout within 4 to 8 weeks. Bulbils take 8 to 9 months.
The Best Method and Tips for Success
Growing your own garlic is a very fulfilling task. The varieties available to home growers are far more diverse and flavorful than what you can find at the grocery store. Plus, growing garlic is pretty easy. But what if you don’t have an in-ground vegetable garden? Can you still grow garlic? Absolutely! In this article, I’m going to share everything you need to know about how to grow garlic in pots.
Garlic is easy to grow in pots, if you follow a few basic guidelines.Garlic growing basics for containers
Before we dive into the specifics about how to grow garlic in pots, it’s essential that you understand a few basics about how garlic grows. Garlic has a long growing season. And by long, I mean lllllooooonnnggg. It takes about 8 to 9 months for a small planted garlic clove to develop into a ready-to-harvest head of garlic. Yes, that means you could grow a whole human baby in the same amount of time it takes to grow a head of garlic! Don’t let the timeline stop you, though. Homegrown garlic is a treasure that’s well worth the long wait (just like a baby, but without the midnight feedings). Typically, in cooler climates, the cloves are planted in the autumn (usually around the time of your first frost) and the heads aren’t harvested until the following summer.
The best type of garlic for planting in pots
There are two types of garlic for growing in containers or in the ground: Hardneck and softneck. I’ve already written an in-depth article about the differences between hardneck and softneck garlic, so I’ll just give you the basic factors that influence how to grow garlic in pots here.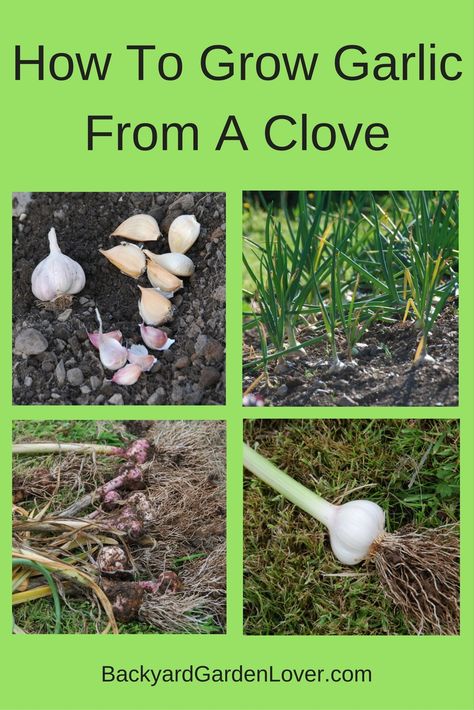
Hardneck = Due to its hardiness, this is the best garlic for growing in cold climates where cold winter temperatures are the norm.
Softneck = Because softneck varieties are often less winter-hardy, they are best grown in mild climates.
Before I introduce the planting technique for both of these types of garlic, let’s quickly talk about which garlic to grow in pots based on what type of climate you live in.
To grow garlic in a pot, you’ll need a few supplies, including right kind of garlic, a container, potting mix, straw, and bubblewrap.The best garlic for growing in pots in a cold climate
I live in Pennsylvania, which means cold winters, so hardneck garlics are my preferred choice due to their hardiness. There are hundreds of flavorful varieties of hardneck garlics to grow. But, here’s a very important thing to understand when it comes to growing garlic in containers: Hardneck garlic varieties must be exposed to 6 to 8 weeks of temperatures below 45 degrees F in order for them to sprout and develop into a full head of garlic the following season. If you live in a cold-winter climate like me, that’s no problem. Hardneck garlics are your go-to choice.
The best garlic for growing in pots in a mild climate
If you live in a warmer climate that doesn’t receive at least 6 to 8 weeks of temperatures below 45 degrees F, you have one of two options. Either grow softneck garlics by planting them in the fall, or pre-chill hardneck garlics to “fake them out”. Yep, you read that right. Give hardneck garlic a fake winter by sticking the bulbs in a paper bag in the crisper drawer of the fridge for about 8 weeks before planting them in pots in the early spring. They’ll think they’ve gone through a winter period and will grow just as they would have if you lived in a cold climate. Who says you can’t fool Mother Nature?
Purchase garlic for planting from a garlic farm, a seed catalog, or a local farmer. Grocery store garlic may not be the best variety for your region.Selecting a container for growing potted garlic
Once you know which type of garlic to grow in your containers, it’s time to choose a pot.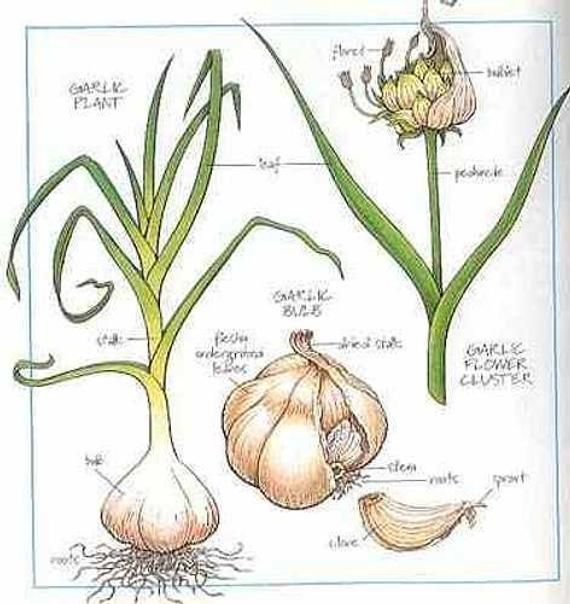 While terra cotta pots are a popular choice, they are not the best option for growing garlic. Their porous nature means you’ll be a slave to watering for 8 to 9 months – no gardener I know wants that. In addition, water often gets into those pores and freezes in the winter, causing the pots to flake and crack. Instead of terra cotta, I recommend using either a plastic, glazed ceramic, fiberstone, or plasti-stone pot. Since the pot will sit outdoors all winter long, make sure the pot is frost-proof and will not crack. This is especially important if you choose a glazed ceramic pot.
Your selected container needs to have a drainage hole in the bottom, and it should be at least 8 inches deep to allow ample room for the roots to grow. How wide the pot should be depends on how many cloves of garlic you intend to grow. My garlic-planting pot is 22 inches in diameter, and I plant 8 to 10 cloves inside. The larger the container, the more cloves you can plant (and the less frequently you have to water – bonus!).
Which soil is best for growing garlic in a container
When it comes to learning how to grow garlic in pots, please know that your success depends on many things, but one of the most critical – and often the most neglected – is choosing the best soil mix for the job. Garlic needs a well-drained soil mix or the cloves may rot, especially during the winter if you receive a lot of precipitation. But garlic also needs fertile soil that’s heavy enough to support the tall plants and expanding heads in the spring and summer. For that reason, I recommend mixing a high-quality potting soil with compost at a ratio of 75:25. That means for every 3 cups of potting soil, mix in 1 cup of compost. If you don’t make your own compost, purchase it by the bag. To save money, you can also use my basic DIY potting soil recipe found here if you want to mix your own from scratch.
The best fertilizer for garlic planted in a pot
After you’ve filled your container with a mix of potting soil and compost, it’s time to add the right fertilizer. Garlic is a bulb plant, just like daffodils and tulips, and in order for it to produce top-sized heads of garlic, the plants require a good bit of phosphorous. Mix 2 to 3 tablespoons of a granular organic fertilizer that’s formulated specifically for bulbs into the pot. I like BulbTone, but there are other brands on the market, too. Use a trowel to stir in the fertilizer and distribute it evenly throughout the pot.
When and how to plant garlic in a container
After your soil is filled with a blend of potting soil and compost, space out the cloves prior to planting.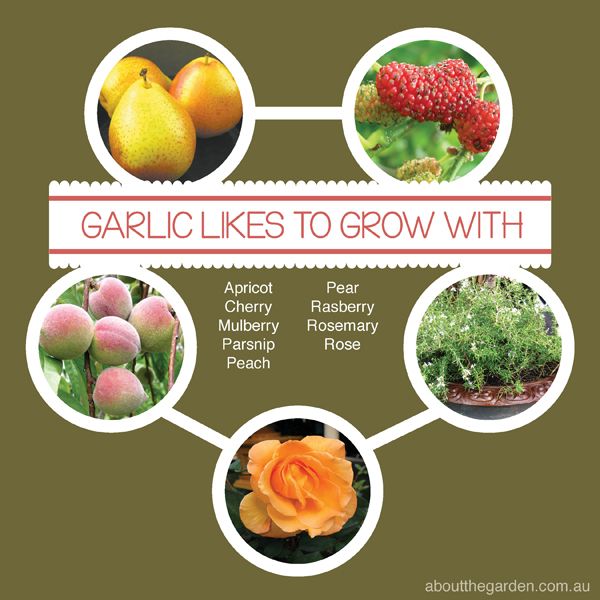 Give each clove plenty of room to grow.
Right around the time of your first frost is the best time to plant garlic in pots. To plant, split the head of garlic into its individual cloves by cracking it apart. Don’t be shy about this; you won’t hurt it. Save the biggest cloves for planting and use the smallest ones in the kitchen.
Sink each clove into the soil, pointy end up, so the base of the clove sits about 3 inches beneath the soil surface. Remember, the soil will settle a bit after you water it in. Unlike planting it in the ground, when you’re growing garlic in pots there’s no need to use a trowel; just push each clove down into the potting mix with your finger. Space your cloves about 3 to 4 inches apart. Do not cram them together. To form large heads, the cloves need plenty of room.
Use your finger to push each clove down into the soil so its base is about 3 inches deep. Make sure the pointy end is up!Once the cloves have been planted, water the pot well and put a 1- to 2-inch-thick layer of mulch on top of the pot. I like to use straw, but you can also use finely shredded leaves. This mulch layer helps insulate the bulbs through the winter.
It is absolutely essential that you keep the pot watered throughout the garlic’s entire life cycle. Yes, that means you’ll be watering occasionally for the next 8 to 9 months, including during the winter if the soil isn’t frozen. When learning how to grow garlic in pots, this cannot be stressed enough. Lack of water is responsible for many dead pots of garlic upon spring’s arrival.
Use a thick layer of straw or shredded leaves to mulch the top of the pot for the winter.What to do with pots of garlic in the winter
Place your pot of garlic in a sunny location that receives at least 6 to 8 hours of full sun per day. If you live in a mild climate, you can let the pot sit in this same location all winter long, but if you live in a cold climate, when winter arrives, move the pot to a sheltered spot next to your house. To help insulate the soil and bulbs, pile fall leaves or straw up around the sides of the container. Don’t pile them on top of the pot; just around its exterior. Alternatively, I’ve wrapped the pot in a few layers of bubble wrap to give it some added insulation. You can skip this step if you don’t mind risking the bulbs freezing out. In most years, they will be fine. But, if a good old “polar vortex” decides to show up, all bets are off.
How to care for container garlic in the spring and summer
When spring arrives, move the pot of garlic back out into the sunshine and continue to regularly water it. Sprinkle another 2 tablespoons of granular organic bulb fertilizer on top of the soil’s surface. In early spring, tiny green shoots will emerge from the soil. Soon, they’ll grow into large green stalks. If you’ve grown hardneck garlic in your pot, they’ll produce a scape (curly flower stalk) in early summer. Snap the scape off to divert the plant’s energy into growing a bigger bulb. Then, let the plants grow until the foliage is about 50% yellow. When that happens, it’s time to harvest!
When to harvest garlic grown in pots
Garlic leaves typically begin to yellow in early summer. Once they’re half yellow (at my house, that’s often around early or mid July), dump out the pot and unearth the heads of garlic. For information on curing and storing harvested garlic, visit this article.
Homegrown garlic is far more flavorful than store-bought. Try a few different varieties and see which you prefer.As you can see, learning how to grow garlic in pots is a worthwhile task. Yes, you’re in it for the long haul, but I promise the rewards are absolutely delicious.
For more on growing in containers, check out the following articles:
- DIY Potting soils for container gardening
- Garlic spacing: How far apart to plant garlic
- The best fertilizers for container gardening
- Growing tomatoes in pots
- Container cucumbers
- Compact veggies perfect for growing in pots
- Learn how to plant garlic in the spring – in garden beds and containers
When to plant garlic?
It is impossible to imagine our diet without fragrant, pungent cloves.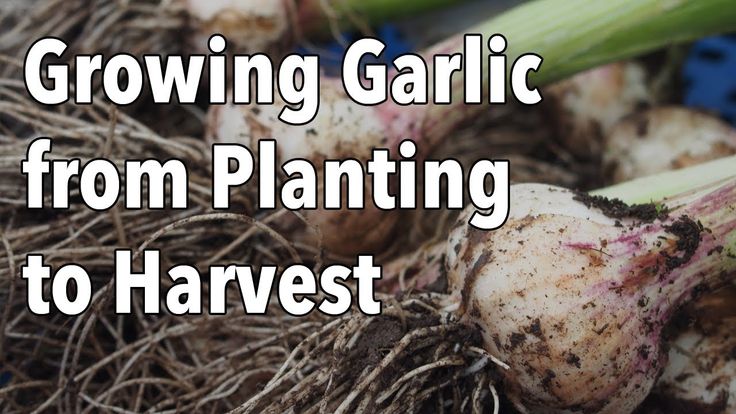 They are eaten with pleasure with borsch, added to salads and meat dishes, put in sauces and jars of pickles. At the time of the first Olympic Games, garlic was equated with doping. Despite the undemanding care and growing conditions, gardeners often cannot boast of a high yield. What's the matter? Poor-quality planting material, the wrong variety or the wrong planting time? Let's figure out when to plant garlic? nine0003
In central Russia, plantings are predominantly in autumn. This is rational, in the hot springtime you do not have to spend time planting garlic.
Advantages of autumn planting:
- The plant does not spend energy on vegetation, strong roots begin to form almost immediately.
- Autumn planting is extremely simple - planted, watered and you can forget about the garden until spring.
The main advantage of spring garlic is its excellent keeping quality, but in terms of yield it is inferior to its winter counterpart. In the home pantry, spring planting garlic successfully reaches the new harvest, while winter cloves begin to wither and deteriorate after the New Year. nine0003
Planting time
To get a high yield, it is important not to miscalculate the planting date. Usually this is the beginning or middle of October. However, the weather makes its own adjustments. If the autumn is warm, you should not rush, the first frosts have come - you need to hurry. It is necessary to plant before the onset of steadily cold weather so that your garlic has time to take root well, but does not give seedlings that will die under the snow and weaken the plants.
Experienced agronomists believe that for good development and a high yield, it is necessary that garlic go into winter, having 10-12 roots 5-7 cm long. It will take 30-35 days to develop such a root system.
With spring garlic, everything is much simpler. Cloves can be planted as soon as the snow melts, and with the onset of stable heat, active root growth will begin.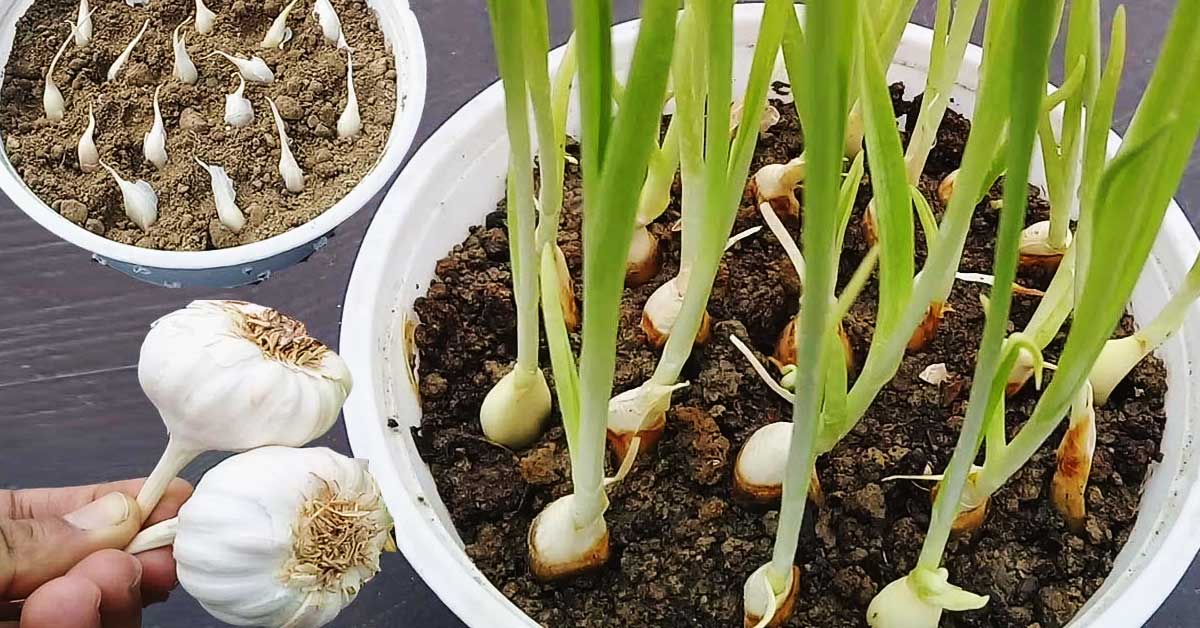
Planting the right way
Start preparing the bed two weeks before planting. The first thing to do is to dig up the soil on the bayonet of a shovel with the simultaneous introduction of organic matter (7-8 kg of humus or compost per m2). Digging to a great depth is not an easy job, requiring a lot of strength. When using a professional tool, such an activity brings pleasure. With a light, reliable shovel, to which the soil does not stick, and the blade does not have to be sharpened often, you can literally turn mountains in a short time (bayonet shovel IDEALSPATEN). nine0003
The optimal garlic planting pattern is 5-7 cm between plants in a row and 15-20 cm between rows. The ideal depth of planting material is 8-10 cm. Through such a layer of soil, tender, not yet rooted teeth will not “grab” upon the onset of early frosts, and in spring at a depth there will be enough moisture for powerful growth. It is difficult to make deep grooves with a hoe. To make holes for the tines, a Royal Dutch Hand Sneeboer Hoe will do, the DeWit Corkscrew Rooter is long enough, you don't even have to bend over. It remains only to lay a prong in each hole with the tail up, and then level the soil. nine0003
Choose tools from the best European brands in the catalog of the online store Cadeaux.ru, remember when to plant garlic, do not forget to feed the seedlings and prepare bags for a good harvest.
cultivation, planting, care in the open field
There are 2 varieties of garlic: winter and spring (1). You can tell them apart by the bulbs.
Winter garlic. It has an even number of cloves in the head - from 4 to 10. They are large and arranged in a circle. And in the center there is always a stem - the rest of the stem. The problem with winter garlic is that it does not store well. nine0003
Spring garlic. Its teeth are arranged in a spiral, and they are of different sizes - larger on the outside, smaller closer to the center. And there are many more - up to 30 pieces. And there is no stem in the center. This variety of garlic is perfectly stored - it can easily lie for a whole year until the next harvest.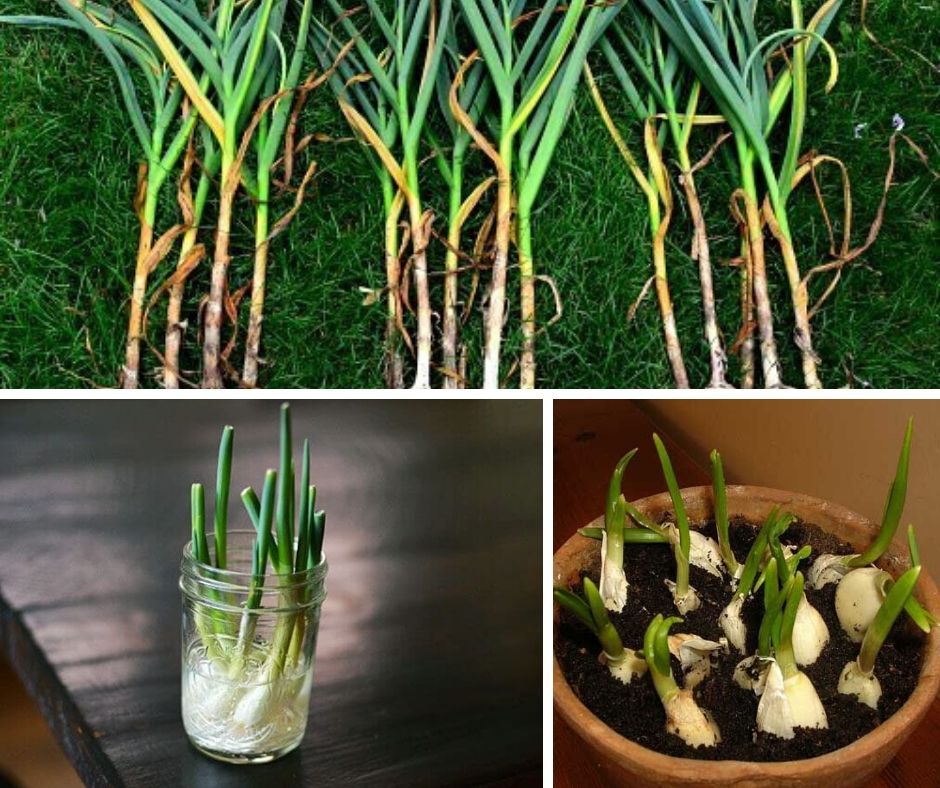
Winter garlic is planted before winter, spring - in spring, respectively, their care has differences.
Cultivation of garlic
Garlic is a rather unpretentious crop; in many gardeners it grows almost without care and gives good yields. But still, he has one requirement - the soil must be pedigree. Therefore, before planting on the site, fertilizers must be applied (calculation per 1 sq. M):
- humus - 1/2 bucket;
- rotted sawdust of deciduous trees - 1/2 bucket;
- ash - 5 cups;
- fluffy lime - 5 cups.
Fertilizers should be mixed, spread evenly over the area and dug up by 10 cm. And he does not like urea and potassium chloride.
Place for garlic should be sunny - this is a light-loving crop. nine0003
Planting garlic
Planting time for garlic depends on the variety.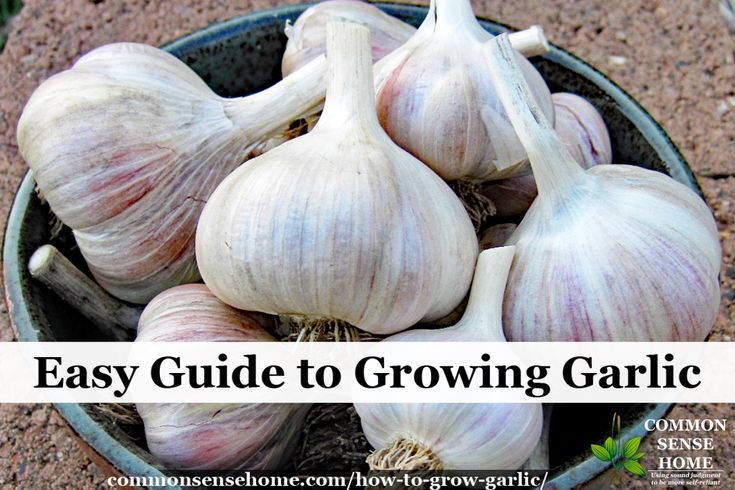
Winter garlic. It is traditionally planted 2 to 3 weeks before the onset of hard frost, in late September - early October (2), when the soil temperature drops below 15°C.
Planting pattern is as follows:
- row spacing - 25 cm;
- in a row - 10 - 15 cm;
- planting depth - 8 - 10 cm.
Spring garlic. nine0053 It is planted in the spring, no later than the end of April (3). He is not afraid of frosts, therefore, the earlier you plant, the more likely it is that the crop will have time to ripen - this is especially true in regions with a short summer. The optimum soil temperature is 5-6 °C.
Planting pattern:
- row spacing - 25 - 30 cm;
- in a row - 8 - 10 cm;
- planting depth - 2 cm.
The cloves are planted at a depth of 3 - 4 cm, and when they begin to take root, they themselves go deep into the soil by 6 - 8 cm (4). nine0003
Outdoor garlic care
Watering. It should be regular, but up to a certain point:
- in April-May - once a week: 10 liters per 1 sq. m
- in June-July - 1 time in 2 weeks: 10 liters per 1 sq. m;
- Do not water from August.
In rainy summers, garlic does not need watering.
Top dressing. As a rule, in fertile areas of this crop, it is enough that they were applied to the soil before planting. On poor soils, it is useful to additionally feed it with phosphorus and potassium - fertilizers must be applied between rows 2 weeks after planting the cloves:
- double superphosphate - 30 g (2 tablespoons) per 1 sq. m;
- potassium sulfate - 20 g (1 tablespoon) per 1 sq. m.
- It is important to cover winter garlic in the winter - mulch with humus, compost or peat with a layer of about 5 cm, - advises agronomist-breeder Svetlana Mikhailova. - This should be done in late autumn, at the end of November. The mulch will help keep the bulbs from freezing if the winter turns out to be snowless and the frosts are severe. In the spring, as soon as the snow melts, the mulch must be removed so that the cloves in the soil do not get wet. nine0003
“Caring for spring garlic also has its tricks,” continues Svetlana Mikhailova. - It happens that in the cold summer, the ripening of the bulbs slows down, and they may not have time to ripen before the autumn frosts. In this case, in mid-August, you can collect the leaves in a bunch and tie them in a knot - then they will stop growing, the plants will direct all their forces to the ripening of the bulb.
Harvesting garlic
Harvesting time also depends on the variety of garlic.
Winter garlic. It is usually harvested at the end of July. There are three signs that it is already ripe:
- the covering skin begins to crack on the inflorescences, and the bulbs are exposed, but this only applies to shooter varieties - yes, garlic arrows usually break out (5), but you can always leave a couple of plants with inflorescences to use as beacons;
- lower leaves turn yellow;
- The outer, covering scales of the bulb become dry - this can be seen if you dig up one plant.
 nine0067
Spring garlic. It is removed later - around the end of August. Most varieties of this group do not form arrows, so yellowing of the leaves and lodging of the tops can serve as a visual signal for harvesting.
Photo: pixabay.com– It is better to dig up garlic with a pitchfork – this way there is less chance of damaging the bulb, recommends agronomist Svetlana Mikhailova. - You need to dig in dry weather. After harvesting, the garlic, together with the tops, is removed to dry - for about a week it should lie under a canopy. nine0003
After drying, cut off the roots and stems of the bulbs, leaving a stump of about 10 cm (if the garlic is to be stored in braids, the stems are not cut).
Garlic storage rules
There are many ways to store garlic, but practice shows that almost all of them are unreliable. The best way is to braid the plants in the same way as you do with onions.
But there are nuances:
- garlic stalks are hard and brittle, it is difficult to braid them, so you need to weave straw or twine there; nine0067
- Braids should be stored at a temperature of 1 - 2 °C - onions are stored at room temperature, and garlic dries quickly in heat.
Large heads are stored longer, so the small heads should be eaten first.
Popular questions and answers
agronomist Svetlana Mikhailova answered our questions about growing garlic.
Should garlic cloves be peeled before planting?
No way! Covering scales - reliable protection of teeth from mechanical damage, diseases and pests. Peeled cloves will rot rather than germinate. nine0003
Should winter garlic be watered after planting?
No. It will be enough for him to take root in the autumn rains. Over watering can cause tooth decay.
Can winter garlic be planted in spring?
It makes no sense. For winter varieties, it is important that there are low temperatures after planting. And the spring is too warm. If planted in April, the bulbs will grow inferior and will not be stored. And besides, underdeveloped teeth cannot be used for planting - they form roots very slowly and freeze out in winter.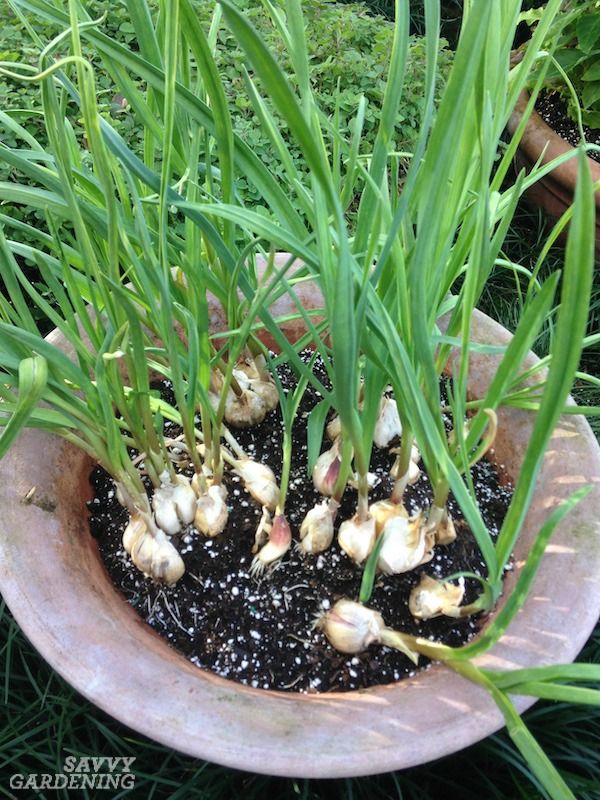 nine0003
Is it possible to plant spring garlic before winter?
It is possible, but spring varieties, when planted in autumn, take root worse and often freeze, therefore, they will give a crop much less than winter varieties.
Why does winter garlic turn yellow in spring?
There may be 4 reasons:
- cold spring - in such a situation, the leaves begin to grow, and the roots cannot yet extract nutrients from the soil;
- lack or excess of moisture in the soil;
- acidic soil;
- Fusarium disease. nine0003
Sources
- Fisenko A.N., Serpukhovitina K.A., Stolyarov A.I. Garden. Handbook // Rostov-on-Don, Rostov University Press, 1994 - 416 p.
- Pantielev Ya.Kh. ABC vegetable grower // M .: Kolos, 1992 - 383 p.
- Group of authors ed. Polyanskoy A.M. and Chulkova E.I. Tips for gardeners // Minsk, Harvest, 1970 - 208 p.
- Shuin K.A., Zakraevskaya N.K.
Learn more