Paint kitchen cabinets pictures
29 Painted Kitchen Cabinet Ideas You Can Easily Copy
Devon Grace Interiors
Looking for a quick way to transform your kitchen? Invest in a fresh coat of paint—and remember that your walls aren’t the only thing worth repainting. Since cabinets are the most visible element in any kitchen, they probably deserve a tune-up more than your walls do.
“Nothing is more impactful than a fresh coat of paint,” Mary Maloney, owner and principal designer at Bee's Knees Interior Design, says. “Paint can revive, refresh, and add new life to a tired and dated kitchen.”
When it comes to repainting your kitchen cabinets, there are a few things you’ll want to consider. For starters, what does the rest of your space look like? “Plan and coordinate carefully,” Maloney says. “Think about how the colors will relate to all the other elements and connecting spaces.”
Then, consider other factors—like your home’s architectural style, and how long you plan to live in your home before reselling it. (Spoiler alert: If you plan to sell soon, Maloney recommends keeping your space as classic and versatile as possible.)
Once you’ve narrowed down your selection, you’ll still have plenty of great paint colors to choose from. So to help you pick the perfect shade for your space, we’ve rounded up some strikingly painted kitchen cabinets, and we asked designers to share their go-to kitchen cabinet painting advice.
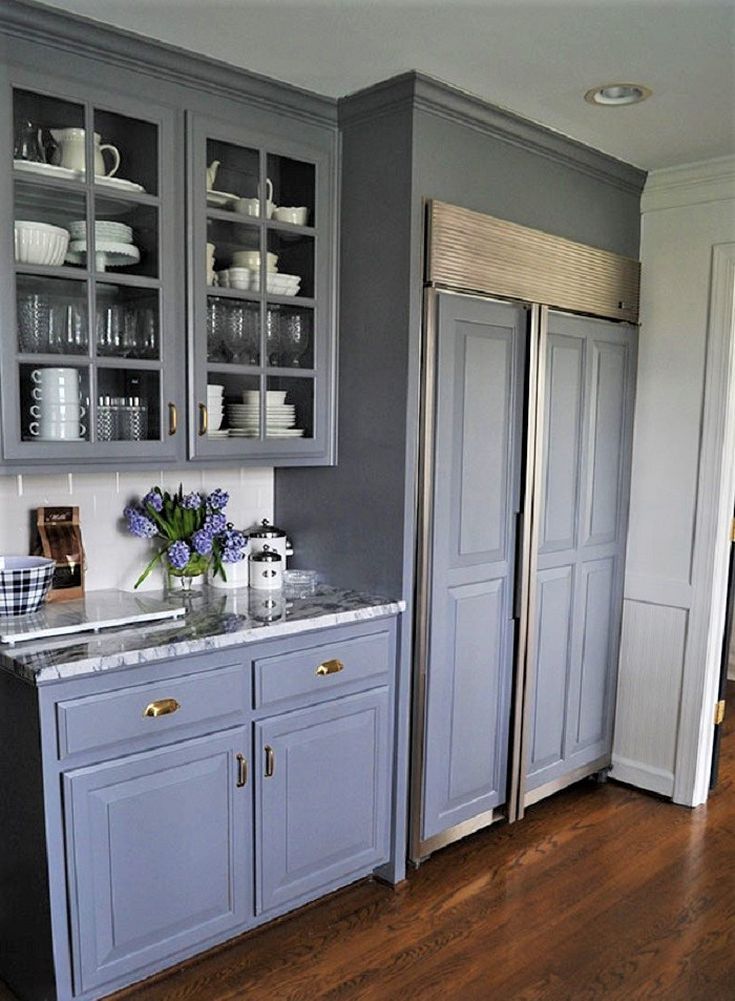
01 of 29
Becca Interiors
If you're having trouble picking a paint color, use your space as a starting point.
“We love a pop of color, but you really need to map out a game plan that is going to make sense for the long haul,” Maloney says. “What colors will work best with the architecture and style of your home?”
02 of 29
Goldalamode
Can't settle on a single cabinet color? Paint your cabinets two different colors. Two-toned cabinets have become a popular pick for kitchens. And while you can choose any two colors you like, you’ll probably want to ground your base cabinets with a dark color and pick a lighter shade for your wall cabinets.
03 of 29
Amy Bartlam
Kitchens are filled with decorative accents. And if harmony is your goal, you probably don’t want all of them to be bold.
“Pick a focal point,” Maloney says. “Who is going to be the star of the show—the colorful cabinets, the exotic marble countertops, the statement backsplash?” Decide whether your cabinets are the statement-maker, and if they're not, keep them subdued.
04 of 29
Bespoke Only
When choosing a paint color, consider how you can add contrast to your space. Olga Hanono, the principal designer at Olga Hanono, says she loves to pair a classic kitchen with a surprisingly bold cabinet color.
“If your kitchen is very traditional, I recommend that you choose a strident color to give it a touch of creativity,” she says.
05 of 29
Julian Porcino
When choosing a paint color, don't just take a shade at face value. Pay attention to the color's undertones and consider how they'll pair with the other undertones in your space.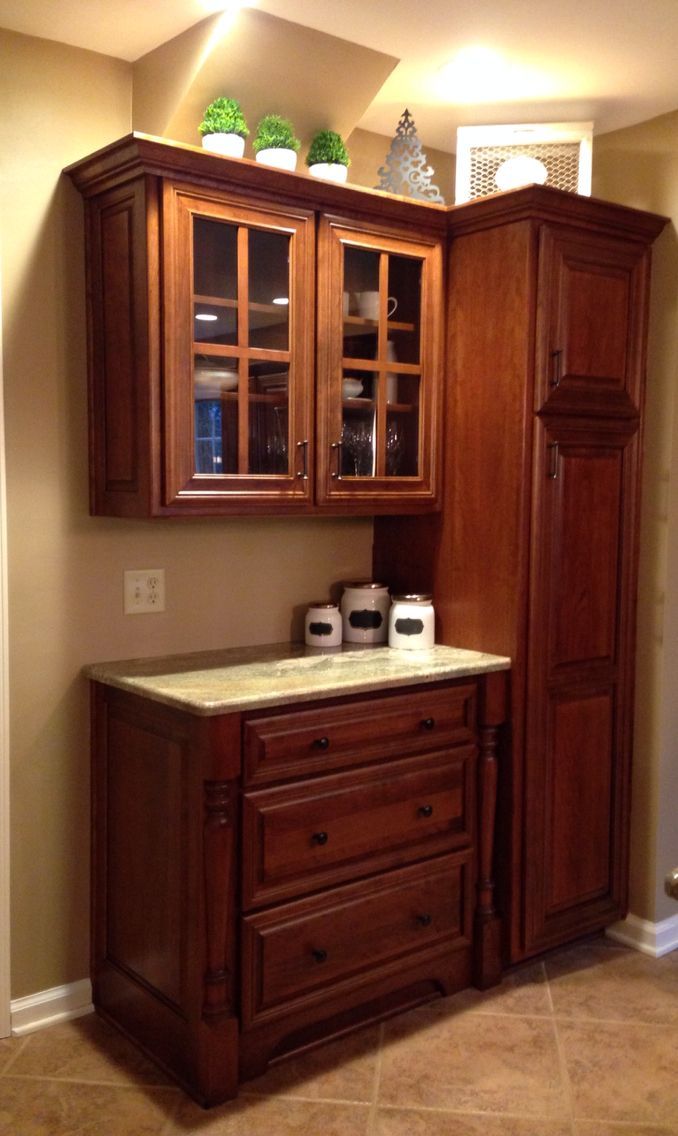
“Mistakes are common, and often occur due to a conflict of undertones,” Maloney says. Undertones are typically either warm (yellow) or cool (blue), and you’ll want to stick to one or the other.
06 of 29
Finding Lovely
There's nothing wrong with keeping it simple. Warm white cabinets are a favorite for a reason—they reliably look good.
“We love color, and we get excited when a client lets us ‘play’ with color, but you can’t go wrong with a classic white cabinet,” Maloney says. “A warm white is a favorite ‘go-to’ for cabinetry.”
07 of 29
Reena Sotropa
Your cabinets should pair well with the rest of your kitchen, so turn to your backsplash for color inspiration. Match your cabinets directly to your backsplash, or use your cabinets as an opportunity for contrast: If your backsplash is bold, could you mellow out your kitchen with a neutral cabinet color?
08 of 29
Erin Williamson Design
If you're painting your cabinets more than one color, consider divvying up your shades by cabinet style. Paint your base cabinets one color and your wall cabinets another. Or make your floor-to-ceiling cabinets a different color than the other cabinet styles in your space.
09 of 29
Becca Interiors
Black may seem like an odd color for kitchen cabinets, but the bold neutral can look great in classic and contemporary kitchens, alike. If you find yourself drawn to a dark color, go for it.
10 of 29
Design: Mindy Gayer Design, Photo: Vanessa Lentine
Keep your kitchen sleek by matching your cabinets to your walls—and matching your walls to your ceiling. This top-to-bottom approach will create one continuous wall of color, which is sure to make a statement, even if the color you choose is white.
11 of 29
Design: Mindy Gayer Design, Photo: Vanessa Lentine
Color isn't the only thing you can play with when it comes to cabinetry. Texture can make your space more dynamic, too. “I like not only using paint for the cabinets,” Hanono says.
She notes that by layering paint over a textured material—like a mesh cabinet door or a deep-grained wood—you can “give a special touch” to your kitchen.
12 of 29
Finding Lovely
If you have any glass door cabinets, consider the items you store inside them. Since glass is transparent, these items will shine through—affecting the way your paint color looks. Treat these items like you’d treat the other accents in your kitchen: Choose a cabinet color capable of complementing them.
13 of 29
Julia Robbs
Since your kitchen counters probably touch your kitchen cabinets, you want the two to pair well. “The cabinet colors you select must play nicely with your solid surfaces,” Maloney says.
Keep your colors complementary, and balance out your space. If your countertops are particularly bold, keep your cabinets subtle—and vice versa.
14 of 29
Finding Lovely
Cabinets come in different styles, and you want to make sure the paint color you choose suits the kind of cabinets you have. If your kitchen is lined with modern slab cabinets, complement them with a contemporary color, or add contrast by pairing versatile shaker cabinets with a surprisingly bold shade.
15 of 29
Jessica Nelson Design
When choosing a paint color, you need to consider every color that's in your kitchen—and every color you can see from your kitchen. (This is particularly important if you have an open floor plan.)
“Are there open site lines visually connecting your kitchen to other living areas?” Maloney says. “If so, you must think about how all the colors relate to each other—do they play nicely together?”
16 of 29
Design: Mindy Gayer Design, Photo: Vanessa Lentine
If you went all out with your kitchen—pairing bold countertops with textured light fixtures and a statement ceiling—your cabinets may be a good place to take a breather. Choose a neutral that will lend your space the cohesion it needs. And if that sounds boring, remember that neutrals abound. (Your options aren't limited to cool white or warm white.)
17 of 29
Ashley Montgomery Design
A range hood is an eye-catching element in any kitchen, so consider painting it the same color as your cabinets. This is an easy way to bring your space together, and it can look particularly statement-making if your range hood is situated between matching cabinets or shelves.
18 of 29
Design: Mindy Gayer Design, Photo: Lane Dittoe
Cabinet exteriors get all the attention. (And rightfully so—they're the first thing someone will see when they step into your kitchen.) But cabinet interiors deserve some love, too. For a striking effect, paint your cabinet interiors the same color as your cabinet exteriors. Then they're sure to look great, whether they're open or shut.
19 of 29
Proem Studio
Your floors may not be the first place you turn for kitchen cabinet inspiration. But since they're a major part of your space, they're worth keeping in mind.
“You need to factor in your flooring, backsplash, and countertop materials,” Maloney says. So keep your undertones consistent. And if your floors are particularly striking, balance them out with subtler cabinets.
20 of 29
Becca Interiors
If you want your cabinets to blend into your space without matching your walls exactly, choose a color that's a shade or two darker than your walls. Since the shade will be in the same color family, it should naturally suit your space—while adding a subtle dose of contrast to your kitchen.
21 of 29
Amy Bartlam
Craving a kitchen that feels classic but not conventional? Paint your cabinets a subtle shade, and save the pop of color for your island. “You can play it safe by introducing a pop of color for the island area,” Maloney says.
22 of 29
Tyler Karu
Remember that you don't have to paint all your cabinets. In fact, by painting most of your cabinets—and leaving some unpainted—you can create a pop of un-color that’s just as bold as a pop of color.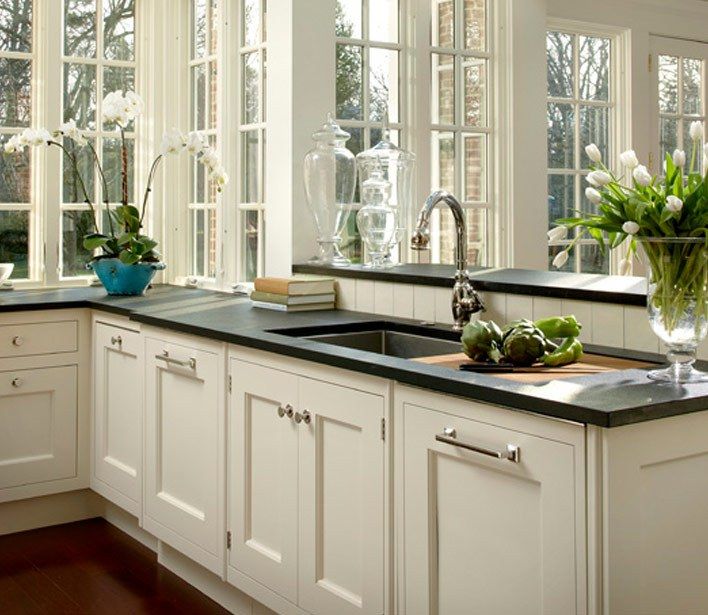
23 of 29
Tyler Karu
On-trend colors can be incredibly tempting, but Maloney cautions against them. “Stay away from anything too trendy, and think about what you are going to love for the long haul,” she says.
24 of 29
Design: Mindy Gayer Design, Photo: Vanessa Lentine
One sneaky place to add an accent color? Your cabinet interiors. If your cabinets are open, this can be a great way to add contrast. And if your cabinets are closed, this detail can serve as a fun finishing touch—one that’s only visible when your cabinet doors are open.
25 of 29
Devon Grace Interiors
Picking three different cabinet colors may seem like overkill. But if all three shades are neutrals, they should play surprisingly well together.
26 of 29
Homemade by Carmona
If you can’t commit to wall-to-wall color, designate a few statement cabinets to paint a vibrant shade. Look around your space for worthy candidates: could the tiny cabinets above your oven become the pop of color you’re looking for?
27 of 29
Devon Grace Interiors
Anxious about adding color to your space? Push yourself to take a risk. “I encourage people to dismiss their fear of colors and experiment,” Hanono says. “You can add a lot of freshness to your kitchen with a bit of color.”
28 of 29
Devon Grace Interiors
No kitchen cabinet is complete without a little hardware. So factor accents—like hinges, doorknobs, and drawer pulls—into your painting plan. “If you wish to update or replace hardware, make that decision before the painting begins,” Maloney says.
After all, your new hardware might affect your cabinet color choice. And if it’s a different size than your old hardware, you might have some holes to fill in before painting.
29 of 29
Calimia Home
Colors can look different at different times of day, so spend time with the colors you’re eyeing before committing to them. “Do color tests,” Hanono says. “Colors don't always match.” And they don’t always look the way you thought they would, either.
12 Ways to Revamp Your Kitchen Cabinets for the Ultimate Makeover
30 Painted Kitchen Cabinet Ideas in A Variety of Beautiful Colors
Painting your kitchen cabinets is one of the easiest ways to completely change the look and feel of your kitchen on a budget.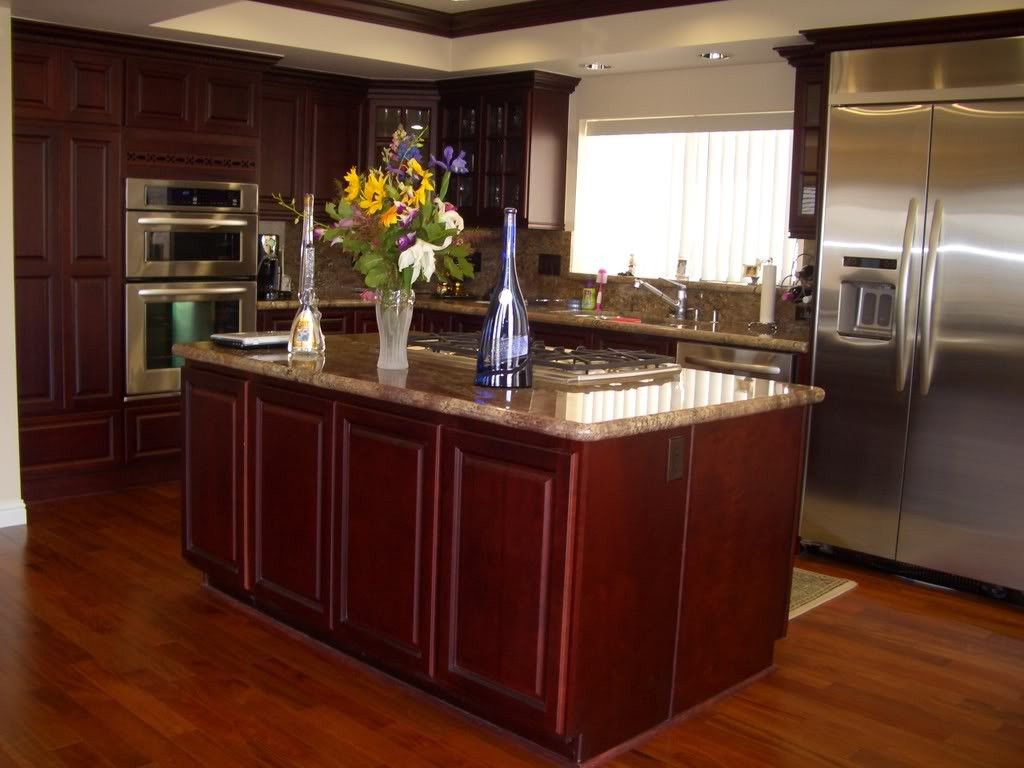 These 30 beautiful painted kitchen cabinets include ideas for many different styles of cabinets painted with a whole range of gorgeous colors.
Painted kitchen cabinets are very popular and it isn’t hard to see why.
A fresh coat of paint can make even the most dated kitchen look fresh and new in just a few days. It really is amazing how much painting your cabinets can completely transform your kitchen even if you don’t change anything else in the room.
You can hire a professional to paint your cabinets, but I highly recommend painting your own kitchen cabinets as a DIY project.
Painting cabinets isn’t a particularly difficult or complicated DIY and you will save thousands of dollars by doing it yourself rather than paying someone else.
But even if you decide DIY isn’t for you, hiring a professional to paint your cabinets is still much more affordable than taking on a full kitchen remodel.
This post contains affiliate links which means if you make a purchase after clicking a link I will earn a small commission but it won’t cost you a penny more. Click here to see my full disclosure policy.
Before we get to all the beautiful kitchen cabinet inspiration, I want to share a few tips for choosing the right paint for your kitchen cabinets.
When you decide to paint your cabinets, you have two very important decisions to make –
- What paint color to choose.
- And what type of paint to use.
Choosing the best paint color for your painted kitchen cabinets
Choosing the right paint color for your kitchen cabinets is the fun part. But it can also be extremely intimidating.
Your kitchen cabinets are usually the biggest component of your kitchen. That’s why painting them can completely transform your whole kitchen.
But that also means that the color you choose is going to have a huge impact on your finished kitchen so you want to choose a color you are going to really love.
Different paint colors can give the same kitchen a completely different feel.
White or gray might be perfect for that modern farmhouse look while a deep dark green or even black can give a more contemporary, sophisticated look.
The most popular colors for kitchen cabinets right now are white, gray, shades of blue, shades of green, and black. But that doesn’t mean you can’t choose any color you like – I’ve even seen pink kitchen cabinets that looked beautiful!
I’ve gathered kitchens with cabinets in a wide range of colors below to make it easier to see how different paint colors affect the look and feel of different kitchens.
Choosing the best paint for your painted kitchen cabinets
Just as important as the color is what type of paint you use to paint your cabinets.
Most of us use our cabinets every single day, opening and closing cabinets and drawers repeatedly, and all of that use can quickly destroy a poor paint job.
The biggest factor in making sure your beautiful paint job will last is using a high quality paint that is meant for cabinets. This isn’t the time to grab some leftover wall paint and start painting.
The great thing about painted cabinets being so popular is there are now lots of great cabinet paints out there with new ones coming out all the time.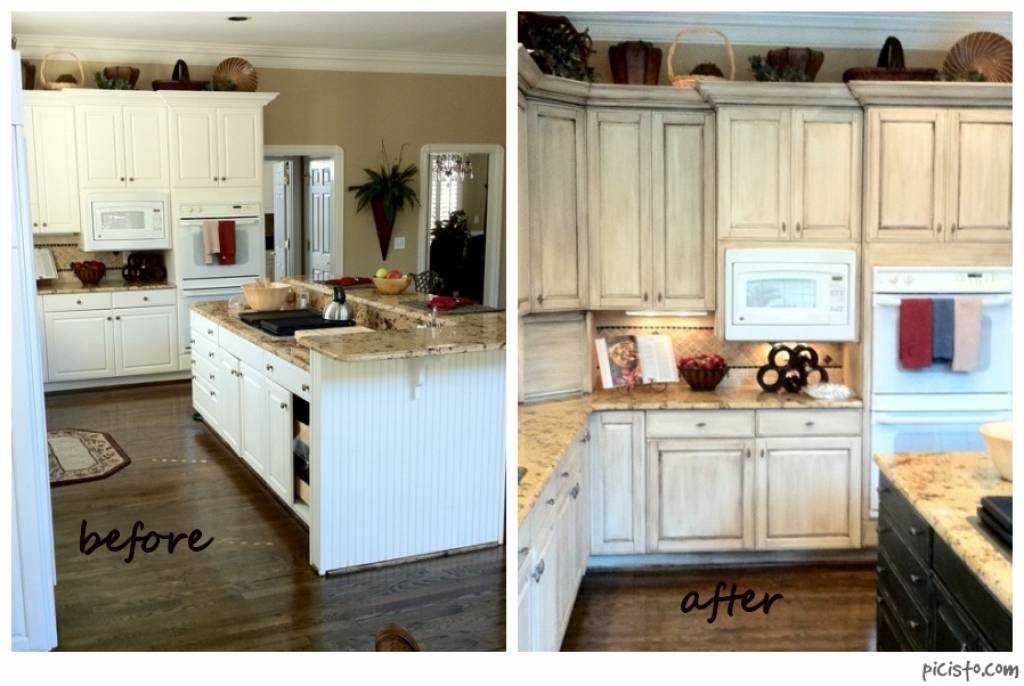
I haven’t tried all the cabinet paints available, so I can’t comment on all of them, but I do have two paints that I highly recommend for painting kitchen cabinets.
Both of these paints hold up well to moisture and regular cleaning, resist yellowing over time, and dry to a very durable finish.
My top paint picks for painting cabinets
Benjamin Moore Advance
Benjamin Moore Advance is a self-leveling, non-yellowing, paint that helps block stains. It is also low VOC, low odor, dries to a hard finish, and does not require a separate sealer. You will need to use primer before using this paint on wood cabinets.
General Finishes Milk Paint
General Finishes Milk Paint is actually an acrylic paint, not a true milk paint, and doesn’t usually require primer. It is easy to work with, goes on smoothly, and dries to a hard finish. A separate sealer is not required, but it is recommended to use a sealer for high-traffic projects like painting cabinets.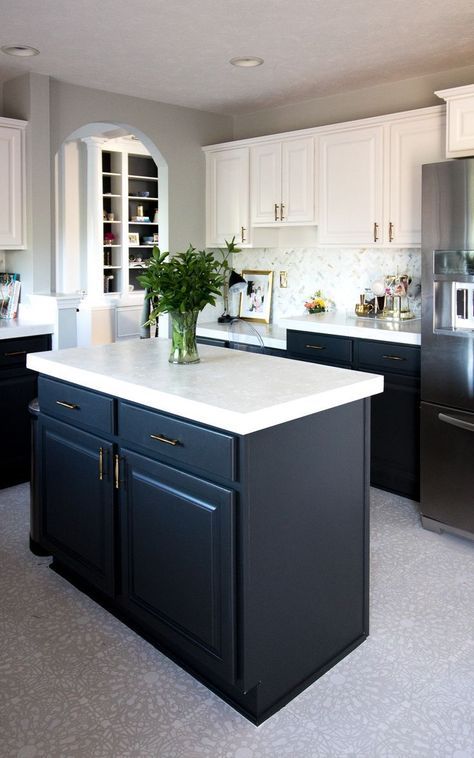
General Finishes High Performance Topcoat is my top pick for sealing painted cabinets. I’ve used General Finishes Milk Paint + High Performance Topcoat to paint my bathroom cabinets as well as many furniture pieces and they have held up beautifully.
Kitchen Cabinets Painted White
You can never go wrong with classic white cabinets. They look beautiful in any style kitchen and work well with every type of countertops, backsplash, or flooring.
Blue Painted Kitchen Cabinets
Blue painted cabinets have gotten very popular in recent years and it's not hard to see why! Whether it's a dark navy or a lighter shade of blue, painting your cabinets blue is a great way to really make them stand out.
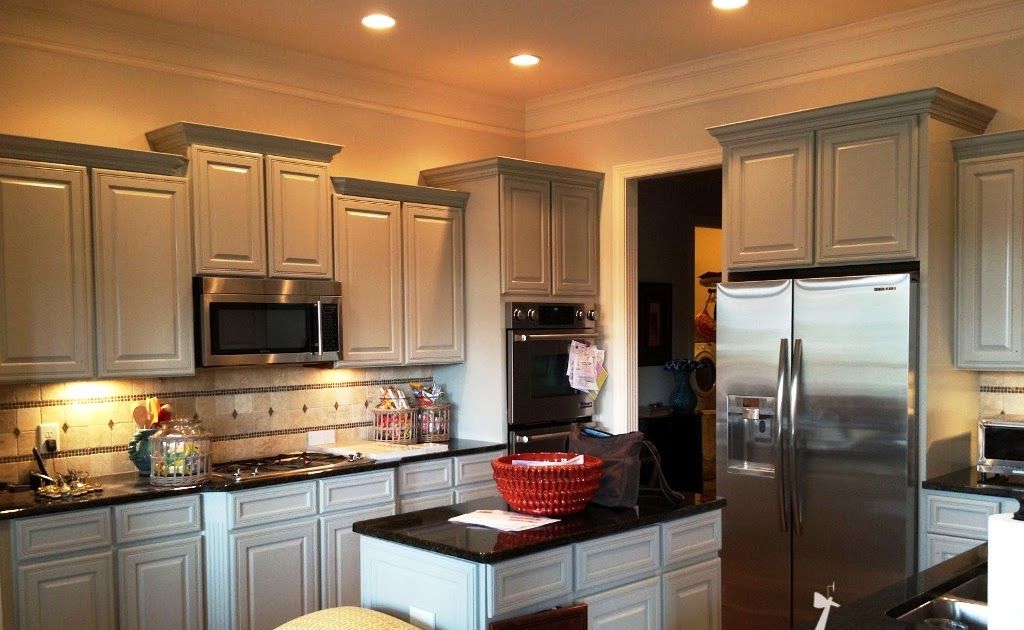
Gray Kitchen Cabinets
If you want a great neutral color for your cabinets, but white's not for you, gray may be the perfect choice!
Kitchen Cabinets Updated with Green Paint
Green is an increasingly popular choice for painted cabinets and once you see these gorgeous makeovers you will understand why!
More DIY kitchen projects I think you’ll like:
- 21 Best Budget Kitchen Makeovers
- Painting oak kitchen cabinets white: the secret to perfectly smooth cabinets
- How my painted countertops look after three years of use
- Where to buy inexpensive cabinet knobs and pulls
I’d love for you to pin this post on Pinterest!
6 painting steps and instructions
Skip to content
Furniture
Mister
Kitchen cupboards are not always worth replacing, sometimes they need to be painted. Renovation of kitchen furniture is now an extremely fashionable trend. Beautiful facades often have great potential that can be highlighted with the right paint. Before deciding to completely get rid of the old kitchen decor, take a brush or roller. It may turn out that painting furniture white will be the bull's-eye! nine0003
Contents of the article
Replacing or painting kitchen furniture, what to do?
DIY is one of the fastest growing trends. Repairing old kitchen furniture, or rather painting it, which has already survived its best years, is a positive trend dating back to the good times when do-it-yourself was appreciated and individual appliances were respected. Better to repair than throw away, freshen up instead of replaced, right? Moreover, we will always have time to buy a new one, if there would be, as they say, money. And the easiest and most effective way to give the kitchen a neat look is to paint it with quality paint.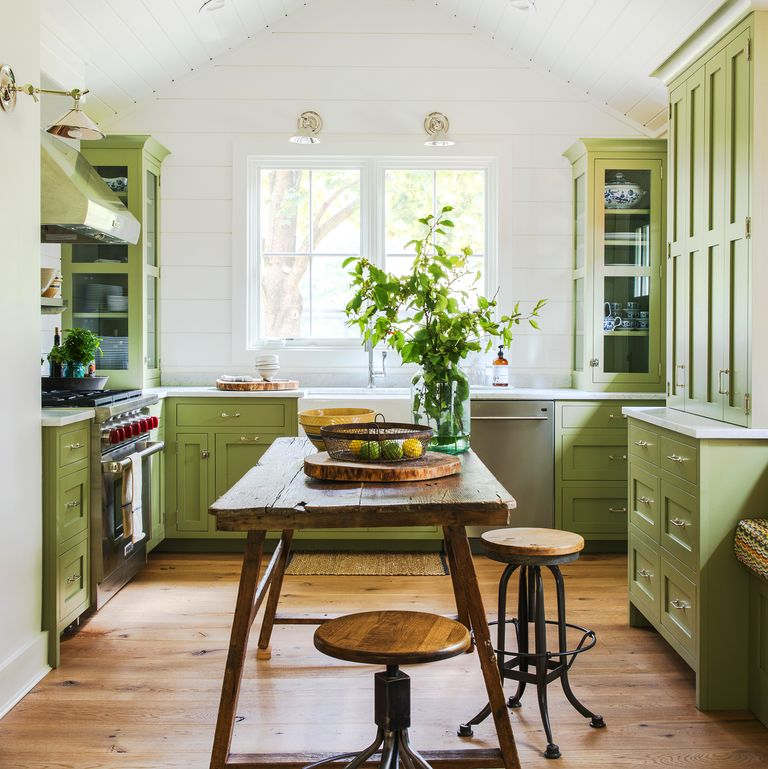 Here's how to do it competently, we will discuss in this article step by step, in 6 simple steps. nine0003
Kitchen furniture wears out the fastest. High intensity of use, exposure to grease, stains, exposure to water vapor and, finally, the risk of damage means that after a few years we can notice more or less serious scratches or abrasions on the fronts of drawers and cabinets. On the other hand, such minor flaws do not necessarily mean that they need to be replaced. Kitchen paint is often a much better (and certainly cheaper!) way to replace it. It is enough to apply several layers, replace the handles or the countertop, to change a lot in the design of the kitchen. nine0003 If you decide to repaint the kitchen set and decide what color it will be, be prepared for the fact that you will have to change the textiles on the windows and the upholstery of upholstered furniture
What paint to choose for painting kitchen furniture
Of course, our mission has a chance of success if we focus on a quality product. Many people who start their adventure with do-it-yourself furniture repairs - kitchens and other areas - are in doubt about which product is being used. Do I need paint for veneered furniture or is it standard wood furniture paint? There is no single answer. nine0003
The manufacturer's recommendations and the product data sheet, which describes the applications, are of key importance. Usually, painting kitchen furniture made of MDF board, as well as veneered or even wooden furniture, requires us to purchase one product.
These are mainly acrylic paints, universal, resistant to a number of factors, including exposure to solar radiation or cleaning. Manufacturers often produce special paints for painting wooden furniture, which allow you to achieve the perfect visual effect and effectively protect the surface. nine0003 Applying enamel with a brush or roller is difficult. For painting kitchen facades with your own hands, it is better to choose auto enamel. It is available in pressurized cans to achieve an even coat without the hassle.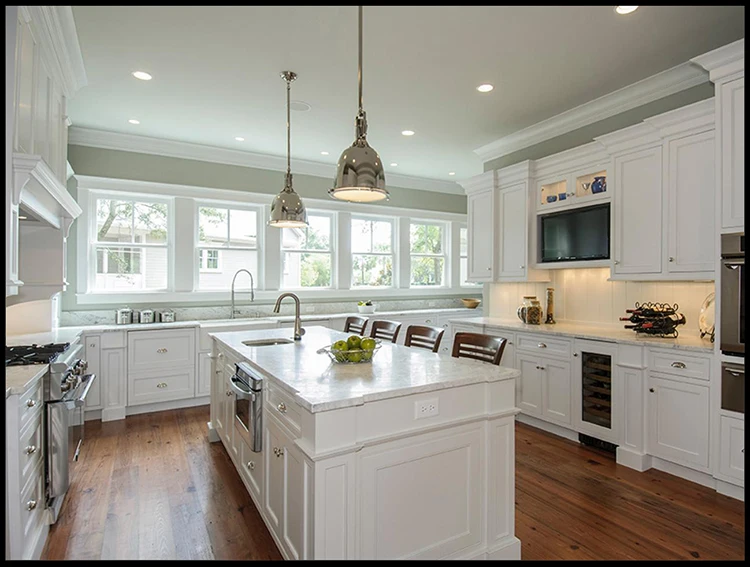
Features of kitchen paints
To paint kitchen cabinets well, you need to take into account the nature of the composition, water resistance, degree of coverage, and, of course, color. In fact, the choice is not so great:
- Oily - they are called so because the solvent for them is not aqueous solutions, but oily ones. nine0025 This option is remarkably resistant to the action of moisture and steam, perfectly tolerates temperature changes. However, the structure of the paint is viscous, it is difficult to apply it. To repaint the facade well - without streaks, bumps and light spots, you need a lot of experience. In addition, oil formulations dry for a long time, and drying is accompanied by a heavy unpleasant odor.
- Acrylic paints. They use water as a solvent, so they are completely safe and hygienic. For the kitchen, it is necessary to choose waterproof acrylic compositions, otherwise the painted set will quickly lose its appearance.
 The composition lays down very easily and evenly, so painting the facade of the kitchen with your own hands is quite simple. In fact, waterproof paint is also washed off with each wash. However, this does not happen so quickly: visible abrasion is observed no earlier than after 500 cleanings
 - Alkyd enamels - paints based on organic solvents. For the kitchen, this option is considered the best, as it has a remarkable hiding power; safe, dries quickly and easily and does not wash off. The coloring layer is resistant to steam and condensate, does not absorb dyes and soot and is insensitive to temperature. All its advantages can be observed in finished kitchens made of MDF with enamel coating.
- Repair paints (e.g. repair paint V33) . This is a special range of products for the repair of kitchen furniture and other surfaces (including ceramic tiles or even household appliances - depending on the type). They are easy to apply and provide a durable and very attractive surface.
Aerosol paint
The most convenient option for painting the facade of the kitchen at home is aerosol paint in cans, for example, acrylic or car enamel due to its heat and moisture resistance. nine0025 Acrylic spray paint is durable, damage resistant and available in many shades.
Aerosol car enamel provides the greatest strength, visually looks smoother, perfectly tolerates heat and temperature changes.Aerosol paint in cans is used in a variety of areas, including it is applicable in household and repair work for painting furniture. Low cost, ease of spraying and the ability to create a perfectly even coating make you choose this particular paint and varnish material and make it indispensable for repair and decoration. nine0003
Of course, spray painting will be more accurate. Here we must remember that during operation, part of the material will be sprayed to the sides. Therefore, it is necessary to cover everything around with a film so that the paint does not get. For a more saturated color, you can paint again after the first layer has completely dried.
A perfectly glossy finish can be achieved by applying several coats of varnish with an intermediate polish after each coat driesImportant! Before starting work, we protect all surfaces that we are not going to repair and paint, such as countertops, as well as walls and floors, it is advisable to cover them with masking film and stick with masking tape
Video - How to update an old kitchen
Choosing a paint color
You can choose one color or several colors for painting a kitchen set, which is becoming very popular , it is important that the color scheme is in harmony with the overall interior. It will be easy for those who have taste, but for beginners in this business it will be a little difficult.
Consider the following options:
- Neutral solution . This includes all varieties of beige, as well as brown, black, gray and white. Combining these colors, it is quite difficult to make a mistake, you just need to carefully combine dark tones. The most common option: the upper cabinets are light in color, the lower cabinets are dark. This combination is more suitable for classic interiors.
- It is important to remember that it is better not to combine only dark or only light colors. nine0025 Don't forget about bright colors. So, black can be combined with red, light green, mint, pink, beige, white with blue, lilac, blue, beige with red, lilac with cappuccino color, burgundy with cream, white, wood color, etc. Two bright or two neutral colors is an interesting option, here you should rely on your taste. The theme of vegetables and fruits will look no less interesting.

- If you want to have an original interior, combine contrasting colors - yellow with lilac, orange with blue, blue with red or pink. For a more relaxed atmosphere - orange with red or yellow, green with yellow or blue with green.
- To date, the use of several colors at the same time has become widespread. For example, two calm shades can be “diluted” with a colorful detail. You can use a different color for each individual facade - your kitchen will be in retro style.
See examples in the photo below:
Read also:
Color solutions for the interior of the kitchen: Description and best examples of design
How to color the kitchen settings: Repair in 6 stages
Painting kitchen cabinets is often a much better solution than buying a low quality, inexpensive new kit, especially if the furniture is still functional and easy to use.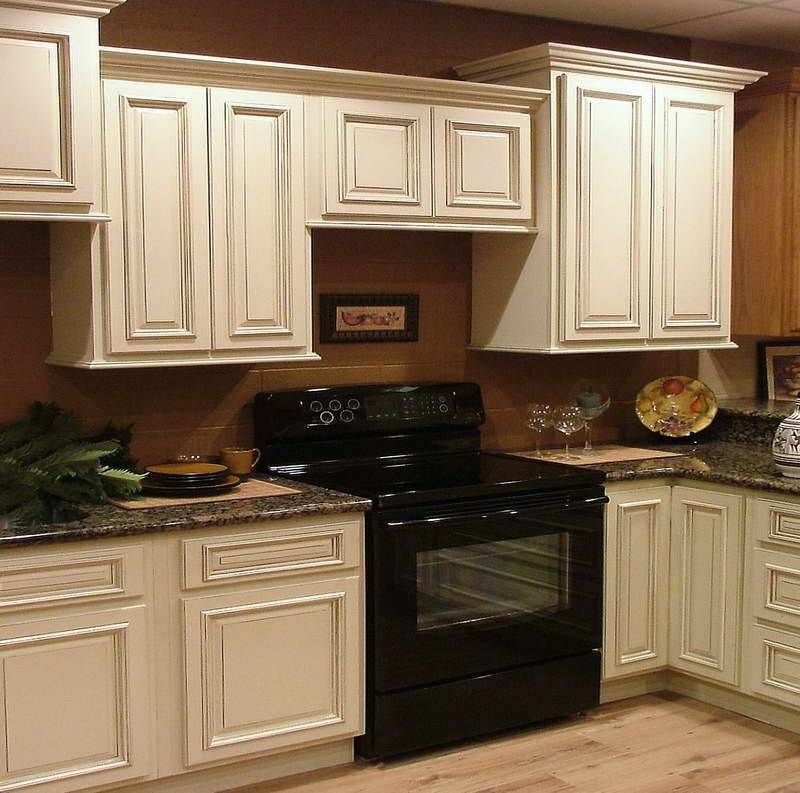 nine0024 A universal, well-known and applicable principle in many areas, which can be applied to the repair of kitchen furniture: the most important thing is preparation. The final effect will depend on how accurately we prepare the equipment for further work.
1. Defect detection and minor repairs
The first thing to consider is the furniture. We will check the condition of cases, facades, skirting boards, shelves, cabinets and drawers, we will check how serious the damage, scratches and cracks are. It is possible that they can be supplemented with a special mass (for example, with wood defects) or sanded with sandpaper. By the way, let's think about adjusting and profiling (and in some cases replacing) fittings, hinges and guides. nine0003
2. Preparation of surfaces for painting: matting
Of course, only a change in color will allow us to make a diametrical metamorphosis of kitchen furniture. To achieve a beautiful (and durable!) effect, let's first prepare the furniture for painting.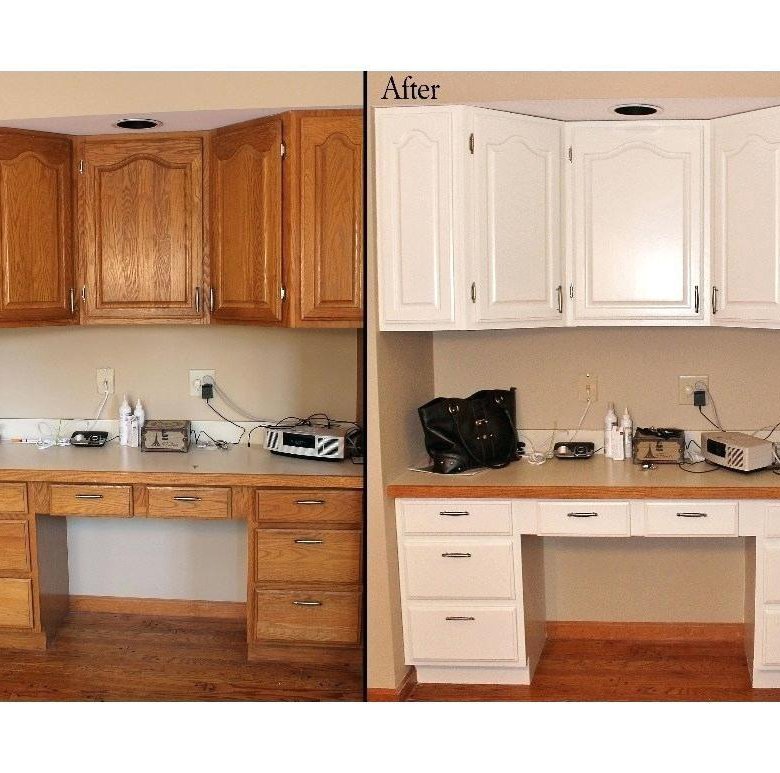 To do this, we will disassemble the handles and handles, which will allow us to accurately perform the work. It will not always be necessary to disassemble cabinet doors. We can do this to facilitate repair work.
It turns out that the repair of kitchen furniture from different materials is basically very similar. The basis here is matting the surface, that is, rubbing with sandpaper and at the same time grinding all the bumps and reducing scratches. Why is it so important? If the surface is not rough, the new paintwork will not provide adequate adhesion. As a result, after a while, it will begin to flake off. nine0003
First we mat the furniture with coarse-grained sandpaper, then we smooth the surface and get rid of burrs with fine-grained paper. Such procedures will ensure perfect adhesion of the paint to the furniture.
A sander will greatly facilitate manual workWant to achieve the most even and durable finish? Then it is worth sanding the surfaces after each coat of primer, paint and varnish (except for top coats)
You can also use nail polish removers. To remove the PVC film, you will need a building hair dryer. With it, it is necessary to heat the film from the front side and carefully remove it from the facade. nine0024 Please note that during the work a rather pungent odor will be released, so it is advisable to choose a non-residential premises for this procedure.
In addition, we prepare both veneered and wooden furniture for further work. In the case of veneers, first check their condition. If they stick out and start to come off, let's tear them off the facades. We remove all chipped paint and its peeling fragments from the surface of wooden furniture - if the furniture was previously painted. nine0003 Finally, remove the dust generated during operation with a vacuum cleaner, and then wipe the furniture with a damp cloth and detergent. Let's try to remove the grease that could affect the adhesion of the paint layer to the furniture
3. Primer
The primer for plastic and wood differs in composition, so before you update the facade of the kitchen, consult with the sales assistant in choosing the right product. The quality of the primer determines how well the painting will happen. The substance must be applied in 2 thin layers. nine0003 Before applying the compound, arrange the parts so that you are comfortable.
After each application, it is recommended to wait until completely dry, and then treat the primed surfaces with sandpaper to even out the coating and increase paint adhesion. After that, leave the product for a day.
4. The process of painting the set
We start painting veneered, plank or wooden furniture as soon as it is completely dry. We will need a small brush, a large brush, a narrow and wide roller - the size of the tools must be adapted to the specifics, furniture design, length and type of bristles and paint. nine0003
In the product data sheet, because each paint may have different requirements. The manufacturer's recommendations should also be followed when it comes to painting conditions, the number of coats or the time interval between one coat and another.
We start painting kitchen appliances from their hard-to-reach places, corners, corners and details. For this, a small brush is useful, thanks to which we can accurately cover the cavities or milling with paint. nine0003
Then move on to painting larger surfaces using a larger brush or roller. We paint fragment by fragment, first with a brush, and then with a roller, covering the next parts of the furniture with paint.
Tip! The brush for painting the facade of the kitchen at home should be new. With it, it is easy to paint recesses, joints, corners, small details, in general, all those hard-to-reach places where it will be difficult or impossible to reach with a roller. For even application of paint, purchase a roller on foam rubber, and a special paint tray will make the work more convenient and will not absorb a lot of paint material into a brush or roller
5.
 Replacing the decor of the front of the kitchen set or getting rid of unnecessary elements
 A brilliant trick that allows you to visually refresh the look of old kitchen furniture is to remove the front trim. In addition, think about replacing the legs (those covered with an overlay usually do not look very designer). These two simple steps will allow you to optically shift the center of gravity: the floor will become more visible, and the body will become lighter, thinner and less massive.
If you want an original kitchen set, use decoupageDecoupage cards or napkins with a pattern are used here, you can take various pictures cut out from magazines, print some picture on a printer. We place the images on the facades, glue them on PVA, leave them to dry completely. At the end, we cover with a transparent varnish in several layers.
Even an inexperienced painter can decorate boring facades of a headset or hide local damages (scratches, chips, stains, etc.) with decoupage drawingsAdditional decorative processing
Additional materials help create unusual effects on the surface, no matter the color scheme:
- Stencil or tulle allow you to create lace designs.
- Gleezal will be needed to create embossed patterns.
- Masking tape and stencil are used when the shades themselves when finishing are two or more.
- A thin brush is more convenient to display gold and silver patterns. This should be done after the varnish layer dries. nine0051
- With the help of an airbrush, artistic painting is performed according to sketches.
- Cling wrap is a technique used to create marble surfaces. At such moments, the products simply glisten, while drawing veins and highlighting the relief texture.
- With a simple comb, it is easy to draw a relief graceful structure.
- Unique rustic facades are created by applying a rough canvas or mesh to the surface.
- Embossing - this technology is applicable with the help of pimpled film. The surface will look like alligator skin when painted. nine0051
The main thing is a competent approach, and simple painting will give new life to an old set
Painting kitchen furniture with your own hands is a complex process, but it involves the use of a creative approach.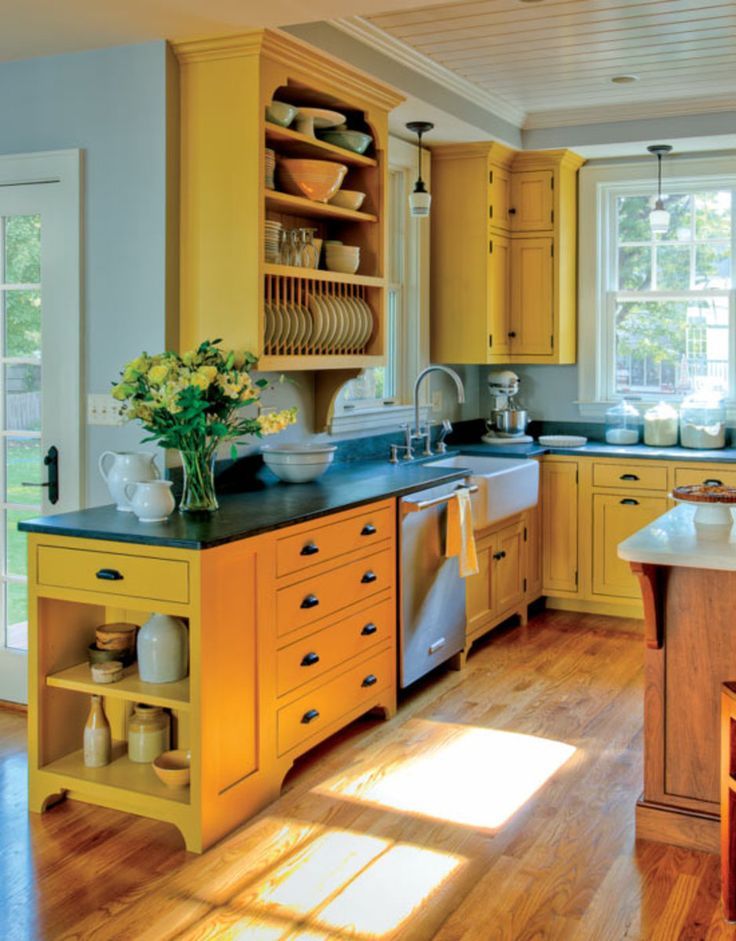 You will have to spend a lot of time, but the result will pleasantly surprise not only the owners, but also the guests who will visit you. There are no restrictions on the options used, everyone finds the closest option. It remains only to select the appropriate materials. nine0003 Some frame hinged doors (except for painting) are additionally transformed by replacing the inside with glass. Thanks to this, a stylistic renewal is achieved.
6. Replacement of accessories
Details, little things, small elements can make a significant, even diametrical change in the appearance of kitchen furniture. When planning a comprehensive kitchen renovation, do not forget about replacing handles. Thanks to this, it is much easier to achieve a given interior style. There are rustic and modern, industrial and classic pens in every store, just pick the ones you like best. Believe me, if the accessories are not rare and there is nothing valuable in their design, you should not bother with their repair.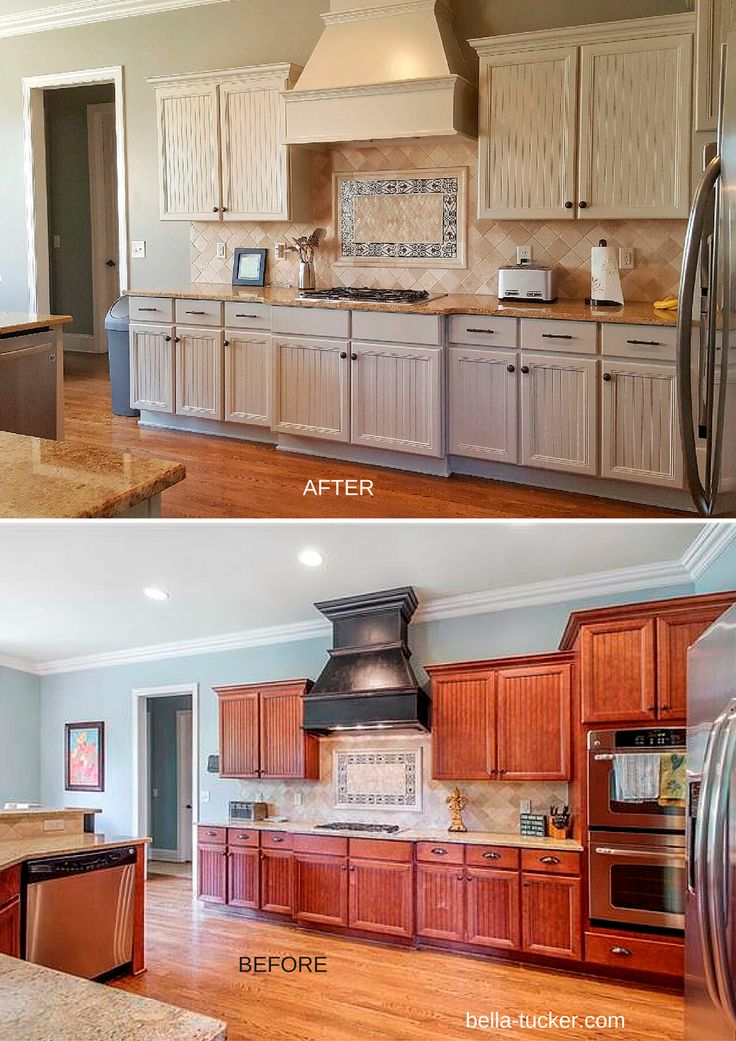 nine0003
Read also:
How to choose high-quality accessories for kitchen furniture
Video-painting of kitchen facades MDF
photos of example of furniture
The following are several photo dodging kitchens and after painting. painting. Pay attention to how updated and bright the kitchen furniture has become, and how the interior of the kitchen has changed.
To summarize
How to repair and paint kitchen furniture, so that the result does not disappoint? First evaluate the range of damage and work required, then select the best paint product.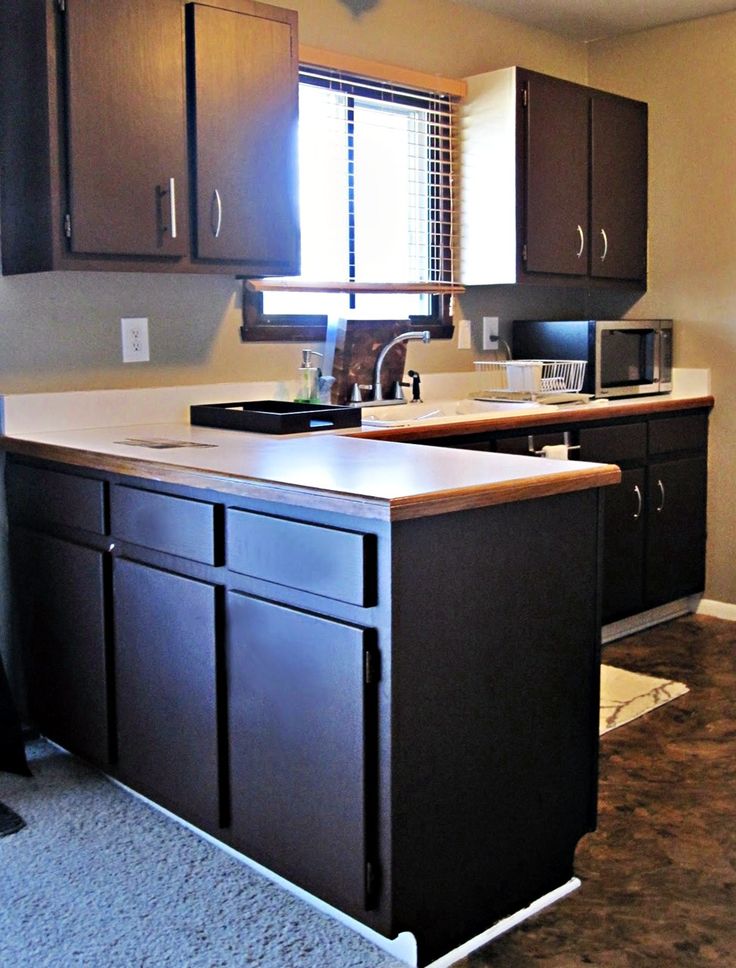 Thanks to high-quality paint for painting furniture, we do not have to think about time-consuming, thorough repair and replacement of equipment. Why replace when you can extend life? All you have to do is change the color, tone or shade, plus a thoughtful selection of accessories to create your dream kitchen with interior design magazine furniture. nine0003
As you can see, painting a kitchen is not only a renovation, but also creativity. Now that you know how and how to paint the facade of the kitchen with your own hands, you can safely get to work. In the renovated premises it will be not only pleasant to be, but also to cook, wash dishes, meet and chat.
Video - Master class: how to paint furniture in the kitchen
- ← Your kitchen: 100+ photos of real interiors and examples of kitchen design
- Porcelain tableware for serving the dining table: sophistication and style →
TOP-5 articles
Buy a grinding machine with delivery in Krasnodar wholesale and retail from the PROinstrument online storeHow to paint by numbers: preparation, tips and techniques
one What is included?
2 Nuances of choice: complexity, stretcher, image nine0003
3 Preparation is work too!
4 5 coloring techniques
five Take care of the instrument!
6 findings
Do you dream of drawing, but doubt your abilities? Paint by number is what you need.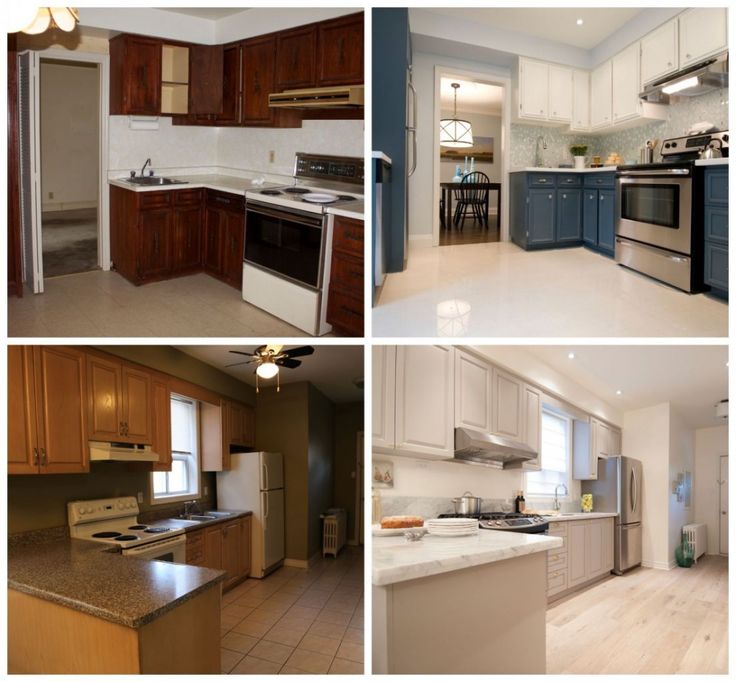 With their help, you can not only have a good time, but also create your own “little masterpiece of painting”. To do this, you do not have to finish drawing courses and run around the shops in search of the right brush. It is enough to choose a set with the image you like. nine0003
How to do this and start painting by numbers, we tell in our article.
The set of materials included in the drawing kit may vary, but as a rule it contains:
- drawing , which is printed on canvas (textile) or cardboard (paper). It is easier to draw on cardboard, and kits with it are more budgetary, but due to the nature of the material, you will not be able to fully feel like an artist. Drawing on canvas is more difficult, such drawings are more expensive, but the sensations are more naturalistic. The canvas can be stretched on a stretcher or not. Our advice to beginners: start on cardboard canvases; nine0051
- diagram (control sheet) - “spare sheet” with drawing and numbers.
 Needed for force majeure: for example, if the sector number on canvas or cardboard is worn out or dirty;
 - a color image of the future painting - so that the artist from time to time compares with what he is getting and be sure that he is moving in the right direction;
- paints are usually small jars of acrylic (rarely watercolor) paints. The jars are marked with numbers that correspond to the sector numbers in the picture. Sometimes paints come in tubes. For novice artists, acrylic is more suitable, since it is easier to work with them and it dries faster; nine0051
- brushes - usually in a set there are several brushes of different sizes for convenient drawing of large and small details;
- lacquer mix - May be included but not required. She covers the finished work to protect it from dust and fading. If there is no varnish in the kit, you can buy it yourself.
More rarely, the set may include a leaflet with brief information about the artist, fasteners to hang the painting on the wall, and even easel .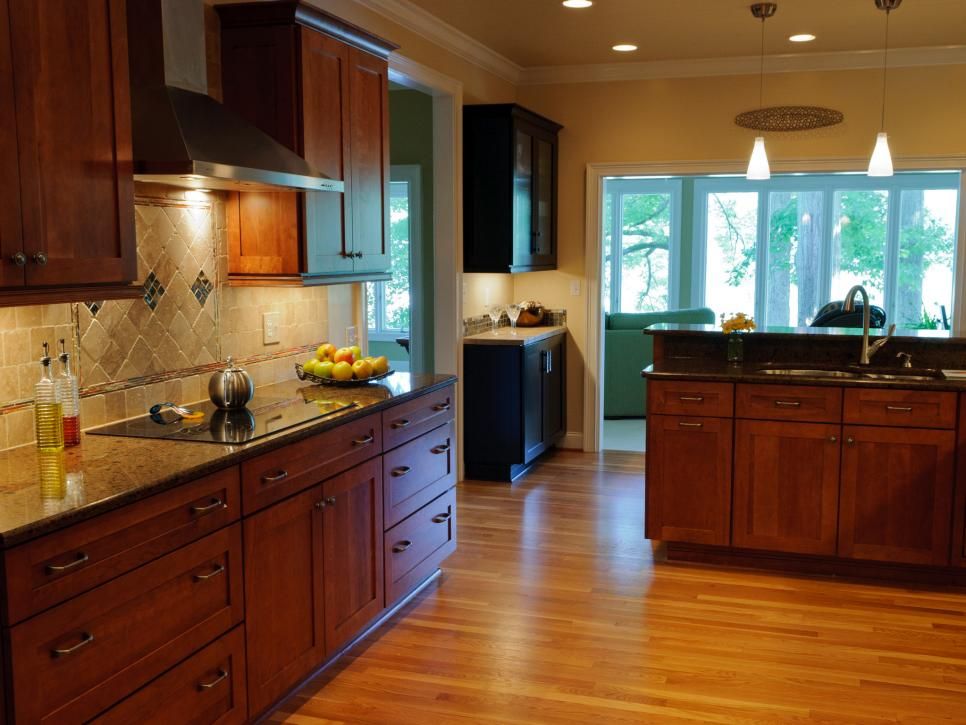
Interesting to know: some drawings are originally "slightly colored", that is, their sectors are slightly tinted in the desired colors. Such kits are designed for people with vision problems and children.
If you are just about to enter the cohort of painters by numbers, it is worth knowing about some of the features of choosing a picture and kit configuration that you may encounter.
Of course, the first thing that people pay attention to is the picture itself . Someone likes cute animals, someone likes beautiful landscapes, someone has a weakness for majestic architectural structures. You should not jump into the quarry and choose something difficult. For the first attempt, plain landscapes, animals, birds are more suitable, but it will not be easy for a beginner to draw a person or an icon.
Another important nuance is difficulty level . It is indicated by asterisks or numbers on the box: the more, the more difficult.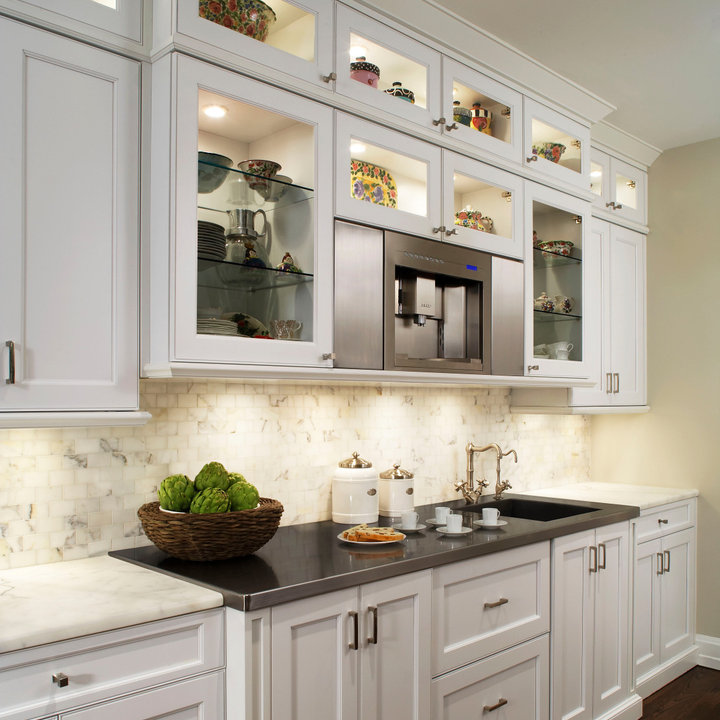 The following levels are distinguished:
- initial (1-2) - the minimum number of small parts and a large number of large ones. Suitable for those who pick up a brush for the first time, or for children;
- medium (3-4) - more medium and small parts. Suitable for those who already have little experience, or for very confident beginners;
- complex (5) - with a large number of small elements. It is better to start such creations already having filled your hand in simpler jobs.
If the image in your set is printed on canvas and not cardboard, make sure the canvas is stretched on a stretcher. Some manufacturers remove it from the package to reduce the cost of the kit, but drawing on canvas without a stretcher is inconvenient.
If you liked the image in the set without a stretcher, then you should buy it separately and stretch the finished work yourself or in a framing workshop.
Life hack: Use a magnifying glass to draw areas with an abundance of small elements. nine0003
To make drawing enjoyable and not have to wash paint off surfaces afterwards, do not ignore the stage of workplace preparation. To start , clear the space for work so that nothing interferes or distracts. After securely position the picture . There are two options here:
- for easel — convenient, but a little expensive;
- on the table - not so convenient, but without extra expenses.
Prepare materials. In addition to the paints and brushes from the set, you may need:
- newspaper or film to cover the surface if you are painting on a table. Otherwise, you will then have to wipe off the acrylic paints from the countertop;
- jar of water - to wash the brushes in the process;
- toothpicks - sometimes with their help it is easier to draw the smallest elements;
- cotton swabs or wipes - useful to remove excess paint or correct a careless smear.
Life hack: it happens that light shades do not overlap the color numbers. In this case, you can first apply white paint to the element, let it dry, and then apply the desired color.
You have bought a set, prepared a workplace, which means you can start working. But there are so many sectors on the canvas, and so many colors in the picture that the eyes run wide. Where to begin? nine0003
There are 5 basic ways to paint pictures by numbers.
Light to Dark - a technique in which the lightest shades are painted first, the darkest ones last. This method is good for beginners, it allows you to easily correct blots and inaccuracies: a darker color will easily overlap a lighter one.
Largest to Smallest - a technique where the largest areas are painted first, and the smallest ones are filled in at the end. The convenience of this method is that it is much more convenient to add small touches when the picture is more or less drawn. nine0003
For many artists, the main figure is in the center, but with the technique "From the center to the edges" , it is the main image that is drawn first. This minimizes the risk of smearing what has already been painted over with the sleeve. Agree: the most important thing is that it is the main image that is drawn with high quality, and not the background.
Experienced painters by numbers say that the Top-Down method is best for beginners. Thanks to this technique, there is almost no risk of smearing what has already been drawn, and there is no need to wait until the already applied layer dries. It is important to clarify that right-handers should start coloring with this method from the upper left corner, and left-handers from the upper right. nine0003
When using the Color Numbering method, the artist goes in the order in which the colors are numbered. This approach is good for complex artworks with lots of colors and small details.
By the way, with experience you will develop your own technique, which will be a kind of mix of all techniques.
To avoid having to buy new tools for each drawing lesson, you should follow simple rules for caring for them. Do not open too many cans of paint at once , because they dry quickly and lose their color and attractiveness.
Do not leave the brushes in paint or water for a long time : this will spoil their structure, they will bulge and become uncomfortable to draw with. Also wash them thoroughly after using so that droplets do not dry on the bristles. Wash your brushes under warm soapy water, for best results use a cloth or sponge. Do not let the paint dry on clothes or hands - it will be very difficult to wash it off later. nine0003
Following these simple tips will prolong the life of your brushes and paints, and save you money at the same time!
So, in order to choose and draw a picture by numbers, you need:
- 1.
 Know what is included in set. The kit includes a drawing divided into sectors and applied to cardboard or canvas. For beginners, it is better to start with drawing on cardboard. In the drawing process, a diagram may come in handy if any of the numbers on the drawing gets dirty or erased. The set also includes a color image of the finished creation, paint and brushes. In some kits there is varnish —for fixing paints, protection from dust and fading. nine0051
 - 2. Consider the nuances. Beginners should not choose complex works with images of people or icons and lots of small details. Beginning artists are better off choosing small images of landscapes or animals. Also, when buying, pay attention to & nbsp the stars on & nbsp the box. They indicate the level of difficulty. The more stars , the more difficult the work, i.e. it has more small and very small areas.
 Another nuance is the subframe. it's not in it's better to have it. If the choice nevertheless fell on a set without a stretcher, it is better to buy it and stretch a canvas over it. nine0051
 - 3. Prepare the work area. To get started, clean up everything and free up space. Then install the drawing on an easel or lay it on a table. Next, prepare the necessary materials and tools: paints and brushes, a jar of water. It is also worth covering the table with a film or newspaper, preparing toothpicks for drawing especially small details, cotton swabs and napkins - to remove excess paint and water. nine0051
- 4. Decide on a coloring method. There are five main ways. You can color in the picture, starting with light colors and going to dark. This will avoid blots: dark colors easily overlap light ones. The second way is to start with larger areas and finish with small ones. The last elements in this case are drawn easier.
 Another method of drawing is moving from the center to theedges. This will avoid accidental smearing. The fourth technique is to paint from top to bottom. Right-handers in this case start from the upper-left corner, left-handers start from right. This technique is suitable for beginners: nothing will be smeared, and it is not necessary to wait until the already applied layer dries. The last method is to draw in the order in which the colors are numbered. It's suitable for creating artworks with lots of colors and plenty of small elements. nine0051
 - 5. Protect tools. To ensure that the painting process goes well from beginning to to finish, open all the cans of paint at once, so that dries out, leave the brushes in paint or in water, and wash them thoroughly with soap after work, don let dry the paint
Creativity is a great way to get away from problems and the hustle, and a little "fly in the clouds" too! Buy, dream, create! Your online hypermarket 21vek.