How hot should a grill be for steaks
How to Grill a Perfect Steak – Country Natural Butcher Shop
Your Guide to Grilling The Perfect SteakLearning to grill the perfect steak is like a rite of passage on our ranches, where we pass down the secret tricks of the trade form one generation to the next – always varying slightly from one ranch to the next. And we think it’s something everyone should know how to do as well! We know it can be intimidating, but it truly is something everyone can master - especially if you start with a delicious piece of meat!
To help get you grill ready, we are so excited to partner up with our friend The Wooden Skillet to give you a 101 guide on grilling steaks, using some of our favorite Country Natural Beef cuts (which you can get delivered right to our door from the Butcher Shop!). Continue reading to see every step broken down to make the process of grilling steak easy and approachable!
Quick Tips & Tricks
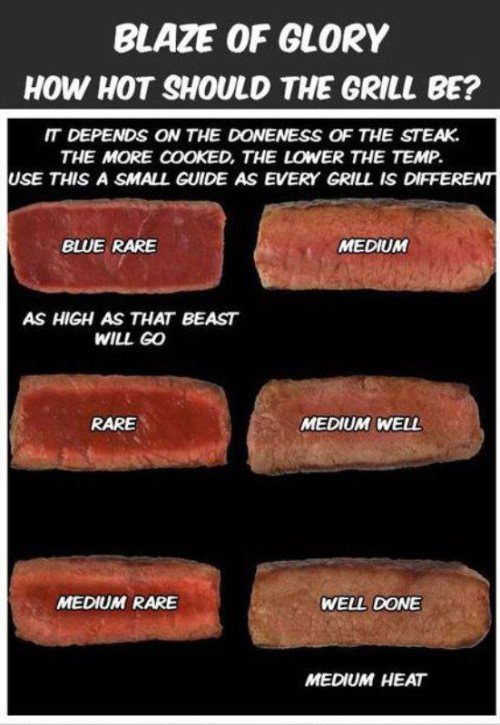
Grill Temp for Steaks
The best grill temperature to grill a steak is high heat (450-550 degrees F. ).
How to Prepare Steaks for the Grill
To prepare steaks for the grill you will need to:
- Pat them dry: this helps the steaks get a better sear on them
- Season or marinate: whether you use salt & pepper or a great marinade, we would definitely recommend adding just a little seasoning
Best Steak Seasoning
The best steak seasoning is salt & pepper - keep it simple (hello
Infused Sea Salt!)
A Favorite Steak Marinade
A little something extra to up your game, is using a classic, flavorful steak marinade. This Easy Steak Marinade happens to be one of our favorites!
How Long to Grill Steak
- For a 1 inch steak you will be grilling it approximately 3-4 minutes per side over direct, high heat - or until it reaches your desired internal temperate.
- For a 2 inch steak(like a Filet Mignon) you will still grill it for 3-4 minutes per side over direct, high heat, but then you will move it to indirect heat until it reaches your desired internal temperature (which will take a few additional minutes).
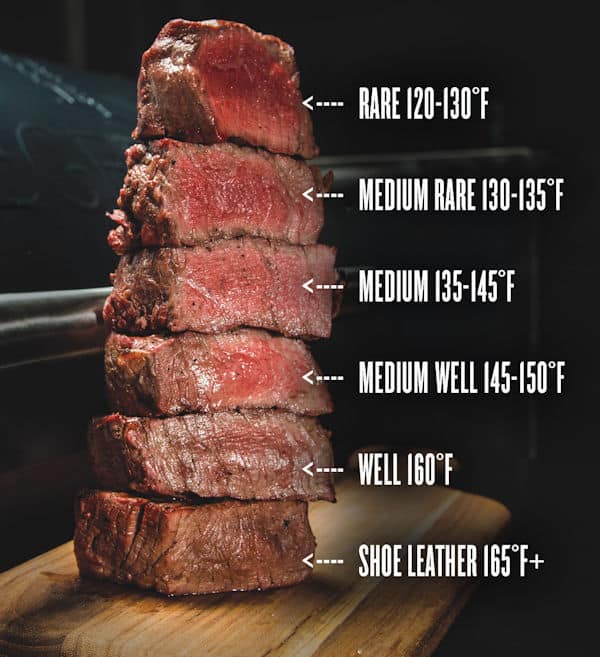
Internal Temp of Steak
To check the internal temp of steak (and see if it is done to your liking or not) use an instant-read thermometer. Insert it into the thickest part of the steak. Here are the temperature ranges to look for (depending up on how you like your steak done):
- Rare (still quite red): 120 - 130 degrees
- Medium-Rare (pinkish red): 130 - 140 degrees
- Medium (pink): 140 - 145 degrees
- Medium-Well (a little pin): 145 - 155 degrees
- Well-Done (no pink): 160 degrees
How to Make Your Steak Juicy and Tender
- Marinate or season your steak: it is so nice to add in that little extra flavor!
- Pierce with fork (optional): this isn't necessary, but piercing the steak with a fork to create some tiny holes allows either your salt & pepper or your marinade to penetrate the meat much faster.

- Sear on both sides: the sear is the key and then you can move to indirect heat to finish cooking. This seals in all those juices and leaves a nice char on the outside.
- Do NOT over-cook: remember that your steak will continue to cook after you take it off the grill, so really you should shoot for about 5 degrees under where you ultimately want to be when you take the steaks off the grill.
- Let rest: your steak will continue to raise about 5 degrees while resting and this allows the juices to redistribute evenly throughout the piece of steak so when you do cut into it, it will be juicy and perfect!
How to Grill Steak Perfectly – Here We Go!
First you are going to want to pick your cut of meat. Now, everyone loves a good Filet Mignon (c'mon, even the name is fun to say!), and the other go-to is a New York Strip – classic. But, our absolute favorite is a ribeye. There is just enough fat marbled through it that it marinates itself as it cooks and stays incredibly moist and tender.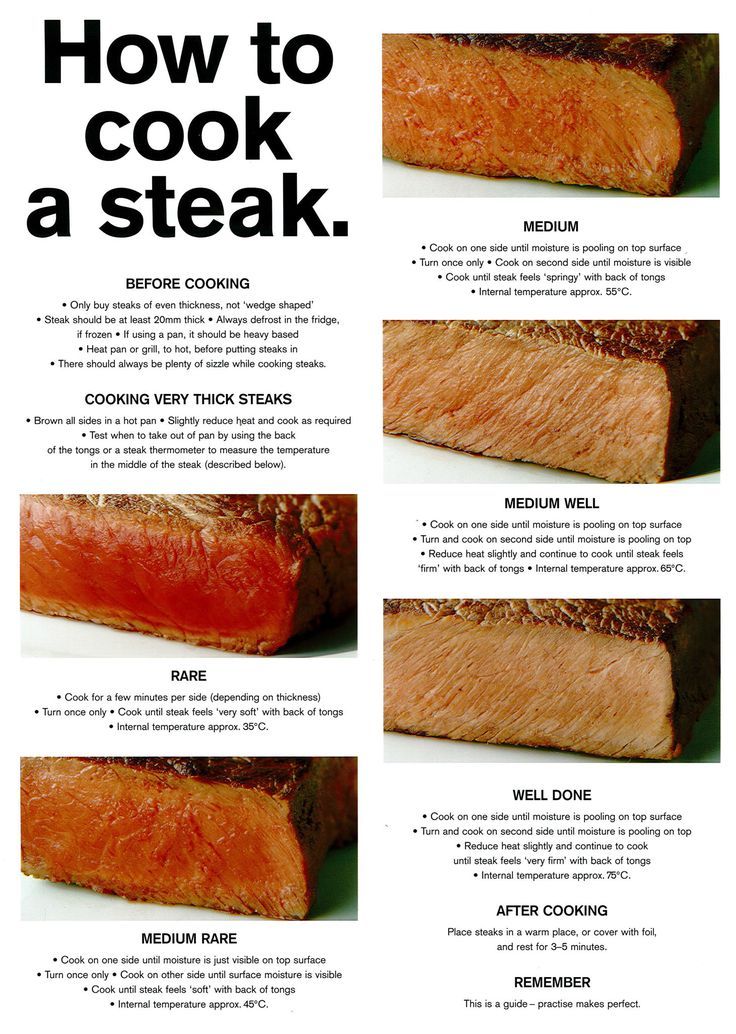 The flavor is amazing! It is a go-to on the ranches. Go grab a 1 inch ribeye for you and whoever else you are having over…..
But we just couldn’t help ourselves, and have added some Filet Mignons as well!
Next, after you go out and grab your cut of meat, you are going to want to let it come to room temp before you season your meat. Just salt and pepper people, you don’t need to reinvent the wheel! But first, take a fork and pierce the meat all over – fat and everything. Then sprinkle with salt and ground black pepper; on both sides – enough that it will be nicely seasoned, but not over-powered with either.
You can also marinate your steak if you want – always fun to mix things up!
After you have cleaned your grill thoroughly with your brush, spray it with a grill-worthy non-stick spray and then turn it up to 450-500 degrees.
Place steak over direct heat to sear – let it stay over direct heat for 3-4 minutes. Flip and sear an additional 3-4 minutes on the other side.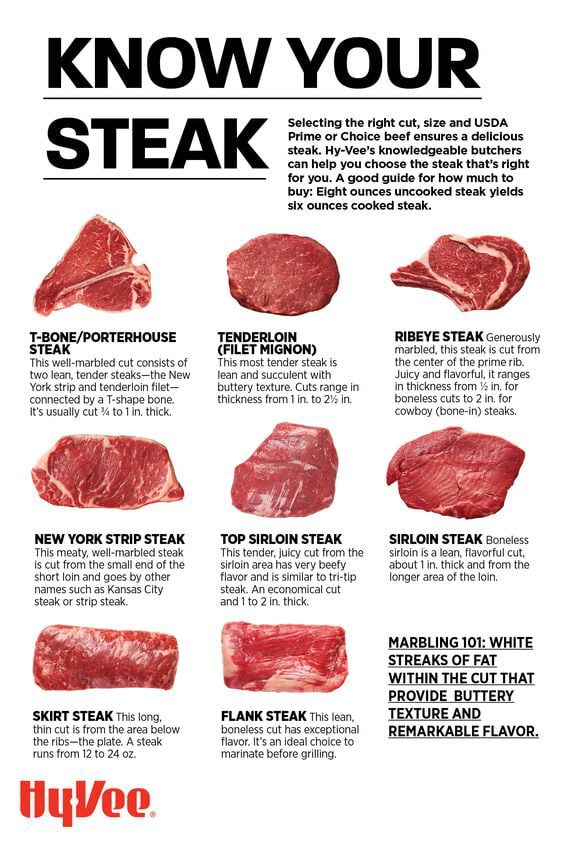
Meat Head Tip: If you are cooking a fattier meat, like a Ribeye, you will probably want to move the steak over to indirect heat at this time. Leaner meats, like a New York Strip or Filet should be left over direct heat the entire time.
Then check with your meat thermometer (stick the probe into the side of the steak, not on top!). Possibly let cook for another 1 minute or so – for medium rare you are looking for an internal temp of 130-140; for medium you want 140-145. If you want it medium well or your steak is thicker than 1 inch, you may just need to keep on indirect heat a bit longer – medium well you want 145-155.
Remove from grill and let rest for 5 minutes, preferably on a separate plate as the juices will be flowing. Steak wasn’t meant to be eaten piping hot. Once cooled, add your sides and serve!
Not sure what to serve with your steak? We love this Homemade Herbed Butter Recipe by The Wooden Skillet to top our steaks off, this elevates your meal and is an easy way to impress your guests! A fresh mixed green & arugula salad and vinaigrette dressing is a light side that will also compliment the flavorful steaks.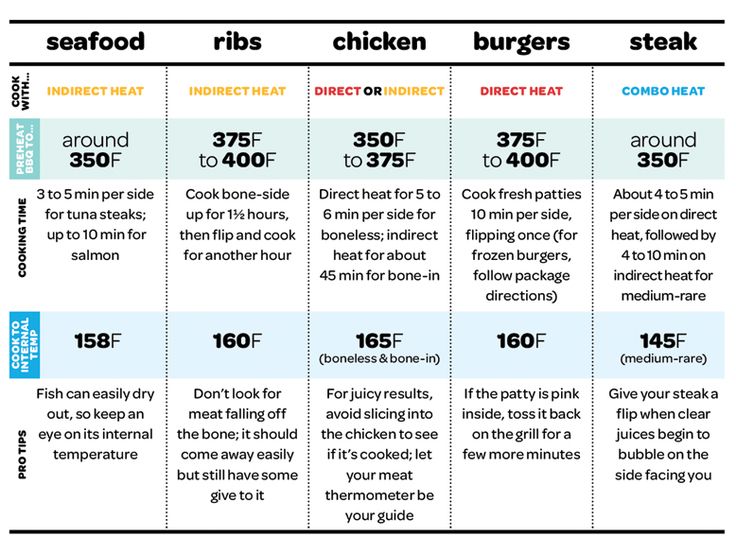
That's it! All that's left to do is sit back and enjoy!!
Made in partnership with The Wooden Skillet - show her some love and check out even more recipes, tips and her recommendations for grilling tools!
@TheWoodenSkillet
How to Grill the Perfect Steak
Toggle Nav
Grilling a steak in the backyard is an American pastime. Enjoy it even more with exact know-how around grilling the perfect steak. This grilling guide will beef up your skills in no time.
Directions
List Steps
Step 1 Of 6
1
Buy the Best.
Prime grade provides the most tender and flavorful steaks, but you may not see this grade often at your local grocery. If this is the case, look for the next best in grade, Choice. Filet, ribeye and porterhouse steaks are all good selections. If you have access to butcher, take advantage of his or her expertise. There are ranges within each grade, and your butcher will be able to tell you if your steak falls at the top or bottom of the Choice grade. Top of the range will give you a cut very close to Prime in quality.
2
Warm It Up.
Make sure your steak is at room temperature. If you place a cold steak on the grill, the exterior will burn before the interior cooks to the desired temperature.Hot Tip
Do not let the steak sit at indoor room temperature for more than an hour before cooking.
3
Oil the Meat, Not the Grill.
An evenly applied coating of neutral oil such as vegetable or canola on both sides of the steak will ensure the steak doesn’t stick to the grill.4
Get It Hot.
Preheat your grill on high.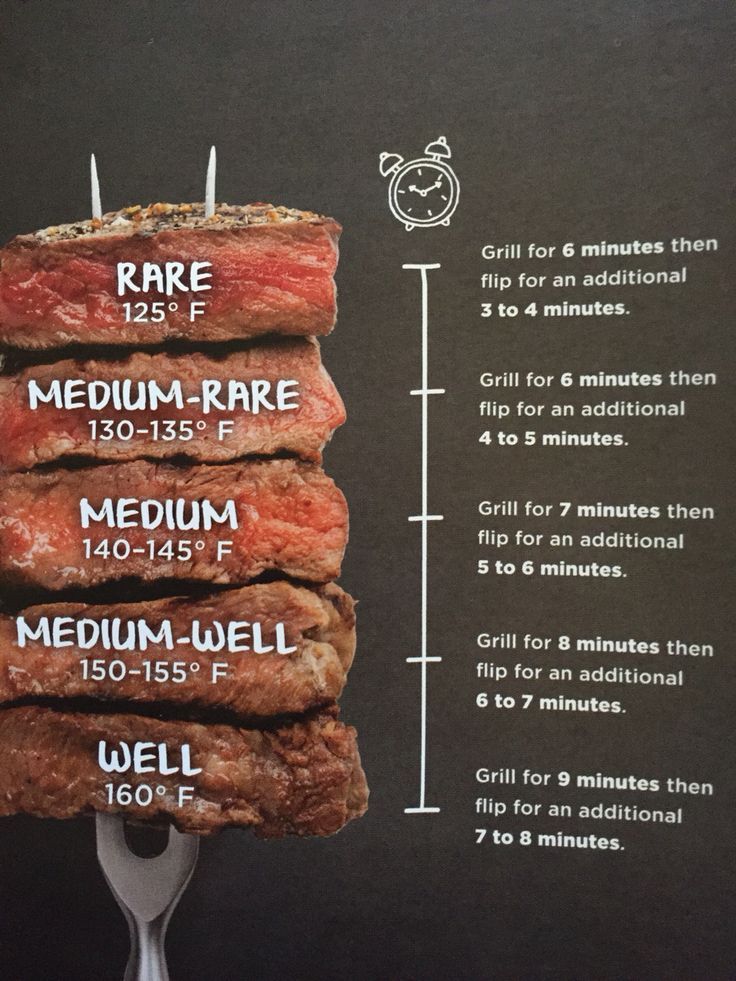 High heat will give your steak a perfect crust. Monitor the grill temperature to ensure that it remains at around 450°F to 500°F.
Hot Tip
You want to hear that sizzle when the steak hits the grill.
5
Know When It's Done.
This can be the most nerve-wracking aspect when learning to grill the perfect steak. Take the guesswork out by measuring the internal temperature. Invest in a digital thermometer. For rare steak, the internal temperature as measured in the middle of the steak is 125°F. For medium rare, it’s 130°F to 135°F and well done is 155°F.6
Let It Rest.
Never cut into a steak that’s hot off the grill. When pulling your steak off the grill, tent with foil and let it rest about 8 minutes. While it rests, the steak’s fibers will relax, and the juices will redistribute back to the center.
Hot Tip
If your steak is roughly 2 inches thick, it will continue to rise in temperature even when it’s off the grill. We recommend pulling it off 5°F before your desired target internal temperature.
Comments & Questions
Smoke out the goods!
Get recipes, cooking tips and tricks and promotional offers delivered to your inbox each week.
Sign Up for Our Newsletter:What to look for first
We are all used to the fact that a home grill is a simple and uncomplicated device, the only function of which is to maintain a set temperature that provides the best roasting for a particular dish. However, modern grills offer many additional features, including the presence of a timer, precise temperature control, and even automatic selection of the desired program for roasting steaks.
Let's take a look at the variety of modern models and see what they have in common and how they differ. And, of course, we will try to assess how much certain functions will be needed in reality.
Almost a grill, but not quite
In this review, we will look at contact grills equipped with panels on which, in fact, the food is cooked. Behind the scenes will remain such specific and niche appliances as electric barbecues (appliances for cooking barbecue on a spit) and air grills (devices that compete more with ovens than with contact grills).
Let's start with the "little brothers" of contact grills - electric sandwich makers, waffle makers and baking tools. All of them, at their core, are a less powerful analogue of full-fledged contact grills, and are designed to perform a rather narrow range of tasks.
The electric sandwich maker, for example, is familiar to almost everyone. This small "grill" with a power of about 700-800 W is intended exclusively for making hot sandwiches, which is its weak and strong side at the same time: such a sandwich maker is unlikely to open up new culinary horizons, but it will most likely cope with its task perfectly well. And such a gadget takes up little space in the kitchen.
Note that in the countries of developed capitalism there are many varieties of such sandwich makers that offer extended functionality: cooking multi-layer high sandwiches, frying scrambled eggs, etc. In Russia, they can be quite rare, and the effectiveness of such devices remains in question, so focus on we won't be them. Let's just mention that such gadgets exist, and therefore there is a certain demand for them.
An "advanced" version of these grills are devices for preparing all kinds of pastries - donuts, waffles, dough nuts, etc. Simpler models of such gadgets have non-removable panels and are designed to cook one type of product.
Advanced - allow you to change panels and thus cook a variety of pastries. In this case, additional panels can either be included in the delivery set or sold separately, which allows the user to independently choose the necessary forms depending on their own needs, but in the end can significantly affect the final cost of the entire set.
Many different panels have been released for the Redmond RMB-M713 / 1 multi-baker, allowing you to cook pastries of various types and sizes : too often such devices are sent to the mezzanine for permanent storage. However, this is "also a grill" - albeit with one panel. Mini Pizza Oven Princess 115003 deserves special attention: the temperature under the lid, according to our measurements, can reach 370 °C, which is well above the capacity of most ovens. Also included is a pizza stone. However, let's go directly to the topic of our review - to full-fledged grills.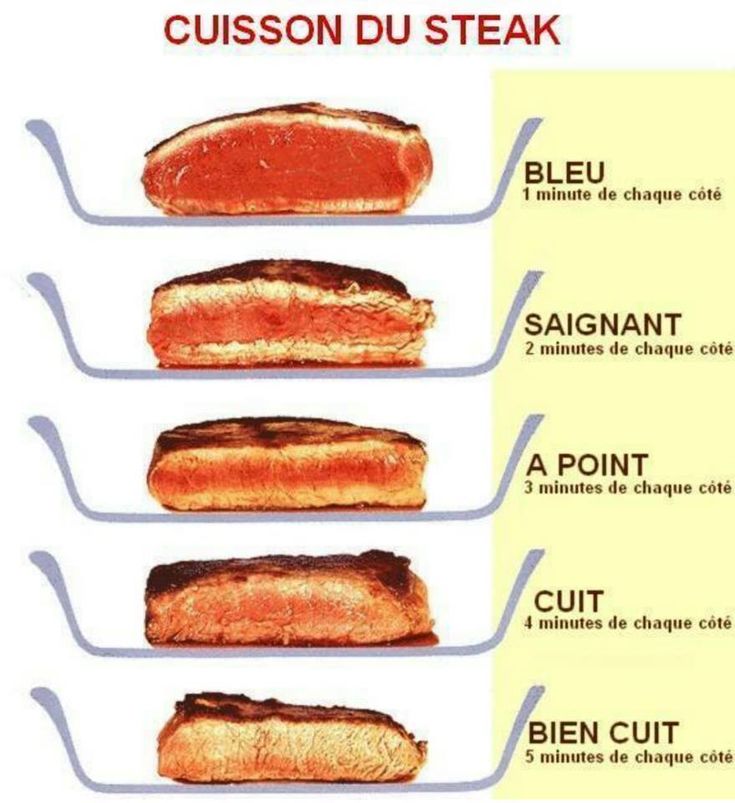
Contact grills: selection principle
Home contact grills are very similar to each other: they have two panels, one of which is fixed on a hinged lid. A heating element and a temperature sensor are hidden under the panel. The control panel, as a rule, consists of temperature adjustment knobs and a timer (although options are possible here).
Inexpensive Sinbo SSM 2530 toaster grill with non-removable frying panelsThis grill is suitable for cooking meat, fish and poultry, can easily cope with hot sandwiches and homemade shawarma, will allow you to roast vegetables and fry flatbread.
Differences between different models are in a number of characteristics, each of which significantly affects both the capabilities of the device and the overall ease of use. Let's list the main characteristics and see how and what they affect.
Power and maximum temperature
The power of the contact grill and the maximum heating temperature directly related to it are the key parameters that determine how quickly the device will heat up to operating temperature and how well it will cope with maintaining it during the cooking process.
Lack of power will cause the grill panels not to heat up fast enough (which is not really a big deal), and also cause the temperature to drop significantly after placing the food in the grill (which is not good at all, especially for cooking steaks).
Full-fledged household grills have a power of about 2000 watts. This is the level of power we would recommend focusing on if you want to get a guaranteed good result, regardless of the type of product intended for frying. Fortunately, such power can be found in relatively inexpensive models.
Choosing a significantly smaller grill is always a trade-off that is best avoided unless absolutely necessary and fully aware of why you need it in the first place.
The maximum temperature that the grill can maintain is usually listed in the accompanying documentation. To be sure that the grill will adequately cope with any type of food, it must reach a temperature of 230-240 °C. Do not need anymore. Less is bad.
The vast majority of manufacturers honestly indicate both the power and the maximum operating temperature of the grill, although we sometimes met unscrupulous sellers whose devices turned out to be significantly “weaker” than the declared characteristics. In general, this is the case when it makes sense to refer to such a concept as “brand trust”: serious manufacturers may release a model that is not very successful, but its characteristics will be honestly indicated.
Types of panels
Removable or non-removable
Panels for contact grills are removable (for more expensive models) or fixed (for cheaper ones). If there is no need to save money, we definitely recommend choosing removable panels: they are attached to the device body using special latches and can be easily “snapped off” by pressing a special button.
These panels are not only easier to clean (cleaning the panel under running water is much more convenient than wiping it directly on the grill, trying not to flood the body of the appliance with dirty water), but they are also easier to replace in case of damage (for example, if the protective non-stick layer is broken ). Spare panels for current models are available for purchase at service centers.
With built-in heating element
More and more often heating elements are pressed directly into the panels. It is believed that this type of connection provides better thermal conductivity, and therefore a higher accuracy in controlling the temperature of the panels. Frankly, in the course of numerous tests, we did not reveal a pronounced pattern regarding the accuracy of maintaining the temperature, however, almost always panels with a pressed heating element are a sign that this model belongs to the “above average” category. And consequently - the overall quality of the device should be above average.
Redmond SteakMaster RGM-M807: the heating element is pressed into the panel, in the grill body you can only see the contacts for its connection , but also ensures the removal of excess moisture (vegetable juice and meat fat). Some grills have one of the panels "striped" and the other (top) is flat. As a rule, such solutions can be found on grills that fold out 180 degrees, allowing the panels to be used as a regular frying surface. On such a flat panel, you can, for example, fry fried eggs.
Maximum lid opening angle
While we mentioned that some grills can tilt the lid 180 degrees, turning the appliance into two independent frying surfaces, we will also mention other options. For budget grills (however, not only for them), the standard way to adjust the distance between the panels is the most common mechanical switches that adjust the opening angle of the panels. The advantages and disadvantages of this method are obvious: on the one hand - simplicity, on the other - the inability to ensure uniform heating (especially thick pieces of meat that will be pressed unevenly).
More modern grills are equipped with a mechanism that allows the top plate to move in a horizontal plane. Thanks to this, it is always parallel to the bottom, regardless of the thickness of the product placed in the grill. It is clear that this method is more preferable. Especially for cooking products that require precise control over the degree of roasting (for example, steaks).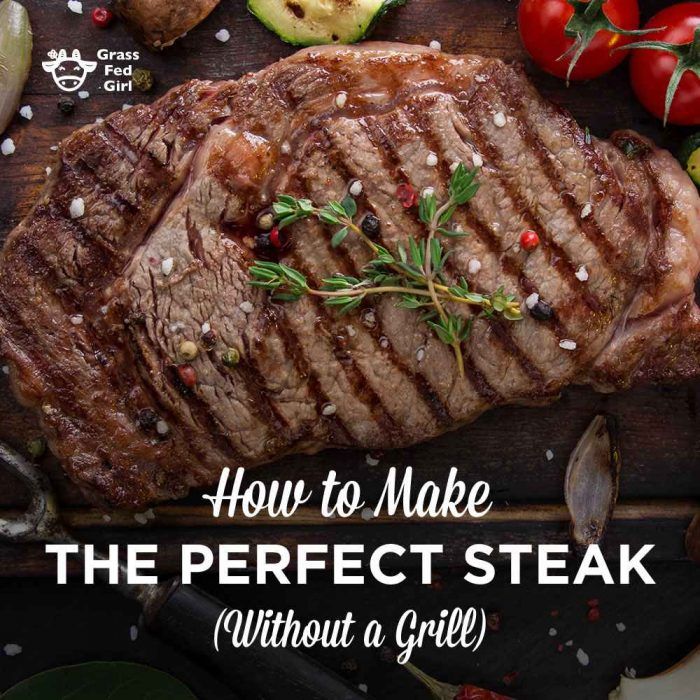
Panel coating
The panels of contact grills are covered with a non-stick coating, and therefore they will be quite easy to care for. The main thing is to avoid the use of aggressive household chemicals and abrasive materials (metal sponges and similar items).
In most cases, soiling can be removed by turning the grill on to the highest temperature and then removing the soot. This method, however, can lead to the release of a large amount of smoke.
Regarding the comparative quality of non-stick coatings, we cannot draw far-reaching conclusions: in the testing mode, they all demonstrated approximately the same properties, and we cannot talk about their durability. Therefore, again it remains to trust the strength of the brand or the reviews of other users.
Control
Control of domestic grills can be mechanical or electronic. Mechanical control, as a rule, includes two knobs, one of which is responsible for the heating level, and the second performs the function of a timer - in exactly the same way as the well-known mechanical timer on the oven (with a bell).
Electronic control means that all settings (temperature, operating time, etc.) are set using mechanical or touch buttons, and the selected mode is displayed on the display. Such control is considered by many to be more convenient and understandable, although there are not so many fundamental differences between such electronic and mechanical control.
But for more “advanced” models, electronic control provides access to additional functions, the most interesting of which, in our opinion, is the automatic selection of the roasting mode depending on the type of product and its thickness. This smart grill will automatically measure the thickness of the piece of meat and automatically select the best combination of temperature and cooking time.
With this function (of course, if it works adequately), you can fry steaks and cook other products with little or no participation of the cook. All that is required is to put the product on the grill, select the desired mode and wait for the signal indicating the completion of cooking.
Easy to clean
The grill is easy to get dirty and cooking is prone to spattering of grease and sticky food particles. Therefore, caring for such a device is an important issue, because you will have to clean the grill after each use.
When choosing a grill, you need to pay attention to the presence of a special container for collecting excess fat and moisture. Access to such a container should be easy, and the container itself should be easy to remove and install back.
The presence of removable panels and the absence of gaps between the panels and the grill body will greatly facilitate the maintenance of the grill: cleaning fixed panels is a dubious pleasure.
Finally, it's worth noting that many grills have a nasty habit of splattering oil on the surroundings and on the outside of the cabinet (particularly their own control panel). This option should also be kept in mind, and therefore, the simpler the grill body looks, and the fewer nooks and crevices it has where dirt can get in, the better.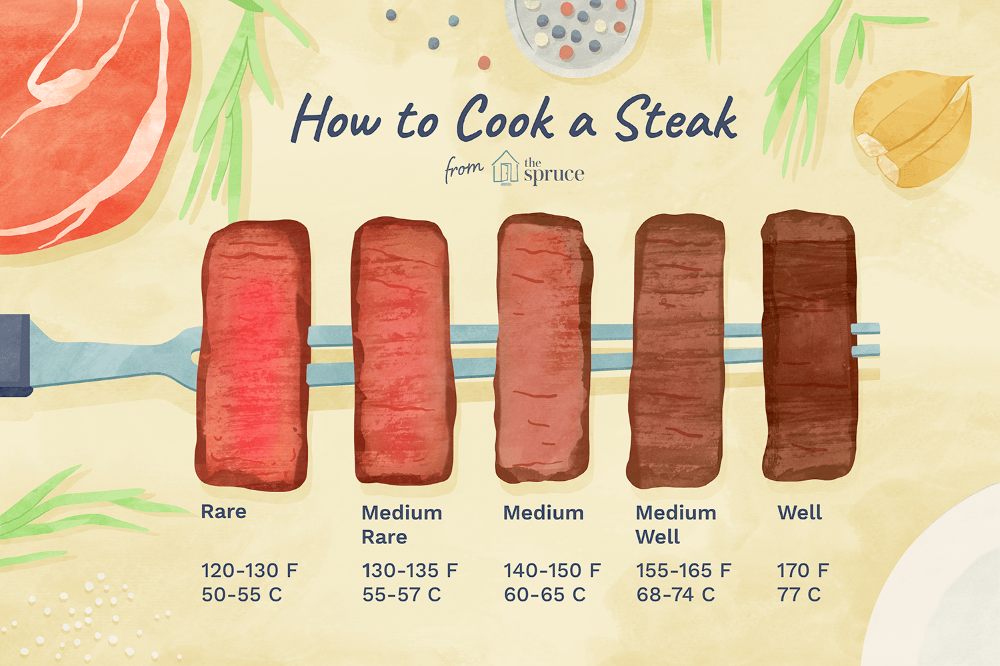
External probe thermometer
Concluding the conversation about grills, let's mention such a simple device as an external probe thermometer, the presence of which will greatly simplify the process of cooking food in a contact grill. Despite the fact that modern grills work well in the selected automatic modes, additional control does not hurt.
An external probe thermometer will allow you to accurately control the temperature of the core of the product, which ensures that there are no problems with overcooked or overdried food.
Well, the most advanced of these thermometers will be able to beep when the desired temperature is reached, or even send a corresponding signal to the chef's smartphone.
Weber iGrill 2 provides precise temperature control of grilled food via BluetoothConclusions
To sum up the conversation about household contact grills, let's summarize the above.
So, when choosing a grill for your home, you need to decide on the following things:
- What foods are you going to cook? It may not be necessary to purchase a full-fledged grill - for example, if your tasks are limited to cooking hot sandwiches or waffles.
- When buying a full-fledged grill, you don't need to save on power: 2 kilowatts is the necessary and sufficient power for a household grill, ensuring that it can handle even the largest pieces of meat.
- A mechanical grill will suffice for most tasks. If you are a supporter of process automation, then it makes sense to pay attention to grills with built-in programs and automatic determination of the thickness of a piece of meat.
- Grill maintenance is important. We would not recommend grills with non-removable panels or without a container to collect excess moisture and fat. When choosing among other models, we recommend that you pay attention to the absence of secluded places in the body, which can get oil splashes or other particles. The simpler the grill body looks, the easier it will be to clean it, and vice versa: the more decorative elements there are on the body, the more difficult it will be to wash it.
How to grill: 10 tips from the pros
Creating the perfect steak on fire is not an easy task even for a professional.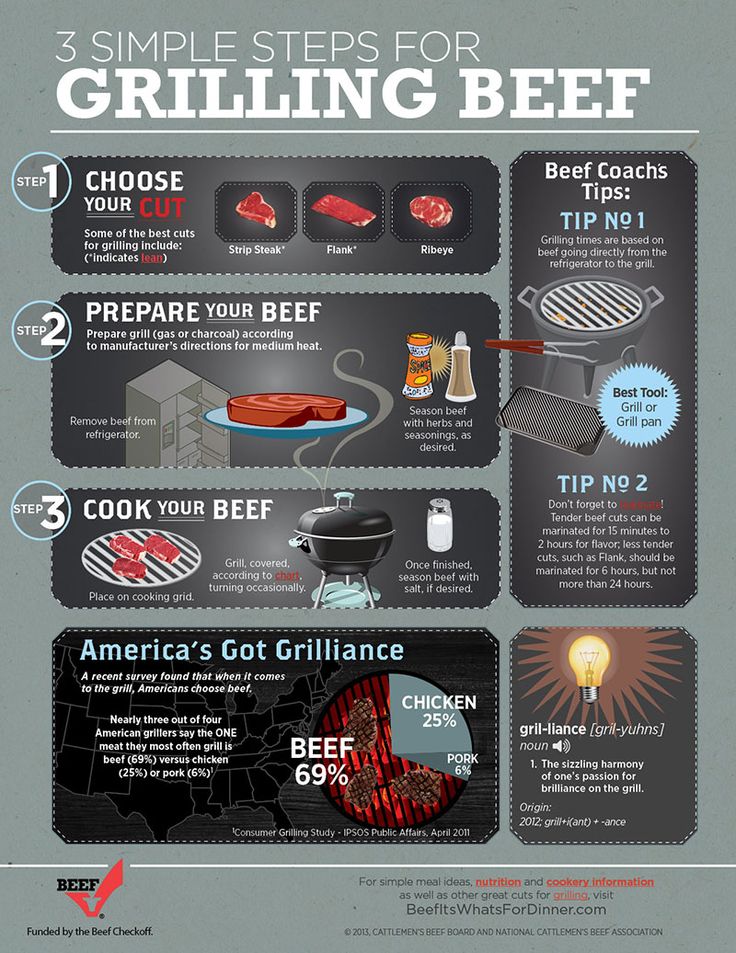 A few useful tips from experienced grill masters will allow even a novice cook to cook a real culinary masterpiece.
The right choice of meat
Steaks to start with on the grill are rib eye and rib steak. The high marbling of such meat indicates a significant supply of juiciness, so it is quite difficult to cook it incorrectly. In addition, the more streaks of fat in a piece of meat, the longer it can be cooked without losing juiciness. You should not try to cook a steak from cheap beef, in most cases the result will not live up to expectations.
Sometimes you need a marinade
If the budget for the purchase of meat is limited, and you bought inexpensive parts of beef, it is better to cook them using a marinade. Of course, the presence of marinade will not turn them into expensive steaks, but will make the taste more pronounced, and the meat itself more juicy and soft.
Meat must reach room temperature
It is not recommended to fry the meat immediately after you have taken it out of the refrigerator.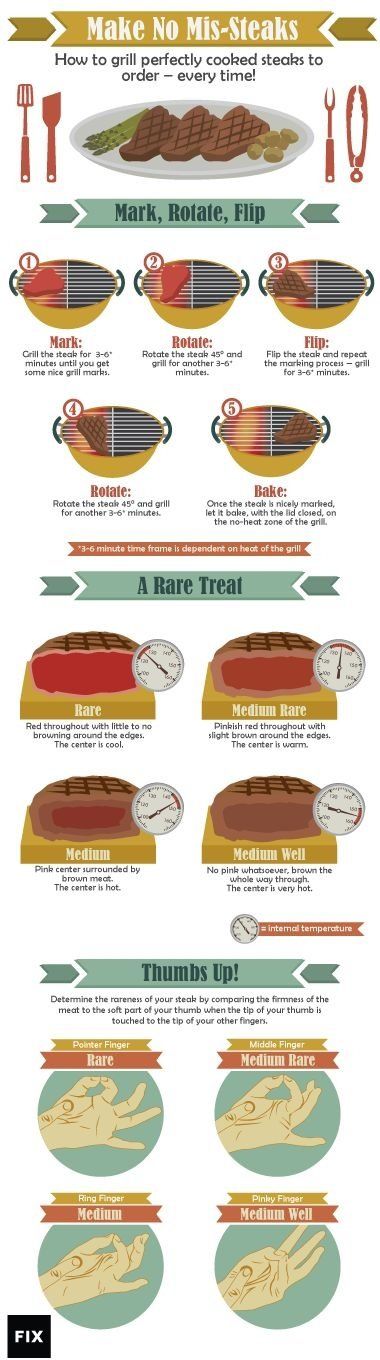 Let the steak rest at room temperature for 1-2 hours. The internal temperature of the meat should be 10-12°C. This will achieve uniform roasting, texture and color of the meat.
Use oil
The best option is an 80/20 or 10/90 blend of olive oil and canola oil. Oil is applied to the steak with your hands before sprinkling it with spices. Burning the oil provides a tight crust on the surface of the steak, which keeps the juices inside the meat and provides a beautiful appearance. It is not recommended to choose cold-pressed olive oils, when burned, they release 3 times more carcinogens. Before placing the steak on the grill grate, blot it with an oil-soaked kitchen towel.
Careful with spices
The best spices for meat are sea salt and freshly ground pepper. However, even with pepper should be careful. The more spices, the faster they burn on fire. Salt should be added after cooking. If you salt the steak beforehand, the salt can draw the moisture out of the steak.
Control the fire
For a perfect steak, you need a lot of heat. It will provide an appetizing crust on the outside, while inside the meat will not have time to completely fry. If flames are visible in the coals, then the heat is enough. If there is a lot of flame, you need to act urgently. All parts of the grill should be hot and the coals should be in an even layer. This will allow at the moment when a strong flame flares up from dripping fat, shift the steak to a spare place. It is not recommended to extinguish a fire with water, as this will drastically lower the temperature of the grill and meat.
Do not turn the steak too often
You should not often turn or move the steak on the grill, you risk spoiling the pattern and burning all the spices on it. Flip the meat in one quick, steady motion.
Meat needs rest
After the product is removed from the grill, the temperature inside it continues to rise for some time, which contributes to the redistribution of internal juices.