How big to make raised garden beds
6 things to think about before preparing a raised bed garden
by Tara NolanComments (98)
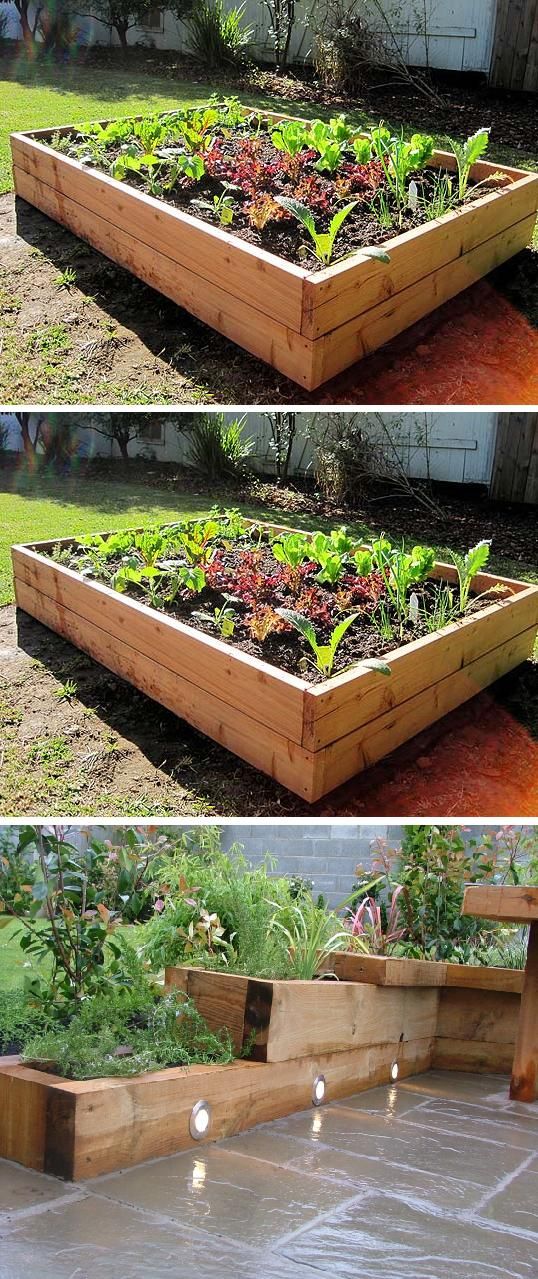
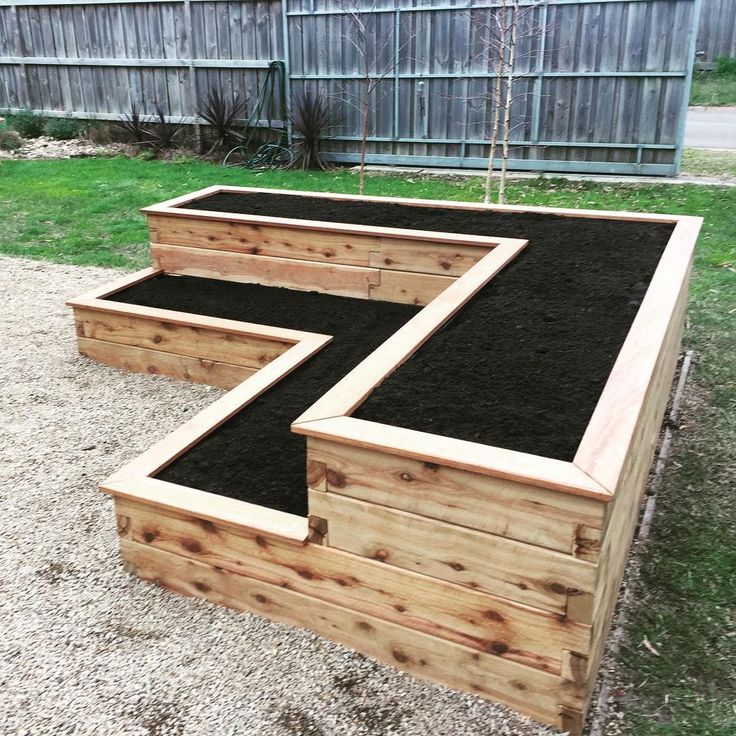
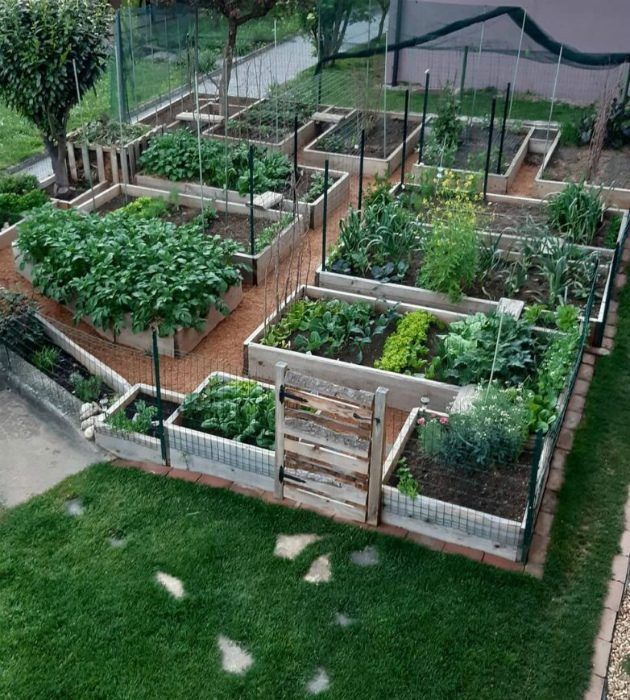
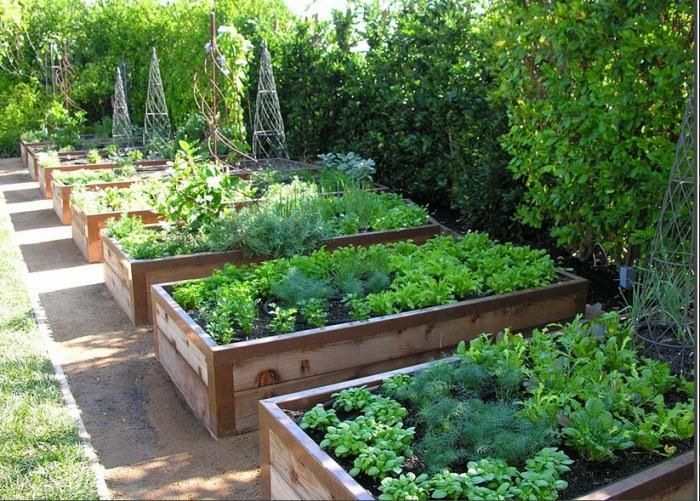
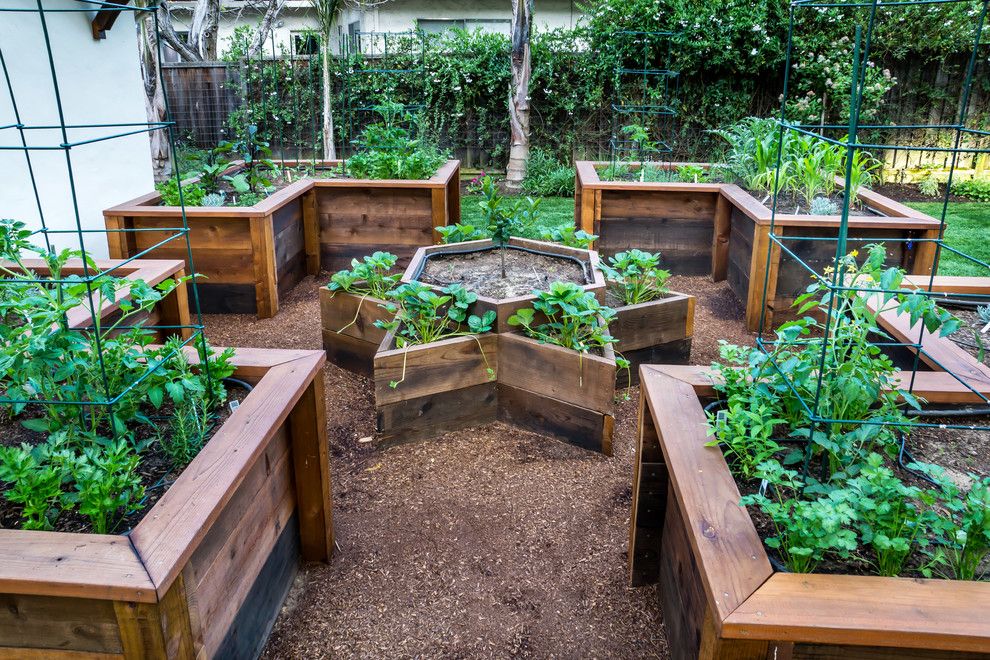
Are you planning to build and/or install a raised bed? I like to emphasize that raised beds can go anywhere that gets six to eight hours of sunlight a day. And they can be any size you like. However, for the purpose of this article, I’m going to talk about the standard rectangular raised beds that are generally built from untreated, rot-resistant wood (like Niki’s amazing raised bed setup) or concrete blocks, as well as what you might want to think about when preparing a raised bed garden.
When I made my first raised beds, these are a few tips I gathered, as well as things I wish I had thought about beforehand.
Things to think about when preparing a raised bed garden
1. What size will it be?
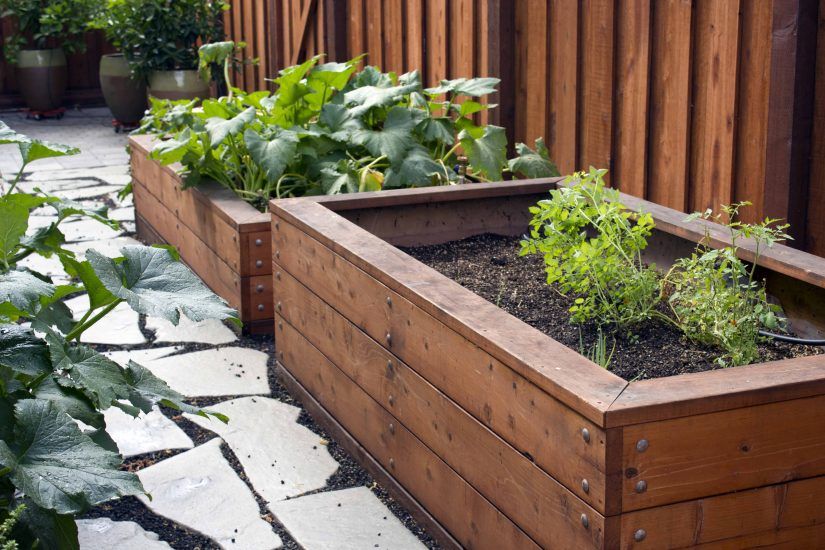
Raised beds are generally three to four feet wide by about six to eight feet long. This allows you to easily reach into the raised bed from the side to plant and dig and weed, without having to step into the garden where you risk compacting the soil.
The height can also be important. If you are putting your raised bed on a hard surface, like a driveway, or over hard-packed soil, you want to make sure it’s deep enough for plants (especially root vegetables like beets and carrots) to root. If it’s too shallow those roots will reach down into that subsoil (or hard surface) and hit a brick wall. I usually recommend at least 10 to 12 inches.
2. How do you pick the perfect spot?
When preparing a raised bed garden, location is everything, but it doesn’t have to be your backyard. Your raised bed could go in a sunny side yard, your front yard, or even your driveway.
You’ll want to make modifications if you have a slope and assess whether the area drains well. Here are some tips for planning where to put your raised bed.
3. How will you get rid of grass?
Good question because this is a common concern. If you’ve ever tried to cut out and lift sod, you know what an enormous task it is.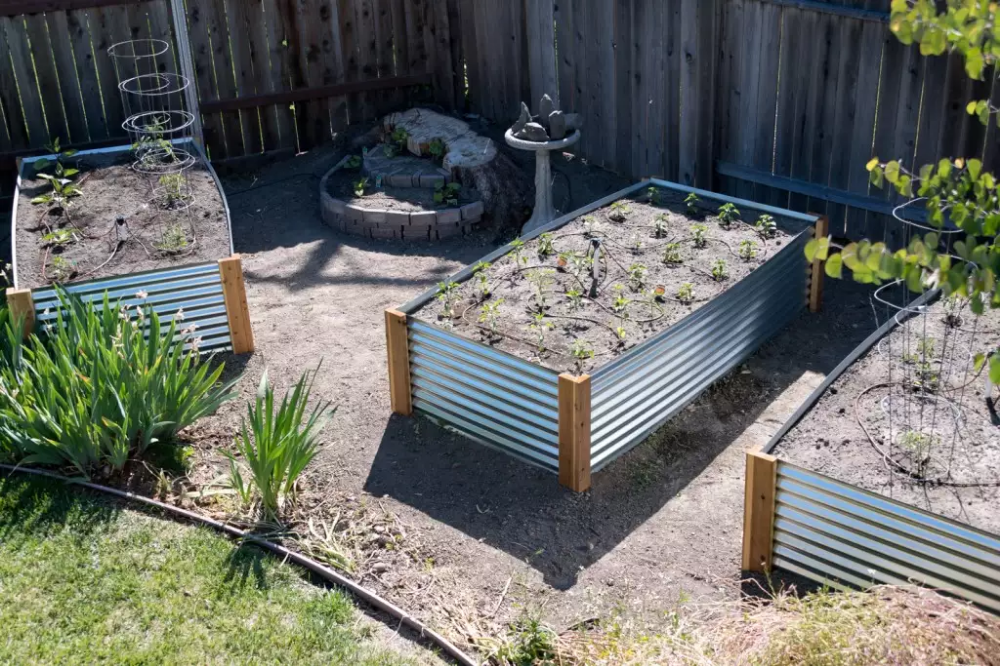 An easier way to get rid of grass is to outline the space and cover it with a layer of cardboard and cover that with a layer of soil. The grass will break down and voilà! A new garden site. Doing this in the fall will allow everything to break down over the winter.
4. Do you want to install irrigation?
If you want to set up a whole drip irrigation system with a line running from your tap or rain barrel, you might want to do this before your raised bed areas are finished and filled. That way you can run hoses under pathways or layers of mulch, and adapt the bed around where the hose attaches to the irrigation system.
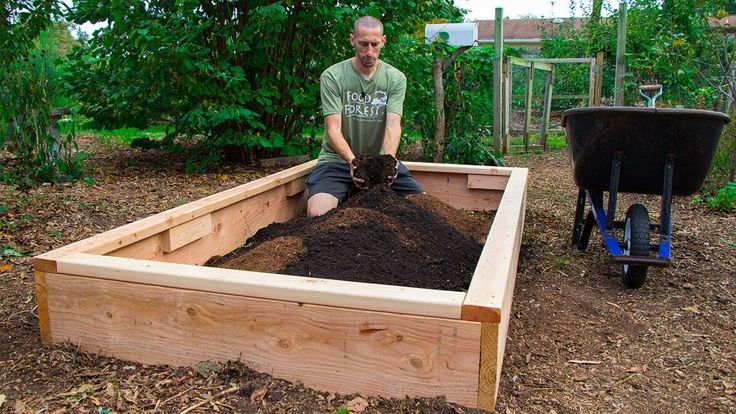
5. How much soil will you need and what kind?
There are some handy soil calculators out there that will help you determine how much you need to fill your raised bed, like this one from Gardener’s Supply Company.
As far as type of soil, I like to emphasize buying the best quality that you can afford when preparing a raised bed garden.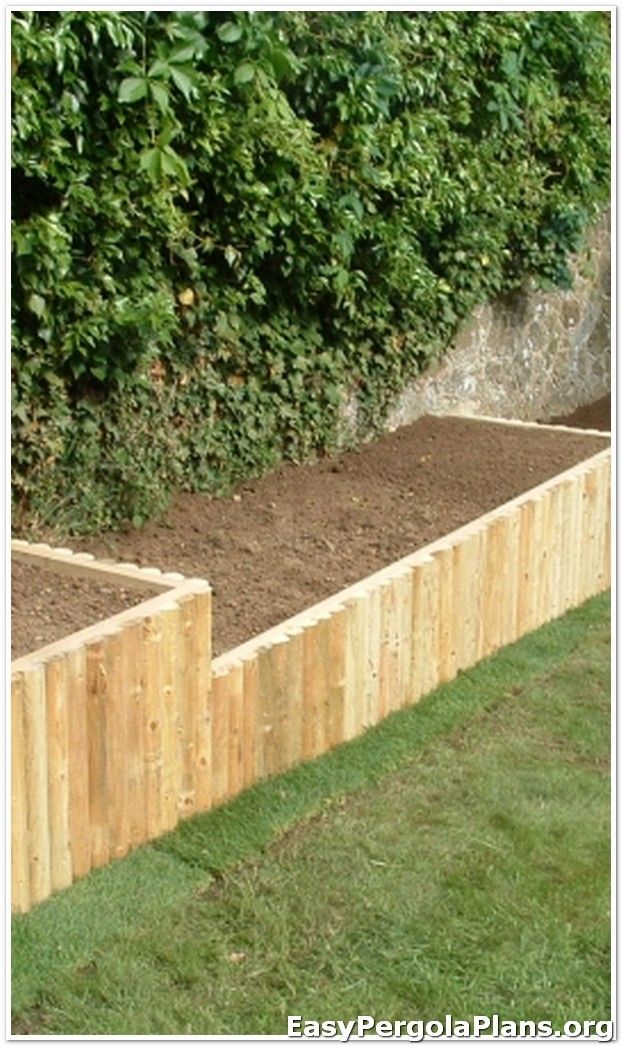 When I had multiple raised beds to fill, I ordered triple mix from a local supplier (after chatting with them on the phone about my options) and top-dressed it with organic vegetable compost. I like to recommend leaving some in reserve to replenish your raised beds throughout the season. Please visit this link if you want more details on the best soil for raised beds.
6. Should you stake the sides?
One thing I wish that I had done when I built my first two raised beds is install a couple of midpoint stakes to prevent the beds from shifting over time. This is one of my number one raised bed tips!
Not sure how many vegetables you can grow in each one of your beds? Here are several illustrated 4×8 raised bed layout plans you can use to determine the placement and spacing of your veggie plants.
For more information on gardening in raised beds, check out the following articles:
- Elevated raised bed gardening: The easiest way to grow
- Fabric raised beds: An easy, inexpensive way to get started
- The benefits of raised bed gardens
- 5 tips for growing tomatoes in raised beds
- How to start a vegetable garden FAST
Do you garden in raised beds? Share your experience in the comment section below.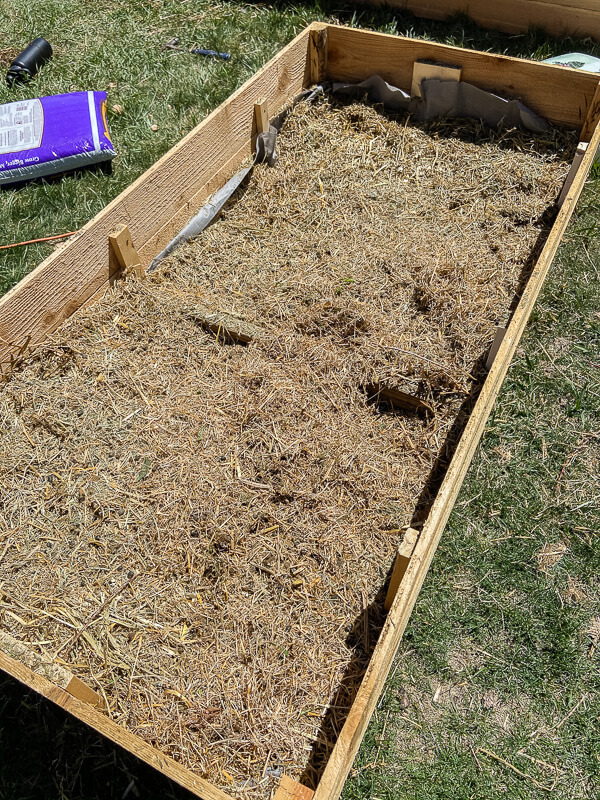
photography by Donna Griffith for Raised Bed Revolution
Pin it!
Filed Under: Garden Projects Tagged With: Garden planning and design, Raised bed garden projects
Reader Interactions
Page not found [404] | UGA Cooperative Extension
Publications
4-H Youth Development County and Club Meetings, Environmental Education, Livestock Programs, Project Achievement, Summer Camp
Animal Production Aquaculture, Beef, Bees, Dairy, Equine, Small Ruminants, Poultry & Eggs, Swine
Environment & Natural Resouces Invasive Species, Pollution Prevention, Forestry, Water & Drought, Weather & Climate, Wildlife
Money, Family & Home Adult & Family Development, Infant, Child and Teen Development, Money, Housing & Home Environment
Field Crop, Forage & Turfgrass Production Corn, Cotton, Forages, Hemp, Peanuts, Small Grains, Soybeans, Tobacco, Turfgrass
Food & Health Food Preservation, Commercial & Home Food Safety, Food Science & Manufacturing, Nutrition and Health
Fruit, Vegetable & Ornamental Production Blueberries, Grapes, Ornamental Horticulture, Onions, Peaches, Pecans, Small Fruits, Vegetables
Lawn, Garden & Landscapes Home Gardens, Lawn Care, Ornamentals, Landscaping
Weeds, Diseases & Pests Animal Diseases and Parasites, Ants, Termites, Lice, and Other Pests, Nuisance Animals, Plant Pest and Disease Management, Weeds
Timely & Trending Topics Recent updates, initiatives and programs from UGA Extension.
Featured Programs
- 4-H County and Club Meetings
- Master Gardener Extension Volunteer Program
- Pesticide Safety Education Program
- School Garden Curriculum
- ServSafe® Training
- Soil and Water Testing Services
Classes, Workshops, and Club Meetings UGA Extension offers a wealth of personalized services like workshops, classes, consultation, certifications, camps, and educator resources. Find out what Extension has for you!
See All Programs & Services
County Offices
Calendar
Extension Changes Georgia University of Georgia Cooperative Extension programming improves people's lives and gets results.
Our Impact
Join Us
- Agent & Faculty Jobs
- Extension Educators
- Staff Jobs
- Internships
- 4-H Environmental Educators
- Volunteers
About Extension
- What We Do
- Our Programs
- Our History
- Districts, Facilities and Centers
- Personnel Directory
- Leadership
- Related Agencies
- Support Us
- Contact Us
how to make, from boards, metal, slate, plastic
Many summer residents suffer from the fact that groundwater is too high on the site.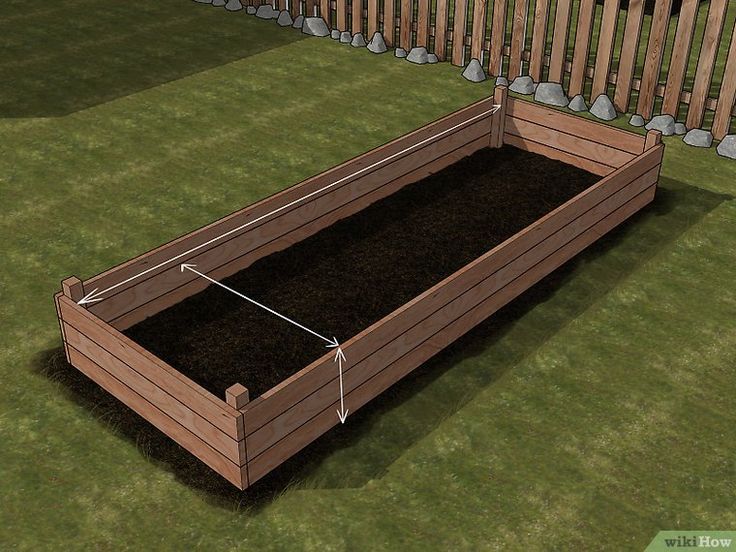 Excessive soil moisture is not suitable for all plants, many develop poorly or die altogether. You can solve the problem by making high beds. With such an organization of landings, it is possible to control the degree of humidity. And a nice bonus to such a decision will be an earlier ripening period and a much larger yield.
Content of Article
- 1 Proceedings and Disadvantages 9000
- 5.2 High bed for strawberries
- 5.3 High bed for cucumbers and tomatoes
- 6.1 From planks
- 6.2 From logs
- 6.3 From slate
Advantages and disadvantages that the sun warms the walls. This is also facilitated by the decomposition processes occurring in plant waste, which make up a significant part of the backfill. Therefore, such beds are also called warm. If you put arcs on such a bed and cover it with spunbond or other similar material, then the crop can be harvested even earlier.
The device is more problematic in regions with a hot climate. The task in this case is not better to heat the earth, but to keep it from overheating. But this can also be solved: use materials with poor thermal conductivity, for example, wood, to fence high beds. For the best effect, you can make double walls, between which you can fill up, for example, sawdust, lay foam, or you can leave an air gap - the best thermal insulation. It is better to paint the outer wall in a hot climate with white paint or whitewash. It is known that light surfaces heat up less. In this case, it will be possible to save the root system from overheating: in the south, the earth sometimes warms up very much and the higher the plant is, the cooler it will be. And over the beds you can stretch the same covering material. It not only retains heat, but also protects against overheating.
Beet harvest in a high bed High beds can also be a good yield on infertile lands. It is more convenient to lay out the imported soil in the beds, and not distribute it throughout the site.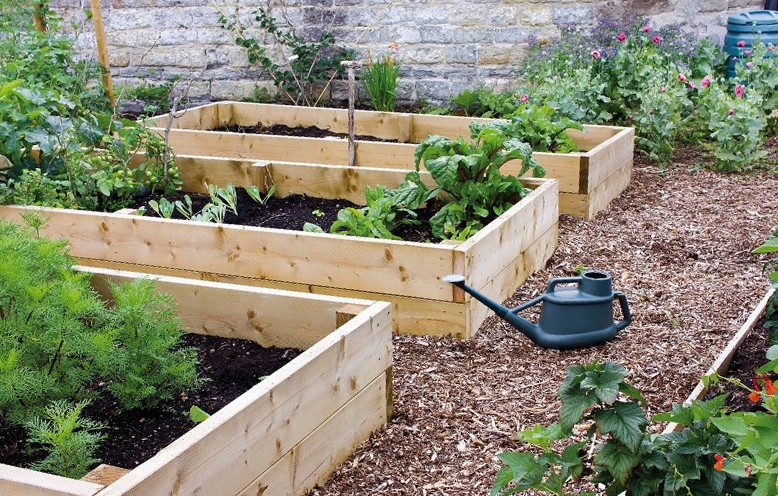 Maintaining fertility contributes to the compost layer, which is located under the layer of earth.
The problem of arid regions is also being solved. In this case, the fence for a high bed is coated with bituminous mastic from the inside or upholstered with a film, a rolled waterproofing material is laid on the bottom (on the grid) (the roofing material will quickly rot, so something from the modern type of waterproofing is better). Complete waterproofing cannot be achieved, but to keep moisture inside in sufficient quantities - yes.
Carrots - one to one. The best on a high bed, although the same varietywas planted on a regular one. As you can see, with a balanced approach, almost any problem can be solved. There are few shortcomings in high beds, but they were not without them:
- In most cases, you have to make a fence, and these are costs.
- The complexity of the process. Again, making fences takes time, and also moving a decent amount of earth and plant debris, and this is hard work.
- Medvedka and other similar living creatures feel great in rotting leaves, branches, bark. You have to fight them.
- Fertility has to be maintained by updating or completely replacing the "stuffing".
That's all the shortcomings. If you decide on the arrangement of high beds, be prepared for a considerable amount of work. But the harvest will be many times greater. For testing, you can make one or two beds. Then decide if you need them or not.
Size
There are no strict recommendations in this regard, and there cannot be: very different conditions in the country, and people too. There are sizes that many consider optimal.
In one area there are very high beds and not very ...So, the dimensions of the high beds:
- Height - from 20 cm to 50-60 cm. Here you can see what a difficult task is. The higher the bed is raised, the easier it is to process it - to bend less. But the earth and the rest of the "stuffing" will need more.
 Another point: if a small bed in height can be under the snow and will be covered from severe frosts, then the high one will freeze through: the sides are also open. For those ridges where annuals are sown, this does not play any role, but for perennial strawberries, say, this is a problem. Therefore, the height is chosen based on these considerations. According to the experience of many summer residents for strawberries, the optimal height is 20 cm. Then we can hope that it will not freeze out.
 - Width - from 60 cm to 1.2 m. Choose a distance that makes it convenient for you to process the bed. A distance of 60-70 cm is chosen if the approach to the garden is only on one side. If you can get to it from both sides, you can make a meter or more. It is important that the middle is processed without much stress.
- Length. Here everyone chooses based on the configuration of the site or their desire. There are no recommendations at all.
So that the bed is not too high, part of it can be deepened: dig in 20-30 cm, and already put walls on top.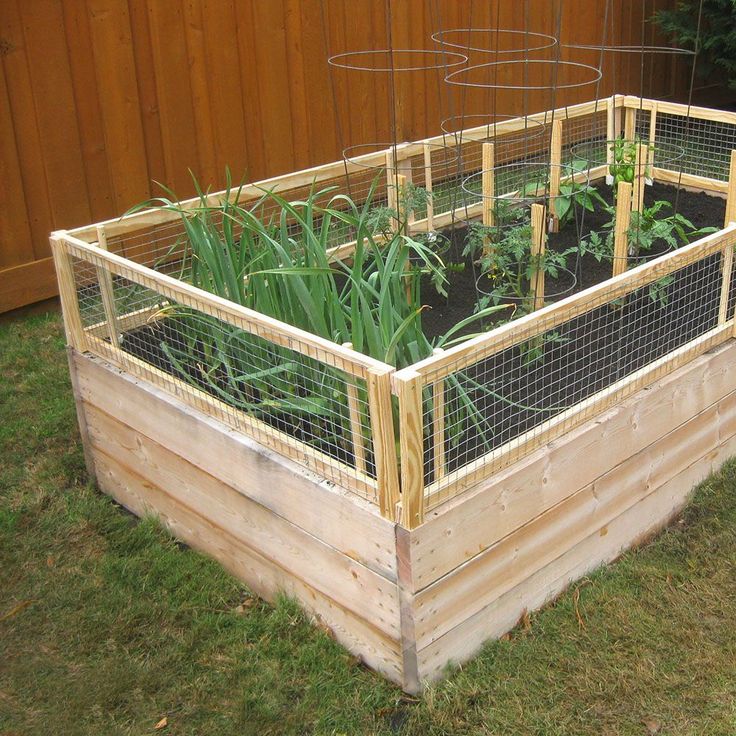 The removed soil will go to backfill (there is often simply not enough land), and the substrate from the lower rough layers can be made thicker. And to minimize the cost of maintaining such a bed, you can do drip irrigation.
How to fence high beds
You can use anything that can hold the soil. The most durable curbs are made from brick, stone and concrete.
Beds made of concrete and stone can be made like thisBut a brick costs a lot, it takes a long time to fiddle with concrete. A concrete fence is made according to all the rules: first, the formwork into which the reinforcement is laid, then it is poured with concrete and they wait until it sets. But the service life is impressive - decades.
Concrete garden fences are the most durable and will never “float” The brick and stone fence is also folded according to all the rules: on the mortar with dressing. To reduce the consumption of bricks, the walls are placed in half a brick. And so that the earth does not move it, the rows are reinforced with a mesh.
But even with this option, support poles will need to be installed one meter apart. If your soil is viscous, heavy, often waterlogged, such walls can be squeezed out. Therefore, put wooden or metal supports that will fix the long walls or make small beds, as for an ornamental garden.
Brick raised beds for ornamental gardensFences made of expanded clay blocks have proven themselves well. Even the voids in them can be covered with soil and plants with a small root system can also be planted there: for example, some types of greens and salads.
Fencing for high beds made of expanded clay concrete blocks They also make fences for high beds from galvanized metal and slate. Slate can be used second-hand, you can buy a new one, wave or smooth - it doesn't matter. Cut the sheets into strips of the required width. There is no need to fear that it is harmful. In slate, asbestos is contained in a bound state, and it does not dissolve in water. It is harmful when it is sawed: the dust rises and enters the body through the respiratory tract. To reduce exposure, wear a respirator and wet the incisions.
They make plastic garden fences. Changed siding? Use it. There are old plastic panels - they are in business. But for plastic, a rigid base is needed. They make it from a metal mesh of thick wire.
Raised beds in wire basketsNets can form the basis for pebbles or pellets. Only in this case, a double frame will be needed, inside which stones or some other material are poured. This technique is called "gabion" and not only fences for beds and flower beds are made from it, but also fences. But so that water does not seep through the walls from the gabion beds, the inside of the box is lined with a dense film.
Filled stone fence for high bedsThe most popular fence is made of wood. You can use boards, timber, logs. Wood is good for everyone, except that it rots.
Really high beds And since all the conditions for activating this process are created in the high beds, destruction occurs rather quickly.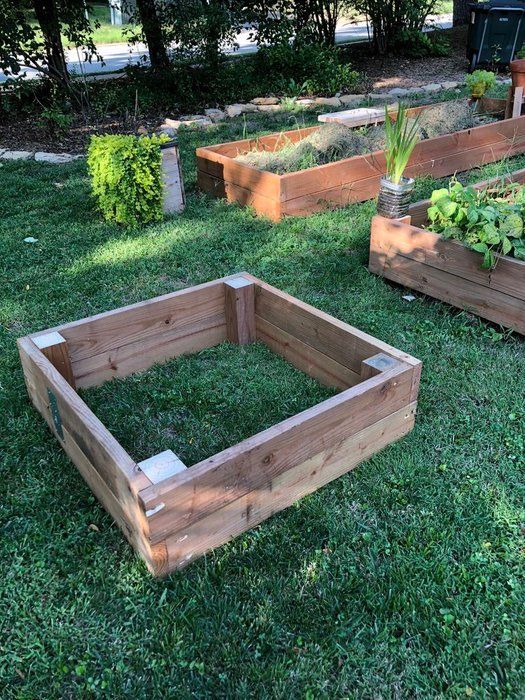 You can slow down the process somewhat by painting the boards or by impregnating them with a bioprotective compound. But there is still no guarantee against destruction.
But the material can be used cheap, and sometimes even junk: the remains after construction, slabs, old logs, pallets, etc. If desired, you can even make a fence out of branches. Only the bark is desirable to remove: it is under it that there are many larvae and woodworms. Although...they will also process the wood residue that you lay on the bottom of the backfill. But too many of them are also not needed, so, probably, it is still better to remove the bark.
You can even make a fence out of branchesFrom the same branches, only freshly cut, you can make a wicker fence. And it will also need to be lined from the inside with a film: to keep water and earth inside.
Read how to make wattle here.
Bed framing can be woven from fresh branches or laid out of stones Even straw can be used.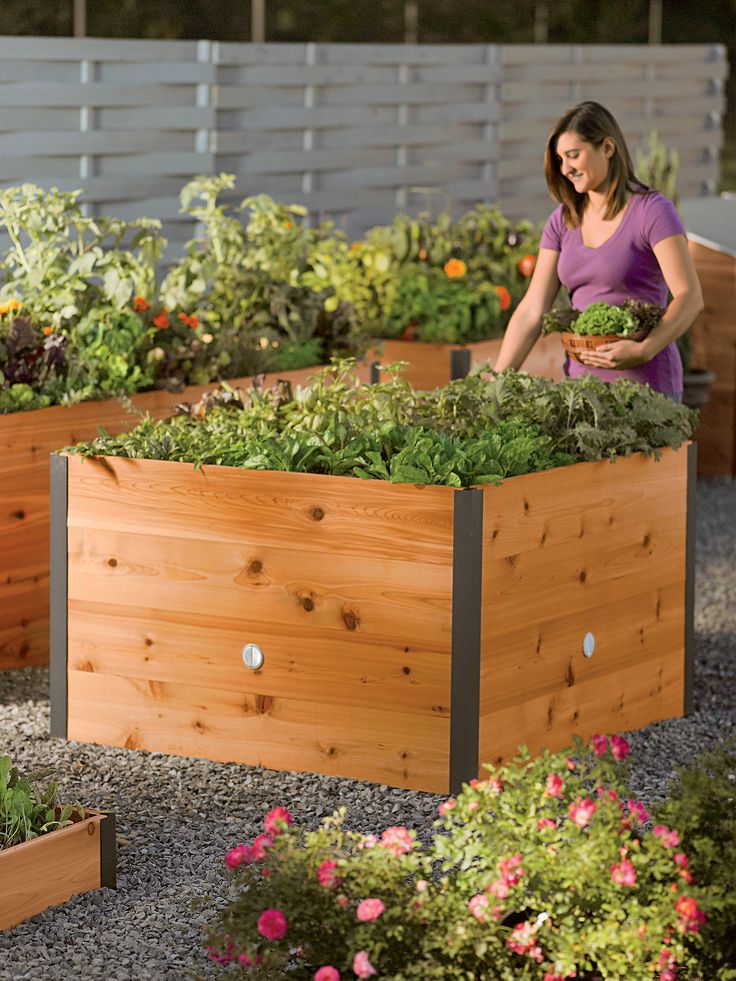 It is tied into small bundles, which are interconnected with a wire. It simply cannot be cheaper, but it keeps water and temperature well. The only disadvantage of this option is that such a fence will last a maximum of two seasons, but rather one. But it can then be used as one of the layers.
Bulk beds
There are high beds without a fence: the so-called bulk beds. The soil in them is poured in the form of hills.
Raised bedsTo improve drainage, branches are laid inside such a bed. To reduce the height of the bed (for example, under tomatoes), it is slightly deepened, throwing the soil to the side. After laying the branches, it is covered from above, often there is a need for additionally imported soil. If you can’t choose the row spacing deeply.
Internal arrangement of bulk beds The disadvantage of this kind of vegetable garden: when watering and during rains, the topsoil is washed away. Therefore, they began to make boxes - to avoid washing out the soil.
Raised Bed Layers
Framing is only a small part of the job. You still need to fill the received box. It must be said right away that the thickness of the layers depends on the height of the bed that you have chosen, so if any values \u200b\u200bare given, then only approximately. In addition to the size of the bed, the thickness of the layer, for example, the fertile one, is influenced by the choice of plants: 5 cm is enough for someone, and much more is needed for someone.
Approximate layers for a high bedSo, what to pour into a high bed - layers from bottom to top:
- A metal mesh with a small cell or a layer of geotextile is laid on the bottom. You can put cardboard. Mesh and geotextile - protection against rodents and moles. Cardboard plays about the same role, but it is less effective.
- Large wood residues: thick branches, branches, even chocks and bars. This layer serves, firstly, for drainage, and secondly, moisture accumulates in the wood.
 The more arid the climate in your area, the more wood you need. Moreover, the following wood layers too.
 - Shredded small branches, bark. Other coarse plant residues will do: corn stalks, straw. Their mission is also twofold. They store water, and when decomposed, they release heat and nutrients. But when using corn trunks and straw, keep in mind that the bed will soon sink: these remains quickly rot, but the yield will be high, and you can add fertile land on top.
- Paper, thin cardboard. It is usually lined with a thin layer. They use packaging cardboard more often, because glossy paper is not suitable, just like newspapers: the lead base of the paint is not at all what plants need to be fertilized with. If there is an old unnecessary burlap (natural), you can lay it.
- Layer of plant residues: leaves, grass, semi-decomposed sawdust. Be careful with sawdust: they strongly acidify the soil. So sprinkle them under plants that love acidic soil, or neutralize the acidity by sprinkling them with a good layer of ash.
- Fertile land.
In the last two layers, you can add a good portion of matured compost, as well as sprinkle deeper layers with it. This will speed up the “readiness” of the high bed for planting.
Read about how to make a pond in the country with your own hands here, and this article says how to turn it into a fountain.
When is the best time to plant and what to plant
It is better to fill the high bed in autumn. During this period, there will be enough “material” and during the winter the processes inside will gain momentum. In this case, you can plant plants in the spring and hope for a high yield. It can be done in the spring, but there are unlikely to be any significant differences in yield: the processes have just begun and will not be able to have a noticeable effect on the fertility of the backfill. Although you will definitely feel the difference in the amount of water for irrigation: much less water is required.
One of the options for a high bed: metal mesh and reinforced polyethylene filmPlant rotation
In the year of a high bed, plants requiring high fertility can be planted on it: cucumbers, zucchini, zucchini, pumpkin, any kind of cabbage, eggplant, tomatoes, sweet peppers . The next year, you can plant greens - spicy-aromatic and leafy. Root crops feel good in the second year.
After the second harvest, fertility must be restored. If the contents of the bed sagged, in the fall they fill up with good earth mixed with mature compost. If there is nowhere to fill up, remove part of the top layer (on a compost heap or in another box as part of the backfill) and replace it with fresh earth with fertilizers.
High bed for strawberries
It differs only in that a covering material is spread over the finished “pie”. Holes are made in it, in which plants are planted. This option leads to the fact that moisture evaporates in minimal quantities, and weeds do not grow in the aisle. The second option - mulching the ground also works well, but evaporation is more intense.
Strawberries feel good Strawberries are peculiar in that their roots are located mainly on the surface. Therefore, the fertile layer can be small. But this same feature leads to the fact that in severe frosts it can die.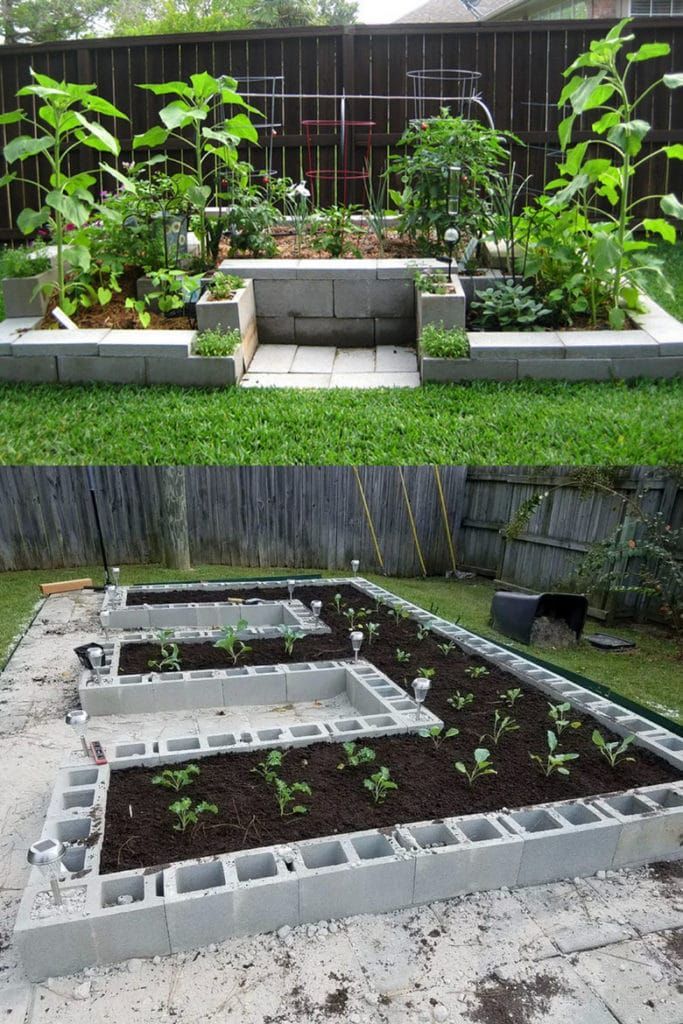 Although there is a decomposition process inside the high bed, warming up the soil, if the bed is without snow and not covered for the winter, the root system may freeze.
High bed for cucumbers and tomatoes
It is no different in terms of its structure. Is it only because they need poles and crossbars or stretched wire around the edges in order to be able to tie up bushes of tomatoes or lashes of cucumbers.
For cucumbers and tomatoes, you need to take care of the garterYou can read about the organization of automatic watering of the garden or plot here.
Do-it-yourself high beds
Most often, questions arise not when laying layers in high beds, but when making a box. Since women often do a lot of gardening, right up to making fences for garden beds, many points may not be clear to them. To clarify the most difficult ones, we present photo reports of making a box from boards and slate - the most common fences.
From planks
Several options for how to make high beds from boards were in the photo above. The main snag is usually in the connection at the corners. The easiest way is to overlap them: just put one to the other at 90 ° and knock it down with nails through. But there are aesthetes who all strive to do the right thing. And that's right - cut down two boards at an angle of 45 ° and connect them like that. It is this option that will be shown in the photo.
To make it convenient to fix the fence on the ground, vertical bars or pieces of board are nailed in increments of 1.2-1.5 m, the length of which is approximately 20 cm more than the selected bed height.
We nail vertical bars so that the box is strong and can be dug in.The lower end of the bar or board needs to be sharpened - this will make it easier to drive the fence into the ground. Then we take a miter box or a circular saw, and cut off the edges at an angle of 45 °. Putting two boards together creates a perfect 90° angle.
Correctly made corner For a strong connection on the inside of the corner, we install a bar, to which we nail the boards.
Fencing for high beds made of wood does not take long, but even easier, connect the boards end-to-end, and nail metal corners for strength (pictured below).
The easiest optionFrom logs
It is not difficult to make a similar box from hewn logs. For example, this option: two long sides from logs, and short ones from pieces of boards.
The advantage of logs is that they are heavy, and due to their weight they will hold the soil well.Whitewash the finished fence: both protection from pests and a more attractive look.
Getting StartedFrom Slate
When making beds from flat or wave slate, questions also arise about how to fix it. The easiest way is to dig in. But this is uneconomical: you will have to make the stripes wider by at least 10 cm and still there is no guarantee that the slate will not “float” in the spring. In the muddy earth, it will simply be squeezed out with a mass.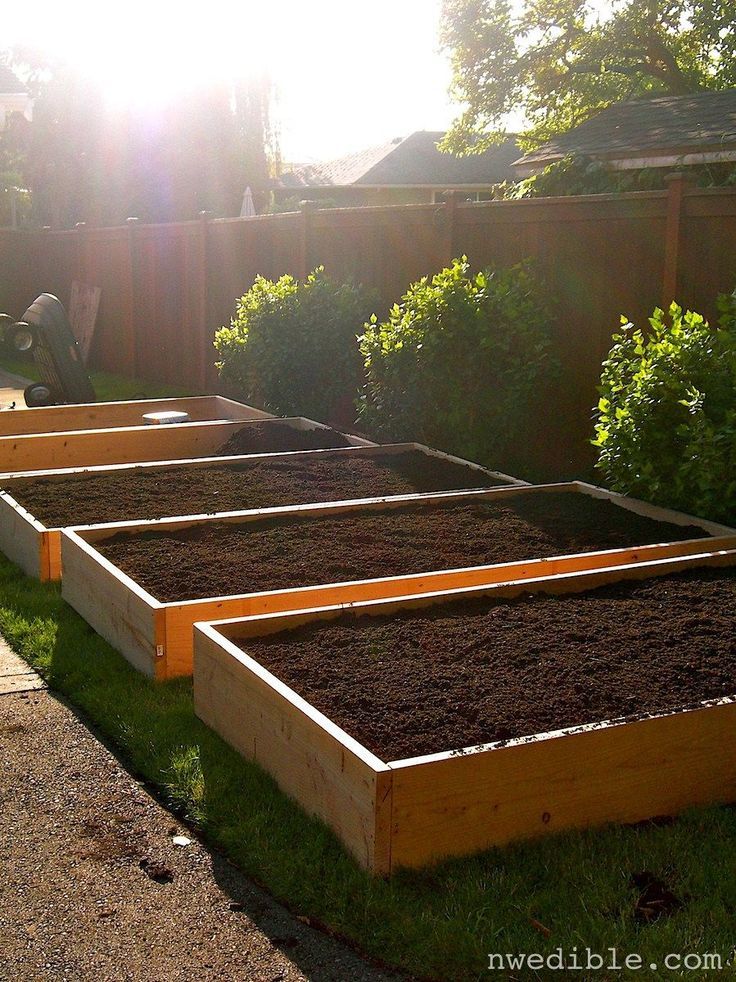 You can fix it, but it's too much time and effort.
Therefore, most often corners or pipes are driven in from one or both sides of the sheet, which clamp the slate and prevent it from deviating strongly. In the photo, the corners are driven in only from the outside: from the inside, the mass of layers of the high bed will press, so that the fence will not fall inside.
Fencing beds with slateThe joints of two sheets are secured with a special welded plate. For reliability, they can be bolted to a wooden bar attached from the other side.
A piece of reinforcement with a welded plate - for insuring the joint of two sheets of flat slateAnother option is to make a frame. Attach a bar or a corner to similar racks with welded plates - for whom it is cheaper. And to this frame, attach the slate cut into strips (it holds well with nails, but it’s easier with self-tapping screws).
Bar frame in fence for high bed The same principle - with guides - makes beds from plastic panels and other similar materials.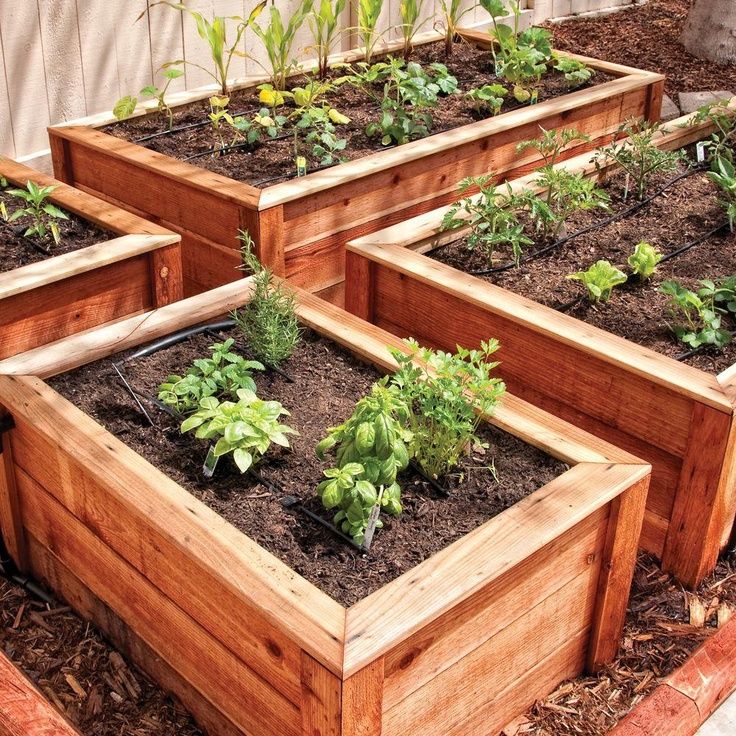 As you understand, especially virtuoso skill is not needed here. The main thing is to keep well.
The right beds - less work, more harvest. We choose a garden bed. Photo - Botanichka
In modern gardening, it is customary to use several types of beds. The purpose of their arrangement, on the one hand, is to create optimal conditions for plants, which means getting the most out of them. And on the other hand, a reduction in the amount of work, facilitating the work of a summer resident. The type of proper bed decides a lot when growing vegetables and herbs. Properly approaching its choice and arrangement, you can save soil moisture, increase the temperature of the soil, or, conversely, prevent it from overheating in the summer. Even with weeds it is easier to fight on properly equipped beds. Which garden bed to choose for your site? Our article will help you decide.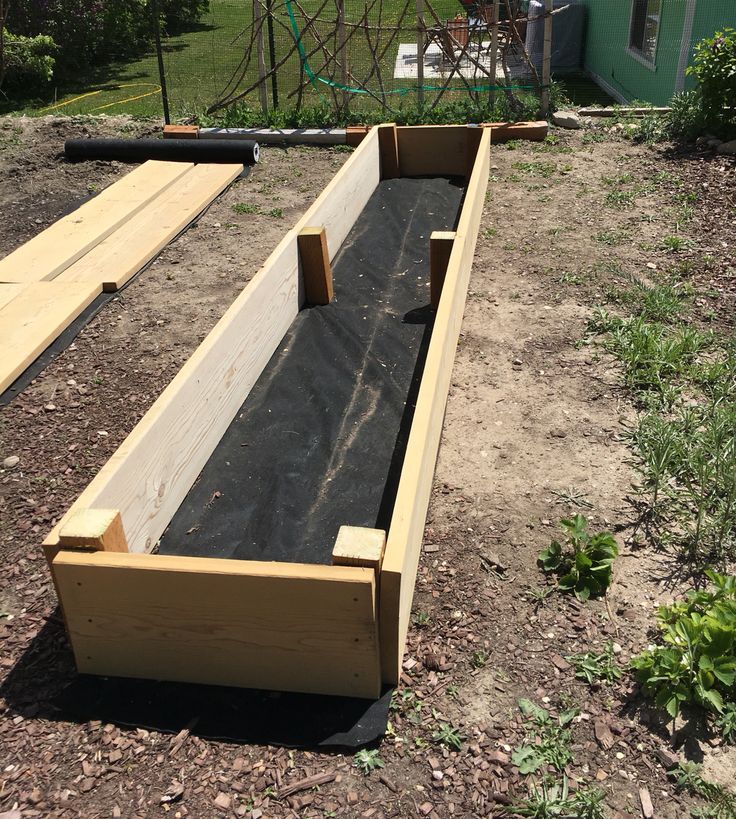
Contents:
- Raised raised beds
- Raised beds-boxes
- Warm beds
- Deep beds
Raised raised beds
Unlike standard raised beds, which are flush with the vegetable garden, raised raised beds rise above ground level. Due to this, they warm up faster. Therefore, high beds are effective in cool regions, especially for growing heat-loving crops.
It is good to build such beds in areas with a high level of groundwater, in low-lying areas and areas prone to flooding. Any beds raised above the soil level are very good for growing crops that are sensitive to diseases or root rot - cucumbers, onions, garlic.
The easiest way to build a raised bed is to build it in bulk. It can be done using imported soil. To do this, it is enough to mark the bed with pegs and pour the earth. If the earth is dense, heavy, then first you need to arrange a drainage layer - put thick branches, rough stems, hemp.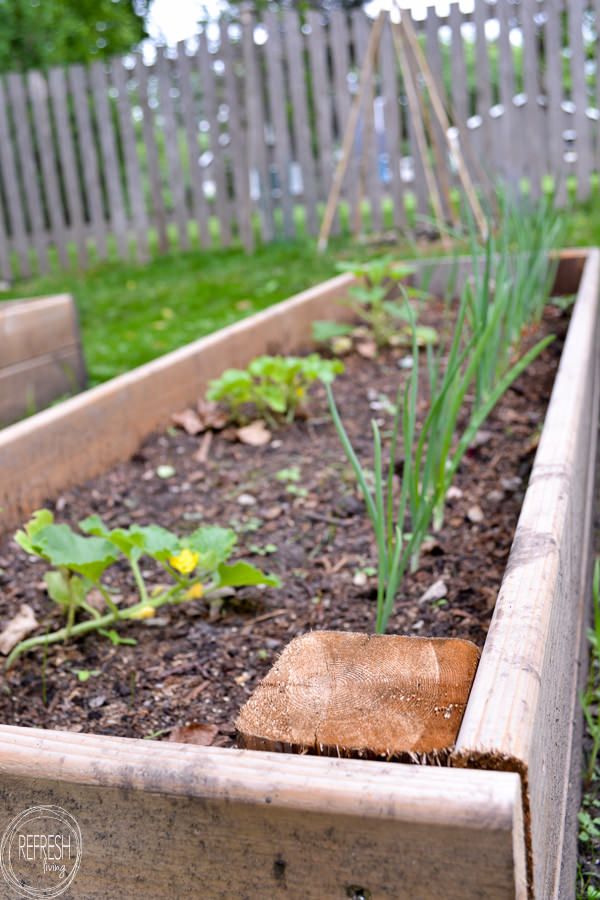 And then pour fertile soil. This method of arrangement requires material costs for the acquisition of soil.
The second method is more economically available, but more labor intensive. To equip the beds, you will need to raise part of the soil from the paths to the garden. Thus, the bed will become higher. If the soil is heavy, then it is necessary to make a drainage layer. If possible, compost, turf turned down with grass, fallen leaves, plant debris can be laid in the bottom layer of the bed. Thus, it is possible to partially solve the problem of lack of soil.
Advantages of raised raised beds
Raised beds have a number of advantages over traditional ones:
- They warm up faster in spring, which means that planting on such beds can be started earlier;
- During the season, the soil temperature in them is higher, so you can plant more heat-loving crops in the country;
- These beds are universal due to the fact that they settle down quickly enough, any crop can be planted on them.
 Perhaps only moisture-loving cabbage, which does not develop well in hot conditions, will not feel good on a high bed;
 - In lowland areas, in conditions of regular flooding, these beds will be ideal for growing plants. According to the principle of a high bed, a so-called “cushion” is laid for growing fruit trees in conditions of a high level of groundwater;
- High beds allow you to grow vegetables in areas with low fertility, however, for this you will have to spend money on purchased soil.
How you can reduce labor costs in the garden by organizing the right beds, read the material "How I made narrow beds and made my life easier."
Cons of high bulk beds
High beds, in addition to advantages, have their disadvantages. In some cases, they are so significant that it is better to abandon the idea at the planning stage.
The biggest problem when arranging beds is where to get soil for them? Imported - expensive, if you use the land from the paths, then the beds will not come out very high.
Another disadvantage of such a bed is its overheating and drying of the soil in hot summer weather. To avoid this, you do not need to make very high beds. Its optimal height is 20–30 cm. The issue of overheating and drying out of the soil can be solved with the help of mulching. Where to get mulch is a separate question.
In high beds without a border, when it rains or waters, the water rolls and the soil is washed away.
It is good to build high bulk beds in areas with a high level of groundwater, in low-lying areas and areas prone to flooding. © Couri CenterHigh Box Beds
Many of these shortcomings are eliminated by the improved version of the high beds - the box bed. This is a high bed, fenced with some kind of material.
The process of creating a bed-box is quite simple, the main thing is to stock up on the necessary materials. A box 15 to 70 cm high is assembled at the place marked out for the bed. Boards, logs, slate, brick can be used to make the box.
Place a fine mesh at the bottom of the box to keep mice out. Then comes a layer of organic matter: branches, tops, foliage, humus. And a fertile layer of earth is poured on top - and the bed is ready.
Read more about how to create a high box bed in our material "How to make high beds - a solution for any soil."
Advantages of a high box-bed
Box-beds warm up much better in the spring in the sun. This means that the planting season can start much earlier. In addition, it is easier to fix the arcs in them and stretch the covering material.
In beds made with materials that do not warm up so much in the sun (wood, brick, slate), moisture is retained better, which means that it will be possible to water less often.
The "sides" of the beds protect the soil from erosion. The fence of the bed clearly limits it, so that perennial weeds cannot get into the bed.
High beds-boxes in the dacha are very convenient in work: to plant, weed, you need to bend over less than in a traditional bed. There is no need for digging, it is enough to loosen the earth.
Read about the features of growing plants using this method in our material "10 rules for growing in high beds."
Such beds, if they are made with high quality, are beautiful and tidy, so they are used in creating the so-called "beautiful vegetable garden".
The box bed can, if desired, be turned into a warm bed for growing very early greens or seedlings. To do this, the soil is removed from the box and organic matter is laid in layers.
Cons of a high bed-box
The main problem that stops summer residents is the need to purchase materials for arranging the garden. As well as the lack of opportunity and skills to build the basis of the structure.
Always keep in mind that in extreme heat, the beds can overheat. The way out is soil mulching and the right choice of material. According to experienced gardeners, plants feel best in beds equipped with wood.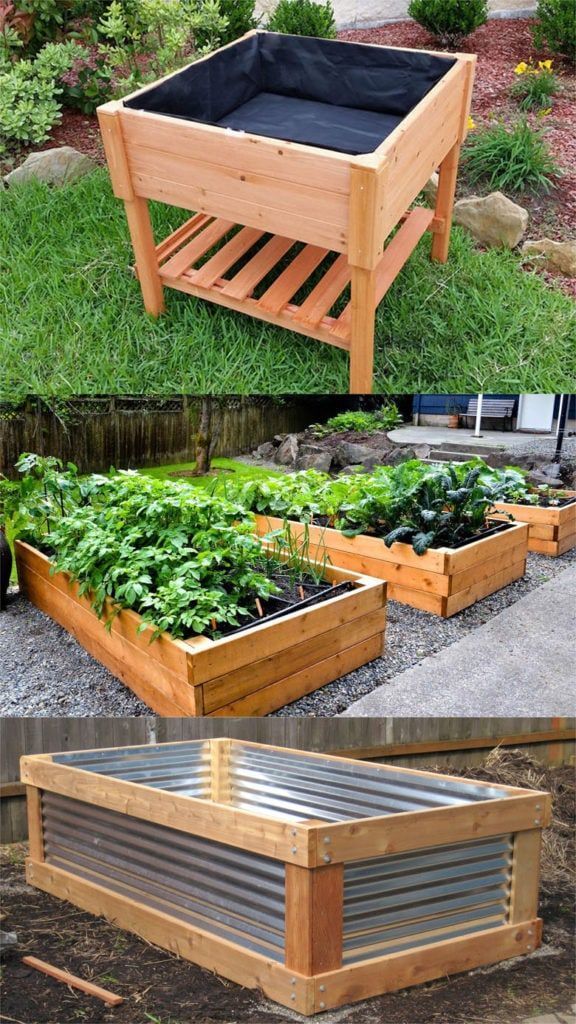
In high beds, the soil can freeze hard in winter, so they are more suitable for annual plants. Such a bed needs to be mulched for the winter and, if possible, throw snow. Even if there are no plants in it, beneficial microorganisms in the soil may die.
The process of creating a bed-box is quite simple, the main thing is to stock up on the necessary materials. If desired, high beds can be used as a garden decorationWarm beds
Warm beds differ from ordinary ones in that they are based on organic materials, which, when decomposed, release a significant amount of heat. Therefore, warm beds, in the first place, are suitable for regions with a cold climate, late spring and short summer. In the middle lane, these beds are ideal for growing heat-loving crops, early greenery and even seedlings.
In addition to heat, as a result of biochemical processes, the nutrients necessary for plants are formed, which can be used to grow plants demanding fertility: cucumbers, zucchini, pumpkins, tomatoes, peppers.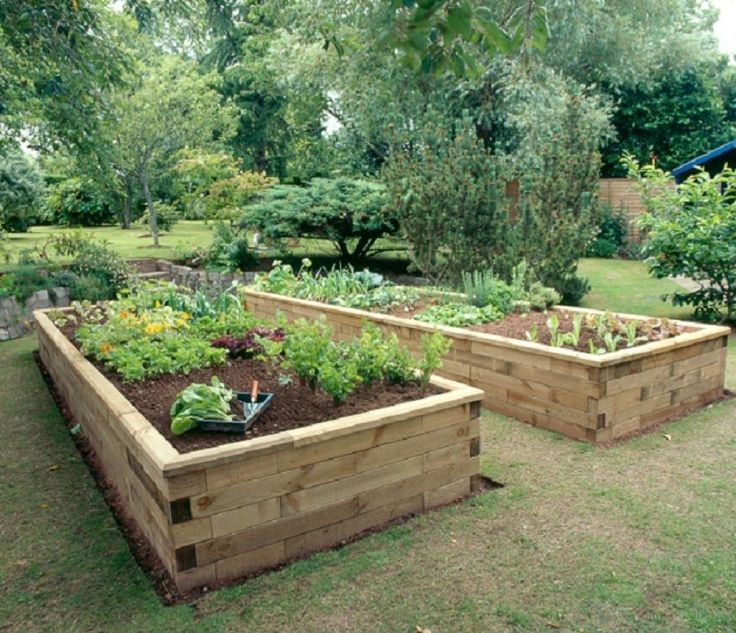 Growing capricious eggplants is especially good on such beds.
The basic principle of creating a warm bed is that different types of organic materials are laid in layers. The bottom layer serves as drainage. This layer provides air access and removal of excess water, so hemp, thick tree branches, and rough plant stems are laid down. The higher, the less rough organics fit.
The second layer is usually plant and food waste, weeds, sawdust, wood chips. The next layer is compost, humus, animal waste - biofuel, which, decomposing, will be a source of heat. Next comes a layer of fertile soil. Each layer must be spilled with water and compacted.
If a garden bed is prepared in autumn, it is better to cover it with a film, covering material, in order to avoid weed seeds from getting there.
In order for biochemical processes to proceed correctly, it is important to observe the following rules:
- do not lay plant residues with signs of disease;
- for proper air exchange, the drainage layer must be mandatory;
- the bed should be kept moist (but not damp).
Warm beds can be used in spring and autumn. In autumn, it is more practical to do this: when the main work is done, you can take your time. There are many plant residues that are needed in large quantities. By spring, these beds will be ready for use.
There are several options for warm beds. Depending on the nuances of the arrangement, they are recessed, raised, or combined.
Buried warm beds
Under the buried bed, you will need to dig a trench, which then needs to be filled in layers with organic matter. As a result, the finished bed will be flush with the level of the soil. The peculiarity of using such a bed is that it will need to be watered less often, compared to a raised one. But it can not be equipped where water can stagnate.
Raised warm bed
Raised bed does not need to be trenched, it is laid on the surface of the earth. Such a bed is the best option for cold, humid regions where there is a risk of flooding.
Hill Bed - is a raised bed variant without borders.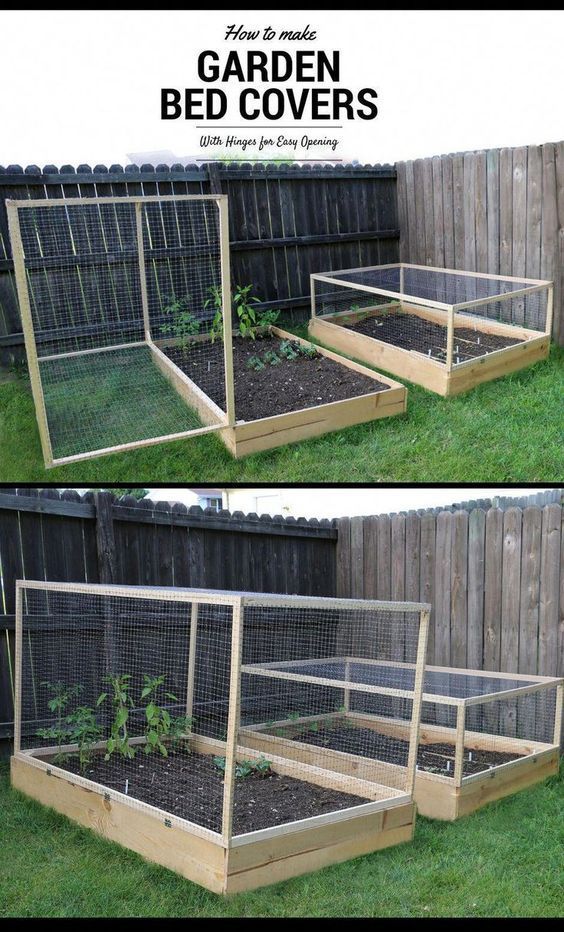 Such a bed is very quickly and easily equipped.
Combined warm beds
Settled in a trench, their upper part is above the ground. A trench under such a bed needs to be dug 2 times smaller than under a buried one.
Caring for warm beds consists in timely watering, loosening and weeding. In a dry summer, in order to save raised warm beds from drying out, it is advisable to mulch them.
Benefits of warm beds
- The gardening season in warm beds can start earlier than usual. And, at the same time, the cultivation of plants can be extended by 2-3 weeks;
- The beds can be rationally used due to the possibility of growing early greens or seedlings before planting the main crop. To do this, it is enough to put arcs with shelter. The result is a mini greenhouse.
- The earth does not need to be dug up, it is always loose due to the large amount of organic matter.
- On such beds, optimal conditions are created for heat-loving plants, which means that their productivity increases.
- At its core, a warm bed is a kind of compost heap, which contains the necessary nutrients for plants. Therefore, fertilizing can be minimized.
- On poor, infertile soil, you can create beds with good quality soil.
- This arrangement of the bed allows you to effectively use plant residues without building a compost heap, as well as dispose of animal waste.
Cons of warm beds
- The arrangement of a warm bed in the country requires considerable effort, and in the case of making beds with sides, material costs are also needed;
- Short life of use. The effect of a warm bed disappears after five years, when the process of decay of organic matter ends. In this case, it will be possible to make a bed in a new place. And if the bed is stationary, arranged in the form of a box, then it will be possible to remove the soil from it for use elsewhere, and equip the warm bed again, observing the same conditions.
- Mice are very fond of settling in warm beds, so before arranging the beds, you must definitely stock up on a mesh with small cells and cover the base of the future bed with it.
Read our detailed material: How to make a warm bed with your own hands?
Deep beds
Such beds are also called low or recessed beds. The name speaks for itself. The main function of the "low" beds is to save the soil from overheating and retain moisture. Therefore, they are suitable for regions with a hot, sultry climate, where droughts are very common, especially for areas with sandy or infertile soil that constantly dries up. The arrangement of such beds requires physical effort, so they are usually prepared in the fall, when the heat subsides.
The choice of location must be approached responsibly, even in the most arid region, natural disasters can periodically occur. Therefore, a bed should not be arranged in low-lying places of the site, where there may sometimes be an excess of water.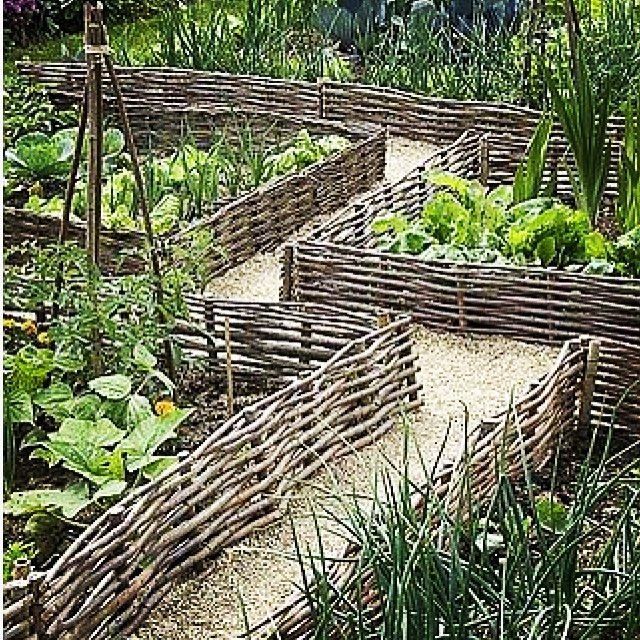
For arrangement, it is necessary to dig a trench of the required length in the selected area. The width of such a bed will depend on whether the walls of the bed will be laid out. If there are walls, then the thickness of the material must be added to the desired width of the beds.
Brick, stone, cinder blocks, wooden boards, etc. can be used as fencing material.
Next, the bed is arranged depending on the characteristics of the soil:
- In order not to stagnate water, on heavy soils, it is necessary to dig a trench, preferably, for 2 spade bayonets, at least. Next, you will need to equip a good drainage layer. For this, construction waste, hemp, thick branches and other similar material are suitable;
- Also on poor soils - the deeper the layer, the better. In a deep bed, it will be possible to make a sufficient layer of fertile soil in which plants will develop comfortably;
- On sandy soils, in addition to sufficient depth, it is advisable to make a small clay layer at the bottom of the trench or lay out covering material.
 This technique will help to avoid problems with the rapid leaching of nutrients and the outflow of water during irrigation.
 - The last layer of the bed is covered with fertile soil, depending on the type of soil. If the soil is heavy, add sand, compost. If poor, infertile - compost, humus.
- After watering, the bed is left unattended for some time to allow the soil to settle, after which it can be used.
Care of such beds consists in timely watering and harvesting of grass from the aisle.
As the bed is used, the soil in it can settle considerably. Then it will need to be added more. In very dry and hot times, the beds will need to be mulched in order to retain moisture as much as possible and avoid overheating of the plants.
Benefits of deep beds
The arrangement of such beds, on the one hand, contributes to the creation of optimal conditions for growing plants in hot and dry regions. On the other hand, the work of the gardener is facilitated by reducing watering.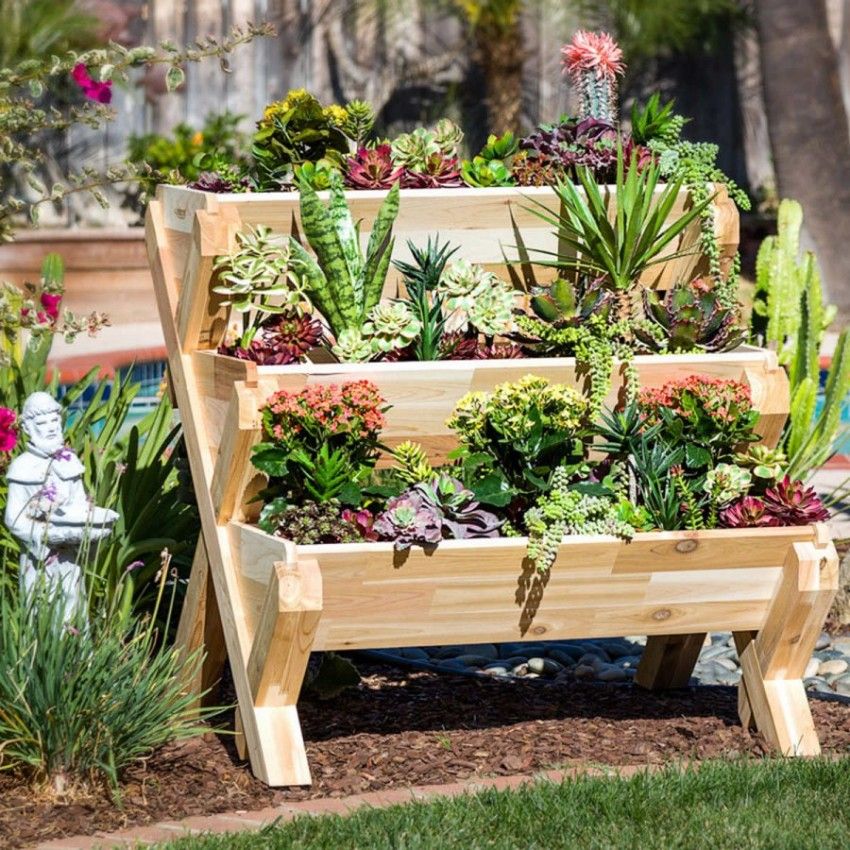
Plants in more comfortable conditions will be able to show greater yields, which means that it will be possible to reduce the number of plants grown without detriment to the yield, in this case, labor costs are also reduced.
The deep bed arrangement creates conditions for growing plants on very poor, infertile soils. Of course, this requires considerable physical effort, but on practically barren soils, these efforts are commensurate with the end result.
The main function of deepened beds is to save the soil from overheating and retain moistureDisadvantages of deepened beds
- Labor-intensive arrangement, and in the version with sides you need to purchase material;
- If the surface of the bed is not level, then water can stagnate at the lowest point, so the bed is carefully leveled before planting or sowing;
- If the trench is not dug deep enough on heavy soils, water may stagnate during irrigation, so you need to dig a deep trench and be sure to make a drainage layer.