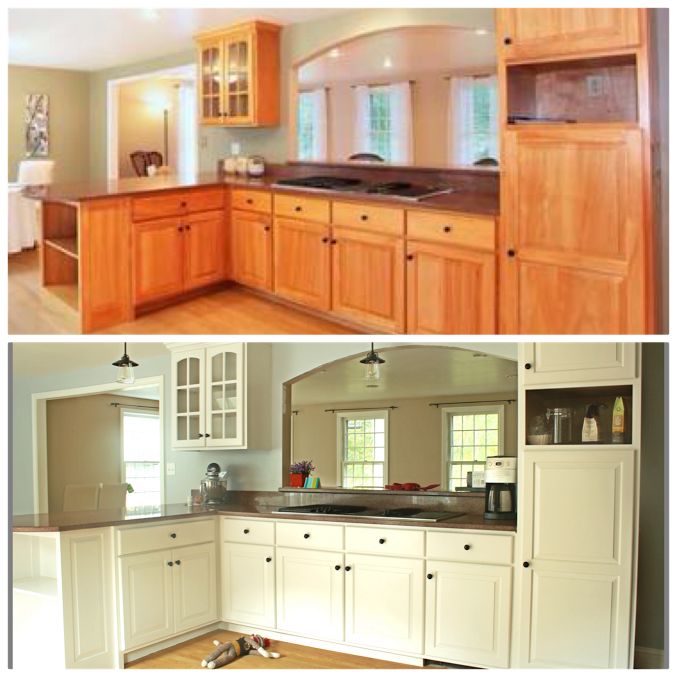
Do it yourself refinish kitchen cabinets
How to Refinish Cabinets and Give Your Kitchen a New Look — Bob Vila
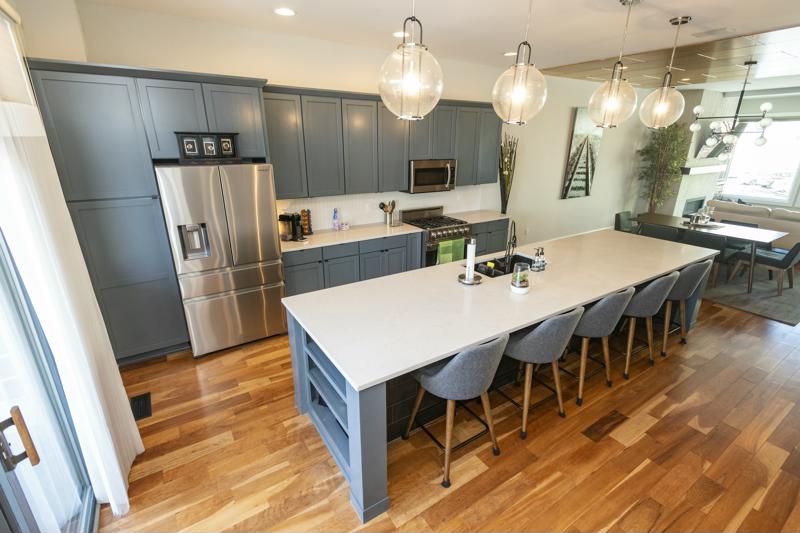
Photo: istockphoto.com
Refinishing cabinets is one of the best ways to give your old, ho-hum kitchen a fresh new look, and it can make a big difference in the way you feel about a space. After all, having expensive cabinets hanging on your kitchen walls doesn’t mean much if you don’t like the color. That’s why many homeowners think about refinishing cabinets with a stain color of their own choosing. It is a big job, but there’s an even bigger payoff.
Before you begin refinishing your cabinets, however, it’s best to do a little detective work. You need to know what materials you’re working with to see if the job is even possible. But, with that research and a lesson on how to refinish cabinets, it’s possible to give a kitchen a serious upgrade.
Safety Considerations for Refinishing Kitchen Cabinets
Before we go too far, it’s important to consider the safety and environmental concerns involved with kitchen cabinet refinishing. You’ll probably need to employ harsh chemicals and create a lot of airborne particulates, so safety does matter.
First, make sure to refinish the cabinets in a well-ventilated area. If the cabinets aren’t mobile, open windows and use a box fan to keep air moving. Next, be sure to wear a respirator when working with chemicals or sanding to avoid inhaling harmful substances. Finally, avoid damaged or stained skin by donning a pair of chemical resistant gloves.
Finally, remember that some chemicals used in kitchen cabinet refinishing (particularly during stripping or staining) are flammable, so be sure to play it safe around any heaters, open flames, or anything of the sort. Oily rags can also combust if left in a pile, so hang them to dry before throwing them out.
Advertisement
RELATED: The Best Under Cabinet Lighting of 2021
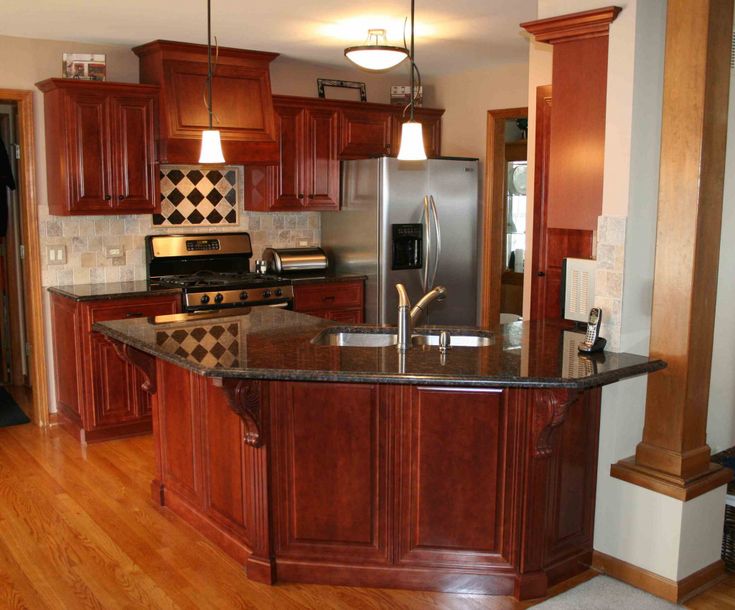
Method 1: Refinishing Cabinets to Make Them Lighter
Photo: istockphoto.com
Refinishing darker cabinets to make them lighter is probably the most involved method of refinishing, and it takes some specific knowledge, tools, and materials.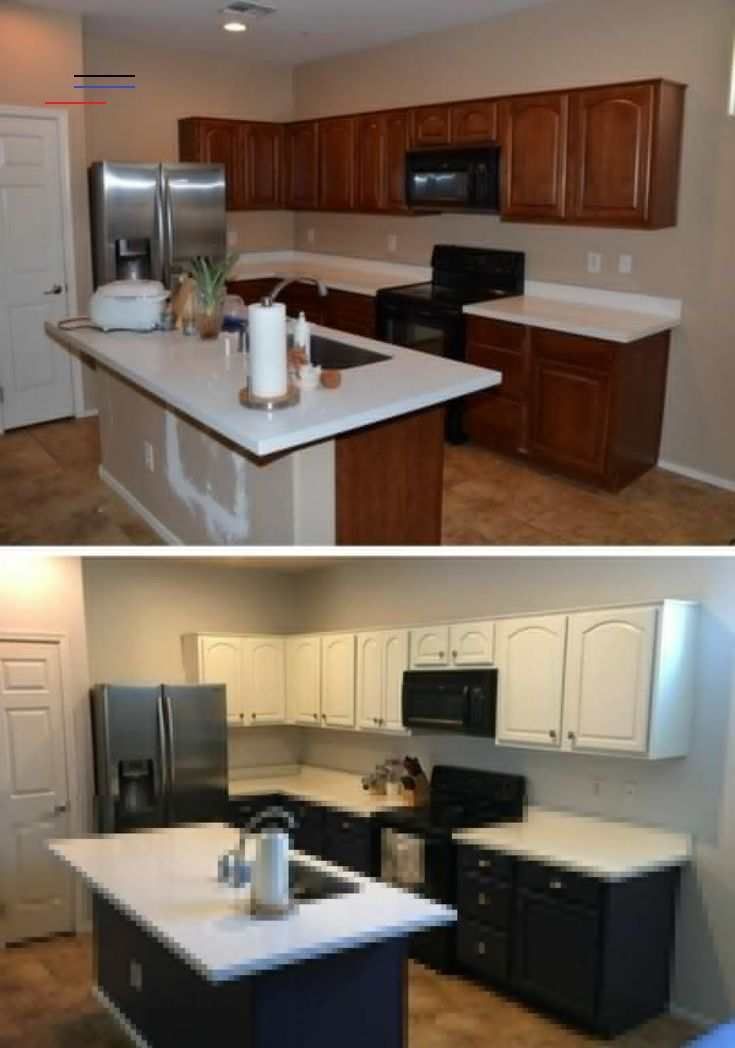 With the following list and steps in mind, you should be able to remove the finish, paint, and stain from wood-based cabinets to bring them to a lighter finish.
– Sandpaper
– Paint stripper
– Chlorine bleach (if necessary)
– Wood filler
– Wood sealer
– Denatured alcohol
– Stain
– Varnish
– Respirator
– Rubber gloves
– Sanding block
– Scraper
– Putty knife
– Orbital sander
– Rags
– Paintbrush
– Steel wool
– Tack cloth
STEP 1 : Remove the cabinet doors.
Before embarking, remove one of the doors and sand off a small area of the finish on the back. Do the same to an area at the back of a rail or stile (horizontal or vertical framing member).
If the doors and drawer fronts are made of hardwood, remove them and take off all the hardware.
Note: If the doors and drawer fronts are fiberboard, forget about refinishing them with stain. The only way you’re going to get the cherry, oak, or birch tones you love so much is by applying a veneer or buying all new doors and drawer fronts.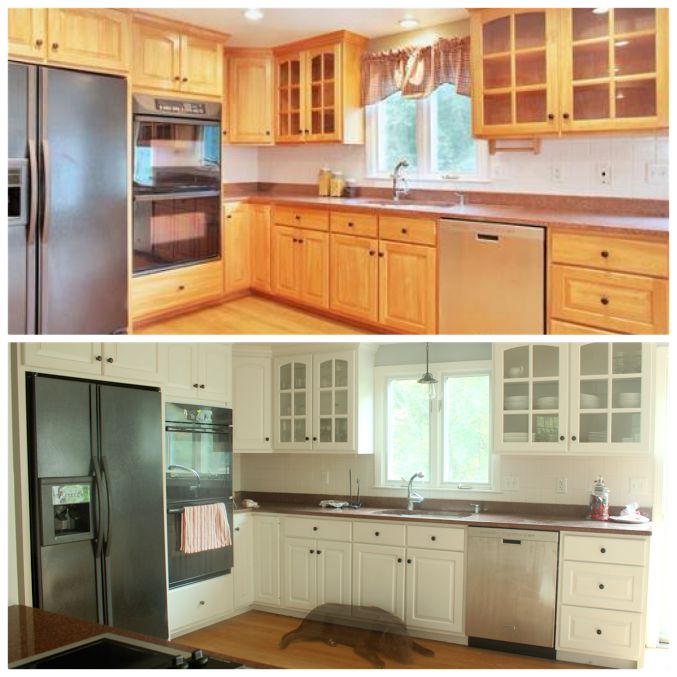
STEP 2 : Strip the old finish from the cabinets.
In a well-ventilated room (or outdoors), use a paint stripper to remove the existing finish. Removing a clear coat finish should be a lot easier than removing paint, but you may have to use an aggressive stripper or chlorine bleach to remove the old stain. The job is messy and potentially unhealthy, but if you’re careful, it’s better than blowing thousands of dollars on new cabinets.
Note: Removing paint from cabinets, or any wood furniture, requires patience. Not all of the paint lifts off after the first application of remover, and maybe not after the second or third, either. It’s imperative to work in a ventilated space, to wear a respirator, to wear protective gloves and a long-sleeve work shirt.
Advertisement
Use a sharp scraper to remove as much finish as possible and use whatever you have on hand (old spoons, dental tools, etc.) to scrape contours and crevices.
STEP 3 : Fill damaged wood with wood filler, then proceed with sanding the cabinets.
Fill dents and deep scratches with wood filler, then sand thoroughly until all finish is removed and the wood is super smooth with no scratches.
Make your first pass with an orbital sander using 100-grit paper, your second with 180-grit paper, and your last pass with 220-grit.
STEP 4 : Apply a sealer.
Before applying it, thin out the sealer to a 50-50 concentration with denatured alcohol.
Apply the sealer (this is sometimes called a wood conditioner). A sealer does just what it says: It seals the surface with a light, thin coating so that when you apply stain, the color goes on evenly. Zinsser’s Bull’s Eye Seal Coat, an alcohol-based sealer that’s easy to apply and dries fast, is a good option.
When the sealer dries, lightly rub with 000 steel wool, then clean the surface thoroughly with a tack cloth.
STEP 5 : Apply the stain.
Apply stain using a soft cotton rag, a brush, or a brush in combination with a rag. Experiment until you find a combination that allows you to apply a consistent tone.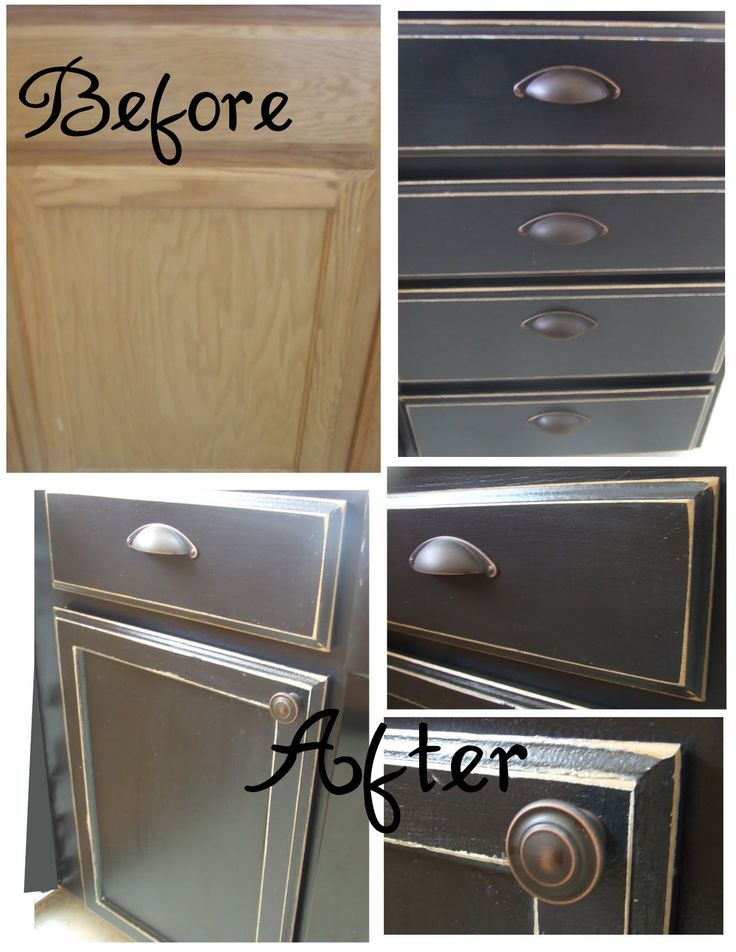
If the stain is going on too dark, rub some it off. Too light? Don’t worry. You can apply another coat after the first one dries.
Once the stain dries, follow up with another very light rubbing with 000 or 0000 steel wool before cleaning with tack cloth.
Note: It’s always wise to experiment on the backside of a single door before committing to the project, just to be sure you’re going to be pleased with the results.
Advertisement
STEP 6 : Add a protective varnish to the cabinets.
Now you can apply a protective coat of clear polyurethane varnish. Applying any clear coat must be done in a dust-free environment.
Read the directions on the can and follow them, but when it comes to thinning, you may need to deviate from the product literature. Most makers say you won’t have to, and maybe that is the case under perfect conditions, but I find that it’s usually necessary to pour in a little mineral spirits to keep the polyurethane flowing smoothly and drying without brush marks.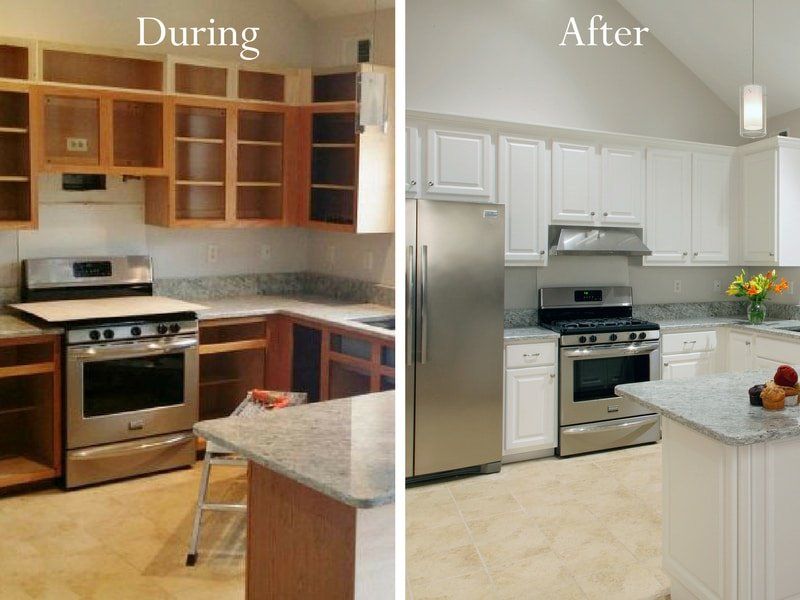
RELATED: These Cabinet Customizations Are Totally Worth It, According to Pro Organizers
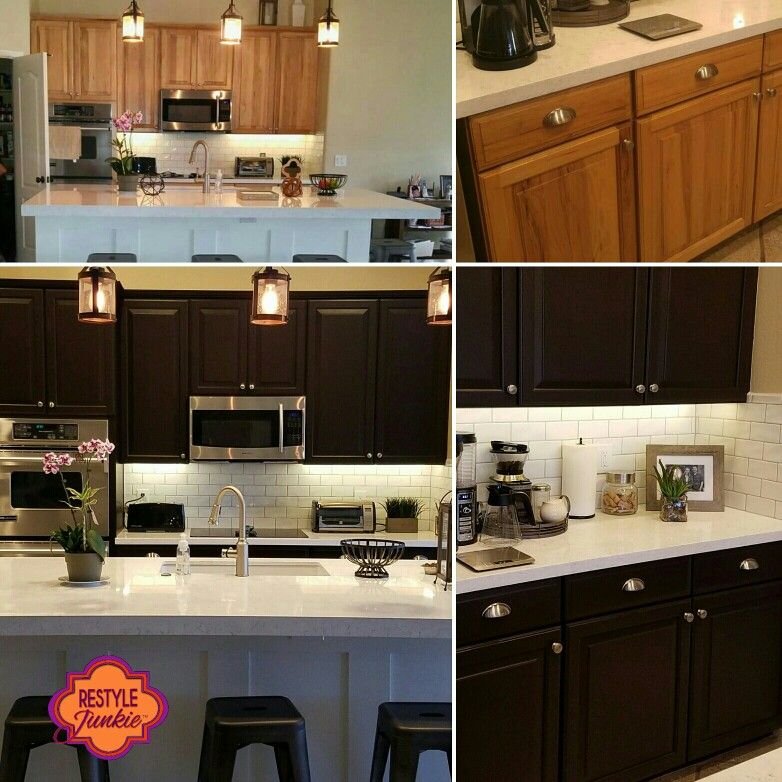
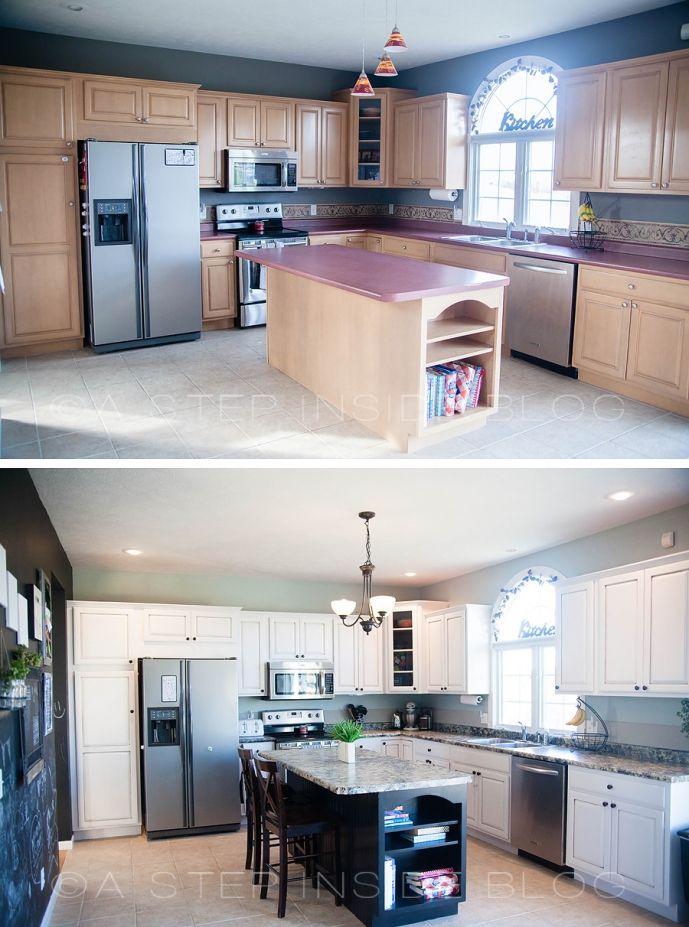
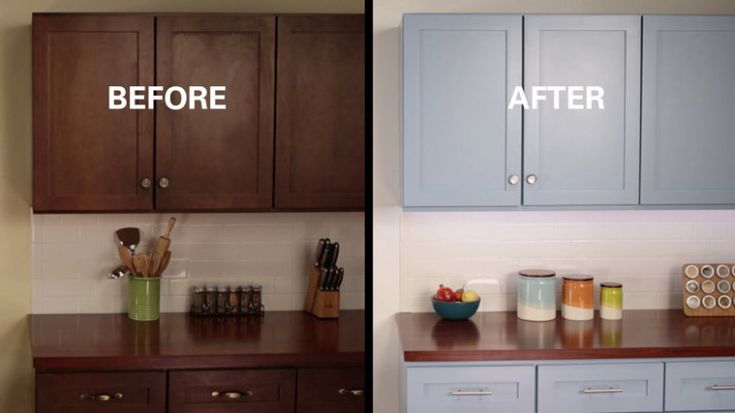
Method 2: Refinishing Kitchen Cabinets to Make Them Darker
Photo: istockphoto.com
If you want darker-toned cabinets than what you currently have, you may be able to simply tint the existing finish. This method of refinishing kitchen cabinets, or cabinetry in any space, is much easier to accomplish than others that require stripping and sanding, but there are still a few ins and outs that you need to know.
SUPPLIES– Respirator
– Rubber gloves
– Trisodium Phosphate (TSP)
– Water
– Sandpaper
– Tack cloth
– Tinted polyurethane varnish
– Paintbrush
– Polyurethane finish
STEP 1 : Remove and wash doors and drawer fronts.
After removing the doors, drawers and hardware; begin by thoroughly washing grease and wax off the cabinets with TSP and water.
STEP 2 : Sand and dust the cabinets.
Lightly sand and wipe off the dust with a tack cloth.
STEP 3 : Apply a tinted polyurethane.
Experiment with a tinted polyurethane varnish (such as Polyshades by Minwax) to see if you can achieve the tone desired. Tinted polyurethanes combine stain and varnish in a single product.
Note: It’s always wise to experiment on the back side of a single door before committing to the project, just to be sure you’re going to be pleased with the results.
Advertisement
RELATED: How to Stain Cabinets
Method 3: Repainting Kitchen Cabinets
Photo: istockphoto.com
While it might make the biggest impact, repainting kitchen cabinets is actually quite a bit easier than restaining them. And, since you’re applying a whole new coat, the color possibilities are endless.
SUPPLIES– Respirator
– 220-Grit sandpaper
– Foam sanding block
– Tack cloth
– Degreaser
– Primer
– Paintbrush
– Paint roller and tray
– Enamel cabinet and trim paint
STEP 1: Remove the cabinet doors and hardware.
Start by removing the doors, door knobs, drawer fronts, drawer pulls, and other hardware from the cabinets. For very large kitchens, it’s a good idea to number the cabinet doors and drawer fronts to ensure you know where to put them back.
STEP 2: Lightly scuff the cabinets’ surfaces.
Cabinets are typically smooth and covered with a bit of polyurethane. While primer can adhere to this surface, it’s better to scuff it up a bit first. Put on a respirator and use the 220-grit sandpaper and foam sanding block to lightly scuff the surface of the boxes, face frames, drawer fronts, and doors. The foam sanding block should be able to get into intricate door profiles.
Keep in mind that your goal isn’t to sand down to bare wood. Instead, you simply want to roughen the surface of the existing finish to give the primer something to hold on to.
RELATED: The Best Primers for Kitchen Cabinet Transformations
STEP 3: Clean the cabinet surfaces.

After scuffing, remove the dust from the cabinets with a tack cloth. Take your time with this step as any dust that stays behind is going to create a rough texture on the cabinet.
While you’re sanding, you’re inadvertently transferring oils from your fingers to the cabinets. Also, cabinets see a lot of cooking oil, as well, and neither substance is conducive to a great paint job. The answer to this conundrum is to use the degreaser to clean the entire surface of the boxes and doors. Once clean, the surface is ready for primer.
Advertisement
RELATED: The Best Paint for Kitchen Cabinets
STEP 4: Prime the cabinets.
After pouring primer into the paint tray, use the paintbrush and roller to coat the boxes, face frames, doors, and drawer fronts with primer. Be sure to brush the primer into any cracks or corners, especially along the door profiles. This finish might look a bit streaky, but you should only need one coat of primer before moving to paint. Pour the excess primer back into the can and clean the brush and paint tray while allowing the primer to dry.
STEP 5: Paint the cabinets.
Once the primer dries, it’s time to paint the cabinets. Put a new roller cover on your paint roller and pour some paint into the paint tray. Use the brush and roller to coat the doors, face frames, drawer fronts, and boxes with an enamel paint made specifically for cabinets and trim for the best results. After allowing the first coat to dry, apply a second coat of paint. Once dry, put all the doors, drawer fronts, and hardware back on and enjoy the fresh, new, updated look in your kitchen.
RELATED: The 14 Freshest Kitchen Cabinet Colors
Final ThoughtsPhoto: istockphoto.com
With this primer on how to refurbish kitchen cabinets, you have the knowledge necessary to give those boring or ugly wood boxes and doors a facelift. Whether sanding down to bare wood and restaining kitchen cabinets, using a tinted varnish to darken the color, or painting your cabinets, be sure to wear the proper safety gear while you tackle this big-impact project.
That might feel like a lot of information about the refinishing kitchen cabinets, and it’s hard to cover everything in one coat. If you still have questions about restaining cabinets or simply refurbishing old kitchen cabinets, this section is for you.
Advertisement
Q: What is the average cost to refinish cabinets?Generally speaking, the cost of refinishing kitchen cabinets (with labor) will run between about $1,800 and $4,000, depending on the size of the kitchen. You can save up to 75 percent of that cost if you tackle the project yourself.
Q: Is it worth it to refinish kitchen cabinets?It is absolutely worth refinishing kitchen cabinets. If your boxes and doors are still in good shape, a fresh coat of stain or paint can breathe new life into an old space and save you up to $20,000.
Q: Is it cheaper to reface or refinish cabinets?Generally speaking, refinishing cabinets is less expensive than refacing kitchen cabinets.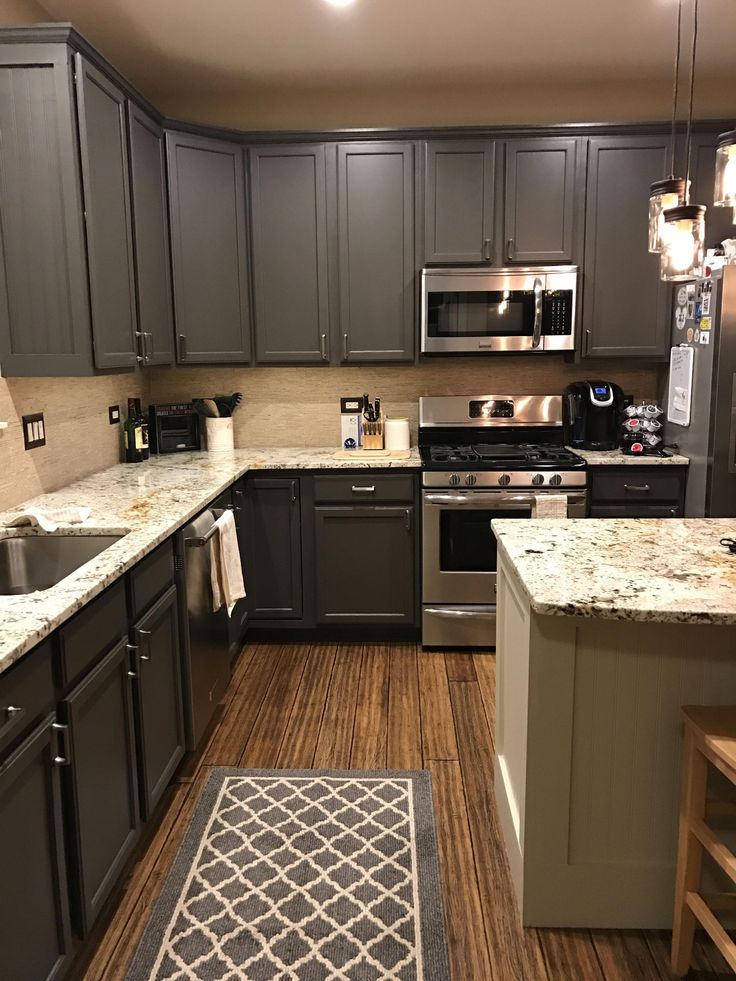 Cabinet refacing costs, on average, $7,132.
Usually, discoloration is caused by old stain that’s deeply embedded in the wood. Liquid strippers and sanding might not even be an option, so it’s best to go with a darker stain or paint that will hide the blotchiness.
Refinishing your cabinets?
Get free, no-commitment project estimates from pros near you.
Find Pros Now
+How to Refinish Kitchen Cabinets to Look New
If the kitchen is a culinary theater, then the cabinets are the stagehands. They contain the spices, tools, and cookware that’s required to carry out the show. But after a grueling schedule of back-to-back performances that can last for years, it’s no wonder that well-worn kitchen cabinets can look ready for their final bow.
But before you send your chipped, broken, or outdated cabinets into retirement, remember that there’s always one last route to take before a curtain call: refinishing.
“A quality refinishing job will keep your kitchen cabinets in good condition and extend the life of their finish,” says Hunter Macfarlane, Lowe’s Project Expert.
While this project is best performed by a professional, Macfarlane notes that experienced DIYers can take it on with the proper tools, an adequate timeline, and enough research. So to get this show on the road, we asked Macfarlane for his advice on how to refinish kitchen cabinets in five key steps. And with his advice, your cabinets will be looking as good as new.
What to Know If You're Working on Your Own
If you consider yourself to be someone who can take on an advanced home project like refinishing kitchen cabinets, then the first thing you need to be aware of is how much time you'll be committing to getting it done. Macfarlane estimates that refinishing kitchen cabinets can take anywhere from four to eight weekends, or between 60 and 130 hours.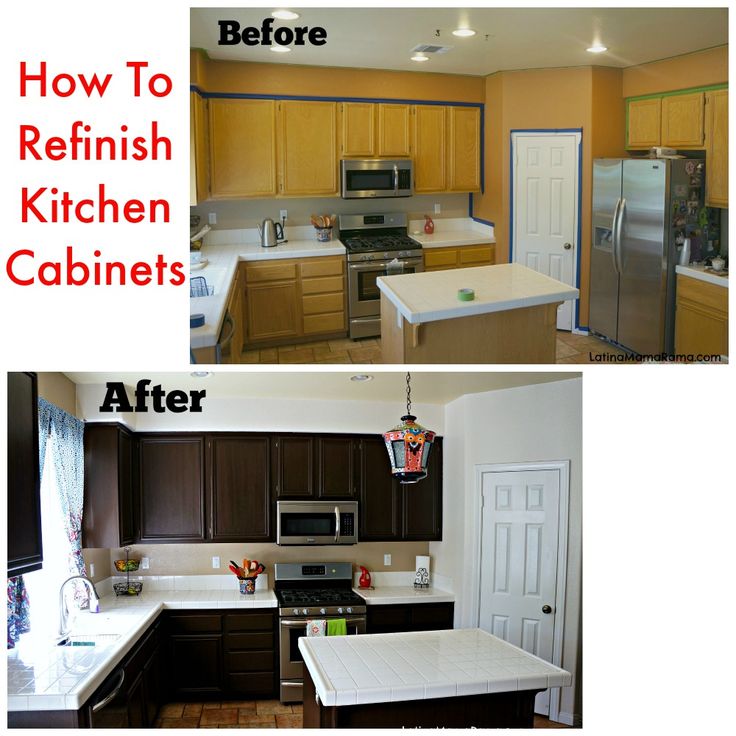 This time frame depends on the size of your kitchen, and it may need to be adjusted depending on the extent of the work. Also keep in mind that your kitchen may not be functional as you complete this undertaking, too.
“It’s a very tedious and time-consuming project, which can often lead to frustration and failure if done incorrectly,” he says. “That’s why I highly recommend consulting with someone who specializes in refinishing projects.”
That being said, if you’d like to manage this on your own, remember to follow the manufacturing instructions of chemicals, and to protect yourself and your kitchen as you work. And if you need help along the way, it’s never too late to call in a professional.
How to Refinish Kitchen Cabinets
Step 1: Clean the surfaces.Before you do any refinishing, Macfarlane recommends starting this project by thoroughly scrubbing your kitchen cabinetry. To do this, carefully remove the cabinetry from the walls, clean them off, and give the wood time to dry completely.
“It’s a good idea to label or number the cabinet doors so you'll put them back in the right place,” he notes. “If you're sanding or painting, be sure not to sand off or paint over the marks. The holes for the hinges need to match too, so you can easily determine which door goes where.”
Spread drop cloths on the countertops, and use them to cover the appliances and floors, too. Don’t forget to wear gloves and eye protection when you’re using a wood cleaner.
Step 3: Soak the hardware.Since the hardware is likely also in need of a good cleaning, place them in a large basin with soapy water for 30 minutes, Macfarlane advises.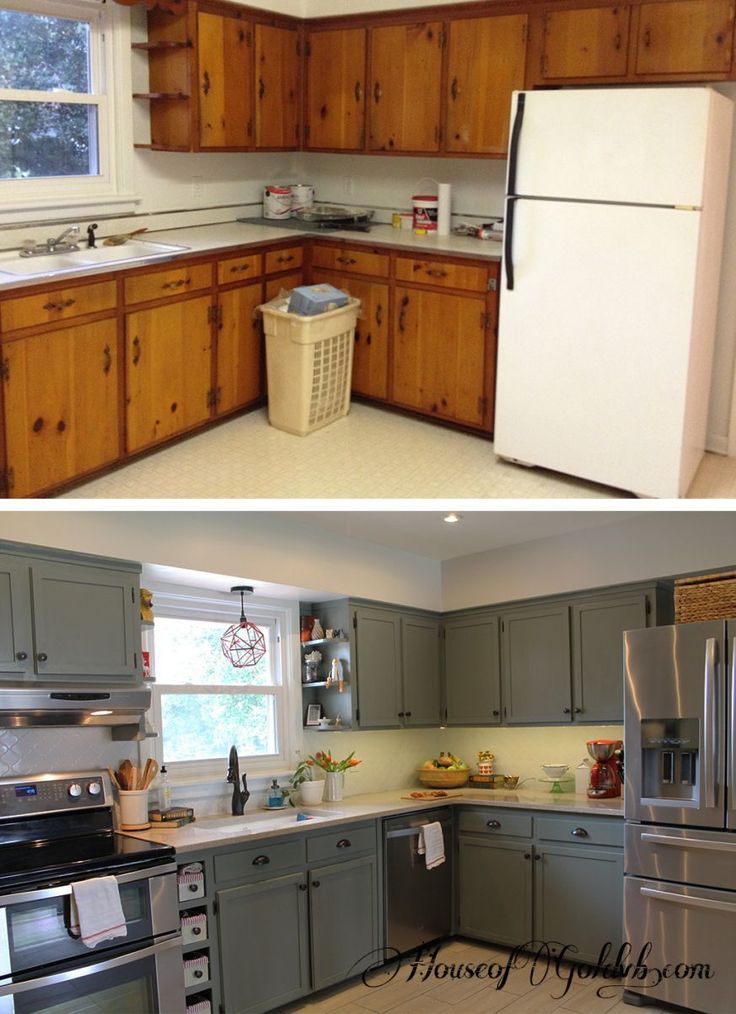 “You can scrub them lightly with a soft brush before rinsing,” he says. Once they’re clean, allow the hardware to dry completely. Then, apply a polish and let the pieces dry again.
Now it’s time to strip your cabinets—and this is where the process can get tricky. First, make sure that your workspace is in a well-ventilated area, and preferably outside.
In order to determine which stripping agent is best for your cabinetry, you’ll need to figure out what type of finish is already on the wood. If you think that the cabinetry has a wax finish, for instance, then Macfarlane says that you’ll have to put a few drops of turpentine on the wood. If the solution dissolves, you’re correct. Other possibilities include shellac, lacquer, paint, vinyl, polyurethane, varnish, penetrating oil, or a water-based finish, and each have their own specifications for proper removal or care.
The Right Solution to Strip Your Cabinets, Depending on Their Finish:
Shellac
“Apply a few drops of denatured alcohol,” Macfarlane says. “If the finish dissolves quickly, it's Shellac.”
Lacquer
“Try a few drops of lacquer thinner to dissolve,” he continues.
Water-Based
“A few drops of Xylene liquefies water-based finishes,” Macfarlane says.
Polyurethane or Varnish
“Varnish remover strips these materials, but you'll probably still have to sand some of the old finish off,” he notes.
Penetrating Oil
“The color isn't strippable, since it's become part of the wood. If the wood is dry, it can be clear-coated, waxed, or painted,” Macfarlane says.
Paint
“Rub a rag or cotton ball moistened with denatured alcohol on the surface. If it rubs off or gets soft, it's latex. Alcohol won't affect oil paint,” he says. For oil-based paint, sand and prime it, then cover it with Latex paint.
Vinyl or Formica Surfaces
“Don't attempt to paint or refinish these cabinets, because they’re best suited to be handled by a professional,” he says.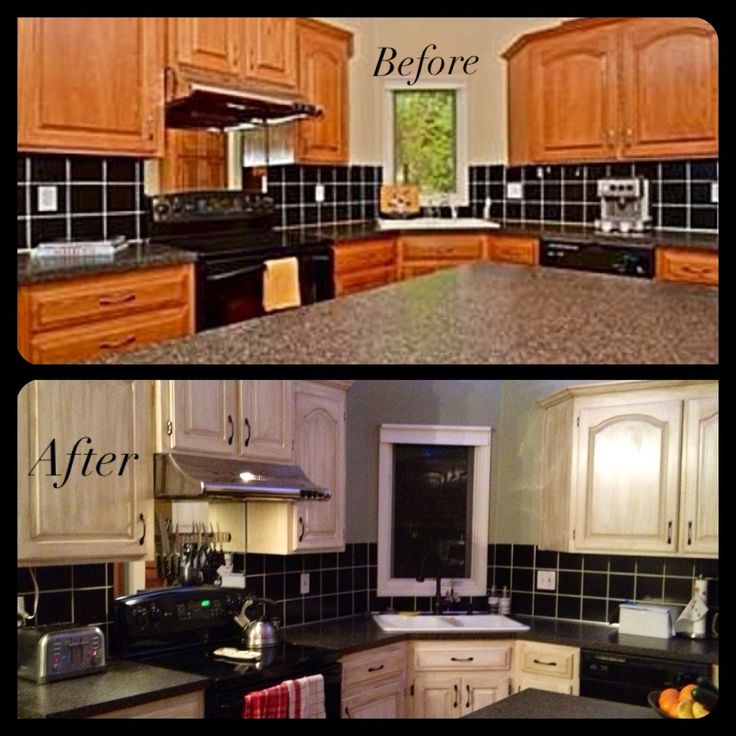
Determine the proper plan of action for your cabinetry, and then apply the right stripping agent to the wood. Start with an inconspicuous corner to be sure that it works, and wear the right protective materials as you work.
Step 5: Sand, prime, and paint the wood.Once you’re finished with the stripping agent, use a wood filler to repair any holes or scratches in the wood, and then lightly sand out the patch once it dries. The rest of the cabinetry should also be sanded, and as previously mentioned, that’s why it’s best to do this work outdoors. Finally, paint the cabinetry in a fresh coat of paint, noting too that cold or hot temperatures may cause the wood to expand. Roll on another layer if you notice that the weather has exposed unfinished wood.
“It's also a good idea to use paste wax on cabinets that you finished using penetrating oils,” Macfarlane adds. “The wax will give additional protection while complementing the appearance of this finish.”
After the paint has dried, carefully reinstall the cabinetry and its hinges in your kitchen. It’s a lot of work to complete this project on your own, so if you do, use this moment to appreciate a well-deserved round of applause.
Follow House Beautiful on Instagram.
how to repair facades and other elements with your own hands set
To change or update the kitchen, it is not at all necessary to change the set, especially since such expenses significantly affect the budget. One of the advantages of modern furniture is high maintainability, and the kitchen is no exception.
Restoration of a kitchen set is actually a very interesting job, although not an easy one.
Restoration of coating
Restoration of kitchen facades depends on both the base material and the finishing layer. In most cases, if the main material is damaged, then the entire facade will have to be replaced. The exception is small scratches and chips, which can be repaired with a special wood putty or wax pencil.
Damage to the finish is not so simple.
- PVC film. M The material does not adhere very well to chipboard or MDF due to its different nature. Over time, as well as under the influence of moisture and temperature changes, the film peels off. The advantage of the material can be considered that the restoration of such a coating is quite possible.
In case of small defects, the PVC film is simply glued: PVA glue, “Moment” is drawn into the syringe from the needle and the area under the film is filled. Then the coating is smoothed and fixed with adhesive tape for 4 hours. If the damage is great, you can remove the entire old film from the facade by heating it with a hairdryer, and stick a new one in the same way. In this case, it is better to use liquid nails.
- Melamine and acrylic films have much better adhesion to wood material, so peeling is rare.
 Small areas are glued in the same way, but with extensive damage, the facade cannot be repaired at home: the coating will have to be changed in the workshop.
 - Acrylic panel. This kind of kitchen renovation is not possible. In case of severe chips, scratches, the sash must be replaced with a new one.
- Veneer is as easy to stick as PVC film. Replacing it is also not difficult: the material is produced with glue already applied to the back.
- Enamel. Do-it-yourself kitchen facade repair is quite possible, although the work requires extreme accuracy. Firstly, it is necessary to clean up scratches or delaminations, secondly, to choose exactly the same shade, and thirdly, to apply very carefully. With a large area of damage, it is better to entrust the work to a professional.
Renovation with PVC foil
Restoration is not always understood only as the return of facades to their original appearance and replacement of fittings. Modern methods of decorating allow you to change the look of the kitchen beyond recognition, using quite affordable means.
One of these options is a vinyl film, or rather a sticker with an image on a PVC film. Moreover, the image can be anything - from a wood pattern to an ornament of any complexity or landscape.
Quite often, this technique is used to change the style of the kitchen or just diversify the design. To do this, decorate a zone or two sashes with a sticker. If you want to update your entire suite, all facades are pasted over with vinyl film. The choice is entirely determined by the style of the room.
Panel fronts are very suitable for such kitchen renovation. At the same time, the frames are painted or also pasted over with a film of a different color, and the inner plane is decorated with a self-adhesive film.
In the photo - a good solution in the Art Nouveau style.Staining
Restoration of kitchen facades with staining is the second most popular method. It is worth noting that it is far from being as simple as it seems at first glance. All facades are painted with the exception of MDF doors with acrylic panels.
Polyurethane enamels are preferred for kitchen materials. They are resistant to moisture and temperature extremes, are not afraid of light, dry quickly and are safe. In addition, the palette of colors includes all sorts of shades and textures - from matte to high-gloss, literally with a mirror shine.
How to restore a kitchen set with painting?
- Remove all fittings from the sashes, then remove the facades themselves.
- The finishing layer is completely removed, the surface is cleaned with sandpaper.
- The material is primed - a water-based polyurethane primer is recommended. The procedure should be repeated and wait for the primer to dry completely.
- Apply the paint using a roller and brushes of various sizes. The paint must be applied in several layers, after allowing each layer to dry completely.
 The carved parts of the product are especially carefully painted. Using a stencil, you can form a pattern, ornament or image on the sash.
 - When restoring the facade, do not forget about the final stage - varnishing. No matter how good the enamel is, the varnish will prevent its mechanical damage.
Staining techniques are different. Depending on your own skill, you can simply paint the facade in one color, you can paint it, you can paint the kitchen set with “metallic” paint - it includes aluminum powder.
A fashionable aging effect is obtained in this way: the facade is covered in two layers of paint of different shades, and after drying, a solvent is applied to the surface. In this case, the top layer is covered with cracks. With proper skill, you can also get the “chameleon” effect: this will also require painting in two colors, but after drying, the facades are covered with glossy varnish.
Decoupage
To restore the facades of kitchen furniture, sometimes they resort to not quite traditional methods.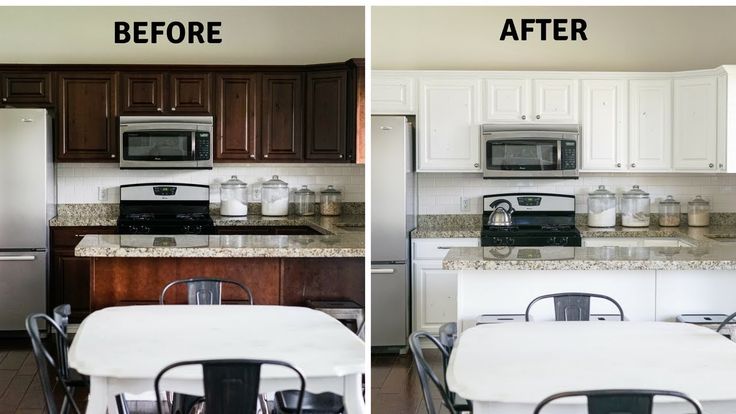 Decoupage has become a trendy retro kitchen touch. But in practice it is used quite rarely, as it requires taste and accuracy in execution.
Decoupage material is special napkins with bright original images. In fact, in this capacity, you can use newspaper clippings, pieces of fabric, fragments of lace, your own old photos, a finished image from albums or books. In the kitchen, decoupage using small items will be very useful: coffee beans, herb stalks and spikelets, dried flowers, and the like.
The decoupage technique is quite simple: do-it-yourself kitchen set is sanded with large and then fine sandpaper. Painted with a background color - acrylic paint is used, and then with the help of stationery glue, the image or objects are fixed on the surface. Be sure to cover the craft with several layers of transparent furniture varnish after the glue has dried.
In the photo - "vegetable" decoupage of the kitchen.Lacquering
Repair of a kitchen set made of wood comes down to restoration, especially if the material is quite expensive wood. Yes, and old wooden furniture today, and centuries ago, is perceived as a symbol of solidity. In addition, wooden kitchen sets are not that difficult to update.
Varnishing and toning are the most popular techniques, and they are often combined. The varnish can be used as a matte transparent, glossy or even colored. It does not radically change the color palette of furniture, but gives a shade. Stain is used in cases where they really want to change the color of the facade by a couple of tones.
The technology of both processes is similar.
- Facades are removed from hinges, fittings are removed.
- The surface is cleaned of old varnish or other finishes, treated with sandpaper, coarse and fine, and then carefully sanded.
- The cleaned surface is primed.
- After the primer has completely dried, a layer of varnish is applied to the facade with a brush. After the varnish has dried, the procedure is repeated at least twice.
The stain is applied in the same way, after the primer has dried. Depending on how much they want to change the color of the furniture, tinting is carried out from 1 to 4 times. Then the product is varnished at least twice.
Molding will help to diversify the look of the updated furniture - a furniture plinth of various shapes. It is very diverse in size and configuration. The molding is glued to the facade surface and can be painted and varnished together with the sash.
Unusual solutions
The imagination of home craftsmen literally has no limits, so completely unexpected things can serve as material for a kitchen renovation.
- Photowall-paper - the material in terms of density and strength is by no means inferior to PVC film. To the surface of chipboard, MDF and even plastic, it is fixed with liquid nails. Photowall-paper is cut according to the sizes of facades and pasted in the most usual way. After the glue has dried, the products must be varnished.
 If you wish, you can order photo wallpapers with images from your personal archive.
 - Tiled. As a rule, walls are finished with ceramics. However, nothing prevents the use of this beautiful material as a decoration for a flat or paneled facade. The tile is cut and fixed using the same liquid nails.
- An even more interesting, but also time-consuming option is porcelain mosaic. Broken dishes from one apartment are not enough for this, so the fragments will have to be obtained somewhere: if you agree with the nearest cafes and restaurants, then the material will be typed pretty quickly. The fragments are sorted by color, they form a pattern or just a color gradient with their help and stick them on the surface of the facade. The gaps between the fragments are sealed with grout.
Restoration of kitchen furniture should first of all restore functionality. However, the process is creative, exciting, so that as a result, the kitchen can completely change its appearance.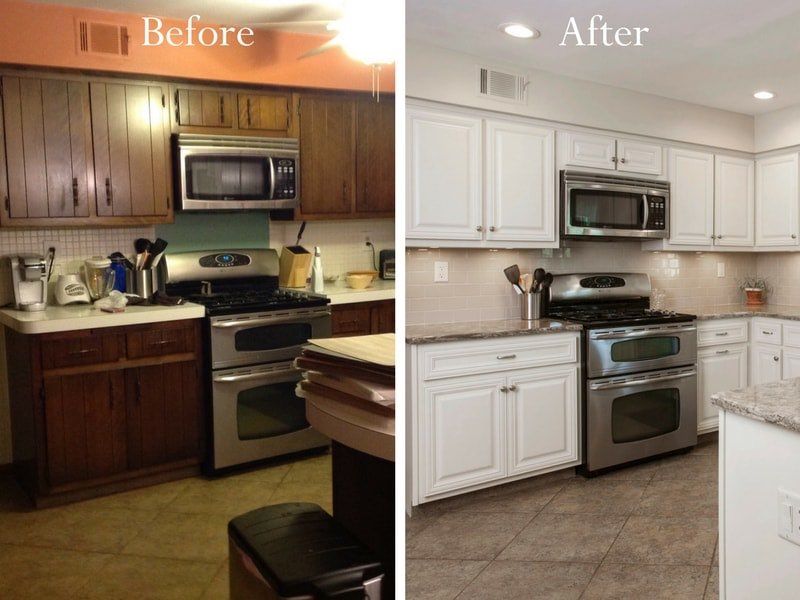
Repair of kitchen furniture, useful and detailed recommendations for beginners
Kitchen furniture is constantly exposed to various negative influences. This leads to a rather short service life. Therefore, it is often necessary to repair kitchen furniture at home, this process depends entirely on what kind of damage there is. Restoration, reinstallation of doors or other simple actions can be done by hand. To do this, it is enough just to understand the features and stages of this work in order to save a significant amount of money on the remuneration of specialists.
Content
- possible breakdowns of kitchen furniture
- Instructions for repair
- Facade
- Doors
- Donet Rules for Operation
possible breakdowns of its kitchen furniture 9000 9000 9000 9000 9000 9000 9000 9000 9000 9000 9000 9000 9000 appearance.
It is necessary to identify the cause of the breakdown in order to prevent its recurrence in the future.
Furniture repair is required for various reasons:
- natural aging of various materials, and the solution to the problem is the replacement of old structures with new high-quality products;
- poor quality of the materials from which the furniture is made;
- incorrect assembly of the structure;
- the presence of adverse operating conditions, leading to the rapid failure of various products.
The main breakdowns for various reasons include:
- the appearance of chips, scuffs or scratches;
- changing the color of the facades of the headset;
- loosening of various connections, both mechanical and adhesive;
- direct destruction of various walls, doors, shelves or other elements.
Each breakdown has its own specific methods and techniques. In most cases, they are simple and understandable, and if you do it yourself for the first time, it is recommended to watch the training video in advance in order to provide for the various nuances and features of this process.
Repair manual
Do-it-yourself kitchen furniture repair begins with determining the cause of the problem. After that, appropriate work is carried out aimed at eliminating it and correcting the breakdown. The work depends entirely on which part of the headset you need to work with.
Facade
Usually problems with facades are related to the loss of their original attractiveness, so they can not only be completely replaced, but simply restored, which will improve their appearance.
If a complete replacement of facades is required, then successive steps are taken for this:
- the old doors are initially dismantled, after which measurements are taken from them in order to know exactly what parameters the new structures should have;
- drawers are dismantled, and if they are planned to be used further, then this process is implemented carefully so as not to spoil them;
- , new facades are purchased along with suitable fittings, and it is important to make sure that they fit well into the style of the room, are moisture resistant and reliable;
- fittings are mounted carefully on new doors, and it is recommended to use special tools for tapping in order to get a high-quality result;
- doors mounted on hinges;
- other accessories are installed if necessary.
Thus, the replacement of facades is considered a simple process, if you carefully understand it and use high-quality and suitable tools for this purpose.
Often facades simply lose their attractive appearance. In this case, you can not change all the furniture or some of its parts, as the facades are restored in different ways. This ensures that they are updated, they become attractive and interesting, but it does not require a significant amount of money to be spent.
To update any door or all facades, different methods can be used:
- staining - furniture painted in different shades significantly changes its appearance. To do this, you can completely update the entire room, as well as hide various scratches or other minor defects on the surface. This process is considered very simple, so the repair of kitchen furniture can be done by hand. It is allowed to use different brushes for this, but the use of an airbrush is considered optimal.
 It provides a smooth and high quality finish. These homeworks do not require the complete release of the premises, however, it is necessary to prepare the surface where the process will be performed, as well as to ensure high-quality ventilation of the room. The furniture repair itself, which consists in painting the facades, is divided into stages. Initially, the doors are removed, the hinges are unscrewed from them, they are cleaned of dirt and degreased, and then they are cleaned. Only then paint is applied in several layers. After it has completely dried, the facades are attached to the headset;
 - Wrapping with foil - kitchen renovation and renovation can be done with foil. It is suitable in a situation where the integrity of doors and facades is not violated, but they have already lost their attractiveness during operation. It is important to choose a high-quality and attractive film that matches the style of the room. It is recommended to choose products made of durable materials so that they last a long time and are resistant to various influences in the kitchen;
- rattan finishing - the doors can be easily and beautifully decorated with rattan.
 It provides a cozy and warm environment. This solution is suitable for rooms made in country or retro style.
Staining is allowed only if the furniture is in good condition, that is, the wooden surfaces are not broken or rotted, and there are no other significant deformations on them.
Rattan finishingPaintingPaintingDoors
Kitchen refurbishment is most often associated with the need to replace the fasteners for the doors or with their complete replacement. This is due to the fact that these elements are constantly affected by many negative factors.
The door replacement procedure is divided into steps:
- old doors are removed;
- screws are unscrewed that provide fastening to the hinge boxes;
- fastening points are marked on new facades, and for this it is recommended to focus on dismantled structures;
- holes for locks are drilled;
- loops are inserted into these holes;
- , new doors are hung, and the upper hinge is initially fixed, and after it the lower element.
Replacing doors is therefore a simple and quick process, resulting in a refurbished room in which all elements are secure, attractive and well fixed.
Removing the old doorsCreating markings Inserting the hingesHanging the doors In most apartments, the kitchen is used not only for cooking, but also as a dining area, so a table with chairs or a kitchenette is installed in it.The table is constantly exposed to various negative influences, as hot dishes are placed on it, food gets in or different drinks are spilled. Therefore, it quickly fails, cracks, begins to rot or loses its attractiveness. Purchasing a new piece of furniture entails significant financial costs, so the best solution is to replace the countertop. This process is easy to do on your own:
- the tabletop is unscrewed from the base;
- It is applied as a sample in the process of purchasing a new item;
- in the new countertop, special holes are made for fasteners, for which you need to focus on the old design;
- a new worktop is being installed.
If a person has repaired a table with high quality, then it will be able to serve for many more years. If the surface of the table has simply worn out, so there are numerous scratches or other defects on it, then repair can be quite simple, since it is enough just to sand the surface of the wooden table.
Dismantling the countertopPurchasing a new countertopCreating fastenersInstallingRules of Use
Renovation of the kitchen is usually required after the owners of the premises did not provide optimal care for various interior items. To make the need to replace or repair furniture as rare as possible, you need to properly treat it in the process of using it for its intended purpose. To do this, the rules are taken into account:
- for furniture, the entire load must be distributed evenly;
- do not make significant efforts in the process of opening or closing lockers;
- it is not necessary to press heavily on the fittings;
- it is desirable that the sun's rays do not constantly fall on various elements of the furniture;
- when water gets on different surfaces of interior items, it is necessary to ensure its prompt removal;
- to clean the coatings, it is not allowed to use any complex household products that contain abrasives or other aggressive substances;
- all contaminants are removed as quickly as possible;
- when working in the kitchen, the hood will certainly turn on, ensuring the creation of optimal humidity and temperature in the room, as well as purifying the air from various impurities;
- Remove moisture and dirt only with soft and clean sponges.